7200GS Manual - TECO-Westinghouse Motor Company
7200GS Manual - TECO-Westinghouse Motor Company
7200GS Manual - TECO-Westinghouse Motor Company

Create successful ePaper yourself
Turn your PDF publications into a flip-book with our unique Google optimized e-Paper software.
INVERTER<br />
<strong>7200GS</strong><br />
(SENSORLESS VECTOR)<br />
INSTRUCTION MANUAL<br />
220V Class 3Φ 25~100HP<br />
440V Class 3Φ 25~400HP<br />
4H358D0280003<br />
Please hand this manual to the end-users. It will be of<br />
great help for their daily operation, maintenance,<br />
inspection and troubleshooting.
BEFORE INSTALLATION & USE<br />
1. Ensure nameplate data corresponds with your requirements.<br />
2. Ensure the apparatus is undamaged.<br />
WARNING<br />
The following safety precautions must be observed:<br />
1. Electric apparatus and electricity can cause serious or fatal injury if the<br />
apparatus is improperly installed, operated or maintained.<br />
Responsible personnel must be fully trained to understand the<br />
hazards to themselves and others before being involved in installing,<br />
operating, maintaining and decommissioning electrical apparatus.<br />
European Union Safety information can be obtained from such as:<br />
BS4999; EN60204-11 EN292-1 EN294<br />
IEE Wiring Regulations<br />
Particular industries and countries have further safety requirements.<br />
Refer to their trade safety bodies, British Standards Institution, Dept.<br />
of Trade & Industry, etc., for further information. For instance, in the<br />
USA, refer to NEMA MG2, the National Electrical Code, local safety<br />
requirements, etc.<br />
2. When servicing, all power sources to the apparatus and to the<br />
accessory devices should be de-energized and disconnected and all<br />
moving parts at standstill.<br />
3. Safety guards and other protective, devices must neither be bypassed<br />
nor rendered inoperative.<br />
4. The apparatus must be earthed. Refer to relevant standards such as<br />
EN60204-1, IEE Wiring Regulation etc.<br />
5. A suitable enclosure must be provided to prevent access to live parts.<br />
Extra caution should be observed around apparatus that is<br />
automatically started or has automatic resetting relays or is remotely<br />
started in case such starting means has not been properly disabled<br />
and the apparatus starts unexpectedly.
CAUTION AND WARNING:<br />
WARNING<br />
Do not change the wiring while power is applied to the circuit.<br />
After turning OFF the main circuit supply, do not touch circuit components until<br />
CHARGE LED is extinguished.<br />
Never connect power circuit output U (T1), V (T2), W (T3) to AC power supply.<br />
When the retry function (Cn-36) is selected, motor may restart suddenly after being<br />
stopped by momentary power loss.<br />
!<br />
CAUTION<br />
When mounting units in a separate enclosure, install a fan or other cooling device<br />
to keep the intake air temperature below 45℃.<br />
Do not perform a withstand voltage test to the inverter.<br />
All the constants of the inverter have been factory preset. Do not change the<br />
settings unnecessarily.<br />
-1-
CONTENTS<br />
PART I INSTALLATION MANUAL Pages<br />
1. GENERAL .................................................................................................................5<br />
1.1 SAFE OPERATION NOTES.................................................................................5<br />
1.2 PRODUCT CHANGES.........................................................................................5<br />
2. RECEIVING...............................................................................................................6<br />
3. INSTALLATION.........................................................................................................7<br />
3.1 MOUNTING SPACE.............................................................................................7<br />
3.2 LOCATION...........................................................................................................8<br />
4. WIRING .....................................................................................................................9<br />
4.1 NOTES ON WIRING TO PERIPHERAL UNITS...................................................9<br />
4.2 CONNECTION DIAGRAM .................................................................................10<br />
4.3 TERMINAL FUNCTION...................................................................................... 11<br />
4.3.1 MAIN CIRCUIT TERMINALS ................................................................... 11<br />
4.3.2 CONTROL CIRCUIT TERMINALS........................................................... 11<br />
4.3.3 MAIN CIRCUIT SCHEMATIC...................................................................12<br />
4.4 WIRING PARTS .................................................................................................13<br />
4.4.1 RECOMMENDED WIRING PARTS .........................................................13<br />
4.4.2 CAUTIONS FOR WIRING .......................................................................15<br />
5. TEST OPERATION .................................................................................................17<br />
5.1 CHECK BEFORE TEST OPERATION...............................................................17<br />
5.2 SETTING THE LINE VOLTAGE SELECTING CONNECTOR............................17<br />
6. MAINTENANCE ......................................................................................................18<br />
6.1 PERIODIC INSPECTION...................................................................................18<br />
6.2 SPARE PARTS ..................................................................................................19<br />
7. SPECIFICATIONS...................................................................................................21<br />
8. DIMENSIONS..........................................................................................................23<br />
9. PERIPHERAL AND OPTIONS................................................................................26<br />
9.1 AC REACTOR....................................................................................................26<br />
9.2 NOISE FILTER...................................................................................................27<br />
9.2.1 INPUT NOISE FILTER .............................................................................27<br />
9.2.2 EMI SUPPRESSION ZERO CORE .........................................................28<br />
-2-
9.3 BRAKING RESISTOR AND BRAKING UNIT.....................................................29<br />
9.4 OTHERS ............................................................................................................30<br />
9.4.1 DIGITAL OPERATOR WITH EXTENSION WIRE ....................................30<br />
9.4.2 ANALOG OPERATOR .............................................................................31<br />
9.4.3 LED DIGITAL OPERATOR.......................................................................31<br />
9.4.4 OPTION CARDS......................................................................................32<br />
-3-
PART II OPERATION MANUAL Pages<br />
1. DESCRIPTION OF USING <strong>7200GS</strong>........................................................................35<br />
1.1 Using LCD (OR LED) digital operator ................................................................35<br />
1.2 DRIVE mode and PRGM mode displayed contents...........................................37<br />
1.3 Parameter description........................................................................................38<br />
1.4 Sample example of using LCD digital operator ..................................................39<br />
1.5 Control mode selection ......................................................................................41<br />
2. SETTING USER CONSTANT .................................................................................42<br />
2.1 Descriptions of Constant / function list ...............................................................42<br />
2.2 Frequency Command An-□□ ...........................................................................43<br />
2.3 Parameters Can Be Changed during Running Bn-□□ .....................................44<br />
2.4 System Parameters Sn-□□..............................................................................51<br />
2.5 Control Parameters Cn-□□ ............................................................................109<br />
2.6 Monitoring Parameters Un-□□.......................................................................129<br />
3. FAULT DISPLAY AND TROUBLE SHOOTING ....................................................131<br />
4. APPENDIX:<br />
A. SENSORLESS VECTOR CONTROL ................................................................139<br />
B. AUTO ENERGY-SAVING CONTROL IN PID CONTROL MODE.......................142<br />
C. PID CONTROL IN PID CONTROL MODE ........................................................147<br />
D. PG FEEDBACK CONTROL ..............................................................................153<br />
E. NOTES ON APPLICATION OF MOTORS .........................................................157<br />
F. PERIPHERAL UNIT NOTES ..............................................................................158<br />
G. CIRCUIT PROTECTION AND ENVIRONMENTAL RATING NOTES ................159<br />
H. DRIVE INPUT FUSES.......................................................................................161<br />
I. CERTIFICATION FOR THE INVERTER .............................................................162<br />
-4-
PART I<br />
INSTALLATION MANUAL<br />
-5-
1. GENERAL<br />
1.1 SAFE OPERATION NOTES<br />
Read this installation manual thoroughly before installation, operation, maintenance<br />
or inspection of the inverter. Only authorized personnel should be permitted to perform<br />
maintenance, inspections or parts replacement.<br />
In this manual, notes for safe operation are classified as:<br />
"WARNING" or "CAUTION".<br />
!<br />
WARNING<br />
CAUTION<br />
: Indicates a potentially hazardous situation which, if not avoided,<br />
could result in death or serious injury to personnel.<br />
: Indicates a potentially hazardous situation which, if not avoided, may<br />
result in minor or moderate injury to personnel and damage to<br />
equipment. It may also be used to alert against unsafe practices.<br />
This inverter has been placed through demanding tests at the factory before<br />
shipment. After unpacking, check for the following:<br />
1. Verify that part numbers on shipping carton and unit match the purchase order sheet<br />
and/or packing list.<br />
2. Do not install or operate any inverter which is damaged or missing parts.<br />
3. Do not install or operate any inverter which has no QC marking.<br />
Contact your local distributor or <strong>TECO</strong> representative if any of the above have been<br />
found.<br />
1.2 PRODUCT CHANGES<br />
<strong>TECO</strong> reserves the right to discontinue or make modifications to the design of its<br />
products without prior notice, and holds no obligation to make modifications to products<br />
sold previously. <strong>TECO</strong> also holds no liability for losses of any kind which may result<br />
-6-
from this action.<br />
-7
2. RECEIVING<br />
!<br />
CAUTION<br />
This <strong>7200GS</strong> has been put through demanding tests at the factory before shipment.<br />
After unpacking, check the followings.<br />
Verify the received product with the purchase order sheet (invoice) and/or packing<br />
list.<br />
Transit damage.<br />
If any part of <strong>7200GS</strong> is damaged or lost, immediately notify the shipper.<br />
■ NAMEPLATE DATA ( 220V CLASS 75HP example )<br />
MODE<br />
INPU<br />
OUTPU<br />
SER. NO.<br />
■ MODEL DESIGNATION<br />
Inverter Series<br />
<strong>7200GS</strong><br />
Enclosures and<br />
mountings<br />
JNTEBGBA0075JK- - -<br />
220V CLASS INVERTER<br />
AC 3PH 200-230V 50/60Hz<br />
AC 3PH 0-230V 81KVA 212A<br />
<strong>TECO</strong> Electric & Machinery Co., Ltd.<br />
JNTEBGBA0075JK ---<br />
Key pad<br />
BG: LCD digital operator<br />
BC: LED digital operator<br />
-8-<br />
Inverter Model<br />
Input Spec.<br />
Output Spec.<br />
Series No.<br />
CE Mark<br />
Voltage<br />
Applicable maximum<br />
motor output(HP)<br />
Reserved<br />
JK: 200~230V / 50, 60Hz<br />
AZ: 380~460V / 50, 60Hz
3. INSTALLATION<br />
!<br />
CAUTION<br />
Never move, lift or handle the <strong>7200GS</strong> cabinet by the front cover.<br />
Lift the cabinet from the bottom.<br />
Do not drop the inverter.<br />
3.1 MOUNTING SPACE<br />
Install <strong>7200GS</strong> vertically and allow sufficient space for effective cooling as shown in<br />
Fig. 1.<br />
1.18in(30mm)<br />
OR MORE<br />
1.18in(30mm)<br />
OR MORE<br />
ALLOWABLE<br />
TEMPERATURE OF<br />
CONTROL PART:<br />
131℉ (55℃)<br />
5.9in(150mm)<br />
OR MORE<br />
FRONT<br />
COVER<br />
5.9in(150mm)<br />
OR MORE<br />
(a) Front View (b) Side View<br />
Note: For product external dimensions and mounting dimensions,<br />
refer to “DIMENSIONS” on page 23.<br />
-9-<br />
AIR<br />
AIR<br />
OPEN CHASSIS TYPE:<br />
113℉ (45℃)<br />
ENCLOSED WALL-<br />
MOUNTED<br />
TYPE: 104℉ (40℃)
Fig. 1 Mounting Spaces<br />
-10-
3.2 LOCATION<br />
!<br />
Location of the equipment is important to achieve proper performance<br />
and normal operating life. The <strong>7200GS</strong> should be installed in areas<br />
where the following conditions exist:<br />
Protected from rain or moisture.<br />
Protected from direct sunlight.<br />
Protected from corrosive gases or liquids.<br />
Free from airborne dust or metallic particles.<br />
Free from vibration.<br />
Free from magnetic noise (e.g. welding machines, power units)<br />
Ambient temperature:<br />
+14 to 104℉, -10 to +40℃ (For enclosed type),<br />
+14 to 113℉, -10 to +45℃ (For open chassis type)<br />
Free from combustible materials, gases, etc.<br />
CAUTION<br />
When mounting multiple units in a common enclosure, install a<br />
cooling fan or some other means to cool the air entering the<br />
inverter to at least 113℉ (45℃) or below.<br />
-11-
4. WIRING<br />
4.1 NOTES ON WIRING TO PERIPHERAL UNITS<br />
Power Supply<br />
MCCB<br />
MC<br />
AC REACTOR<br />
INPUT NOISE FILTER<br />
<strong>7200GS</strong><br />
OUTPUT NOISE FILTER<br />
3Φ AC<br />
INDUCTION MOTOR<br />
MCCB (molded case circuit breaker)<br />
Please refer to Table 1. for MCCB selection.<br />
Do not use a circuit breaker for start/stop operation.<br />
When a ground fault interrupter is used, select the one<br />
with no influence for high frequency. Setting current<br />
should be 200mA or above and the operating time at<br />
0.1 second or longer to prevent malfunction.<br />
MC (magnetic contactor)<br />
It is not always necessary to have the MC on the input<br />
side. However, an input MC can be used to prevent an<br />
automatic restart after recovery from an external<br />
power loss during remote control operation.<br />
Do not use the MC for start/stop operation.<br />
AC REACTOR<br />
To improve power factor or to reduce surge, install an<br />
AC reactor. There is a DC choke built-in on <strong>7200GS</strong>,<br />
models 25HP(18.5 KW) and larger for 220V class and<br />
30HP(22 KW) and larger for 440V class. The 440V<br />
300 ~ 400HP need to install AC reactor externally.<br />
Input Noise Filter<br />
When used with specified input noise filter, the<br />
<strong>7200GS</strong> can comply with EN55011 class A. Please<br />
refer to our EMC technical manual for noise filter<br />
selection.<br />
Inverter<br />
Wire input to terminals L1, L2 and L3 for three phase<br />
input. Make sure to connect the ground terminal to an<br />
appropriate safety ground.<br />
Output Noise Filter (EMI Suppression zero core)<br />
When used with output noise filter, radiated and<br />
conducted emissions may be reduced.<br />
<strong>Motor</strong><br />
When multiple motors are driven in parallel with an<br />
inverter, the inverter rated current should be at least<br />
1.1 times the total motor rated current. Make sure that<br />
the motor and the inverters are separately grounded.<br />
-12-
4.2 CONNECTION DIAGRAM<br />
The following diagram shows interconnection of the main circuit and<br />
control circuit. With the digital operator, the motor can be operated by<br />
wiring the main circuit only. (Terminal Symbols: ◎ indicates main<br />
MCCB<br />
POWER SUPPLY L1(R)<br />
3-PHASE<br />
200/208/220VAC,<br />
50Hz L2(S)<br />
200/208/220/<br />
230VAC, 60Hz<br />
L3(T)<br />
EXTERNAL<br />
FREQUENCY<br />
COMMAND<br />
STANDARD<br />
FUNCTIONS<br />
SET AT<br />
FACTORY<br />
PRIOR TO<br />
SHIPMENT<br />
circuit; ○ indicates control circuit).<br />
2kΩ<br />
FORWARD<br />
RUN/STOP<br />
REVERSE<br />
RUN/STOP<br />
EXTERNAL<br />
FAULT<br />
FAULT RESET<br />
MULTI-STEP SPEED SETTING 1<br />
(MASTER/AUX)<br />
MULTI-STEP<br />
SPEED SETTING 2<br />
JOG<br />
COMMAND<br />
EXTERNAL<br />
COAST TO STOP<br />
0V<br />
2kΩ<br />
0 TO +10V<br />
4 TO 20mA<br />
0 TO +10V<br />
CAUTION<br />
The connections of control circuit terminals<br />
1 through 27 do not follow the terminal<br />
numbering order. To connect them<br />
properly, follow the figure below.<br />
11 12 13 14 15 16 17 25 26 27<br />
1 2 3 4 5 6 7 8 21 22<br />
Notes:<br />
P<br />
P<br />
9 10 18 19 20<br />
P<br />
3*<br />
3*<br />
L1(R)<br />
L2(S)<br />
L3(T)<br />
6<br />
7<br />
8<br />
11<br />
BRAKING RESISTOR<br />
UNIT (OPTION)<br />
○- B1/P B2<br />
1 FORWARD RUN<br />
AT CLOSED<br />
2 REVERSE RUN<br />
AT CLOSED<br />
3 EXTERNAL FAULT<br />
4 RESET<br />
5<br />
MULTI-FUNCTION<br />
INPUT<br />
SEQUENCE<br />
COMMON (0V)<br />
-13-<br />
7200 GS<br />
12(G) SHIELD<br />
CONNECTION<br />
ANALOG<br />
MONITOR<br />
SPEED SETTING POWER SUPPLY<br />
15 +15V 20mA<br />
13 MASTER SPEED REF.<br />
0 TO 10V (20kΩ)<br />
14 MASTER SPEED REF.<br />
4 TO 20mA (250Ω)<br />
16 MULTI-FUNCTION<br />
ANALOG INPUT 0 TO 10V (20kΩ)<br />
17<br />
STANDARD OUTPUT AUX.<br />
FREQUENCY REFERENCE<br />
0V.<br />
T1(U)<br />
T2(V)<br />
T3(W)<br />
PE<br />
21<br />
22<br />
(12)<br />
1. indicates shielded wire and twisted P pair shielded wire.<br />
18<br />
19<br />
20<br />
9<br />
10<br />
25<br />
26<br />
27<br />
{GROUNDING<br />
(100Ω OR LESS)}<br />
FREQ. METER CALIBRATION<br />
RESISTOR RV30YN20SB 20kΩ<br />
MULTI-FUNCTION ANALOG<br />
OUTPUT *5<br />
0 TO +10V<br />
- + SIGNAL DURING RUNNING<br />
FM IS SET AT FACTORY PRIOR<br />
TO SHIPMENT<br />
FREQ METER (METER SPECIFICATION: 3VDC 1mA)<br />
FAULT CONTACT OUTPUT<br />
CONTACT CAPACITY<br />
250VAC 1A OR LESS<br />
30VDC 1A OR LESS<br />
MULTI-FUNCTION<br />
CONTACT OUTPUT<br />
250VAC 1A OR LESS<br />
30VDC 1A OR LESS<br />
MOTOR<br />
IM<br />
OPEN COLLECTOR 1<br />
(ZERO SPEED SIGNAL IS<br />
SET AT FACTORY)<br />
OPEN COLLECTOR 2<br />
(ZERO SPEED SIGNAL IS<br />
SET AT FACTORY)<br />
MULTI-FUNCTION OUTPUT<br />
COMMON<br />
2. Control circuit terminal 15 of +15V has maximum output current capacity of 20mA.<br />
3. Either external terminal 13 or 14 can be used.<br />
(For simultaneous input, two signals are internally added in the unit).<br />
4. Multi-function analog output is an exclusive meter output such as frequency meter etc.<br />
and not available for the feedback control system.<br />
5. Control circuit terminal 12 is frame ground of the unit.<br />
Fig. 2 Standard connection diagram.<br />
MULTI-FUNCTION<br />
OUTPUT
4.3 TERMINAL FUNCTION<br />
4.3.1 MAIN CIRCUIT TERMINALS<br />
Table 1. Main Circuit Terminals<br />
HP Range<br />
Terminals<br />
R / L1<br />
S / L2<br />
T / L3<br />
U / T1<br />
V / T2<br />
W / T3<br />
B1/P<br />
B2<br />
○-<br />
440V: 25HP<br />
Main Circuit Input Power Supply<br />
Inverter Output<br />
B1/P - B2: Braking Resistor<br />
B1/P - ○- : DC power supply<br />
○+ -<br />
E ( PE, ) Grounding (3rd Type Grounding)<br />
4.3.2 CONTROL CIRCUIT TERMINALS<br />
Table 2. Control Circuit Terminals<br />
Terminal Functions<br />
1 Forward operation-stop signal<br />
2 Reverse operation-stop signal<br />
3 External fault input<br />
4 Fault reset<br />
5<br />
6<br />
7<br />
8<br />
9<br />
10<br />
-14-<br />
220V: 25~100HP<br />
440V: 30~400HP<br />
-<br />
○+ ~○- : DC Power Supply or Braking<br />
Unit<br />
Multi-function contact input: the following signals available to select. Forward/reverse select,<br />
run mode select, multi-speed select, jog frequency select, accel/decel time select, external<br />
fault, external coast to stop, hold command, inverter overheat prediction, DB command, aux.<br />
input effective, speed search, energy-saving operation.<br />
Multi-function contact output: one of the following signals available to output. Output during<br />
running, zero speed, synchronized speed, arbitrary speed agreed, frequency detection,<br />
overtorque, undervoltage, run mode, coast to stop, braking resistor overheat, alarm, fault.<br />
11 Sequence control input common terminal.<br />
12 Connection to shield sheath of signal lead.<br />
13 Master speed voltage reference (0 to 10V).<br />
14 Master speed current reference (4 to 20mA).<br />
15 +15V<br />
16<br />
Aux. analog command: one of the following signals available to select. Frequency<br />
command, frequency gain, frequency bias, overtorque detection level, voltage bias,<br />
accel/decel rate, DB current.<br />
17 Common terminal for control circuit (0V).<br />
18 Fault contact output a (Closed at fault).<br />
19 Fault contact output b (Open at fault).<br />
20 Fault contact output common.<br />
21 Multi-function analog monitor (+).<br />
22 Multi-function analog monitor (-).<br />
25 Multi-function PHC output 1.<br />
26 Multi-function PHC output 2.<br />
27 Multi-function PHC output common.<br />
Output current or output<br />
frequency is selectable.<br />
The same as terminals 9 and 10
4.3.3 MAIN CIRCUIT SCHEMATIC<br />
1. 440V : 25HP 2. 220V : 25HP<br />
B1/P B2<br />
440V : 30HP, 40HP, 50HP<br />
R(L1)<br />
S(L2)<br />
T(L3) R(L1)<br />
S(L2)<br />
T(L3)<br />
○-<br />
○-<br />
E<br />
E<br />
RCC<br />
3. 220V : 30HP, 40HP<br />
440V : 60HP, 75HP<br />
R(L1)<br />
S(L2)<br />
T(L3)<br />
○-<br />
○-<br />
E<br />
AC/<br />
DC<br />
DCL<br />
4. 220V : 50HP, 60HP, 75HP, 100HP<br />
5. 440V : 100HP 6. 440V : 125HP, 150HP, 175HP, 215HP, 250HP<br />
7. 440V : 300HP, 400HP<br />
External<br />
ACL<br />
R(L1)<br />
S(L2)<br />
T(L3)<br />
○-<br />
R(L1)<br />
S(L2)<br />
T(L3)<br />
○-<br />
E<br />
E<br />
X<br />
+<br />
X RCC<br />
RCC RCC<br />
X<br />
AC/<br />
X<br />
DC<br />
RCC<br />
X<br />
AC/<br />
DC<br />
○+<br />
+<br />
CONTROL<br />
CIRCUITS<br />
○+ ○+<br />
DCL<br />
DCL<br />
○+<br />
+<br />
X<br />
+<br />
○+<br />
+<br />
RCC<br />
CONTROL<br />
CIRCUITS<br />
CONTROL CONTROL<br />
CIRCUITS CIRCUITS<br />
CONTROL<br />
CIRCUITS<br />
* External ACL is necessary<br />
CONTROL<br />
CIRCUITS<br />
U(T1)<br />
V(T2)<br />
W(T3)<br />
U(T1)<br />
V(T2)<br />
U(T1)<br />
W(T3)<br />
V(T2)<br />
W(T3)<br />
U(T1)<br />
V(T2)<br />
W(T3)<br />
U(T1)<br />
V(T2)<br />
W(T3)<br />
-15-
4.4 WIRING PARTS<br />
4.4.1 RECOMMENDED WIRING PARTS<br />
Be sure to connect MCCBs between power supply and <strong>7200GS</strong> input terminals<br />
L1 (R), L2 (S), L3 (T). Recommended MCCBs are listed in Table 3.<br />
When a ground fault interrupter is used, select the one with no influence for high<br />
frequency. The current setting should be 200mA or over and operating time, 0.1 second<br />
or over to prevent malfunction.<br />
Max. Applicable<br />
<strong>Motor</strong> Output<br />
HP (KW)<br />
[Note 1]<br />
25(18.5)<br />
30(22)<br />
40(30)<br />
50(37)<br />
60(45)<br />
75(55)<br />
100(75)<br />
Table 3. 220V and 440V class applicable wire size and contactor<br />
(a) 220V SERIES<br />
Power Cable<br />
[Note 2]<br />
22<br />
(4)<br />
30<br />
(2)<br />
60<br />
(2/0)<br />
60×2P<br />
(2/0)<br />
60×2P<br />
(2/0×2P)<br />
60×2P<br />
(2/0×2P)<br />
100×2P<br />
(4/0×2P)<br />
[Note] 1. For Constant Torque Load.<br />
Cable Size - mm 2 (AWG)<br />
Ground Cable E<br />
[G]<br />
14<br />
(6)<br />
14<br />
(6)<br />
22<br />
(4)<br />
22<br />
(4)<br />
22<br />
(4)<br />
30<br />
(2)<br />
50<br />
(1/0)<br />
Control Cable<br />
[Note 3]<br />
-16-<br />
0.5~2<br />
(20-14)<br />
0.5~2<br />
(20-14)<br />
0.5~2<br />
(20-14)<br />
0.5~2<br />
(20-14)<br />
0.5~2<br />
(20-14)<br />
0.5~2<br />
(20-14)<br />
0.5~2<br />
(20-14)<br />
Molded-Case<br />
Circuit Breaker<br />
[Note 4]<br />
TO-225S<br />
(150A)<br />
TO-225S<br />
(175A)<br />
TO-225S<br />
(175A)<br />
TO-225S<br />
(200A)<br />
TO-225S<br />
(225A)<br />
TO-400S<br />
(300A)<br />
TO-400S<br />
(400A)<br />
Magnetic<br />
Contactor [Note<br />
4]<br />
CN-80<br />
CN-100<br />
CN-125<br />
CN-150<br />
CN-180<br />
CN-300<br />
CN-300<br />
2. Power Cable Include Cables to the Terminals R (L1), S (L2), T (L3), ○+ , ○- , BR, U (T1),<br />
V (T2), W (T3).<br />
3. Control Cable Include Cables to the Control Terminals.<br />
4. The Molded-Case Circuit Breaker and Magnetic Contactors Shown in Table are Taian<br />
Products and are for reference only. Other manufactures' equivalent products may be<br />
selected.<br />
5. The Magnetic contactors S-K400 and S-K600 are Mitsubishi Products and are for reference<br />
only. Other manufactures' equivalent products may be selected.
Max. Applicable<br />
<strong>Motor</strong> Output<br />
HP (KW)<br />
[Note 1]<br />
25(18.5)<br />
30(22)<br />
40(30)<br />
50(37)<br />
60(45)<br />
75(55)<br />
100(75)<br />
125(90)<br />
150(110)<br />
175(132)<br />
215(160)<br />
250(185)<br />
300(220)<br />
400(300)<br />
Power Cable<br />
[Note 2]<br />
8<br />
(8)<br />
14<br />
(6)<br />
22<br />
(4)<br />
22<br />
(4)<br />
38<br />
(1)<br />
60<br />
(2/0)<br />
60×2P<br />
(2/0)<br />
60×2P<br />
(2/0×2P)<br />
60×2P<br />
(2/0×2P)<br />
100×2P<br />
(4/0×2P)<br />
100×2P<br />
(4/0×2P)<br />
250×2P<br />
(2P)<br />
250×2P<br />
(2P)<br />
250×2P<br />
(2P)<br />
(b) 440V SERIES<br />
Cable Size - mm 2 (AWG)<br />
Ground Cable E<br />
[G]<br />
8<br />
(8)<br />
8<br />
(8)<br />
8<br />
(8)<br />
14<br />
(6)<br />
14<br />
(6)<br />
22<br />
(4)<br />
22<br />
(4)<br />
30<br />
(2)<br />
30<br />
(2)<br />
50<br />
(1/0)<br />
50<br />
(1/0)<br />
50<br />
(1/0)<br />
60<br />
(2/0)<br />
60<br />
(2/0)<br />
Control Cable<br />
[Note 3]<br />
-17-<br />
0.5~2<br />
(20-14)<br />
0.5~2<br />
(20-14)<br />
0.5~2<br />
(20-14)<br />
0.5~2<br />
(20-14)<br />
0.5~2<br />
(20-14)<br />
0.5~2<br />
(20-14)<br />
0.5~2<br />
(20-14)<br />
0.5~2<br />
(20-14)<br />
0.5~2<br />
(20-14)<br />
0.5~2<br />
(20-14)<br />
0.5~2<br />
(20-14)<br />
0.5~2<br />
(20-14)<br />
0.5~2<br />
(20-14)<br />
0.5~2<br />
(20-14)<br />
Molded-Case<br />
Circuit Breaker<br />
[Note 4]<br />
TO-100S<br />
(75A)<br />
TO-100S<br />
(100A)<br />
TO-100S<br />
(100A)<br />
TO-125S<br />
(125A)<br />
TO-225S<br />
(175A)<br />
TO-225S<br />
(175A)<br />
TO-225S<br />
(225A)<br />
TO-400S<br />
(300A)<br />
TO-400S<br />
(300A)<br />
TO-400S<br />
(400A)<br />
TO-400S<br />
(400A)<br />
TO-600S<br />
(600A)<br />
TO-800S<br />
(800A)<br />
TE-1000<br />
(1000A)<br />
Magnetic<br />
Contactor [Note<br />
4]<br />
CN-50<br />
CN-50<br />
CN-65<br />
CN-80<br />
CN-100<br />
CN-125<br />
CN-150<br />
CN-300<br />
CN-300<br />
CN-300<br />
CN-300<br />
S-K400<br />
[Note 5]<br />
(450A)<br />
S-K600<br />
(800A)<br />
S-K600<br />
(800A)
4.4.2 CAUTIONS FOR WIRING<br />
!<br />
CAUTION<br />
The external interconnection wiring must be performed with the following procedures.<br />
After completing <strong>7200GS</strong> interconnections, be sure to check that connections<br />
are correct. Never use control circuit buzzer check.<br />
(A) MAIN CIRCUIT INPUT/OUTPUT<br />
(1) Phase rotation of input terminals L1 (R), L2 (S), L3 (T) is available in either<br />
direction. (Clockwise and counterclockwise).<br />
(2) When inverter output terminals T1 (U), T2 (V), and T3 (W) are connected to<br />
motor terminals T1 (U), T2 (V), and T3 (W), respectively, motor rotates<br />
counterclockwise. (Viewed from opposite side of drive end, upon forward<br />
operation command). To reverse the rotation interchange any two of the motor<br />
leads.<br />
(3) Never connect AC main circuit power supply to output terminals T1 (U), T2<br />
(V), and T3 (W). This may cause damage to the inverter.<br />
(4) Care should be taken to prevent contact of wiring leads with <strong>7200GS</strong> cabinet.<br />
If this occurs, a short-circuit may result.<br />
(5) Never connect power factor correction capacitors or noise filters to <strong>7200GS</strong><br />
output.<br />
(6) Never open or close contactors in the output circuit unless inverter is properly<br />
sized.<br />
-18-
!<br />
CAUTION<br />
Lead size should be determined taking into account voltage drop of leads. Voltage<br />
drop can be obtained by the following equation: select such lead size that voltage<br />
drop will be within 2% of normal rated voltage.<br />
phase-to-phase voltage drop (V)<br />
= 3 x lead resistance ( Ω /km) X wiring distance(m) x current(A) X 10 -3 .<br />
Wiring length between inverter and motor.<br />
If total wiring distance between inverter and motor is excessively long and inverter<br />
carrier frequency (main transistor switching frequency) is high, harmonic leakage<br />
current from the cable will increase to effect the inverter unit or peripheral devices.<br />
If the wiring distance between inverter and motor is long, reduce the inverter<br />
carrier frequency.<br />
-19-
(B) GROUNDING (PE: Protective Earth)<br />
Ground the <strong>7200GS</strong> through ground terminal E (PE).<br />
(1) Ground resistance should be 100 ohms or less.<br />
(2) Never ground <strong>7200GS</strong> in common with welding machines, motors, and other<br />
large-current electrical equipment, or ground pole. Run the ground lead in<br />
separate conduit from leads for large-current electrical equipment.<br />
(3) Use the ground leads which comply with AWG standards and make the sure<br />
the length is as short as possible.<br />
(4) Where several <strong>7200GS</strong> units are used side by side, it is preferable to ground<br />
each unit separately to ground poles. However, connecting all the ground<br />
terminals of <strong>7200GS</strong> in parallel while grounding only one of the <strong>7200GS</strong>’s to<br />
the ground pole is also permissible (Fig. 3). Be sure not to form a loop with the<br />
ground leads.<br />
(C) CONTROL CIRCUIT<br />
CORRECT CORRECT NOT ACCEPTABLE<br />
PE PE PE PE PE PE PE PE PE<br />
(a) (b) (c)<br />
Fig. 3 Grounding of Three <strong>7200GS</strong> Units<br />
(1) Separation of control circuit leads and main circuit leads: All signal leads must<br />
be separated from main circuit leads L1 (R), L2 (S), L3 (T), ○+ , ○- , B2, T1 (U),<br />
T2 (V), T3 (W) and other power cables to prevent erroneous operation caused<br />
by noise interference.<br />
(2) Control circuit leads ○9 , ○10 , ○18 , ○19 , ○20 (contact output) must be separated from<br />
leads 1 to 8, ○21 , ○22 , ○25 , ○26 , ○27 and ○11 ~○17 .<br />
(3) Use twisted shielded or twisted pair shielded wire for the control circuit line<br />
and connect the shield sheath to the inverter terminal E to prevent malfunction<br />
caused by noise. See Fig.4. Wiring distance should be less than 164ft (50m).<br />
TO INVERTER SHIELD<br />
SHEATH TERMINAL E<br />
SHIELD<br />
SHEATH<br />
-20-<br />
ARMOR<br />
NEVER CONNECT<br />
INSULATE THESE PARTS<br />
WITH INSULATING TAPE.
Fig. 4 Shielded Wire Termination<br />
-21-
5. TEST OPERATION<br />
To assure safety, prior to test operation, disconnect the coupling or belt<br />
which connects the motor with the machine so that motor operation is<br />
isolated. If an operation must be performed while the motor is directly<br />
connected to the machine, use great care to avoid any possible<br />
hazardous condition.<br />
5.1 CHECK BEFORE TEST OPERATION<br />
After completion of installation and wiring, check for<br />
(1) proper wiring<br />
(2) short-circuit due to wire clippings<br />
(3) loose screw-type terminals<br />
(4) proper load<br />
5.2 SETTING THE LINE VOLTAGE SELECTING CONNECTOR FOR<br />
460V CLASS 30HP (22kW) AND ABOVE<br />
The cooling fan line voltage selecting connector shown in Fig. 5 must be<br />
set according to the type of main circuit power supply. Insert the connector<br />
at the position showing the appropriate line voltage.<br />
The unit is preset at the factory to 440 line voltage.<br />
(a) 440V CLASS: 30HP ~ 75HP<br />
FU2<br />
300HP ~ 400HP<br />
1 23CN 3 1 24CN 3 1 25CN 3 1 26CN 3<br />
TB4(220V)<br />
26CN<br />
440V<br />
(b) 440V CLASS: 100HP ~ 250HP<br />
220V<br />
+<br />
DM1 25CN<br />
4P108C0010103 VER.03 36CN<br />
32CN<br />
33CN<br />
31CN<br />
-22-<br />
JP1 JP2 JP3 JP4<br />
380V 400/415 440V 460V<br />
1 21CN 4 1 22CN 4<br />
FU1<br />
34CN 35CN<br />
JP1<br />
1<br />
380V<br />
JP2<br />
1<br />
400/415<br />
JP3<br />
1<br />
440V<br />
JP4<br />
1<br />
460V<br />
R TB2 S<br />
1 (220) 2<br />
R (440) S<br />
1 TB3 2<br />
220V<br />
440V<br />
SA4(220V)<br />
2<br />
1<br />
S R<br />
TB3<br />
TB2
Fig. 5 Voltage Selecting Connector<br />
-23-
6. MAINTENANCE<br />
6.1 PERIODIC INSPECTION<br />
The <strong>7200GS</strong> requires very few routine checks. It will function longer if it<br />
is kept clean, cool and dry. Observe precautions listed in "Location". Check<br />
for tightness of electrical connections, discoloration or other signs of<br />
overheating. Use Table 4 as your inspection guide. Before servicing, turn<br />
OFF AC main circuit power and be sure that CHARGE lamp is OFF.<br />
Table 4 Periodic Inspection<br />
Component Check Corrective Action<br />
External terminals, Loose screws Tighten<br />
unit mounting bolts,<br />
connectors, etc. Loose connectors Tighten<br />
Cooling fins Build-up of dust and dirt<br />
Printed circuit board Accumulation of conductive dust or oil<br />
Cooling fan<br />
Abnormal noise and vibration.<br />
Whether the cumulative operation<br />
time exceeds 20,000 hours or not.<br />
Power elements Accumulation of dust and dirt<br />
Smoothing capacitor Discoloration or odor<br />
Note: Operating conditions as follows:<br />
Ambient temperature: Yearly average 30℃, 86℉<br />
Load factor: 80% or less<br />
Operating time: 12 hours or less per day<br />
Standard Parts Replacement<br />
-24-<br />
Blow with dry compressed air of<br />
39.2 ×10 4 to 58.8 x 10 4 Pa (57 to<br />
85psi.) pressure.<br />
Blow with dry compressed air of<br />
39.2 x10 4 to 58.8 x 10 4 Pa (57 to<br />
85psi.) pressure.<br />
If dust and oil cannot be<br />
removed, replace the board.<br />
Replace the cooling fan.<br />
Blow with dry compressed air of<br />
39.2 x10 4 to 58.8 x 10 4 Pa (57 to<br />
85psi) pressure.<br />
Replace the capacitor or inverter<br />
unit.<br />
Item Name Replacement Cycle Remarks<br />
Cooling fan 2 or 3 years Replace with a new product.<br />
Smoothing capacitor 5 years<br />
Replace with a new product. (Determine<br />
after examination).<br />
Circuit Breakers and relays - Determine after examination.<br />
Fuse 10 years Replace with a new product.<br />
Aluminum capacitor on PC<br />
board<br />
5 years<br />
Note: Operating conditions as follows:<br />
Ambient temperature: Yearly average 30℃, 86℉<br />
Load factor: 80% or less<br />
Replace with a new product. (Determine<br />
after examination).
Operating time: 20 hours or less per day<br />
-25-
6.2 SPARE PARTS<br />
INVERTER & PARTS NAME<br />
HP SPEC<br />
25<br />
30<br />
40<br />
50<br />
60<br />
75<br />
100<br />
As insurance against costly downtime, it is strongly recommended that<br />
renewal parts be kept on hand in accordance with the table below.<br />
When ordering renewal parts, please specify to your local distributor or<br />
<strong>TECO</strong> representative the following information: Part Name, Part Code<br />
No. and Quantity.<br />
Table 5 Spare Parts for 220V Class<br />
Control PC Board* Power Board<br />
-26-<br />
Main Circuit<br />
Transistor<br />
Main Circuit Diode Cooling Fan<br />
MODEL - - CM200DU-12H DF200BA080 4E-230B<br />
CODE 4H300D4820002 3P106C0670008 277810212 277192187 3M903D0450004<br />
Qty 1 1 3 1 2<br />
MODEL - - CM200DU-12F DF200BA080 4E-230B<br />
CODE 4H300D4820002 4P106C02900B1 277810255 277192187 3M903D0450004<br />
Qty 1 1 3 1 2<br />
MODEL - - CM300HA-12H 2R160E-080 4E-230B<br />
CODE 4H300D4820002 3P106C06400D4 3H324D0460000 277051532 3M903D0450004<br />
Qty 1 1 6 6 3<br />
MODEL - - CM400HA-12H 2RI60E-080 4E-230B<br />
CODE 4H300D4820002 3P106C06400E2 277800179 277051532 3M903D0450004<br />
Qty 1 1 6 6 3<br />
MODEL - - 1MBI600NP-060 2RI60E-080 4E-230B<br />
CODE 4H300D4820002 3P106C06400F1 277800195 277051532 3M903D0450004<br />
Qty 1 1 6 6 3<br />
MODEL - - 1MBI600NP-060 2RI60E-080 4E-230B<br />
CODE 4H300D4820002 3P106C06400G9 277800195 277051532 3M903D0450004<br />
Qty 1 1 6 6 3<br />
MODEL - - CM300HA-12H 2RI100E-080 S175-2-HWB<br />
CODE 4H300D4820002 3P106C06400H7 3H324D0460000 277051516 279152115<br />
Qty 1 1 12 6 3
INVERTER &<br />
PART NAME<br />
HP SPEC<br />
25<br />
30<br />
40<br />
50<br />
60<br />
75<br />
100<br />
125<br />
150<br />
175<br />
215<br />
250<br />
300<br />
400<br />
Control PC<br />
Board*<br />
Table 6 Spare Parts for 440V Class<br />
Power Board Main Circuit Transistor Main Circuit Diode Cooling Fan<br />
MODEL - - 7MBP075RA120 DF75LA160 AFB0824SH-B -<br />
CODE 4H300D4820002 3P106C06500C1 277831538 277192195 4H300D1050001 -<br />
Qty 1 1 1 1 2 -<br />
MODEL - - CM100DU-24F DF75LA160 A2123-HBT ASB0624H-B<br />
CODE 4H300D4820002 4P106C02900A2 277810280 277192195 4M903D1890001 4H300D1060007<br />
Qty 1 1 3 1 2 1<br />
MODEL - - CM150DU-24F DF100LA160 A2123-HBT ASB0624H-B<br />
CODE 4H300D4820002 4P106C02900A2 277810298 277192217 4M903D1890001 4H300D1060007<br />
Qty 1 1 3 1 2 1<br />
MODEL - - CM200DU-24F 2U/DDB6U145N16L A2123-HBT ASB0624H-B<br />
CODE 4H300D4820002 4P106C02900A2 277810301 277190222 4M903D1890001 4H300D1060007<br />
Qty 1 1 3 1 2 1<br />
MODEL - - CM200DU-24F 2U/DDB6U145N16L AFB1224SHE AFB0824SH-B<br />
CODE 4H300D4820002 4P106C02900A2 277810301 277190222 4M903D1880006 4H300D1440004<br />
Qty 1 1 3 1 2 1<br />
MODEL - - CM300DU-24F 2U/DDB6U205N16L AFB1224SHE AFB0824SH-B<br />
CODE 4H300D4820002 4P106C02900A2 277810310 277190249 4M903D1880006 4H300D1440004<br />
Qty 1 1 3 1 2 1<br />
MODEL - - SKM400GB128D SKKH106/16E FFB1224EHE ASB0624H-B<br />
CODE 4H300D4820002 4P106C02900D7 277810611 277112302 4H300D5110009 4H300D1060007<br />
Qty 1 1 3 3 2 1<br />
MODEL - - CM600HU-24F 2RI100G-160 AFB1224SHE A2123-HBT<br />
CODE 4H300D4820002 4P106C02700A1 277800225 277051524 4M903D1880006 4M903D1890001<br />
Qty 1 1 6 6 3 1<br />
MODEL - - CM600HU-24F 2RI100G-160 AFB1224SHE A2123-HBT<br />
CODE 4H300D4820002 4P106C02700A1 277800225 277051524 4M903D1880006 4M903D1890001<br />
Qty 1 1 6 6 3 1<br />
MODEL - - CM600HU-24F 2RI100G-160 AFB1224SHE A2123-HBT<br />
CODE 4H300D4820002 4P106C02700A1 277800225 277051524 4M903D1880006 4M903D1890001<br />
Qty 1 1 6 6 3 1<br />
MODEL - - CM400HU-24F 2RI100G-160 EFB1524HHG A2123-HBT<br />
CODE 4H300D4820002 4P106C02700A1 277800217 277051524 4M300D3680002 4M903D1890001<br />
Qty 1 1 12 6 3 1<br />
MODEL - - CM400HU-24F 2RI100G-160 EFB1524HHG A2123-HBT<br />
CODE 4H300D4820002 4P106C02700A1 277800217 277051524 4M300D3680002 4M903D1890001<br />
Qty 1 1 12 6 3 1<br />
MODEL - - Skiip1203GB122-2DL SKKH500/E16 2RRE45250*56R -<br />
CODE 4H300D4820002 3P106C0060009 4M903D2030006 4M903D2000000 4M903D1940009 -<br />
Qty 1 1 3 3 2 -<br />
MODEL - - Skiip1513GB122-2DL SKKH500/E16 2RRE45250*56R -<br />
CODE 4H300D4820002 3P106C0060009 4M903D2040001 4M903D2000000 4M903D1940009 -<br />
Qty 1 1 3 3 2 -<br />
-27-
-28-
7. SPECIFICATIONS<br />
Basic Specifications<br />
220V CLASS<br />
INVERTER (HP) 25 30 40 50 60 75 100<br />
MAX. APPLICABLE MOTOR 25 30 40 50 60 75 100<br />
OUTPUT HP (KW)*1<br />
(18.5) (22) (30) (37 (45) (55) (75)<br />
Inverter Capacity<br />
(KVA)<br />
34 41 54 57 67 85 128<br />
Rated Output<br />
Current (A)<br />
Output<br />
Characteristics<br />
80 96 130 160 183 224 300<br />
Power Supply<br />
440V CLASS<br />
Max. Output<br />
Frequency<br />
Rated Output<br />
Frequency<br />
Rated Input Voltage<br />
And Frequency<br />
Allowable Voltage<br />
Fluctuation<br />
Allowable<br />
Frequency<br />
Fluctuation<br />
-29-<br />
3-Phase, 200/208/220/230V<br />
(Proportional to input voltage)<br />
Up to 400Hz available<br />
3-Phase, 200/208/220V, 50Hz<br />
200/208/220/230V, 60Hz<br />
+10% ~ -15%<br />
INVERTER (HP) 25 30 40 50 60 75 100 125 150 175 215 250 300 400<br />
MAX. APPLICABLE<br />
MOTOR OUTPUT HP<br />
(KW)*1<br />
Inverter<br />
Capacity (KVA)<br />
Output<br />
Characteristics<br />
Power<br />
Supply<br />
Rated Output<br />
Current (A)<br />
Max. Output<br />
Frequency<br />
Rated Output<br />
Frequency<br />
Rated Input<br />
Voltage And<br />
Frequency<br />
Allowable<br />
Voltage<br />
Fluctuation<br />
Allowable<br />
Frequency<br />
Fluctuation<br />
25<br />
(18.5)<br />
30<br />
(22)<br />
40<br />
(30)<br />
50<br />
(37)<br />
60<br />
(45)<br />
75<br />
(55)<br />
100<br />
(75)<br />
125<br />
(90)<br />
±5%<br />
150<br />
(110)<br />
175<br />
(132)<br />
215<br />
(160)<br />
250<br />
(185)<br />
300<br />
(220)<br />
34 41 54 68 82 110 138 180 195 230 260 290 385 513<br />
40 48 64 80 96 128 165 192 224 270 300 340 450 600<br />
3-Phase, 380/400/415/440/460V<br />
(Proportional to input voltage)<br />
Up to 400Hz available<br />
3-Phase, 380/400/415/440/460V, 50/60Hz<br />
+10% ~ -15%<br />
±5%<br />
400<br />
(300)
*1 Based on 4 pole motor<br />
-30-
Control Characteristics<br />
Protective Functions<br />
Environmental<br />
Conditions<br />
CHARACTERISTICS<br />
Control Method<br />
Starting Torque<br />
Speed Control Range<br />
Sine wave PWM<br />
Four control modes (switched by parameter)<br />
- V/F control<br />
- Sensorless vector control (With Auto-tuning)<br />
- PID&Auto Energy Saving control<br />
- V/F+PG control<br />
V/F control: 150% at 3Hz<br />
Sensorless Vector control: 150% at 1Hz<br />
V/F control: 1 : 10<br />
Sensorless Vector control: 1 : 60<br />
Speed Response 5Hz (Sensorless Vector)<br />
Speed Control Accuracy<br />
Frequency Control Range 0.1 ~ 400.0Hz<br />
V/F control: ±1% (with slip compensation)<br />
V/F+PG Control : ±0.03%<br />
Sensorless Vector control: ±0.5%<br />
Frequency Setting Resolution Digital reference: 0.01Hz (100Hz Below); Analog reference: 0.06Hz/60Hz<br />
Frequency Accuracy Digital reference: ±0.01% (-10 ~ +40℃); Analog command: ±0.1% (25℃± 10℃)<br />
Output Frequency Resolution 0.01Hz (1/30000)<br />
Frequency Setting Signal 0 ~ 10VDC (20KΩ), 4~20mA (250Ω)<br />
Overload Capacity 150% rated output current for 1 minute.<br />
Accel/Decel Time 0.1 ~ 6000.0 sec (Accel/Decel time settings independently)<br />
Efficiency at Rated Freq. 0.95 above<br />
Braking Torque<br />
<strong>Motor</strong> Overload Protection Electric thermal overload relay<br />
Instantaneous Overcurrent (OC)<br />
and Short Circuit Protection<br />
Inverter Overheat Protection<br />
(OL2)<br />
Overvoltage (OV)<br />
Undervoltage (UV)<br />
Approx. 20% (Approx. 125% When using braking resistor)<br />
Inverter of 220V 20HP (15KW) or less and 440V 25HP (18.5KW) or less have a<br />
Built-in braking transistor<br />
<strong>Motor</strong> coasts to stop at approx. 200% rated output current.<br />
150% inverter rated output current for 1 min.<br />
<strong>Motor</strong> coasts to stop if the main circuit voltage exceeds 410VDC (820VDC for<br />
440V class)<br />
<strong>Motor</strong> coasts to stop if the main circuit voltage drops to 190VDC (380VDC for<br />
440V class)<br />
Immediately stop after 15 ms or longer power loss (at factory setting)<br />
Momentary Power Loss<br />
Continuous operation during power loss less than 2 sec. (standard)<br />
Fin Overheat (OH) Thermostat<br />
Stall Prevention Stall prevention during acceleration/deceleration and constant speed operation.<br />
Ground Fault (GF) Provided by electronic circuit.<br />
Power Charge Indication Indicates until main circuit voltage reaches 50V.<br />
Location Indoor (Protected from corrosive gases and dust)<br />
Humidity 95% RH (non-condensing)<br />
Storage Temperature -20 ~+60℃ (for short period during shipping)<br />
Ambient Temperature -10 to +40℃ (for NEMA1 type); -10 to +45℃ (for open chassis type)<br />
Altitude 1000m or below<br />
Vibration 9.8m/s 2 at 20Hz or below, up to 2m/s 2 at 20 to 50Hz<br />
Communication Function MODBUS, PROFIBUS (option)<br />
-31-
EMI Meet EN 50081-2 (1994) with specified EMI filter<br />
EMC Compatibility Meet Pr EN50082-2<br />
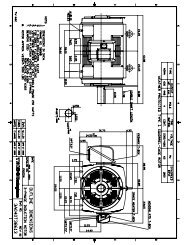
8. DIMENSIONS<br />
Voltage<br />
(V)<br />
220V<br />
440V<br />
Inverter<br />
Capacity<br />
(HP) W H D W1 H1 d<br />
25<br />
30<br />
Table 7 Dimension and Weight<br />
Open Chassis Type (IP00) mm Enclosed Type (NEMA1) mm<br />
Weight<br />
(Kg)<br />
W H D W1 H1 d<br />
-32-<br />
Weight<br />
(Kg)<br />
283.5 525 307 220 505 M8 30 291.5 745 307 220 505 M8 33<br />
40 75 81<br />
50 76 82<br />
459 790 324.6 320 760 M10 462 1105 324.6 320 760 M10<br />
60 79 85<br />
75<br />
79<br />
100 599 1000 381.6 460 960 M12 120 602 1305 381.6 460 960 M12 130<br />
25 265 360 225 245 340 M6 12 265 360 225 245 340 M6 12<br />
30 36 38<br />
283.5 525 307 220 505 M8 291.5 745 307 220 505 M8<br />
40<br />
36<br />
38<br />
50 47 50<br />
60 47 50<br />
344 630 324.5 250 610 M8 352 945 324.5 250 610 M8<br />
75 47 50<br />
100<br />
62<br />
125 80 85<br />
150 459 790 324.6 320 760 M10 81 462 1105 324.6 320 760 M10 86<br />
175<br />
81<br />
215 132 139<br />
599 1000 381.6 460 960 M12 602 1305 381.6 460 960 M12<br />
250<br />
132<br />
139<br />
300 170 176<br />
730 1230 382 690 930 M12 730 1330 382 690 930 M12<br />
400<br />
190<br />
196<br />
(a) 440V:25HP<br />
W<br />
W1<br />
H1<br />
H2<br />
d<br />
H<br />
88<br />
65<br />
86<br />
ACL/DCL<br />
DCL Built-in<br />
(Standard)<br />
External ACL<br />
(option)<br />
DCL Built-in<br />
(Standard)<br />
DCL Built-in<br />
(Standard)<br />
DCL Built-in<br />
(Standard)<br />
DCL Built-in<br />
(Standard)<br />
External ACL<br />
(option)<br />
D<br />
Reference<br />
Figure<br />
(b)<br />
(a)<br />
(b)<br />
(c)
-33-
(b) 220V:25HP~100HP<br />
H<br />
440V:30HP~250HP<br />
H1<br />
d<br />
W<br />
W1<br />
D<br />
H<br />
(Open Chassis Type -IP00) (Wall-mounted Type-NEMA1)<br />
H1<br />
-34-<br />
d<br />
W<br />
W1<br />
D
-35-
H<br />
365<br />
365<br />
200<br />
23<br />
(d) 440V:300HP, 400HP<br />
W<br />
W1<br />
500<br />
d<br />
D<br />
H<br />
365<br />
365<br />
200<br />
122<br />
(Open Chassis Type -IP00) (Wall-mounted Type-NEMA1)<br />
W<br />
W1<br />
500<br />
-36-<br />
d<br />
D
9. PERIPHERAL AND OPTIONS<br />
9.1 AC REACTOR<br />
When power capacity is significantly large compared to inverter capacity, or when<br />
the power factor needs to be improved, externally connect an AC reactor.<br />
<strong>7200GS</strong> 220V 25 ~ 100HP and 440V 30 ~ 250HP have built-in DC reactor as<br />
standard. (When the power factor needs to be improved, externally connect an AC<br />
reactor).<br />
440V 25HP connects an optional AC reactor When the power factor needs to be<br />
improved.<br />
440V 300 ~ 400HP need to connect an AC reactor externally.<br />
Table 8 AC REACTOR<br />
Inverter AC Reactor<br />
Voltage HP Rated current (A) Current (A) Inductance (mH) Code NO.<br />
25 80 90 0.12 3M200D1610102<br />
30 96 120 0.09 3M200D1610111<br />
40 130 160 0.07 3M200D1610269<br />
220V 50 160 200 0.05 3M200D1610277<br />
60 183 240 0.044 3M200D1610285<br />
75 224 280 0.038 3M200D1610293<br />
440V<br />
100 300 360 0.026 3M200D1610307<br />
25 40 50 0.42 3M200D1610218<br />
30 48 60 0.36 3M200D1610226<br />
40 64 80 0.26 3M200D1610234<br />
50 80 90 0.24 3M200D1610242<br />
60 96 120 0.18 3M200D1610251<br />
75 128 150 0.15 3M200D1610315<br />
100 169 200 0.11 3M200D1610323<br />
125 192 200 0.11 3M200D1610323<br />
150 224 250 0.09 3M200D1610331<br />
175 270 330 0.06 3M200D1610340<br />
215 300 330 0.06 4M200D0010340<br />
250 340 400 0.05 4M200D0010008<br />
300 450 500 0.04 4M200D0020003<br />
400 600 670 0.032 4M200D0040004<br />
-37-
9.2 NOISE FILTER<br />
9.2.1 INPUT NOISE FILTER<br />
When input noise filter is installed as indicated, the <strong>7200GS</strong> will comply with the<br />
EN55011A noise interference suppression directive.<br />
Voltage (V) HP<br />
220V<br />
440V<br />
Table 9 Input Noise Filter<br />
Inverter Input Noise Filter<br />
Rated<br />
current (A)<br />
Code NO. Model NO.<br />
-38-<br />
Input Noise Filter<br />
R<br />
MCCB<br />
IN<br />
1 4<br />
S<br />
2 5<br />
T<br />
3 6<br />
PA<br />
R/L1 U/T1<br />
S/L2 V/T2<br />
T/L3 W/T3<br />
Input Noise Filter Connection Example<br />
Rated<br />
current (A)<br />
25 80A 4H000D1690004 FS6100-90-34 90A<br />
30 96A 4H000D1710005 FS6100-150-40 150A<br />
40 130A 4H000D1710005 FS6100-150-40 150A<br />
50 160A 4H000D1720001 FS6100-250-99 250A<br />
60 183A 4H000D1720001 FS6100-250-99 250A<br />
75 224A 4H000D1750007 FS6100-400-99 400A<br />
100 300A 4H000D1750007 FS6100-400-99 400A<br />
25 40A 4H000D1770008 FS6101-50-52 50A<br />
30 48A 4H000D1790009 FS6101-80-52 80A<br />
40 64A 4H000D1790009 FS6101-80-52 80A<br />
50 80A 4H000D1800004 FS6101-120-35 120A<br />
60 96A 4H000D1800004 FS6101-120-35 120A<br />
75 128A 4H000D1820005 FS6101-200-40 200A<br />
100 165A 4H000D1820005 FS6101-200-40 200A<br />
125 192A 4H000D1850001 FS6101-320-99 320A<br />
150 224A 4H000D1850001 FS6101-320-99 320A<br />
175 270A 4H000D1850001 FS6101-320-99 320A<br />
215 300A 4H000D1880008 FS6101-400-99 400A<br />
250 340A 4H000D1880008 FS6101-400-99 400A<br />
I
300 450A 4H000D1900009 FS6101-600-99 600A<br />
400 600A 4H000D1910004 FS6101-800-99 800A<br />
-39-
9.2.2 EMI SUPPRESSION ZERO CORE<br />
Model: JUNFOC046S - - - - - - -<br />
Code No.: 4H000D0250001<br />
According to the required power rating and wire size, select the matched ferrite core<br />
to suppress the zero sequence EMI filter.<br />
The ferrite core can attenuate the frequency response at high frequency range<br />
(from 100KHz to 50MHz, as shown below). It should be able to attenuate the RFI<br />
from inverter to outside.<br />
The zero-sequence noise filter ferrite core can be installed either on the input side<br />
or on the output side. The wire around the core for each phase should be winded by<br />
following the same convention and one direction. The more winding turns the better<br />
attenuation effect. (Without saturation). If the wire size is too big to be winded, all<br />
the wire can be grouped and go through these several cores together in one<br />
direction.<br />
Frequency attenuation characteristics (10 windings case)<br />
attenuation value (dB)<br />
0<br />
-10<br />
-20<br />
-30<br />
10 1<br />
-40<br />
Example: EMI suppression zero core application example<br />
DRIVE FWD REV REMOTE<br />
DIGITAL OPERATOR JNEP-31<br />
PRGM<br />
DRIVE<br />
JOG<br />
FWD<br />
REV<br />
DSPL<br />
EDIT<br />
ENTER<br />
RESET<br />
RUN STOP<br />
10 2<br />
10<br />
Interference Frequency (kHz)<br />
3<br />
10 4 10 5<br />
-40-
Note: All the line wire of U/T1, V/T2, W/T3 phase must pass through the same zerophase<br />
core in the same winding sense.<br />
-41-
9.3 BRAKING RESISTOR AND BRAKING UNIT<br />
The braking transistor of 440V 25HP was built-in as standard, the braking resistor<br />
can be connected to main circuit terminals B2 and ○+ directly. The others without<br />
built-in braking transistor need to connect braking unit with braking resistor<br />
externally.<br />
When connecting braking resistor or braking unit with braking resistor, set system<br />
parameter Sn-10=XX1X (i.e. stall prevention during deceleration not enabled).<br />
Braking resistor and braking unit selection table is shown below.<br />
Voltage HP<br />
220V<br />
440V<br />
Table 10 Braking Resistor and Braking Unit<br />
Inverter Braking Unit Braking Resistor<br />
Rated current<br />
(A)<br />
Type<br />
Number<br />
used<br />
Code NO. Specs. Number used<br />
-42-<br />
Braking Torque<br />
(%)<br />
25 80A JUVPLV-0060 1 3H333C0020108 4800W/6.8Ω 1 125%(10%ED)<br />
30 96A JUVPLV-0040 2 3H333C0020086 3000W/10Ω 2 125%(10%ED)<br />
40 130A JUVPLV-0040 2 3H333C0020086 3000W/10Ω 2 100%(10%ED)<br />
50 160A JUVPLV-0060 2 3H333C0020108 4800W/6.8Ω 2 120%(10%ED)<br />
60 183A JUVPLV-0060 2 3H333C0020108 4800W/6.8Ω 2 100%(10%ED)<br />
75 224A JUVPLV-0060 3 3H333C0020108 4800W/6.8Ω 3 110%(10%ED)<br />
100 300A JUVPLV-0060 3 3H333C0020108 4800W/6.8Ω 3 90%(10%ED)<br />
25 40A - - 3H333C0190005 1600W/50Ω 1 70%(5%ED)<br />
30 48A JUVPHV-0040 1 3H333C0020213 6000W/20Ω 1 125%(10%ED)<br />
40 64A JUVPHV-0060 1 3H333C0020221 9600W/16Ω 1 125%(10%ED)<br />
50 80A JUVPHV-0060 1 3H333C0020230 9600W/13.6Ω 1 125%(10%ED)<br />
60 96A JUVPHV-0040 2 3H333C0020213 6000W/20Ω 2 135%(10%ED)<br />
75 128A JUVPHV-0060 2 3H333C0020230 9600W/13.6Ω 2 145%(10%ED)<br />
100 165A JUVPHV-0040 3 3H333C0020213 6000W/20Ω 3 120%(10%ED)<br />
125 192A JUVPHV-0040 3 3H333C0020213 6000W/20Ω 3 100%(10%ED)<br />
150 224A JUVPHV-0040 4 3H333C0020230 6000W/20Ω 4 115%(10%ED)<br />
175 270A JUVPHV-0060 4 3H333C0020230 9600W/13.6Ω 4 140%(10%ED)<br />
215 300A JUVPHV-0060 4 3H333C0020230 9600W/13.6Ω 4 120%(10%ED)<br />
250 340A JUVPHV-0060 4 3H333C0020230 9600W/13.6Ω 4 100%(10%ED)<br />
300 450A JUVPHV-0060 5 3H333C0020230 9600W/13.6Ω 5 110%(10%ED)<br />
400 600A JUVPHV-0060 5 3H333C0020230 9600W/13.6Ω 5 100%(10%ED)
9.4 OTHERS<br />
9.4.1 DIGITAL OPERATOR WITH EXTENSION WIRE<br />
Used for the operation of LCD (or LED) digital operator or monitor when removed<br />
from the front of inverter unit.<br />
<strong>7200GS</strong><br />
Cable Extension Cable Extension Cable<br />
Length<br />
Set*1<br />
Set*2<br />
1m 4H332D0010000 4H314C0010003<br />
2m 4H332D0030001 4H314C0030004<br />
3m 4H332D0020005 4H314C0020009<br />
5m 4H332D0040006 4H314C0040000<br />
10m 4H332D0130005 4H314C0060001<br />
-43-<br />
DRIVE FWD REV REMOTE<br />
SEQ REF<br />
DIGITAL OPERATOR JNEP-312<br />
RUN STOP<br />
Blank Cover*3<br />
4H300D1120000<br />
*1 : Including special cable for LCD (or LED) operator, blank cover, fixed use screws<br />
and installation manual.<br />
*2 : One special cable for digital operator.<br />
*3 : A blank cover to protect against external dusts, metallic powder, etc.<br />
The physical dimension of LCD (or LED) digital operator is drawn below.<br />
DRI VE F WD REV<br />
DI GI TAL OPERATOR J NEP-34<br />
PRGM<br />
DRI VE<br />
J OG<br />
F WD<br />
REV<br />
RUN<br />
SEQ<br />
RE MOTE<br />
DSPL<br />
RESET<br />
STOP<br />
L<br />
REF<br />
EDI T<br />
ENTER<br />
PRGM<br />
DRIVE<br />
JOG<br />
FWD<br />
REV<br />
DSPL<br />
EDIT<br />
ENTER<br />
RESET
Fig. 6 LCD Digital Operator Dimension<br />
-44-
9.4.2 ANALOG OPERATOR<br />
All <strong>7200GS</strong> have the LCD (or LED) digital operator. Moreover, an analog operator<br />
as JNEP-16 (shown in fig. 7) is also available and can be connected through wire as a<br />
portable operator. The wiring diagram is shown below.<br />
9.4.3 LED DIGITAL OPERATOR<br />
R/L1<br />
S/L2<br />
T/L3<br />
FWD<br />
BREAKER<br />
Master Freq. Ref.<br />
976Ω, 1/4W<br />
2kΩ<br />
RUN<br />
STOP<br />
REV<br />
RESET<br />
0 ~ 10V<br />
FM<br />
- +<br />
Analog Operator<br />
(JNEP-16)<br />
Fig. 7 Analog Operator<br />
All <strong>7200GS</strong> have standard with LCD digital operator (JNEP-34). Moreover, an LED<br />
digital operator JNEP-33 (shown in Fig. 10) is also available and can be connected<br />
through the same cable and connector.<br />
The LED digital operator has the same installation and dimension with the LCD<br />
digital operator.<br />
-45-<br />
R/L1<br />
S/L2<br />
T/L3<br />
○1<br />
○2<br />
○3<br />
○4<br />
○11<br />
○15<br />
○13<br />
○17<br />
○21<br />
○22<br />
○+ ○-<br />
<strong>7200GS</strong><br />
GND 0V<br />
ANALOG<br />
OUTPUT<br />
U/T1<br />
V/T2<br />
W/T3<br />
IM
-46-
9.4.4 OPTION CARDS<br />
Name Code No. Descriptions<br />
RS-485<br />
Communication 4H300D4560001<br />
Card SI-M<br />
PG Speed<br />
Controller Card 3H300D1180009<br />
FB-C<br />
Digital pulse<br />
monitor Card<br />
PM-C<br />
Analog monitor<br />
Card AO-12<br />
3H331C0060008<br />
4H300D3850005<br />
Digital<br />
reference Card 4H300D4570006<br />
DI-08<br />
MODBUS RTU protocol communication<br />
optional card:<br />
Communication method: Asynchronous<br />
Communication speed: 19.2Kbps<br />
(max.)<br />
Interface: RS-232, RS-422, RS-485<br />
Permits compensation of speed variation<br />
caused by slip, by speed feedback using<br />
a pulse generator (PG) provided to the<br />
motor:<br />
Phase A (signal pulse) input.<br />
PG frequency range: 50 to 65535Hz<br />
Pulse monitor output: +12V, 20mA<br />
Input Voltage: +12V<br />
Input current: 300mA<br />
-47-<br />
External supply<br />
Outputs pulse train signal corresponding<br />
to the inverter output frequency<br />
Output pulse: 1F, 6F, 10F, 12F, 36F<br />
(F: output frequency)<br />
Output voltage: +12V ±10% (isolated)<br />
Output current: 20mA max<br />
Output analog signal for monitoring<br />
inverter output state (output frequency,<br />
output current etc.)<br />
Output resolution: 11 bits (1/2048)<br />
Output voltage: -10 to +10V<br />
(non isolated)<br />
Output channel: 2 channels<br />
Allows 8 bits digital speed reference set.<br />
Input signal: binary 8 bits/BCD 2 digits<br />
+ code<br />
Input voltage: +24V (isolated)<br />
Input current: 8mA<br />
Allows bipolar high precision, high<br />
Analog<br />
resolution analog speed reference set.<br />
reference Card 4H300D4580001<br />
Input signal level: 0 to ±10VDC (20KΩ)<br />
AI-14B<br />
4 to 20mA (250Ω)<br />
○: Valid<br />
╳: Invalid<br />
Valid Access Levels<br />
GP SL PID PG<br />
Install<br />
Location<br />
○ ○ ╳ ╳ 2CN<br />
╳ ╳ ╳ ○ 3CN<br />
○ ╳ ○ ╳ 3CN<br />
○ ○ ○ ╳ 3CN<br />
○ ○ ○ ○ 2CN<br />
○ ○ ○ ○ 2CN
3 channels<br />
Input resolution: 13 bits + code<br />
(1/8192)<br />
-48-
Name Code No. Descriptions<br />
V/I Conversion<br />
card V/I card 3P103D0280001<br />
Converts the multi-function analog output<br />
(terminals ○21 -○22 ) signal from 0~10V to<br />
4~20mA signal<br />
Digital output<br />
card DO-08<br />
MODBUS<br />
Communication<br />
card GS-M<br />
PROFIBUS<br />
Communication<br />
card GS-P<br />
Outputs isolated type digital signal for<br />
monitoring inverter run state (alarm<br />
signal, zero speed detection etc.)<br />
Output channel: Photo coupler 6<br />
channels<br />
(48V, 50mA or less)<br />
Relay contact output 2<br />
channels<br />
250VAC, 1A or less<br />
30VDC, 1A or less<br />
MODBUS RTU protocol communication<br />
optional card.<br />
Communication method: Asynchronous<br />
Communication speed: 19.2Kbps<br />
(max.)<br />
Interface: RS-485, RS-422<br />
PROFIBUS protocol communication<br />
optional card:<br />
Communication method: Asynchronous<br />
Communication speed: depend<br />
Interface: RS-485<br />
【Installation】Use the following procedure to install these option card.<br />
1>. Turn off the main circuit power supply.<br />
-49-<br />
Valid Access Levels<br />
GP SL PID PG<br />
Install<br />
Location<br />
○ ○ ○ ○ 3CN<br />
○ ○ ○ ╳ 3CN<br />
○ ○ ○ ○ 1CN<br />
○ ○ ○ ○ 1CN<br />
2>. Leave it off for a least one minute before removing the front cover of<br />
the inverter. Check to be sure that the CHARGE indicator is OFF.<br />
3>. Insert the spacer (Which is provided with the option card) into the<br />
spacer hole at the control board.<br />
4>. Pass the spacer through the spacer hole at the option card. Check to<br />
be sure that it is precisely aligned with the 2CN or 3CN position, and<br />
snap it into the proper position.<br />
CONTROL PC<br />
BOARD<br />
CONTROL<br />
TERMINAL<br />
2CN<br />
3CN<br />
1CN<br />
OPERATOR<br />
MAIN CIRCUIT TERMINAL
控制基板<br />
泛用通信界面卡<br />
支撐柱×4<br />
Fig. 8 Option card Installation<br />
CN2<br />
(上)<br />
(下)<br />
數位操<br />
作器<br />
-50-<br />
CN1<br />
主回路端子