Firmware Update MiniMod - Maintech.de
Firmware Update MiniMod - Maintech.de
Firmware Update MiniMod - Maintech.de

Create successful ePaper yourself
Turn your PDF publications into a flip-book with our unique Google optimized e-Paper software.
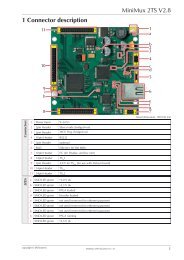
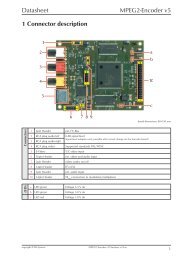
This manual explains how to update the firmware<br />
of a <strong>MiniMod</strong> board.<br />
The procedure is valid for the hardware versions<br />
v2.1, v2.2, v2.3, v2.4 and v2.5. Please check that<br />
your hardware is labeled with one of this version<br />
numbers as shown in the picture.<br />
Please update the firmware of your hardware only<br />
if we explicitly ask you to do so. Do not try to<br />
update without a good reason. Make sure to only<br />
update your boards with the right firmware – you<br />
can‘t change the function of your hardware by updating<br />
it with firmware for another product.<br />
copyright © SR-Systems <strong>Firmware</strong>update <strong>MiniMod</strong> v1.0 en<br />
<strong>Firmware</strong> <strong>Update</strong> <strong>MiniMod</strong><br />
<br />
Before updating your hardware:<br />
Please take some time to read and un<strong>de</strong>rstand the whole manual before updating your hardware.<br />
If in doubt, check back with us and only update if we advise you to do so. Updating<br />
your hardware with the wrong firmware will ren<strong>de</strong>r it unusable.<br />
1. Required Hardware<br />
• Windows-PC (Windows 2000, Windows XP, Windows Vista)<br />
• Power supply 8–24V=/500mA<br />
• serial port on your PC<br />
• RS232-Adapter 10 pin to SUB-D adaptor cable<br />
• <strong>MiniMod</strong> to be updated<br />
2. Installing the <strong>Update</strong> Software<br />
Start the installation by executing PCWFRsetup.exe and then follow<br />
the instuctions on the screen.<br />
The software will, by <strong>de</strong>fault, be installed to C:\Program Files\FU-<br />
JITSU\FUJITSU FLASH MCU Programmer\FR\. If you want to<br />
change this target path, change the installation method from Complete<br />
to Custom before klicking the Next button.<br />
You may then enter your <strong>de</strong>sired installation path in the next dialog<br />
window by using the Change button. Confirm the next steps by<br />
clicking the Next button.<br />
After clicking Finish in the last dialog the Flash Programmer is<br />
ready to use.<br />
You will find the software in your Start Menu in Programs/FUJIT-<br />
SU FLASH MCU Programmer/FR.<br />
1
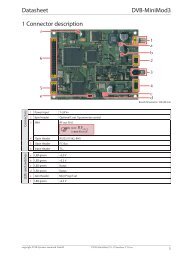
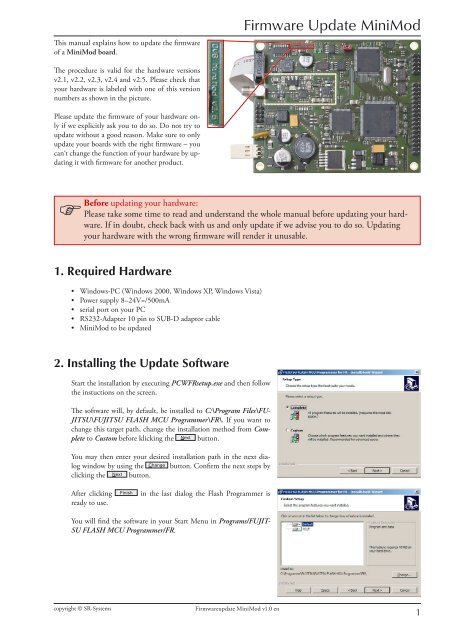
3. Hardware Setup<br />
<br />
<br />
<br />
1. Jumper for selecting Programming Mo<strong>de</strong> (see Chap. 4, Step 7)<br />
2. RS232 10 pin to SUB-D adaptor cable<br />
3. Power Supply<br />
4. Performing the <strong>Firmware</strong> <strong>Update</strong><br />
1. Start the Programer Software in your Start Menu<br />
in Programs/FUJITSU FLASH MCU Programmer/FR.<br />
You should see the programmer‘s<br />
main window as shown in the picture.<br />
2. Select MB91F272 as Target Microcontroller.<br />
copyright © SR-Systems <strong>Firmware</strong>update <strong>MiniMod</strong> v1.0 en<br />
<strong>Firmware</strong> <strong>Update</strong> <strong>MiniMod</strong><br />
2
3. Click the Set Environment Button and select the COM-Port that you want to connect<br />
to your <strong>MiniMod</strong> Board. Apply your setting by clicking the OK button.<br />
4. Click the Open button to choose the firmware file for the update. Please<br />
select the firmware file we sent you. In this example, the file is named<br />
<strong>MiniMod</strong>_MCU_V540.mhx, but your file name may differ.<br />
5. Check if the programmer window on your<br />
screen looks like the picture to the right and<br />
click Full Operation (D+E+B+P) .<br />
6. You should see this dialog box:<br />
7. Please close the Programming<br />
<br />
Mo<strong>de</strong> Jumper (the red jumper in the picture).<br />
8. Connect the <strong>MiniMod</strong> board to the COM port you selected in step 3 (see pictures<br />
in Chapter 3).<br />
<br />
9. Connect your <strong>MiniMod</strong> board to your power supply.<br />
10. Remember the dialog box from step 6? Now start the update process by<br />
clicking OK there.<br />
copyright © SR-Systems <strong>Firmware</strong>update <strong>MiniMod</strong> v1.0 en<br />
<strong>Firmware</strong> <strong>Update</strong> <strong>MiniMod</strong><br />
Important:<br />
Do not click OK yet.<br />
You still need to prepare<br />
the board.<br />
3
<strong>Firmware</strong> <strong>Update</strong> <strong>MiniMod</strong><br />
11. While the software update proceeds, status updates like the following will appear on your screen:<br />
If you should see error messages instead of those status updates, please disconnect your hardware and continue<br />
with step 5 to try again.<br />
12. When you see the finish message It en<strong>de</strong>d normally completely,<br />
the firmware update was successful. If you should<br />
see error messages instead, please disconnect your hardware<br />
and continue with step 5 to try again.<br />
13. Disconnect the <strong>MiniMod</strong> board from power.<br />
14. Remove the Programming Mo<strong>de</strong> jumper you plugged in<br />
step 7.<br />
15. Done!<br />
<br />
If you want to verify the firmware update, open the COM-Port connected to the <strong>MiniMod</strong> Board with a<br />
terminal (like Hyperterm). Use the following settings: 115.2 kBps/8 Bit/no parity/1 stop bit (115200 8N1).<br />
After connecting the <strong>MiniMod</strong> board to power, you should see a welcome message including product<br />
name and version of the new firmware.<br />
Anhang<br />
serial Interface (Board)<br />
1 con. with 4+6 2 TxD<br />
3 RxD 4 con. with 1+6<br />
5 GND 6 con. with 1+4<br />
7 not connected 8 not connected<br />
9 not connected 10 GND<br />
Adapter 10pol. SUB-D<br />
copyright © SR-Systems <strong>Firmware</strong>update <strong>MiniMod</strong> v1.0 en<br />
<br />
<br />
<br />
<br />
<br />
<br />
<br />
<br />
<br />
<br />
<br />
<br />
<br />
<br />
<br />
<br />
<br />
<br />
<br />
4
Errata/corrections:<br />
29.04.2008 Release v1.0 en<br />
copyright © SR-Systems <strong>Firmware</strong>update <strong>MiniMod</strong> v1.0 en<br />
<strong>Firmware</strong> <strong>Update</strong> <strong>MiniMod</strong><br />
The information in this manual was compiled with high care and to our best knowledge; nevertheless there might be some errors<br />
left in this document. We do not take legal or any other responsibility for the correctness of any information.<br />
This doument is protected by copyright law. All rights including copying, translation, microfilming as well as storage and<br />
processing in electronic systems are reserved.<br />
We are happy to receive your comments and questions:<br />
SR-Systems Tel.: +49 (66 63) 91 88 66<br />
Brü<strong>de</strong>r-Grimm-Straße 130 Fax: +49 (66 63) 91 88 67<br />
36396 Steinau eMail: DATV@SR-Systems.<strong>de</strong><br />
5