Manual de usuario - Soler & Palau Chile
Manual de usuario - Soler & Palau Chile
Manual de usuario - Soler & Palau Chile

You also want an ePaper? Increase the reach of your titles
YUMPU automatically turns print PDFs into web optimized ePapers that Google loves.
ARTIC - 400 CRC
Fig. 2<br />
Fig. 4<br />
Fig. 3<br />
Fig. 5<br />
Fig. 6<br />
Fig. 1<br />
3
4<br />
Luz indicadora función lógica<br />
Logical function pilot lamp<br />
Témoin lumineux <strong>de</strong> la<br />
fonction logique<br />
Luz indicadora <strong>de</strong>velocida<strong>de</strong>s<br />
Speed pilot lamp<br />
Témoin lumineux <strong>de</strong>svitesses<br />
Luz indicadora <strong>de</strong>temporizador<br />
Timer pilot lamp<br />
Témoin lumineux <strong>de</strong> la minuterie<br />
Receptor<br />
Receiver<br />
Recepteur<br />
Temporizador<br />
Timer<br />
Minuterie<br />
Función lógica<br />
Logical Function<br />
Fonction logique<br />
Oscilación Izquierda<br />
Left oscillation<br />
Oscillation vers la gauche<br />
Función lógica<br />
Logical Function<br />
Fonction logique<br />
Puesta en marcha<br />
yselección <strong>de</strong> velocida<strong>de</strong>s<br />
Start and speed selection<br />
Mise enmarche<br />
et sélection <strong>de</strong>s vitesses<br />
Detiene el<br />
funcionamiento <strong>de</strong>l aparato<br />
Turn off the appliance<br />
Arrêt <strong>de</strong> l’appareil<br />
Velocida<strong>de</strong>s<br />
Speeds<br />
Vitesses<br />
Control oscilación<br />
Oscillation control<br />
Contrôle <strong>de</strong>l’oscillation<br />
Oscilación <strong>de</strong>recha<br />
Right oscillation<br />
Oscillation vers la droite<br />
Fig. 7<br />
Fig. 8
ESPAÑOL<br />
• Instrucciones<br />
Laserie<strong>de</strong>ventiladores ARTIC reúne en su construcción los últimos avances<br />
tecnológicos y un diseño bello y funcional. Fruto <strong>de</strong> la calidad, sus prestaciones<br />
garantizan un servicio amplio, seguro y eficaz. Entre sus características principales<br />
<strong>de</strong>stacaremos la función <strong>de</strong> oscilación <strong>de</strong> 360º, temporizador y control remoto.<br />
Este aparato cumple con las directivas <strong>de</strong> compatibilidad electromagnética<br />
vigentes, sus prestaciones garantizan un servicio amplio, seguro y eficaz.<br />
Rogamos compruebe, el perfecto estado <strong>de</strong> todas las piezas subministradas<br />
(Fig.1) y el funcionamiento <strong>de</strong>l aparato al <strong>de</strong>sembalarlo, ya que cualquier <strong>de</strong>fecto<br />
<strong>de</strong> origen está amparado por la garantía <strong>de</strong> S&P.<br />
• Recomendaciones <strong>de</strong> seguridad<br />
- Asegúrese que la tensión <strong>de</strong> alimentación coinci<strong>de</strong> con la indicada en la placa<br />
<strong>de</strong> características.<br />
-Noutilice este aparato enelinterior <strong>de</strong> cuartos <strong>de</strong> baños o duchas.<br />
- No sumerja el aparato.<br />
-Notire <strong>de</strong>l cable para extraer la clavija <strong>de</strong> la enchufe.<br />
-Noutilice el aparato con el cable o la clavija dañada.<br />
-Notoque la clavija con las manos mojadas.<br />
-Sielcableflexible<strong>de</strong>alimentación está dañado, únicamente pue<strong>de</strong> ser substituido<br />
por un cable subministrado por S&P o por el servicio post venda.<br />
- Desenchufe el aparato cuando no lo esté utilizando o cuando quiera proce<strong>de</strong>r<br />
a su limpieza.<br />
-Mantenga el aparato fuera <strong>de</strong>l alcance <strong>de</strong> los niños o personas discapacitadas.<br />
- No <strong>de</strong>je el ventilador al lado <strong>de</strong> focos <strong>de</strong> calor o cortinas.<br />
-Nointroduzca ningún objeto através <strong>de</strong> la rejilla <strong>de</strong> protección.<br />
- No cuelgue objetos <strong>de</strong> las rejillas <strong>de</strong>l ventilador.<br />
No es recomendable que bebés o personas enfermas, estén expuestas a las<br />
corrientes <strong>de</strong> aire.<br />
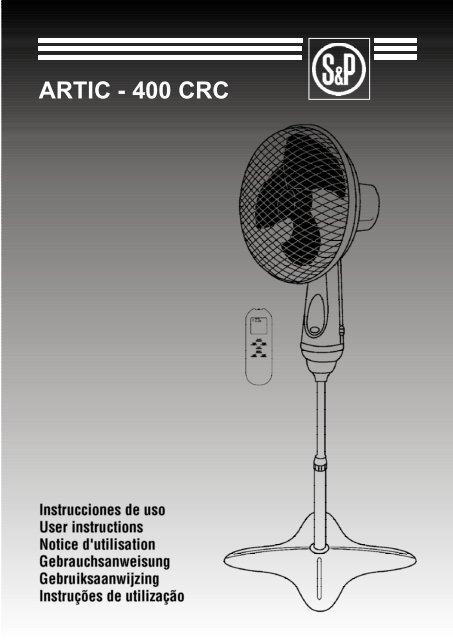
• Instrucciones <strong>de</strong> montaje (fig.1)<br />
(Fig.2)<br />
1. Rosque el extremo inferior <strong>de</strong>l tubo (15) <strong>de</strong>ntro <strong>de</strong> la base (16) en sentido<br />
horario. Afloje el anillo <strong>de</strong> sujeción (14) girándolo en sentido antihorario, tire<br />
5
6<br />
<strong>de</strong>l tubo (13) hacia arriba hastalaaltura <strong>de</strong>seada y aprieteelanillo<strong>de</strong>sujeción,<br />
girándolo en sentido horario.<br />
(Fig.3)<br />
2. Afloje el tornillo <strong>de</strong> presión (11).Introduzca el tubo(13)enelcuerpo<strong>de</strong>control<br />
(9). Apriete eltornillo <strong>de</strong> presión.<br />
(Fig.4)<br />
3. Suelte latuerca<strong>de</strong>lafijación <strong>de</strong> la rejilla trasera (4) en sentido horario y la<br />
tuerca para la fijación <strong>de</strong> la hélice en sentido antihorario <strong>de</strong>l eje <strong>de</strong>l motor.<br />
4. Monte la rejilla <strong>de</strong> protección trasera (5) sobre el cabezal <strong>de</strong>l motor, haciendo<br />
coincidir los 3 agujeros situados en la rejilla, con las tres espigas <strong>de</strong> la parte<br />
frontal <strong>de</strong>l motor (6), ysujete la rejilla a la caja <strong>de</strong>l motor con la tuerca <strong>de</strong><br />
fijación <strong>de</strong> la rejilla trasera (4).<br />
(Fig.5)<br />
5. Introduzca la hélice (3) sobre el eje <strong>de</strong>l motor, ysujétala con la tuerca <strong>de</strong><br />
fijación <strong>de</strong> la hélice (2).<br />
6. Compruebe la hélice girándola manualmente. Asegúrese <strong>de</strong> que no hay roce<br />
con la tuerca <strong>de</strong> fijación <strong>de</strong> la rejilla trasera (4). La hélice <strong>de</strong>be girar libremente,<br />
en caso contrario, repita las operaciones anteriores.<br />
7. Monte la rejilla <strong>de</strong> protección <strong>de</strong>lantera (1) introduciendo el gancho situado<br />
en la parte superior <strong>de</strong> la misma, en la rejilla trasera (5). Junte las dos rejillas<br />
y presione hasta que que<strong>de</strong>n bien unidas <strong>de</strong>ntro <strong>de</strong>l aro <strong>de</strong> plástico.<br />
(Fig.6)<br />
8. Coloque el seguro <strong>de</strong> la rejilla (18) utilizando el tornillo (19) y la contratuerca<br />
<strong>de</strong> la rejilla (17).<br />
• Mando a distancia<br />
Incorpora una pantalla LCD dón<strong>de</strong> se muestran las diferentes funciones y la<br />
temperatura ambiente aproximada.<br />
1. Siempre dirija el control remoto haciaelreceptor <strong>de</strong> señal <strong>de</strong>l ventilador cuando<br />
se esté utilizando.<br />
2. El control remoto pue<strong>de</strong> trabajar a una distancia <strong>de</strong>l receptor <strong>de</strong> hasta unos<br />
3metros, siempre que entre ellos no haya ningún obstáculo que distorsione la
señal <strong>de</strong>l emisor.<br />
3. El mando a distancia no <strong>de</strong>berá estar expuesto a golpes, humeda<strong>de</strong>s y a<br />
exposiciones prolongadas <strong>de</strong> los rayos <strong>de</strong>l sol.<br />
4. No abuse <strong>de</strong>l uso <strong>de</strong>l control remoto.<br />
Inserte las dos baterías <strong>de</strong> alimentación subministradas en el mando a distancia.<br />
No utilice baterías recargables. Cuando reemplace las baterías asegúrese <strong>de</strong><br />
que sea con dos baterías nuevas y <strong>de</strong>l mismo tipo.<br />
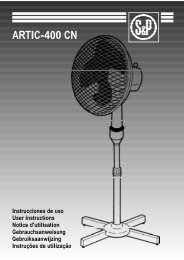
• Puesta en marcha yfunciones <strong>de</strong> control (Fig.7- Fig.8)<br />
Una vez comprobada la tensión <strong>de</strong> alimentación, conecte el aparato alared<br />
eléctrica.<br />
Para su puesta en marcha podrá actuar mediante lasteclas <strong>de</strong>l panel <strong>de</strong> control<br />
<strong>de</strong>l ventilador o con el control remoto. Previamente asegúrese <strong>de</strong> que la batería<br />
<strong>de</strong>l mando a distancia esta correctamente ubicada.<br />
Presione ON para poner en marcha el ventilador y el OFF/RESET para pararlo.<br />
Velocida<strong>de</strong>s<br />
Para seleccionar las diferentes velocida<strong>de</strong>s presione SPEED repetidamente<br />
hasta conseguir la velocidad <strong>de</strong>seada (Lenta – Media – Alta –Rítmica). La luz<br />
indicadora correspondiente se iluminará en el panel <strong>de</strong> control.<br />
Función rítmica<br />
Mediantelafunción rítmica (RHY) el ventilador alterna las velocida<strong>de</strong>s alta, media<br />
ylenta simulando una brisa natural.<br />
Función lógica<br />
Mediante lafunción lógica (FUZZY) el ventilador selecciona automáticamente la<br />
velocidad según las variaciones <strong>de</strong> temperatura ambiente comoseindicaa<br />
continuación:<br />
Temperatura Velocidad<br />
Más <strong>de</strong> 26ºC Alta<br />
Entre 24 y 26 ºC Media<br />
Entre 22 y 23 ºC Baja<br />
Menos <strong>de</strong> 22ºC Pausa<br />
7
Las funciones <strong>de</strong> oscilación y temporización únicamente pue<strong>de</strong>n ser seleccionadas<br />
con el control remoto.<br />
Temporizador<br />
El tiempo programable <strong>de</strong> funcionamiento pue<strong>de</strong> ser <strong>de</strong> 1 a 15 horas. Presione<br />
la tecla TIMER repetidamente hasta que en la pantalla aparezca el tiempo<br />
<strong>de</strong>seado.<br />
Oscilación<br />
El ventilador pue<strong>de</strong> oscilar 360º en ambos sentidos. Presione R-OSC para que<br />
gire a la <strong>de</strong>recha ó L-OSC si <strong>de</strong>sea giro a la izquierda. Para <strong>de</strong>tener la oscilación<br />
vuelva a pulsar R-OSC ó L-OSC.<br />
Para seleccionar los grados <strong>de</strong> oscilación presione OSC/SET y seguidamente<br />
R-OSC ó L-OSC. Deje que el ventilador oscile hasta los grados <strong>de</strong>seados.<br />
Presione nuevamente OSC/SET y los grados <strong>de</strong> oscilación <strong>de</strong>l ventilador quedarán<br />
programados.<br />
Cuando se <strong>de</strong>tiene el funcionamiento <strong>de</strong>l ventilador la función <strong>de</strong> oscilación<br />
programada no se guardará.<br />
• Inclinación <strong>de</strong>l cabezal<br />
El ventilador presenta un cabezal direccional. Para ello, basta con ejercer una<br />
leve presión sobre el mismo ajustándolo al ángulo <strong>de</strong>seado.<br />
• Mantenimiento<br />
Nota: Antes <strong>de</strong> proce<strong>de</strong>r con la limpieza <strong>de</strong>l aparato, asegúrese <strong>de</strong> que este<br />
esta <strong>de</strong>sconectado <strong>de</strong> la red eléctrica.<br />
Esta gama<strong>de</strong>ventiladores, no necesita <strong>de</strong>unespecialmantenimiento. Pue<strong>de</strong><br />
limpiar el exterior <strong>de</strong>l aparato con un trapo húmedo. No lo sumerja en agua. No<br />
utilice <strong>de</strong>tergentes o disolventes abrasivos para su limpieza. Antes <strong>de</strong> proce<strong>de</strong>r<br />
al montaje, asegúrese que todas las piezas están completamente secas.<br />
• Importante<br />
Le aconsejamos que no intente <strong>de</strong>smontar más que las piezas indicadas en su<br />
ensamblaje. Cualquier manipulación anularía automáticamente la garantía. Si<br />
usted <strong>de</strong>tecta cualquier anomalía, acudaalaampliaRed<strong>de</strong>ServiciosOficiales<br />
S&P.<br />
8
ENGLISH<br />
• Instructions<br />
The ARTIC fans serie is fitted with the latest technological improvements and<br />
withaniceandfunctional <strong>de</strong>sign. Those fans have been manufactured to achieve<br />
the highest quality which assures a wi<strong>de</strong>, sure and efficient service.<br />
As some of the fan’s main characteristics we can highlight the 360º fan head<br />
oscillation, the timer and the remote control.<br />
This appliance complies with electromagnetic compatibility regulations that are<br />
in force, its characteristics guaranteeing a long, safe and efficient service.<br />
After unpacking please check that all the parts supplied are in perfect condition<br />
(fig.1) and thatthe appliance works correctly, as any <strong>de</strong>fect originating from source<br />
is covered by the S&P guarantee.<br />
• Safety recommendations<br />
- Ensure that the mains alternating current coinci<strong>de</strong>s with the voltage indicated<br />
on the characteristics plate located on the back of the connecting box.<br />
-Donot use this appliance in bathrooms or showers.<br />
-Donot submerge the appliance in liquids.<br />
-Donot pull on the cable to remove the plug from the socket.<br />
-Donot use the appliance if the cable or plug are damaged.<br />
-Donottouch the plug with wet hands.<br />
-Before plugging or unplugging the appliance, ensure that the switch is in the 0<br />
position.<br />
- If the mains cable flex is damaged, it can only be replaced with a cable supplied<br />
by S&P or by their after sales service.<br />
- Unplug the appliance when not in use or when cleaning it.<br />
-Keepthe appliance out of the reach of children or people with disabilities.<br />
-Donot place the fan near sources of heat or curtains.<br />
-Donot put objects through the protective grill.<br />
-Donot hang objects from the protective grill of the fan.<br />
Exposing babies or sick people to the air currentfrom the fan is not recommen<strong>de</strong>d..<br />
• Instructions for assembly (fig.1)<br />
(Fig. 2)<br />
1. Screw the lower end of the tube (15) into the base (16) clockwise. Turn the<br />
9
10<br />
tightening ring (14) anticlockwise to loosen it, pull the tube (13) upward to the<br />
<strong>de</strong>sired height and turn the tightening ring clockwise to tighten it.<br />
(Fig. 3)<br />
2. Loosen the locking screw (11). Insert the tube (13) in the control body (9).<br />
Tighten the locking screw.<br />
(Fig. 4)<br />
3. Loosen the nut holding the rear safety guard (4) by turning it clockwise and<br />
turn the nut holding the fan bla<strong>de</strong>s to the motor shaft anticlockwise.<br />
4. Assemble the rear safety guard (5) onto the motor head, making sure the<br />
three holes on the guard coinci<strong>de</strong> with the three pins on the front ofthe motor<br />
(6), and fix the guard to the motor casing with the rear safety guard fixing nut<br />
(4).<br />
(Fig. 5)<br />
5. Place the fan bla<strong>de</strong>s (3) onto the motor, and fix with the bla<strong>de</strong> fixing nut (2).<br />
6. Check the bla<strong>de</strong>s by turning them manually. Make sure thatthere is no contact<br />
with the rear guard fixing nut (4). The bla<strong>de</strong>s should turn freely, if this is not<br />
the case, repeat the process.<br />
7. Assemble the front safety guard (1) by inserting the hook on the top into the<br />
rear safety guard (5). Bring the two guards together and press them until they<br />
are firmly joined insi<strong>de</strong> the plastic ring.<br />
(Fig. 6)<br />
8. Place the safety latch on the guard (18) using the screw (19) and the guard<br />
lock nut (17).<br />
• Remote Control<br />
It has a LCD screen which shows the different functions and the approximate<br />
room temperature.<br />
1. Always point the remote control towards the fan’s signal receiver when it is in<br />
use.<br />
2. The remote control can work at adistance of up to 3metres from the receiver,<br />
as long as there are no obstacles between them that could interfere with the<br />
signal.
3. The remote control should not be subjected to knocks, humidity or prolonged<br />
exposure to sunlight.<br />
4. Do not overuse the remote control unnecessarily.<br />
5.Insertthe two batteries supplied in the remotecontrol. Do not use rechargeable<br />
batteries. When the batteries are replaced make sure that two new batteries of<br />
the same type are used.<br />
• Start and Control Functions (Fig.7 –Fig.8)<br />
Once you have checked the power supply, connect the fan to the mains.<br />
To start the fan you can use the keys on the fan’s control panel or the remote<br />
control. First make sure that the batteries are correctly inserted in the remote<br />
control.<br />
Press ON to start the fan and OFF/RESET to stop it.<br />
Speeds<br />
To selectthe different speeds press SPEED repeatedly until the <strong>de</strong>sired speed<br />
is reached (Slow – Medium – High – Rhythmic). The corresponding pilot lamp<br />
will light up on the control panel.<br />
Rhythmic Function<br />
With the rhythmic function (RHY) the fan alternates through high, medium and<br />
slow speeds to simulate anatural breeze.<br />
Logical Function<br />
With the logical function (FUZZY) the fan automatically selects the speed <strong>de</strong>pending<br />
on room temperature variations as indicated below:<br />
Temperature Speed<br />
Higher than 26ºC High<br />
Between 24 and 26 ºC Medium<br />
Between 22 and 23 ºC Low<br />
Less than 22ºC Pause<br />
11
The oscillation and timer functions can only be selected from the remote control.<br />
Timer<br />
The programmable operation time can be from 1 to 15 hours. Press the TIMER<br />
key repeatedly until the <strong>de</strong>sired time appears on the screen.<br />
Oscillation<br />
The fan can oscillate 360º in both directions. Press R-OSC for it torotate to the<br />
right or L-OSC if you want it torotate to the left. To stop the oscillation press R-<br />
OSC or L-OSC again.<br />
To select the oscillation <strong>de</strong>grees press OSC/SET followed by R-OSC or L-OSC.<br />
Letthe fan oscillate to the <strong>de</strong>sired number of <strong>de</strong>grees,then press OSC/SET again<br />
and the fan’s oscillation <strong>de</strong>grees will be set.<br />
When the fan operation is stopped the oscillation function set will not be saved.<br />
• Tilting the fanhead<br />
The ARTIC range of fans have a directional fan head. To tilt the fan head, apply<br />
aslight pressure on the fan head, so as to adjust the angle to obtain the <strong>de</strong>sired<br />
air current direction.<br />
• Maintenance<br />
Warning: Before cleaning the appliance, ensure that is not connected to<br />
the mains.<br />
This range of fans, do not require any special maintenance. You can clean the<br />
exterior of the fan with a damp cloth. Do notsubmerge the appliance in water.<br />
Do not use <strong>de</strong>tergents or abrasive cleaners to clean the appliance. Before mounting<br />
ensure that all the parts arecompletely dry.<br />
• Important<br />
We advise you not to try and disassemble any of the parts, other than those<br />
indicated on the packaging. Any manipulation of parts other than those specified<br />
will automatically annul the guarantee. if you <strong>de</strong>tect any fault, please contact any<br />
of the wi<strong>de</strong> range of Official S&P Service Centres.<br />
12
FRANÇAIS<br />
• Instructions<br />
Les ventilateurs ARTIC ont été conçus et fabriqués dans l'objectif <strong>de</strong> fournir un<br />
appareil <strong>de</strong> qualité au <strong>de</strong>sign agréable etfonctionnel.Il vous apporteraunservice<br />
sûr et efficace.<br />
Parmi ses caractéristiques principales à noter la fonction oscillation sur 360º, la<br />
minuterie et la comman<strong>de</strong> à distance.<br />
Les performances <strong>de</strong> cet appareil, conforme aux directives <strong>de</strong> compatibilité<br />
électromagnétique en vigueur, vous garantissent un fonctionnement durable, sûr<br />
et efficace.<br />
Vérifier au moment du désemballage que toutes les pièces fournies (fig 1) sont<br />
en parfait état et que l’appareil fonctionne bien, car tout défaut d’origine est<br />
couvert par la garantie <strong>de</strong> S&P.<br />
• Consignes <strong>de</strong> sécurité<br />
- S’assurer que la tension électrique d’alimentation est bien celle indiquée sur<br />
la plaque caractéristiques en bas <strong>de</strong> la boîte <strong>de</strong> raccor<strong>de</strong>ments.<br />
-Nepasutiliser cet appareil dans <strong>de</strong>s salles <strong>de</strong> bain ou douches.<br />
- Ne pas immerger l’appareil ni le placer sous l’eau.<br />
-Nepastirer sur le câble pour extraire la fiche <strong>de</strong> la prise électrique.<br />
-Nepasutiliser l’appareil si le câble ou la fiche est endommagé.<br />
-Nepastoucher la fiche si vous avez les mains mouillées.<br />
- Si le câble flexible d’alimentation est endommagé, il ne peut être remplacé que<br />
par un câble fourni par S&P ou son service après-vente.<br />
- Débrancher l’appareil lorsqu’il n’est pas utilisé ou lorsque vous souhaitez le<br />
nettoyer.<br />
-Maintenir l’appareil hors <strong>de</strong> portée <strong>de</strong>s enfants ou <strong>de</strong> personnes invali<strong>de</strong>s.<br />
-Nepaslaisserleventilateur auprès <strong>de</strong> foyer <strong>de</strong> chaleur ou <strong>de</strong> ri<strong>de</strong>aux.<br />
- Ne passer aucun objet au travers <strong>de</strong> la grille <strong>de</strong> protection.<br />
- N’accrocher aucun objet aux grilles du ventilateur.<br />
- L’exposition aux courants d’airn’est pas recommandée pour les bébés et<br />
personnes mala<strong>de</strong>s.<br />
• Instructions <strong>de</strong> montage (Fig.1)<br />
(Fig.2)<br />
1. Visser l’extrémitéinférieure du tube (15) sur la base (16). Dévisser légèrement<br />
13
14<br />
l’anneau <strong>de</strong> fixation (14), tirer vers le haut le tube (13) jusqu’à la hauteur<br />
désirée et revisser l’anneau pour bloquer la position.<br />
(Fig.3)<br />
2. Dévisser la vis <strong>de</strong> pression (11).Introduire le tube (13) dans le bloc comman<strong>de</strong>s<br />
(9). Resserrer la vis <strong>de</strong> pression (11).<br />
(Fig.4)<br />
3. Retirer, en le dévissant dans le sens inverse <strong>de</strong>s aiguilles d’une montre,<br />
l’écrou <strong>de</strong> fixation <strong>de</strong> l’hélice (2) ainsi que celui <strong>de</strong> la grille arrière (4) en le<br />
dévissant dans le sens <strong>de</strong>s aiguilles d’une montre.<br />
4. Monter la grille <strong>de</strong> protection arrière (5) sur le bloc moteur, en faisant coïnci<strong>de</strong>r<br />
les 3 trous situés sur la grille avec les 3 tenons <strong>de</strong> la partie frontale du moteur<br />
(6), et fixer la grille au moteur avec l’écrou d’assemblage <strong>de</strong> la grille arrière<br />
(4).<br />
(Fig.5)<br />
5. Introduire l’hélice (3) sur l’arbre moteur, et la fixer avec l’écrou <strong>de</strong> fixation<br />
d’hélice (2).<br />
6. Vérifier, en la faisant tourner manuellement, que l’hélice ne frotte pas avec<br />
l’écrou <strong>de</strong> fixation<strong>de</strong>lagrillearrière(4). L’hélice doit tourner librement, dans<br />
le cas contraire, recommencer les opérations précé<strong>de</strong>ntes.<br />
7. Monter la grille <strong>de</strong> protection avant (1) en introduisant le crochet situé en<br />
partie supérieure dans la grille arrière (5). Unir les <strong>de</strong>ux grilles et presser pour<br />
qu’elles coïnci<strong>de</strong>nt dans l’anneau <strong>de</strong> plastique sur toute la périphérie.<br />
(Fig.6)<br />
8. Placer la sécurité <strong>de</strong>grille(18)enutilisant la vis (19) et la vis (17).<br />
• Comman<strong>de</strong> àdistance<br />
Elle est munie d’un écran LCD où s’affiche les différentes fonctions ainsi que la<br />
température ambiante approximative.<br />
1. Diriger la comman<strong>de</strong> à distance vers le ventilateur pour piloter les différentes<br />
fonctions.<br />
2. La comman<strong>de</strong> à distance est efficace jusqu’à environ 3 mètres et il ne doit pas<br />
y avoir d’obstacle entre la télécomman<strong>de</strong> et le ventilateur
3. La comman<strong>de</strong> à distance doit être protégée <strong>de</strong>s chocs, <strong>de</strong> l’humidité et <strong>de</strong><br />
toute exposition prolongée aux rayons du soleil.<br />
4. Ne pas abuser <strong>de</strong> l’utilisation <strong>de</strong> la télécomman<strong>de</strong>.<br />
5.Insérer les <strong>de</strong>ux piles fournies avec la comman<strong>de</strong>. Ne pas utiliser d’accumulateur<br />
rechargeable. Quand les piles sont usager, les remplacer par <strong>de</strong>s piles neuves<br />
du même type.<br />
• Mise en marche et fonctions <strong>de</strong> contrôle (Fig.7 –Fig.8)<br />
Après avoir vérifié la tension électrique, brancher l’appareil sur le secteur.<br />
Pour mettre en marche le ventilateur, vous pourrez le faire manuellement sur le<br />
bloc comman<strong>de</strong> du ventilateur ou à l’ai<strong>de</strong> <strong>de</strong> la télécomman<strong>de</strong>. Vérifier auparavant,<br />
que la pile <strong>de</strong> la télécomman<strong>de</strong> est bien positionnée<br />
Appuyer sur ON pour mettre en marche le ventilateur et sur OFF/RESET pour<br />
l’arrêter.<br />
Vitesses<br />
Pour sélectionner les différentes vitesses appuyer plusieurs fois sur SPEED<br />
jusqu’à obtenir la vitesse désirée (Lente – Moyenne – Rapi<strong>de</strong> – Rythmique). Le<br />
témoin lumineux correspondant àlavitesse s’allume sur le bloc comman<strong>de</strong> du<br />
ventilateur.<br />
Fonction rythmique<br />
En fonction rythmique (RHY) le ventilateur alterne les vitesses en simulant une<br />
brise naturelle.<br />
Fonction logique<br />
En fonction logique (FUZZY) le ventilateur sélectionne automatiquement la vitesse<br />
en fonction<strong>de</strong>latempérature ambiante comme indiqué dans le tableau suivant:<br />
Température Vitesse<br />
Plus <strong>de</strong> 26ºC Rapi<strong>de</strong><br />
Entre 24 et 26 ºC Moyenne<br />
Entre 22 et 23 ºC Lente<br />
Moins <strong>de</strong> 22ºC Pause<br />
15
Les fonctions d’oscillation et <strong>de</strong> minuterie sont accessibles seulement avec la<br />
télécomman<strong>de</strong>.<br />
Minuterie<br />
La minuterie est programmable entre 1 et 15 heures. Appuyer plusieurs fois sur<br />
la touche TIMER jusqu’à ce que sur l’écran apparaisse le temps désiré.<br />
Oscillation<br />
Le ventilateur peut osciller sur 360º dans un sens ou dans l’autre. Appuyer sur<br />
R-OSC pour qu’il tourne vers la droite ou sur L-OSC pour qu’il tourne vers la<br />
gauche. Pour arrêter l’oscillation appuyer <strong>de</strong> nouveau sur R-OSC ou L-OSC.<br />
Pour sélectionner un angle précis d’oscillation appuyer sur OSC/SET puis sur R-<br />
OSC ou L-OSC. Laisser le ventilateur osciller jusqu’à l’angle désiré puis appuyer<br />
<strong>de</strong> nouveau sur OSC/SET pour gar<strong>de</strong>r en mémoire l’angle d’oscillation.<br />
Quand on arrête leventilateur, la programmation <strong>de</strong> l’angle d’oscillation n’est pas<br />
gardée en mémoire.<br />
• Inclinaison <strong>de</strong> la têtedu ventilateur<br />
La gamme <strong>de</strong>s ventilateurs ARTIC dispose d’une tête orientable <strong>de</strong> bas en haut.<br />
Pour changer l’orientation, il suffit d’exercer une légère pression sur la tête pour<br />
ajuster l’angle <strong>de</strong> diffusion <strong>de</strong> l’air.<br />
• Entretien<br />
Remarque : avant <strong>de</strong> procé<strong>de</strong>r au nettoyage du ventilateur, assurez-vous<br />
qu’il n’est pas branché sur le secteur.<br />
Cette gamme <strong>de</strong> ventilateurs ne requiert pas d’entretien spécifique. Vous pouvez<br />
nettoyer l’extérieur <strong>de</strong> l’appareil avec un chiffon humi<strong>de</strong>. Ne pas l’immerger ni<br />
le placer sous l’eau. Ne pas utiliser <strong>de</strong> détergents ou<strong>de</strong>dissolvants abrasifs.<br />
Avant <strong>de</strong> procé<strong>de</strong>r à l’assemblage, veiller à ce que toutes les pièces soient bien<br />
complètement sèches.<br />
• Important<br />
Il est recommandé <strong>de</strong> ne pas essayer <strong>de</strong> démonter d’autres pièces que celles<br />
indiquées dans les instructions d’assemblage. Toute manipulation annulerait<br />
automatiquement la garantie. Si vous remarquez une anomalie quelconque,<br />
veuillez contacter votre distributeur S&P.<br />
16
Fig. 2<br />
Fig. 4<br />
Fig. 3<br />
Fig. 5<br />
Fig. 6<br />
Fig. 1<br />
17
18<br />
Anzeigelicht zur Logikfunktion<br />
Indicatorlampje van <strong>de</strong> functie automatisch<br />
Luz indicadora <strong>de</strong>função lógica<br />
Anzeigelicht für Geschwindigkeiten<br />
Indicatorlampje van <strong>de</strong> snelheid<br />
Luz indicadora <strong>de</strong>velocida<strong>de</strong>s<br />
Anzeigelicht <strong>de</strong>r Zeitsteuerung<br />
Indicatorlampje van <strong>de</strong> timer<br />
Luz indicadora <strong>de</strong>temporizador<br />
Empfänger<br />
Signaalontvanger<br />
Receptor <strong>de</strong> sinal<br />
Zeitsteuerung<br />
Timer<br />
Temporizador<br />
FUZZY-funktion<br />
Functie automatisch<br />
Função lógica<br />
Linksschwenkung<br />
Oscillatie naar links<br />
Oscilação esquerda<br />
Logikfunktion<br />
Functie automatisch<br />
Função lógica<br />
Inbetriebsetzung und<br />
Geschwindigkeitsanwahl<br />
Het inschakelen en <strong>de</strong><br />
selectie van <strong>de</strong> snelheid<br />
Por em funcionamento e<br />
selecção <strong>de</strong> velocida<strong>de</strong>s<br />
Ausschalten <strong>de</strong>s Apparates.<br />
Stopknop<br />
Paragem do funcionamento<br />
do aparelho<br />
Geschwindigkeiten<br />
Snelhe<strong>de</strong>n<br />
Velocida<strong>de</strong>s<br />
Schwenksteuerung<br />
Instelling Oscillatie<br />
Controlo oscilação<br />
Rechtsschwenkung<br />
Oscillatie naarrechts<br />
Oscilação direita<br />
Fig. 7<br />
Fig. 8
DEUTSCH<br />
• Gebrauchsanweisung<br />
Die mit <strong>de</strong>n mo<strong>de</strong>rnsten Produktionstechniken hergestellteARTIC. Serie verbin<strong>de</strong>t<br />
formschönes und funktionelles Design sowie hervorragen<strong>de</strong> Qualität mit<br />
Leistungsstärke, Betriebssicherheit und einer breiten Palette von<br />
Einsatzmöglichkeiten. Unter <strong>de</strong>n Hauptmerkmalen ist insbeson<strong>de</strong>re auf die 360º<br />
Schwenkfunktion, die Zeitsteuerung und die Fernbedienung hinzuweisen.<br />
Der Apparat hält die gültigen Richtlinien zur elektromagnetischen Kompatibilität<br />
ein und seine Leistungen garantieren eine sichere, effiziente und weitgefächerte<br />
Funktionsweise.<br />
Wir bitten Sie, <strong>de</strong>n unversehrten Zustand aller gelieferten Teile (Abb. 1), sowie<br />
das korrekte Funktionieren <strong>de</strong>s Gerätes sofort nach <strong>de</strong>m Auspacken nachzuprüfen,<br />
da je<strong>de</strong> Fehlfunktion bei Lieferung von <strong>de</strong>r S&P-Garantie abge<strong>de</strong>ckt ist.<br />
• Sicherheitshinweise<br />
-Stellen Sie sicher, dass die Netzspannung mit <strong>de</strong>r <strong>de</strong>s Gerätes übereinstimmt.<br />
Die technischen Daten fin<strong>de</strong>n Sie auf <strong>de</strong>r Unterseite <strong>de</strong>s Anschlusskastens.<br />
-Benutzen Sie das Gerät nicht in Ba<strong>de</strong>zimmern.<br />
-Halten Sie das Gerät niemals unter Wasser.<br />
- Ziehen Sie nicht am Kabel, um <strong>de</strong>n Stecker aus <strong>de</strong>r Steckdose zu ziehen.<br />
-Benutzen Sie das Gerät nicht, wenn Kabel o<strong>de</strong>r Stecker beschädigt sind.<br />
- Berühren Sie <strong>de</strong>n Stecker niemals mit nassen Hän<strong>de</strong>n.<br />
- Vor Anschließen <strong>de</strong>s Geräts o<strong>de</strong>r Ziehen <strong>de</strong>s Netzsteckers muss <strong>de</strong>r Netzschalter<br />
auf Position 0 stehen.<br />
-SolltedasNetzkabel beschädigt sein, so darf es nur durch ein S&P-Originalkabel<br />
o<strong>de</strong>r von unseren Kun<strong>de</strong>ndienst ersetzt wer<strong>de</strong>n.<br />
- Ziehen Sie <strong>de</strong>n Netzstecker, wenn Sie das Gerät nicht benutzen o<strong>de</strong>r wenn<br />
Sie es reinigen wollen.<br />
-Stellen Sie das Gerät außerhalb <strong>de</strong>r Reichweite von Kin<strong>de</strong>rn o<strong>de</strong>r Personen<br />
mit Behin<strong>de</strong>rung auf.<br />
-Stellen Sie <strong>de</strong>n Ventilator nicht in die Nähe von Wärmequellen und Gardinen<br />
o<strong>de</strong>r Vorhängen.<br />
-Stecken Sie keine Gegenstän<strong>de</strong> durch das Schutzgitter.<br />
- Hängen Sie keine Gegenstän<strong>de</strong> an das Schutzgitter <strong>de</strong>s Ventilators.<br />
- Wir raten davon ab, kranke Personen o<strong>de</strong>r Säuglinge <strong>de</strong>m Luftstrom <strong>de</strong>s<br />
Ventilators auszusetzen.<br />
• Montageanleitung (Fig. 1)<br />
(Fig.2)<br />
1. Schrauben Sie im Uhrzeigersinn das untere Rohren<strong>de</strong> (15) in <strong>de</strong>n Fuß (16).<br />
19
20<br />
Lockern Sie <strong>de</strong>n oberen Klemmring (14). Drehen Sie hierbei im<br />
entgegengesetzten Uhrzeigersinn. Ziehen Sie das Rohr (13) nach oben, bis<br />
die gewünschte Höhe erreicht wird und ziehen Sie <strong>de</strong>n Klemmring im<br />
Uhrzeigersinn an.<br />
(Fig.3)<br />
2. Lockern Sie die Andrückschraube (11). Führen Sie das Rohr (13) in <strong>de</strong>n<br />
Ventilatorkörper (9) ein. Ziehen Sie die Andrückschraube wie<strong>de</strong>r an.<br />
(Fig.4)<br />
3. Lösen Sie im Uhrzeigersinn die Fixiermutter (4) <strong>de</strong>r rückseitigen Gitterhaube<br />
und die Mutter zur Befestigung <strong>de</strong>r Flügel im entgegengesetzten Uhrzeigersinn<br />
<strong>de</strong>r Motorachse.<br />
4. Bringen Sie die rückseitige Schutzhaube (5) auf <strong>de</strong>n Motorkopf. Hierbei<br />
müssen die 3 Löcher <strong>de</strong>r Haube mit <strong>de</strong>n drei auf <strong>de</strong>r Frontseite <strong>de</strong>s Motors<br />
(6) vorhan<strong>de</strong>nen Stifte übereinstimmen. Befestigen Sie die Haube an <strong>de</strong>n<br />
Motor mit <strong>de</strong>r Fixiermutter (4) <strong>de</strong>r rückseitigen Gitterhaube.<br />
(Fig.5)<br />
5. Stecken Sie die Flügel (3) durch die Motorachse und befestigen Sie sie mit<br />
<strong>de</strong>r Mutter (2).<br />
6. Überprüfen Sie die Flügel, in<strong>de</strong>m Sie diese mit <strong>de</strong>r Hand drehen. Überzeugen<br />
Sie sich, daß keine Reibung mit <strong>de</strong>r Fixiermutter (4) <strong>de</strong>r rückseitigen Gitterhaube<br />
vorliegt. Die Flügel müssen sich frei drehen, ansonsten wie<strong>de</strong>rholen Sie die<br />
oben beschriebenen Schritte.<br />
7. Setzen Sie die vor<strong>de</strong>re Schutzhaube (1) auf. Hierzu ist <strong>de</strong>r oben vorhan<strong>de</strong>ne<br />
Haken in die rückseitige Gitterhaube (5) einzustecken. Pressen Sie bei<strong>de</strong><br />
Hauben zusammen und drücken Sie, bis sie innerhalb <strong>de</strong>s Kunststoffrings<br />
richtig aneinan<strong>de</strong>rliegen.<br />
(Fig.6)<br />
8. Befestigen Sie die Haubenabsicherung (18) mit <strong>de</strong>r Schraube (19) und <strong>de</strong>r<br />
Haubengegenmutter (17).<br />
• Fernbedienung<br />
Mit eingebautem LCD-Display, auf welchem verschie<strong>de</strong>ne Funktionen und die<br />
Umgebungstemperatur erblickt wer<strong>de</strong>n kann.<br />
1. Richten Sie während <strong>de</strong>s Betriebs die Fernsteuerung hin zum Signalempfänger<br />
<strong>de</strong>s Ventilators.<br />
2. Die Fernsteuerung kann bis 3 Meter vom Ventilator entfernt benutzt wer<strong>de</strong>n,
soweit dazwischen keine das Sen<strong>de</strong>rsignal verzerren<strong>de</strong> Hin<strong>de</strong>rnisse stehen.<br />
3. Die Fernbedienung darf keinen Schlägen, Feuchtigkeit o<strong>de</strong>r längere Zeit <strong>de</strong>n<br />
Sonnenstrahlen ausgesetzt sein.<br />
4. Mißbrauchen Sie nicht die Fernbedienung.<br />
5. Legen Sie bei<strong>de</strong> mitgelieferten VersorgungsbatterienindieFernbedienung.<br />
Verwen<strong>de</strong>n Sie nicht aufladbare Batterien. Wenn Sie die Batterien austauschen,<br />
überzeugen Sie sich, daß es sich um neue Batterien vom gleichen Typ han<strong>de</strong>lt.<br />
• Inbetriebsetzung und Steuerfunktionen (Fig.7 –Fig.8)<br />
Nach Überprüfung <strong>de</strong>r Versorgungsspannung, schalten Sie das Gerät an das<br />
Stromnetz.<br />
Zur Inbetriebsetzung können Sie die Tasten <strong>de</strong>s Bedienfelds am Ventilator o<strong>de</strong>r<br />
an <strong>de</strong>r Fernbedienung betätigen. Überzeugen Sie sich, daß die Batterie <strong>de</strong>r<br />
Fernbedienung richtig positioniert ist.<br />
Drücken Sie auf ON, um <strong>de</strong>n Ventilator zu starten und auf OFF/RESET um ihn<br />
zu stoppen.<br />
Geschwindigkeiten<br />
Um die verschie<strong>de</strong>nen Geschwindigkeiten anzuwählen, drücken Sie mehrmals<br />
auf SPEED, bis Sie die gewünschte Geschwindigkeit erreicht haben. (langsam–<br />
mittelmäßig – hohe – rhythmisch). Das entsprechen<strong>de</strong> Anzeigelicht erleuchtet<br />
auf <strong>de</strong>m Bedienfeld.<br />
Rhythmische Funktion<br />
Anhand <strong>de</strong>r rhythmischen Funktion (RHY) läuft <strong>de</strong>r Ventilator abwechselnd mit<br />
hoher, mittlerer und niedriger Geschwindigkeit und simuliert somit eine natürliche<br />
Windbrise.<br />
Logikfunktion<br />
Über die Logikfunktion stellt <strong>de</strong>r Ventilator automatisch die Geschwindigkeit ein,<br />
abhängig von <strong>de</strong>n in <strong>de</strong>r Umgebung herrschen<strong>de</strong>n Temperaturschwankungen,<br />
sowie unten beschrieben wird:<br />
Temperatur Geschwindigkeit<br />
Über 26ºC Hohe<br />
Zwischen 24 und 26 ºC Mittlere<br />
Zwischen 22 und 23 ºC Niedrige<br />
Unter 22ºC Pause<br />
21
Die Schwenkfunktionen und Zeitsteuerung können nur mit <strong>de</strong>r Fernbedienung<br />
angesteuert wer<strong>de</strong>n.<br />
Zeitsteuerung<br />
Die einprogrammierbar Betriebszeit kann1bis15Stun<strong>de</strong>n betragen. Drücken<br />
Sie mehrmals auf die Taste TIMER, bis auf <strong>de</strong>m Display <strong>de</strong>r gewünschte Zeitwert<br />
ausgegeben wird.<br />
Schwenkung<br />
Der Ventilator kann sich in bei<strong>de</strong> Richtungen 360º drehen. Drücken Sie auf R-<br />
OSC damit er sich nach rechtsdreht o<strong>de</strong>r auf L-OSC um nach links zu schwenken.<br />
Um die Schwenkbewegung zu stoppen, drücken Sie wie<strong>de</strong>r R-OSC bzw. L-OSC.<br />
Zur Anwahl <strong>de</strong>r Schwenkweite drückenSieauf OSC/SET und anschließend auf<br />
R-OSC bzw. L-OSC. Lassen Sie <strong>de</strong>n Ventilator die gewünschten Gra<strong>de</strong> schwenken.<br />
Drücken Sie nochmals auf OSC/SET, um die Schwenkgra<strong>de</strong> einzuprogrammieren.<br />
Beim Anhalten <strong>de</strong>s Ventilatorbetriebs, wird die einprogrammierteSchwenkfunktion<br />
nicht abgespeichert.<br />
• Neigung <strong>de</strong>s Kopfes<br />
Die Serie <strong>de</strong>r Ventilatoren ARTIC besitzen einen schwenkbaren Kopf. Zur<br />
Einstellung <strong>de</strong>r gewünschten Richtung <strong>de</strong>s Luftstroms brauchen Sie <strong>de</strong>n Kopf<br />
nur entsprechend zu schwenken.<br />
• Pflege<br />
Achtung: Bevor Sie das Gerät reinigen, müssen Sie unbedingt <strong>de</strong>n<br />
Netzstecker ziehen.<br />
Diese Ventilatorenserie benötigt keine beson<strong>de</strong>ren Wartungsprozesse. Sie können<br />
die äußeren Teile Ihres Geräts einfach mit einem feuchten Tuch abwischen.<br />
Halten Sie das Gerät niemals unter Wasser. Benutzen Sie keine Lösungsmittel<br />
o<strong>de</strong>r Scheuermittel für die Reinigung. Vor <strong>de</strong>r Montage muss sichergestellt wer<strong>de</strong>n,<br />
dass alle Teile vollkommen trocken sind.<br />
• Wichtiger Hinweis<br />
Bitte versuchen Sie nur die Teile auseinan<strong>de</strong>rzubauen, die in <strong>de</strong>r Montageanleitung<br />
angegeben sind. Jedwe<strong>de</strong> an<strong>de</strong>re Manipulation <strong>de</strong>s Apparats führt automatisch<br />
zum Verlust <strong>de</strong>s Garantieanspruchs. Falls Sie ein fehlerhaftes Funktionieren <strong>de</strong>s<br />
Apparates feststellen sollten, setzen Sie sich bitte sofort mit unserem offiziellen<br />
S&P-Servicenetz in Verbindung.<br />
22
NEDERLANDS<br />
• Instructies<br />
De ARTIC serietafelventilatoren heeft een funktioneel <strong>de</strong>sign en is eenvoudig<br />
in gebruik.<br />
Als belangrijkste kenmerken vermel<strong>de</strong>n we hier <strong>de</strong> oscillatiefunctie over 360º,<br />
<strong>de</strong> timer en <strong>de</strong> afstandsbediening.<br />
Dit apparaat voldoet aan <strong>de</strong> huidige richtlijnen van electromagnetische comptabiliteit,<br />
<strong>de</strong> kwaliteit garan<strong>de</strong>erd een lange, veilige en doeltreffen<strong>de</strong> levensduur.<br />
Uwordt verzocht <strong>de</strong> kwaliteit van <strong>de</strong> meegelever<strong>de</strong> on<strong>de</strong>r<strong>de</strong>len en het goed<br />
functioneren van het apparaat te testen voordat uhet in gebruikneemt, meld<br />
onrechtmatighe<strong>de</strong>n direct aan uw leverancier, elke onvolkomenheid in <strong>de</strong> levering<br />
valt on<strong>de</strong>r <strong>de</strong> fabriekgarantie van S&P. Reparatie door onbevoedge instanties<br />
tij<strong>de</strong>ns <strong>de</strong> garantieperio<strong>de</strong> doen <strong>de</strong> garantie vervallen.<br />
• Veiligheidsvoorschriften<br />
- Verzekert Uzichervan, dat <strong>de</strong> netspanning overeenkomt met <strong>de</strong> aanwijzingen<br />
vermeldophet plaatje aan <strong>de</strong> on<strong>de</strong>rkant van <strong>de</strong> ventilator.<br />
-Niet geschikt voor badkamers of douches.<br />
-Dompelhet apparaat niet in water on<strong>de</strong>r.<br />
- Trek niet aan het snoer om <strong>de</strong> stekker uit het stopcontact te halen.<br />
- Gebruikt Uhet apparaat niet als het snoer of <strong>de</strong> stekker beschadigd zijn.<br />
- Raakt U<strong>de</strong>stekker niet met natte han<strong>de</strong>n aan.<br />
- Voordat U<strong>de</strong>stekker in het stopcontact doet of eruit haalt verzekert Uzichvan<br />
het feit dat <strong>de</strong> schakelaar op het apparaat op stand 0 staat.<br />
-Alshetflexibele voedingssnoer is beschadigd dan dient dit alleen vervangen<br />
wor<strong>de</strong>n door een goedgekeurd snoer.<br />
- Trek <strong>de</strong> stekker uit het stopcontact, als U het apparaat niet gebruikt of als U<br />
het wilt schoonmaken.<br />
- Houdt Uhet apparaat buiten het bereik van kin<strong>de</strong>ren.<br />
-Plaats <strong>de</strong>ventilator niet in <strong>de</strong> nabijheid van warmtebronnen of gordijnen.<br />
- Druk geen objecten door het beschermingsrooster.<br />
- Hang geen objecten aan <strong>de</strong> roosters van <strong>de</strong> ventilator.<br />
• Instructies voor het monteren (fig. 1)<br />
(Fig.2)<br />
1. Schroef <strong>de</strong> on<strong>de</strong>rzij<strong>de</strong> van <strong>de</strong> buis (15) in wijzerszin in <strong>de</strong> basis (16). Maak<br />
23
24<br />
<strong>de</strong> bevestigingsring (14) los door <strong>de</strong>ze te verdraaien in tegenwijzerszin, breng<br />
<strong>de</strong> bovenste buis (13) naar boven tot <strong>de</strong> gewenste hoogte en maak <strong>de</strong><br />
bevestigingsring vast door <strong>de</strong>ze aan te draaien in wijzerszin.<br />
(Fig.3)<br />
2. Maak <strong>de</strong> spanschroef (11) los. Steek <strong>de</strong> buis (13) in het controlelichaam (9).<br />
Draai <strong>de</strong> spanschroef aan.<br />
(Fig.4)<br />
3. Draai <strong>de</strong> bevestigingsmoer van <strong>de</strong> achterste rooster (4) los in wijzerszin.<br />
Draai vervolgens <strong>de</strong> bevestigingsmoer van <strong>de</strong> ventilatorschroef in<br />
tegenwijzerszin van <strong>de</strong> motoras.<br />
4. Bevestig <strong>de</strong> achterste beschermingsrooster(5)op<strong>de</strong>kopvan<strong>de</strong>motor,<br />
zodanig dat <strong>de</strong> 3 openingen in <strong>de</strong> rooster overeenkomen met <strong>de</strong> drie pennen<br />
aan <strong>de</strong> voorzij<strong>de</strong> van <strong>de</strong> motor (6). Bevestig <strong>de</strong> rooster op <strong>de</strong> motorkast met<br />
<strong>de</strong> bevestigingsmoer van <strong>de</strong> achterste rooster (4).<br />
(Fig.5)<br />
5. Plaats<strong>de</strong>ventilatorschroef (3)over<strong>de</strong>motoras, en draai <strong>de</strong> bevestigingsmoer<br />
van<strong>de</strong>ventilator (2) schroef vast.<br />
6. Controleer <strong>de</strong> ventilatorschroef door <strong>de</strong>ze met <strong>de</strong> hand te laten draaien. Ga<br />
na of <strong>de</strong>ze sleept over <strong>de</strong> bevestigingsmoer van <strong>de</strong> achterste rooster (4). De<br />
ventilatorschroef moet vrij draaien.Indien dit niet het geval is moet u<strong>de</strong>vorige<br />
stappen herhalen.<br />
7. Haak <strong>de</strong> voorste beschermingsrooster (1) met <strong>de</strong> haak bovenaan in <strong>de</strong><br />
achtersterooster (5). Druk <strong>de</strong> twee roosters samen totdat ze in elkaar klikken<br />
samen met plastic ring.<br />
(Fig.6)<br />
8. Bevestig <strong>de</strong> zekering van <strong>de</strong> rooster (18) met <strong>de</strong> bout (19) en <strong>de</strong> borgmoer<br />
van<strong>de</strong>rooster (17).<br />
• Afstandsbediening<br />
Deze bevat een LCD-scherm die <strong>de</strong> verschillen<strong>de</strong> functies en <strong>de</strong> bena<strong>de</strong>r<strong>de</strong><br />
omgevingstemperatuur laten zien.<br />
1. Houd <strong>de</strong> afstandbediening tij<strong>de</strong>ns het gebruik altijdin<strong>de</strong>richting van <strong>de</strong><br />
signaalontvanger van <strong>de</strong> ventilator.<br />
2. De afstandsbediening is werkzaam tot een afstand van 3 meter. De afstand
tussen <strong>de</strong> afstandbediening en <strong>de</strong> ontvanger moet vrij zijn van obstakels.<br />
3. De afstandsbediening moet beschermd wor<strong>de</strong>n tegen schokken, vocht en l<br />
angdurige blootstelling aan <strong>de</strong> zon.<br />
4. Maak geen misbruik van het gebruik van <strong>de</strong> afstandsbediening.<br />
5. Plaats<strong>de</strong>twee meegelever<strong>de</strong> batterijen in <strong>de</strong> afstandsbediening. Gebruik geen<br />
oplaadbare batterijen. Controleer bij het vervangen van <strong>de</strong> batterijen of <strong>de</strong><br />
batterijen nieuw en van het zelf<strong>de</strong> type zijn.<br />
• Het inschakelen enhet gebruikvan<strong>de</strong> verschillen<strong>de</strong> functies (Fig.7- Fig.8)<br />
Na het controleren van <strong>de</strong> voedingsspanning kan u het apparaat op het<br />
elektriciteitsnet aansluiten.<br />
Het aanzetten kan gebeuren via <strong>de</strong> bedieningsknoppen van <strong>de</strong> ventilator of via<br />
<strong>de</strong> afstandsbediening. Zorg ervoor dat <strong>de</strong> batterijen op <strong>de</strong> juiste wijze in <strong>de</strong><br />
afstandsbediening wor<strong>de</strong>n geplaatst.<br />
Druk op ON om<strong>de</strong>ventilator in te schakelen en op OFF/RESET om hem uit te<br />
schakelen.<br />
Snelhe<strong>de</strong>n<br />
Druk herhaal<strong>de</strong> malen op SPEED om <strong>de</strong> verschillen<strong>de</strong> snelhe<strong>de</strong>n te selecteren<br />
(Traag – Mid<strong>de</strong>l – Hoog – Ritmisch). Het overeenstemmen<strong>de</strong> indicatorlampje zal<br />
aangaan op het controlepaneel.<br />
Functie ritmisch<br />
Bij gebruik van <strong>de</strong> functie ritmisch (RHY) wisselt <strong>de</strong> ventilator van snelheid tussen<br />
traag, mid<strong>de</strong>l en snel om een natuurlijke bries te simuleren.<br />
Functie automatisch<br />
Met <strong>de</strong> functie automatisch (FUZZY) kiest <strong>de</strong> ventilator zelf automatisch <strong>de</strong><br />
snelheid in functie van <strong>de</strong> omgevingstemperatuur zoals hier is aangegeven:<br />
Temperatuur Snelheid<br />
Meer dan 26ºC Hoog<br />
Tussen 24 en 26ºC Mid<strong>de</strong>l<br />
Tussen 22 en 23ºC Laag<br />
Min<strong>de</strong>r dan 22ºC Pauze<br />
25
De functie oscillerend en timer kunnen alleen met <strong>de</strong> afstandsbediening wor<strong>de</strong>n<br />
geselecteerd.<br />
Timer<br />
De ingestel<strong>de</strong> werkingsduur moet tussen <strong>de</strong> 1 en 15 uur zijn. Druk herhaal<strong>de</strong>lijk<br />
op <strong>de</strong> TIMER-knop tot <strong>de</strong> gewenste tijd op het scherm verschijnt.<br />
Oscilleren<br />
De ventilator kan oscilleren over 360º in bei<strong>de</strong> richtingen. Druk op R-OSC om<br />
hem naar rechts telatendraaienenopL-OSC om hem naar links telaten draaien.<br />
Druk op R-OSC of L-OSC om het oscilleren te doen stoppen.<br />
Druk op OSC/SET en vervolgens op R-OSC of L-OSC om <strong>de</strong> gra<strong>de</strong>n van het<br />
oscilleren in te stellen. Laat <strong>de</strong> ventilator oscilleren tot <strong>de</strong> gewenste hoek. Druk<br />
vervolgens opnieuw op OSC/SET om <strong>de</strong>ze hoek te programmeren.<br />
Bij het uitschakelen van <strong>de</strong> ventilator gaat <strong>de</strong> instelling van <strong>de</strong> oscillatiefunctie<br />
verloren.<br />
• Kantelen van <strong>de</strong>ventilatorkop<br />
De ARTIC CRCheeft een kantelbare ventilatorkop, <strong>de</strong> hellingshoek kunt u<br />
verstellen door <strong>de</strong> kop op of neer te bewegen.<br />
• On<strong>de</strong>rhoud<br />
Belangrijk: Alvorens het apparaat schoon te maken moet men er zeker van<br />
zijn dat het snoer uit het stopcontact gehaald is.<br />
Dit mo<strong>de</strong>l ventilator heeft geen speciaal on<strong>de</strong>rhoud nodig. Men kan <strong>de</strong> buitenkant<br />
met een vochtige doek schoonmaken. Dompel het apparaat niet in water on<strong>de</strong>r.<br />
Gebruik geen schoonmaak- of oplosmid<strong>de</strong>len die een schuren<strong>de</strong> werking hebben.<br />
Voordat U ver<strong>de</strong>r gaat met monteren, weet dan zeker dat al <strong>de</strong> on<strong>de</strong>r<strong>de</strong>len weer<br />
helemaal droog zijn.<br />
• Belangrijk<br />
Wij ra<strong>de</strong>n U aan niet meer on<strong>de</strong>r<strong>de</strong>len te <strong>de</strong>monteren dan zijn toegestaan.<br />
Ie<strong>de</strong>re veran<strong>de</strong>ring of onrechtmatige reparatie doet <strong>de</strong> garantie vervallen.<br />
Meldt u voor garantie aanspraken direct tot uw leverancier.<br />
26
PORTUGUÉS<br />
• Instruções<br />
A série <strong>de</strong> ventiladores ARTIC foi concebida segundo os últimos avanços<br />
tecnológicos e tem um <strong>de</strong>senho belo e funcional. Reflexo da sua qualida<strong>de</strong>,<br />
garante um serviço completo, seguro e eficaz. Entre as suas principais<br />
características <strong>de</strong>stacaremos a função <strong>de</strong> oscilação <strong>de</strong> 360º, temporizador e<br />
controlo remoto.<br />
Este aparelho cumpre com as directivas <strong>de</strong> compatibilida<strong>de</strong> electromagnética<br />
vigente e as suas prestações garantem um serviço amplo, seguro e eficaz.<br />
Pedimos que se certifique do perfeito estado <strong>de</strong> todas as peças (fig.1) e do<br />
correcto funcionamento do aparelho aquando da sua <strong>de</strong>sembalagem, uma vez<br />
que, qualquer <strong>de</strong>feito <strong>de</strong> origem está a coberto da garantia <strong>de</strong> S&P.<br />
• Recomendações <strong>de</strong> segurança<br />
-Verifique se a tensãodaalimentação é coinci<strong>de</strong>nte com a indicada na placa<br />
<strong>de</strong> características, situada na parte inferior da caixa <strong>de</strong> ligações.<br />
-Nãoutilize este aparelho no interior <strong>de</strong> casas <strong>de</strong> banho ou duches.<br />
- Não submergir o aparelho.<br />
- Não puxe o cabo eléctrico para extrair a ficha da tomada.<br />
-Nãoutilize o aparelho se o cabo ou ficha estiverem danificados.<br />
-Nãotoque na ficha com as mãos molhadas.<br />
- Se o cabo flexível da alimentação estiver danificado, só po<strong>de</strong>rá ser substituído<br />
por um outro cabo fornecido pela S&P ou pelo seu serviço pós venda.<br />
- Desligue o aparelho quando não esteja a ser necessário ou quando queira<br />
proce<strong>de</strong>r à sua limpeza.<br />
-Mantenha o aparelho fora do alcance das crianças ou pessoas incapacitadas.<br />
-Não<strong>de</strong>ixeaventoinha perto <strong>de</strong>fontes <strong>de</strong> calor ou <strong>de</strong> cortinados.<br />
-Nãointroduza nenhum objecto atravésdare<strong>de</strong><strong>de</strong>protecção.<br />
- Não pendure objectos nas re<strong>de</strong>s da ventoinha.<br />
- Não é recomendável que bebés ou pessoas que pa<strong>de</strong>çam <strong>de</strong> alguma doença,<br />
estejam expostas a correntes <strong>de</strong> ar.<br />
• Instruções <strong>de</strong> montagem (fig.1)<br />
(Fig. 2)<br />
1. Aperte oextremo inferior do tubo (15) <strong>de</strong>ntro da base (16) no sentido dos<br />
ponteiros do relógio. Desaperte ligeiramente oparafuso <strong>de</strong> sujeição (14)<br />
27
girando-o no sentido contrário aos ponteiros do relógio, suba o tubo (13) até<br />
à posição <strong>de</strong>sejada e aperte o parafuso <strong>de</strong> sujeição.<br />
(Fig. 3)<br />
2. Desaperte o parafuso <strong>de</strong> pressão (11). Introduza o tubo (13) no corpo <strong>de</strong><br />
controlo (9). Aperte o parafuso<strong>de</strong>pressão.<br />
(Fig. 4)<br />
3. Solte aporca<strong>de</strong>fixação da grelha posterior (4) no sentido dos ponteiros do<br />
relógio e a porca para fixar a hélice no sentido contrário.<br />
4. Monte agrelha<strong>de</strong>protecção posterior (5) sobre a cabeça do motor,fazendo<br />
coincidir os 3 furos situados na grelha, com as 3 espigas da parte frontal do<br />
motor (6) e ajuste a grelha à caixa do motor com a porca <strong>de</strong> fixação da grelha<br />
posterior.<br />
(Fig. 5)<br />
5. Introduza a hélice (3) sobre o eixo do motor e ajuste-a com a porca <strong>de</strong> fixação<br />
da hélice (2).<br />
6. Verifique se a hélice gira livremente. Assegure-se que não há fricção com<br />
a porca <strong>de</strong> fixação da grelha posterior (4). Se a hélice não girar livremente<br />
repita as operações.<br />
7. Monte a grelha <strong>de</strong> protecção dianteira (1) introduzindo o gancho situado na<br />
parte superior da mesma na grelha posterior (5). Junte as duas grelhas e<br />
pressione até que fiquem bem unidas <strong>de</strong>ntro do aro <strong>de</strong> plástico.<br />
(Fig. 6)<br />
8. Coloque a segurança da grelha (18) utilizando o parafuso (19) e a contra<br />
porca da grelha (17).<br />
• Comando à distância<br />
Incorpora um painel LCD on<strong>de</strong> se mostram as diferentes funções e a temperatura<br />
ambiente aproximada.<br />
1. Dirija sempre o controlo remoto para o receptor <strong>de</strong> sinal do ventilador quando<br />
este está aserutilizado.<br />
2. O controlo remoto po<strong>de</strong> trabalhar a uma distância do receptor <strong>de</strong> pelo menos<br />
3metros, sempre que entre eles não haja nenhum obstáculo que distorça o<br />
sinal do emisor.<br />
3. O comando à distância não <strong>de</strong>verá estar exposto a danos, humida<strong>de</strong>s e a<br />
exposições prolongadas dos raios solares.<br />
4. Não abuse do uso do controlo remoto.<br />
5. Insira as duas pilhas <strong>de</strong> alimentação fornecidas no comando à distância. Não<br />
utilize pilhas recarregáveis. Quando substituir as pilhas assegure-se que sejam<br />
com duas pilhas novas e do mesmo tipo.<br />
28
• Por emfuncionamento efunções <strong>de</strong> controlo (Fig.7 –Fig.8)<br />
Uma vez comprovada a tensão <strong>de</strong> alimentação, ligue o aparelho à re<strong>de</strong> eléctrica.<br />
Para se por em funcionamento po<strong>de</strong>rá utilizar as teclas do painel <strong>de</strong> controlo do<br />
ventilador ou com o controlo remoto. Previamente assegure-se que as pilhas do<br />
comando à distância estão correctamente colocadas.<br />
Pressione o ON para por em funcionamento oventilador e o OFF/RESET para<br />
<strong>de</strong>sliga-lo.<br />
Velocida<strong>de</strong>s<br />
Para seleccionar as diferentes velocida<strong>de</strong>s pressione SPEED repetidamente até<br />
conseguir a velocida<strong>de</strong> <strong>de</strong>sejada (Lenta–Media–Alta–Rítmica). A luz indicadora<br />
correspon<strong>de</strong>nte se iluminará no painel <strong>de</strong> controlo.<br />
Função rítmica<br />
Através da função rítmica (RHY) o ventilador alterna as velocida<strong>de</strong>s alta, media<br />
elenta simulando uma brisa natural.<br />
Função lógica<br />
Através da função lógica (FUZZY) o ventilador selecciona automaticamente a<br />
velocida<strong>de</strong> segundo as variações <strong>de</strong> temperatura ambiente como se indica a<br />
seguir:<br />
Temperatura Velocida<strong>de</strong><br />
Mais <strong>de</strong> 26ºC Alta<br />
Entre 24 e 26ºC Média<br />
Entre 22 e 23ºC Baixa<br />
Menos <strong>de</strong> 22ºC Pausa<br />
As funções <strong>de</strong> oscilação e temporização só po<strong>de</strong>m ser seleccionadas unicamente<br />
por controlo remoto.<br />
Temporizador<br />
O tempo <strong>de</strong> programação <strong>de</strong> funcionamento po<strong>de</strong> ser <strong>de</strong> 1 a 15 horas. Pressione<br />
29
a tecla TIMER repetidamente até que no painel apareça o tempo <strong>de</strong>sejado.<br />
Oscilação<br />
O ventilador po<strong>de</strong> oscilar 360º em ambos os sentidos pressione OSC/SET e<br />
seguidamente R-OSC ou L-OSC. Deixe que o ventilador oscile até à amplitu<strong>de</strong><br />
<strong>de</strong>sejada. Pressione novamente OSC/SET eessaamplitu<strong>de</strong> ficará programada.<br />
Quando se para o funcionamentodoventilador a função <strong>de</strong> oscilação programada<br />
não fica guardada.<br />
• Inclinação dacabeça<br />
A série <strong>de</strong> ventoinhas ARTIC apresentam uma cabeça direccional. Para isso, é<br />
suficiente exercerumalevepressãosobreomesmoajustando-o ao ângulo<br />
<strong>de</strong>sejado.<br />
• Manutenção<br />
Nota: Antes <strong>de</strong> proce<strong>de</strong>r à limpeza do aparelho, verifique se este está<br />
<strong>de</strong>sligado da corrente eléctrica.<br />
Esta série <strong>de</strong> ventoinhas, não necessita <strong>de</strong>manutenção especial. Po<strong>de</strong> limpar<br />
oexterior do aparelho com um pano húmido. Não submergir o aparelho na<br />
água. Não empregue <strong>de</strong>tergentes ou dissolventes abrasivos na sua limpeza.<br />
Antes <strong>de</strong> proce<strong>de</strong>r à montagem, verifique se todas as peças estão completamente<br />
secas.<br />
• Importante<br />
Aconselhamos que não tente <strong>de</strong>smontar mais do que as peças indicadas na sua<br />
embalagem. Qualquer manipulação anularia automaticamente agarantia. Se<br />
<strong>de</strong>tectar qualquer anomalia, contacte a ampla Re<strong>de</strong> <strong>de</strong> Serviços Oficiais S&P.<br />
30