Calgary MP35 San Diego MP35 - Blaupunkt
Calgary MP35 San Diego MP35 - Blaupunkt
Calgary MP35 San Diego MP35 - Blaupunkt

Create successful ePaper yourself
Turn your PDF publications into a flip-book with our unique Google optimized e-Paper software.
Radio / CD / MP3<br />
<strong>Calgary</strong> <strong>MP35</strong> 7 645 170 310<br />
<strong>San</strong> <strong>Diego</strong> <strong>MP35</strong> 7 645 190 310<br />
Operating instructions<br />
http://www.blaupunkt.com
2<br />
1<br />
2<br />
3 4 5<br />
6 7<br />
13 12 11<br />
10 9 8
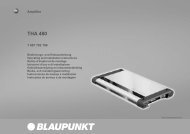
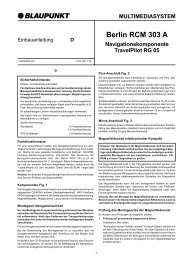
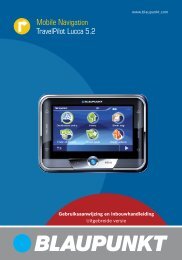
CONTROLS<br />
1 Button to switch the device on/<br />
off and operate the volume mute<br />
function.<br />
2 button for detaching the control<br />
panel (release panel).<br />
3 button to eject a CD from the<br />
device.<br />
4 Volume control<br />
5 CD compartment<br />
6 AUDIO button to adjust the<br />
bass, treble, balance and fader.<br />
To select an equalizer preset.<br />
7 MENU button<br />
Short press: Open the settings<br />
menu.<br />
Long press: Start the scan function.<br />
8 Arrow buttons<br />
9 X-BASS button to activate/deactivate<br />
and adjust the X-BASS.<br />
: TRAF•RDS button<br />
Short press: Switch traffic-information<br />
standby on/off.<br />
Long press: Switch the RDS<br />
function on/off.<br />
; Keys 1 - 6<br />
30<br />
< BND•TS button<br />
Short press: Select the FM<br />
memory banks and the MW and<br />
LW wavebands.<br />
Long press: Start the Travelstore<br />
function.<br />
= SRC button<br />
Short press: Switch sources between<br />
CD/MP3, CD changer (if<br />
connected) and AUX.<br />
Long press: Briefly display the<br />
clock time.
Notes and accessories ............. 32<br />
Removable control panel.......... 33<br />
Switching on/off ....................... 34<br />
Adjusting the volume................ 35<br />
Radio mode .............................. 36<br />
Adjusting the tuner settings ............. 36<br />
Switching to radio mode .................. 37<br />
RDS functions ................................. 37<br />
Selecting the waveband /<br />
memory bank ................................... 37<br />
Tuning into a station ......................... 38<br />
Setting the sensitivity of station<br />
seek tuning ...................................... 38<br />
Storing stations ................................ 38<br />
Storing stations automatically<br />
(Travelstore) ..................................... 39<br />
Listening to stored stations .............. 39<br />
Scanning receivable stations<br />
(SCAN) ............................................ 39<br />
Setting the scanning time ................. 39<br />
Programme type (PTY) .................... 39<br />
Optimising radio reception ............... 41<br />
Configuring the display .................... 41<br />
Traffic information .................... 42<br />
CD mode ................................... 43<br />
Switching to CD mode .................... 43<br />
Selecting tracks ............................... 43<br />
Fast track selection .......................... 43<br />
Fast searching (audible) .................. 43<br />
Random track play (MIX) ................. 44<br />
Scanning tracks (SCAN) ................. 44<br />
Repeating tracks (REPEAT) ............. 44<br />
Pausing playback (PAUSE) .............. 44<br />
Configuring the display .................... 44<br />
Displaying CD text ........................... 45<br />
Traffic announcements in CD mode . 45<br />
Ejecting a CD .................................. 45<br />
CONTENTS<br />
MP3 mode ................................. 46<br />
Preparing an MP3-CD ..................... 46<br />
Switching to MP3 mode................... 47<br />
Configuring the display .................... 47<br />
Selecting a directory ........................ 48<br />
Selecting tracks/files ....................... 48<br />
Fast searching ................................. 48<br />
Random track play (MIX) ................. 48<br />
Scanning tracks (SCAN) ................. 49<br />
Repeating individual tracks or<br />
whole directories (REPEAT) ............. 49<br />
Pausing playback (PAUSE) .............. 49<br />
CD-changer mode .................... 50<br />
Switching to CD-changer mode ....... 50<br />
Selecting CDs ................................. 50<br />
Selecting tracks ............................... 50<br />
Fast searching (audible) .................. 50<br />
Configuring the display .................... 50<br />
Repeating individual tracks or<br />
whole CDs (REPEAT) ...................... 50<br />
Random track play (MIX) ................. 51<br />
Scanning all the tracks on all<br />
the CDs (SCAN).............................. 51<br />
Pausing playback (PAUSE) .............. 51<br />
Remote control ......................... 52<br />
CLOCK time .............................. 52<br />
Sound........................................ 53<br />
X-BASS ..................................... 55<br />
Configuring the level display .... 55<br />
External audio sources ............. 56<br />
Specifications ........................... 56<br />
31<br />
DANSK PORTUGUÊS<br />
NEDERLANDS<br />
ENGLISH DEUTSCH<br />
FRANÇAIS<br />
ITALIANO<br />
SVENSKA<br />
ESPAÑOL
NOTES AND ACCESSORIES<br />
Notes and accessories<br />
Thank you for choosing a <strong>Blaupunkt</strong><br />
product. We hope you enjoy using this<br />
new piece of equipment.<br />
Please read these operating instructions<br />
before using the equipment for<br />
the first time.<br />
The <strong>Blaupunkt</strong> editors are constantly<br />
working on making the operating instructions<br />
clearer and easier to understand.<br />
However, if you still have any<br />
questions on how to operate the device,<br />
please contact your dealer or the telephone<br />
hotline for your country. You will<br />
find the telephone number printed at the<br />
back of this booklet.<br />
We provide a manufacturer guarantee<br />
on our products bought within the European<br />
Union. You can view the guarantee<br />
conditions at www.blaupunkt.de<br />
or ask for them directly at:<br />
<strong>Blaupunkt</strong> GmbH<br />
Hotline<br />
Robert Bosch Str. 200<br />
D-31139 Hildesheim<br />
Gerrmany<br />
Road safety<br />
Road safety has absolute priority.<br />
Only operate your car sound system<br />
if the road and traffic conditions<br />
allow you to do so. Familiarise yourself<br />
with the device before setting off<br />
on your journey.<br />
You must always be able to hear<br />
police, fire service and ambulance<br />
sirens in good time from inside your<br />
32<br />
vehicle. For this reason, listen to your<br />
car sound system at a moderate volume<br />
level during your journey.<br />
Installation<br />
If you want to install your car sound system<br />
yourself, please read the installation<br />
and connection instructions that<br />
follow these operating instructions.<br />
Accessories<br />
Only use accessories approved by <strong>Blaupunkt</strong>.<br />
Remote control<br />
The RC 08, RC 10, RC 10H or RC 12H<br />
(<strong>Calgary</strong>: available as optional accessories)<br />
remote controls allow you to operate<br />
the main functions of your car radio<br />
safely and conveniently.<br />
You cannot switch the device on/off using<br />
the remote control.<br />
Note<br />
The <strong>San</strong> <strong>Diego</strong> <strong>MP35</strong> is supplied with<br />
the RC 12H remote control.<br />
Amplifiers<br />
You can use all <strong>Blaupunkt</strong> and Velocity<br />
amplifiers.<br />
CD changers<br />
You can connect the following <strong>Blaupunkt</strong><br />
CD changers: CDC A 08, IDC A 09 and<br />
CDC A 03.
Removable control panel<br />
Theft protection<br />
As a way of protecting your car radio<br />
against theft, the unit is equipped with<br />
a removable control panel (release panel).<br />
Without this control panel, the car<br />
radio is worthless to a thief.<br />
Protect you car radio against theft by<br />
taking the control panel with you every<br />
time you leave your vehicle. Do not leave<br />
the control panel in your vehicle - not<br />
even in a hiding place.<br />
The control panel has been designed<br />
to be easy to use.<br />
Notes:<br />
● Never drop the control panel.<br />
● Never expose the control panel to<br />
direct sunlight or other heat sources.<br />
● Avoid making direct skin contact<br />
with the control panel’s contacts. If<br />
necessary, clean the contacts with<br />
a lint-free cloth and some alcohol.<br />
Removing the control panel<br />
2<br />
➮ Press the button 2.<br />
The control panel locking mechanism<br />
opens.<br />
REMOVABLE CONTROL PANEL<br />
➮ First, pull the control panel straight<br />
off the unit and then out towards<br />
the left.<br />
The device switches off.<br />
All the current settings are saved.<br />
Any CD already inserted in the unit remains<br />
there.<br />
Attaching the control panel<br />
➮ Slide the control panel from left to<br />
right into the unit’s guide.<br />
➮ Carefully press on the left edge of<br />
the control panel until it clicks into<br />
place.<br />
Note:<br />
● When attaching the control panel,<br />
make sure you do not press the<br />
display.<br />
If the device was still switched on when<br />
you removed the control panel, it will<br />
automatically switch on again with the<br />
last settings activated (i.e. radio, CD/<br />
MP3, CD changer or AUX) when the<br />
panel is replaced.<br />
33<br />
DANSK PORTUGUÊS<br />
NEDERLANDS<br />
ENGLISH DEUTSCH<br />
FRANÇAIS<br />
ITALIANO<br />
SVENSKA<br />
ESPAÑOL
SWITCHING ON/OFF<br />
Switching on/off<br />
You can switch the device on/off in the<br />
following ways:<br />
Switching on/off using the vehicle<br />
ignition<br />
If the device is correctly connected to<br />
the vehicle’s ignition and it was not<br />
switched off using button 1, it will<br />
switch on/off simultaneously with the<br />
ignition.<br />
Switching on/off using button 1<br />
➮ To switch on the device, press button<br />
1.<br />
➮ To switch off the device, press and<br />
hold down button 1 for longer<br />
than two seconds.<br />
The device switches off.<br />
Note:<br />
● To protect the vehicle battery, the<br />
device will switch off automatically<br />
after one hour if the ignition is off.<br />
Switching on by inserting a CD<br />
If the device is switched off and there is<br />
no CD present in the drive,<br />
➮ gently push the CD with its printed<br />
side uppermost into the drive 5<br />
until you feel some resistance.<br />
The drive draws in the CD automatically.<br />
You must not hinder or assist the drive<br />
as it draws in the CD.<br />
The device switches on and starts playing<br />
the CD.<br />
34<br />
Note:<br />
● If the vehicle ignition was switched<br />
off before you inserted the CD, you<br />
will first have to switch on the device<br />
by pressing button 1 in order<br />
to start playing the CD.<br />
Switching on/off using the<br />
removable control panel<br />
➮ Remove the control panel.<br />
The unit switches off.<br />
➮ Attach the control panel again.<br />
The unit switches on. The settings (radio,<br />
CD/MP3, CD changer or AUX) that<br />
were set before the unit was switched<br />
off will be reactivated.
Adjusting the volume<br />
You can adjust the volume in steps from<br />
0 (off) to 66 (maximum).<br />
To increase the volume,<br />
➮ press the button 4.<br />
To decrease the volume,<br />
➮ press the button 4.<br />
Setting the power-on volume<br />
Note:<br />
● The device is equipped with a timeout<br />
function. If, for instance, you<br />
press the MENU button 7 and select<br />
a menu item, the device will<br />
switch back approx. 8 seconds after<br />
the last button was pressed.<br />
Any changes to the settings that<br />
you have made will be saved.<br />
You can set the power-on volume.<br />
➮ Press the MENU button 7.<br />
➮ Press the or button 8 repeatedly<br />
until “ON VOLUME” appears<br />
in the display.<br />
➮ Adjust the power-on volume using<br />
the buttons 8.<br />
To help you adjust the setting more easily,<br />
the device will increase or decrease<br />
the volume as you make your changes.<br />
If you change the setting to “LAST VOL”,<br />
the volume level that was set the last<br />
time you switched off the device will be<br />
activated again.<br />
ADJUSTING THE VOLUME<br />
Note:<br />
● To protect your hearing, the poweron<br />
volume is limited to a value of<br />
“38”. If the volume level was higher<br />
than this when the device was last<br />
switched off and the “LAST VOL”<br />
setting is activated, the system will<br />
reset the volume to “38” when you<br />
switch the device on again.<br />
When you have finished adjusting the<br />
setting,<br />
➮ press the MENU button 7 twice.<br />
Quick volume reduction (mute)<br />
You can quickly decrease the volume<br />
(mute) to a level preset by you.<br />
➮ Briefly press button 1.<br />
“MUTE” appears in the display.<br />
Cancelling mute<br />
To return to your previously set volume<br />
level,<br />
➮ briefly press button 1 again.<br />
Setting the mute level<br />
You can adjust the mute level.<br />
➮ Press the MENU button 7.<br />
➮ Press the or button 8 repeatedly<br />
until “MUTE LVL” appears in<br />
the display.<br />
➮ Adjust the mute level using the<br />
buttons 8.<br />
When you have finished adjusting the<br />
setting,<br />
➮ press the MENU button 7 twice.<br />
35<br />
DANSK PORTUGUÊS<br />
NEDERLANDS<br />
ENGLISH DEUTSCH<br />
FRANÇAIS<br />
ITALIANO<br />
SVENSKA<br />
ESPAÑOL
ADJUSTING THE VOLUME<br />
Switching the confirmation beep<br />
on/off<br />
The system will play a confirmation beep<br />
for some functions if you keep a button<br />
pressed down for longer than two seconds,<br />
for instance, when you assign a<br />
radio station to a station button. You can<br />
switch the beep on/off.<br />
➮ Press the MENU button 7.<br />
➮ Press the or button 8 repeatedly<br />
until “BEEP ON” or “BEEP<br />
OFF” appears in the display.<br />
➮ Activate/deactivate the beep using<br />
the buttons 8. “OFF” means<br />
the beep is switched off and “ON”<br />
means the beep is switched on.<br />
When you have finished adjusting the<br />
setting,<br />
➮ press the MENU button 7.<br />
Mute while telephoning<br />
If your device is connected to a mobile<br />
telephone, the car radio’s volume will<br />
be muted as soon as you “pick up” the<br />
telephone. This requires that the mobile<br />
telephone be connected to the device<br />
as described in the installation instructions.<br />
“PHONE” appears in the display.<br />
36<br />
Radio mode<br />
RADIO MODE<br />
Adjusting the tuner settings<br />
To ensure that the tuner works properly,<br />
the device must be configured for the<br />
region in which it is being used. You can<br />
choose between Europe (EUROPE),<br />
United States (USA), South America (S-<br />
AMERICA) and Thailand (THAI). By<br />
default, the tuner is set to the region in<br />
which the device was sold. If you encounter<br />
problems with radio reception,<br />
please check this setting.<br />
The radio functions described in these<br />
operating instructions refer to the EU-<br />
ROPE tuner setting.<br />
➮ Switch the device off using button<br />
1.<br />
➮ Press and hold down the 1 and 5<br />
buttons ; simultaneously and<br />
switch on the device again by<br />
pressing button 1.<br />
“TUNER” is displayed.<br />
➮ Select your tuner region using the<br />
or button 8.<br />
To save the setting,<br />
➮ switch the device off and on again<br />
or wait approx. 8 seconds. The car<br />
sound system switches on and the<br />
mode that was selected last is activated<br />
(radio, CD/MP3, CD changer<br />
or AUX).
Switching to radio mode<br />
If you are in CD/MP3, CD-changer or<br />
AUX mode,<br />
➮ press the BND•TS button <<br />
or<br />
➮ press the SRC button = repeatedly<br />
until the memory bank<br />
(e.g. “FM1”) appears in the display.<br />
RDS functions<br />
This device is equipped with an RDS<br />
radio receiver (Radio Data System).<br />
Many of the receivable FM stations<br />
broadcast a signal that not only carries<br />
the programme but also additional information<br />
such as the station name and<br />
programme type (PTY).<br />
The station name appears in the display<br />
as soon as the tuner receives it.<br />
The convenient RDS functions AF (Alternative<br />
Frequency) and REGIONAL<br />
extend your radio’s range of functions.<br />
● AF: If the RDS function is activated,<br />
the radio automatically tunes<br />
into the best receivable frequency<br />
for the station that is currently set.<br />
● REGIONAL: At certain times, some<br />
radio stations divide their programme<br />
into regional programmes<br />
providing different content. You can<br />
use the REG function to prevent<br />
the car radio from switching to alternative<br />
frequencies that are<br />
broadcasting different programme<br />
content.<br />
Note:<br />
● REGIONAL must be activated/deactivated<br />
separately in the menu.<br />
RADIO MODE<br />
Switching the RDS function on/off<br />
If you want to use the RDS functions<br />
(AF and REGIONAL),<br />
➮ press and hold down the TRAF<br />
RDS button : for longer than two<br />
seconds.<br />
The RDS function is active when the<br />
RDS symbol is shown in the display.<br />
Switching REGIONAL on/off<br />
➮ Press the MENU button 7.<br />
➮ Press the or button 8 repeatedly<br />
until “REG” appears in the display.<br />
“OFF” or “ON” is displayed<br />
alongside “REG”.<br />
➮ To switch REGIONAL on/off, press<br />
the or button 8.<br />
➮ Press the MENU button 7.<br />
Selecting the waveband /<br />
memory bank<br />
You can use this device to receive programmes<br />
broadcast over the FM frequency<br />
range as well as the MW and<br />
LW (AM) wavebands. There are three<br />
memory banks available for the FM<br />
waveband (FM1, FM2 and FMT) and<br />
one for each of the MW and LW wavebands.<br />
Six stations can be stored in<br />
each memory bank.<br />
To switch between the FM memory<br />
banks (FM1, FM2 and FMT) and the<br />
MW and LW wavebands,<br />
➮ briefly press the BND•TS button<br />
RADIO MODE<br />
Tuning into a station<br />
Setting the sensitivity of station<br />
There are various ways of tuning into a seek tuning<br />
station.<br />
You can choose whether the radio<br />
Automatic station seek tuning<br />
➮ Press the or button 8.<br />
should only tune into stations providing<br />
good reception or whether it can also<br />
tune into those with a weak reception.<br />
The radio tunes into the next receivable<br />
station.<br />
➮ Press the MENU button 7.<br />
➮ Press the or button 8 repeat-<br />
Tuning into stations manually<br />
edly until “SENS” and the currently<br />
You can also tune into stations manual- set value appear in the display.<br />
ly.<br />
“SENS HI6” means that the tuner is set<br />
Note:<br />
● You can only tune into stations<br />
manually if the RDS function is deactivated.<br />
to the highest sensitivity setting. “SENS<br />
LO1” means it is set to the lowest sensitivity<br />
setting.<br />
➮ Set the desired sensitivity using the<br />
➮ Press the or button 8.<br />
buttons 8.<br />
Browsing through broadcasting<br />
networks (only FM)<br />
If radio stations provide several pro-<br />
When you have finished adjusting the<br />
setting,<br />
➮ press the MENU button 7.<br />
grammes, you have the option of brows- Note:<br />
ing through their “broadcasting net- ● You can set different sensitivity<br />
works”.<br />
levels for FM and MW or LW (AM).<br />
Note:<br />
Storing stations<br />
● The RDS function must be activated<br />
before you can use this feature.<br />
Storing stations manually<br />
➮ Press the or button 8 to<br />
switch to the next station on the<br />
broadcasting network.<br />
Note:<br />
● When using this feature, you will<br />
only be able to switch to stations<br />
that you have received once before<br />
already. To receive the stations,<br />
use the scan function or the Travelstore<br />
function.<br />
➮ Select the memory bank that you<br />
want (FM1, FM2, FMT) or one of<br />
the wavebands (MW or LW).<br />
➮ Tune into the station that you want.<br />
➮ Press and hold down one of the<br />
station buttons 1 - 6 ; for longer<br />
than two seconds to assign the station<br />
to that button.<br />
38
Storing stations automatically Scanning begins. “SCAN” appears<br />
(Travelstore)<br />
briefly in the display followed by a flash-<br />
You can automatically store the six stations<br />
providing the best reception in the<br />
ing display of the current station name<br />
or frequency.<br />
region (only FM). The stations are stored Cancelling SCAN and continuing<br />
in the FMT memory bank.<br />
listening to a station<br />
Note:<br />
➮ Press the MENU button 7.<br />
● Any stations previously stored in<br />
this memory bank are deleted in<br />
the process.<br />
➮ Press and hold down the BND•TS<br />
button < for longer than two sec-<br />
Scanning stops and the radio continues<br />
playing the station that it tuned into last.<br />
Setting the scanning time<br />
➮ Press the MENU button 7.<br />
onds.<br />
➮ Press the or button 8 repeat-<br />
The storing procedure begins. “FM edly until “SCAN TIME” appears in<br />
TSTORE” appears in the display. After the display.<br />
the process has completed, the radio<br />
will play the station that is stored in<br />
memory location 1 of the FMT memory<br />
bank.<br />
Listening to stored stations<br />
➮ Select the memory bank or waveband.<br />
➮ Press the station button 1 - 6 ;<br />
that corresponds to the station that<br />
you want to listen to.<br />
➮ Set the desired scanning time using<br />
the buttons 8.<br />
When you have finished adjusting the<br />
setting,<br />
➮ press the MENU button 7 twice.<br />
Note:<br />
● The scanning time that you set is<br />
also used when scanning in CD/<br />
MP3 mode and in CD-changer<br />
mode.<br />
Scanning receivable stations<br />
(SCAN)<br />
You can use the scan function to listen<br />
to all the receivable stations briefly. You<br />
can set the scanning time in the menu<br />
to between 5 and 30 seconds (in steps<br />
of 5 seconds).<br />
Starting SCAN<br />
➮ Press and hold down the MENU<br />
button 7 for longer than two seconds.<br />
RADIO MODE<br />
Programme type (PTY)<br />
Besides transmitting the station name,<br />
some FM stations also provide information<br />
on the type of programme they are<br />
broadcasting. Your car radio can receive<br />
and display this information.<br />
For example, the programme types can<br />
be:<br />
CULTURE TRAVEL JAZZ<br />
SPORT NEWS POP<br />
ROCK CLASSICS<br />
39<br />
DANSK PORTUGUÊS<br />
NEDERLANDS<br />
ENGLISH DEUTSCH<br />
FRANÇAIS<br />
ITALIANO<br />
SVENSKA<br />
ESPAÑOL
RADIO MODE<br />
You can use the PTY function to select Selecting the PTY language<br />
stations of a particular programme type. You can select the language in which<br />
PTY-EON<br />
If you specify the programme type and<br />
start seek tuning, the radio will switch<br />
from the current station to a station of<br />
the selected programme type.<br />
the programme types are displayed.<br />
The following are available:<br />
“DEUTSCH”, “ENGLISH” and<br />
“FRANÇAIS”.<br />
➮ Press the MENU button 7.<br />
Notes:<br />
● If the tuner does not find a station<br />
that matches the selected pro-<br />
➮ Press the or button 8 repeatedly<br />
until “PTY LANG” appears in<br />
the display.<br />
gramme type, you will hear a beep ➮ Set your preferred language using<br />
and “NO PTY” appears briefly in the buttons 8.<br />
●<br />
the display. The radio will then retune<br />
to the station that it received<br />
last.<br />
If the tuned radio station or another<br />
When you have finished adjusting the<br />
setting,<br />
➮ press the MENU button 7 twice.<br />
station on the broadcasting net- Selecting a programme type and<br />
work broadcasts your selected programme<br />
type at a later point in<br />
time, the radio will automatically<br />
starting seek tuning<br />
➮ Press the or button 8.<br />
switch from the currently tuned sta- The current programme type appears<br />
tion or from CD mode or CD- in the display.<br />
changer mode to the station whose<br />
programme type matches the one<br />
you selected.<br />
➮ If you want to select another programme<br />
type, you can do so by<br />
pressing the or button 8<br />
Switching PTY on/off<br />
whilst this display is visible.<br />
➮ Press the MENU button 7.<br />
➮ Press the or button 8 repeatedly<br />
until “PTY ON” or “PTY OFF”<br />
appears in the display.<br />
➮ Press the or button 8 to<br />
switch PTY ON or OFF.<br />
➮ Press the MENU button 7.<br />
The selected programme type appears<br />
briefly in the display.<br />
➮ Press the or button 8 to start<br />
seek tuning.<br />
The radio will then tune into the next<br />
station it finds that matches your selected<br />
programme type.<br />
40
Optimising radio reception<br />
HICUT<br />
The HICUT function improves reception<br />
during poor radio reception (only FM).<br />
If interference occurs, the interference<br />
level is cut automatically.<br />
Switching HICUT on/off<br />
➮ Press the MENU button 7.<br />
➮ Press the or button 8 repeatedly<br />
until “HICUT” appears in the<br />
display.<br />
➮ Press the or button 8 to adjust<br />
the HICUT setting.<br />
“HICUT 0” means that the interference<br />
level will not be cut automatically. “HI-<br />
CUT 1” means that it will be cut automatically.<br />
➮ Press the MENU button 7.<br />
Configuring the display<br />
In radio mode you have the option of<br />
displaying the waveband together with<br />
the memory bank / memory location and<br />
the time or the station name / frequency<br />
of the current station.<br />
Select “FREQUENCY” to display the<br />
station name / frequency or select<br />
“CLOCK” to display the waveband together<br />
with the memory bank / memory<br />
location and the clock time.<br />
RADIO MODE<br />
➮ Press the MENU button 7.<br />
➮ Press the or button 8 repeatedly<br />
until “TUN DISP” appears in<br />
the display.<br />
➮ Press the or button 8 to<br />
switch between “CLOCK” and<br />
“FREQUENCY”.<br />
➮ Press the MENU button 7 twice.<br />
41<br />
DANSK PORTUGUÊS<br />
NEDERLANDS<br />
ENGLISH DEUTSCH<br />
FRANÇAIS<br />
ITALIANO<br />
SVENSKA<br />
ESPAÑOL
TRAFFIC INFORMATION<br />
Traffic information<br />
Your device is equipped with an RDS-<br />
EON receiver. EON stands for Enhanced<br />
Other Network.<br />
Whenever a traffic announcement (TA)<br />
is broadcast, the system switches automatically<br />
from a station that does not<br />
provide traffic reports to the appropriate<br />
traffic information station within the<br />
broadcasting network that does.<br />
Once the traffic report has been played,<br />
the system will switch back to the programme<br />
you were listening to before.<br />
Switching traffic information<br />
priority on/off<br />
➮ Briefly press the TRAF•RDS button<br />
:.<br />
Traffic announcement priority is active<br />
when the traffic jam symbol is shown in<br />
the display.<br />
Notes:<br />
You will hear a warning beep:<br />
● if you leave the reception area of a<br />
traffic information station that you<br />
are currently listening to.<br />
● if you are receiving a traffic information<br />
station and the volume is<br />
set to minimum (0) or if, whilst listening<br />
to a CD/MP3, a CD in the<br />
changer or an AUX source, you<br />
leave the reception area of the<br />
tuned traffic information station and<br />
the subsequent automatic search<br />
cannot find a new traffic information<br />
station.<br />
42<br />
● if you retune the radio from a traffic<br />
information station to a station that<br />
does not broadcast traffic information.<br />
If you hear the warning beep, you can<br />
either switch off traffic information priority<br />
or tune into a station that broadcasts<br />
traffic information.<br />
Setting the volume for traffic<br />
announcements<br />
➮ Press the MENU button 7.<br />
➮ Press the or button 8 repeatedly<br />
until “TA VOLUME” appears in<br />
the display.<br />
➮ Adjust the volume using the<br />
buttons 8.<br />
When you have finished adjusting the<br />
setting,<br />
➮ press the MENU button 7 twice.<br />
Notes:<br />
● You can use the volume control 4<br />
to adjust the volume during a traffic<br />
announcement for the duration of<br />
that announcement.<br />
● You can set the volume distribution<br />
for the traffic announcements. For<br />
further details, please read the<br />
“Sound” chapter.
CD mode<br />
You can use this device to play standard<br />
audio CDs, CD-Rs and CD-RWs<br />
with a diameter of 12 or 8 cm.<br />
Risk of severe damage to the<br />
CD drive!<br />
Contoured CDs (shape CDs) are not<br />
suitable for playback in this unit. We<br />
do not accept responsibility for any<br />
damage to the CD drive that may<br />
occur as a result of the use of unsuitable<br />
CDs.<br />
To ensure the system functions properly,<br />
only use CDs labelled with the compact<br />
disc logo. Problems might be experienced<br />
when playing copy-protected<br />
CDs. <strong>Blaupunkt</strong> cannot guarantee<br />
the proper functioning of copy-protected<br />
CDs!<br />
Besides being able to play audio CDs<br />
on this device, you can also play CDs<br />
containing MP3 music files. For further<br />
details, please read the “MP3 mode”<br />
chapter.<br />
Switching to CD mode<br />
If there is no CD inserted in the drive,<br />
➮ gently push the CD with the printed<br />
side uppermost into the CD compartment<br />
5 until you feel some<br />
resistance.<br />
The drive draws in the CD automatically.<br />
You must not assist or hinder the drive<br />
as it draws in the CD.<br />
The CD starts playing.<br />
Note:<br />
CD MODE<br />
● If the vehicle ignition was switched<br />
off before you inserted the CD, you<br />
will first have to switch on the device<br />
by pressing button 1 in order<br />
to start playing the CD.<br />
If there is already a CD inserted in the<br />
drive,<br />
➮ press the SRC button = repeatedly<br />
until “CD” appears in the<br />
display.<br />
Playback begins from the point at which<br />
it was last interrupted.<br />
Selecting tracks<br />
➮ Press one of the arrow buttons 8<br />
to select the next or previous track.<br />
If you press the or button 8 once,<br />
the current track will be played again<br />
from the beginning.<br />
Fast track selection<br />
For fast track selection (backwards or<br />
forwards),<br />
➮ press and hold down one of the<br />
buttons 8 until fast-reverse /<br />
fast-forward track selection begins.<br />
Fast searching (audible)<br />
For fast searching (backwards or forwards),<br />
➮ press and hold down one of the<br />
buttons 8 until fast searching<br />
backwards / forwards begins.<br />
43<br />
DANSK PORTUGUÊS<br />
NEDERLANDS<br />
ENGLISH DEUTSCH<br />
FRANÇAIS<br />
ITALIANO<br />
SVENSKA<br />
ESPAÑOL
CD MODE<br />
Random track play (MIX)<br />
➮ Press the 5 MIX button ;.<br />
“MIX CD” appears briefly in the display<br />
and the MIX symbol lights up. The next<br />
randomly selected track will then be<br />
played.<br />
Cancelling MIX<br />
➮ Press the 5 MIX button ; again.<br />
“MIX OFF” appears briefly in the display<br />
and the MIX symbol disappears.<br />
Scanning tracks (SCAN)<br />
You can scan (briefly play) all the tracks<br />
on the CD.<br />
➮ Press and hold down the MENU<br />
button 7 for longer than two seconds.<br />
The next track will then be scanned.<br />
Note:<br />
● You can set the scanning time. For<br />
further details, please read the section<br />
entitled “Setting the scanning<br />
time” in the “Radio mode” chapter.<br />
Cancelling SCAN and continuing<br />
listening to a track<br />
➮ To cancel scanning, press the<br />
MENU button 7.<br />
The currently scanned track will then<br />
continue to be played normally.<br />
Repeating tracks (REPEAT)<br />
If you want to repeat a track,<br />
➮ press the 4 RPT button ;.<br />
“RPT TRCK” appears briefly in the display<br />
and the RPT symbol lights up. The<br />
44<br />
track is repeated continuously until you<br />
deactivate RPT.<br />
Cancelling REPEAT<br />
If you want to cancel the repeat function,<br />
➮ press the 4 RPT button ; again.<br />
“RPT TRCK” appears briefly in the display<br />
and the RPT symbol is displayed.<br />
Pausing playback (PAUSE)<br />
➮ Press button 3 ;.<br />
“PAUSE” appears in the display.<br />
Cancelling pause<br />
➮ Press button 3 ; whilst pause<br />
is activated.<br />
Playback is resumed.<br />
Configuring the display<br />
You can choose between two display<br />
types for CD mode:<br />
● Track number and clock time<br />
● Track number and playing time<br />
➮ Press the MENU button 7.<br />
➮ Press the or button 8 repeatedly<br />
until “CD DISP” appears in the<br />
display.<br />
➮ Press the or button 8 to<br />
switch between “PLAY TIME” and<br />
“CLOCK”.<br />
➮ Press the MENU button 7 twice.
Displaying CD text<br />
Some CDs include CD text. The CD text<br />
might contain the names of the artist,<br />
album and track.<br />
You can allow the CD text to be displayed<br />
as scrolling text every time you<br />
switch to another track. The default display<br />
will appear again after the whole<br />
CD text has been shown once. For further<br />
details, please read the section<br />
entitled “Configuring the display”.<br />
Switching CD text on/off<br />
➮ Press the MENU button 7.<br />
➮ Press the or button 8 repeatedly<br />
until “CD TEXT” appears in<br />
the display.<br />
➮ Switch the CD text function on<br />
(“TEXT ON”) or off (“TEXT OFF”)<br />
using the or button 8.<br />
When you have finished adjusting the<br />
setting,<br />
➮ press the MENU button 7 twice.<br />
Traffic announcements in CD<br />
mode<br />
If you wish to receive traffic announcements<br />
whilst CD mode is activated,<br />
➮ press the TRAF•RDS button :.<br />
Traffic announcement priority is active<br />
when the traffic jam symbol is shown in<br />
the display. For further details, please<br />
read the “Traffic information reception”<br />
chapter.<br />
CD MODE<br />
Ejecting a CD<br />
➮ Press the button 3 next to the<br />
CD compartment.<br />
The CD is ejected.<br />
➮ Remove the CD.<br />
Notes:<br />
● If a CD is ejected, the drive will automatically<br />
draw it back in again after<br />
approx. 10 seconds.<br />
● You can also eject CDs whilst the<br />
device is switched off or whilst another<br />
audio source is activated.<br />
45<br />
DANSK PORTUGUÊS<br />
NEDERLANDS<br />
ENGLISH DEUTSCH<br />
FRANÇAIS<br />
ITALIANO<br />
SVENSKA<br />
ESPAÑOL
MP3 MODE<br />
MP3 mode<br />
You can also use this car sound system<br />
to play CD-Rs and CD-RWs that<br />
contain MP3 music files.<br />
Preparing an MP3-CD<br />
The various combinations of CD burners,<br />
CD burning software and CD blanks<br />
may lead to problems arising with the<br />
device’s ability to play certain CDs. If<br />
problems occur with your own burned<br />
CDs, you should try another brand of<br />
CD blank or choose another colour of<br />
CD blank.<br />
The format of the CD must be ISO 9660<br />
Level 1 / Level 2 or Joliet. Other formats<br />
cannot be played reliably.<br />
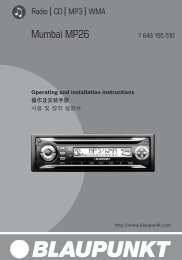
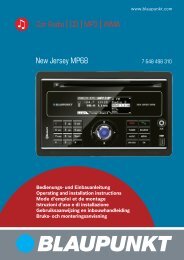
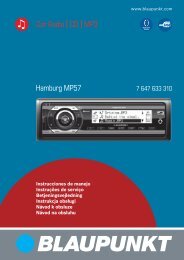
You can create a maximum of 252 directories<br />
on a CD. You can use this device<br />
to access each of the directories.<br />
Regardless of the number of directories<br />
on the CD, the device can handle up to<br />
999 MP3 files on a single CD with a<br />
maximum of 255 files in a directory.<br />
46<br />
D01<br />
D02<br />
D03<br />
T001<br />
T002<br />
T003<br />
T004<br />
T005<br />
T001<br />
T002<br />
T003<br />
T004<br />
T005<br />
T006<br />
D04<br />
T001<br />
T002<br />
T003<br />
T004<br />
T005<br />
T006<br />
T007<br />
T008<br />
T009<br />
T010<br />
T011<br />
Each directory can be given a name using<br />
a PC. The device is capable of displaying<br />
the directory name. You should<br />
name the directories and tracks/files<br />
using the method provided by your CD<br />
burner software. The software’s instruction<br />
manual will provide details on how<br />
to do this.<br />
Note:<br />
● When naming directories and<br />
tracks/files you should not use accents<br />
and special characters.<br />
If you like your files to be in the correct<br />
order, you should use burner software<br />
that places files in alphanumerical order.<br />
If your software does not provide<br />
this feature you also have the option of<br />
sorting the files manually. To do so, you<br />
should place a number (e.g. “001”,<br />
D<br />
i<br />
r<br />
e<br />
c<br />
t<br />
o<br />
r<br />
i<br />
e<br />
s<br />
T ra<br />
c<br />
k<br />
s •<br />
F iles
“002”, etc.) at the beginning of each file<br />
name - you must include the leading<br />
zeros.<br />
MP3 tracks can contain additional information<br />
such as the artist, album and<br />
track names (ID3 tags). This device can<br />
display ID3 tags (version 1).<br />
When creating (encoding) MP3 files<br />
from audio files, you should use bit rates<br />
up to a maximum of 256 kbits/sec.<br />
This device can only play MP3 files that<br />
have the “.MP3” file extension.<br />
Note:<br />
To ensure uninterrupted playback,<br />
● do not attempt to change the file<br />
extension to “.MP3” of any files other<br />
than MP3 files and then attempt<br />
to play them! The device will ignore<br />
these invalid files during playback.<br />
● Do not use “mixed” CDs containing<br />
both non-MP3 data and MP3<br />
tracks (the device only reads MP3<br />
files during MP3 playback).<br />
● Do not use mix-mode CDs containing<br />
both CD audio tracks and MP3<br />
tracks. If you try playing a mixmode<br />
CD, the device will only play<br />
the CD audio tracks.<br />
Switching to MP3 mode<br />
MP3 mode is activated in the same way<br />
as normal CD mode. For further details,<br />
please read the section entitled “Switching<br />
to CD mode” in the “CD mode” chapter.<br />
MP3 MODE<br />
Configuring the display<br />
An MP3-CD must already be inserted<br />
in the device before you can change the<br />
following settings.<br />
Configuring the default display<br />
You can display various types of information<br />
on the current track:<br />
● Track number and playing time<br />
(“TRCK-TIME”)<br />
● Track number and clock time<br />
(“TRCK-CLK”)<br />
● Directory number and track<br />
number (“DIR-TRCK”)<br />
● Directory number and clock time<br />
(“DIR-CLK”)<br />
● Directory number and playing time<br />
(“DIR-TIME”)<br />
Note:<br />
● After you switch tracks, the device<br />
first displays the MP3 scrolling text<br />
once and then it displays the information<br />
continuously.<br />
To switch between the different display<br />
options,<br />
➮ press the MENU button 7.<br />
➮ Press the or button 8 repeatedly<br />
until “CD DISP” appears in the<br />
display.<br />
➮ Select the option that you want using<br />
the or button 8.<br />
When you have finished adjusting the<br />
setting,<br />
➮ press the MENU button 7 twice.<br />
47<br />
DANSK PORTUGUÊS<br />
NEDERLANDS<br />
ENGLISH DEUTSCH<br />
FRANÇAIS<br />
ITALIANO<br />
SVENSKA<br />
ESPAÑOL
MP3 MODE<br />
Configuring the MP3 scrolling text<br />
One of the following scrolling texts is<br />
displayed once every time the track is<br />
changed. Afterwards, the configured<br />
default display is shown.<br />
The available scrolling texts are:<br />
● Directory name (“DIR NAME”)<br />
● Track name (“SONG NAME”)<br />
● Album name (“ALBM NAME”)<br />
● Artist name (“ARTIST”)<br />
● File name (“FILE NAME”)<br />
Note:<br />
● The artist, track and album names<br />
are part of the MP3-ID tag (version<br />
1) and can only be displayed if they<br />
have been saved with the MP3<br />
files (for further details, please read<br />
the instructions that came with your<br />
PC’s MP3 software or burner software).<br />
To switch between the different display<br />
options,<br />
➮ press the MENU button 7.<br />
➮ Press the or button 8 repeatedly<br />
until “MP3 DISP” appears in<br />
the display.<br />
➮ Use the or button 8 to select<br />
the MP3 scrolling text that you<br />
want.<br />
When you have finished adjusting the<br />
setting,<br />
➮ press the MENU button 7 twice.<br />
48<br />
Selecting a directory<br />
To move up or down to another directory,<br />
➮ press the or button 8 once or<br />
several times.<br />
Selecting tracks/files<br />
To move up or down to another track/<br />
file in the current directory,<br />
➮ press the or button 8 once or<br />
several times.<br />
If you press the button 8 once, the<br />
current track will be played again from<br />
the beginning.<br />
Fast searching<br />
For fast searching (backwards or forwards),<br />
➮ press and hold down the or<br />
button 8 until fast searching backwards<br />
/ forwards begins.<br />
Random track play (MIX)<br />
To play the tracks in the current directory<br />
in random order,<br />
➮ briefly press the 5 MIX button ;.<br />
“MIX DIR” appears in the display and<br />
the MIX symbol lights up.<br />
To play all the tracks on the inserted<br />
MP3-CD in random order,<br />
➮ press and hold down the 5 MIX<br />
button ; for longer than two seconds.<br />
“MIX CD” appears in the display and the<br />
MIX symbol lights up.
Cancelling MIX<br />
To cancel MIX,<br />
➮ briefly press the 5 MIX button ;.<br />
“MIX OFF” appears in the display and<br />
the MIX symbol disappears.<br />
Scanning tracks (SCAN)<br />
You can scan (briefly play) all the tracks<br />
on the CD.<br />
➮ Press and hold down the MENU<br />
button 7 for longer than two seconds.<br />
The next track will then be<br />
scanned.<br />
“TRK SCAN” appears in the display<br />
alongside the flashing track numbers.<br />
The tracks on the CD are briefly played<br />
in ascending order.<br />
Note:<br />
● You can set the scanning time. For<br />
details on setting the scanning<br />
time, please read the section entitled<br />
“Setting the scanning time” in<br />
the “Radio mode” chapter.<br />
Cancelling SCAN and continuing<br />
listening to a track<br />
➮ Briefly press the MENU button 7.<br />
The currently scanned track will then<br />
continue to be played normally.<br />
MP3 MODE<br />
Repeating individual tracks or<br />
whole directories (REPEAT)<br />
To play the current track repeatedly,<br />
➮ briefly press the 4 RPT button ;.<br />
“RPT TRCK” appears briefly in the display<br />
and RPT lights up.<br />
To play the whole directory repeatedly,<br />
➮ press and hold down the 4 RPT<br />
button ; for longer than two seconds.<br />
“RPT DIR” appears in the display.<br />
Cancelling REPEAT<br />
To stop the current track or current directory<br />
from being repeated,<br />
➮ briefly press the 4 RPT button ;.<br />
“RPT OFF” appears briefly and RPT<br />
disappears from the display.<br />
Pausing playback (PAUSE)<br />
➮ Press button 3 ;.<br />
“PAUSE” appears in the display.<br />
Cancelling pause<br />
➮ Press button 3 ; whilst pause<br />
is activated.<br />
Playback is resumed.<br />
49<br />
DANSK PORTUGUÊS<br />
NEDERLANDS<br />
ENGLISH DEUTSCH<br />
FRANÇAIS<br />
ITALIANO<br />
SVENSKA<br />
ESPAÑOL
CD-CHANGER MODE<br />
CD-changer mode<br />
Note:<br />
● Information on handling CDs, inserting<br />
CDs and operating the CD<br />
changer can be found in the operating<br />
instructions supplied with<br />
your CD changer.<br />
Switching to CD-changer mode<br />
➮ Press the SRC button = repeatedly<br />
until “CHANGER” appears<br />
in the display.<br />
The device starts playing the first CD<br />
that the CD changer detects.<br />
Selecting CDs<br />
To move up or down to another CD,<br />
➮ press the or button 8 once or<br />
several times.<br />
Note:<br />
● The device will ignore empty CD<br />
slots in the changer and slots containing<br />
invalid CDs.<br />
Selecting tracks<br />
To move up or down to another track<br />
on the current CD,<br />
➮ press the or button 8 once or<br />
several times.<br />
Fast searching (audible)<br />
For fast searching (backwards or forwards),<br />
➮ press and hold down one of the<br />
buttons 8 until fast searching<br />
backwards / forwards begins.<br />
50<br />
Configuring the display<br />
There are five display options available<br />
for CD-changer mode:<br />
● Track number and playing time<br />
(“TRCK-TIME”)<br />
● Track number and clock time<br />
(“TRCK-CLK”)<br />
● CD number and track number<br />
(“CD-TRCK”)<br />
● CD number and clock time<br />
(“CD-CLK”)<br />
● CD number and playing time<br />
(“CD-TIME”)<br />
➮ Press the MENU button 7.<br />
➮ Press the or button 8 repeatedly<br />
until “CDC DISP” appears in<br />
the display.<br />
➮ Press the or button 8 repeatedly<br />
until the option that you want<br />
is displayed.<br />
➮ Press the MENU button 7 twice.<br />
Repeating individual tracks or<br />
whole CDs (REPEAT)<br />
To repeat the current track,<br />
➮ briefly press the 4 RPT button ;.<br />
“RPT TRCK” appears briefly in the display<br />
and RPT is displayed.<br />
To repeat the current CD,<br />
➮ press and hold down the 4 RPT<br />
button ; for longer than two seconds.<br />
“RPT DISC” appears briefly in the display<br />
and RPT is displayed.
Cancelling REPEAT<br />
To stop the current track or current CD<br />
from being repeated,<br />
➮ briefly press the 4 RPT button ;.<br />
“RPT OFF” appears and RPT disappears<br />
from the display.<br />
Random track play (MIX)<br />
To play the tracks on the current CD in<br />
random order,<br />
➮ briefly press the 5 MIX button ;.<br />
“MIX CD” appears briefly in the display<br />
and MIX is displayed.<br />
To play the tracks on all the inserted CDs<br />
in random order,<br />
➮ press and hold down the 5 MIX<br />
button ; for longer than two seconds.<br />
“MIX ALL” appears briefly in the display<br />
and MIX is displayed.<br />
Cancelling MIX<br />
➮ Briefly press the 5 MIX button ;.<br />
“MIX OFF” appears and MIX disappears<br />
from the display.<br />
CD-CHANGER MODE<br />
Scanning all the tracks on all the<br />
CDs (SCAN)<br />
To scan (briefly play) all the tracks on<br />
all the inserted CDs in ascending order,<br />
➮ press and hold down the MENU<br />
button 7 for longer than two seconds.<br />
“TRK SCAN” appears in the display and<br />
the number of the current track flashes.<br />
Cancelling SCAN<br />
To stop scanning,<br />
➮ briefly press the MENU button 7.<br />
The currently scanned track will then<br />
continue to be played normally.<br />
Note:<br />
● You can set the scanning time. For<br />
further details, please read the section<br />
entitled “Setting the scanning<br />
time” in the “Radio mode” chapter.<br />
Pausing playback (PAUSE)<br />
➮ Press button 3 ;.<br />
“PAUSE” appears in the display.<br />
Cancelling pause<br />
➮ Press button 3 ; whilst pause<br />
is activated.<br />
Playback is resumed.<br />
51<br />
DANSK PORTUGUÊS<br />
NEDERLANDS<br />
ENGLISH DEUTSCH<br />
FRANÇAIS<br />
ITALIANO<br />
SVENSKA<br />
ESPAÑOL
REMOTE CONTROL CLOCK TIME<br />
Remote control<br />
<strong>Calgary</strong> <strong>MP35</strong><br />
Your car radio is equipped with an integrated<br />
infrared remote-control receiver.<br />
The receiver is built into the detachable<br />
control panel.<br />
You can safely and conveniently control<br />
the majority of the device’s functions<br />
using a steering-wheel remote control<br />
or handheld remote control (available<br />
as optional accessories).<br />
You cannot switch the device on/off using<br />
the remote control.<br />
Note:<br />
The infrared receiver that is included<br />
with the remote control only needs to<br />
be installed (as described in the installation<br />
instructions) if there is no direct<br />
line-of-sight connection between the<br />
remote control and the car radio.<br />
<strong>San</strong> <strong>Diego</strong> <strong>MP35</strong><br />
The <strong>San</strong> <strong>Diego</strong> <strong>MP35</strong> is supplied with<br />
the RC 12H handheld remote control.<br />
The infrared receiver is built into the<br />
detachable control panel. An additional<br />
receiver is not included.<br />
52<br />
CLOCK time<br />
Displaying the clock time<br />
To display the clock time briefly,<br />
➮ press and hold down the SRC<br />
button = until the clock time appears<br />
in the display.<br />
Setting the clock time<br />
To set the clock time,<br />
➮ press the MENU button 7.<br />
➮ Press the or button 8 repeatedly<br />
until “CLOCK SET” appears in<br />
the display.<br />
➮ Press the button 8.<br />
The clock time appears in the display.<br />
The hours flash and can be adjusted.<br />
➮ Adjust the hours using the<br />
tons 8.<br />
Once the hours are set,<br />
➮ press the button 8.<br />
The minutes flash.<br />
➮ Adjust the minutes using the<br />
buttons 8.<br />
but-<br />
➮ Press the MENU button 7 twice.<br />
Selecting 12/24-hour clock<br />
mode<br />
➮ Press the MENU button 7.<br />
“MENU” appears in the display.<br />
➮ Press the or button 8 repeatedly<br />
until “24 H MODE” or “12 H<br />
MODE” appears in the display.<br />
➮ Press the or button 8 to<br />
switch between the modes.
CLOCK TIME<br />
When you have finished adjusting the<br />
setting,<br />
➮ press the MENU button 7.<br />
Displaying the time continuously<br />
when the device is off and the<br />
ignition is on<br />
To display the time when the device is<br />
off and the vehicle ignition is on,<br />
➮ press the MENU button 7.<br />
“MENU” appears in the display.<br />
➮ Press the or button 8 repeatedly<br />
until “CLOCK OFF” or<br />
“CLOCK ON” appears in the display.<br />
➮ Press the or button 8 to<br />
switch between the ON/OFF settings.<br />
When you have finished adjusting the<br />
setting,<br />
➮ press the MENU button 7.<br />
Briefly displaying the time when<br />
the device is switched off<br />
To display the time briefly when the device<br />
is off,<br />
➮ press the SRC button =.<br />
The time is displayed for approx. 8 seconds.<br />
SOUND<br />
Sound<br />
You can adjust the sound settings (bass<br />
and treble) separately for each source<br />
(radio, CD/MP3, CD changer or AUX).<br />
The volume distribution settings (balance<br />
and fader) apply to all the audio<br />
sources (except for traffic announcements).<br />
You can only adjust the balance and<br />
fader settings for traffic announcements<br />
whilst a traffic announcement is actually<br />
being played.<br />
Adjusting the bass<br />
➮ Press the AUDIO button 6.<br />
“BASS” appears in the display.<br />
➮ Press the or button 8 to adjust<br />
the bass.<br />
When you have finished adjusting the<br />
setting,<br />
➮ press the AUDIO button 6.<br />
Adjusting the treble<br />
➮ Press the AUDIO button 6.<br />
“BASS” appears in the display.<br />
➮ Press the button 8 repeatedly<br />
until “TREBLE” appears in the display.<br />
➮ Press the or button 8 to adjust<br />
the treble.<br />
When you have finished adjusting the<br />
setting,<br />
➮ press the AUDIO button 6.<br />
53<br />
DANSK PORTUGUÊS<br />
NEDERLANDS<br />
ENGLISH DEUTSCH<br />
FRANÇAIS<br />
ITALIANO<br />
SVENSKA<br />
ESPAÑOL
SOUND<br />
Setting the left/right volume<br />
distribution (balance)<br />
To adjust the left/right volume distribution<br />
(balance),<br />
➮ press the AUDIO button 6.<br />
“BASS” appears in the display.<br />
➮ Press the button 8 repeatedly<br />
until “BAL” appears in the display.<br />
➮ Press the or button 8 to adjust<br />
the balance (right/left).<br />
When you have finished adjusting the<br />
setting,<br />
➮ press the AUDIO button 6.<br />
Adjusting the front/rear volume<br />
distribution (fader)<br />
To adjust the front/rear volume distribution<br />
(fader),<br />
➮ press the AUDIO button 6.<br />
“BASS” appears in the display.<br />
➮ Press the button 8 repeatedly<br />
until “FADER” appears in the display.<br />
➮ Press the or button 8 to adjust<br />
the fader (front/rear).<br />
When you have finished adjusting the<br />
setting,<br />
➮ press the AUDIO button 6.<br />
54<br />
Equalizer presets<br />
This device is equipped with an equalizer<br />
that has been preset with settings<br />
for the “ROCK”, “POP” and “CLASSIC”<br />
music styles.<br />
To select an equalizer preset,<br />
➮ press the AUDIO button 6.<br />
“BASS” appears in the display.<br />
➮ Press the button 8 repeatedly<br />
until “POP”, “ROCK”, “CLASSIC” or<br />
“EQ OFF” appears in the display.<br />
➮ Press the or button 8 to select<br />
one of the presets or select<br />
“EQ OFF” to switch off the equalizer.<br />
If you select one of the presets,<br />
it is shown continuously in the display.<br />
When you have finished adjusting the<br />
setting,<br />
➮ press the AUDIO button 6.
X-BASS LEVEL DISPLAY<br />
X-BASS<br />
You can use the X-Bass feature to boost<br />
the bass at low volume levels.<br />
The selected X-Bass setting affects all<br />
the audio sources (radio, CD/MP3, CD<br />
changer or AUX).<br />
You can set the X-BASS boost in steps<br />
ranging from 1 to 3.<br />
“XBASS OFF” means that the X-BASS<br />
function is switched off.<br />
Adjusting the X-BASS boost<br />
➮ Press the X-BASS button 9.<br />
➮ Press the or button 8 repeatedly<br />
until the setting that you want<br />
appears in the display.<br />
When you have finished adjusting the<br />
setting,<br />
➮ press the X-BASS button 9.<br />
Configuring the level<br />
display<br />
The level display temporarily provides<br />
you with a symbolic representation of<br />
the volume and audio settings whilst you<br />
are adjusting them.<br />
When you are not changing any settings,<br />
the level display depicts the peak<br />
music/speech output. You can switch<br />
the level display on/off.<br />
➮ Press the MENU button 7.<br />
“MENU” appears in the display.<br />
➮ Press the or button 8 repeatedly<br />
until “PEAK LVL” appears in<br />
the display.<br />
➮ Press the or button 8 to<br />
switch between “PEAK ON” and<br />
“PEAK OFF”.<br />
When you have finished adjusting the<br />
setting,<br />
➮ press the MENU button 7 twice.<br />
55<br />
DANSK PORTUGUÊS<br />
NEDERLANDS<br />
ENGLISH DEUTSCH<br />
FRANÇAIS<br />
ITALIANO<br />
SVENSKA<br />
ESPAÑOL
EXTERNAL AUDIO SOURCES<br />
56<br />
SPECIFICATIONS<br />
External audio sources Specifications<br />
Instead of connecting a CD changer,<br />
you can connect another audio source<br />
equipped with a line output. Audio sources<br />
can, for example, be portable CD<br />
players, MiniDisc players or MP3 players.<br />
If you want to connect an external audio<br />
source, you will need an adapter<br />
Amplifier<br />
Output power: 4 x 25 watts sine<br />
in accordance with<br />
DIN 45 324<br />
at 14.4 V<br />
4 x 45 watts max.<br />
power<br />
cable. You can obtain this cable (<strong>Blaupunkt</strong><br />
no.: 7 607 897 093) from your Tuner<br />
authorised <strong>Blaupunkt</strong> dealer.<br />
Wavebands in Europe:<br />
Note:<br />
● If no CD changer is connected, the<br />
AUX input must be activated in the<br />
FM :<br />
MW :<br />
LW :<br />
87.5 - 108 MHz<br />
531 - 1 602 kHz<br />
153 - 279 kHz<br />
menu.<br />
FM frequency response:<br />
Switching the AUX input on/off<br />
35 - 16,000 Hz<br />
➮ Press the MENU button 7.<br />
“MENU” appears in the display.<br />
CD<br />
➮ Press the or button 8 repeatedly<br />
until “AUX OFF” or “AUX ON”<br />
Frequency response:<br />
20 - 20,000 Hz<br />
appears in the display.<br />
➮ Press the or button 8 to<br />
switch AUX on/off.<br />
Pre-amp out<br />
4 channels: 2 V<br />
When you have finished adjusting the<br />
setting,<br />
Input sensitivity<br />
➮ press the MENU button 7.<br />
Note:<br />
AUX input: 2 V / 6 kΩ<br />
● If the AUX input is activated, you<br />
can select it by pressing the SRC<br />
button =. “AUX INPUT” then<br />
appears in the display.<br />
Subject to changes!
Bitte den ausgefüllten Gerätepass sicher aufbewahren!<br />
Please keep the filled-in radio pass in a safe place!<br />
Prière de conserver soigneusement la carte d’autoradio remplie !<br />
Tenete per favore il libretto di apparecchio, debitamente riempito,<br />
in un posto sicuro!<br />
Bewaar de ingevulde apparaatpas op een veilige plaats!<br />
Vänligen förvara ifyllt apparatpass på säker plats!<br />
¡Favor guardar el documento del aparato debidamente llenado en<br />
un lugar seguro!<br />
Por favor, guardar o cartão preenchido do aparelho num lugar<br />
seguro!<br />
Det udfyldte apparatpas opbevares et sikkert sted!<br />
253<br />
DANSK PORTUGUÊS<br />
NEDERLANDS<br />
ENGLISH DEUTSCH<br />
FRANÇAIS<br />
ITALIANO<br />
SVENSKA<br />
ESPAÑOL
Country: Phone: Fax: WWW:<br />
Germany (D) 0180-5000225 05121-49 4002 http://www.blaupunkt.com<br />
Austria (A) 01-610 39 0 01-610 39 391<br />
Belgium (B) 02-525 5444 02-525 5263<br />
Denmark (DK) 44 898 360 44-898 644<br />
Finland (FIN) 09-435 991 09-435 99236<br />
France (F) 01-4010 7007 01-4010 7320<br />
Great Britain (GB) 01-89583 8880 01-89583 8394<br />
Greece (GR) 210 94 27 337 210 94 12 711<br />
Ireland (IRL) 01-4149400 01-4598830<br />
Italy (I) 02-369 62331 02-369 62464<br />
Luxembourg (L) 40 4078 40 2085<br />
Netherlands (NL) 023-565 6348 023-565 6331<br />
Norway (N) 66-817 000 66-817 157<br />
Portugal (P) 01-2185 00144 01-2185 11111<br />
Spain (E) 902 52 77 70 91 410 4078<br />
Sweden (S) 08-7501500 08-7501810<br />
Switzerland (CH) 01-8471644 01-8471650<br />
Czech. Rep. (CZ) 02-6130 0441 02-6130 0514<br />
Hungary (H) 01-333 9575 01-324 8756<br />
Poland (PL) 0800-118922 022-8771260<br />
Turkey (TR) 0212-335 06 69 0212-346 00 40<br />
USA (USA) 800-2662528 708-6817188<br />
Brasil<br />
(Mercosur) (BR) +55-19 3745 2769 +55-19 3745 2773<br />
Malaysia<br />
(Asia Pacific) (MAL) +604-6382 474 +604-6413 640<br />
02/05 - CM/ASA<br />
Gerätepass<br />
Name: ....................................................<br />
Typ: ....................................................<br />
7 645<br />
Serien-Nr: BP ...............................................<br />
<strong>Blaupunkt</strong> GmbH, Robert-Bosch-Straße 200, D-31139 Hildesheim
(DE) Hinweis zum PTY-EON-Empfang<br />
Wenn Ihr <strong>Blaupunkt</strong>-Gerät von einem gehörten Radioprogramm zu einem anderen<br />
Radioprogramm oder von einer gewählten Quelle (CD oder CD-Wechsler) zu<br />
einem Radioprogramm umschaltet, so überprüfen Sie bitte, ob Sie PTY<br />
(Programm-Typ) eingeschaltet haben.<br />
Möchten Sie diese PTY-EON-Umschaltung nicht haben, so schalten Sie diese im<br />
Menü mit „PTY off” aus. Drücken Sie zuvor eine der Tasten AUDIO, SRC oder<br />
BND.<br />
Bitte lesen Sie dazu auch in der Bedienungsanleitung unter „Radiobetrieb” den<br />
Absatz „Programm-Typ (PTY)”.<br />
(GB) Note regarding PTY-EON reception<br />
If your <strong>Blaupunkt</strong> system switches from your chosen radio programme to another<br />
radio programme or from your chosen audio source (CD or CD changer) to a radio<br />
programme, please check whether you have activated the PTY (programme type)<br />
function.<br />
If you do not want this PTY-EON switching to occur, you should deactivate it in the<br />
menu by selecting “PTY off”. Press one of the AUDIO, SRC or BND buttons<br />
beforehand.<br />
Please also read about this in the operating instructions in the section entitled<br />
“Programme type (PTY)” under “Radio mode”.<br />
(FR) Remarque concernant la réception PTY EON<br />
Quand votre appareil <strong>Blaupunkt</strong> commute d’une émission de radio que vous êtes<br />
en train d’écouter à un autre programme radio ou d’une source (CD ou changeur<br />
CD) que vous avez choisie, assurez-vous d’avoir activé PTY (type de programme).<br />
Si vous ne souhaitez pas cette commutation PTY EON, désactivez-la en<br />
sélectionnant « PTY off » dans le menu. Appuyez au préalable sur l’une des<br />
touches AUDIO, SRC ou BND.<br />
Pour plus d’informations, reportez-vous également au paragraphe « Type de<br />
programme (PTY) » du chapitre « Mode radio » du mode d’emploi.<br />
(IT) Nota sulla ricezione del PTY-EON<br />
Quando il vostro apparecchio <strong>Blaupunkt</strong> si sintonizza da un radioprogramma in<br />
ascolto ad un altro, oppure si disinserisce dalla fonte audio selezionata (CD o<br />
multilettore CD) e passa alla ricezione di un programma radio, controllate per<br />
favore se avete inserito la funzione PTY (tipo di programma).<br />
8 622 404 794<br />
1
Se volete evitare queste commutazioni PTY-EON, selezionate nel menu la funzione<br />
"PTY off". Prima di fare ciò premete uno dei tasti AUDIO, SRC o BND.<br />
Leggete per favore a tale proposito quanto riportato nelle istruzioni d’uso nella<br />
sezione "Esercizio Radio" al punto "Tipo di programma (PTY)".<br />
(NL) Aanwijzing bij de PTY-EON-ontvangst<br />
Wanneer uw <strong>Blaupunkt</strong>-apparaat van één beluisterde radiozender overschakelt op<br />
een andere, of van een gekozen geluidsbron (cd of cd-wisselaar) op een<br />
radiozender, kunt u controleren of u PTY (programmatype) hebt ingeschakeld.<br />
Wanneer u geen prijs stelt op deze PTY-EON-omschakeling, schakelt u deze in het<br />
menu uit met "PTY off". Druk van tevoren op een van de toetsen AUDIO, SRC of<br />
BND.<br />
Lees hiervoor ook in de gebruiksaanwijzing onder "Radioweergave" de alinea<br />
"Programmatype (PTY)".<br />
(SW) Information om mottagning med PTY-EON<br />
Byter din <strong>Blaupunkt</strong> bilstereo självmant från inställt radioprogram eller spelad cd/cdväxlare<br />
till annat radioprogram? Då är möjligen funktionen Programtyp (PTY-EON)<br />
tillkopplad.<br />
Om Du vill undvika detta, frånkopplar Du funktionen Programtyp (PTY-EON) i<br />
menyn. Tryck först på någon av knapparna AUDIO, SRC eller BND och välj sedan<br />
"PTY off".<br />
För mer information, se avsnittet "Programtyp (PTY)" i bruksanvisningens kapitel<br />
"Radio".<br />
(ES) Observaciones sobre la recepción PTY-EON<br />
Si su equipo <strong>Blaupunkt</strong> cambia de la emisora de radio que está escuchando a otra,<br />
o de la fuente de sonido seleccionada (CD o cambiadiscos) a una emisora de<br />
radio, verifique si tiene activada la función PTY (tipo de programa).<br />
Si no desea que el equipo cambie automáticamente a emisoras PTY-EON,<br />
desactive dicha función seleccionando la opción “PTY off” en el menú. Pulse<br />
previamente una de las teclas AUDIO, SRC o BND.<br />
Para más detalles, consulte el punto “Tipo de programa (PTY)” en el capítulo<br />
“Modo de radio” de las instrucciones de manejo.<br />
2
(PT) Informação sobre a recepção no modo PTY-EON<br />
Se o seu aparelho mudar de um programa para outro programa ou de uma fonte<br />
que está a ouvir actualmente (CD ou CDC) para um programa radiofónico,<br />
verifique se a função PTY (tipo de programa) está activada.<br />
Se não desejar usar a função PTY-EON, desactive-a no menu escolhendo a opção<br />
“PTY OFF”. Prima anteriormente uma das teclas AUDIO, SRC ou BND.<br />
Para tal, leia também o parágrafo “Tipo de programas (PTY)” no capítulo “Rádio”<br />
nas instruções de serviço.<br />
(DK) Oplysning om PTY-EON-modtagelse<br />
Hvis din <strong>Blaupunkt</strong> radio slår fra det aktuelle radioprogram over i et andet eller fra<br />
en valgt kilde (CD eller Multi CD) over i et radioprogram, bør du tjekke om du har<br />
tændt for PTY (programtype).<br />
Hvis PTY-EON-omskiftningen ikke ønskes, deaktiveres funktionen med "PTY off" i<br />
menuen. Forinden trykkes på en af tasterne AUDIO, SRC eller BND.<br />
Læs også afsnittet om "Programtype (PTY)" under "Radiodrift" i<br />
betjeningsvejledningen.<br />
(SF) PTY-EON-vastaanottoon liittyvä ohje<br />
Jos <strong>Blaupunkt</strong>-laite vaihtaa kuuntelemastasi radio-ohjelmasta toiseen radioohjelmaan<br />
tai valitsemastasi äänilähteestä (CD tai CD-vaihtaja) johonkin radioohjelmaan,<br />
tarkista onko PTY (ohjelmatyypin tunnistus) päällä.<br />
Jos et halua laitteen vaihtavan radio-ohjelmaa automaattisesti PTY-EON-toiminnon<br />
avulla, voit kytkeä sen pois toiminnasta valikossa ("PTY off"). Paina ensin jotain<br />
painikkeista AUDIO, SRC tai BND.<br />
Lue myös käyttöohjeen kohdasta "Radiokäyttö" kappale "Ohjelmatyyppi (PTY)".<br />
(PL) (PL) Wskazówki Wskazówki dotyczàce dotyczàce odbioru odbioru odbioru PTY-EON<br />
PTY-EON<br />
Gdy urzàdzenie prze∏àcza si´ z jednej stacji radiowej na innà lub z wybranego<br />
êród∏a audio (CD / zmieniacz CD) na odbiór programu radiowego, to nale˝y<br />
sprawdziç, czy w∏àczony program jest programem typu PTY.<br />
Je˝eli nie chcà Paƒstwo korzystaç z funkcji PTY EON, to prosz´ w odpowiednim<br />
menu wybraç opcj´ „PTY off”. Przed wybraniem tej opcji trzeba wcisnàç jeden z<br />
przycisków AUDIO, SRC lub BND.<br />
Dalsze informacje na ten temat znajdà Paƒstwo w instrukcji obs∏ugi w rozdziale<br />
„Tryb obs∏ugi radia”, w punkcie „Typ programu (PTY)”.<br />
3
(CZ) (CZ) (CZ) Upozornûní Upozornûní Upozornûní k k k pfiíjmu pfiíjmu s s s funkcí funkcí PTY-EON PTY-EON<br />
PTY-EON<br />
Pokud se vበpfiístroj pfiepne ze stanice, kterou právû posloucháte, na jinou<br />
rozhlasovou stanici, nebo ze zvoleného zdroje (CD nebo mûniã CD) na jiné<br />
rozhlasové vysílání, zkontrolujte, jestli není zapnutá funkce PTY (typ programu).<br />
Pokud si nepfiejete, aby do‰lo k pfiepínání pfiístroje funkcí PTY-EON, vypnûte ji<br />
v nabídce bodem „PTY off”. Stisknûte nejprve jedno z tlaãítek AUDIO, SRC nebo<br />
BND.<br />
Bliωí informace k tomuto bodu naleznete v návodu k obsluze v kapitole „ReÏim<br />
rádia” v odstavci „Typ programu (PTY)”.<br />
(HU) Utasítás a PTY-EON vételhez<br />
Ha az Ön <strong>Blaupunkt</strong> készüléke egy hallgatott rádiómæsorról egy másik<br />
rádiómæsorra vagy egy kiválasztott forrásról (CD vagy CD-váltó) egy rádiómæsorra<br />
kapcsol át, úgy kérjük ellenœrizze, hogy bekapcsolta-e a PTY-t (mæsortípus).<br />
Ha Önnek nem megfelelœ ez a PTY-EON átkapcsolás, kérjük, kapcsolja azt ki a<br />
menüben a „PTY off”-fal. Elœtte azonban nyomja le az AUDIO, SRC vagy BND<br />
gombok egyikét.<br />
Kérjük, ezzel kapcsolatban olvassa el a kezelési útmutató „Rádió üzemmód”<br />
fejezetében a „Mæsortípus (PTY)” c. bekezdést.<br />
(KR) (KR) (KR) Napomena Napomena uz uz PTY-EON-prijem<br />
PTY-EON-prijem<br />
PTY-EON-prijem<br />
Ako Va‰ <strong>Blaupunkt</strong> ure∂aj prebacuje sa jednog radio-programa na neki drugi ili sa<br />
jednog izabranog izvora (CD ili CD-izmjenjivaã) na neki radio-program, onda<br />
molimo da provjerite, da li ste ukljuãili PTY (tip programa).<br />
Ako ne Ïelite ovo PTY-EON-prebacivanje, onda ga iskljuãite u meniju sa „PTY<br />
off”. Prethodno pritisnite jednu od tipki AUDIO, SRC ili BND.<br />
Molimo Vas, o tome proãitajte i u uputama za upotrebu pod „Rad radija” poglavlje<br />
„Tip programa (PTY)”.<br />
(SE) (SE) Napomena Napomena uz uz PTY-EON-prijem<br />
PTY-EON-prijem<br />
Ako Va‰ <strong>Blaupunkt</strong> ure∂aj prebacuje sa jednog radio-programa na neki drugi ili sa<br />
jednog izabranog izvora (CD ili CD-izmenjivaã) na neki radio-program, onda<br />
molimo da proverite, da li ste ukljuãili PTY (tip programa).<br />
Ako ne Ïelite ovo PTY-EON-prebacivanje, onda ga iskljuãite u meniju sa “PTY<br />
off”. Prethodno pritisnite jedan od tastera AUDIO, SRC ili BND.<br />
Molimo Vas, o tome proãitajte i u uputstvu za upotrebu pod “Rad radija” pasus<br />
“Tip programa (PTY)”.<br />
4
(SK) (SK) Pokyny Pokyny pre pre pre príjem príjem PTY-EON<br />
PTY-EON<br />
Ak Vበprístroj <strong>Blaupunkt</strong> prepína z poãúvaného rádioprogramu na in˘<br />
rádioprogram alebo z niektorého zvoleného zdroja (CD alebo meniãa CD) na in˘<br />
rádioprogram, tak prosím skontrolujte, ãi ste zapnuli PTY (Program Type).<br />
Ak nechcete toto prepínanie PTY-EON, vypnite ho v menu pomocou “PTY off”.<br />
Stlaãte pred t˘m niektoré z tlaãidiel AUDIO, SRC alebo BND.<br />
Preãítajte si prosím k tomu tieÏ v návode na obsluhu, pod “Rádiová prevádzka”<br />
odsek “Program Type (PTY)”.<br />
(SL) (SL) (SL) Navodilo Navodilo Navodilo za za PTY-EON PTY-EON sprejem<br />
sprejem<br />
Ko se Va‰a <strong>Blaupunkt</strong> naprava preklopi iz slu‰nega radijskega programma na<br />
drugi radijski program, oziroma iz izbrane zveze (CD ali CD-menjalca) na radijski<br />
program, Vas prosimo, da preverite, ãe ste vklopili PTY (programni-tip).<br />
âe noãete preklop PTY-EON, potem priklopite le-tega v meniju na „PTY off”.<br />
Pritisnite pred tem na tipko AUDIO, SRC oziroma na BND.<br />
Prosimo, da si preberete v navodilih za uporabo pod “radijo delovanje” odstavek<br />
“program-tip (PTY)”.<br />
(TR) PTY-EON yay∂n∂ al∂nmas∂ ile ilgili bilgi<br />
Eπer <strong>Blaupunkt</strong> cihaz∂n∂z dinlediπiniz bir radyo program∂ndan baµka bir radyo<br />
program∂na veya seçmiµ olduπunuz bir kaynaktan (CD veya CD deπiµtirici) bir<br />
radyo program∂na geçerse, PTY (program tipi) fonksiyonunu açm∂µ olup<br />
olmad∂π∂n∂z∂ lütfen kontrol ediniz.<br />
Eπer bu PTY-EON geçiµini istemiyorsan∂z, bu fonksiyonu menü üzerinden "PTY off"<br />
ile kapat∂n∂z. Bu iµlemden önce AUDIO, SRC veya BND tuµlar∂ndan birine bas∂n∂z.<br />
Lütfen bu konu ile ilgili olarak, kullanma k∂lavuzunda "Radyo modu" bölümündeki<br />
"Program tipi (PTY)" k∂sm∂n∂ okuyunuz.<br />
(GR) Àapplefi‰ÂÈÍË ÁÈ· ÙË Ï‹„Ë PTY-EON<br />
ŸÙ·Ó Ë Û˘Û΢‹ Û·˜ <strong>Blaupunkt</strong> ·ÏÏ¿˙ÂÈ ·applefi ¤Ó· Ú·‰ÈÔʈÓÈÎfi appleÚfiÁÚ·ÌÌ· appleÔ˘<br />
·ÎÔ‡Ù Û ¤Ó· ¿ÏÏÔ Ú·‰ÈÔʈÓÈÎfi appleÚfiÁÚ·ÌÌ· ‹ ·applefi ÌÈ· ÂappleÈÏÂÁ̤ÓË appleËÁ‹ (CD<br />
‹ ÙÚÔÊÔ‰fiÙ˘ CD) Û ¤Ó· Ú·‰ÈÔʈÓÈÎfi appleÚfiÁÚ·ÌÌ·, ÙfiÙ ÂϤÁÍÙ apple·Ú·Î·ÏÒ,<br />
Â¿Ó ¤¯ÂÙ ÂÓÂÚÁÔappleÔÈ‹ÛÂÈ ÙÔ PTY (Ù‡appleÔ˜ appleÚÔÁÚ¿ÌÌ·ÙÔ˜).<br />
ŸÙ·Ó ‰ÂÓ ÂappleÈı˘Ì›Ù ӷ ¤¯ÂÙ ·˘Ù‹ ÙËÓ ·ÏÏ·Á‹ ÏÂÈÙÔ˘ÚÁ›·˜ PTY-EON, ÙfiÙÂ<br />
·appleÂÓÂÚÁÔappleÔÈ‹ÛÙ ÙËÓ ÛÙÔ ÌÂÓÔ‡ Ì “PTY OFF”. ·Ù‹ÛÙ appleÚÔËÁÔ˘Ì¤Óˆ˜ ¤Ó·<br />
·applefi Ù· appleÏ‹ÎÙÚ· AUDIO, SRC ‹ BND.<br />
¢È·‚¿ÛÙ apple·Ú·Î·ÏÒ ÁÈ’ ·˘Ùfi Âapple›Û˘ ÛÙȘ Ô‰ËÁ›Â˜ ¯ÂÈÚÈÛÌÔ‡ οو ·applefi<br />
“§ÂÈÙÔ˘ÚÁ›· Ú·‰ÈÔÊÒÓÔ˘” ÙËÓ ÂÓfiÙËÙ· “∆‡appleÔ˜ appleÚÔÁÚ¿ÌÌ·ÙÔ˜ (PTY)”.<br />
5
(RU) Указание по приему PTY-EON<br />
При переключении тюнера аппарата <strong>Blaupunkt</strong> на другую радиостанцию или<br />
переключении с радиоприема на другой источник звука (проигрыватель CD<br />
или CD-чейнджер) проверьте, пожалуйста, включена ли функция PTY (тип<br />
программы). Eсли Вы хотите отключить автоматический выбор программ<br />
PTY-EON, то выключите эту функцию опцией меню "PTY off". Для этого<br />
нажмите одну из следующих клавиш – AUDIO, SRC или BND.<br />
Ознакомьтесь, пожалуйста, с соответствующими инструкциями о включении<br />
автоматического режима выбора программ (PTY) в разделе "Прием<br />
радиопередач" пользовательской документации к Вашему аппарату<br />
<strong>Blaupunkt</strong>.<br />
6