Roboboa User Manual - WowWee
Roboboa User Manual - WowWee
Roboboa User Manual - WowWee

You also want an ePaper? Increase the reach of your titles
YUMPU automatically turns print PDFs into web optimized ePapers that Google loves.
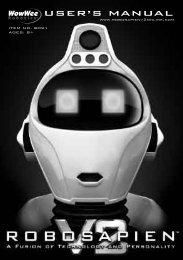
ROBOBOA<br />
A Fusion of Technology and Personality<br />
<strong>User</strong> <strong>Manual</strong><br />
Item No. 8032 | Ages 8+
Welcome<br />
Hold<br />
mode<br />
C<br />
ongratulations on purchasing your new<br />
<strong>Roboboa</strong> from Wowwee, a cool sci-fi<br />
tech toy with mood and mobility. Combining<br />
advanced A.I. animations with lights, vision, and<br />
sound, <strong>Roboboa</strong> is a smart desk light, wake-up<br />
alarm, scanning room guard, disco marquee,<br />
roving tank, safety light, playful cannon, and<br />
friendly and attentive “alien” robot. Fun and<br />
useful for the whole family!<br />
Please read these instructions carefully for<br />
details on how to get the most out of your<br />
<strong>Roboboa</strong>.<br />
Package contents<br />
1 x <strong>Roboboa</strong><br />
1 x Remote controller<br />
This user manual<br />
tail/head<br />
Reset<br />
Scan<br />
Sleep<br />
Daily<br />
track<br />
explore<br />
alarm<br />
Sentry<br />
Party<br />
guard<br />
demo<br />
execute<br />
Program<br />
Strafe<br />
Lazer<br />
Cannon<br />
Test<br />
Patrol<br />
Volume<br />
Back
Contents<br />
Welcome p.1<br />
Contents<br />
p.2-3<br />
Getting started p.4<br />
Battery details p.4<br />
<strong>Roboboa</strong><br />
Remote controller<br />
Low Power<br />
<strong>Roboboa</strong> overview p.5<br />
Controller overview p.6<br />
Power on / off p.7<br />
Stop and reset p.7<br />
Stopping <strong>Roboboa</strong><br />
Resetting <strong>Roboboa</strong><br />
Aware mode p.7<br />
Mode Light button p.8<br />
Remote controller functions overview p.8<br />
Remote controller quick reference p.9<br />
Remote controller directional pad p.10<br />
Miscellaneous directional pad functions p.11<br />
Stop function<br />
Hold function<br />
Shutdown function p.12<br />
Mode light function<br />
Safety light mode p.13<br />
Remote flashlight mode p.13<br />
Mode functions p.13<br />
Tail / Head function p.14<br />
Reset function p.14<br />
Strafing p.14<br />
Track mode p.15<br />
Scan mode p.15<br />
Explore mode p.15
Contents<br />
Alarm modes p.15<br />
Sleep mode p.16<br />
Guard modes p.16<br />
Demo mode p.17<br />
Party mode p.17<br />
Volume control p.17<br />
Program function p.17<br />
Programming <strong>Roboboa</strong> p.17<br />
Program Mode<br />
Back function p.18<br />
Program play function p.18<br />
Troubleshooting guide p.19<br />
Support p.19<br />
Notes p.20
Battery details<br />
Getting started<br />
To use your <strong>Roboboa</strong>, insert batteries (see below), place him on a large level<br />
surface with his battery compartments facing downwards, turn him on, and<br />
explore some of his functions from the Button overview table (see page 6).<br />
Read on for full details about your grooving, roving, attentive robot friend.<br />
Battery details<br />
This sections deals with battery<br />
information for your <strong>Roboboa</strong><br />
and his remote controller.<br />
<strong>Roboboa</strong> battery requirements<br />
Your <strong>Roboboa</strong> is powered by<br />
4 x “D” size batteries (not included).<br />
Battery installation<br />
Before installing or changing<br />
batteries, be sure the power<br />
button located on the robot’s<br />
tail is in the OFF position (see<br />
page 7).<br />
1. Remove the battery compartment<br />
covers using a Phillips<br />
screwdriver (not included).<br />
2. Insert batteries into <strong>Roboboa</strong><br />
as illustrated in the diagram.<br />
3. Replace the battery covers and<br />
all screws.<br />
1.5V “D”<br />
LR20/UM1<br />
1.5V “D”<br />
LR20/UM1<br />
Bottom view of<br />
<strong>Roboboa</strong>’s body<br />
1.5V “D”<br />
LR20/UM1<br />
1.5V “D”<br />
LR20/UM1<br />
Low power<br />
When <strong>Roboboa</strong>’s batteries are low, the LEDs on <strong>Roboboa</strong>’s<br />
face will continuously pulse with a hiss sound. When this<br />
happens, you need to replace all robot batteries.<br />
Remote controller battery requirements<br />
<strong>Roboboa</strong>’s remote controller is powered<br />
by 4 x “AAA” size batteries (not included).<br />
Battery installation<br />
To install the batteries in <strong>Roboboa</strong>’s remote<br />
controller:<br />
1. Remove the battery compartment<br />
cover using a Phillips screwdriver (not<br />
included).<br />
2. Insert batteries into the controller as<br />
illustrated in the diagram.<br />
3. Replace the battery cover and lightly<br />
tighten the holding screw.<br />
Low power<br />
If <strong>Roboboa</strong> is not responding well to<br />
controller commands, you might need to<br />
replace the controller batteries.<br />
ATTENTION: Important battery information<br />
• Replace all batteries at the same time with new batteries of the same type, size,<br />
and brand.<br />
• Use only fresh batteries of required size and recommended type.<br />
• Do not mix old and new batteries, different brands of batteries<br />
(standard Carbon-Zinc, Alkaline or rechargeable), or rechargeable<br />
batteries of different capacities.<br />
• Respect the correct contact and battery polarities, (+) and (-).<br />
• Rechargeable batteries must be charged under adult supervision.<br />
• Do not attempt to recharge non-rechargeable batteries.<br />
• Do not burn or incinerate used batteries.<br />
• Do not short-circuit battery terminals.<br />
• Remove exhausted batteries from <strong>Roboboa</strong> to avoid leakage damage.<br />
• Batteries should be replaced under adult supervision.<br />
• Remove batteries if the toy is not going to be played with for some time.<br />
• Rechargeable batteries must be removed from the toy before being charged.<br />
1.5V<br />
LR03<br />
UM4<br />
“AAA”<br />
1.5V<br />
LR03<br />
UM4<br />
“AAA”<br />
1.5V<br />
LR03<br />
UM4<br />
“AAA”<br />
1.5V<br />
LR03<br />
UM4<br />
“AAA”<br />
1.5V<br />
LR03<br />
UM4<br />
“AAA”<br />
1.5V<br />
LR03<br />
UM4<br />
“AAA”<br />
Bottom view of<br />
remote controller
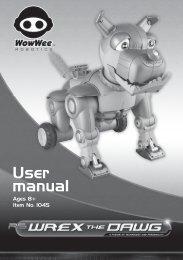
<strong>Roboboa</strong> Overview<br />
IR receiver<br />
Animation face lights<br />
On/Off button<br />
Motorized tail wheel<br />
IR transmitters<br />
Mode light button<br />
Casters<br />
Light sensor
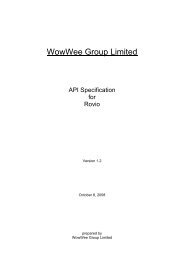
Controller Overview<br />
Mode button (small)<br />
Flashlight LED<br />
Signal indicator LED<br />
Hold<br />
mode<br />
Mode button (large)<br />
Directional pad<br />
Tail / Head button<br />
Track button<br />
Explore button<br />
Alarm button<br />
Guard button<br />
Demo button<br />
Execute button<br />
tail/head<br />
Reset<br />
Scan<br />
Sleep<br />
Daily<br />
track<br />
explore<br />
alarm<br />
Sentry<br />
Party<br />
guard<br />
demo<br />
execute<br />
Program<br />
Strafe<br />
Lazer<br />
Cannon<br />
Test<br />
Patrol<br />
Volume<br />
Back<br />
NOTE: Always point the controller at the <strong>Roboboa</strong>’s face when controlling him.
Power on / off / Stop and reset / Aware mode<br />
Power on / off<br />
Resetting <strong>Roboboa</strong><br />
ON<br />
ON / OFF<br />
OFF<br />
You can reset <strong>Roboboa</strong> to Aware mode by pressing the Stop button again. <strong>Roboboa</strong><br />
will return to the default (start-up) position no matter what position he<br />
was in. While resetting, his eyes will only show a steady orange color, and then<br />
enter the yellow-eyed Aware mode when he’s ready.<br />
Aware mode<br />
In Aware mode, <strong>Roboboa</strong> will pay attention to objects in front of him up to several<br />
feet away. He might react to these objects in one of the following ways:<br />
<strong>Roboboa</strong>’s power button is located in the center of his tail wheel. To turn him<br />
on or off, toggle the power button by pressing it. <strong>Roboboa</strong> will reset himself and<br />
automatically enter Aware mode.<br />
Stop and reset<br />
This section describes how to use the stop and reset functions (including the<br />
Mode Light button functions) on <strong>Roboboa</strong>.<br />
Stopping <strong>Roboboa</strong><br />
To freeze <strong>Roboboa</strong> in place, press the entire remote-control directional pad<br />
inwards for Stop. He will remain still for about 2 minutes, and then re-enter<br />
Aware mode.<br />
Flinch response: If <strong>Roboboa</strong> sees an object pass by his face quickly, he will<br />
emit a surprised sound.<br />
Follow response: If an object stays within view for a second or more, he will<br />
emit a recognizing sound and then track it as it moves.<br />
Frustration response: If an object stays too close to his face for too long,<br />
then <strong>Roboboa</strong> will turn away.<br />
Scanning response: When left alone, <strong>Roboboa</strong> will scan around for something<br />
interesting to look at.<br />
Timeout response: If <strong>Roboboa</strong> is not disturbed for about 2 hours, he will fold<br />
up and go to sleep (see page 16).
Mode Light button / Remote controller functions overview<br />
Mode Light button<br />
You can press the Mode Light button on top of the <strong>Roboboa</strong>’s head to stop him<br />
in place, and then enter one of three different Lighting modes: Spotlight, Wide,<br />
and Full.<br />
Remote controller functions overview<br />
Most of the <strong>Roboboa</strong> functions can be controlled from his multi-function<br />
remote controller.<br />
<strong>Roboboa</strong>’s remote controller can be used<br />
by right or left handed users. You can lay<br />
it flat, on its side, or even use it as a smart<br />
flashlight. Each of the buttons on the<br />
remote controller can be used for more<br />
than one function:<br />
Note: Both the small Mode button and the large Mode button on the remote<br />
controller have the same function for left or right hand use.<br />
When <strong>Roboboa</strong> is in these Lighting modes, he cannot see or move by himself.<br />
However, he will revert back to Aware mode after about 1 hour if he does not<br />
receive a signal or any other input.<br />
NOTE: If you hold this button down for more than 2 seconds, <strong>Roboboa</strong> will<br />
enter Safety Light mode where he will turn his lights on anything shown in front<br />
of him. (For more details, see page 13).<br />
Command<br />
Instant commands<br />
Held commands<br />
Description<br />
Press any action button quickly once.<br />
Example: press the Demo button.<br />
Press and hold any action button for more than<br />
2 seconds.<br />
Example: press and hold the Demo button to<br />
get Party mode.<br />
Mode commands<br />
Press and hold the Mode button, then press any<br />
action button within 2 seconds.<br />
Example: Hold the Mode button down then<br />
press the Demo button to change the volume.
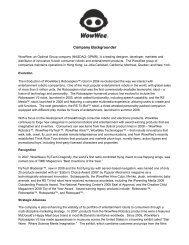
Remote controller quick reference<br />
The following is a quick reference guide to remote controller functions:<br />
<strong>Roboboa</strong> remote controller quick reference<br />
•Switches the LEDs between 4 modes.<br />
•(Hold for 2 seconds) Light turns on if sees<br />
something, but does not track, like a Safety<br />
light.<br />
Hold<br />
ACTION LED<br />
mode<br />
•Toggles trackpad between Head/Neck and<br />
Body/Tail movements<br />
•Reset robot to default<br />
•Machine gun round<br />
•Press once for STOP, press again for RESET.<br />
•HOLDs position as a sun-activated nightlight.<br />
•8 direction action trackpad.<br />
•Disco dance demonstration<br />
•Waving disco party marquee •Set volume<br />
•Executes stored program<br />
•Records program steps •Back one prog step<br />
tail/head<br />
Reset<br />
Scan<br />
Sleep<br />
Daily<br />
track<br />
explore<br />
alarm<br />
Sentry<br />
Party<br />
guard<br />
demo<br />
execute<br />
Program<br />
Strafe<br />
Lazer<br />
Cannon<br />
Test<br />
Patrol<br />
Volume<br />
Back<br />
•Follow and light moving things<br />
•Search area for objects •Lazer shot<br />
•Let’s check this crib out<br />
•Fold up sleep •Cannon round<br />
•Set future alarm time up to 16 hours<br />
•Same time every day •Test alarm<br />
•Tabletop machine gun guard mode<br />
•Spinning guard mode<br />
•Roving guard mode
Remote controller directional pad<br />
Remote controller directional pad<br />
By default the remote controller’s directional pad provides eight<br />
control directions for your robot’s head and neck.<br />
The directional pad also controls the body and tail movements<br />
using the Tail / Head button (See page 14).<br />
The directional pad moves<br />
the robot as illustrated:<br />
The directional pad also provides 4 roving & 4 lighting actions<br />
using the Mode button (See page 13).<br />
UPPER<br />
RIGHT<br />
HEAD<br />
RIGHT<br />
UPPER<br />
LEFT<br />
HEAD RIGHT<br />
HEAD LEFT<br />
NECK<br />
RIGHT<br />
Hold<br />
NECK<br />
LEFT<br />
NECK RIGHT<br />
DOWN<br />
RIGHT<br />
HEAD<br />
LEFT<br />
DOWN<br />
LEFT<br />
BODY DOWN<br />
NOTE: Moving the <strong>Roboboa</strong> with the remote is like directing an actor on a<br />
stage: actions are opposite to the robot’s left and right, making him more natural<br />
for you to control from the front<br />
NECK LEFT<br />
TAIL BACKWARD<br />
HINT: As your <strong>Roboboa</strong> twists in any direction, rotating the remote controller<br />
along with his movements is a good way to keep him in sync with your commands.<br />
10<br />
TAIL FORWARD<br />
BODY UP
Miscellaneous directional pad functions / Stop function / Hold function<br />
Miscellaneous directional pad functions<br />
This section describes miscellaneous functions of the directional pad on the<br />
<strong>Roboboa</strong> remote controller.<br />
Stop function<br />
Press the red dot on the directional pad all the way inwards to activate the<br />
Stop function.<br />
Hold function<br />
The Hold function turns your robot into a smart<br />
night light. The light sensor is located on the<br />
back of the robot’s neck.<br />
Light sensor<br />
The following table lists more Stop functions:<br />
The following table outlines the Hold function:<br />
Function<br />
Description<br />
Indicators<br />
Function<br />
Description<br />
Indicators<br />
First Stop<br />
Press the Stop button once to halt the<br />
robot in his tracks. He will not move<br />
or see but you’ll be able to move him<br />
from the remote. If he receives no more<br />
signals from the remote controller, he<br />
resets to Aware mode after about 2<br />
minutes.<br />
Hold<br />
Press and hold the directional pad<br />
inwards completely for more than 2<br />
seconds to activate the Hold function.<br />
Doing this turns <strong>Roboboa</strong> into a darkness-activated<br />
desk lamp, turning up<br />
his lights in the dark and lowering them<br />
in the light.<br />
Second Stop<br />
Press the Stop button to Reset him to<br />
his default position and enter Aware<br />
mode.<br />
While he is resetting to his default<br />
position, his eyes glow orange. During a<br />
reset, he will unfold from any position<br />
he was in previously to the default<br />
position (see page 7).<br />
When you press the stop command,<br />
<strong>Roboboa</strong> will exit from any action<br />
except Program. (In Program, the Stop<br />
command acts as a half-second delay<br />
in the program sequence see page 17.)<br />
If the room is bright, his face flashes as<br />
above, but when the room goes dark<br />
his entire face lights up, as shown, for<br />
about 6 hours.<br />
When in Hold mode, your robot stops moving and turns off all his face lights to<br />
save power. You can tell your robot is in Hold mode because his smile flashes<br />
every few seconds .<br />
IMPORTANT: When <strong>Roboboa</strong> is in Hold mode, he will not power down on his<br />
own. <strong>Roboboa</strong> can last for many days in Hold mode on fresh batteries, but make<br />
sure to turn him off when not in use.<br />
11
Shutdown function / Mode light function<br />
Shutdown function<br />
Turn your robot completely off from the remote control.<br />
The following table describes the Shutdown function.<br />
Function<br />
Shutdown<br />
Description<br />
Hold Mode then press the<br />
Stop button within 2 seconds.<br />
This causes your robot to<br />
completely power down.<br />
Indicator<br />
Mode light function:<br />
This mode turns your robot into a remote-controlled spotlight with threebrightness<br />
levels. This section describes Mode light function available on the<br />
remote controller.<br />
You can enable the Light mode by<br />
pressing the Mode button on the<br />
remote controller, or the Mode<br />
light button on the <strong>Roboboa</strong>’s<br />
head.<br />
When you press any of these buttons, all motors, sensors, and awareness on<br />
<strong>Roboboa</strong> stop, and he stays where you point him from the remote.<br />
The following table describes the Mode light function:<br />
Mode light button<br />
Hold<br />
mode<br />
Function<br />
Description<br />
Indicators<br />
<strong>Roboboa</strong> will emit a Shutdown sound to confirm that he is completely shut<br />
down. You can only wake him up by toggling the power button on the robot’s<br />
tail OFF then back ON.<br />
Mode light<br />
Firmly press the Mode button on the<br />
remote controller once. Mode lighting<br />
function turns your robot into a<br />
remote-controlled spotlight. The Mode<br />
button freezes your robot in place and<br />
cycles lights through four brightness<br />
modes: Spotlight, Wide, Full and Off<br />
(Aware mode)<br />
Each time you press the Light mode<br />
button you can press on the directional<br />
pad to point him anywhere.<br />
SPOT<br />
WIDE<br />
FULL<br />
OFF<br />
(AWARE Mode)<br />
Mode lighting stays on for about 1 hour after you press any Mode button or<br />
change brightness. After that, the robot defaults to Aware mode.<br />
12
Safety light mode / Mode functions<br />
Safety light mode<br />
Press and hold the Mode button on the remote controller or on top of the<br />
<strong>Roboboa</strong>’s head for more than 2 seconds. <strong>Roboboa</strong> can act like a stationary<br />
back yard safety light, turning on his lights when anything disturbs his focused<br />
forward beam.<br />
<strong>Roboboa</strong> indicates that he<br />
is in Safety mode when his<br />
mouth flashes red every<br />
few seconds as shown.<br />
When <strong>Roboboa</strong> detects an<br />
object in front of his face,<br />
he powers on his face<br />
lights as shown.<br />
When <strong>Roboboa</strong> is in Safety mode, he will “autorange” his vision beam to the<br />
nearest object about 5 feet (1.5 meters) away, counting in 6 equal beats. This<br />
means if you point him at a near wall or object, he’ll automatically figure out<br />
the distance and trigger on anything that gets closer than that.<br />
CAUTION: Safety mode never times out as long as the robot has power. Your<br />
robot will remain functional for many days in SAFETY mode on fresh batteries,<br />
but remember to turn him OFF if he is not used for extended periods.<br />
Mode functions<br />
You can also use the 8 Mode actions on the remote controller as shortcuts to<br />
roving and lighting actions:<br />
To access any of the Mode functions, press and hold the Mode button, and<br />
then press any direction on the directional pad, as follows:<br />
Robot moves to<br />
light up the ceiling<br />
to the user’s LEFT.<br />
Robot lifts and spins<br />
counter-clockwise<br />
for a minute.<br />
Robot moves to<br />
light up the floor<br />
to the user’s LEFT.<br />
Robot lifts and<br />
travels forward for a<br />
minute.<br />
Hold<br />
Robot lifts and moves<br />
backward for a minute.<br />
Robot moves to<br />
light up the ceiling<br />
to the user’s RIGHT.<br />
Robot lifts and<br />
spins clockwise<br />
for a minute.<br />
Robot moves to<br />
light up the floor to<br />
the user’s RIGHT.<br />
Remote flashlight mode<br />
Press the Mode button on the remote controller twice quickly. The remote<br />
controller turns into a flashlight useful for finding your <strong>Roboboa</strong> in the dark.<br />
Press either the Mode button twice quickly to turn the light on, and twice again<br />
to turn off, or press Stop. The light will also fade off by itself about 5 minutes.<br />
NOTE: If he sees something in front of him when travelling forward, he will stop<br />
to avoid hitting it.<br />
13
Tail / Head function / Reset function / Strafing<br />
Tail / Head function<br />
Control the upper and lower parts of your <strong>Roboboa</strong> from the same trackpad.<br />
This section describes the Tail / Head button function and is as follows:<br />
BODY<br />
UP<br />
TAIL<br />
BACKWARD<br />
Note: During Tail Mode the red LED lights up on the remote control.<br />
Reset function<br />
This section describes the Reset function and is outlined in the following table:<br />
Function<br />
Reset<br />
Hold<br />
BODY<br />
DOWN<br />
Button combination<br />
Press and hold the<br />
Tail / Head button for<br />
more than 2 seconds<br />
TAIL<br />
FORWARD<br />
Description<br />
Resets your <strong>Roboboa</strong> to default<br />
position, clearing all alarms, volume<br />
settings, and program memories to<br />
their power-on defaults.<br />
Strafing<br />
This function fires off a short ‘machine-gun’ round at whatever is directly in<br />
front of the <strong>Roboboa</strong>’s face. Shoot light and sound at friends, toys, pets, or<br />
other Wowwee robots and watch them react! Secret codes embedded in the<br />
animations directly activate functions in prior Wowwee technology.<br />
• Strafe. Used for stimulating Robopet, Roboquad, and other <strong>Roboboa</strong>s.<br />
• “Lazer” Used for stimulating Roboraptor and Roboreptile,<br />
• Cannon. Used for stimulating bigger game like Robosapien and<br />
Robosapien V2.<br />
Function<br />
Strafe<br />
Lazer<br />
Button combination<br />
Hold Mode, then press<br />
the Tail / Head button<br />
within 2 seconds<br />
Hold Mode, then press<br />
the Track button within<br />
2 seconds<br />
Description<br />
<strong>Roboboa</strong> shoots lights over a wide<br />
area.<br />
A few animated lazer shots at<br />
whatever’s in front of the robot’s<br />
face. Good for interacting with<br />
Roboraptor and Roboreptile.<br />
Cannon<br />
Hold Mode, then press<br />
the Explore button<br />
within 2 seconds<br />
“Ka-Boom” at the press of a button.<br />
Useful for activating Wowwee<br />
humanoids like the Robosapien, and<br />
the Robosapien V2.<br />
14
Track mode / Scan mode / Explore mode / Alarm modes<br />
Track mode<br />
Ever needed someone to “move that light here” In Track mode, <strong>Roboboa</strong><br />
searches for objects with his lights on full, then follows them as they move (like<br />
your hands while fixing a flat tire in the dark).<br />
If your <strong>Roboboa</strong> finds nothing in view, then he will continue to look around with<br />
his lights on until he does find something to look at. He will do this for about<br />
10 minutes before returning back to aware mode.<br />
Alarm modes<br />
This section describes the alarm modes you can set on <strong>Roboboa</strong> from the<br />
remote controller. You can set <strong>Roboboa</strong> in one of three Alarm modes: Alarm<br />
Set, Daily alarm and Test alarm.<br />
The following table describes the different functions of the Alarm modes:<br />
Function<br />
Button combination<br />
Description<br />
Scan mode<br />
In Scan mode, <strong>Roboboa</strong> searches an entire room for something else to look at<br />
other than what he is currently staring at.<br />
Function<br />
Scan<br />
Button combination<br />
Press and hold the<br />
Track button for more<br />
than 2 seconds<br />
Description<br />
Your <strong>Roboboa</strong> scans the whole room<br />
for nearby objects from left to right,<br />
and takes an interest in what he<br />
finds. Useful for getting the robot to<br />
look elsewhere when he gets fixated<br />
on just one thing. If he sees nothing,<br />
then he shows his confusion.<br />
Alarm Set<br />
function<br />
Daily alarm<br />
function<br />
Press the Alarm button<br />
for each hour you want<br />
to “timeshift” the alarm,<br />
that is, to set the alarm.<br />
Press and hold the Alarm<br />
button for more than 2<br />
seconds<br />
<strong>Roboboa</strong> will confirm each press of the<br />
button with a ding noise.<br />
Press the Alarm button as many hours<br />
as you need to (up to about 16 hours),<br />
then wait for about 5 seconds and he’ll<br />
put himself to sleep. After the passing<br />
of hours equal to the number of “dings”,<br />
your <strong>Roboboa</strong> will wake up with a loud,<br />
compelling alarm.<br />
Want your <strong>Roboboa</strong> to wake you up<br />
at the same time every day Set the<br />
timeshift alarm as above and press this<br />
button for four rapid pings. As long as<br />
he’s got power, he’ll wake up with an<br />
alarm at the same time every day (plus<br />
or minus a few minutes).<br />
If you have not set an alarm when you<br />
press Daily, then the robot will get<br />
confused.<br />
Explore mode<br />
<strong>Roboboa</strong> roves around to have a look around, genuinely curious about what<br />
you’re doing and where he lives. He’ll explore for about 10 minutes looking for<br />
near things (with a ping noise), and far things (with a bump noise).<br />
When entering explore, the first thing he does is check twice if there is floor<br />
in front of him. If he sees nothing, he’ll refuse to wander for fear of hurting<br />
himself.<br />
Before you put him in Explore mode ensure that he is on a smooth and flat floor<br />
surface clear of walls or obstacles.<br />
Test alarm<br />
function<br />
Hold MODE then press<br />
the Alarm button for<br />
more than 2 seconds<br />
See and hear your <strong>Roboboa</strong>’s waking<br />
alarm.<br />
15
Sleep mode / Guard modes<br />
Even if you interact with your <strong>Roboboa</strong> once the alarm is set, he’ll interrupt<br />
whatever he’s doing to play the alarm. If you need your robot to remind you to<br />
go somewhere in two hours (for example), you can still use him as a light or for<br />
fun and he’ll remember to activate his alarm.<br />
Note: To clear your alarm, wake up your <strong>Roboboa</strong> by pressing Stop, then press<br />
Reset (hold the Tail / Head button for more than 2 seconds), or execute a<br />
Shutdown command (hold the Mode button then press Stop within 2 seconds),<br />
or power your robot Off from the power button in his tail.<br />
NOTE: Before activating any guard mode, be sure to place him on an open<br />
surface or floor.<br />
To activate the Guard mode, press the Guard button. When your <strong>Roboboa</strong><br />
enters guard mode, he first “loads” himself up, then starts to scan the room<br />
for objects.<br />
The following table outlines the Guard mode functions from the remote<br />
controller:<br />
When his alarm goes off, you can turn him off or Stop by pressing any Mode<br />
button.<br />
Sleep mode<br />
Put <strong>Roboboa</strong> to sleep so you can carry him around and all his programs and<br />
alarm settings will be remembered.<br />
Function<br />
Sleep<br />
Button combination<br />
Press and hold the<br />
Explore button for<br />
more than 2 seconds<br />
Description<br />
<strong>Roboboa</strong> yawns and then folds<br />
himself into his sleep position.<br />
CAUTION: If you have set an alarm, he will wake up on his own, so do not<br />
position him where he will hit things upon waking.<br />
NOTE: If left asleep for more than 24 hours, he will enter Shutdown mode<br />
and all programs and settings will be lost unless you have pressed Daily. (See<br />
page 15)<br />
Guard modes<br />
<strong>Roboboa</strong> can be used as a vigilant guard that can “protect” your desk, shelf, or<br />
doorway. Guard mode scans a room from left to right at about 45 degrees on<br />
each side, and to a range of several feet.<br />
Function<br />
Guard<br />
Sentry<br />
Patrol<br />
Button combination<br />
Press the Guard button<br />
Press and hold the<br />
Guard button for more<br />
than 2 seconds<br />
Hold the Mode<br />
button then press the<br />
Guard button within 2<br />
seconds<br />
Description<br />
NOTE: This function times out after<br />
about 2 hours, then re-enters Aware<br />
mode.<br />
A spin-in-place-shooting mode,<br />
your robot scans the nearby area for<br />
intruders and objects. Anything that<br />
falls within several feet of his face<br />
gets ray-beamed.<br />
After 12 shots, he reloads himself<br />
and will start to spin the other way<br />
NOTE: Sentry mode times out after<br />
about 20 minutes, then re-enters<br />
Aware mode.<br />
A roving patrol robot that cannonrounds<br />
anything that comes within<br />
several feet as he moves around.<br />
After 4 shots, he’ll turn around and<br />
rove in another direction.<br />
NOTE: Patrol stops after about 10<br />
minutes, then re-enters Aware mode.<br />
16
Demo mode / Party mode / Volume control / Program function / Programming <strong>Roboboa</strong> / Program mode<br />
Demo mode<br />
The following outlines the Demo function from the remote controller:<br />
Function<br />
Button combination<br />
Description<br />
Program function<br />
The following outlines the Program function on the remote controller:<br />
Function<br />
Button combination<br />
Description<br />
Demo<br />
function<br />
Press the Demo<br />
button.<br />
<strong>Roboboa</strong> will perform a demonstration<br />
showing his party animal side!<br />
Be sure to put on large, smooth,<br />
open surface for best performance.<br />
Program<br />
function<br />
Press and hold the<br />
Execute button for<br />
more than 2 seconds.<br />
Enters program mode<br />
Party mode<br />
The following outlines the Party function from the remote controller:<br />
Function<br />
Party button<br />
Button combination<br />
Press and hold the<br />
Demo button for more<br />
than 2 seconds.<br />
Description<br />
Turns <strong>Roboboa</strong> into your very own<br />
Disco Marquee Light suitable for<br />
parties or just attracting attention.<br />
Times out after about 20 minutes<br />
and re-enters Aware mode.<br />
Volume control<br />
The following outlines the Volume control function from the remote<br />
controller:<br />
Function<br />
Volume control<br />
button<br />
Button combination<br />
Hold Mode then press<br />
the Demo button<br />
within 2 seconds.<br />
Description<br />
Cycles the <strong>Roboboa</strong> master volume<br />
from Loud, to Medium, to Soft, to<br />
Off with every button press. Can be<br />
cleared to Loud by powering your<br />
robot off/on or with the remote<br />
control Reset function (see page14).<br />
Programming <strong>Roboboa</strong><br />
You can program your <strong>Roboboa</strong> with<br />
a sequence of up to 40 steps. He’ll<br />
remember exactly what you program<br />
him to do, and afterwards, he’ll repeat<br />
the same thing back to you.<br />
Program mode<br />
While programming your robot, be sure you are pointing the remote directly<br />
at the robot’s face for each step. This will ensure that your program steps are<br />
properly recorded as he moves around.<br />
As you enter functions, the robot will execute that function and play a ‘beep’ at<br />
the end to confirm that it has been stored. You cannot move on to program the<br />
next step until the “beep” sound completes.<br />
The maximum number of program steps is 40. If you fill up the program memory,<br />
<strong>Roboboa</strong> makes a sound, automatically saves your program, and executes it.<br />
NOTE: Every time you enter Program mode, the <strong>Roboboa</strong> puts you at the end<br />
of the last program entered. This allows you to fine-tune long programs easily<br />
using the Back function (see next page) or add new commands to your previous<br />
program.<br />
During Program mode, press the Execute button at any time to store your<br />
program and auto-execute your routine. Do not press Stop to end programming:<br />
Stop is just stored as a half-second delay in your program sequence.<br />
17
Back function / Program play function<br />
You can clear your program from Aware mode by pressing the Reset button, or<br />
powering your robot Off then back On. He will not remember his program if<br />
powered off.<br />
Functions like Forward, Backward, Left turn, Right turn, Track, Explore, Guard,<br />
Sentry, Patrol, Party, and Safety only save and execute for about 10 seconds in<br />
Program Mode.<br />
Functions like Reset, Alarm, Sleep and Test only execute their animations. They<br />
do not change any of the robot’s Aware mode functions. (The Daily function<br />
is a good command for quickly resetting the robot to default position during<br />
program, but it is not stored as a program step.)<br />
Conditional programming:<br />
There are two special functions - Hold and Safety that are reserved as<br />
“conditional” program commands.<br />
1 - When a Safety mode Program Step is reached in the sequence: Program<br />
execution waits until an object passes in front of his face, triggering the<br />
Safety Light on, then the program moves on to the next program step.<br />
2 - When a Hold mode Program Step is reached: Program execution waits until<br />
there is a light level change on the light sensor at the back of the <strong>Roboboa</strong>’s<br />
neck.<br />
- If it’s light when this step is reached, then the program moves on to the<br />
next step when it gets dark on the sensor.<br />
- If it’s dark when this step is reached, then the program moves on to the<br />
next step when it gets light on the sensor.<br />
This allows you to set up programmed games with your robot so he won’t<br />
activate until you shine a flashlight on him, or until the sun goes down, or a<br />
roomlight comes on, or someone walks in front of his face.<br />
Example of a program<br />
• Hold the Execute button for more than 2 seconds to enter Program Mode<br />
(his forehead brain light starts flashing).<br />
• Press the directional pad upwards to move the head left.<br />
• Press and hold the Mode button for more than 2 seconds for Safety mode.<br />
• Press Mode + Tail / Head (Strafe).<br />
• Press the directional pad downwards to move the head right.<br />
• Press and hold the Mode button for more than 2 seconds for Safety mode.<br />
• Press Mode + Track (Lazer).<br />
• Press the directional pad inward for more than 2 seconds for Hold mode.<br />
• Press Mode + Alarm (Test).<br />
• Press Execute.<br />
• The robot will now shoot something it sees to your left, then to your right,<br />
waiting each time for something to pass in front of his face. Then the robot<br />
will wait until the room gets dark (or something covers the back of his neck)<br />
and play his alarm.<br />
Back function<br />
In a programming sequence, you can clear the last step in your program using<br />
the Back function on the remote controller:<br />
Function<br />
Back<br />
Program play function<br />
The following outlines the Program Play function on the remote controller:<br />
Function<br />
Program play<br />
function<br />
Button combination<br />
Hold Mode then press<br />
the Execute button<br />
within 2 seconds<br />
Button combination<br />
Press the Execute<br />
button<br />
Description<br />
Clears the last step in your program<br />
with a slice noise. Your robot will<br />
return to the last physical position<br />
he was in before the cleared step<br />
was entered.<br />
You can use this button to remove<br />
as many program steps as you want.<br />
NOTE: If you are at program step<br />
one, you’ll hear an error noise.<br />
Description<br />
Executes your stored program, or,<br />
if no program has been entered,<br />
<strong>Roboboa</strong> will show his confusion.<br />
18
Troubleshooting guide / Support<br />
Troubleshooting guide<br />
Q: Where is the best place to use my <strong>Roboboa</strong><br />
A: In Aware, Guard, Alarm, Track, Scan, Hold, or Party mode your robot is safe<br />
to put on a table or shelf. However, be careful with commands like Explore,<br />
Sentry, Program, Demo, or Patrol as he won’t be able to always detect table<br />
edges before he falls off.<br />
He is best used on large, open, smooth surfaces or short carpets. He has<br />
trouble keeping his balance on thick carpets, beds, or grass.<br />
WARNING: Do not use <strong>Roboboa</strong> outside as dirt or sand can clog his<br />
mechanisms.<br />
Q: When I carry my <strong>Roboboa</strong>, why does he sometimes fight against me<br />
A: In some modes like Aware, Explore, Sentry, or Patrol, your <strong>Roboboa</strong> needs<br />
to be in the default position to work, and he’s just trying to align himself<br />
upright. Just press the mode button on his head and he’ll stop struggling.<br />
Q: How can I use him as a regular desk light<br />
A: Reset your robot to default position, then place him so his wheels touch the<br />
back wall or edge of a desk or table, then press and hold his forehead Mode<br />
light button.<br />
Q: Why does my <strong>Roboboa</strong> sometimes deliberately look away from me<br />
A: If there are other objects nearby while he’s tracking you (like in small rooms<br />
or hallways), <strong>Roboboa</strong> will tend to favor those instead. Try putting him where<br />
he has several feet of open area in front of him to see clearly.<br />
Q: Sometimes he can’t stay in the positions I move him, what’s wrong<br />
A: Like any snake-like creature, there are some positions where he cannot hold<br />
up his whole body length. Experiment with the directional pad and the Tail /<br />
Head button to find positions where he’s nice and stable.<br />
Q: If my <strong>Roboboa</strong> performs an unexpected function, what do I do<br />
A: Reset him by pressing the ON/OFF button to OFF and then back to ON, or<br />
press and hold the Tail/Head button for more than 2 seconds (see page 14).<br />
Q: He’s weird. Where did the idea for him come from<br />
A: The alien thought control messages were very specific.<br />
Support<br />
If you have questions that are not answered in this manual, refer to the <strong>Roboboa</strong><br />
support site: www.roboboaonline.com<br />
Q: What can <strong>Roboboa</strong> see<br />
A: <strong>Roboboa</strong>’s vision is like radar that allows him to recognize average objects<br />
several feet away. Some things reflect better than others, while things like<br />
glass, black velvet, and thin table legs are very hard for him to see and avoid.<br />
He generally likes large wide things like people, walls, furniture, and pets.<br />
Q: What are those holes along his body<br />
A: For mounting small cameras, ropes, mounting screws, and other items of<br />
interest and fun.<br />
19
20<br />
Notes
Manufactured and distributed by<br />
© 2007 Wowwee Limited.<br />
Product names, designations, and logos<br />
are trademarks or registered trademarks<br />
of Wowwee Limited. All rights reserved.<br />
Wowwee (Asia Office)<br />
Unit 301A-C, 92 Granville Road<br />
T.S.T. East, Hong Kong<br />
Wowwee (North America Office)<br />
Wowwee Group Company<br />
6600 Decarie, Suite 200<br />
Montreal, Quebec<br />
H3X 2K4, Canada<br />
Consumer Hotline: 1-800-310-3033<br />
Customer Service Email: support@wowwee.com<br />
www.wowwee.com<br />
We recommend that you retain our<br />
address for future reference.<br />
Product and colors may vary.<br />
Packaging printed in China.<br />
This product is not suitable for children<br />
under 3 years because of small parts -<br />
choking hazard.<br />
MADE IN CHINA.<br />
8032US01FLA<br />
CAUTION<br />
Changes or modifications not expressly approved by the party responsible for compliance could void the<br />
user’s authority to operate the equipment.<br />
NOTE<br />
This equipment has been tested and found to comply with the limits for a class B digital device, pursuant<br />
to part 15 of the FCC rules. These limits are designed to provide reasonable protection against harmful<br />
interference in a residential installation. This equipment generates, uses and can radiate radio frequency<br />
energy and, if not installed and used in accordance with the instructions, may cause harmful interference to<br />
radio communications.<br />
However, there is no guarantee that interference will not occur in a particular Installation. If this equipment<br />
does cause harmful interference to radio or television reception, which can be determined by turning the<br />
equipment off and on, the user is encouraged to try and correct the interference by one or more of the<br />
following measures:<br />
- Reorient or relocate the receiving antenna<br />
- Increase the separation between the equipment and receiver<br />
- Connect the equipment into an outlet on a circuit different from that to which the receiver is connected<br />
- Consu lt the dealer or experienced radio/TV technician for help