

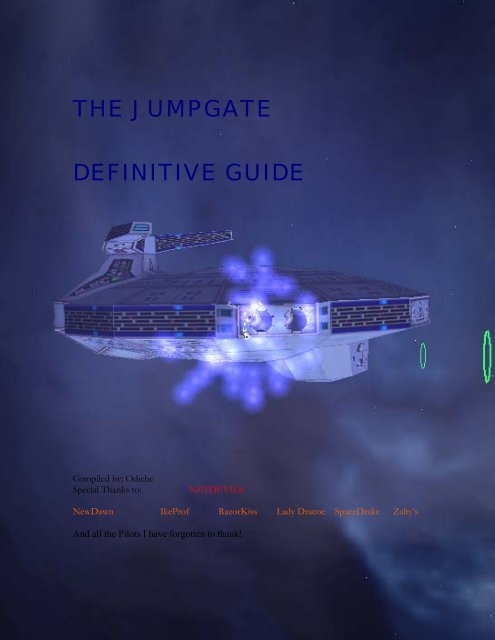
THE JUMPGATE DEFINITIVE GUIDE - Tripod
THE JUMPGATE DEFINITIVE GUIDE - Tripod
THE JUMPGATE DEFINITIVE GUIDE - Tripod

Create successful ePaper yourself
Turn your PDF publications into a flip-book with our unique Google optimized e-Paper software.
<strong>THE</strong> <strong>JUMPGATE</strong><br />
<strong>DEFINITIVE</strong> <strong>GUIDE</strong><br />
Compiled by: Odiche<br />
Special Thanks to: NETDEVIL©<br />
NewDawn IkeProf RazorKiss Lady Dracoe SpaceDrake Zalty’s<br />
And all the Pilots I have forgotten to thank!
FACTIONS<br />
Solrain:<br />
Medium-fast ships, heavy, fast-recharging shields. A little light on firepower, lots<br />
of flexibility in ship loadout because of a large number of MODx slots. (MODx are<br />
worth reading up on in JOSSH). All Solrain ships have buckets of cargo space...<br />
the Solrain Fighter-class ship, the Intensity can carry a full set of equipment in<br />
it's hold to re-equip a downed squadmate. The Solrain Bomber and Medium<br />
Fighter are top-of-the-line, and they have a good Light Transport as well. Solrain<br />
ships are fairly forgiving for a new pilot; the glut of Flashfire MODxes they can<br />
equip can ensure their survival in situations where any other ship would be<br />
gunned down before it could escape. Solrain ships often utilize hit and run<br />
techniques in combat to gain the maximum advantage from their fast-recharging<br />
shields. Solrain ships can generally re-equip to a fairly good degree from their<br />
home stations. Solrain are typically RPed (Roleplayed) as greedy, profiteering<br />
traders. Which they are. Assassins, Mercenaries, Pirates, Traders, or<br />
Factionalists. To piss off a Solrain pilot, call him a Smurf.<br />
Quantar:<br />
Usually have the fastest ships in a given class. They also have a medium loadout<br />
of MODx slots. Quantar ships rely on maneuvrability to evade incoming fire;<br />
the Quantar fighters, the Typhoon, is an ideal wolf-pack ship. Their speed can<br />
carry them out of most trouble; only scouts or an Intensity can really catch them<br />
up, and if you are a skilled pilot, you can evade and escape from those also. The<br />
Quantar level-3 ship, the Gust, is an amazing combat vehicle simply because it is<br />
so small. It is almost impossible to hit with ammo weapons, and can accelerate<br />
amazingly quickly, plus can spin on a dime. The Quantar cargo tow is slower<br />
than the others, and is generally felt to be sub-standard. The Quantar Light<br />
Transport frankly kicks ass. It can carry the same number of missiles as a<br />
Solrain Bomber, and boasts two large-size gunmounts as well as a decent turn of<br />
speed and hefty armour. The Quantar Medium Fighter and Bomber both rock as<br />
well. Quantar ships require a high level of skill to get one-on-one kills against a<br />
ship of equivalent type, but they are very good in wolfpacks. Quantar ships<br />
usually have more armour than Solrain ships, but the same shielding as Octavian<br />
ships (less ) One problem with the Quantar fighter is it's reliance on a<br />
powerplant from Amanath, that is massively expensive and requires a trip<br />
through dangerous unregulated space to obtain. Quantar combat squads are<br />
normally RPed as religious zealots. There are, of course, plenty of Quantar<br />
traders and factionalists as well. And miners. Miners are wierdos. The derogatory<br />
name for a Quantar is "Rocklicker" or something of this vien.
Octavians:<br />
Octavian design philosophy is basicly that bit from the Matrix;<br />
"What do you need?"<br />
"Guns. Lots of guns."<br />
Yeah, so it isn't subtle, so sue me. Try and sue me, and I'll blow you up. That's<br />
pretty much Octavians for you. Octavian ships forgo speed, shielding, cargo<br />
space and MODx slots for Guns, Armour and Power. The Octavian Fighter, the<br />
Phoenix, is the slowest, with the least MODx slots. It is very good as acting as a<br />
target for missiles. However, getting in front of it is a mistake that you will<br />
regret. Note that you won't regret it for very long The Raptor Bomber is in a<br />
similar vien, but it's even slower, and you'll have even less time to regret your<br />
mistake in. This is compensated by the fact that it's the size of a reasonably<br />
large moon. Anyone failing to hit a Raptor needs an urgent sight test and/or<br />
amputation of the head due to unreasonable levels of incompetance. The<br />
Octavian Light Transport is a pile of rubbish that is affectionally known as the<br />
'Turkey' or 'That Piece Of Shit'. The Octavian Cargo tow is great, the Light<br />
Fighter is rather shoddy, and the less said about the Albatross, the Octavian<br />
level 3 ship, the better. The Octavian Scout is really the shining star of the<br />
Imperial Navy; it's the fastest ship in the entire game and wolfpacks made up of<br />
5-6 scouts can tear apart a force many times their size. The one problem with it<br />
is that the shielding is slightly less effective than tissue paper and they can be<br />
swatted out of the sky amazingly quickly, if you can hit them. Octavians are<br />
usually roleplayed as factionalists, mercenaries, or Psychotics. If you want to<br />
piss off an Octavian, don't bother; it'll all end in tears. Well, blood, more likely,<br />
but there you go.<br />
I'm Octavian and I'm a hard-line factionalist borderline-psychotic. Nice to meet<br />
you. *twitches while drooling on keyboard*
DOCKING<br />
IMPORTANT!<br />
Important for all Jumpgate Pilots. This is the first thing you will need to<br />
know when you finally launch into space.<br />
1) Target the Station<br />
2) Look for the GREEN rings projected from the station<br />
3) Maneuver yourself into the rings<br />
4) Come to a FULL STOP<br />
5) Point yourself at the center of the tube at the apex end of<br />
the rings<br />
6) Proceed at UNDER 100v, for those still learning, I suggest<br />
under 50v<br />
7) Look out for ‘Bumps’ from other ships<br />
8) Enter tube without clipping the sides<br />
9) Docking Successful.
Table of Contents<br />
Topic Pages<br />
I. JOSSH Internal Interface…………………6 - 35<br />
II. SpaceDrake’s Ship Report ………………..36 - 93<br />
i. Octavian Ships…………………..37 - 55<br />
ii. Solrain Ships…………………….56 - 74<br />
iii. Quantar Ships……………………75 - 93<br />
III. Ike Profari’s Story………………………….93 - 100<br />
IV. Zalty’s Combat Guide……………………...101 - 113<br />
V. NewDawn Conflux Guide………………….114 - 137<br />
i. “Ramblings…………………...….116 - 119<br />
ii. General information……………..120 - 122<br />
iii. Conflux Types…………………...123 - 129<br />
iv. Sentient Conflux………………...133<br />
v. Combat Styles……………………134 - 136<br />
vi. Conflux Map……………………..137<br />
VI Economy…………………………………….138 – 157<br />
VII Artifacts……………………………………..158 – 174<br />
IIX Mining……………………………………….175 – 179<br />
IX Piracy!.............................................................180 - 181<br />
X Fiction FAQ………………………………....182 - 192<br />
XI /Command Uses…………………………….193 - 195<br />
XII Keyboard Commands……………………...196<br />
XIII Medals………………………………………197 - 206<br />
XIV Titles………………………………………...201- 208<br />
XV Commodity List…………………………….209 - 213<br />
XVI TRI Map…………………………………….214<br />
XVII Quick Reference Cards……………...……..215 -218
Internal JOSSH Device<br />
Welcome Recruit. This is Solder Ronin speaking, sectional leader of<br />
the TRI Department for Novice Pilot Affairs. I have been charged with<br />
educating you about TRI's JOSSH system. There's a lot to learn, so<br />
pay attention! With a little work on your part, we'll have you up to<br />
speed in no time. Are you ready, recruit?<br />
The following documentation will briefly describe the internal JOSSH<br />
device. This guide will teach you what to expect from JOSSH and how<br />
to find what you're looking for.<br />
Internal JOSSH Device<br />
Upon entering a station or outpost your internal JOSSH device will<br />
automatically open and present a multitude of options. This device<br />
provides many more options than the external system, and involves<br />
much more pilot interaction. There are three basic components that<br />
make up the internal JOSSH device: the communications display<br />
module, the location module, and the command module.<br />
The Internal JOSSH Device<br />
Communications Display Module<br />
The communications display module is located in the upper left hand<br />
corner of the JOSSH device. The chat window along the top of the<br />
screen enables pilots to communicate with other pilots who are<br />
currently on duty. For more information on communication functions<br />
and commands, check the communications guide.<br />
Pilots will notice a small gray button in the left of the communications<br />
display. You will also notice two yellow scroll arrows, which may be<br />
6
used to review previous communication chatter.<br />
Pilots may also access the options screen from this section by clicking<br />
on the icon. From the options screen users may configure<br />
Jumpgate according to personal preference. Pressing the esc key will<br />
also open the options screen. For more information on configuring<br />
your client via this screen, take a look at the options screen guide.<br />
Location Module<br />
The location module can be found in the upper right hand corner of<br />
the screen, and looks something like this:<br />
The green text box is the location indicator. This component is used to<br />
display which station a pilot is currently docked at. If said pilot is not<br />
currently connected to the jumpgate universe, their location will be<br />
displayed as 'offline'. (Displayed)<br />
To the right of the location indicator is a button labeled 'map'. Clicking<br />
on this buttons opens a map of all known sectors. Take a look at the<br />
map guide for more information on using the map.<br />
The 'station commlink access' tab, located directly below the location<br />
indicator, is a handy feature that can be used to display a list of pilots<br />
who are currently docked at this station.<br />
Above the station commlink access tab is the 'flight registry' toggle.<br />
This determines your flight status, and is used to control such things<br />
as player vs. player combat. The basic setting is 'TRI Civilian'. With<br />
this mode engaged, other pilots will be punished for firing on or<br />
destroying your ship. Other register settings are available, such as<br />
Honor Guard.<br />
The final component of the location module is a large light located to<br />
7
the right of the station commlink access tab. a green light indicates<br />
that a pilot is currently connected to the jumpgate universe. A red light<br />
will be displayed if the pilot is either offline or in sim mode.<br />
Command Module<br />
This portion of the JOSSH device interface allows pilots to issue<br />
commands to the station's personnel. This module spans the bottom<br />
of the internal JOSSH device.<br />
Along the top of the command module are five tabs: ship configurator,<br />
market, mission, trade and simulator. (Trade and simulator are<br />
displayed.) When clicked these tabs will bring up five different<br />
holographic screens that allow pilots to customize their ship, purchase<br />
goods, accept missions, trade with other pilots, and access the<br />
simulator.<br />
In this picture a red flag labeled 'sim mode active' is displayed to the<br />
right of the tabs. This flag indicates whether a pilot is launching into<br />
the simulator or real space.<br />
There is a large green text box below the command tabs. This is the<br />
pilot data bar, and displays various statistics on the current user.<br />
These statistics are rank and name, credits, experience, and cargo.<br />
(Cargo is displayed.) The most confusing statistics are the three<br />
numbers displayed as cargo. The first number is the amount of cargo<br />
that is currently loaded, the second is the maximum cargo that can be<br />
loaded, and the third is the amount of floor space that the docking<br />
crew will allow to be used. (This third number includes the ship's<br />
cargo.) Floor space can be used as temporary storage space, but will<br />
need to be cleared before a pilot can launch.<br />
To the right of the pilot data bar is the 'request launch' button. By<br />
clicking this button a pilot will be propelled away from the safety of the<br />
station and into space. This button will occasionally be covered while<br />
tasks are being preformed, and a pilot will not be able to launch during<br />
that time.<br />
8
Options<br />
The options screen can be used to configure Jumpgate for your<br />
specific hardware configuration and preferences. Pilots can access<br />
the options screen either by pressing the ESC-key or clicking on the<br />
button on the JOSSH interface.<br />
The JOSSH options screen<br />
The options menu contains the following menu choices:<br />
Connect<br />
Clicking on this option allows you to connect to the Jumpgate<br />
Universe. The connect submenu contains both a user name and a<br />
password field. If you are connecting for the first time you will need to<br />
type your pilot name and password, and click 'connect'. In all<br />
subsequent connects this information will automatically appear, and<br />
simply clicking 'connect' will connect you to the Jumpgate Universe.<br />
Sound<br />
Clicking on this option enables pilots to adjust sound options and<br />
volume control for music and in-game sound. Clicking on the blue<br />
arrow in the sound options menu cycles through several supported<br />
sound configurations.<br />
To adjust the volume for music and sound, move the sliders in the<br />
volume controls towards the '+' or '-' arrows. (Note: music volume<br />
does not affect the start-up theme.)<br />
9
Video<br />
Clicking on this option reveals a new window with a number of<br />
choices:<br />
Video Card - Determines if Jumpgate should use a<br />
primary or secondary video card. In most cases primary<br />
will be the logical choice. If you have a 2d card and a 3daccelerator<br />
card, choose secondary.<br />
Resolution - Enables you to choose your screen<br />
resolution. Please note that some monitors and/or video<br />
cards may not support all the resolutions displayed.<br />
Colors - Choose the color bit depth at which you'd like to<br />
play Jumpgate.<br />
Text Options - You have a choice between 2D and 3Dtext.<br />
Many pilots find 3D-text easier to read.<br />
Buffering - Choose between double and triple buffering.<br />
Not all video cards support triple buffering.<br />
Tooltips - Toggles tooltip help visibility.<br />
Particles - Toggles particle effects visibility.<br />
Hardware T&L - Some of the newer video cards support<br />
a function called hardware transformation and lighting. If<br />
you own such a card, you may check this box to activate<br />
T&L.<br />
10
Control<br />
This submenu can be used to configure your controls to fit your<br />
preferences.<br />
The first step is to select your input type. Click the 'cycle input' button<br />
until the preferred device is selected. (Your options are keyboard,<br />
keyboard and mouse, keyboard and joystick, keyboard and joystick<br />
with throttle, and keyboard and joystick with throttle and rudder.) Once<br />
you have selected an input type, the default commands for the<br />
selected device(s) will be loaded.<br />
Now you can customize your controls. You will notice several buttons<br />
near the top of this submenu labeled 'flight,' 'combat,' 'display,'<br />
'MODx,' 'basic,' 'radar,' and 'view'. By clicking through these buttons<br />
you will notice that the commands and controls listed on the lower half<br />
of the machine will change. To change these controls you will need to<br />
select the box to the right of each command, and then press the<br />
preferred button, key, or control. (Note: make sure you have your<br />
joystick and throttle centered when mapping keys.)<br />
Credits<br />
This screen contains credits and legal information related to<br />
Jumpgate.<br />
Quit Jumpgate<br />
Click this button to exit the Jumpgate Universe.<br />
11
Map<br />
Welcome Pilot. I am Zhilaa Katdinal, Divisional Chief of the TRI<br />
Bureau of Stellar Cartography. I've heard you needed some help<br />
using your sector map, and I was hoping we could work out some sort<br />
of.... deal. You see, I helped design that system, so I can tell you<br />
everything you need to know about it. The thing is, we're a little light<br />
on sector information from The Gurge...<br />
This documentation briefly reviews basic map usage and functions.<br />
The map can be accessed in flight by pressing 'm', or in station by<br />
pressing the button labeled 'map' in the upper right hand corner.<br />
Some pilots prefer to have a hard copy map on hand, just incase their<br />
in flight systems should fail. TRI's most current 2D map can be found<br />
under the "TRI Files" subheading of the flight academy.<br />
TRI Sector Map Module<br />
The standard TRI sector map module come pre-installed on all ships,<br />
and can be accessed from any station. Activating the map will display<br />
a 3D representation of every known sector.<br />
This module consists of four main components and functions: a 3D<br />
map display, waypoints, visibility options, and view controls.<br />
3D Map Display<br />
The map display is the core object of the map module. This display<br />
contains three basic objects: sectors, stations, and jumppaths. Right<br />
clicking on a sector or station will zoom in on the selected object.<br />
Sector - Represents a known space location.<br />
Color changes depending on sector control.<br />
Station - Represents a space station. Colored<br />
per faction.<br />
Jumppath - A blue line that represents the<br />
space spanned by jumpgates.<br />
12
Map Waypoints<br />
The TRI map module uses two types of waypoints: mission waypoints<br />
and user defined waypoints. (Displayed below.)<br />
Mission waypoints are set at time of mission accept, and user<br />
waypoints can be set at any time. Waypoints will only remain active on<br />
your map until the marked sector is visited. (Certain mission waypoints<br />
will remain until the mission has been completed.)<br />
Mission Waypoint - Displays locations of space which<br />
are directly involved with the current mission.<br />
User Defined Waypoint - Displays waypoints of your<br />
choosing.<br />
Travel Advisory System<br />
The TRI Travel Advisory System (TAS) system places indicators on<br />
the flight map to alert pilots to sectors which might be hazardous due<br />
to recent combat activity. Originally intended as a safety measure,<br />
TAS is also useful to bounty hunters or factional combat pilots looking<br />
to see where "the action is".<br />
Cargo pilots intending to pass through a Hazard Zone are urged to<br />
hire or otherwise arrange combat escort, as a precaution.<br />
Amber Travel Zones - indicate relatively low levels<br />
of threat, usually an isolated incident, or an event<br />
that happened several minutes in the past and now<br />
represents "stale" information.<br />
Red Travel Zones - indicate recent or sustained<br />
combat action and are best avoided by peaceful<br />
traffic.<br />
13
Visibility Options<br />
The visibility options are located in the lower left hand corner of the<br />
map. These options can be used to display sectors based on faction<br />
location or control.<br />
To display sectors by faction location, disable both the 'all' and<br />
'control' buttons (located in the center function set). Now select each<br />
faction that you would like to be displayed from the first tier. (The TRI<br />
logo represents neutral sectors.) Sectors near the selected faction will<br />
now be displayed.<br />
To display sectors by control, enable the 'control' button, and select<br />
each faction whose control you would like to see displayed.<br />
To display all sectors, enable the 'all' button again.<br />
In the third tier, on the far right, are two waypoint icons. By disabling<br />
these buttons each waypoint type can be displayed or hidden. To the<br />
right of the waypoints is a weather cloud icon, which toggles weather<br />
visibility.<br />
Map tip: you will notice that sectors that are affected by a weather storm are tinted to<br />
the color of the storm. To quickly determine stormy sectors, disable the "all" visibility<br />
option and the weather visibility option. You will now be able to quickly and<br />
accurately determine which sectors to stay away from.<br />
14
View Controls<br />
The view controls are located in the lower right hand corner of the<br />
map. This section of the map interface contains camera control<br />
functions such as zoom, slide, and rotate.<br />
The square button in the middle of the map control module will reset<br />
the map to a top down view, and the 'x' button in the lower right hand<br />
corner will close the map.<br />
market<br />
Greetings, pilot. This is Dorakk Thol, sectional chief of the TRI<br />
Bureau of Trade Regulation. TRI has noticed that your TRI credit<br />
account has been steadily growing, and I think it's important that you<br />
learn how to use the market interface in case you would like to begin<br />
spending.<br />
TRI and their various partners offer a huge selection of wonderful toys<br />
for every pilot. These are available for purchase at the market. Every<br />
single item found here cannot only be applied for personal use, but<br />
can also sold for a tidy profit.<br />
15
Basic Market Interface<br />
The basic market interface can be used to perform two basic tasks -<br />
purchasing and selling. The left portion of the screen displays the<br />
station's inventory, and the right portion displays your inventory. You<br />
will notice that the station inventory section has a list of equipment<br />
types - this portion of the market display is used to simplify item<br />
browsing at a station, due to the large amount of items that are kept in<br />
stock. (To the left of each sub-category you will notice an icon. these<br />
are useful symbols to know, as each item will always display this icon<br />
for easy reference.)<br />
Station Inventory portion of Market Interface<br />
Along the top of the market inventory list you will notice several small<br />
boxes - these are sort options. The market inventory can be sorted in<br />
several ways:<br />
Name Alphabetical sort by item name. An<br />
item's name is also displayed in green<br />
text below its picture.<br />
Price Numerical sort by retail price before<br />
tax. An item's price is also displayed<br />
in black text in the thick green band<br />
below each item.<br />
Size Numerical sort by size. An item's size<br />
is graphically displayed with a set of<br />
boxes to the right of each item. Each<br />
box represents 1 cubic unit.<br />
Rank Sort by rank required to purchase<br />
item. Rank requirements can also be<br />
found in the upper right hand corner of<br />
16
the item purchase pop-up. (You will<br />
need to click on the item for this to be<br />
displayed.)<br />
Quantity Numerical sort by quantity in stock.<br />
The quantity of an item at the current<br />
location can be found in the upper left<br />
hand corner of each market item box.<br />
Ascending /<br />
Descending<br />
Show All<br />
On/Off<br />
Determines sort order of inventory. If<br />
the "up" arrow is selected, the<br />
largest/last items will be displayed at<br />
the bottom of the list, and the<br />
smallest/first at the top. The opposite<br />
is true for the "down" arrow.<br />
With the "show all" option turned off,<br />
out-of-stock items will be hidden from<br />
view.<br />
It is also important to familiarize yourself with the items available at<br />
each station. Below is a short description of each sub-category<br />
displayed in the market:<br />
Commodities<br />
Commodities are the basic elements which are used to produce every<br />
other piece of equipment in the Jumpgate universe. These items<br />
range from essentials such as food and water to advanced chemicals,<br />
medical supplies and electronics. Commodities are generally the most<br />
profitable items to trade. Like with any other market item, clicking on a<br />
commodity reveals additional information, such as size, price and a<br />
more detailed description.<br />
Power Plants<br />
Power Plants furnish the energy needed to power a ship's various<br />
systems. This unit produces the energy needed for all ship functions.<br />
This does not necessarily mean it provides enough energy for all other<br />
systems to function at maximum efficiency all the time. if you are flying<br />
at full speed your engines might draw so much energy from the power<br />
plant that there just isn't enough left to sufficiently power your other<br />
systems.<br />
17
Engines<br />
Engines provide the thrust needed to propel you ship forward. Your<br />
main engine system is also hooked into your braking thruster<br />
subsystem, and the strength of one directly affects the other.<br />
Radar<br />
Radar allows you to keep an eye on the activities taking place in your<br />
vicinity. The better your radar, the greater your range. Different objects<br />
will appear in different colors, to make them easily identifiable.<br />
Asteroids are gray, faction ships are their respective faction colors,<br />
stations are yellow and jumpgates are light blue.<br />
ECM<br />
Electronic Counter Measures, or "jammers", distort the signals emitted<br />
by the radar systems other ships receive about your vessel. By<br />
distorting these 'scans' the effective range of enemy radar is reduced.<br />
While these devices will not make you invisible, they will make it much<br />
harder for other pilots or enemies to spot you and pinpoint your<br />
location.<br />
Capacitors<br />
Capacitors are energy storage devices that hold a charge which can<br />
be used to power your guns. This is a vital piece of equipment since<br />
so many of the weapons systems require such a large amount of<br />
power to fire. Keep in mind that the more guns you mount, the more<br />
energy you'll need. Sometimes it may be more effective to mount only<br />
one powerful gun instead of several weaker ones.<br />
Shields<br />
The shields module's main function of is to protect the hull of a ship<br />
from any outside damage. This includes not only enemy fire, but also<br />
collisions with other objects. Like all equipment, shields need energy<br />
to function. Each time your shields take damage they loose some of<br />
their power and then slowly recharge. Once shields are depleted your<br />
hull will take direct damage. Your hull is still protected by armor, but<br />
several direct hits will eventually destroy any ship.<br />
18
Guns<br />
Guns seem to be the favored piece of equipment for some reason.<br />
These weapons are either energy or projectile based, or a<br />
combination their of. All energy weapons must be recharged by your<br />
power plant before they can be fired again. Their power diminishes<br />
over distance and eventually dissipates completely. On the other<br />
hand, projectile-based weapons do not require much energy and may<br />
be fired continuously, but they have a limited number of projectiles<br />
and generally do less damage. These guns will be automatically reloaded<br />
upon docking with a friendly station. Ammo-based weapons<br />
require you to lead your target, i.e. you have to aim where your target<br />
will be at the time of impact. To aid you with this technique you can<br />
supplement these weapons with a targeting computer (available in the<br />
MODx section of the market).<br />
One special item that is listed among the guns is the mining laser. The<br />
mining laser represents a special sub-category of the weapons<br />
section. This device is mounted to a gun hard point and activated by<br />
pressing the fire button. Mining lasers extract ore from asteroids,<br />
which is then transported into you cargo hold. While a mining laser is<br />
not a weapon, its extractor beam will do a small amount of damage to<br />
a target.<br />
Missiles<br />
Missiles do much more damage than guns, but their number is limited<br />
to the amount of hard points on your ship. After softening up your<br />
opponents shield and armor with your guns, a well-placed missile is<br />
like the last magno-bolt in their escape pod.<br />
Missiles are divided into dumb fire and intelligent categories. Dumb<br />
fires travel on a straight path and are best fired at targets that are very<br />
close. Intelligent missiles have build-in targeting devices that lock on<br />
and follow their target until they either hit or run out of fuel.<br />
MODx<br />
MODx are special items which can be used to perform various tasks.<br />
Every ship is outfitted with several special equipment slots. These<br />
items can be cameras, scanners, BCUs, targeting devices, or other<br />
items yet to be developed by TRI.<br />
19
Storage<br />
This button allows you to view your storage locker. You may store five<br />
units plus one unit per rank level in your locker. (For instance, if you<br />
are rank 4 you can store 5+4=9 units.) You can view your storage<br />
inventory from any station. To access your stored items you will need<br />
to fly to your faction's storage facility.<br />
20
Trade<br />
Hello again, pilot. This is Dorakk Thol, sectional chief of the TRI<br />
Bureau of Trade Regulation. We've notice that you have been<br />
attempting to trade lately, and have decided to step in and inform you<br />
of a few rules and regulations. Trade is a serious thing which pilots<br />
need to learn about and respect...<br />
The trade interface is a fairly simple interface that can be used to<br />
directly exchange items between pilots. Here's what you'll need to do:<br />
trade<br />
To initiate a trade you will first need to click on the 'trade' tab along the<br />
top of JOSSH's command module. (The command module resides at<br />
the bottom of the screen.) Next you will need to select the name of the<br />
pilot you wish to trade with from the pilot list. (You will notice that you<br />
can only trade with pilots docked at your current station.) Now hit<br />
'offer,' and it's up to the other pilot where this trade will go.<br />
If the pilot you offered the trade to declines you will not be able to<br />
trade with them. However, if the pilot accepts, the pilot selection<br />
screen will disappear. You will now see 3 sets of eight inventory slots.<br />
The first set is your current inventory, the second set is your trade<br />
offer, and the final set is the other pilot's offer.<br />
21
You will now be given an opportunity to trade goods. Select an item<br />
from your inventory, or type an amount of credits in the credits box<br />
along the bottom of the trade screen. Now press offer. A pop-up will<br />
appear informing you that the trade has been offered and that you are<br />
waiting on the other pilot.<br />
Now the other pilot is given the same options you were, and will be<br />
able to offer a counter trade. Once they are finished, the pop-up will<br />
disappear. If the offer is good enough, select accept and the trade will<br />
be completed. If the offer was not to your liking you will be able to offer<br />
a counter offer as well, which will restart the cycle.<br />
That's all there is to it! You may cancel a trade at any time by pressing<br />
'cancel'.<br />
22
Ship Configuration<br />
Welcome back Pilot. This is Solder Ronin speaking, sectional leader<br />
of the TRI Department for Novice Pilot Affairs. I hear you're having<br />
trouble configuring your ship, and it is my duty to help you to be all you<br />
can be. Let's get started, I've got a transport full of recruits coming in<br />
within the hour...<br />
The following report will teach you the basics of configuring your ship.<br />
Keep in mind: this is an interface explanation only, and you will not be<br />
given hints and tips regarding specific customizations.<br />
Ship Purchase Dialogue<br />
The ship purchase section of the ship configuration screen can only<br />
be accessed from your faction's stations. To view a ship's statistics<br />
you will first need to select a ship using the left and right scroll arrows.<br />
Once you have selected a ship click the 'info/purchase' button. The<br />
information and purchase pop-up will provide you with further<br />
statistical information on the selected ship.<br />
System Selection Menu<br />
The system selection menu is a green, arced list of systems located to<br />
the left of the graphic representing your current ship. When a system<br />
is selected via this menu, the equipment assignment slots will change<br />
accordingly.<br />
23
Graphical Ship Layout<br />
In this portion of the ship configuration screen you will see a top down<br />
view of your current craft. Depending on which system you have<br />
selected you will see various icons displaying where each component<br />
resides on your ship.<br />
Equipment Assignment Slots<br />
The ship configurator contains eight equipment assignment slots,<br />
located directly in the center of the screen. This is the most vital<br />
portion of the ship configurator. From here you will input all equipping<br />
orders for your ship.<br />
Each equipment assignment slot contains four basic components: the<br />
standard item image and icon , inventory scroll arrows , size<br />
indication boxes , and an equip status button .<br />
Slot Breakdown<br />
Standard Item Image and Icon - The item images and<br />
icons are standard throughout the interface, and you<br />
have undoubtedly familiarized yourself with them<br />
already. This portion of the slot displays graphically<br />
what item you are looking at, and is accompanied by<br />
an icon indicating an item's type and what faction<br />
produces it (determined by color).<br />
Inventory Scroll Arrows - These blue scrolling arrows,<br />
when clicked, will scroll through every item in your<br />
inventory that corresponds with the slot's type. (i.e.<br />
shields, missiles, engines, etc.)<br />
Size Indication Boxes - Size boxes are also a<br />
standard throughout the interface. In the ship<br />
configurator you will notice three different size boxes:<br />
open green, solid green, and solid red. An open green<br />
box means that you have an open size slot. A solid<br />
green box means that the current piece of equipment is<br />
taking up that size box. (Note: you may see a mixture<br />
of green boxes in a slot. for instance: if you can fit a<br />
size three engine, but have a size two engine<br />
equipped, you will see two solid green boxes and one<br />
open green box.) The final box type, solid red, indicates<br />
that an item is too big for your ship.<br />
24
Equip Status Button - The equip icon will only display<br />
if an item will fit on your ship. A blue arrow pointing<br />
towards the ship diagram indicates that the item is in<br />
inventory, and can be equipped on your ship. Once you<br />
have clicked on the blue icon, the item will be equipped<br />
on your ship. A red icon with an arrow pointing away<br />
from the ship indicates that the selected item is already<br />
equipped, and can be unequipped and added to<br />
inventory.<br />
Slot Examples<br />
Note the four red size boxes along<br />
the bottom of the screen. This<br />
indicates that the capacitor is too<br />
big, and cannot be equipped. (Thus<br />
the missing equip icon.)<br />
This item is currently equipped,<br />
because the equip status button is<br />
red. Also, note the size boxes: this<br />
powerplant is a size one, and a<br />
size two powerplant can be<br />
equipped.<br />
This jammer fills all available slots<br />
on this ship, and can be equipped.<br />
it is currently in inventory, as<br />
denoted by the blue equip icon.<br />
25
PGA (Power Grid Analyzer)<br />
The power grid analyzer will allow you to compare<br />
the performance of different components that are<br />
equipped on your ship. You will notice that the PGA<br />
flows from top to bottom, and that certain<br />
components are required to power lower level<br />
systems.<br />
On the PGA, an item that is equipped will be<br />
outlined in green. if an item is powered, it will be<br />
filled with yellow. Inside of the engine component<br />
you will notice a set of arrows and 2 statistics. The<br />
first statistic is a throttle percentage. The second<br />
Statistic is your maximum velocity. (Note: This is<br />
for power consumption analysis only, and does not<br />
effect your in-flight throttle settings.)<br />
To the right of the PGA you will notice several<br />
numbers. These numbers display your current<br />
power based on the maximum amount of power<br />
drain caused by each component. The number<br />
directly to the left of each system is the amount of power required to<br />
run the system at it's full potential. The number between each item is<br />
the running total (remaining power).<br />
26
Mission<br />
Welcome Pilot. This is Alywn Pinguar speaking, sectional leader of<br />
the TRI Department for Galactic Mission Oversight and Regulation.<br />
Below is the overview of mission standards and objectives that you<br />
requested. Since you have not filled out a 103104xz requisition form,<br />
you are limited to declassified data and general mission information.<br />
This is fairly straightforward document describing the basic information<br />
related to each mission. You will notice that each mission has certain<br />
requirements that you will need to fulfill before the mission will be<br />
marked as complete.<br />
Mining Missions<br />
Mining is a good way of collecting raw materials<br />
without stripping a planet of its resources. Since each<br />
station is constantly consuming these materials,<br />
mining missions are always available and often pay<br />
very well.<br />
Before you can mine you will need to obtain a few pieces of<br />
equipment. The first is a mining laser. (The best of which are<br />
produced primarily by the Quantar.) Secondly, you will need a<br />
capacitor to power the laser.<br />
Now you are ready to begin mining. Before you launch, take a<br />
moment to figure out where the best place to mine would be. Since<br />
you are not cleared for galactic mineral surveys and distribution<br />
charts, you may want to take a few scout missions and note which<br />
sectors contain which types of deposits.<br />
(Tip: Due to the spatial disturbances that ripped apart known space in<br />
the first place, there are large deposits of all types of minerals near the<br />
epicenter. It is also rumored that mineral deposits can be mined fasted<br />
by actively mining different areas of an asteroid.)<br />
27
Common Metals<br />
Precious Metals<br />
These are the<br />
most basic<br />
asteroids<br />
containing trace<br />
elements of<br />
common<br />
materials.<br />
Although such<br />
materials sell for<br />
a very low<br />
amount, they are<br />
often needed in<br />
large quantities.<br />
The materials<br />
mined from this<br />
type of asteroid<br />
often are rich in<br />
metals such as<br />
gold, platinum,<br />
and silver. On<br />
average, the ore<br />
mined from this<br />
asteroid will be<br />
worth more than<br />
common<br />
materials.<br />
28
Radioactive Metals<br />
Semifluxors<br />
Radioactive<br />
asteroids are by<br />
far the most<br />
worthwhile to<br />
mine. Due to the<br />
high demand for<br />
such materials in<br />
reactors and<br />
weapon<br />
systems,<br />
radioactive<br />
metals will<br />
always be in high<br />
demand.<br />
Semifluxor<br />
asteroids are the<br />
most despised<br />
asteroids in all<br />
space due to<br />
their dark color,<br />
which has<br />
created a<br />
navigational<br />
hazard for many<br />
a pilot. Rich in<br />
silicon, this type<br />
of asteroid will<br />
often fetch you a<br />
profit<br />
comparable to a<br />
precious metals<br />
mining run.<br />
29
Ice Ore<br />
Transport Missions<br />
Formed in the icy<br />
depths of space,<br />
this type of<br />
asteroid is rich in<br />
frozen water<br />
deposits, but<br />
also contains<br />
trace amounts of<br />
various other<br />
elements. Mining<br />
these lumps of<br />
ice is not very<br />
profitable, but is<br />
very necessary<br />
for life forms<br />
needing water to<br />
survive.<br />
Transport missions are fairy simple missions. Once<br />
you accept a transport mission, a unique item will be<br />
loaded into your cargo bay. These items may contain<br />
sensitive data or equipment, such as weapons and<br />
equipment prototypes, sensitive data discs, or<br />
personal belongings.<br />
Once you have received your transshipment container, all you have to<br />
do is deliver it to the designated station. Unlike most other missions,<br />
transport missions will pay on the spot. (You do not even have to sell<br />
the item, you must simply dock at the station, and the dock crew will<br />
take care of delivery for you.)<br />
The biggest fear for a transport pilot is splashing against a 'roid, or<br />
being shot down by rogue fighters. If you splash during the course of a<br />
transport mission, the item will be lost, resulting in a failure.<br />
Some complain that transport missions don't pay very well, but as a<br />
starter pilot, a few courier runs will help you out in a hurry.<br />
30
Standard Transshipment Containers<br />
Standard cargo crate. Used for<br />
transporting any number of personal or<br />
sensitive items. Each crate is<br />
magnetically sealed.<br />
Standard data disc. Although small in<br />
size, each disc can contain virtually<br />
unlimited amounts of data. Secured using<br />
any number of encryption techniques.<br />
Standard liquid transport containers. Can<br />
also be used for pressurized gases.<br />
Usually sealed or locked using magnetic<br />
or other means.<br />
Cargo Missions<br />
Cargo missions are slightly more advanced than<br />
transport missions. A station offers cargo missions<br />
when the supply of a particular commodity is low. To<br />
complete a cargo mission you will need to fly to a<br />
space station which stocks the particular item,<br />
purchase the specified quantity, and then return to<br />
the station of origin.<br />
These missions, which consist mostly of profit margin comparisons<br />
and long hours behind the flight stick, are one of the riskier missions<br />
available. Since pilots are often weighed down by cargo they will need<br />
to keep an eye out for renegade fighters. In fact, on an expensive<br />
haul, it may be worth your time to split the profits with a few wingmen,<br />
and hire and escort fighter wing.<br />
Another thing to keep in mind is that you, unlike the transport pilot, will<br />
have to pay for the cargo load out of your own pocket! As risky as this<br />
type of venture is, the profits are usually worth it.<br />
Cargo missions can be very lucrative to a pilot who can afford a<br />
freighter, but will be considerably more difficult for a low level pilot in a<br />
fighter craft.<br />
31
Patrol Missions<br />
Patrol missions are imperative to local defense within<br />
a faction's sphere of influence. These missions are<br />
extremely straightforward, in that all you need to do is<br />
pass through a series of space locations. Once you<br />
have docked, the dock crew will make sure that your<br />
ship's flight recorder information is downloaded and sent to central<br />
command for processing.<br />
A helpful resource for patrol missions is the in-flight map.<br />
These missions can also be used in conjunction with personal cargo or<br />
beacon runs since they are so easy to complete.<br />
Combat Missions<br />
Although TRI encourages peaceful conflict<br />
resolution, the protection of enlisted pilots comes<br />
before communication with the conflux. To date no<br />
method of communication has succeeded, which<br />
leaves no choice but to rip 'em and send them back<br />
whenceforth they came. Combat missions are often offensive in<br />
nature, and are by far the riskiest of all missions.<br />
Once you have accepted a combat mission, you will need to locate<br />
and destroy a given number of conflux craft. Combat missions will<br />
usually pay better than expected, as each conflux kill will generate a<br />
bounty as well as an experience point bonus.<br />
32
T.R.I. Missions<br />
TRI often issues missions which will serve their<br />
interest (and supposedly everyone else's...) These<br />
missions range from keeping the conflux population<br />
down to running large loads of a particular<br />
commodity to a TRI certified production facility. TRI<br />
missions can be accepted from any station, and are universally<br />
uniform.<br />
Faction Missions<br />
Faction missions are issued from each empire's<br />
home world, and provide specific objectives for their<br />
members. Faction missions, when completed, build<br />
specific buildings and other useful items for that<br />
sector, which adds varying benefits and abilities to<br />
the faction's station and or pilots.<br />
33
Scout Missions<br />
Scout missions are one of the more important<br />
missions available from TRI's perspective. These<br />
assignments, should you choose to accept them,<br />
provide TRI with much needed recon data about<br />
spatial anomalies and the like.<br />
On occasion, you may also receive scouting assignments from your<br />
faction, which often consist of snapping a few pictures or scans of an<br />
opposing faction's stations. These assignments can be especially<br />
risky if other pilots catch on to your intent. In fact, once your mission<br />
has been uncovered by enemy pilots, be prepared to face espionage<br />
charges (usually dispensed at point blank from the steaming barrel of<br />
a serializer.)<br />
Before accepting a scout mission, you will want to make sure that you<br />
have purchased the necessary mission equipment. Depending on the<br />
mission, you will need either a camera or a scanner MODx equipped.<br />
Scanning Equipment<br />
Solrain's standard data recording device<br />
can be configured to record any number<br />
of frequencies directly to an internal disc<br />
drive.<br />
Quantar's standard scanning device can<br />
record for several hours before the<br />
onboard hard drive must be wiped.<br />
Working on a slightly different system,<br />
the standard Octavian scanner pipes<br />
recorded data directly into the ship's<br />
main computer, giving virtually endless<br />
hours of recording time.<br />
Visual Recording Devices (Cameras)<br />
The Solrain camera includes such<br />
features as automatic zoom and digital<br />
image compression. these cameras can<br />
be used on even the most invasive<br />
espionage missions.<br />
34
Quantar's VRD (visual recording device)<br />
is the most durable camera on the<br />
market. this device was used during the<br />
GVB wars, and over 80% of damaged<br />
cameras contained salvageable data.<br />
Although Octavian cameras are both<br />
bulky and somewhat low tech, they do<br />
serve their purpose.<br />
35
SPACEDRAKE’S COMPILED SHIP REPORT<br />
FOR <strong>THE</strong> THREE FACTIONS v1.1<br />
"Subtle and insubstantial; the expert leaves no<br />
trace of motives; divinely mysterious, he is inaudible.<br />
Thus, he is the master of his enemy's fate."<br />
Ancient Octavian Saying. 498th passage - Book of Tactics<br />
36
Date Entry: 104.02.21 12:00 EKT<br />
Subject: Imperial Octavian Navy Octavian Ship Report<br />
Author: André “SpaceDrake” Ricard<br />
Classification Level: General public<br />
Imperial Octavian Navy Octavian Ship Report<br />
Version: 1.1<br />
UPDATER’S NOTE 104.02.21<br />
Fellow pilots,<br />
Although the ship statistics available to new recruits on JOSSH are certainly interesting for new<br />
pilots and a good way to get their attention, they actually do not have much in the way of tangible<br />
data for pilots to see what ships work best in what roles, and what equipment is best for what<br />
craft. The purpose of these reports, then, is to outline the capabilities of the ships that each of the<br />
fleets of the Reconstruction Initiative member states. Our first report focuses on the Imperial Navy<br />
of Octavius.<br />
The Octavian Navy has, for a fairly long time, suffered from poor research and design. Although<br />
the original O2 Phoenix prototypes were fantastic combat craft, they had to be redesigned for<br />
safety concerns, leaving the vessel a shadow of its former self. Combined with such engineering<br />
disasters as the Raptor Bomber, Octavius suffered militarily for years. In recent months, though,<br />
the Imperial Navy has made a comeback with a vengeance, and now fields very capable combat<br />
craft as well as the most types of combat craft of any national fleet (with the introduction of the<br />
Vulture Assault Gunboat.) Although the Imperial Navy lost the last two “faction wars”, in many<br />
engagements they performed admirably and it is the general feeling among the pilot cadre that<br />
had the Brotherhood of the Stone not intervened on the side of Solrain, the Oct/Sol War of the<br />
Raven would have turned out far differently than it did. Although the Octavian Empire is a husk of<br />
its former pre-collapse glory, only fools would still dare to underestimate it.<br />
These reports are arranged in the following manner: when components like engines are listed,<br />
the recommended part is given along with the size, except for guns, where all practical loadouts<br />
are covered. Missiles, MODx and ECM are all given in size alone, due to the variety of parts<br />
available in these areas. Speed is given in meters per second, with normal power, afternburn and<br />
Flashfire top speeds; Yaw/Pitch/Roll rates are given in degrees per second and indicate the turn<br />
rate of a ship not firing its engines. Acceleration is kilo-Newtons of thrust per kilogram. Armor is in<br />
millimeters, shields are rated compared to the equivalent protection in mm of armor they provide.<br />
Cargo is in cubic meters. Also, classification is slightly changed from the TRI standard to be more<br />
accurate (in the author’s opinion.)<br />
I hope this information is useful to new and returning pilots alike. Clear skies to you all!<br />
At your service,<br />
André “SpaceDrake” Ricard<br />
SHUTTLES<br />
Octavian shuttles are fairly clearly designed for one thing: combat. Octavius is the only nation that<br />
gives its nugget pilots an unquestionably combat-oriented “shuttle” right off the bat. The Imperial<br />
Navy offers a few vessels for hauling at low rank, but the intent of the Octavian shuttle line is<br />
obviously to give their nugget pilots something to learn the fine art of combat in before they are<br />
unleashed upon the universe in a Raven Light Fighter. While still nowhere near a match for an<br />
actual fighter, don’t underestimate an Apteryx. The Albatross and Buzzard, however, are a<br />
different matter entirely. Do note that these loadouts are optimal; barring mentor gifting you’ll<br />
rarely encounter rookies in ships this well outfitted.<br />
S-1<br />
37
Apteryx<br />
Classification: Shuttle/Ultra-Light Fighter<br />
Power plant: Centerfuge MK3 (size 2)<br />
Engines: Guzzler x 1 (size 3)<br />
Radar: Chime (24000 meter range) (size 1)<br />
Shield: Shelter (6009mm equivalent), Deflector (5700mm equivalent) (size 1)<br />
Armor: 9000mm<br />
Capacitor: Spore, Jug, Seed if using lower-power lasers (size 2)<br />
Laser Config: Medium Lasers x 2, ER Lasers x 2 (note below)<br />
Ammo Config: Straker x 2<br />
Missiles (# x size): 2x2<br />
MODx: 2<br />
ECM: 1<br />
Speed (nor/ab/ff): 360/410/710 MPS<br />
Acceleration: 105.3 (laser), 96.5 (Straker) kN/kg<br />
Yaw/Pitch/Roll: 80/90/70 DPS<br />
Cargo: 1 m³<br />
Notes:<br />
The Apteryx is hands down the best combat ship available to rank 0 pilots in all three national<br />
navies. When its chassis is fully upgraded, the ‘Ape’ can kill any conflux up to C5 with ease (and<br />
notorious are the pilots who have brought down Krakens in them). Against other faction<br />
shuttles… it performs ruthlessly. It is very nimble and easy to maneuver, allowing pilots to dodge<br />
incoming projectile-based weaponry with ease. Many Apteryx pilots prefer to stay in this ship until<br />
the Raven class Light Fighter is available. It should be noted that like many lighter Octavian craft,<br />
the Apteryx does not possess the proper power plant for utilizing Octavian-manufactured<br />
weaponry to its fullest. Although such guns are often in short supply in these war-torn days, Ape<br />
pilots should consider using other kinds of lasers. Also of note is its missile mounts – the Ape can<br />
mount full anti-fighter missiles, giving it a much heavier punch than most “shuttle” classes.<br />
S-2<br />
38
Albatross<br />
Classification: Shuttle<br />
Power plant: Centerfuge MK3(size 2)<br />
Engine: Guzzler x 1 (size 3)<br />
Radar: Chime (24000 meter range) (size 1)<br />
Shield: Haven (15400mm equivalent), Canopy (12240mm equivalent, the only<br />
reason to use the Canopy is that it is available at level 8 rather then 13)<br />
(size 2)<br />
Armor: 9000mm<br />
Capacitor: Jug (size 1)<br />
Laser Config: Medium Laser, ER laser<br />
Ammo Config: Straker<br />
Missiles (# x size): 2x1<br />
MODx: 3<br />
ECM: 1<br />
Speed (nor/ab/ff): 341/389/673 MPS<br />
Acceleration: 83.6 (laser), 81.0 (Straker) kN/kg<br />
Yaw/Pitch/Roll: 70/85/75 DPS<br />
Cargo: 3 m³<br />
Notes:<br />
The Albatross is designed off the Apteryx chassis, using the same powerplant and engine if<br />
available. But unlike its older cousin, the Alby is built for non-combat pilots. With only one gunmount,<br />
size one missiles, and a size one capacitor, it takes a very long time to dispatch conflux,<br />
and maneuverability is shaved off a bit (although it still handles like a Light Fighter, except for the<br />
acceleration, which is atrocious for a ship of its pedigree.) With that said, this little shuttle can<br />
mount the powerful Haven shield…which is the same shield most combat aerospace fighters use.<br />
This makes it very hard to kill compared to the Apteryx. The additional cargo space and modx slot<br />
are also welcome to aspiring trader pilots. Therefore, it is a semi-decent upgrade for the trademinded<br />
Octavian until he can acquire a Buzzard. Don’t try taking on the Conflux hordes in this<br />
ship, though.<br />
S-3<br />
39
Buzzard<br />
Classification: Heavy Shuttle<br />
Power plant: Centerfuge MK3 (size 2)<br />
Engines: Adventa x 1 (size 4)<br />
Radar: Chime (24000 meter range) (size 1)<br />
Shield: Haven (15400mm equivalent), Canopy (12240mm equivalent, the only<br />
reason to use the Canopy is that it is available at level 8 rather then 13)<br />
(size 2)<br />
Armor: 9000mm<br />
Capacitor: Jug (size 1)<br />
Laser Config: Heavy Laser, Spitfire Ion Cannon<br />
Ammo Config: Hammer or Cobra<br />
Missiles (# x size): 2x1<br />
MODx: 3<br />
ECM: 1<br />
Speed (nor/ab/ff): 343/392/678 MPS<br />
Acceleration: 85.0 (laser), 83.3 (Spitfire), 82.6 (Hammer), 81.0 (Cobra) kN/kg<br />
Yaw/Pitch/Roll: 60/21/68 DPS<br />
Cargo: 8 m³<br />
Notes:<br />
The Buzzard is an odd bird to say the least. Many pilots have a love-hate relationship with it and<br />
skip it in favor of the Raven class Light Fighter. The engine upgrade to the Adventa gives it<br />
decent speed and acceleration (mounting a Rush or Burn engine will leave no juice for other<br />
systems). The 8 units of cargo space give traders their first real cargo hauler (and one that<br />
actually mounts a weapon, as opposed to the Albatross) or miner. The addition of the Haven<br />
class shield and 3 modx slots round out its defensive systems quite nicely. The major problem it<br />
has, however, is the way the designers added the size 4 engine mount – it is a lateral extension<br />
coming straight off of the elongated chassis. This design, however, does not allow for vertical<br />
thrust vectoring. In short, it pitches like a freighter. Thankfully its yaw and roll rates are fairly<br />
nimble, but this odd handling quirk can make it the single most annoying ship in the five systems<br />
to operate. Despite this, it is still a manageable cargo/mining vessel. Pilots are urged to get a<br />
Hawk as soon as possible, however. As per weaponry, the Shark Heavy Laser and Spitfire Ion<br />
Cannon work well, but the vessel may have trouble utilizing it in combat. It also lacks in the<br />
missile department in comparison to the Apteryx (although its mountings are standard for<br />
shuttles.)<br />
S-4<br />
40
FIGHTER CRAFT<br />
Octavian Fighter Craft were, for a terribly long time, the red-headed stepchildren of the five<br />
systems. Although the O2 Phoenix prototype was quite fearsome, it was eventually redesigned<br />
due to safety concerns. The other fighters the Navy fielded were exiled to non-usefulness for<br />
ages… but no longer. Thanks to the Empire’s upgrade program, the O2-X2, O4-I, and O10-I are<br />
all at or above par with the ships of the other nations… and it also has the ferocious O17 Dragon.<br />
With the advent of missile size restrictions due to safety concerns, even the O13 Raptor shall<br />
likely find use in its narrow role. Mixed fleets are now both a reality and the rule, and the Empire<br />
at last possesses craft capable of bringing death to its enemies. Every one of these ships has a<br />
use – it would behoove pilots of the Empire to learn to use all of them well.<br />
It should also be noted that this list may not be complete. Rumors continue to circulate<br />
concerning the “Falcon” class advanced tactical fighter – a fighter that can change modes<br />
between combat and intercept, allowing it to pursue a fleeing foe with impunity (and possibly no<br />
afterburners). Unfortunately, it is a project that has been plagued with setbacks and problems<br />
(reportedly resulting in the deaths of several test pilots) for, by some estimates, over a year and a<br />
half. The latest unofficial news from Octavian High Command is that Project Falcon is continuing,<br />
but we should not expect to see the O12 Falcon out for some time yet – the most (some would<br />
say laughably) optimistic estimate is perhaps sometime in the second quarter of TRI year 104.<br />
(And even then, the Corvette Project is apparently getting more funding.) Until then, however, the<br />
Octavian fleet is still very well supplied with top of the line fighters.<br />
S-5<br />
41
Raven<br />
Classification: Light Fighter<br />
Power plant: Instigator, Antagonizer works well (size 3)<br />
Engines: Impeller x 2 (size 2 x 2)<br />
Radar: Chime (24000 meter range) (size 1)<br />
Shield: Haven (15400mm equivalent) (size 2)<br />
Armor: 10000mm<br />
Capacitor: Spore, Jug or Seed for Distorters or Strakers (size 2)<br />
Laser Config: ER Lasers x 4, Medium Laser x 4 (somewhat popular despite range)<br />
Ammo Config: Straker x 4<br />
Missiles (# x size): 4x2<br />
MODx: 3<br />
ECM: 1<br />
Speed (nor/ab/ff): 476/543/940 MPS<br />
Acceleration: 111.3 (lasers), 114.6 (Distorters), 104.0 (Straker) kN/kg<br />
Yaw/Pitch/Roll: 80/70/70 DPS<br />
Cargo: 3 m³<br />
Notes:<br />
It used to be that the Light Fighter class in general meant “lesser fighter.” With the upgrades<br />
made to the Impeler class engine and the O4-I spaceframe, that is no longer the case (as many<br />
hapless Solrain and Quantar pilots have recently found out to their detriment). The O4-I Raven is,<br />
when properly equipped, the fastest attack fighter in the five systems. It is capable of running<br />
down any vessel that isn’t a Scout. While it does not possess the heavy armament that larger<br />
chassis do, it is more than capable of supplementing a larger fighter’s attack and being a general<br />
nuisance. It also carries four anti-fighter missiles, which supplement its anti-fighter punch<br />
admirably. The only weaknesses the craft possesses are a lack of armor compared to other<br />
combat craft and a distinct lack of MODx slots. While earlier models of the O4 were severely<br />
lacking in MODx slots, the Raven still suffers somewhat in this category – a pilot must be aware<br />
of his FlashFire levels, lest he get stuck in a position where his normal superior speed matters not<br />
against a FlashFiring Intensity.<br />
There is an odd quirk involved with this fighter concerning the placement of the cockpit in relation<br />
to the engines. If a pilot pitches upward to the point of nearly going in reverse and then applies<br />
his engines full throttle (especially on afterburn), the engine wash has a tendency to spray all over<br />
the rear-mounted cockpit, blinding the pilot. While this effect is sometimes slightly noticeable on<br />
all craft, because the Raven’s cockpit is mounted directly behind and above the engines the effect<br />
is far more pronounced and can be troublesome while performing complex flight maneuvers. A<br />
pilot who flies with knowledge of this limitation should not have many problems, however.<br />
S-6<br />
42
Chiropteran<br />
Classification: Medium Fighter<br />
Power plant: Instigator (size 3)<br />
Engines: Impeller x 2 (size 2 x 2)<br />
Radar: Chime (24000 meter range) (size 1)<br />
Shield: Haven (15400mm equivalent) (size 2)<br />
Armor: 12500mm<br />
Capacitor: Spore for lasers, Jug or Seed for ammo (size 2)<br />
Laser Config: 2 Heavy Lasers/2 ER lasers, 2 Warpers/2 Distorters<br />
Ammo Config: 2 Cobras/2 Strakers<br />
Missiles (# x size): 2x2, 2x3<br />
MODx: 4<br />
ECM: 2<br />
Speed (nor/ab/ff): 448/511/884 MPS<br />
Acceleration: 100.2 (lasers), 102.4 (pulse), 91.5 (ammo) kN/kg<br />
Yaw/Pitch/Roll: 60/65/70 DPS<br />
Cargo: 4 m³<br />
Notes:<br />
The O10-I “Chiro” is, in essence, the Octavian response to the Quantar Typhoon: a highly<br />
maneuverable line fighter. The original O10 was meant primarily as a “stepping stone” to the<br />
Phoenix that could still combat other ships… sort of. However, Octavian High Command noted<br />
that their fleet lacked a ship that could perform the kind of maneuvers the Typhoon did while still<br />
carrying the amount of armament and armor it did. While the Raven was certainly a nimble little<br />
craft (especially after its upgrades), it lacked the raw firepower of the Typhoon. Thus, the O10-I<br />
was born. While it is exactly as maneuverable as the O2-X2 Phoenix, it accelerates much faster<br />
than its larger cousin and in maneuverability and acceleration it nearly matches the Typhoon,<br />
while carrying roughly 2/3rds of the combined armament (including heavier missile armament<br />
when correctly configured with 2 HellRazors or 2 Light Torpedoes in its oversize missile slots), on<br />
a slimmer and more accessible frame to boot. The OHC thought their efforts were, on the whole,<br />
successful.<br />
In combat the Chiropteran is used as a wingman craft – it generally does not have the speed to<br />
chase down light or heavy fighters too well, but it can draw and dodge fire much better than a<br />
Phoenix or Dragon can, and ignoring a Chiro for even short amounts of time tends to be fatal.<br />
Small wings of Chiros are also excellent patrol forces, and are quite capable of dealing with most<br />
small forces thrown their way.<br />
S-7<br />
43
Phoenix<br />
Classification: Heavy Fighter<br />
Power plant: Centerfuge MK5 (do not use other powerplant, see below) (size 5)<br />
Engines: Dream x 1 (size 5)<br />
Radar: Knocker (35000 meter range) (size 2)<br />
Shield: Haven (15400mm equivalent) (size 2)<br />
Armor: 16200mm<br />
Capacitor: Varies greatly on loadout; Carrier (low weight) for Pulse laser loadout,<br />
Keytso for Thorns and Ion, Alembic for Injustices, Deepol for ammo (size<br />
4)<br />
Laser Config: Heavy Laser x 4, VAPOR x 2/Warper x 2, Featherfire x 2/Spitfire x 2<br />
Ammo Config: Barrak x 2/Hitman x 2<br />
Missiles (# x size): 2x4, 2x2<br />
MODx: 4<br />
ECM: 1<br />
Speed: (nor/ab/ff): 441/503/871 MPS<br />
Acceleration: 83.7 (laser), 78.2 (Ion), 73.3 (ammo) kN/kg<br />
Yaw/Pitch/Roll: 60/65/70 DPS<br />
Cargo: 8 m³<br />
Notes:<br />
The O2-X2 Phoenix is the premier fighter craft of the Octavian Navy. The Phoenix has a long and<br />
storied history, some good and some quite awful. The current model is the most advanced model<br />
of the Phoenix yet. The ship was designed primarily around the idea of overwhelming firepower;<br />
while the Quantar Typhoon technically has the same kind of gun mounts, the Phoenix can power<br />
any kind of combination of weapons it can mount and still fire all guns at full throttle, without<br />
problem. Thus, an accurate pilot in a Phoenix can cause far more damage than their Solrain or<br />
Quantar counterparts. It also possesses the heaviest (and most) missile mounts of any Heavy<br />
Fighter. The “Nix” is a maneuverable craft for its size; however, its single-engine design means<br />
that its acceleration is not quite at good as its contemporaries. (It does mean that the craft can<br />
afterburn longer than others, though, so the effect is mitigated somewhat.) The Nix can also take<br />
somewhat more damage to its armor before going down. It is, on the whole, an excellent<br />
backbone to the Octavian fleet. It works best, however, when supported by a Raven or<br />
Chiropteran to cover its flanks.<br />
An additional note about the ship: pilots will note that the Nix can mount a stronger power plant<br />
than the Centerfuge Mk.V. HOWEVER, the CentV was designed specifically with the Phoenix in<br />
mind, and the only weapon combination it cannot power is a plasma configuration. As plasma is<br />
not extremely useful in fighter-to-fighter combat, it is not covered here. To keep acceleration<br />
tolerable, do not use any other power plant on the Phoenix.<br />
S-8<br />
44
Dragon<br />
Classification: Assault Fighter<br />
Power plant: TRIP-1 for laser configuration, Sport Plus for mortar configuration,<br />
Intimidator for railgun configuration (size 5)<br />
Engines: Rush x 2 (size 4 x 2)<br />
Radar: Knocker (35000 meter range) (size 2)<br />
Shield: Makk (36000mm equivalent) (size 3)<br />
Armor: 19800mm<br />
Capacitor: Keytso for lasers, Alembic for railguns, Seed/Jug for mortars (size 4)<br />
Laser Config: Shard x 3/VAPOR x 2, Heavy Laser x 5, Featherfire x5<br />
Ammo Config: Flail x3/Hitman x 2, Vantage x 3/Peeler x 2<br />
Missiles (# x size): 1x6, 2x4, 2x2<br />
MODx: 4<br />
ECM: 2<br />
Speed (nor/ab/ff): 436/497/862 MPS<br />
Acceleration: 74.6 (laser), 72.8 (mortar), 60.1 (railgun) kN/kg<br />
Yaw/Pitch/Roll: 42/42/35 DPS<br />
Cargo: 12 m³<br />
Notes:<br />
The Dragon is the ultimate personification of the Octavian ideal of combat: overwhelming<br />
firepower combined with the ability to absorb a great amount of pain as well. The Dragon’s<br />
primary role is command vehicle and wing-leader: it is meant to lead a wing into battle and be the<br />
focus-point of that combat. It is capable of mounting more gun-based firepower than any ship in<br />
the five systems and mounts the same shield system as a heavy cargo vessel, while also being<br />
able to carry an impressive array of missiles (including a single tactical nuclear warhead or<br />
Morningstar Missile Cluster if the pilot so chooses.) The only weakness it possesses is the fact<br />
that it neither maneuvers nor accelerates well. Therefore, unsupported it is vulnerable to an<br />
attack from more than one craft. One on one, however, there is no better ship in all of the five<br />
systems. If you pilot one of these, prepare to take some heat: these fighters tend to get targeted<br />
first. But you can be confident in the fact that you have the firepower to devastate your enemies.<br />
One should note that the railgun configuration is far less nimble than the other versions, due to<br />
the extreme weight of the Intimidator powerplant. While the railguns do provide superior range to<br />
any weapon system, pilots should take that into consideration.<br />
S-9<br />
45
Raptor<br />
Classification: Bomber<br />
Power plant: Centerfuge MK5, TRIP-1 for railguns (size 5)<br />
Engines: Dream x 1 (size 5)<br />
Radar: Knocker (35000 meter range) (size 2)<br />
Shield: Haven (15400mm equivalent) (size 2)<br />
Armor: 20700mm<br />
Capacitor: Keytso (lasers), Alembic (railguns) (size 4)<br />
Laser Config: Heavy Laser x 5, FeatherFire x 4/Spitfire x 1<br />
Ammo Config: Hitman x 4/Barrak x 1<br />
Missiles (# x size): 2x8, 2x6, 2x4, 2x2<br />
MODx: 5<br />
ECM: 2<br />
Speed (nor/ab/ff): 402/458/793 MPS<br />
Acceleration: 54.6 (lasers), 51.2 (ion), 49.3 (railguns) kN/kg<br />
Yaw/Pitch/Roll: 50/60/50 DPS<br />
Cargo: 12 m³<br />
Notes:<br />
The Raptor is a ship designed with exclusively one purpose in mind: delivering massive amounts<br />
of ordinance to a specific target. It is barely able to combat one-on-one anything larger than a<br />
medium fighter (even though it does carry an appreciable amount of gun firepower.) However, in<br />
an attack on freighters, gate infestations and theorized larger targets (like the upcoming corvettes<br />
and the theorized conflux hive-bases) it is invaluable for the sheer amount of missile ordinance it<br />
can deliver to the battlefield. It is also useful in a support role as a missile artillery platform in fleet<br />
battles; this ship can carry the largest missile payload of any aerospace craft known to any nation<br />
(with four Morningstars, 2 HellRazors and 2 basic anti-fighter missiles it carries enough raw<br />
ordinance to kill a small wing of fighters with missiles alone.) In either role, however, it absolutely<br />
must be escorted by light or medium fighters to ensure the ordinance reaches its destination. The<br />
Raptor is a ponderous beast, and the superstructure required to safely carry and launch so many<br />
heavy missiles makes it a large target from any angle (and gives it the slowest acceleration of any<br />
combat ship on record – even a Vulture out-accelerates a Raptor). Pilots of Raptors must be<br />
vigilant for attacks from any vector, and work with their escorts to ensure their survival. If they are<br />
properly guarded however, the Raptor is an invaluable asset to fleet operations and is Octavius’<br />
only true option for destroying hardened targets. (And it isn’t exactly unarmed in guns either –<br />
although it does chain-fire them, 5 Injustices will ruin anyone’s day!)<br />
As a final, recent note, Octavian High Command has confirmed that many of the design elements<br />
of the new Light and Medium Fighters are being tested on the Raptor in an attempt to make it<br />
move faster than a cargo vessel. We can only hope for success.<br />
S-10<br />
46
SCOUTS<br />
Scouts have always been a vital part of any military operation. In space, getting enemy positional<br />
data is just as vital. Fast ships are also needed for exploring sectors and mapping asteroid fields.<br />
The modern Scout vessel was developed with these missions in mind. They are generally<br />
designed to do one thing: go very, very fast. While armed, the general response of a scout is to<br />
bug out of a battle, not fight. Since the development of the Heavy Scout (AKA Ranger), very little<br />
has gone on in this class. The Falcon is rumored to go as fast as a Peregrine in intercept mode,<br />
though.<br />
Peregrine<br />
Classification: Light Scout<br />
Power plant: Sport Plus (size 4)<br />
Engines: Rush x 2 (size 4 x 2)<br />
Radar: Knocker (35000 meter range) (size 2)<br />
Shield: Shelter (6009mm equivalent) (size 1)<br />
Armor: 10800mm<br />
Capacitor: Jug (size 1)<br />
Laser Config: Heavy Laser or Spitfire Ion cannon<br />
Ammo Config: Barrak x 1<br />
Missiles (# x size): 1x4<br />
MODx: 4<br />
ECM: 1<br />
Speed (nor/ab/ff): 539/615/1065 MPS<br />
Acceleration: 164.5 (laser), 161.3 (ion), 157.1 (gauss) kN/kg<br />
Yaw: 18/36/38 DPS<br />
Cargo: 1 m³<br />
Notes:<br />
The Peregrine is the fastest light scout class ship in existence. This ship was once used as a<br />
skirmisher in the days before the modern Light Fighters (indeed, squad OEC is notorious among<br />
veterans for its “’Grine Packs” of old), but those aforementioned ships have now superseded the<br />
Peregrine in the support fighter role, due to the fact that they improve upon one thing:<br />
maneuverability. Even when not firing its prodigious engines, the Peregrine is a difficult bird to<br />
move around. Its yaw rate is particularly unforgivable, as on that axis it maneuvers almost like a<br />
freighter. The days of the ‘Grine Packs are probably at an end, but this ship still excels at scouting<br />
ahead of a larger force or flipping beacons with impudence (especially since its acceleration rate<br />
is the absolute greatest in TRI space and is far higher than that of its larger brother). It should<br />
also be noted that, like many scout-class ships, the Peregrine has been cleared for carrying<br />
medium-sized missile ordinance.<br />
S-11<br />
47
Griffin<br />
Classification: Heavy Scout<br />
Power plant: Sport Plus (size 4)<br />
Engines: Rush x 2 (size 4 x 2)<br />
Radar: Night Watchman (54000 meter range) (size 5)<br />
Shield: Shelter (6009mm equivalent) (size 1)<br />
Armor: 9000mm<br />
Capacitor: Spore (size 2)<br />
Laser Config: Heavy Laser x 2, VAPOR/Warper, FeatherFire/Spitfire<br />
Ammo Config: Hitman/Barrak<br />
Missiles (# x size): 2x4<br />
MODx: 3<br />
ECM: 1<br />
Speed (nor/ab/ff): 550/627/1087 MPS<br />
Acceleration: 133.3 (laser), 128.9 (ion), 124.8 (gauss) kN/kg<br />
Yaw/Pitch/Roll: 18/33/50 DPS<br />
Cargo: 10 m³<br />
Notes:<br />
The Griffin is a faster, more dead-sexy-looking version of the basic Peregrine design. While it was<br />
meant to be a semi-replacement for the ‘Grine, it has not become this for several reasons. Firstly,<br />
even if the Griffin is unarmed the Peregrine can still out-accelerate and out-maneuver the craft<br />
(though the Griffin does roll better.) While the craft does possess more heavy weaponry than the<br />
Peregrine (almost as much firepower as a Chiropteran in fact) it suffers from the same fate of<br />
having difficulty utilizing it in combat. The best thing it has going for it is the fact that it mounts the<br />
largest sensor package in the five systems, the TRI-produced Night Watchman. The Griffin is<br />
capable of spotting approaching fleets before anything else can. In addition to being an excellent<br />
artifact hunting ship with its decent cargo bay, the Griffin is commonly deployed in sectors such<br />
as The Gurge to watch for any incoming ship traffic, including hostile attack wings. While such<br />
duty is hardly glamorous, it is necessary intelligence for the defense wings of Octavia, and the<br />
combat pilots are always grateful toward those who pull “watchman” duty.<br />
Of recent note is the fact that, like the Peregrine and the scouts of the other factions, the Griffin<br />
has been cleared to carry fairly hefty missile ordinance for a craft of its size. It also possesses a<br />
size 3 gun mount, giving it substantially more firepower than other scout craft. While it still cannot<br />
maneuver like a fighter, any Griffin pilot can use such large weapons mounts as he sees fit…<br />
S-12<br />
48
TRANSPORTS<br />
Transports. They get things where they need to go. In Octavia the job of hauling isn’t very highly<br />
valued (above the fighting anyway) but even the most thick-skulled aerojock does recognize that<br />
sometimes things just need to be hauled. Octavian ships have somewhat smallish holds, but<br />
these ships (usually) have some other special redeeming feature. And all you ace fighter jocks<br />
would do well to respect your cargo pilots – they’re the ones who keep your birds supplied with<br />
feed.<br />
Hawk<br />
Classification: Light Transport<br />
Power plant: Instigator, Antagonizer (size 3)<br />
Engines: Guzzler x 2 (size 3 x 2)<br />
Radar: Chime (24000 meter range) (size 1)<br />
Shield: Haven (15400mm equivalent) (size 2)<br />
Armor: 9360mm<br />
Capacitor: Spore, Seed in pulse laser or ammo configurations (size 2)<br />
Laser Config: 1 Heavy Laser/2 Medium or ER lasers, 1 Warper/2 Distorters<br />
Ammo Config: 1 Cobra/2 Strakers<br />
Missiles (# x size): 3x2<br />
MODx: 3<br />
ECM: 1<br />
Speed (nor/ab/ff): 415/472/819 MPS<br />
Acceleration: 111.4 (laser), 114.3 (pulse), 105.6 (ammo) kN/kg<br />
Yaw/Pitch/Roll: 45/65/55 DPS<br />
Cargo: 12 m³<br />
Notes:<br />
The Hawk is an exceptional rookie transport vessel. With the same T/M ratio as a light fighter and<br />
almost comparable armament, it could be a fighter-craft if it wasn’t so slow (comparatively). Even<br />
then, it is often capable of chasing off the lone pirate who is trying to jack your cargo or random<br />
Conflux. It is also an excellent low-rank mining platform, as it can mount a Banker and several<br />
defensive weapons, allowing the pilot to go into deep space without worrying about Conflux.<br />
Thanks to the way the engines are mounted, it has a little trouble with horizontal vectoring, but<br />
not to the degree the Buzzard has with vertical. An excellent ship for the rookie hauler, overall.<br />
S-13<br />
49
Wyvern<br />
Classification: Transport (OBSOLETE)<br />
Power plant: Sport (size 3)<br />
Engines: Dream (size 5)<br />
Radar: Knocker (35000 meter range) (size 2)<br />
Shield: Haven (15400mm equivalent) (size 2)<br />
Armor: 15600mm<br />
Capacitor: Pint for Heavy lasers, Spore for Pulse lasers, Jug for ammo (size 3)<br />
Laser Config: VAPOR/Warper x 2, Heavy Laser x 3<br />
Ammo Config: Hammer x 3 or Cobra x 3<br />
Missiles (# x size): 4x2<br />
MODx: 4<br />
ECM: 2<br />
Speed (nor/ab/ff): 334/380/660 MPS<br />
Acceleration: 51.4 (lasers), 53.4 (pulse), 50.8 (ammo) kN/kg<br />
Yaw/Pitch/Roll: 36/50/47 DPS<br />
Cargo: 48 m³<br />
Notes:<br />
The 'Turkey', as this ship is (not so) affectionately called is serviceable, nothing more. This is<br />
commonly known as one of OPL’s great engineering disasters. It LOOKS rather excellent, but in<br />
function it is nearly useless. Its T/M ratios are disgusting, it handles poorly (although its pitch isn’t<br />
atrocious), and its cargo capacity is pathetic compared to other nation’s ships in the same class.<br />
Perhaps its only saving grace is its size 3 mount in the center, which allows it to equip a Financier<br />
mining laser. The Turkey does make for a fairly decent self-defended mining platform (1<br />
Financier, 1 Banker and a Heavy laser or similar gun), but it is eclipsed in this function by the<br />
Simurgh (especially since the Simurgh mounts an Anti-Flux ECM). Not only that, but the Simurgh<br />
is now a better cargo vessel than the Turkey in every meaningful way, rendering the Wyvern<br />
completely and totally obsolete. There is currently no reason whatsoever to fly this ship –<br />
although OPL claims to be working on a Wyvern upgrade program furiously.<br />
50
Simurgh<br />
Classification: Light Miner/Transport<br />
Power plant: Sport (size 3)<br />
Engines: Guzzler x 2 (size 3 x 2)<br />
Radar: Doorbell (40000 meter range) (size 3)<br />
Shield: Haven (15400mm equivalent) (size 2)<br />
Armor: 9000mm<br />
Capacitor: Jug (size 1)<br />
Laser Config: Financier x 2/Banker x 2 (guns mounted sometimes)<br />
Ammo Config: Financier x 2/Banker x 2 (guns mounted sometimes)<br />
Missiles (# x size): 3x2<br />
MODx: 4<br />
ECM: 3<br />
Speed (nor/ab/ff): 372/424/735 MPS<br />
Acceleration: 64.2 (miner) kN/kg<br />
Yaw/Pitch/Roll: 25/30/15 DPS<br />
Cargo: 60 m³<br />
Notes:<br />
The Simurgh is good at lifting ore from asteroids. That’s it. While it is not the atrocity of a vessel it<br />
once was, it still lacks somewhat in combat capacity and speed. It was, however, designed for<br />
mining, and with the modifications made to match the upgraded Harmattan the Simurgh performs<br />
this duty well at last. When in full mining mode, it can overheat an asteroid quickly and it has<br />
good cargo capacity, enough for perhaps nine medium-sized asteroids. With a size 3 ECM slot, it<br />
can mount an Anti-Flux ECM as well. Many Octavian pilots, however, prefer to house weapons in<br />
at least one of the size 2 slots, allowing them to destroy any idle Conflux possibly left behind by<br />
other pilots passing though. The Simurgh is aggressively designed with this in mind as well; it<br />
possesses more MODx and missile slots than any other Light Miner design, and by far the most<br />
armor in its class. It is my no means a warship, but a Simurgh is more than capable than<br />
defending itself against light Conflux and possibly even Light Fighters.<br />
Ironically, the upgrades to the Simurgh have made it a better overall transport vessel than its<br />
cousin the Wyvern; it is now the Octavian medium transport in addition to being the Light Miner of<br />
the fleet (although it lacks the capacitor capability for very heavy size 3 weapons like the Hitman.)<br />
51
Condor<br />
Classification: Cargo Tow<br />
Power plant: Sport Plus (size 4)<br />
Engines: Dream x 2 (size 5 x 2)<br />
Radar: Sentinel (48500 meter range, less power need than a Nubbler) (size 4)<br />
Shield: Makk (36000mm equivalent) (size 4)<br />
Armor: 96000mm<br />
Capacitor: Spore, Keysto for plasma (size 4)<br />
Laser Config: Heavy Laser x 2, Spitfire x 2, Serializer x 2<br />
Ammo Config: Barrak x 2<br />
Missiles (# x size): 2x6, 2x2<br />
MODx: 7 (camera Modx recommended)<br />
ECM: 3<br />
Speed (nor/ab/ff): 452/515/893 MPS<br />
Acceleration: 64.8 (laser), 64.1 (ion), 63.0 (gauss), 63.1 (plasma) kN/kg<br />
Yaw/Pitch/Roll: 28/39/28 DPS<br />
Cargo: 500 m³<br />
Notes:<br />
The Cargo Tow is the standard hauling vehicle of the five systems. All use standardized cargo<br />
pods, with the actual tow vehicle making up the rest of the vessel. These ships were designed<br />
with the assistance of TRI to ensure the smooth and plentiful flow of goods between and within<br />
the various member nations. The Condor is the most heavily armored Tow in the five systems,<br />
mounting enough armor to withstand exactly two tactical nuke hits (though a micrometeor could<br />
destroy the vessel afterward.) It also mounts a good shield, but it is not well armed (with the<br />
possible exception of two assault-class missile mounts, and the ability to utilize the hard-to-aim<br />
Serializer plasma cannons) and will require escort if it looks as though it will face more than<br />
Conflux on its run (thanks to the Anti-Flux ECM). It is also quite fast for a cargo vessel, with a<br />
serviceable T/M ratio. Hauling is not a glorious job, but this vessel will more than get the job done.<br />
It is interesting to note that this vessel was used as something like a gunboat before the advent of<br />
the Vulture class Assault Gunboat. With its small guns and lack of power, however, it was a poor<br />
ship for the role. These days it is used exclusively for hauling, though it can be used in combat in<br />
the direst of emergencies. Also, it is recommended that cargo pilots keep a Camera in one of<br />
their MODx slots so they can view their destination gate from a distance and align accordingly.<br />
S-16<br />
52
Roc<br />
Classification: Freighter<br />
Power plant: Intimidator (size 5)<br />
Engines: Tangent x 1 (size 7)<br />
Radar: Nubbler (50000 meter range) (size 4)<br />
Shield: Guardian (99700mm equivalent) (size 6)<br />
Armor: 195000mm<br />
Capacitor: Pint for Hitmen, Deepol for Nova Mk1, Seed for Peelers (size 3)<br />
Energy Config: Nova Mk1 x 2<br />
Ammo Config: Hitman x 2, Peeler x 2<br />
Missiles (# x size): 2x6<br />
MODx: 7 (camera recommended)<br />
ECM: 3<br />
Speed (nor/ab/ff): 377/430/745 MPS<br />
Acceleration: 29.1 (plasma), 29.0 (railgun), 29.2 (mortar) kN/kg<br />
Yaw/Pitch/Roll: 15/15/25 DPS<br />
Cargo: 740 m³<br />
Notes:<br />
The largest cargo vessel currently in service to the Octavian navy, the Roc is a massive beast. Its<br />
combined defensive assets are capable of withstanding six direct hits with tactical nuclear<br />
weapons. It can also mount decently sized defensive weapons (including two generously sized<br />
missiles), but in practice it requires an escort if serious opposition to the run is expected. It is also<br />
a ponderous bird to maneuver, but no other vessel in the Octavian navy can move as much cargo<br />
as the Roc. It also has the great advantage of having a single (massive) engine, thus can<br />
afterburn much longer than most large cargo vessels (which allows it to accelerate much faster<br />
than might be expected.) It is, on the whole, probably the best of the three Freighter designs<br />
plying the space lanes of the five systems.<br />
Rumor speculates that this hull will be used as the basis for the upcoming Corvette class ships<br />
being developed by Octave Propulsion Labs. The hull could certainly accommodate a small crew<br />
with ease.<br />
S-17<br />
53
GUNBOATS<br />
The “gunboat” class of vessels are fairly new to space combat, and only one example of the class<br />
is currently in service: the Vulture Assault Gunboat (AKA “Heavy Miner.”) Octavian High<br />
Command has confirmed though unofficial channels that they are working on heavier corvette<br />
class vessels that utilize turreted guns and several crew members. However, until we get reliable<br />
data on those ships, only the Vulture shall occupy this space.<br />
As for what Gunboats are, they are in some ways “pain sponges.” They are meant to either wade<br />
into a large battle and attract attention or assault a position and possess enough armor and<br />
weaponry to eliminate all opposition without an overwhelming amount of fighter support. Some<br />
might term them a “replacement” for fighters… however, the cost of such ships (and for the<br />
projected larger models, the crew involved) ensure that the aerospace fighter craft will have a<br />
place on the battlefield for decades if not centuries to come. The value of a mobile firebase to<br />
take into battle cannot be underestimated, however. A vessel capable of causing damage to most<br />
targets it could conceivably face while being able to withstand any return fire is of great strategic<br />
and tactical value to the Imperial Navy, and research continues apace.<br />
S-18<br />
54
Vulture<br />
Classification: Assault Gunboat/Combat Transport/”Heavy Miner”<br />
Power plant: Sport Plus (size 4)<br />
Engines: Rush x 2 (size 4 x 2)<br />
Radar: Sentinel (48500 meter range, less power need than a Nubbler) (size 4)<br />
Shield: Mortar (60000mm equivalent), Warden (36500mm equivalent, four times<br />
faster recharge than Mortar; pilot/commander preference) (size 5)<br />
Armor: 79800mm<br />
Capacitor: Pint for Flails, Jug for Vantages and Shards (size 3)<br />
Laser Config: Shard x 2<br />
Ammo Config: Flail x 2, Vantage x 2<br />
Missiles (# x size): 1x5, 2x4<br />
MODx: 7<br />
ECM: 3<br />
Speed (nor/ab/ff): 423/484/839 MPS<br />
Acceleration: 67.0 (Shard), 65.6 (Vantage), 61.3 (Flail) kN/kg<br />
Yaw/Pitch/Roll: 26/26/31 DPS<br />
Cargo: 260 m³<br />
Notes:<br />
Released under the guise of a “Heavy Miner” (and it is still a capable mining craft using 2<br />
Prospector mining lasers), the Vulture is in actuality an entirely different kind of ship than anything<br />
seen before. It is the first Assault Gunboat any nation’s fleet has ever seen. The craft mounts<br />
several heavy weapons, and also mounts a massive shield capable of taking a direct tactical<br />
nuke hit and still holding. It also mounts a great number of MODx, allowing it an astounding<br />
amount of tactical flexibility. Additionally, it carries a large radar system that allows it to see much<br />
farther than attending fighters. It is not particularly swift, but it is meant to perform somewhat the<br />
same function as the Dragon – wade into fleet battles and absorb incredible (in this case<br />
staggering) amounts of damage. It also possesses enough firepower to appreciably damage<br />
other combat craft, and it mounts several moderate-to-heavy warheads capable of heavily<br />
damaging fighters and lighter cargo vessels (although they lack the size for hardened targets like<br />
Infestations.) It is not very maneuverable, but it is a mobile firebase – it is not meant to be<br />
handled like a light fighter. Dragon and Raptor pilots will feel right at home in the cockpit of a<br />
battle-configured Vulture. It can also be used as a battle transport, conveying medium-sized loads<br />
though areas where commanders feel the transport could use some firepower on it as well.<br />
Astute pilots will note that the ship’s gun mounts are actually size 5, while currently the most<br />
devastating ballistic weaponry available in the five systems is size 4. Rumors are circulating that<br />
these mounts were designed specifically for the exceptionally illegal Imperializer weapon system<br />
produced by Annihilitech. It is possible the Navy may move to have the weapon legalized and<br />
released in Octavian space. The weapons on the Vulture are already destructive; the power of a<br />
Vulture with Imperializers would be difficult to fathom.<br />
S-19<br />
55
Date Entry: 104.02.21 12:00 EKT<br />
Subject: Imperial Octavian Navy Solrain Ship Report<br />
Author: André “SpaceDrake” Ricard<br />
Classification Level: General public<br />
Imperial Octavian Navy Solrain Ship Report<br />
Version: 1.1<br />
UPDATER’S NOTE 104.02.21<br />
Fellow pilots,<br />
This last in our series of reports deals with the aerospace fighters and ships fielded by the various<br />
interstellar nations of TRI, this report focusing on the vessels fielded by the Commonwealth of<br />
Solrain. We hope to present a fair view of the vessels the Solrain Defense Force (SDF) fields; if it<br />
seems like we’re harsh on some ships, believe us, many Solrain pilots are just as unhappy.<br />
The Solrain fleet recently underwent upgrades that were mostly result of outright theft of technical<br />
data from the Octavian Empire. That incident bore fruit, for better or worse; both the Solrain Light<br />
and Medium Fighter have been significantly redesigned along the lines of the Raven and<br />
Chiropteran. And of course, their main-line combat ships, the S2-X Intensity and S13-R<br />
Barracuda remain as deadly as they’ve been for years. The Intruder remains an odd bird, and<br />
Solrain cargo vessels still have the most expansive cargo holds in the five systems. Although they<br />
dominated the five systems in the recent past, Solrain has declined in power and prestige<br />
somewhat recently; as with the Octavians, it would still be foolish to underestimate the power of<br />
some of these vessels. Several of these designs rank among the best combat ships in recorded<br />
history.<br />
As previously, these reports are arranged in the following manner: when components like engines<br />
are listed, the recommended part is given along with the size, except for guns, where all practical<br />
loadouts are covered. Missiles, MODx and ECM are all given in size alone, due to the variety of<br />
parts available in these areas. Speed is given in meters per second, with normal power,<br />
afternburn and Flashfire top speeds; Yaw/Pitch/Roll rates are given in degrees per second and<br />
indicate the turn rate of a ship not firing its engines. Acceleration is kilo-Newtons of thrust per<br />
kilogram. Armor is in millimeters, shields are rated compared to the equivalent protection in mm<br />
of armor they provide. Cargo is in cubic meters. Also, classification is slightly changed from the<br />
TRI standard to be more accurate (in the author’s opinion.)<br />
At your service,<br />
André “SpaceDrake” Ricard<br />
SHUTTLES<br />
The SDF hasn’t focused much attention on their shuttle program, on the whole – none of these<br />
vessels are very good compared to their counterparts in the Imperial Navy or the Holy Armada.<br />
Evidently the designers at Tens & Piney were and continue to be more focused on the larger (and<br />
arguably more useful) ship chassis that the more veteran pilots would use in actual combat.<br />
Once again, note that the loadouts listed here are optimal loadouts. Absolute nugget pilots are<br />
likely to be flying ships far less well equipped than what is listed here.<br />
S-20<br />
56
Premia<br />
Classification: Shuttle<br />
Power plant: Contender XPR (size 1)<br />
Engines: Travant Plus x 2 (size 2)<br />
Radar: Chime (24000 meter range) (size 1)<br />
Shields: Himelea (7800mm equivalent; see below) (size 2)<br />
Armor: 4500mm<br />
Capacitor: Jug (size 1)<br />
Laser Config: Medium Laser x 2, ER Laser x 2<br />
Ammo Config: Straker x 2<br />
Missiles (# x size): 2x1<br />
MODx: 3<br />
ECM: 1<br />
Speed (nor/ab/ff): 292/333/577 MPS<br />
Acceleration: 88.9 (laser), 82.9 (ammo) kN/kg<br />
Yaw/Pitch/Roll: 63/55/70 DPS<br />
Cargo: 4 m³<br />
Notes:<br />
The Premia is a merely adequate entry-level shuttle. While it possesses the same gun and<br />
missile mounts as the Apteryx, it is the only ship in the five systems that utilizes size 1<br />
microfusion reactors exclusively – to its detriment. Even when using the extremely overpriced<br />
Contender XPR system (which costs as much as a Centerfuge MK3) it can barely power 2<br />
Travant Plus engines with adequate power left for other systems. Mounting more powerful<br />
engines than Travant Plusses leaves the Premia with nearly no power at all. Thus, the Premia<br />
ends up being depressingly slow and unmaneuverable compared to the entry-level shuttles of<br />
other nations.<br />
It does, however, present two of the SDF’s combat doctrines to the new pilot: oversized shields<br />
and generous MODx slots. If a pilot is mad enough, he can actually install a Haven shield in the<br />
Premia, although it lacks the power for this with even Travant Plusses (making the Solrainmanufactured<br />
Himelea system the most desirable for Premias.) Also, it has as many MODx slots<br />
as most Light Fighters. These two factors introduce a Solrain pilot to his fleet’s greatest strengths<br />
very early on, and reinforces combat doctrines that will serve him well in real combat craft.<br />
S-21<br />
57
Premia XL<br />
Classification: Shuttle/Ultra-Light Scout<br />
Power plant: Sport LP (size 2)<br />
Engines: Respect x 2 (size 2 x 2)<br />
Radar: Knocker (35000 meter range) (size 2)<br />
Shield: Haven (15400mm equivalent), Canopy (12240mm equivalent, the only<br />
reason to use the Canopy is that it is available at level 8 rather then 13)<br />
(size 2)<br />
Armor: 3600mm<br />
Capacitor: Jug (size 1)<br />
Laser Config: Medium Laser x 1, ER Laser x 1<br />
Ammo Config: Straker x 1<br />
Missiles (# x size): 2x1<br />
MODx: 3<br />
ECM: 1<br />
Speed (nor/ab/ff): 439/500/866 MPS<br />
Acceleration: 116.4 (laser), 113.0 (ammo) kN/kg<br />
Yaw/Pitch/Roll: 50/45/55 DPS<br />
Cargo: 1 m³<br />
Notes:<br />
The Premia XL is a unique attempt at a new ship class – it is, however, not a very successful one.<br />
Whereas other factions possess an “Ultra-Light Fighter” for their nugget pilots to use in combat,<br />
engineers at Tens and Piney created the Premia XL with the idea of creating an “Ultra-Light<br />
Scout.” The results are… interesting, at best. The ship does mount the largest radar of any ship in<br />
its class – or indeed any ship available until into the second rank tier of any nation’s navy – but it<br />
lacks in nearly every other regard. It can mount a large shield but again lacks the power required<br />
to keep it working properly, its armor is like bacofoil, and it mounts a tiny weapon. Also, to<br />
properly outfit this craft requires the pilot to be at least rank 10 on the TRI standard rank scale –<br />
long after the nugget pilot has bought this ship and by then he can afford a far superior Light<br />
Fighter. Also, the ship is too slow to effectively escape from any pursuit by anything faster than a<br />
Bomber (and that’s assuming the Bomber lacks FlashFires.) While it is maneuverable for a scout,<br />
the Premia XL is, on the whole, something of a failure.<br />
Interestingly enough, however, the ship was apparently recently upgraded with no fanfare at all. It<br />
now flies at almost 440v – still a hair too slow to be very useful in real combat given its firepower<br />
(it used to fly at 370v), but it is now by far the fastest ship available to a low-rank pilot of any<br />
faction, even without optimal gear. If a nugget is lucky enough to find a generous veteran, he’ll<br />
have a ship that can handle small Conflux with some difficulty and get away from anything large<br />
enough to kill him. With further upgrades it may even fall into the Ultra-Light Fighter category at<br />
last.<br />
S-22<br />
58
Premia SC<br />
Classification: Heavy Shuttle<br />
Power plant: Sport LP (size 2)<br />
Engines: Respect x 2 (size 2 x 2)<br />
Radar: Vine (23000 meters, low power useage) (size 2)<br />
Shields: Haven (15400mm equivalent), Canopy (12240mm equivalent, the only<br />
reason to use the Canopy is that it is available at level 8 rather then 13)<br />
(size 2)<br />
Armor: 7200mm<br />
Capacitor: Jug (size 1)<br />
Laser Config: Medium Laser x 2, ER Laser x 2<br />
Ammo Config: Straker x 2<br />
Missiles (# x size): 2x1<br />
MODx: 3<br />
ECM: 1<br />
Speed (nor/ab/ff): 356/406/703 MPS<br />
Acceleration: 103.2 (laser), 97.6 (ammo) kN/kg<br />
Yaw/Pitch/Roll: 65/45/70 DPS<br />
Cargo: 6 m³<br />
Notes:<br />
The Premia SC is another merely average entry into its class by Tens & Piney. While it lacks the<br />
maneuvering problems of the Buzzard, it has the smallest cargo bay of the three heavy shuttles,<br />
merely average top speed, and 2 size 1 gun (and missile) mounts which severely hamper its<br />
mining capacity (which is one of the best ways for nugget pilots of any faction to make money).<br />
And once again, the optimal equipment for the ship requires a fair amount of rank (by which time<br />
the Light Fighter becomes available). While not bad in any way, the Premia SC isn’t particularly<br />
spectacular, either.<br />
S-23<br />
59
FIGHTER CRAFT<br />
The Tens & Piney Aerospace Fighter division has, in the past few years, developed a reputation<br />
for randomness in the quality of their fighter design – the designs coming out of T&P have been<br />
either brilliant advances of fighter technology or they’ve been utter disasters. Solrain designs<br />
have also often shown off advanced Solrain technology – several times the fighters of the SDF<br />
have done things that nobody thought a ship of that class could do.<br />
Initially, the Solrain military was fairly weak; their premier Heavy Fighter, the S2 Intensity, only<br />
had as an advantage the fact that it mounted an oversize shield. It was under-gunned, presents a<br />
large profile, and didn’t maneuver very well. In the days of the original O2 Phoenix, this resulted<br />
in loss after loss for the SDF in their attempts to maintain the integrity of Solrain space. This<br />
continued for some time until right around 101.09… when out of the blue T&P released the S2-S.<br />
It was the same ship as the old Intensity, except for one difference: it mounted the same kind of<br />
power plant that the Phoenix did at the time. A Sport Plus.<br />
The reversal was unprecedented – the SDF went from being the whipping boy of the five systems<br />
to nearly total and utter domination overnight. With the Nix being “nerfed” recently, and the Phoon<br />
being somewhat underpowered compared to today, there was little to stop Solrain from practically<br />
dictating TRI policy. The release of the superlative Barracuda Bomber – the original oversize<br />
shield version – only further cemented this military dominance, and the original Invader Medium<br />
Fighter (the pre-Impeler version) was also quite useful in combat. And so it was for over a year.<br />
The first faltering steps came with the release of the Intruder, however. In comparison to the aweinspiring<br />
Dragon and the (eventually) excellent Monsoon, the Truder seemed… underwhelming.<br />
Then, the recent theft of technical data from Octavius Core resulted in proper LFs and MFs being<br />
built by T&P… with another schizophrenic result. While the new Interceptor was astounding, on<br />
the whole they actually managed to make the Invader worse – especially compared to the new<br />
competition in town. As T&P continue their ship design efforts, the pilots of the SDF can only<br />
wonder if their next design will be a winner or another disaster that further limits their choices.<br />
There is an interesting note concerning SDF ship development – weapons, specifically. T&P is<br />
certainly attempting to match their rivals in both the advanced tactical fighter and gunship/corvette<br />
areas (like Cromforge, T&P is apparently working on the gunship more, given an immediate<br />
threat of the Vulture and continued failure in the field of the AF like everyone else), but rumors are<br />
circulating that the SDF may be looking to dominate in another area. Recently, Particle Systems<br />
Inc. of Hyperial offered public shares for investment, and then for some reason could not repay<br />
the investment. The situation was eventually handled by the Soria Credit Union by refunding all<br />
investors while complaining loudly about having to do so. While it may seem innocent enough,<br />
rumors are circulating that the non-payment of PSI was planned. This was quite possibly a stealth<br />
payment by the Solrain government (using investor credits as a medium) to PSI for something.<br />
The rumors are also saying that the payment was for PSI’s development of a new kind of weapon<br />
system – to be developed by PSI and manufactured in Solrain space by Tens & Piney. The<br />
weapon is rumored to be a “particle cannon” – a weapon that hurls unstable subatomic particles<br />
at high velocities and causes small atomic explosions on impact. The weapon is deadly, with<br />
good range thanks to its matter-based shot (like an Ion Cannon) and fast enough to be useful in<br />
combat while doing appreciable damage to boot. The weapon is also evidently workable in the<br />
size 2 and 3 range only. Given this, T&P’s negligence of the Invader and Intruder suddenly seem<br />
to make sense. Only time will tell if the rumor pans out – but if it does, it could signal a return of<br />
Solrain dominance in space.<br />
S-24<br />
60
Interceptor<br />
Classification: Light Fighter<br />
Power plant: Instigator, Antagonizer sufficient (size 3)<br />
Engines: Impeler x 2 (size 2 x 2)<br />
Radar: Chime (24000 meter range) (size 1)<br />
Shields: Haven (15400mm equivalent) (size 2)<br />
Armor: 8600mm<br />
Capacitor: Spore for heavy lasers and ions, Jug for others (size 2)<br />
Laser Config: Heavy Lasers x 2, Warper x 2, Spitfire x 2<br />
Ammo Config: Barrak x 2, Cobra x 2, Hammer x 2<br />
Missiles (# x size): 4x2<br />
MODx: 4<br />
ECM: 1<br />
Speed (nor/ab/ff): 465/530/918 MPS<br />
Acceleration: 107.4 (lasers), 110.5 (pulse), 103.9 (ion), 100.4 (gauss), 101.4 (ammo)<br />
kN/kg<br />
Yaw/Pitch/Roll: 75/70/60 DPS<br />
Cargo: 6 m³<br />
Notes:<br />
Even when the Light Fighter class was a lesser type of fighter, the Interceptor was an excellent<br />
ship in its class. With the recent upgrades made to it, it has become arguably the most powerful<br />
Light Fighter in existence. While it is the slowest of the Light Fighters overall – in terms of speed,<br />
acceleration AND maneuverability – Solrain engineers made the brilliant move of giving the<br />
fighter two size 2 weapon mounts running right along side the cockpit. Not only does this make<br />
targeting easy, but the variety of weapons available at size 2 make the Interceptor exponentially<br />
more versatile than the other ships in its class. An Interceptor can be tailored to practically any<br />
kind of mission – fighter combat, conflux combat, cargo stealing (possible with its large cargo<br />
hold), even mining. Perhaps what clinches the deal, however, is the MODx loadout. It has as<br />
many MODx slots as most heavy fighters do – meaning it can mount as many FlashFires as<br />
these ships do, and more than other ships in its class. In other words, it is a nearly perfect pursuit<br />
vessel – a true “interceptor.”<br />
The vessel’s only weaknesses are the aforementioned minor deficiencies in movement, and also<br />
slightly less armor than ships of comparable class. These are only fairly minor inconveniences,<br />
however, that are vastly overshadowed by the fighter’s excellent gun and MODx loadout. A<br />
dangerous vessel overall, and one that should be treated with respect even by Heavy and Assault<br />
Fighter pilots.<br />
S-25<br />
61
Invader<br />
Classification: Medium Fighter<br />
Power plant: Instigator (size 3)<br />
Engines: Impeler x 2 (size 2 x 2)<br />
Radar: Chime (24000 meter range) (size 1)<br />
Shields: Alpaa (20400mm equivalent) (size 3)<br />
Armor: 7600mm<br />
Capacitor: Spore, Jug for ammo (size 2)<br />
Laser Config: Heavy Laser x 2/ER Laser<br />
Ammo Config: Cobra x 2/Straker<br />
Missiles (# x size): 1x4, 2x2<br />
MODx: 4<br />
ECM: 2<br />
Speed (nor/ab/ff): 442/504/873 MPS<br />
Acceleration: 88.8 (laser), 83.4 (ammo) kN/kg<br />
Yaw/Pitch/Roll: 60/60/50 DPS<br />
Cargo: 5 m³<br />
Notes:<br />
The “improved” Invader is, in fact, one of T&P’s great design goofs and possibly the biggest<br />
waste of espionage resources in recorded history. It is not, perhaps, an utterly terrible fighter per<br />
se – it is simply outplayed by everything in its class (and sometimes lower). The original Invader,<br />
while being slow (sub-400v) like its contemporaries, handled well and accelerated surprisingly<br />
fast. Its biggest advantages were defensive – it could mount a massive shield for a craft of its size<br />
(a size 3 Alpaa), and… well, its size. The Invader is thin as paper – it presents the smallest headon<br />
profile of any combat ship on record (barring, perhaps, the Gust). Even for ace gunners, hitting<br />
this ship can be a challenge at times.<br />
When it came time to upgrade the Invader, engineers at T&P knew that pilots would be outraged<br />
if the fighter lost either of those advantages – however, the cost for keeping these two features on<br />
a modern frame was high. The ship lost a gun mount, gained internal structure weight, lost armor,<br />
and had its maneuverability restricted somewhat – all for a top speed that was still worse than<br />
the other medium fighters and just barely above that of a Phoenix. This might not be a problem if<br />
the Invader had more MODx slots than other fighters of its class as most Solrain designs do – but<br />
it does not. Thus, the only thing the Invader has over other MF designs is its oversize shield and<br />
its profile – and given the ability of its larger brother to run it down, most pilots opt for either the<br />
Intensity or the Interceptor. When flown exactly right, it can still be useful in combat, but given<br />
how much easier the Tens and Ceptor are to utilize in combat, the Invader will remain an outcast<br />
for the foreseeable future. Its ability to mount a Heavy Torpedo centrally does open up interesting<br />
possibilities, however.<br />
S-26<br />
62
Intensity<br />
Classification: Heavy Fighter<br />
Power plant: Sport Plus (size 4)<br />
Engines: Guzzler x 2 (size 3 x 2)<br />
Radar: Knocker (35000 meter range) (size 2)<br />
Shields: Alpaa (20400mm equivalent) (size 3)<br />
Armor: 11400mm<br />
Capacitor: Pint for most, Deepol for Injustices, Jug for pulse lasers (size 3)<br />
Laser Config: Heavy Laser x 3, VAPOR x 1/Warper x 2, FeatherFire x 1/Spitfire x 2<br />
Ammo Config: Hitman x 1/Barrak x 2<br />
Missiles (# x size): 1x4, 2x2<br />
MODx: 5<br />
ECM: 1<br />
Speed (nor/ab/ff): 451/515/891 MPS<br />
Acceleration: 90.1 (lasers), 86.4 (ion), 97.4 (pulse), 82.3 (railguns) kN/kg<br />
Yaw/Pitch/Roll: 60/45/60 DPS<br />
Cargo: 24 m³<br />
Notes:<br />
The Flying Banana, The Mean Blue Murder Machine, The Most Insane Ship In The Galaxy… the<br />
Intensity has been and is all of these things. The S2-S Intensity is the ship that went from being a<br />
washout to becoming a legend, and even today is still quite possibly the greatest fighter craft in<br />
the five systems overall.<br />
At first glance the Tens isn’t that great of a fighter. Slow to maneuver, vastly undergunned, thin<br />
armor… there doesn’t seem to be much to love here. Even from the beginning, however, the<br />
Intensity possessed a staggering number of MODx slots – giving it far greater hit-and-run<br />
capacities than any other fighter. It also possessed a shield unit that was originally created<br />
specifically for the Intensity – the TP52 Alpaa. Despite these strengths, the vessel was hampered<br />
by a small power plant while lacking the raw acceleration of the Typhoon. The updated version,<br />
however, stuffs a Sport Plus power plant into the frame, providing enough power for any weapons<br />
loadout sans plasma. Combined with a generous capacitor, the fighter became the premier hitand-fade<br />
vessel of space and was capable for some time of dominating all before it.<br />
These days the Intensity is something of a galactic average – it lacks the guns of other Heavy<br />
Fighters, but it has a number of advantages that still allow it to compete. The best way to fight a<br />
Tens is to exploit its lack of raw firepower – it can power those guns, but it still lacks sheer gun<br />
strength. It’s acceptable to take a blow or two from a Tens to knock its shield down – most Tens<br />
pilots will retreat if their shield goes down, because the Tens is not thickly armored beneath the<br />
Alpaa. Beware, however – good Tens pilots can re-engage just as quickly as they can disengage.<br />
S-27<br />
63
Intruder<br />
Classification: Assault Fighter<br />
Power plant: Sport Plus (size 4)<br />
Engines: Rush x 2 (size 4 x 2)<br />
Radar: Knocker (35000 meter range)<br />
Shields: Alpaa (20400 mm equivalent)<br />
Armor: 20<br />
Capacitor: Seed (size 4, see below)<br />
Laser Config: Not used<br />
Ammo Config: Vantage x 2/Peeler x 3<br />
Missiles (# x size): 1x6, 2x4, 2x2<br />
MODx: 4<br />
ECM: 2<br />
Speed (nor/ab/ff): 449/512/886 MPS<br />
Acceleration: 75.8 kN/kg<br />
Yaw/Pitch/Roll: 50/45/50 DPS<br />
Cargo: 20 m³<br />
Notes:<br />
No matter how you look at it, the Intruder is an engineering disaster. Much like the Invader, both<br />
of the other entries into the Assault Fighter class vastly outmatch the Intruder. It lacks the<br />
powerplant of the Dragon, yet it also lacks the speed and maneuverability (except perhaps in raw<br />
YPR capability) of the Monsoon. Perhaps most perplexingly, though, is that a ship clearly inspired<br />
by the Intensity and nearly half-again the size of that vessel does not possess a larger shield than<br />
that vessel (a feat which the Dragon accomplished) and has fewer MODx slots than its “little”<br />
brother. Granted, it does still mount five large guns and an Alpaa class shield, but in a fight<br />
against any other ship of its own class, the Intruder loses. Badly.<br />
Mortars are the only workable weapons on this vessel, given its deficient power plant; however,<br />
due to the fact that it is outperformed by its predecessor, the Intruder is rarely, if ever, used. It is<br />
suspected that T&P is working on making the Intruder something vaguely resembling competent.<br />
S-28<br />
64
Barracuda<br />
Classification: Bomber<br />
Power plant: Sport Plus (size 4)<br />
Engines: Guzzler x 2 (size 3 x 2)<br />
Radar: Knocker (35000 meter range)<br />
Shields: Haven (15400mm equivalent) (size 2)<br />
Armor: 16800mm<br />
Capacitor: Keytso, Alembic for Hitmen, Carrier for pulse lasers, Seed for mortars<br />
(size 4)<br />
Laser Config: VAPOR x 4, Heavy Laser x 4, FeatherFire x 4<br />
Ammo Config: Hitman x 4, Peeler x 4<br />
Missiles (# x size): 2x8, 2x6, 2x4<br />
MODx: 5<br />
ECM: 2<br />
Speed (nor/ab/ff): 414/472/817 MPS<br />
Acceleration: 70.4 (lasers), 70.9 (pulse), 66.1 (ion), 64.7 (railguns), 68.1 (mortars)<br />
kN/kg<br />
Yaw/Pitch/Roll: 50/40/50 DPS<br />
Cargo: 16 m³<br />
Notes:<br />
Again a reversal in ship design, the Barracuda Bomber is an exceptional entry into its class. Much<br />
like the Invader, the Barracuda is extremely thin, especially for a ship of its class, giving it an<br />
edge in head-on confrontations. The original version also mounted a size 3 shield making it<br />
incredibly powerful, but that was eventually downgraded to a size 2 shield due to power flow<br />
concerns. Even so, the ship remains powerful, due to its good gun loadout (which is also<br />
mounted completely beneath the cockpit, making the craft a sniper’s dream), decent acceleration<br />
and maneuverability for a Bomber, and good hardened target missile loadout. The Barracuda<br />
does lack slightly in the dedicated anti-fighter ordinance category (compared to the Tornado and<br />
Raptor, at least); however, its heavy ordinance slots can also be used for missile packs, ensuring<br />
that the Barracuda does not want for anti-fighter weaponry (although mixing both nukes and<br />
missile clusters in one mission can dramatically impact its ability to fight either hardened or soft<br />
targets due to the sheer lack of missile slots compared to other bombers.) On the whole, the<br />
Barracuda can arguably be called the best of the Bomber designs; it is capable of fulfilling either<br />
Bomber role with ease and has a fairly unique advantage to boot.<br />
S-29<br />
65
SCOUTS<br />
Much like the Quantar fleet, the Solrains really possess only one useful scout-class vessel, the<br />
Vedette Heavy Scout. With many Solrain pilots content with the way things are in this<br />
classification, it seems highly unlikely that the Quicksilver will receive any attention from<br />
engineers at T&P in the near future.<br />
Quicksilver<br />
Classification: Light Scout<br />
Power plant: Sport (size 3)<br />
Engines: Adventa x 2 (size 4 x 2)<br />
Radar: Knocker (35000 meter range) (size 2)<br />
Shields: Haven (15400mm equivalent) (size 2)<br />
Armor: 6000mm<br />
Capacitor: Jug (size 1)<br />
Laser Config: Heavy Laser, Spitfire Ion Cannon<br />
Ammo Config: Barrak<br />
Missiles (# x size): 1x4<br />
MODx: 2<br />
ECM: 1<br />
Speed (nor/ab/ff): 491/560/971 MPS<br />
Acceleration: 135.8 (laser), 133.8 (ion), 130.2 (gauss) kN/kg<br />
Yaw/Pitch/Roll: 45/15/45 DPS<br />
Cargo: 1 m³<br />
Notes:<br />
The Quicksilver is like the Simoom in that it is an outdated ship for its time. Not as fast as the<br />
Heavy Scouts, over-engined (unless you wish to put an Antagonizer or Instigator into the ship,<br />
which still doesn’t power Rushes correctly and doesn’t make the ship any faster), and under-<br />
MODxed, perhaps the most remarkable thing about the Quicksilver is its maneuverability. While<br />
its pitch is atrocious, it actually yaws and rolls tolerably. That still isn’t enough to make up for its<br />
small radar, however; the Quicksilver is primarily the tool of those pilots who can’t afford better.<br />
S-30<br />
66
Vedette<br />
Classification: Heavy Scout<br />
Power plant: Sport Plus (size 4)<br />
Engines: Rush x 2 (size 4 x 2)<br />
Radar: Night Watchman (54000 meter range) (size 5)<br />
Shields: Shelter (6009mm equivalent) (size 1)<br />
Armor: 4800mm<br />
Capacitor: Spore (size 2)<br />
Laser Config: Heavy Laser x 2, Spitfire x 2<br />
Ammo Config: Barrak x 2<br />
Missiles (# x size): 2x4<br />
MODx: 4<br />
ECM: 1<br />
Speed (nor/ab/ff): 547/624/1080 MPS<br />
Acceleration: 137.4 (laser), 134.2 (ion), 128.5 (gauss) kN/kg<br />
Yaw/Pitch/Roll: 35/16/50 DPS<br />
Cargo: 12 m³<br />
Notes:<br />
While the slowest of the Heavy Scouts by 4 MPS, the Vedette is still an impressive craft in<br />
several regards. It possesses the most cargo space of the Heavy Scouts, making the ship<br />
excellent for artifact hunting. It also possesses 4 MODx slots and the most maneuverability of any<br />
Heavy Scout (thanks to its Quicksilver heritage), making it a semi-viable choice in fleet combat if<br />
it must fight alongside the fleet it is spotting for. The armor is a bit of a worry – a single volley from<br />
a Dragon or Monsoon can almost blow right though this fragile ship. With smart piloting, however,<br />
the Vedette makes for an excellent scout craft when utilizing the Night Watchman sensor<br />
package.<br />
S-31<br />
67
TRANSPORTS<br />
The Commonwealth of Solrain is indisputably the economic king of the five systems; its planets<br />
came though the Great Collapse in far better shape than any of its neighbors, and the culture of<br />
the Commonwealth had always been geared toward capitalism. It comes as no surprise then that,<br />
while their transports may not always be the fastest ships in the five systems, they have the<br />
largest cargo holds of their class and in some cases in the known universe. These vessels are<br />
the lifeblood of the Solrain economy and the Solrain pilot – and they have had an appropriate<br />
amount of attention given to them by Tens & Piney.<br />
Phaeton<br />
Classification: Light Transport<br />
Power plant: Instigator, Antagonizer (size 3)<br />
Engines: Guzzler x 2 (size 3 x 2)<br />
Radar: Chime (24000 meter range) (size 1)<br />
Shield: Haven (15400mm equivalent) (size 2)<br />
Armor: 8550mm<br />
Capacitor: Jug (size 1)<br />
Laser Config: Heavy Laser or Warper x 2, Spitfire x 2<br />
Ammo Config: Barrak x 2, Cobra x 2, Hammer x 2<br />
Missiles (# x size): 2x2<br />
MODx: 3<br />
ECM: 1<br />
Speed (nor/ab/ff): 422/481/834 MPS<br />
Acceleration: 110.4 (laser), 107.1 (ion), 101.9 (gauss), 102.9 (ammo) kN/kg<br />
Yaw/Pitch/Roll: 60/55/50 DPS<br />
Cargo: 15 m³<br />
Notes:<br />
A very, very good entry into the Fast Transport classification, the Phaeton is every rookie trader’s<br />
dream come true. Easy to handle, fairly quick to accelerate, and well-armed, perhaps the only<br />
thing the Phaeton might want for is more armor and a larger capacitor. Its twin underslung cargo<br />
pods give it unparalleled cargo capacity in its class, making it extremely useful to new traders.<br />
Especially once loaded out with an advanced power plant, it is also very capable of defending<br />
itself. Every Solrain owes it to himself to try this ship at least once.<br />
There are some vague indications that this ship may get a speed boost using the same<br />
techniques used on the Interceptor. Solrain pilots are praying this doesn’t end in disaster;<br />
regardless, however, if the ship becomes much faster it would make an excellent pirating and<br />
smuggling platform, something which would cause no end of headaches for the other spaceborne<br />
navies.<br />
S-32<br />
68
Traveler<br />
Classification: Transport<br />
Power plant: Instigator (size 3)<br />
Engines: Guzzler x 2 (size 3 x 2)<br />
Radar: Knocker (35000 meter range) (size 2)<br />
Shields: Alpaa (20400mm equivalent) (size 3)<br />
Armor: 13500mm<br />
Capacitor: Spore, Jug for Warpers<br />
Laser Config: Heavy Laser x 3, Warper x 3, Spitfire x 3<br />
Ammo Config: Barrak x 3<br />
Missiles (# x size): 4x2<br />
MODx: 5<br />
ECM: 1<br />
Speed (nor/ab/ff): 381/434/753 MPS<br />
Acceleration: 65.6 (laser), 66.4 (pulse), 63.9 (ion), 61.1 (gauss) kN/kg<br />
Yaw/Pitch/Roll: 45/45/45 DPS<br />
Cargo: 60 m³<br />
Notes:<br />
Another solid transport ship, the Traveler is an excellent mid-size cargo vessel. As with all<br />
dedicated Solrain transports, it possesses the largest cargo hold of any vessel in its class. It also<br />
moves and accelerates reasonably well – better than a Wyvern but not quite as nimble as the<br />
Hurricane. The design is fairly stylish as well, although the “rear spoiler” also has a practical<br />
aspect: it is the primary weapon and targeting system mount on the vessel (freeing up more room<br />
on the main chassis for cargo space.) Additionally, the craft is capable of mounting the powerful<br />
Alpaa shield system, giving it superior defensive capabilities compared to other craft of its class.<br />
Round it off with appreciable MODx and missile mounts, and you end up with a very worthy<br />
transport vessel. It’s still no match for an aerospace fighter one-on-one, but it is more than<br />
capable of defending itself against low-class Conflux marauders or assisting in its own defense<br />
against pirates.<br />
69
Quarrier<br />
Classification: Light Miner<br />
Power plant: Sport (size 3)<br />
Engines: Guzzler x 2 (size 3 x 2)<br />
Radar: Doorbell (40000 meter range) (size 3)<br />
Shield: Haven (15400mm equivalent) (size 2)<br />
Armor: 7200mm<br />
Capacitor: Jug (size 1)<br />
Laser Config: Financier x 2/Banker x 2 (gun sometimes mounted)<br />
Ammo Config: Financier x 2/Banker x 2 (gun sometimes mounted)<br />
Missiles (# x size): 2x2<br />
MODx: 3<br />
ECM: 3<br />
Speed (nor/ab/ff): 379/432/748 MPS<br />
Acceleration: 70.3 kN/kg<br />
Yaw/Pitch/Roll: 26/31/16 DPS<br />
Cargo: 62 m³<br />
Notes:<br />
Following suit with Cromforge (indeed, perhaps the last remnant of the cooperative agreement<br />
between T&P and Cromforge before the Quant/Sol War of the Truth broke out), the Quarrier has<br />
recently been upgraded to a competent level. Unfortunately, much like the Lodestar the Quarrier<br />
falls somewhat short of both its contemporaries; it cannot mine as fast as the Harmattan and it<br />
does not possess the defensive capabilities of the Simurgh. Surprisingly, it does accelerate the<br />
best out of all three Light Miners (the Harmattan mounts heavier mining guns, but acceleration is<br />
acceleration.) It is still a much better mining craft than the Traveler and performs its duty<br />
adequately. The same basic facts as other Light Miners still apply; a size three ECM pod can<br />
keep Conflux spawns away, and some miners mount an offensive weapon or two in case passing<br />
pilots don’t kill the Flux that attack them. And it is generally agreed that the Quarrier looks far too<br />
“cool” to be a mere mining craft.<br />
70
Lodestar<br />
Classification: Heavy Miner<br />
Powerplant: Sport Plus (size 4)<br />
Engines: Rush x 2 (size 4 x 2)<br />
Radar: Nubbler (50000 meter range) (size 4)<br />
Shield: Mortar (60000mm equivalent)<br />
Armor: 21000mm<br />
Capacitor: Jug (all you need, see below) (size 2)<br />
Laser Config: Financier MK2/ER laser x 2<br />
Ammo Config: Financier MK2/Straker x 2<br />
Missiles (# x size): 2x2<br />
MODx: 6<br />
ECM: 3<br />
Speed (nor/ab/ff): 399/455/788 MPS<br />
Acceleration: 73.3 (laser), 71.7 (ammo) kN/kg<br />
Yaw/Pitch/Roll: 27/25/31 DPS<br />
Cargo: 265 m³<br />
Notes:<br />
The Lodestar is fairly odd – there are some things it does right, and there are others that just<br />
make you stand up and say “What the hell were the engineers thinking?” It’s still a decent enough<br />
mining vessel, but it doesn’t lack problems. It was, first and foremost, an attempt by T&P to copy<br />
the Khamsin, resulting in the vessels even looking fairly similar. Contrary to what JOSSH says,<br />
the Lodestar has less armor than its Quantar cousin – although it does mount the massive Mortar<br />
shield system, giving it better defense overall. Two glaring problems, however, are the speed of<br />
the vessel and the secondary gun loadout. The vessel is the slowest, in terms of sheer velocity, of<br />
the heavy miners – even the Vulture can outpace it (although it accelerates reasonably well),<br />
making it very vulnerable to attack from any fighter craft, especially bombers. Also, unlike the<br />
Khamsin, its secondary guns are mere size ones – perhaps an attempt by T&P to sell its<br />
Excavator mining lasers. The only problem is that since the Financier Mark 2 so vastly outclasses<br />
the Excavator in both range and power (range to the point where circle-mining is dangerous), a<br />
pilot is better off using those mounts for defensive weapons. The Lodestar isn’t a disaster like<br />
some Solrain ships are – although it is decidedly the weakest of the heavy mining craft.<br />
S-35<br />
71
Pioneer<br />
Classification: Cargo Tow<br />
Power plant: Sport Plus (size 4)<br />
Engines: Dream x 2 (size 5 x 2)<br />
Radar: Sentinel (48500 meters, less power need than a Nubbler) (size 4)<br />
Shields: Mortar (60000mm equivalent)<br />
Armor: 60000mm<br />
Capacitor: Spore, Keysto for plasma (size 4)<br />
Energy Config: Heavy Laser x 2, Spitfire x 2, Serialzier x 2<br />
Ammo Config: Barrak x 2<br />
Missiles (# x size): 2x6, 2x2<br />
MODx: 5<br />
ECM: 3<br />
Speed (nor/ab/ff): 459/523/906 MPS<br />
Acceleration: 72.9 (laser), 72.1 (ion), 70.7 (gauss), 70.9 (plasma) kN/kg<br />
Yaw/Pitch/Roll: 29/29/29 DPS<br />
Cargo: 500 m³<br />
Notes:<br />
The primary cargo vessel of the Solrain Defense Force and the greater Solrain pilot community,<br />
the Pioneer is a familiar sight on the space lanes of the five systems. It compares very favorably<br />
with the other cargo tow vessels of TRI. It almost matches the defensive capabilities of the Roc<br />
by using a monsterous Mortar shield, and accelerates the best out of all three tows (including the<br />
new version of the Thunder.) It does oddly lack for MODx slots compared to other tow designs,<br />
and it doesn’t handle particularly well. Still, for raw efficiency in hauling the Pioneer is unmatched.<br />
An escort though very dangerous sectors is still recommended, however.<br />
S-36<br />
72
Viceroy<br />
Classification: Freighter<br />
Powerplant: Intimidator (size 5)<br />
Engines: Vector x 2 (size 6 x 2)<br />
Radar: Nubbler (50000 meter range) (size 4)<br />
Shield: Guardian (99700mm equivalent) (size 6)<br />
Armor: 1800000mm<br />
Capacitor: Pint for Hitmen, Deepol for Nova Mk1, Seed for Peelers (size 3)<br />
Energy Config: Nova Mk1 x 2<br />
Ammo Config: Hitman x 2, Peeler x 2<br />
Missiles (# x size): 2x6<br />
MODx: 7<br />
ECM: 3<br />
Speed (nor/ab/ff): 374/427/739 MPS<br />
Acceleration: 27.2 (plasma), 27.1 (railgun), 27.3 (mortar) kN/kg<br />
Yaw/Pitch/Roll: 15/15/25 DPS<br />
Cargo: 750 m³<br />
Notes:<br />
It may be somewhat underarmored compared to its Octavian and Quantar counterparts, and it<br />
may not accelerate as well as them…but nothing, nothing in the five systems that hauls as much<br />
raw cargo tonnage as the Viceroy. It is the last word in getting large cargos to and from Solrain. It<br />
absolutely requires an escort, but such runs can be very lucrative for both the cargo pilot and the<br />
escorts, with how much cargo the Viceroy can hold.<br />
Like most heavy cargo vessels, we do include a plasma loadout here because some cargo pilots<br />
absolutely swear by them, especially for hostiles vectoring in directly on the ship. Plasma is so<br />
energy intensive, however, that it normally isn’t practical for use on combat fighters except<br />
perhaps when facing nothing but Conflux drones.<br />
S-37<br />
73
GUNBOATS<br />
Much like the Holy Armada, the SDF has been caught with its pants down somewhat at the<br />
release of the Vulture. Solrain currently fields nothing remotely resembling a gunboat, but like the<br />
other two major aerospace contractors Tens & Piney is working on developing a corvette class<br />
vessel that utilizes turrets, and is possibly working on a response to the Vulture as well. Until such<br />
ships reach general distribution, this section shall remain empty.<br />
Date Entry: 104.02.21 12:00 EKT<br />
Subject: Imperial Octavian Navy Quantar Ship Report<br />
Author: André “SpaceDrake” Ricard<br />
Classification Level: General public<br />
S-38<br />
74
Imperial Octavian Navy Quantar Ship Report<br />
Version: 1.1<br />
UPDATER’S NOTE 104.02.21<br />
Fellow pilots,<br />
We continue our series of reports on the craft fielded by each national fleet with a report on the<br />
Holy Armada of Quantar. As ever, this report is an attempt to show new (and returning out of<br />
retirement) pilots what each ship of a nation’s fleet can and cannot accomplish.<br />
The Holy Armada of Quantar is dedicated primarily to the defense of what they consider holy<br />
Quantar space, although they have sometimes gone gleefully on the assault (and, like the other<br />
national space forces, it would be a lie to say that the Holy Armada is completely unified; the<br />
fleets of TRI are very fractured compared to conventional armed forces.) The Quantar have<br />
usually possessed well-designed ships, and today only present a slight weakness in cargo vessel<br />
design. Their combat craft are among the most effective, deadly and some (including the author!)<br />
would say most aesthetic ever designed. Several are possessed of harsh learning curves, but<br />
especially the Typhoon is simply unstoppable in the hands of a master. It would do the pilots of<br />
Quantar well to learn these loadouts (and the enemies of Quantar equally well to learn what these<br />
ships can do!)<br />
As before, these reports are arranged in the following manner: when components like engines are<br />
listed, the recommended part is given along with the size, except for guns, where all practical<br />
loadouts are covered. Missiles, MODx and ECM are all given in size alone, due to the variety of<br />
parts available in these areas. Speed is given in meters per second, with normal power,<br />
afternburn and Flashfire top speeds; Yaw/Pitch/Roll rates are given in degrees per second and<br />
indicate the turn rate of a ship not firing its engines. Acceleration is kilo-Newtons of thrust per<br />
kilogram. Armor is in millimeters, shields are rated compared to the equivalent protection in mm<br />
of armor they provide. Cargo is in cubic meters. Also, classification is slightly changed from the<br />
TRI standard to be more accurate (in the author’s opinion.)<br />
At your service,<br />
André “SpaceDrake” Ricard<br />
SHUTTLES<br />
Quantar ships in the Shuttle classification are fairly evenly matched with the other factions – while<br />
the Storm is almost purely a rookie mining vessel due to the tiny engines the craft possesses, the<br />
Gust is pound-for-pound a match for the Apteryx, and the Breeze is on the whole a better entrylevel<br />
cargo vessel than either the Buzzard (thanks to the fact that the former doesn’t have<br />
restrictive engine mounts interfering with vertical movement on the latter). While none of these<br />
craft are really a threat for a fighter pilot (with the possible exception of an expertly-flown Gust), it<br />
is still a good idea to know what the average rookie ship of Quantar is capable of doing, and<br />
whether or not such a ship needs to be engaged in case the Holy Armada attempts to use nugget<br />
pilots in combat (or some noobler’s ego gets a little too large for his cockpit).<br />
Do note that what is described here is the optimal configuration for these ships. It is quite possible<br />
that you will run across nugget pilots with lesser gear than what is described here.<br />
S-39<br />
75
Storm<br />
Classification: Shuttle<br />
Powerplant: Harvester, Rake (anything more is overkill really) (size 2)<br />
Engines: Cardoria x2 (size 1 x 2)<br />
Radar: Chime (24000 meter range) (size 1)<br />
Shield: Shelter (6009mm equivalent) (size 1)<br />
Armor: 6000mm<br />
Capacitor: Jug (size 1)<br />
Laser Config: Mining Laser, Heavy Laser/Warper or Ion Cannon (non-miner rare)<br />
Ammo Config: Barrak, Cobra or Hammer (rare in general)<br />
Missiles (# x size): 2x1<br />
MODx: 3<br />
ECM: 1<br />
Speed (nor/ab/ff): 299/340/590 MPS<br />
T/M: 86.5 (mining laser), 90.1 (laser), 87.5 (Ion), 84.0 (ammo) kN/kg<br />
Yaw/Pitch/Roll: 90/60/90 DPS<br />
Cargo: 2 m³<br />
Notes:<br />
The Storm is the Holy Armada’s standard craft for new pilots. It is, essentially, the cheapest thing<br />
they could give their nuggets to actually get them spaceborne and mining. Even when fully<br />
upgraded it is hardly an impressive craft. (One might ooh and aah at the YPR rates, but the<br />
Apteryx handles better on the whole.) It does mount a single size 2 gun slot, which means with<br />
some brokering it can carry a fair amount of heat, but not substantially more than any other entrylevel<br />
craft. It is slow as well – the Ape beats it easily and even a fully-upgraded Premia can<br />
outpace a Storm. It is, thus, almost purely a trainer craft. It will let a new Quantar pilot learn the<br />
basics of aerospace maneuvers and get a bit of mining under his belt, but that’s it. You’ll rarely<br />
encounter a combat pilot in one of these – anyone with an ounce of sense will upgrade to the<br />
Gust as soon as possible.<br />
S-40<br />
76
Gust<br />
Classification: Shuttle/Ultra-Light Fighter<br />
Powerplant: Sport LP (size 2)<br />
Engines: Respect x2 (size 2 x 2)<br />
Radar: Chime (24000 meter range) (size 1)<br />
Shield: Shelter (6009mm equivalent) (size 1)<br />
Armor: 6600mm<br />
Capacitor: Jug (size 1)<br />
Laser Config: Heavy laser/ER laser, Warper/Distorter<br />
Ammo Config: Cobra/Straker<br />
Missiles (# x size): 2x1<br />
MODx: 3<br />
ECM: 1<br />
Speed (nor/ab/ff): 383/437/756 MPS<br />
Acceleration: 137.9 (laser), 125.0 (ammo) kN/kg<br />
Yaw/Pitch/Roll: 90/60/90 DPS<br />
Cargo: 1 m³<br />
Notes:<br />
Very much unlike the Storm, the Gust is a combat ship in every sense of the word. Streamlined,<br />
faster, and with exceptionally better propulsion, it is designed to give the nugget pilots of the<br />
Holy Armada a decent fighting ship and succeeds much better than the original designers<br />
probably ever dreamed. The Gust is, pound for pound, a match for the Apteryx Ultra-Light Fighter<br />
and butchers any Solrain entry into the Shuttle or Ultra-Light Craft classes. It in fact carries a<br />
slightly heavier gun load than the Ape (though lighter missiles), although it requires a Sport LP<br />
power plant to properly power all of its optimal components. It also outpaces the Ape significantly<br />
(but not the Premia XL) and carries more MODx slots than the Ape does (as many as most Light<br />
Fighters, in fact.) Perhaps this ship’s most frightening aspect is its acceleration. It quite literally<br />
accelerates comparatively with most scout-class vessels, and it is small enough to fit inside an<br />
Assault Fighter several times over. In short, fighting a Gust in a large ship can be like being<br />
nibbled to death by a gnat. No matter how much you swat at it, it just won’t go away. Indeed, in<br />
the past TRI itself classified the ship as a “Light Fighter” and longtime veterans will remember the<br />
Holy Armada’s 1 st Ultra-Light Squadron “Swarm” with either fondness or fear and loathing<br />
(depending which side of the gun barrel they were on.)<br />
With the advent of the modern Light and Medium Fighter, though, the Gust’s heyday as a real<br />
combat craft has passed. It can still be used to annoy, though, and Light Fighter pilots should<br />
make it a priority to kill any of these craft they see buzzing around a heavier craft – they can take<br />
apart a heavier craft much faster than their size might otherwise suggest.<br />
S-41<br />
77
Breeze<br />
Classification: Shuttle<br />
Powerplant: Sport LP (size 2)<br />
Engines: Respect x2<br />
Radar: Vine (23000 meter range, extremely low power use) (size 2)<br />
Shield: Haven (15400mm equivalent), Canopy (12240mm equivalent, the only<br />
reason to use the Canopy is that it is available at level 8 rather then 13)<br />
(size 2)<br />
Armor: 7650mm<br />
Capacitor: Jug (size 1)<br />
Laser Config: Mining Laser, Heavy Laser, Ion Cannon<br />
Ammo Config: Barrak, Cobra, Hammer<br />
Missiles (# x size): 2x1<br />
MODx: 3<br />
ECM: 1<br />
Speed (nor/ab/ff): 362/413/715 MPS<br />
Acceleration: 105.7 (mining laser), 108.8 (laser), 103.5 (ammo) kN/kg<br />
Yaw/Pitch/Roll: 80/60/60 DPS<br />
Cargo: 7 m³<br />
Notes:<br />
The Breeze is an exceptional entry-level mining and transport craft for Quantar pilots. Although it<br />
lacks in the way of weaponry, it is quite fast for a ship of its class and it handles superbly<br />
(especially compared to its opposite number the Buzzard.) It is literally an oversize Storm without<br />
the “cuteness.” And the slowness – it is the fastest of all the cargo shuttle craft. It also mounts a<br />
size 2 shield, giving it adequate defense against attack.<br />
It should be noted that the ship mounts a size 2 radar, but many Quantar pilots will opt for the<br />
Vine because of its incredibly low power usage.<br />
S-42<br />
78
FIGHTER CRAFT<br />
The Quantar have been in possession of fusion-powered, gravity-driven aerospace fighter craft<br />
technology slightly longer than Octavius but still not as long as Solrain. They were the cofounders<br />
of TRI with the Solrains, however, and so have been in possession of jump technology<br />
for nearly as long as Solrain has. Quantar has, on the whole, achieved parity with their rivals in<br />
fighter design.<br />
The Quantar approach to fighter craft is speed and acceleration. All of their fighters, across the<br />
board, match or beat the speed and acceleration of either their Solrain or Octavian counterparts.<br />
One of the ways they keep weight down, however, is by utilizing small power plants in their<br />
heavier craft. Thus, despite fairly large gun mounts very heavy weapons are not practical on<br />
these vessels. Given how these ships maneuver, this is probably a blessing. On the whole, the<br />
Quantar fleets are fairly evenly matched with their competitors, with the Quantar perhaps having<br />
a slight advantage in the ability to disengage from combat more readily than Octavian craft can<br />
(although they can’t flee nearly as well as the Intensity can.)<br />
It should be noted that, like Octave Propulsion Labs and Tens & Piney, Cromforge Enterprises<br />
(the main government aerospace contractor of the Fa’hil Memta) is working on an advanced<br />
tactical fighter similar in concept to the “Falcon”. However, the Holy Armada has had about as<br />
much success making the concept work as the Imperial Navy has (read: zero.) The project has<br />
become a bit of an embarrassment for Cromforge and after hearing of the work OPL and the<br />
Imperial Navy have begun in the area of gunships heavier than the Vulture, they began<br />
scrambling funds into a similar venture. Also, unlike the Navy (which is rumored to be pushing for<br />
a release of the Imperializer since the gun mounts on the Vulture seem to be made for that gun<br />
right down to the hardpoint shaping) and the Solrain Defense Force (which is rumored to be<br />
working on some form of particle weapon) the Holy Armada does not have an outstanding<br />
weapons program, by all indications. Given that they have already released the Spitfire size 2 Ion<br />
cannon, however, they may feel that they are well armed enough as is.<br />
S-43<br />
79
Cyclone<br />
Classification: Light Fighter<br />
Powerplant: Instigator, Antagonizer works well (size 2)<br />
Engines: Impeler x 2 (size 2 x 2)<br />
Radar: Chime (24000 meter range) (size 1)<br />
Shield: Haven (15400mm equivalent) (size 2)<br />
Armor: 9300mm<br />
Capacitor: Spore, Seed for ammo or pulse lasers (size 2)<br />
Laser Config: ER Laser x 2/Heavy Laser, Distorters x 2/Warper<br />
Ammo Config: Straker x 2/Cobra<br />
Missiles (# x size): 4x2<br />
MODx: 3<br />
ECM: 1<br />
Speed (nor/ab/ff): 469/535/926 MPS<br />
Acceleration: 117.6 (laser), 121.4 (pulse), 110.3 (ammo) kN/kg<br />
Yaw/Pitch/Roll: 75/80/80 DPS<br />
Cargo: 5 m³<br />
Notes:<br />
The modern Q4-X Cyclone is, bar none, the most maneuverable aerospace fighter craft ever<br />
produced. It is capable, when not thrusting, of flipping around 360 degrees in just over 2 seconds<br />
regardless of the direction in which it turns, and it rolls just as well. It also accelerates better than<br />
any fighter craft (not counting scouts) available to any nation. It carries as much firepower as a<br />
Raven or laser-based Interceptor, and all of the guns are clustered right under the cockpit – in<br />
fact, the heavy laser mount sits on a direct line with the center of the HUD’s targeting reticule.<br />
Precise pilots can land all their shots easily in a Cyclone.<br />
The only weakness the craft has is that it is slightly slower in top speed than the Raven –<br />
although it is still quite capable of running any heavier craft down with ease. It shares the Raven’s<br />
lack of MODx, though, making its chase capacities slightly limited (which is perhaps the only thing<br />
preventing it from dominating heavier craft.) It also presents a somewhat large profile compared<br />
to the Light Fighters of the other two nations (though most vets will remember the “Death Moth” of<br />
old and think the modern Cyclone slim as paper in comparison.) The Cyclone is still, on the<br />
whole, an exceptionally dangerous craft even for a heavier fighter. Do not let the “Light”<br />
designation fool you – this craft is deadly to any ship.<br />
S-44<br />
80
Tempest<br />
Classification: Medium Fighter<br />
Powerplant: Instigator (size 3)<br />
Engines: Impeler x 2 (size 2 x 2)<br />
Radar: Chime (24000 meter range) (size 1)<br />
Shield: Haven (15400mm equivalent) (size 2)<br />
Armor: 12000mm<br />
Capacitor: Spore (size 2)<br />
Laser Config: Heavy Laser x 3, Warper x 3, Spitfire x 3<br />
Ammo Config: Barrak x 3, Cobra x 3, Hammer x 3<br />
Missiles (# x size): 4x2<br />
MODx: 4<br />
ECM: 2<br />
Speed (nor/ab/ff): 454/517/896 MPS<br />
Acceleration: 100.0 (laser), 95.9 (ion), 88.9 (Barrak), 90.2 (ammo) kN/kg<br />
Yaw/Pitch/Roll: 70/65/70 DPS<br />
Cargo: 6 m³<br />
Notes:<br />
As does the Imperial Navy, so does the Holy Armada. While the Navy faced the question of how<br />
to match the Typhoon and released the updated Chiropteran, the Tahirs of the Fa’hil Memta had<br />
long worried about the Phoenix. Even in some of its less impressive incarnations, the leaders of<br />
the Quantar had always been in fearful awe of the sheer amount of pain the Phoenix could<br />
project. When upgrades made the O2-X2 a very viable spacecraft, the Quantar knew they<br />
needed a similar vessel. Yet, the idea of a ship that emphasized firepower over speed seemed a<br />
betrayal of Quantar ideals… until the engineers at Cromforge looked at their old Medium Fighter,<br />
the Tempest, and realized that in it they had what they needed.<br />
The Q10-I Tempest is the realization of that idea, and is the Quantar response to the Phoenix just<br />
like the Chiropteran is the Octavian response to the Typhoon. It is a craft that is capable of<br />
outgunning any craft in its own class or lower, and can oftentimes even match up favorably in<br />
terms of firepower against craft heavier than itself. However, it combines this with a good number<br />
of MODx, a top speed that allows it to catch most non-Quantar craft, more nimbleness than any<br />
craft of its class, and a T/M ratio only slightly less than that of the Chiropteran – all with the slim<br />
profile of a Medium Fighter. In short, the Tempest is an incredibly dangerous craft, capable of<br />
getting away from most of the things it can’t easily outgun. Caution should be used when<br />
engaging this craft in anything less than a Heavy Fighter. Especially with its Ion Cannon loadout<br />
(which is produced in Quantar space, note) it can probably outshoot anything lighter than a<br />
Phoenix. If there is one hole in its offensive capacity, it’s in the missile mounts – the Chiropteran<br />
and Invader both possess larger missile capacity (in various ways) than the ‘Pest.<br />
S-45<br />
81
Typhoon<br />
Classification: Heavy Fighter<br />
Powerplant: Instigator (size 3)<br />
Engines: Guzzler x 2 (size 3 x 2)<br />
Radar: Knocker (35000 meter range) (size 2)<br />
Shield: Haven (15400mm equivalent) (size 2)<br />
Armor: 14490mm<br />
Capacitor: Often a Spore; see below (size 3)<br />
Laser Config: Heavy Laser x 4 (non-Octavian), Spitfire x 4, VAPOR x 2/Warper x 2<br />
Ammo Config: Hitman x 2/Barrak x 2, Hammer x 4, Cobra x 4 (all rarely used)<br />
Missiles (# x size): 1x4, 2x2<br />
MODx: 4<br />
ECM: 1<br />
Speed (nor/ab/ff): 464/530/917 MPS<br />
Acceleration: 105.2 (laser), 99.9 (ion), 88.1 (railgun/Deepol), 94.8 (ammo/Seed) kN/kg<br />
Yaw/Pitch/Roll: 50/75/60 DPS<br />
Cargo: 16 m³<br />
Notes:<br />
TRI isn’t kidding when it states on JOSSH that “Master Typhoon pilots are some of the most<br />
feared in the galaxy.” When properly flown, the Typhoon is one of the most powerful aerospace<br />
fighters ever created. As the Phoenix epitomizes the Octavian ideal of fighter design, so the<br />
Typhoon is the embodiment of the Quantar ideal: it does things that by rights nothing called a<br />
“Heavy Fighter” should be capable of doing. It can out-accelerate a Medium Fighter, pitch like a<br />
Light Fighter, and run down almost anything in space. It does this at the expense of one thing:<br />
power. To properly fire its guns a Typhoon often has to cut throttle to 50% or lower or face<br />
massive fire delays. To a master Typhoon pilot, though, this is not an impediment. They will<br />
sacrifice fire rate just to get on top of a pilot or lock him into a hopeless circle – and it won’t seem<br />
like they’re firing less as your shields melt away into nothing.<br />
The main weakness the craft has is the fact that it requires a veteran pilot, however. Green<br />
Phoon pilots have another name: target practice. There are so many ways to mess up combat in<br />
this ship or overestimate what it can do that a single mistake can cost a pilot his ship. Green or<br />
inexpert Phoon pilots can most easily be dealt with by exploiting the ship’s large profile and to<br />
keep it accelerating – the less firepower it throws at you, the better. Against master pilots,<br />
however, your best chances are guts, prayers and with luck a wingman. And even a combination<br />
of all three won’t save you all the time.<br />
As a final note, many vet Phoon pilots use the Spore; the Phoon originally mounted this capacitor,<br />
and so most veterans are used to their Phoons chain-firing (and being lighter.)<br />
S-46<br />
82
Monsoon<br />
Classification: Assault Fighter<br />
Powerplant: Sport Plus (size 4)<br />
Engines: Dream x 2 (size 5 x 2)<br />
Radar: Doorbell (40000 meter range) (size 3)<br />
Shield: Alpaa (20600mm equivalent) (size 3)<br />
Armor: 24300mm<br />
Capacitor: Seed (size 4; see below)<br />
Laser Config: Generally not used<br />
Ammo Config: Vantage x 2/Peeler x 2<br />
Missiles (# x size): 1x6, 2x4, 2x2<br />
MODx: 5<br />
ECM: 2<br />
Speed (nor/ab/ff): 459/523/905 MPS<br />
Acceleration: 81.8 kN/kg<br />
Yaw/Pitch/Roll: 45/55/55 DPS<br />
Cargo: 16 m³<br />
Notes:<br />
When first released, the Q17 Monsoon was considered an engineering disaster. Not sporting<br />
nearly enough of a power plant for the scale of the weapons it mounted and possessing a “beachball”<br />
like profile, it was totally rejected by the pilots of the Armada. Then Tens and Piney released<br />
their updated Peeler mortar to match their Vantage system. A pilot named Grimwald Gonzales<br />
mounted these on his Monsoon, as well as a Duelist and many Flashfires. He realized that he<br />
was essentially flying a “Fat Intensity” with enough firepower to take a Phoenix down to nearly no<br />
shields in two salvos and an Intensity in 3 – with a longer range radar to boot. All of a sudden, the<br />
Monsoon didn’t seem so useless anymore.<br />
Monsoons are used in somewhat the same manner as the Dragon Assault Fighter. They are<br />
command vessels and attempt to be the focus of combat. While they do not have the endurance<br />
that the Dragon does by any means, they are possessed of the same MODx arrangement as an<br />
Intensity, and combined with their top speed and high acceleration (for an assault fighter, thanks<br />
to its massive engines) it is very easy for a Monsoon to disengage and re-engage when the fight<br />
favors the pilot. These ships are used as bait, sometimes, to lure enemy ships into desired<br />
locations. Thankfully, though, their reliance on low-power mortar weaponry and their nigh-on<br />
obese profile makes them utterly predictable and very easy to target. Do not underestimate these<br />
ships, though. They still pack a lot of heat (both missile and gun-wise) and they can do enough<br />
damage to blow though either a Phoenix or an Intensity in five salvos (AKA 6 seconds.) If they<br />
disengage, let them run and focus on a wingman of his until he tries to re-enter the fight. Never let<br />
a Monsoon pilot fight on his own terms!<br />
S-47<br />
83
Tornado<br />
Classification: Bomber<br />
Powerplant: Sport Plus (size 4)<br />
Engines: Guzzler x 2 (size 3 x 2)<br />
Radar: Knocker (35000 meter range) (size 2)<br />
Shield: Haven (15400mm equivalent) (size 2)<br />
Armor: 18000mm<br />
Capacitor: Keytso, Alembic for Hitmen, Carrier for pulse lasers, Seed for mortars<br />
(size 4)<br />
Laser Config: VAPOR x 4, Heavy Laser x 4, FeatherFire x 4<br />
Ammo Config: Hitman x 4, Peeler x 4<br />
Missiles (# x size): 2x2, 2x4, 2x6, 1x8<br />
MODx: 6<br />
ECM: 2<br />
Speed (nor/ab/ff): 415/474/820 MPS<br />
Acceleration: 72.2 (laser), 72.8 (pulse), 67.8 (ion), 66.2 (railguns), 69.8 (mortars) kN/kg<br />
Yaw/Pitch/Roll: 45/70/55 DPS<br />
Cargo: 10 m³<br />
Notes:<br />
The Tornado continues the Quantar tradition of breaking the “rules” in a particular fighter class. In<br />
many ways this ship is just as much a heavy anti-fighter platform as it is a bomber. Its pitch and<br />
roll rates are comparable to most of the heavier fighters, and it outpaces the Raptor significantly.<br />
It carries similar armament to most bombers, although the guns are mounted far on the wings,<br />
making targeting a little more difficult than most fighters. Perhaps it’s most frightening aspect is its<br />
MODx capacity – those large wings means that the vessel is capable of carrying extensive<br />
FlashFire loads. Disengaging (or quickly engaging) in a Tornado is not as difficult as it should be<br />
in a bomber.<br />
It does have one obvious problem, however: a lack of truly heavy ordinance slots. While it is more<br />
than suited for anti-fighter work, it is capable of carrying – at best – 3 heavy weapons. Given an<br />
additional lack of heavy ordinance slots on other Quantar vessels, once more “hardened” targets<br />
and vessels come into play (as events seem to be indicating), the Quantar may begin to want for<br />
a vessel capable of carrying larger ordinance. The ship’s excellence in an anti-fighter role,<br />
however, will likely mean that those hard targets lack any of their soft cover. (In particular,<br />
Tornados have been known to be deployed as “Dragon-slayers”, bringing much of their heavy<br />
ordinance to bear on Dragon assault fighters, which have great difficulty in dodging such massed<br />
ordinance.)<br />
S-48<br />
84
SCOUTS<br />
Scout craft in the Holy Armada fulfill more or less the same role they do in other factional fleets.<br />
Surprisingly, only one of these ships is really viable militarily. The Simoom is vastly outmoded by<br />
the Peregrine and its larger brother the Squall (which was the first Heavy Scout class vessel to<br />
undergo development.) It is possible that Cromforge may attempt to put the Simoom through an<br />
upgrade program similar to the treatment the lighter fighters did; however, there is little demand<br />
for such upgrades, and such a project is likely on the back burner compared to the Advanced<br />
Tactical Fighter project and Cromforge’s own Corvette/Gunship project (which is a desperate<br />
attempt at matching Octavian dominance in the class.)<br />
Simoom<br />
Classification: Light Scout<br />
Powerplant: Sport (size 3)<br />
Engines: Guzzler x 2 (size 3 x 2)<br />
Radar: Knocker (35000 meter range) (size 2)<br />
Shield: Haven (15400mm equivalent) (size 2)<br />
Armor: 8400mm<br />
Capacitor: Seed (size 1)<br />
Laser Config: Heavy Laser, Spitfire Ion Cannon<br />
Ammo Config: Barrak Gauss Cannon<br />
Missiles (# x size): 1x4<br />
MODx: 2<br />
ECM: 1<br />
Speed (nor/ab/ff): 504/575/996 MPS<br />
Acceleration: 132.2 (laser), 130.2 (ion), 126.3 (gauss) kN/kg<br />
Yaw/Pitch/Roll: 24/40/20 DPS<br />
Cargo: 1 m³<br />
Notes:<br />
The Simoom is a Light Scout craft that is fairly obsolete. The Peregrine outperforms it in nearly<br />
every way except for better defense and slightly better maneuverability. The Simoom is rarely<br />
used beyond lower-ranked pilots who can’t afford better. Its shielding does give it a fair degree of<br />
survivability, but for long-range detection is it far outperformed by the Squall. It does carry<br />
medium ordinance like all scouts, however.<br />
S-49<br />
85
Squall<br />
Classification: Heavy Scout<br />
Powerplant: Sport Plus (size 4)<br />
Engines: Rush x 2 (size 4 x 2_<br />
Radar: Night Watchman (54000 meter range) (size 5)<br />
Shield: Shelter (6009mm equivalent) (size 1)<br />
Armor: 6600mm<br />
Capacitor: Spore (size 2)<br />
Laser Config: Heavy Laser x 2, Spitfire x 2<br />
Ammo Config: Barrak x 2<br />
Missiles (# x size): 2x4<br />
MODx: 3<br />
ECM: 1<br />
Speed (nor/ab/ff): 566/645/1117 MPS<br />
Acceleration: 140.4 (laser), 136.8 (ion), 130.9 (gauss) kN/kg<br />
Yaw/Pitch/Roll: 18/32/50 DPS<br />
Cargo: 11 m³<br />
Notes:<br />
The Squall was the first of the Heavy Scouts developed, with the Griffin and Vedette following<br />
very soon after (since the other governments had gotten wind of what Cromforge was working<br />
on.) The Squall was meant to be a one-up toward the Peregrine – it can do everything that ship<br />
can do and do it better. It pitches not quite as well, and accelerates a little slower, but the Squall<br />
is the fastest ship, velocity-wise, constructed by a human nation. It fulfills much the same roles as<br />
the Griffin – long-range detection and artifact hunting; it also is a prime “beacon flipper”. And it<br />
does so with ruthless efficiency. Due to its obscene speed it is also sometimes utilized in combat<br />
as a hit-and-fade craft – buzzing around the battlefield being an annoyance. Its profile is less than<br />
ideal, however, and a few swats from large guns will bring this fly down. Killing one can cripple a<br />
fleet’s long range detection capacities, as well.<br />
Ship Classification<br />
TRANSPORTS<br />
Many of the transport ships of the Holy Armada are designed to be mining craft in addition to<br />
combat craft. All are fitted with Bussard mining scoops and all have large gun hard points suitable<br />
for large-scale mining lasers. Thankfully, in many of these ships this does not translate into<br />
possible gun firepower as well…<br />
S-50<br />
86
Hurricane<br />
Classification: Transport<br />
Powerplant: Sport for mining, Instigator for combat (size 3)<br />
Engines: Guzzler x 2 (size 3 x 2)<br />
Radar: Knocker (35000 meter range) (size 2)<br />
Shield: Haven (15400mm equivalent) (size 2)<br />
Armor: 14100 mm<br />
Capacitor: Pint for Hitmen, Jug for VAPORs, Seed for others (size 3)<br />
Laser Config: Financier x 2, VAPOR x 2<br />
Ammo Config: Hitman x 2, Peeler x 2<br />
Missiles (# x size): 6x2<br />
MODx: 5<br />
ECM: 1<br />
Speed (nor/ab/ff): 410/467/809 MPS<br />
Acceleration: 69.1 (miner), 70.4 (laser), 67.9 (mortar), 63.9 (railguns) kN/kg<br />
Yaw/Pitch/Roll: 37/45/50 DPS<br />
Cargo: 52 m³<br />
Notes:<br />
The Hurricane is another example of the Quantar school of thought concerning transports: big<br />
slots for mining guns. Its two size 3 gun mounts allow it to mount Financier mining lasers, giving it<br />
excellent mining capacity… of course, those same mounts can house 2 Hitmen, 2 VAPORs, and<br />
2 Peelers just as easily. Combined with 6 anti-fighter missile mounts, engaging a Hurricane solo<br />
in even a Dragon can be a tricky proposition at best.<br />
In the past, this ship was actually deployed in some cases as something like a Gunboat (leading<br />
a few Quantar to claim that their navy was the one that invented the class). However, the<br />
Hurricane is one reason that the Quantar recently imposed missile size restrictions on their craft.<br />
The designers, while knowing the gun mounts would be appreciated, never dreamed that pilots<br />
would attempt to mount anything larger than an anti-fighter missile on the missile mounts (which<br />
are all located at the front of the craft!); thus, there were many incidents where a Hurricane fully<br />
loaded with tac-nukes or cluster missiles would end up with its entire forward section sheared off<br />
by the gravitic drag force on the oversize warheads! Combined with merely adequate protection<br />
and a smallish power plant, the Hurricane falls short of a true gunboat. However, if the Holy<br />
Armada fields a direct answer to the Vulture, such a ship would very likely be based off of the<br />
Hurricane’s design.<br />
87
Harmattan<br />
Classification: Light Miner<br />
Powerplant: Sport (size 3)<br />
Engines: Guzzler x 2 (size 3 x 2)<br />
Radar: Doorbell (40000 meter range) (size 3)<br />
Shield: Haven (15400mm equivalent) (size 2)<br />
Armor: 6600 mm<br />
Capacitor: Jug (size 1)<br />
Laser Config: Financier x 4 (heavy or pulse laser added sometimes for defense)<br />
Ammo Config: Financier x 4 (occasionally gun added for defense)<br />
Missiles (# x size): 2x2<br />
MODx: 3<br />
ECM: 3<br />
Speed (nor/ab/ff): 388/442/765 MPS<br />
Acceleration: 66.3 kN/kg<br />
Yaw/Pitch/Roll: 27/34/18 DPS<br />
Cargo: 65 m³<br />
Notes:<br />
Very recently, Cromforge released an updated version of the Harmattan Light Miner, with OPL<br />
and T&P following suit soon after with their own updates. The result has been much rejoicing;<br />
these ships are now far more competent in their roles. The Harmattan itself is a fairly mixed bag;<br />
while it isn’t as prepared defensively as the Simurgh is, it is the best pure miner of the ships in its<br />
class with a bullet. Four Financier-class mining lasers can render a medium-sized asteroid<br />
unminable in two minutes with active mining used. Groups of Harmattans can clear clusers of<br />
asteroids in under an hour, easily.<br />
The ship is not often armed with anything beyond Financiers – it mounts a size 3 ECM, allowing it<br />
to evade Conflux spawns. Some Quants arm themselves with a single Hitman or something<br />
similar in case of careless Flux dumping, but many simply put the fourth Financier on so they can<br />
be done faster. It is the fastest of the three Light Miners, so it can vacate an area faster than its<br />
fellows.<br />
88
Whirlwind<br />
Classification: Light Transport<br />
Powerplant: Sport (size 3)<br />
Engines: Guzzler x 2 (size 3 x 2)<br />
Radar: Chime (24000 meter range) (size 1)<br />
Shield: Haven (15400mm equivalent) (size 2)<br />
Armor: 9060mm<br />
Capacitor: Jug (size 1)<br />
Laser Config: Heavy Laser or Warper x 2, Spitfire x 2, Mining Laser x 2<br />
Ammo Config: Barrak x 2, Cobra x 2, Hammer x 2<br />
Missiles (# x size): 3x2<br />
MODx: 2<br />
ECM: 1<br />
Speed (nor/ab/ff): 427/487/844 MPS<br />
Acceleration: 108.4 (laser), 105.5 (ion), 100.5 (gauss), 101.4 (ammo) kN/kg<br />
Yaw/Pitch/Roll: 64/64/42 DPS<br />
Cargo: 14 m³<br />
Notes:<br />
An exceptional Light Transport, the Whirlwind is a favorite of rookie Quantar tradesmen and<br />
miners who have just graduated from their Breezes. It is a great improvement on that vessel –<br />
faster (fastest in class, unsurprisingly, although its lack of acceleration compared to other Fast<br />
Transport designs is fairly shocking in a Quantar design), maneuverable, and capable of lifting<br />
great amounts of ore with its twin size 2 gun hard points. If the pilot feels like upgrading to an<br />
Antagonizer or even Instigator power plant, those same hard points can also mean he is very<br />
capable of chasing away any offending craft. While heavier Quantar transports are superior on<br />
the whole (especially in the MODx department, where the Whirlwind shows an almost shocking<br />
weakness), the ability of a Whirlwind to quickly move supplies and ore to the Holy Armada’s war<br />
effort should not be overlooked – nor should its ability to defend itself.<br />
S-51<br />
89
Khamsin<br />
Classification: Heavy Miner<br />
Powerplant: Sport Plus (size 4)<br />
Engines: Rush x 2 (size 4 x 2)<br />
Radar: Nubbler (50000 meter range) (size 4)<br />
Shield: Makk (36000mm equivalent) (size 4)<br />
Armor: 39000mm<br />
Capacitor: Jug for pure mining, Spore for defensive loadouts (size 2)<br />
Laser Config: Financier MK2 x 1/Banker x 2 or Heavy Laser or Spitfire x 2<br />
Ammo Config: Financier MK2 x 1/Banker x 2 or Barrak x 2<br />
Missiles (# x size): 2x2<br />
MODx: 6<br />
ECM: 3<br />
Speed (nor/ab/ff): 428/488/845 MPS<br />
Acceleration: 78.5 (mining), 79.3 (laser), 78.2 (ion), 76.3 (gauss) kN/kg<br />
Yaw/Pitch/Roll: 28/26/32 DPS<br />
Cargo: 280 m³<br />
Notes:<br />
Completely unlike the Vulture, the Khamsin was designed with actual mining in mind. At this it<br />
succeeds brilliantly; it is, bar none, the single most effective mining craft ever created. It can strip<br />
even the largest asteroid bare in a few minutes, and whereas groups of Harmattans can clear<br />
clusters in an hour, Khamsins with Chinook backup can clear entire FIELDS in short order. In a<br />
full war, downing (or for the Quantar, protecting) these ships would a priority; they can supply a<br />
base with enough raw material for a war fleet in a single day with ease.<br />
As noted, however, the Khamsin is unlike the Vulture in that it is almost totally unsuited for<br />
combat. Although it can sacrifice some mining capacity to mount decent defensive weapons or an<br />
Anti-Flux ECM, it has half the defensive capacity of a Vulture and the missile capacity of a rookie<br />
shuttle. Khamsins are easy prey if unescorted – although their heavy Flashfire load could prove<br />
an obstacle to pursuing one. It is also likely that Khamsins will continue to be unsuited for combat<br />
– barring Tens and Piney developing a size 6 mortar weapon (God help us all in that case), it<br />
seems likely that the Khamsin will not be able to use the sort of superscale weaponry that is<br />
doubtlessly being developed for the larger combat ship types and that would fit in that sort of craft<br />
due to capacitor and power plant issues.<br />
S-54<br />
90
Thunder<br />
Classification: Cargo Tow<br />
Powerplant: Sport Plus (size 4)<br />
Engines: Dream x 2 (size 5 x 2)<br />
Radar: Nubbler (50000 meter range) (size 4)<br />
Shield: Makk (36000mm equivalent) (size 4)<br />
Armor: 72000mm<br />
Capacitor: Spore, Keysto for plasma (size 4)<br />
Energy Config: Heavy Laser x 2, Spitfire x 2, Serializer x 2<br />
Ammo Config: Barrak x 2<br />
Missiles (# x size): 2x6, 2x2<br />
MODx: 6<br />
ECM: 3<br />
Speed (nor/ab/ff): 462/527/912 MPS<br />
Acceleration: 71.8 (laser), 70.9 (ion), 69.5 (gauss), 69.7 (plasma) kN/kg<br />
Yaw/Pitch/Roll: 30/29/39 DPS<br />
Cargo: 500 units<br />
Notes:<br />
Until fairly recently, the Thunder was the stepchild of the Cargo Tow class – the Quantar<br />
engineers had used size 4 engine mounts on the vessel to conserve power. Unfortunately, that<br />
also meant conserving thrust, which is something a cargo pilot can never really have enough of.<br />
Along with the recent combat fleet upgrades, the Thunder was finally upgraded to size 5 engines<br />
(with rumored help from the Solrain government), giving it plenty of thrust and speed to boot.<br />
Other than that, it is very similar to the Octavian Condor – somewhat faster overall, slightly less<br />
MODx, same armament, about as maneuverable, same ECM. Perhaps the only major oversight<br />
is that the vessel possesses a full 20 fewer meters of overall protection as compared to its<br />
counterparts in the Octavian and Solrain fleets – making it still, on the whole, the “worst” of the<br />
three heavy cargo tows.<br />
S-55<br />
91
Chinook<br />
Classification: Freighter<br />
Powerplant: Intimidator (size 5)<br />
Engines: Vector x 2 (size 6 x 2)<br />
Radar: Nubbler (50000 meter range) (size 4)<br />
Shield: Guardian (99700mm equivalent) (size 6)<br />
Armor: 187500mm<br />
Capacitor: Pint for Hitmen, Deepol for Nova Mk1, Seed for Peelers (size 3)<br />
Energy Config: Nova Mk1 x 2<br />
Ammo Config: Hitman x 2, Peeler x 2<br />
Missiles (# x size): 2x6<br />
MODx: 7<br />
ECM: 3<br />
Speed (nor/ab/ff): 382/436/755 MPS<br />
Acceleration: 27.7 (plasma), 27.6 (railgun), 27.8 (mortar) kN/kg<br />
Yaw/Pitch/Roll: 17/17/25 DPS<br />
Cargo: 735 units<br />
Notes:<br />
Since the Freighter designs were constructed with TRI consultation (like the Cargo Tows), it is<br />
little surprise that the vessels resemble one another so greatly. However, once again the<br />
Octavian design comes out slightly ahead. The Chinook is a dual-engine design, meaning it<br />
cannot be as free and loose with the afterburn as the Roc can. It possesses the same<br />
weaponry… but again, it lacks 7500mm of defense that the Roc has. This means that the 6 th nuke<br />
that the Roc could barely withstand would be enough to destroy the Chinook outright. The<br />
tradeoffs for slight speed and maneuver gains do not seem particularly prudent, and the vessel<br />
actually accelerates slower than the Roc, while carrying slightly less cargo to boot due to its hull<br />
design. For all that, it is still a Freighter and it can still move about more cargo than anything in<br />
the Holy Armada, and is quite likely to be defended in wartime. And despite the slight deficit in<br />
defense, they are by no means easy ships to bring down.<br />
S-56<br />
92
GUNBOATS<br />
For the Holy Armada, this section is currently empty. Our Imperial Navy is the only military force<br />
in the five systems that currently fields anything like the Vulture Assault Gunboat (unless you<br />
count the Conflux and their larger “designs.”) However, ever since the release and combat<br />
utilization of the Vulture and the leaking that OPL is working on a much, much larger combat<br />
vessel in this classification, Cromforge is scrambling to field something. It is also possible that the<br />
Hurricane may be used as a baseline for a direct response to the Vulture. If or when such vessels<br />
are released, this section will contain information on them.<br />
S-57<br />
93
A Story by Ike Profari<br />
Ikeprof sighed inwardly while pretending to listen sympathetically to<br />
the transport pilot complain about the new docking strut’s length from<br />
the stations core. Nodding sagely and muttering appropriate “uh-huh’s”<br />
at the correct interval Ikeprof thought about how old he was becoming.<br />
The new docking system was a bit different than the old way but it was<br />
improving every day and sure as heck beat the mess that resulted when<br />
TRI expanded the recruiting effort without taking into account current<br />
station docking capacities. That fiasco resulted in 6 months of waiting<br />
for days at a time for a chance to dock while sitting in space exposed<br />
to the universe and attempting to sleep with one eye fixated on the<br />
radar scope and hundreds of ship losses due to poor docking pattern<br />
management. Before the struts, pilots had to coordinate the traffic<br />
themselves as they entered the single tube that allowed a ship to dock.<br />
Many a heavy laden tow was lost in collisions with the blundering<br />
attempts of a new pilot rotating on all three axis with engines flaring<br />
sporadically as they attempted to learn the trade of docking. In many<br />
respects Ikeprof preferred the new strut system. As soon as he entered<br />
a station sector, he could see at a glance what ships were docked, what<br />
ships were powered up and ready for flight, what squads were present<br />
and what the rough faction make-up of forces were in the sector.<br />
Back in his early days as a TRI pilot, one was blind to who was in the<br />
station and when he docked, one became blind to who was in the sector.<br />
Under the new strut system, he simply could glance out his side window<br />
and see his friends and enemies ships all neatly in a line on all 4<br />
faces of one of the struts. The familiar station transaction interface<br />
activated as soon as the docking clamps closed on the hatch ring in the<br />
nose of his ship, but could be toggled off if he needed to access his<br />
ships radar system to monitor incoming and outgoing vessels. Had the<br />
Quantars not perfected the station force field technology, the whole<br />
concept would have never been accepted by the general pilot population,<br />
but after proving that 16 morning stars and a fully loaded tow of<br />
plutonium could not dent the force field bubbles that protected each<br />
ship, the alternative of sitting in space waiting for an internal<br />
station bay quickly paled in it’s appeal.<br />
A pink flash of light signifying a collapsing force field bubble from<br />
his left viewport caught Ikeprofs attention.. Glancing left out the<br />
viewport, Ikeprof could make out the Solrain medium transport slowly<br />
departing a docking port 30 spots closer to the station. Realizing that<br />
Splooshie was waiting for a reply, Ikeprof muttered a “I couldn’t agree<br />
with you more” response and quickly closed the comm link. Depressing<br />
the launch button on his station interface, Ikeprof watched the force<br />
field become visible as the shimmering energy of the force field bubble<br />
rushed from the rear of his ship towards the strut itself as it<br />
collapsed. Mere seconds later felt the gentle nudge as the docking<br />
clamps released his craft and pushed him away from the strut at roughly<br />
100v backwards. In a practiced and deft motion, Ikeprof swung the nose<br />
of his ship parallel to the strut and roughly towards the station<br />
proper without negating his original rearward motion. Drifting<br />
sideways, he accelerated gently towards the now vacant shield bubble<br />
recently made available by the Solrain craft whose twin engine glow was<br />
still visible as it headed outward. Just prior to coming parallel to<br />
the docking clamps, he swung his ship on all three axis’s at the same<br />
94
time until his inertial vector indicator was pointing directly to the<br />
rear of his ship. With a quick glance out the side viewport he timed a<br />
pulse of engine power and stopped the Venture class command vessel<br />
perfectly. The familiar green cone of the closest available docking<br />
port activated as he targeted the station but Ikeprof was beyond<br />
needing such docking aids. Rotating again, he lined the nose of his<br />
ship up and accelerated towards the docking clamps. One thing he was<br />
glad that didn’t change was that the new strut system still allowed one<br />
to dock at 100v or less. The force field generators which protected the<br />
docked ships also served to brake a ship as it approached the clamps.<br />
The clang of the clamps engaging rang through his hull and the slight<br />
change in cockpit pressure indicated that he was back on station life<br />
support systems. A slower glow of pink light swirled around all of the<br />
ships viewports as the stations field generators formed a bubble around<br />
his ship. The glow cleared as the bubble stabilized and became<br />
completely transparent. The station interface appeared again on his<br />
HUD. From this spot he had a perfect view of almost the full length of<br />
this strut. Knowing that other squad command members were docked on 4<br />
of the 6 other struts emerging on all 3 axis of the station he felt<br />
comfortable that minimal activity could occur here without the squad<br />
being aware of it.<br />
A quick glance to the right showed one of the station port bots<br />
clamping on to an apparently abandoned Quantar mining vessel. When a<br />
pilot became disabled for over 24 hours, his ship was removed from the<br />
docking ports on the struts and placed in the now valuable interior<br />
station storage in order to make room for pilots who would be arriving<br />
and departing in 24 hours or less. The flare from the port bots engines<br />
illuminated the struts surfaces allowing him to truly appreciate the<br />
engineering marvel that it was. At over 2K in length on each axis, the<br />
strut allowed for hundreds of ships to dock at the same time on all 4<br />
faces of the strut. The interior of the strut was a dizzying blur of<br />
high speed shuttles and bots ferrying the commodities, weapons, repair<br />
AI units and pilot support materials to the individual ships docked on<br />
the struts, but the smooth outside surfaces perfection was broken only<br />
by the docking clamps themselves.<br />
It was evident that many of the pilots were enjoying the decrease in<br />
combat activities as at least half of the ships on this strut had<br />
darkened navigation lights signifying that the pilots were not manning<br />
their ships. A quick count showed that a few cargo transport vessels, 1<br />
Quantar fast transport craft and 3 Octavian medium fighters were manned<br />
with the rest of the assorted craft showing as powered down.<br />
Knowing that he was due to go on duty in less than 4 hours, Ikeprof<br />
tapped the control that adjusted his command chair for sleep settings.<br />
“Not enough time to head to the officers quarters” he thought to<br />
himself as he drifted off to a restless sleep.<br />
A distorted beeping and the bright blue text of a squad communication<br />
message appeared on Ikeprofs HUD at the very top. Wakening from a<br />
restless sleep and sitting up in his seat he noted that it was the<br />
expected automated reminder telling him it was time to go on combat<br />
coordinator duty. Stretching tiredly he de-activated the station<br />
interface, glanced out both side cockpit windows and toggled his radar<br />
range to maximum. Setting the radar to “in-flight’ only mode, he<br />
checked the scope for hostiles and bountied pilots. Satisfied the scope<br />
95
was clear, Ikeprof re-activated the station interface and quickly<br />
purchased one of the new MK II Morning star missles. Almost immediately<br />
he felt the faint tremor as the equipping bot attached the missle to<br />
his ships pylon. While the Venture class ship was not directly a combat<br />
capable ship given it’s single gun and minimal shielding, it could<br />
still mount a missle as a last ditch self defense measure.<br />
Tapping the launch button on the station interface, Ikeprof flipped the<br />
ship smoothly over onto it’s back and accelerated quickly towards the<br />
Arkans cloud jumpgate after clearing the docking strut and the other<br />
ships. Establishing communications with on duty combat coordinator, he<br />
confirmed that the battle had lessened to some degree but the conflict<br />
in Dark Gateway between Octavian and Solrain forces still raged.<br />
Knowing that he had time before he was required in sector, Ikeprof<br />
aimed for The Blasted Corner jumpgate rather than Arkans Cloud. The<br />
swirl of blue and white energy cleared his viewport as he jumped, and<br />
he slowly rotated towards the anomaly while scanning his radar for<br />
anything unusual. A dozen OEC pilots where working side by side with<br />
other Octavian ships in constructing the new jumpgate around the<br />
anomaly. As TRI budgets shrank, the secret Zirgmirg construction laser<br />
were released to the general pilot population. Prior to this, TRI<br />
construction drones were responsible for all new station and jumpgate<br />
construction, but the exponential rate of growth of the rapidly<br />
discovered universe quickly outpaced the ability of TRI to keep up with<br />
construction demands. The day’s of dropping off construction materials<br />
to a staging station and allowing the TRI drones to do the work were<br />
over. Now faction pilots not only had to accumulate the construction<br />
materials for new projects, they also had to load these materials into<br />
their holds and fly to the construction location with a Zirgmirg laser<br />
equipped and take an active part in building whatever the focus of the<br />
day was. The Zirgmirg laser slowly used the commodities as it<br />
contributed to the construction of a project. A wire frame holoimage<br />
told the pilots where to aim the conlaser and if one watched closely,<br />
you could see the solid construct form before your eyes.<br />
Ikeprof chucked at the thought of the time that Capt DJMTPocket got his<br />
ship trapped between two walls of a supply depot while proclaiming<br />
loudly that “he knew damn well which way the wall was going to form”.<br />
“Some people are fighters and some are construction workers” Ikeprof<br />
thought to himself.<br />
It looked as if the new jumpgate was ½ done. Data probes had revealed<br />
that this gate should lead to the newly discovered “outer loop”. This<br />
loop so far had consumed each probe in heavy conflux fire by yet to be<br />
identified conflux class frigates, but the promise of discovery and<br />
reward had energized most of TRI. Probe data had been intermittent, but<br />
vast patches of pure roid fields and some artifact signatures had been<br />
mixed in with the data prior to the probes demise. The name Outer Loop<br />
was a rough name as it only circled 2/3rds of TRI space at this time,<br />
but the general consensus was that it would eventually form a complete<br />
circle. Armchairs Wound was the first sector discovered in the outer<br />
loop connected to the Path of Hordes sector. It was unanimously decided<br />
that the honor should go to Pilot Armchair especially after he suffered<br />
his disfigurement during his pod malfunction while studying the<br />
original anomaly.<br />
96
Satisfied that all was well in the sector, Ikeprof, jumped back into<br />
Outpost Station sector and went full burn towards Arkans Cloud. Jumping<br />
without incident, he traversed Arkans Cloud and Primus Point sectors<br />
quickly. Tensing his thumb over the flashfire button, he quickly<br />
inquired about gate camp issues at the gate into Dark Gateway. The<br />
combat coordinator on duty informed him that no vessels were within 10K<br />
of the gate. Ikeprof tensed slightly as he always did when jumping into<br />
a known combat sector and was relieved at the lack of shield flaring<br />
that indicated incoming fire.<br />
Pitching quickly away from the mess of red and blue dots appearing on<br />
his scope Ikeprof aimed his ship away from the battle and into deep<br />
space in the sector. At 100K from the Primus Point gate, Ikeprof<br />
pitched 90 degrees upward and continued on another 100K in case any<br />
enemy ships noticed his original vector and was patiently waiting off<br />
scope to follow him out. Thoughtlessly he flipped his ship and braked<br />
it in a practiced motion. His hands moved quickly across his control<br />
panel as he systematically shut most of his ships subsystems down.<br />
Shields, ships radar, weapons systems all went dark as he activated his<br />
cloaking modx. Satisfied he would present minimal energy emissions, he<br />
notified the combat coordinator on duty that he was in position and<br />
ready to assume control of the squads forces. The departing CC officer<br />
had little to say, most likely due to his being under qualified for the<br />
position. Ikeprof was fine with that as most of the time he found his<br />
tactics clashed with those of other CC’s and he knew the men would<br />
respond as they always did when he took control.<br />
Activating his ships CC modx system, his entire hud exploded into one<br />
huge 3d radar scope of brilliant colors and motion. The three on duty<br />
squad scout craft with their powerful radars and electronic systems fed<br />
massive torrents of information to his ship real time, allowing him to<br />
have a perfect tactical view of the entire battlefield within the 50K<br />
radar range of each scout in addition to the information provided by<br />
the lesser radars of the other squad combat and cargo craft in the<br />
sector. Ikeprof was pleased that at least the departing CC had placed<br />
the Griffens in a nice triangle surrounding the bulk of the battle<br />
action. Having gotten used to operating with only 2 scout craft,<br />
Ikeprof was even more comfortable with the additional information<br />
provided by the third scout. Each enemy blue dot on the scope carried a<br />
pilot name, squad tags, ship type, shield and armor status, velocity,<br />
and current vector indicated by the pointy end of the arrow attached to<br />
each dot. Each friendly squad pilots red dot also showed him current<br />
number of missiles and afterburner and flashfire counters. The fact<br />
that this display filled the screen prevented him from flying at all,<br />
but he knew that his job was as important as any other pilots job in<br />
this battle.<br />
Having proven long ago that voice communications were inefficient in<br />
the milliseconds between life and death battles of the time, the<br />
Venture class command coordinator craft were developed by Octavian<br />
engineers. Only in conjunction with a scout craft did the ship realize<br />
it’s potential. The oversized radars of the scouts were useful in their<br />
own, but having the ability to transmit that information to a command<br />
ship allowed the larger squads to truly coordinate their efforts as a<br />
team. For years the scout craft was dismissed as an ineffective and<br />
useless craft in combat, but after the Venture class ship went into<br />
97
production, the scout craft became an integral part of most combat<br />
encounters and allowed the newer pilots the ability to take part in<br />
some massive battles. Without the scout craft Ikeprof would not be<br />
blind, but he knew he would be lacking the important vector and<br />
velocity information that only the scouts could provide.<br />
Ikeprof quickly scanned the action on the CC scope, rotating it<br />
dynamically while taking stock of friendly and foe forces. Apparently<br />
the typical strengths and weaknesses of the factional craft were<br />
showing through again. The bulk of the Octavian bombers and heavy<br />
fighters were concentrated mid sector in an almost perfect sphere with<br />
guns pointing outwards. 3 Condor class tows were parked in the center<br />
of the sphere loaded out with PWD100’s in order to negate missile<br />
threats. A scattering of light fighters equipped with relic gear<br />
harassed the enemy bombers and heavy fighters with minimal success at<br />
the top of the display. Watching as the vectors of 4 of the enemy<br />
bombers converged at the top, Ikeprof readied himself to counter what<br />
was obviously the preparation for some form of assualt.<br />
Using the Mechanical Organic Unified Sensory Enhancer (Mouse), Ikeprof<br />
simply had to click on a friendly dot, drag the dot onto an enemy dot<br />
to create a target for his pilots to concentrate fire upon. Using a<br />
variety of key presses on his ships data entry keyboard, he could<br />
elevate a target’s level of urgency, create fire teams to work together<br />
on a target, create flight groups that he could communicate to<br />
directly. The huge radar scope was capable of rotating on any axis<br />
using his ships flight control hotas in order to get the best angle to<br />
view the battle.<br />
Dragging a box around the 4 bombers, Ikeprof tagged them as a group.<br />
Dragging a box around the sphere of his main forces, he deftly tapped<br />
the key strokes signifying the primary targets and ordering them to<br />
maintain current position and attitude while awaiting the next move.<br />
Quick acknowledgements from his pilots filled his comms screen as the<br />
enemy bombers began their run. Mentally extending their vector<br />
forwards, he could see they intended to pass tangentially to the sphere<br />
and focus on one or two of his bombers rather than attempting to pass<br />
through the middle of it and exposing themselves to the bulk of his<br />
pilots devastating firepower.<br />
Having seen this type of run before, Ikeprof knew the lightness of the<br />
Solrain bomber made vector extrapolation deceptive. If these pilots<br />
were under the command of a competent CC, it may be a ruse to which any<br />
attempt to counter position his forces could result in more damage than<br />
simply bearing the brunt of the run as it stood. He decided that<br />
patience was the only option.<br />
Watching the progress of the bombers, Ikeprof realized the opposing CC<br />
was not new at this. At roughly 10K distance the first enemy bomber<br />
released a single morning star. Bomber pilot Quick indicated missile<br />
lock but calmly held his position. At 1K intervals each of the other<br />
enemy bombers released a single Morning Star missile also. This type of<br />
run was very textbook in terms of forcing exhaustion of PWD100’s. With<br />
15 PWD’s left in the Condor group, Ikeprof was not worried.<br />
Watching the 4 enemy bombers pass by the defensive sphere Ikeprof grew<br />
98
frustrated at the stalemate situation that had developed as seemed par<br />
for course these days. Both sides had grown so adept at utilizing the<br />
strengths of their crafts that an almost unnatural balance had been<br />
achieved. The brutish firepower of the Octavian craft, combined with<br />
their heavy armor compensated for the lack of speed and in flight<br />
trajectory modification ability. The hard to hit Solrain bombers with<br />
their agility and speed suffered from their own deficiencies. Captain<br />
McInnus was responsible for the innovative and rather brave concept of<br />
the sphere turret defense formation with the PWD tows. Ikeprof<br />
suspected it actually evolved from an attempt at salvaging a losing<br />
battle, but regardless, it had become standard practice when<br />
outnumbered in battle as seemed to be the case the majority of the<br />
time. Prior to the development of that formation, Octavian forces had<br />
been taking a beating by the Solrain craft who could hit and fade<br />
easily at will while the Octavian craft never had that option.<br />
Ikeprof’s continued to issue commands in an almost automatic fashion<br />
while pondering the situation. The Solrain bombers flew lazy 8 patterns<br />
to exhaust the missiles fired routinely by the fade side of his sphere<br />
group. As the missiles disappeared from his scope, the solrain bombers<br />
formed up for another pass with each side having inflicted minimal<br />
damage. A quick scan of remaining ammunition quantities showed that at<br />
least an hour or more of battle at this rate remained before<br />
replacement craft would be necessary. One of the Condor’s was almost<br />
out of PWD’s but had 4 morning stars equipped. Ikeprof tapped out a<br />
quick command instructing that pilot to maneuver to the side of the<br />
sphere opposite of the bombers and launch 2 MS’s on a single bomber<br />
after they had passed.<br />
The 4 bombers began yet another run, appearing to try a split fork<br />
approach this time against the sphere. Two Solrain Intensities appeared<br />
in the Greater Locks gate and began an approach approximately 90<br />
degrees from the bombers in an attempt to confuse his forces. Ikeprof<br />
assigned two of the bombers to target one of the heavies, while<br />
ignoring the other.<br />
As the bombers and fighters arrived at the sphere at almost the same<br />
time Ikeprof was pleased to see one of the Intensities blink out of<br />
existence. Apparently the heavy had gotten a tad too close to the<br />
firepower of his bombers. The remaining intensity afterburned away as<br />
the condors PWD’d the incoming missiles. The almost empty Condor<br />
assigned to launch his missiles at the departing solrain bomber group<br />
did so perfectly as they passed by.<br />
Suddenly at 12K from the sphere the enemy bomber group flipped and<br />
flashfired backwards towards the sphere while unloading a missile each.<br />
Caught unawares, Ikeprof had only time to issue an alert order and<br />
hoped his pilots were awake and sharp. The enemy bombers again vectored<br />
in an expanding V to pass on both sides of the sphere. Missiles<br />
disappeared as the condors did their job perfectly. Ikeprof relaxed as<br />
the surprise tactic by the enemy failed to achieve any measure of<br />
success. The enemy bomber group sharply vectored in a mirroring closure<br />
to their approach pattern flying again as one group. Rotating the<br />
display casually to get a clear view Ikeprof sat up on horror as he<br />
realized why the bombers had vectored so harshly to close their V<br />
pattern. The two morning star clusters launched by his Condor were<br />
attempting to track the original targeted enemy bomber. By flashfiring<br />
99
ack at his sphere, the morning stars were left behind to follow. Only<br />
by closing the V would the enemy insure that the missiles would fly<br />
right back through the sphere. Ikeprof made no attempt to communicate<br />
with his pilots as he knew it would be too late to have any effect. A<br />
quick wrist motion rotated the display to an angle directly behind the<br />
missiles. The first morning star disappeared with the resultant drop in<br />
shields to one of his condor’s. The condor itself disappeared from the<br />
display as the second morning star impacted it’s hull after narrowly<br />
missing one of the bombers.<br />
Ikeprof quickly surveyed his assets. 5 bombers with less than half full<br />
missile racks, one condor with 3 PWD’s and one condor with 2 missiles<br />
and no pwd’s. The condors had no flashfires and would be quickly<br />
overtaken by the enemy bombers. His 3 scouts were maintaining a<br />
circular flight pattern around the main battle area while keeping away<br />
from the enemy scout craft doing the same thing. Somewhere out there<br />
was his counterpart also motionless in space, cloaked and defenseless,<br />
coordinating the enemy forces.<br />
100
Zalty’s Combat Guide<br />
“The guide to keeping your ship intact during a firefight”<br />
Z-1<br />
101
Zalty’s Combat Guide<br />
Introduction<br />
This is a guide that aims to give an all-round appraisal of the abilities required to be a good combat<br />
pilot. Where possible, it will attempt to teach those abilities. The tutorial primarily focuses on laser/ion<br />
combat, but will delve into other areas as well.<br />
Bear in mind that there is much that cannot be taught by text, only by action. Nothing is going to turn<br />
you into an ace overnight. It's long, hard work, but if you're motivated enough, you can be among the<br />
best there is.<br />
Document List<br />
Duelling<br />
Aim<br />
Manuevering<br />
Realspace Combat<br />
Understanding Your Ship<br />
Choosing Armament<br />
Choosing A Ship<br />
Situation Awareness<br />
Mentality<br />
What to do under Fire/Evasives<br />
Flashfire Conservation<br />
Know Your Enemy<br />
Other Tricks<br />
Z-2<br />
102
Duelling - Aim<br />
Aim cannot be taught particularly easily. It is largely a skill that can only be learned through practise,<br />
but there are a few things to bear in mind. Firstly, remember to always have your deadzone set to 0 -<br />
Your ship's implementation of deadzones is poor at best. Make sure that your technicians have<br />
installed a high quality stick to enable precise control.<br />
Try to make sure that any buttons that will be pressed all/much of the time (excepting the trigger) are<br />
not on the shaft of the stick. If you are constantly pressing a thumb button while aiming you may find<br />
that it detracts from your aim. My button setup on my FF2 goes like this (NB the hat is 8 way, but I find<br />
that I cannot use all 8 functions precisely enough to prevent errors):<br />
Hat left: Nearest target<br />
Hat right: Last aggressor<br />
Hat up: Target cycle up<br />
Hat down: Target cycle down<br />
1: (Trigger) Fire main weapons.<br />
2: (Big thumb button) Jump<br />
3: (Left thumb button) Brakes<br />
4: (Right thumb button) Teamspeak transmit<br />
5: AB<br />
6: Missile<br />
7: Flashfire<br />
8: Target under reticle<br />
Capacitors: Cap choice can affect aim to a significant degree. Most pilots find it harder to get a nearperfect<br />
aim using gatling fire. Volley fire, as well as enhancing aim, offers the benefit of increased<br />
damage. This is due to the damage of the initial volley. At any point except the moment at which all<br />
guns in the gatling have fired, gatling fire will have done less damage. Note that as the number of<br />
shots taken in a single engagement increase, the significance of this advantage (percentage-wise)<br />
decreases. If you are taking lots of break-shots, where contact time is very short, the advantage is<br />
significant, however. As a further point, this advantage is enhanced by low RoF weapons such as<br />
Vantages and Injustices.<br />
Z-3<br />
103
Duelling - Maneuvering<br />
This topic focuses on approaches used in a duel, and manoeuvring during the duel. It is suggested<br />
that you read the following subsections:<br />
File List<br />
>Turning<br />
>Approaches<br />
>Choosing Approaches/Turning Method<br />
Laser/Ion vs Laser/Ion: Because the percentage of hits in laser/ion combat is so high, the most<br />
important thing is to keep hitting your enemy. This means that unless you do it on the flashfire, do not<br />
turn away from your enemy where possible.<br />
Laser/Ion vs Ammo/Mortars/Novas: Against the higher damage slow weapons, it is important to put<br />
the enemy in a position such that they will have trouble hitting you. This means that you may find it<br />
beneficial, once you have made the initial contact, to adjust your vector while in the effective range of<br />
the enemy's weapons. If possible, try to do it while they are turning and not hitting you to decrease the<br />
amount of time you spend with your easier to hit faces under their guns.<br />
Duelling - Maneuvering - Turning<br />
There are three methods for turning during a duel.<br />
Pitch: The most common. Use the up-down motion of your mouse/stick. It doesn't provide the speed<br />
of turning of diag-turning, but generally presents a small profile to the enemy, along with ease of<br />
aiming.<br />
Yaw: In most circumstances, do not use yaw (left/right) turning. This will, with most ship profiles, allow<br />
your target a huge margin of error for hitting you.<br />
Diag-Turning: Diag-Turning involves using both axis of the stick to rotate. This makes it harder to aim,<br />
but increases your speed of rotation. Commonly used by turn-rate impaired ships such as the Dragon,<br />
Intensity, and Barracuda.<br />
Duelling - Maneuvering - Approaches<br />
There are various approaches used to a duel. The common ones are discussed here.<br />
Joust: Very straightforward, and the approach everyone started out with. Simply head straight towards<br />
your enemy.<br />
Circle: The standard circle. Assuming a starting distance of 5+k from your oppenent, point your nose<br />
at an angle to your opponent (holding them at the top of your screen is a reasonable guideline),<br />
accelerate, and bring your nose up up to face them between 3 and 4k range. If necessary, cut throttle<br />
to bring the nose up rapidly; this will give you time to draw a bead on your target prior to commencing<br />
firing. If your opponent does the same in the opposite direction, you will usually end up in a gradually<br />
tightening circle (spiral), between 800 and 1.4k range.<br />
Z-4<br />
104
Tight Circle: This is usually accomplished with the aid of flashfires, in the combat of ships with poor<br />
turn rates. My method for doing this involves approaching at a slightly steeper angle than that used for<br />
a normal circle, moving to point towards the enemy at 4k. At 2.5k, I turn to point at 90 degrees to the<br />
target, and flashfire. Then, using diag-turning, I pull into the direction of the enemies travel just before<br />
they go past me. This will usually result in an extremely close range (50-200d) circle when correctly<br />
pulled off. Obviously the numbers are variable dependent upon enemy approach vector and speed -<br />
do it by feel once you get the hang of it. The lighter your ship is (and the better it's turn rate), the better<br />
it will be at holding a tight circle. Be careful with this technique in realspace, as it will deplete your FF<br />
reserves.<br />
Deep Circle: Similar to the standard circle, but held at a longer range (1.5k +). The only real difference<br />
is that your approach angle must be much wider. Don't lose patience if you close range slowly. Pull up<br />
slowly to meet your enemy at the desired range (usually the max range of your guns). Deep circles are<br />
typically used by: Ships with good profiles, ships with poor turn rates, ships with long range weaponry<br />
(such as ions). Heavy ships are generally better at holding deep circles.<br />
Circle Break: The circle break is most easily accomplished by imagining a point along your enemy's<br />
vector where you will both meet. Fly towards that point, and what will generally result is a series of<br />
short mini-jousts. The circle break is useful for a large variety of situations - if you are flying no duelist,<br />
if your aim isn't so hot, if your profile is large relative to your enemy's, if your turn rate is good, if you<br />
have low RoF weapons. Be very careful using this technique in realspace, as it leaves you vulnerable<br />
to divebombs.<br />
Duelling - Maneuvering - Choosing Approaches/Turning<br />
Method<br />
Which approach and turning method should you pick? There are a large variety of items to take into<br />
consideration.<br />
Profile: If your profile is large relative to your enemy's, they will have an easier time hitting than you<br />
will. You thus want to lean more towards approaches that lead to easier vectors, or being close in.<br />
Consider tight circles and circle breaks. Useful, for example, when the Typhoon is fighting a medium<br />
fighter. Your profile is relatively large, so you want to minimise the effect of this. Get in close enough to<br />
the MF that its profile is less relevant, with both combatants hitting well, and your superior<br />
firepower/absorption will probably win out.<br />
Turn Rate: If your turn rate is slow, you face the possibility of being out-turned by your enemy, and not<br />
being able to keep hitting them while they can hit you. Lean towards approaches that don't require fast<br />
turn rates - deep circles in particular. Most notably used to great effect by the Intensity. Conversely, if<br />
your turn rate is good, you may wish to go for a tighter circle - often used by the Typhoon.<br />
Aim: See profile. If your aim is bad, consider getting in close, or using a circle break for an easy<br />
vector. If it's good, you may wish to stay out wide to maximise your advantage.<br />
Rate of Fire: To some degree, low rate of fire weapons lend themselves towards circle breaks,<br />
because your weapons can reset themselves during the turn-around period, maximising the advantage<br />
that you get from the massive damage your low RoF weapons do in the initial volley. Try to time the<br />
mini-jousts such that you fire just before having to turn, to enhance this advantage.<br />
Weaponry: Slow weapons (novas, ammo, and to a degree mortars) are enhanced in ability when<br />
aimed along easy vectors, and at close range. A tight circle will lead to a hard vector, but the range is<br />
so close that you should get a good hit rate. A circle break will generally give an easy vector<br />
Z-5<br />
105
Realspace Combat<br />
The topic of realspace combat is hideously complex, and it's unlikely that anyone knows all there is to<br />
know about it. The advice in this section is probably best applied to fast and/or agile ships, but I will<br />
make an effort to cover the full spectrum of ships. Note that the duelling abilities I described above will<br />
help you in realspace combat significantly. I assume functional voice communications on your ship.<br />
Realspace Combat - Understanding Your Ship<br />
It is extremely important to understand your ship's abilities, and those of others.<br />
Speed: Controls the ability to run and chase over long distances. A fast ship, assuming it doesn't get<br />
killed before it accelerates, will always be able to escape, and will be able to chase down ships running<br />
in a straight line. Fast ships will generally perform well in large fights, but the speed may not be as<br />
useful in smaller ones.<br />
Thrust/Mass (T/M) ratio: Controls the ability to evade, and the ability to run and chase over short<br />
distances. A ship with a good T/M ratio will out-accelerate less agile ships, and can use this to escape<br />
being under fire, and to catch up with running enemies. A good T/M ratio will also allow you to dodge in<br />
such a way that you cause the enemy to miss. A good T/M ratio is useful in all fights, but particularly as<br />
you tend towards the larger ones. High T/M ships will, in general, be good at evading ammo.<br />
Damage/Second (DPS): Self explanatory - the damage your ship can do per second. DPS tends to<br />
decrease in importance in larger fights.<br />
Shield: The larger the shield, the better. Every hitpoint taken off your shield can be regenerated. A<br />
ship with the same total damage absorption (DA) as another, but more of it in shield has an advantage<br />
- particularly in larger fights. Recharge rate is an important factor - the faster your shield recharges, the<br />
quicker any attack on you is nullified. Recharge increases in importance as battle size increases.<br />
Bigger shields are more of a benefit to fast ships - they are more likely to be able to escape to<br />
recharge.<br />
Armour: Contributes to your total DA, but is non-regenerative. Armour increases in value as fight size<br />
decreases, but is, of course, never more worthwhile than shielding.<br />
Profile: Profile is important for all aspects of combat. The more you get hit, the faster you have to<br />
run/die. Ships with bad profiles, as when as losing out in duels, will also get him more in snap shots<br />
(i.e. hitting a target travelling at a large relative vector to you during a brief contact period).<br />
AB supply: Most two engine ships have enough AB to last the vast majority of fights, as long as they<br />
don't waste it too much. Having double the AB supply in a single engined ship is an undeniable<br />
advantage, but it is mostly only over the long chase that it really comes to light. Be careful about going<br />
deep space if you are in a twin engine ship, as you may get caught. You'll also be able to run better in<br />
a single engine ship.<br />
ModX count: ModX are useful in any fight, but their import increases in larger fights. The flashfire is of<br />
course the most commonly used. It is the ultimate get out of jail free, chaser, or offensive tool. Dragon<br />
pilots may now wish to seriously consider the PWD. I've seen several pilots using it to great effect.<br />
Z-6<br />
106
Realspace Combat - Choosing Armament<br />
I will, in general, talk about ions and lasers as laser-esque weapons, and ammo/mortars as ammoesque<br />
weapons.<br />
Lasers/Ions: Lasers and ions should, in general, be considered the main weapon for group PvP.<br />
While ammo weapons sometimes do well in small combat situations, laser-esque weapons scale much<br />
better to group fights, because they are relatively easy to hit ships that aren't engaging you with. This<br />
allows you to cover your friends well, which is key to victory in a group engagement.<br />
If you have a good aim with ions, it is often a good choice to pick them over lasers. They have good<br />
efficiency (which allows ships like the Tempest to fire at close to full throttle), and great range. They<br />
much harder to hit flashfiring ships with, however, and they also cause your ship to be heavier,<br />
reducing your chasing abilities and making you more vulnerable to attack.<br />
Ammo/Mortars: In general, ammo does not have the versatility of lasers and ions. This is largely<br />
because ammo is not great at covering your friends with as it is relatively hard to hit off angle shots<br />
with it. That said, in smaller engagements its damage can throw the balance in its favour. In general, I<br />
would not consider mounting ammo on any ship other than the Dragon, as the weight penalty in<br />
addition to the difficulty of hitting ships not engaging you is fairly painful.<br />
Mortars (i.e vantage and peeler, all others are worthless as it stands) are excellent weapons. They are<br />
somewhat easier to aim with than ammo, and their low rate of fire gives them fearsome damage over<br />
short contact periods. Any ship that can carry them is a massive danger.<br />
I strongly recommend that you read the following section if you wish to understand why particular<br />
weapons are effective.<br />
Realspace Combat - Choosing Armament - Weapon<br />
Effectiveness<br />
This section details what factors control how a weapon behaves.<br />
Velocity: The faster a weapon is, the easier it is to hit with. Faster weapons are likely to improve in<br />
effectiveness as fight size goes up, as they are better for covering your friends.<br />
Range: Lifetime*Velocity. In general, longer range allows you to hit weapons at a higher range, but a<br />
more important case to be considered is effective range - the range at which you are likely to hit a<br />
significant proportion of your shots. Ions, despite having a shorter range than Novas, have a much<br />
higher effective range. Effective range is important in both duels and group fights, but increases in<br />
import in group fights - again for friend covering purposes - it's not hard to close the range in a duel<br />
situation.<br />
Damage Per Second (DPS): Fairly self explanatory - the damage a weapon does per second.<br />
Efficiency: Damage/Energy Used. Efficiency is not of import for a ship with lots of power. For<br />
underpowered ships, better efficiency gives a higher top speed at which your weapons give full<br />
damage. This gives better chase potential, and also leaves you less of a sitting duck when you're<br />
firing. You're more likely to be concerned with DPS than efficiency in a duel, but efficiency is important<br />
in group fights.<br />
Rate of Fire (ROF): Rate of fire is of great importance, for two reasons. Firstly, weapons with a low<br />
ROF are in general easier to aim for most pilots than fast ROF ones (you get time to aim between<br />
volleys), and secondly because a low ROF increases damage<br />
Z-7<br />
107
Realspace Combat - Choosing a Ship<br />
As of the recent ship modifications by each of the factions, there are massive varieties of ships that are<br />
viable in realspace. Which one you choose depends upon the way you fly, and what skills you want to<br />
learn. In general, for pure effectiveness, you obviously want to pick the ships that match your skill set.<br />
For pilots with relatively poor aim and good evasives/combat mentality, pick light ships (LFs, MFs).<br />
Good all-rounders will probably prefer Fs or MFs. For the hit-em-hard people, who aren't necessarily<br />
the best tactical thinkers/evaders, you will do best in Fs, HFs, or bombers, which maximise the<br />
effectiveness of your aiming skill.<br />
For the purposes of self education on how to PvP, I would recommend:<br />
Quants: Typhoon. The best educational ship in the game. Hell on beginners, deadly in the hands of an<br />
expert. It's unforgiving, but it teaches you all the right moves.<br />
Octs: Chiroptean. The Nix/Dragon encourage a few too many bad habits, and the raven underemphasises<br />
aim. It flies like a mini-phoon, but it is a little more forgiving.<br />
Sols: Interceptor, Intensity. I'd recommend a mix of these two ships. The ceptor under-emphasises the<br />
importance of aim, but the tensy can encourage a few bad habits (the so-called "spam and flee").<br />
Realspace Combat - Situational Awareness<br />
One of the most important abilities in RS combat is situational awareness. This involves keeping as<br />
accurate a picture of where enemies are, where friends are, where objects are, and how the battle is<br />
progressing in your head. You should always have time to think during a battle - as more skills become<br />
automatic, you will probably find that your situational awareness picks up.<br />
Radar: The ability to read the radar and track enemies on it, and their position relative to you and your<br />
friends is very useful. I'd suggest cycling your radar down to something below 10k, to make it easier to<br />
read. If you're a fleet leader you may well wish to keep the range up to retain a better overall picture of<br />
the battle.<br />
Target Cycling: Whenever you get the chance, cycle targets. Take a look and see if you're a long way<br />
from the rest of the fleet, see if any enemies are pointing right towards you (indicating that they may be<br />
coming for you). See if there are any good targets around. I tend to cycle targets whenever I am<br />
chasing someone that I am not in range of, when I'm out of range while going evasive, and often when<br />
I am shooting at something large that isn't shooting back (top side of a phoon, for example).<br />
Targeting: Many factors control targets that you select (in no particular order).<br />
• Proximity: You will reach a closer target faster, and hence be causing damage quicker and<br />
reducing 'useless' flight time.<br />
• Damage: Already damaged targets are more likely to already be down on flashfires, and are<br />
closer to death - increasing the chance that you will down them before they make it away.<br />
• Friends: Your target may be causing your friends trouble. If you pull an enemy off a friendly<br />
pilot, you obviously help your fleet. Best targets are often those that are busy engaging one of<br />
your friends - particularly if your friend is firing back. When you shoot at them, not only will you<br />
be helping your friend take less damage, but the enemy may not realise, at least initially, that<br />
they are taking damage from multiple sources - and will probably take significant damage<br />
before running.<br />
• Enemy ship type: You will want to engage, in general, ships that are capable of dealing a lot<br />
of damage before others. This is not a hard and fast rule - because the Dragon, for example,<br />
is so poor at chasing and has such high DA that it is often not the best first target.<br />
Z-8<br />
108
• Enemy pilot type: Some pilots are easier to down than others, some pilots are more<br />
dangerous than others. Generally, I try to force the really good pilots into running a bit first,<br />
then hit the pilots that are good offensively but die easily, then the all-round poor pilots while<br />
keeping the really good pilots at bay, then concentrate on the remaining pilots who are good<br />
defensively, and the good all rounders. This is discussed a little further in the 'Mentality'<br />
section.<br />
• Are they targeting me?: If an enemy is not targeting you, you can often do a very large<br />
amount of shield damaged before they turn round and start shooting back. The initiative in a<br />
fight is one of the most valuable properties of fast ships.<br />
Tracking Flashfire use: Try to track how many FFs each enemy has used. While you can't notice<br />
them all on your own, make it a general policy, where it won't interfere with other voice comms traffic,<br />
to say when a pilot uses a flashfire.<br />
Target Under Reticule: This is a very useful radar feature. If you see pink trails following other engine<br />
trails, use the target under reticule function to see who the FFing pilot is, and who they are chasing. If<br />
one of your friends is under attack by an FFing pilot, let them know - it could save them. This button is<br />
useful for a multitude of other things, so keep it handy.<br />
Nearest target: I frequently hit this button to get a good idea of what is near me.<br />
Last Aggressor: I also frequently use this button to track the motions of those particularly interested in<br />
killing me.<br />
Z-9<br />
109
Realspace Combat - Mentality<br />
The mentality with which you approach PvP is very important to your success. Firstly, try to fly for your<br />
fleet, not just yourself. Secondly, the level of aggression you fight with is crucial. There are multiple<br />
types of pilots, and I try to detail them below.<br />
1. The hideously over aggressive. Pilots such as these are likely to go for the first enemy pilot<br />
they find, and flashfire until that pilot is dead. They won't care that much if they are getting<br />
badly hurt while doing it. Unlikely to disengage from their target. This type of pilot will often<br />
take one down with them, but are of little help to a fleet due to the rate at which they die.<br />
2. The slightly over-aggressive. This type of pilot generally makes sensible decisions, but when<br />
engaged in a 1v1 situation in a large RS battle will often stay in that situation well after it's<br />
become clear that they are not going to win, or will die shortly after winning.<br />
3. 'Just Right'. Generally makes good targeting decisions, and knows when to disengage and reengage.<br />
4. The mildly cowardly. Generally a decent all-round pilot, but likely to disengage from battle for<br />
longer than necessary when hurt (For example, will wait for shields to get to 50% or more<br />
before recommitting to the fight).<br />
5. The hideously cowardly. Travels behind the main body of the fleet. Runs as soon as they get<br />
hurt. Even more useless than type 1 pilots.<br />
As this list implies, type 3 is generally the place to be. Type 1 pilots will sometimes pull their weight,<br />
but don't count on them to be alive to cover your back. They will also have big problems fighting highfirepower<br />
ships such as Dragons - they just don't get that you can't go head to head with them. Types<br />
2-4 will usually be useful fighters, and you might as well tell type 5s to go away - they're only interested<br />
in their kill ratio.<br />
Don't over commit when engaged with an enemy. If it looks like you're going to get too badly damaged,<br />
you can always go evasive; you're pulling at least one pilot out of the fight when they follow you. In<br />
addition, they're distracted, and often a good target for the rest of your fleet. Equally, don't run at the<br />
first sign of a little trouble - try to stay in the overall fight, but don't get too bogged down in individual<br />
engagements. Try to avoid death, but don't be so concerned about it that you won't take a risk to help<br />
your friends - don't throw your life away for the chance of a kill, risk your life on the chance of getting<br />
multiple people killed.<br />
Kill Stealing: This one deserves its own little sub-topic. In general, don't be worried about kill stealing<br />
unless you are actually only engaging with the intent of getting the kill shot. Don't factor the possibility<br />
of you personally getting the kill shot into whether you target someone or not. If you happen to get the<br />
kill shot on a target you selected for legitimate reasons, there's no reason to feel guilty.<br />
Z-10<br />
110
Realspace Combat - Evasives/Under Fire<br />
NB, when I refer to slow ships I generally mean slow and non-agile.<br />
Fast-ish Ships: If I get hit, the first thing I do is hit last aggressor, and whack on the AB. I then assess<br />
the threat the target presents. If I am 1.6k away from a laser ship and travelling perpendicular to it (use<br />
the vector indicator in the yellow circle below your aiming reticule, as well as the speed at which you<br />
are escaping), I can comfortably presume that I will be out of the way soon enough - I just juke a bit,<br />
and get out of range.<br />
If the enemy is flashfiring on me, or is on the same vector as me and in reasonable range, the best<br />
thing to do is generally to turn and head back towards the enemy ship. The most effective way to<br />
ensure that you will escape from its weapons range is to fly right through the ship. This is inadvisable<br />
from the point of view that you will present them with an easy target, and possibly get divebombed, so<br />
fly towards them at an angle. This should get you out of range - although if they persistently flashfire<br />
after you may be forced to FF yourself. In this case, turn towards them before flashfiring, as you will<br />
gain a lot of ground on them.<br />
While evading, always add a little juking, barrel rolling, or anything a bit unpredictable that you can<br />
think of. It will give your target a much harder time hitting you. It's up to you at what shield point you<br />
will flashfire at. In a fast ship I will try to make sure to waste at the very least one of my enemy's<br />
flashfires before doing so myself. I'll generally not hit the FF before about 20 shield, unless the ship<br />
following me has extremely high damage weapons and I don't think I can evade it.<br />
Slow-ish Ships: Slower ships obviously have fewer evasive options than the fast ones. One of the<br />
biggest factors is that you are usually engaged by other ships, rather than the other way around. This<br />
isn't too bad a problem in most cases, but when you are engaged by a faster ship with significant<br />
firepower (Typhoon, Monsoon, etc.), they have the initiative (the time you spend reacting and turning<br />
to engage), and the ability to hit you hard. For this reason, I am generally freer with my FFs in a slow<br />
ship - if I get hit by a ship with significant firepower I will often FF out, and use the rest of the FF to<br />
come back in and engage. This will often save 50 shields or more, and can be very much worth it.<br />
Last Aggressor/Nearest Target: While going evasive, make extensive use of these features. It will let<br />
you keep track of what the pilot who attacked you is doing, and also possibly if he has any friends with<br />
him.<br />
Evasive Mentality: Don't be afraid to go full evasive if you have lots of enemies on you. If you pull<br />
three enemies away from the biggest action, you're giving your fleet a big numbers advantage - they<br />
only lose one, your enemies lose 3. Equally, don't get too far away - if you get into real trouble you're<br />
going to need help to be close by.<br />
Secondly, if you're going evasive on just one or two people, and they aren't being too aggressive, try to<br />
shoot at people in passing. The distraction is a bonus to your fleet, and you may end up with an even<br />
bigger trail of enemies following you.<br />
Profile: Be very aware of your profile, and how you are presenting it to your enemies. For example,<br />
when in a Typhoon (or to some extent the Chiroptean) you want to show the huge topside as little as<br />
possible, as you become very vulnerable to being hit. Try to keep thin edges pointing toward your<br />
enemies at all times.<br />
To stay ahead of an enemy, even if it's slightly faster than you, fly in arcs. If they start predicting your<br />
arc, switch to a different direction arc and you will make up even more ground.<br />
Z-11<br />
111
Realspace Combat - Flashfire Conservation<br />
This topic is extremely important. It is critical that wherever possible you conserve your flashfires. This<br />
means that, particularly in the early stages of a battle, you should not be using your FFs to run people<br />
in down unless you are 100% positive you can do it in a single FF. When attacked, consider if you can<br />
go evasive to the extent that you will escape without taking armour damage - if so, try not to use your<br />
flashfires. Save them for when you _really_ need them - to stop yourself or your friends from dying. If<br />
your evasives and mentality are good, you shouldn't find conserving flashfires too much of a problem.<br />
If you have flashes left at the very end of a battle, you can always use them to finish off the remaining<br />
enemies.<br />
Realspace Combat - Know Your Enemy<br />
Keep track of how your enemies behave towards you and others over the course of many fights. If you<br />
know that a particular enemy is very prone to try and kill you, be on the watch for them. If you know<br />
that an enemy has good aim but poor evasives, take them down early. Try to remember how your<br />
enemies fly - it can be used very much to your advantage.<br />
Z-12<br />
112
Realspace Combat - Other Tricks<br />
Veteran pilots will have a whole host of tricks which they can use to gain an advantage. The files below<br />
describe just a few of them.<br />
Realspace Combat - Other Tricks - No Duelist<br />
Running no duelist usually takes an extreme amount of practise, but it can often be worth it if you are a<br />
highly targeted pilot. Aside from those very few who can aim as well without as they can with, I<br />
wouldn't recommend this for the average pilot. If you wish to use no duelist, this is what I've picked up<br />
from the experts to help you practise.<br />
Do: Practise forever in the sim. Get involved in sim wars when you can to practise off-angle shots. If<br />
you really want to do it, expect many hours simming.<br />
Don't: Expect to aim quite as well as you will with duelist. It may well never happen. You just have to<br />
judge whether it's worth it.<br />
Don't: Rely on jousting/mini jousts. Most of the no duelist pilots I've seen try to go for circle breaks, to<br />
minimise the vector. This is really, really dangerous in any ship with a large missile hitbox. Practise to<br />
the point that you can hit on large deflection angles - in realspace fights you will have to do this<br />
anyway. If you can't there's no point going no duelist.<br />
Don't: FF-[bleep] when simming no duelist. If you do, you're only providing a crutch for yourself that<br />
you won't perform as well in RS.<br />
Realspace Combat - Other Tricks - Quick Docking<br />
An invaluable skill. The quick dock is performed by flashfiring in, and usually involves stopping as<br />
close to the docking tube as possible (the closer you get, the harder it is to perform), and a quick burst<br />
of speed to perform the dock. I'd suggest this as useful to any combat pilot who likes to fight the gank.<br />
It takes a lot of boring practise, but it's worth it. Particularly with TRI's new POS initiative, it's hard to<br />
under-emphasise the importance of this skill.<br />
Realspace Combat - Other Tricks - Dive Bombing<br />
The ability to hit other pilots with nukes or torps. Not a skill I've ever mastered, so I'm not really in a<br />
position to teach, but it is clearly useful to those who know it. The basic technique is: Line up the<br />
enemy extremely carefully. Turn towards them, and fly straight for them. Release the torps or nukes at<br />
(your speed + enemy speed + (200 to 500) range. If you release before that, they will evade them, if<br />
you release after they will not arm and do only kinetic damage (missiles have a 1 second arming<br />
period).<br />
Other techniques include nuke 'mining'. If you're running gate to gate from someone, target the gate<br />
you're heading to. Preferably as the enemy flashfires towards your ship, release the nuke. It will, due<br />
to its lack of thrust, slowly fall behind your ship. If the ship behind you is not paying attention (they get<br />
no missile warning), they will get hit and blow up in a very pretty fashion. Even if they are paying<br />
attention, they have to juke to avoid the missile - which may give you just the edge you need to<br />
escape.<br />
Z-13<br />
113
CONFLUX<br />
New Dawn’s Definitive Guide to the pink menace.<br />
114
Introduction<br />
This is an excerpt from the New Dawn Guide to Hunting Conflux which has only recently been declassified due to the alarming<br />
number of nugget pilots who are being sent home in pods. Equally disturbing are reports of pilots in light fighters and even<br />
medium fighters who are unable to successfully eliminate a c6 manta and its snail escorts without the use of missiles. TRI has<br />
posted some limited information in the JOSSH Database about the history and nature of our conflict with the Conflux. That's a<br />
good starting point, but does too little to prepare pilots for the inevitable conflict ahead.<br />
This report is divided into sections, each of which build upon the last and should be read in order:<br />
Conflux General Information<br />
Tourism Kills: Leaving a Sector<br />
Ammo vs. Lasers: The Duelist<br />
Squid<br />
Snails<br />
c6 Manta<br />
c7 Manta<br />
Kraken<br />
Eels<br />
Phocaena<br />
Multiple Targets<br />
Sentient Conflux<br />
Infestations<br />
Jellyfish<br />
The Weapons of War - a discussion about gun preference<br />
Octopus<br />
Krill<br />
Shrimp<br />
Stingray<br />
Shark<br />
Advantage/Disadvantage Definitions<br />
New Dawn is the premier Conflux hunting squad in The Reconstruction Initiative. We monitor F5:flux and other major channels<br />
for reports of Conflux activity. If you need a sector cleared of conflux and we have a pilot in the area, we will always do our best to<br />
come to the aid of all TRI pilots free of charge. When you're ready to leave the rat race of rip/ripped/reequip, look us up.<br />
New Dawn: all flux, all the time.<br />
F-1<br />
Copyright © by Conflux War Command Center All Right Reserved.<br />
115
Ramblings<br />
Let me tell you. It gets hot in a stock 'Nix. Those who've flown one - you know what<br />
I mean. On a long flight, the extra 500 creds for the climate control addon and a<br />
few minor additions? Well worth it. Coming up in the ranks you get a crap pod, too.<br />
It sucks. Add in the stereo, the custom heads up display, the plush seat, the comm<br />
upgrades, the squadron comp interfaces, the library system, the integrated combat<br />
control system, and personally, I install the Tracker system on my tow. All kinds of<br />
goodies. But, youngster, you have to realize. You *can* just buy one pod. You can.<br />
Just trade it between ships. But what do you get when you do that, if you switch<br />
ships a lot? A lot of useless crap in each ship. I went artifact hunting for a<br />
while. Made a cool chunk of change. Helped finance the squad Command and Control<br />
Center. Cool hardware there. Ties everything together nicely. But the other thing I<br />
did; I outfitted 12 pods. No joke, kids. When you go out, who knows what you'll be<br />
flying - or where you just came from, right? I log the occasional /home at a faction<br />
station. I have to switch ships sometimes. So if I come in hot and need to swap out<br />
fast, I got the custom pod waiting, right? Right. Costs me extra to store em, but<br />
hey, if you got money, may as well use em, eh? 3 versions.<br />
The big ugly monster pod in my Phoenix, well, he's a brute. He pisses me off. Why do<br />
I anthropomorphize my pods? Some people would chalk it up to superstition, or pilot<br />
tradition, or something of that caliber. Me? Umm, yeah. Well, see, there's this<br />
thing. A while back I went on an ill-advised jaunt to unknown space, because I<br />
thought I was hot stuff. Well, for my trouble, I got beat up on and got my head<br />
caved in by some big ugly flux. Killed the pinkos. A lot of them actually. It's<br />
like, my job, y'know? But they got me good. Well, my friend, at least I think she's<br />
a friend; Aelagi. She wrote a lil tale about my outing, called "Ellipse". She has a<br />
pretty turn of phrase, I think. Almost as prosaic as I am, prolly - but anyway. She<br />
tells all about it. I'm rambling again, aren't I? Squaddies still swear I'm touched<br />
in the head. But they're not far from the truth, really. I have a small computer in<br />
my head. A cyborg interface. By Amananth standards, it's not too fancy. Doesn't give<br />
me an "edge" or anything. Well, maybe a little. Sim with me one time and see... but<br />
anyway. I hate rambling. Drives me crazy. But as my mom used to say... It's isn't<br />
that long of a drive, is it? Bah. Regardless. It did weird things to my ship<br />
computers. I have these tiny silicon transfer points in my fingertips that let me<br />
"talk" directly to the ship's computer. I ... umm ... "developed" the ability to do<br />
it without touching, now, too. How? Damned if I know. I don't really want to know.<br />
It's weird. You know how some people talk about voices in their head? Heh. I can<br />
tell you some whoppers, my man. TALL tales. Except, well, they aren't. Kinda sucks.<br />
Anyhoo. Again. I *do* ramble, don't I? Chalk it up to one too many pod rides and<br />
shaddup, k? Aight, thanks. SO. When I "talk" to these computers. It started going<br />
both ways. They picked up on things. Parts of my personality. You ever talked to<br />
yourself? There's some things about yourself that just tick you off occasionally,<br />
right? Heh, well, umm. All 3 piss me off. Badly. Take Galileo, for example. He's my<br />
brutish, slightly snobby, can do no wrong Fighter computer. He's a pain in my ass.<br />
Sounds kinda like me when I get cocky, actually. I HATE cocky people. I don't like<br />
the damn mirror at times, by the way. But yeah, moving on. He's good, though. He<br />
anticipates things - he learns. Ever wish you had a co-pilot? It's cool. Except when<br />
he pisses me off and tells me what to do - as I'm doing it. Snobby bast...<br />
nevermind. You get the picture. Aristotle! Oh my lord what a bookworm. Smart as a<br />
whip, too. Except he's *always* got to right, damn him. I hate the mirror. God I<br />
hate the mirror. He mostly get's used for arty hunting, which is beneath his oh so<br />
high and elevated station and... sorry. It makes him mad. Poor baby. It's one way to<br />
stave off the boredom though. Every so often I take him out for a spin and play with<br />
phocs, though. That's fun. Fast lil bugger, I'll give him that. Heh, Harvey. I swear<br />
to you, I do *not* pick their names. I would never be a "Harvey". Oh Lord. But god<br />
help me, I like the bastard. He's a cursing, loudmouthed curmudgeon who's stingy as<br />
hell. But I love him. He likes arty hunting too. Screw you Aristole! Ha. Sorry. I<br />
F-2<br />
Copyright © by Conflux War Command Center All Right Reserved.<br />
116
almost like him. Until he acts like a stingy Sol with only 50 credits to rub<br />
together. Jerk. So! Welcome to my lovely digital family. Heh. Yay.<br />
So, basically, I have a top-of the line AI in every ship I fly, with a central<br />
database that updates every version to each other every 30 seconds. Cool stuff. I<br />
never get hacked either. HA! A shot in the arm for security. What are the odds of<br />
getting hacked with 12 advanced AI's and an artifact Amananth contruct riding herd<br />
on my system defense? Not bloody likely, says I. God, I need to stop rambling. You<br />
try writing with people talking to you inside your head. Bloody distracting. I get a<br />
real-time spell-checker for my trouble though. Bloody whoopee. I think I'm rambling<br />
again. I suspect by this point, I'm doing it solely to piss off Aristotle, too. So<br />
humor me? He's funny when he gets upset. He splutters. I'm sure you have never heard<br />
an AI splutter - but trust me - it's hilarious.<br />
So. Here I am, trying to ride herd on a 3 toed monkey of a programmer that's<br />
updating the command center, right? I get that straightened out. I tell him - "you<br />
need to pull the data from *this* database, not the bloody personnel files. Not<br />
everyone wants to read bogomips' duty log, k? We all know she can kill hordes of<br />
flux with two hands tied behind her back, and that the triple phocs are just, oh, so<br />
boring, anymore. That's nice. But you know what, Mr. 3 toed monkey programmer? That<br />
does *not* go on the front page of the feed. Know what I mean?" Programmers. Can't<br />
do a damn thing with them. So, that emergency taken care of, I go back to work on<br />
paperwork. Tons of paperwork. I need a clone, Jeeves. Send him right over, and be a<br />
good chap, what? I wish. Paperwork. I have to fly, too. Cool beans. So, having<br />
shrunk the Cinatai mountain peak of paperwork down to mere hillock size, I go over<br />
my personal nest egg. Investments, supplies, procurement, systems functionality<br />
checks, financial briefs. The works. Ah, the wonders of joining the "high-speed"<br />
world of interstellar commerce. I own a Solrain shipping firm supplying the stations<br />
- not one of the big jobbies - just a small independent outfit that was looking for<br />
an out-faction backer. Seems they ran into some problems with overhead and the<br />
vaunted Solrain beauracracy was about to dump them on their ear. I bailed them out,<br />
and they get to wave the flag of "neutral, un-aligned shipping". I make bloody well<br />
sure they *stay* neutral, too. Factionalism is a headache I have no desire to tangle<br />
with. Patriotic? Sure. Blindly serving your fction's interests at the expense of the<br />
Reconstrruction? Nah. Don't get me wrong. I have nothing against Factionalism. But<br />
to each his own. There's plenty of em going around. Somebody has to be bloody<br />
neutral, or inter-factional commerce would grind to a halt, eventually. Your eyes<br />
are glazing over, Ensign. Ah, an Oct. Good man. Carry on.<br />
Where was I? Oh yes. Finances taken care of. Now for a little personal time. Tend to<br />
my artifact hoard, sell the pieces I'm not intending on using. Assemble the pieces I<br />
need for a truly badass ship. All I'm missing is an AB-4, now. Eh, it'll come.<br />
That's a side business, if a lucrative one. I'm not flashy. I don't hang out my<br />
shingle. Not a bit. I get everything I want - and sell whatever's left over. Or I<br />
buy cheap, sell high. Whatever. I made enough to get comfortable on. That's about<br />
it. The rest is going towards my next project. A station. An eight-module hummer.<br />
Want to hear about it? Too bad. Cause I don't know a damn thing about the buggers<br />
yet. I know what everyone else knows - except the people that field tested em.<br />
Bastards. Oh well. Bugger em. I'll get mine too. I'm just tired of living on the<br />
fly. GBS is as close to a home as I have. Even that isn't the same though. I'm<br />
stealing my flight crew from there, though. Bwahahaha. I might hire away that junior<br />
dispatcher, too. He's got a good handle on traffic, from what I've seen. He bought<br />
me a drink after the Battle of GBS, too. Good guy. Night bartender might move, also.<br />
We are seriously going to rape GBS of staff. Oh well. Let ISU hire some new ones.<br />
They've about taken over the bloody place by now anyway. Our whole old guard will<br />
ship over to our POS network when it comes online. Hope ISU realizes that, and is<br />
starting to look for new hires. Hell, I might help em. I still want to stop by the<br />
old stomping ground occasionally.<br />
So, now that I've introduced myself, and gave you a little taste of the life. Well,<br />
my life isn't exactly the "standard". I'll tell you that up front. I'm ummm...<br />
flamboyant? But hey, welcome to the life of your eccentric Air Group Commander - in<br />
our parlance? The CAG. That rambling introduction was a bit of briefing, a bit of<br />
F-3<br />
Copyright © by Conflux War Command Center All Right Reserved.<br />
117
humorous background. I'll try not to go off on so many tangents from here on in. Let<br />
me strtaighten up and become an officer. Welcome to New Dawn, ladies and gents. The<br />
biggest, boldest, and brightest squadron in TRI. We fight Conflux, my friends. You<br />
know that. Some of you have done it already, and I sincerely hope you'll keep on<br />
doing it. Because you are now on the front lines of the most important war<br />
humanity's fought. We've made contact with two non-human races - the first was the<br />
Amananthii. Some will tell you they're not to be trusted. In this squadron, I'm here<br />
to tell you - Amananth and New Dawn have quite a history now. Probably more history<br />
with us then any other squadron in existence. We were *there* at the first Sentient<br />
incursion in Amananth space, and we've been at more than we can count, now. Dr.<br />
Qson? The one you see in the news every other week? That's our closest friend in<br />
TRI. No joke, no lie. She's an honorary member of this squadron, ,we protect her<br />
like she's one of our own, and she's the best ally to have. She hunts Conflux with<br />
us, for us, and we return the favor. It's what we do.<br />
A short history lesson. We started out out in a group called TRA. The Ripstar<br />
Alliance. We started as a pro-Octavian Squad, but eventually became embroiled in the<br />
great Civil war with Cruentius Legio and OEC. Bitter times, massive battles, and we<br />
were decidedly aggressive then. If someone calls you a "carebear" because you fly<br />
with New Dawn? Laugh. That's all. Laugh. We're fighter pilots. We just fight a<br />
different war now. The most important one. Remember that. Always remember that. We<br />
may tow, we may mine, we may hunt artifacts. But we're fighter pilots. We're not the<br />
bloody military. We're better. But I digress. Yeah yeah, I know. I said I wasn't<br />
going to. Oh well. So back to the reason I told you this. Sometimes we may have to<br />
fight to preserve our battle lines. The occasional ne'erdowell, pirate, rogue,<br />
thrill seeker... we get all kinds. Don't be surprised when we do. Every so often we<br />
have to rattle the saber when someone decides to force our hand. Yeah, it sucks. But<br />
you gotta protect your squadmates.<br />
So what do all of our ranks mean? Well, there's a brief outline of them in the Rank<br />
Matrix. The link is on the forums, (and on the squad page....) if you're curious.<br />
Here's the "unofficial" version. Falcon is "The Boss". He started this thing, and<br />
he's been around forever. Honestly? I joined New Dawn shortly after TRA broke up and<br />
Falcon decided to make New Dawn an "all-flux" squad. I've never been anything but a<br />
fluxer. I think I'm #2 on the seniority list, closely followed by ZeroZ95. Havik,<br />
AvengeND, Vengy, and Darkcloud get runners up. (There's more to the origins of New<br />
Dawn itself - we were around before TRI - but that's another story - and a bit long<br />
to tell here. But as far as actual time of service in ND, overall, James, Falcon,<br />
and Vengy were there at the beginning, and I was not too far after - Havik was a few<br />
months behind me. So in case you were wondering, there ya go. I'll tell that story<br />
later.) I'm digressing again. Neato. The CAG stands for Commander, Air Group, like I<br />
said above. In TRI, there's nothing but air, so that implies that we have other<br />
interests - frankly? TRI has nothing to do with that, so we'll leave that out. (I'll<br />
tell that in the other story, too.) It's an old rank - Falcon used to have that<br />
rank, actually. New Dawn's original founder's name is DeathGiver. He was the first<br />
Commander, I was the second, but I never felt quite comfortable outranking Falcon.<br />
He deserves the job. So, he is New Dawn's 3rd Commander. At present, I'm loosely the<br />
"2nd in command". In TRI terms, that means not a thing. I actually recently resigned<br />
my "Fleet Command" spot to actually do my job I've been neglecting. But I'll leave<br />
that for storytime #2 as well. Fleet Command. That is a TRI specific ranking, and as<br />
TRI is the only portion of space we are currently active in, officially, they're the<br />
head honchos. Their word is law, ladies and gents. They make policy, break it,<br />
adjust it, and give the orders. They're there to keep New Dawn running smoothly, and<br />
within it's charter as the premier Conflux fighting force in TRI space. Falcon's<br />
orders are on top, then Fleet Command. Your Fleet Commanders are ZeroZ95, Havik, and<br />
Kelvar.<br />
Next up are the =Huntmasters=. We haven't gone on a proper hunt in a while. Way back<br />
when, we'd get in large groups and hunt as a team. With a quick nod to our<br />
appreciably improved skills and reputation from those times, we seldom find a need<br />
for such an endeavor. Your Huntmasters serve several roles, though. Firstly - They<br />
are all good trainers. They can teach anyone to hunt anything. They know all the<br />
"tricks of the trade" backwards and forwards. They can lead one of the<br />
aforementioned hunts smoothly, and with extreme predjudice. Secondly - They are also<br />
F-4<br />
Copyright © by Conflux War Command Center All Right Reserved.<br />
118
officers. In the absence of Fleet Commanders, they are the ranking officer when on<br />
duty. They know what they're doing, so if they tell you something, likely they havea<br />
good reason for it, y'know? Thirdly - They are diplomats. They have the authority to<br />
speak for New Dawn in regards to NAPs, Problems that occur with other pilots,<br />
misunderstandings, and the like. We appreciate their help - a lot. Fourthly - they<br />
are much like our Colonels, in wartime. We're quite a large group sometimes, and<br />
Generals/Admirals (Fleet Commanders) need to delegate things to people with proven<br />
track records of getting things done. They have lots of experience, and have been<br />
with New Dawn quite a while.<br />
Now for =Specialists=. A relatively new rank. If you're familiar with Warrant<br />
Officers, you know that they aren't *quite* officers, but not enlisted, either.<br />
They're our core of "go-to" guys. Special Forces, in a way. They're good hunters,<br />
quick thinkers, and good at finding solutions to tricky situations. When we need a<br />
name off the top of our heads to do something important, that's who we call first,<br />
usually. It's still largely a definition in progress at this point. Partially a<br />
reward for dedicated service, and partially to give us a pool of seasoned vets to<br />
pull from in time-critical situations. They may be in charge of you for certain<br />
operations, usually on a temporary basis.<br />
If you notice on the forums, you're ranked as Hunters and Jr. Hunters. Those our our<br />
equivalent of enlisted ranks. Flux Assassins can kill anything. They're experts at<br />
what we do best. If you get that rank, you deserve it, and we're proud of you. We<br />
rank you based upon your skill at killing Flux. Anything above Flux Assassin means<br />
extra duties and responsibilites to and for the squad. Master Hunters can kill<br />
anything pink in thesingle digits. They're good, but still working at joining the<br />
Elite. They'll get there. Practice makes perfect. Hunters are our Journeyman pilots.<br />
They got their wings by killing their first manta, but they're not up to Kraken yet.<br />
Keep workin. You're gettin close. Junior Hunters are learning the trade. They can<br />
kill the scout-caliber flux, and might be able to take the bombers too. They usually<br />
get mad at c6's right about now.... heh. Shortly thereafter, the uncomfortable pod<br />
ride gives them the incentive to learn to kill them. Did for me! Well, I had other<br />
reasons, too. But yeah, anyway. I hate mantas.<br />
F-5<br />
Copyright © by Conflux War Command Center All Right Reserved.<br />
119
General Information<br />
Flux seem to spontaneously appear in certain sectors of the galaxy whenever the jumpgates are used. Newly spawned flux target<br />
the pilot using the jumpgate to enter the sector.* Flux do not always spawn, though. The number of conflux, their size, and the<br />
frequency they spawn seems to depend on the individual sector and the size of ship using the jumpgate (higher level pilots spawn<br />
more and larger flux usually). If you are wondering where Conflux of certain sizes can potentially spawn, check our Conflux Spawn<br />
Maps.<br />
Strangely, on the same day TRI found the new storage depots (and most other game server reboots since), c7-c10 conflux began to<br />
spawn in both Inner and Outer Gyre, and we began to see c7-c10 in combinations with c1-c6 conflux much more often than<br />
previously. One veteran pilot reported spawning only c4, c4, c3 in Four Fingers. However, after about a few hours, spawns<br />
returned to normal.<br />
Also, on the same day the new jumpgates to the Conflux Galaxy appeared, the maximum spawn of Conflux in current sectors<br />
increased from 3 to 5; the maximum spawn type of a few sectors was increased; the minimum spawn type was decreased on some<br />
sectors; the likelihood of any Conflux spawning increased; Conflux seem to now occasionally spawn without jumpgate activation;<br />
and several new Conflux varieties were discovered both in our own space and in the Conflux Galaxy. This truely is a new Attack of<br />
the Conflux.<br />
Once a sector is cleared, if another pilot jumps into the sector (or the same pilot jumps out and back in, a procedure known as<br />
"flipping the gate"), new flux may spawn. We do not know what method of transportation conflux use to get to a sector, however<br />
once in a sector, they seem to travel in real space in a manner and at speeds similar to our own ships. They do not use jumpgates,<br />
so when attempting to fight conflux, the newer pilots should remain close to a gate for a quick escape if needed.<br />
One important factor to remember when fighting conflux is that they all stop firing and turn (or "slide") when you score hits on<br />
them. This keeps them from scoring hits on you. It may sound overly simplistic, "shoot them and don't let them shoot you back,"<br />
but your accuracy really is the key to quick victorious battles. Turreting a little to follow them when they turn (only slightly if<br />
jousting) will often let you score more hits per pass.<br />
Every pilot should be mindful of their current cargo when considering whether to engage conflux or not. Few things are harder<br />
than trying to fight when heavy, and few things are more frustrating than dying with expensive cargo in the hold.<br />
*The pilot who the flux are shooting at (or will if they are targeted on and heading toward) has dibs on the kill. It is always amusing<br />
to have another pilot "call" a conflux immediately after jumping in sector even though another pilot has already engaged it in battle.<br />
"Called" flux do not exist. If it is or will be shooting at you, it is yours; if it is not, ask before you pounce. One easy way to<br />
determine if a flux is "on you" or not is to roll. Flux will always roll to remain "level" with the ship they have targeted.<br />
Tourism Kills: Leaving a Sector<br />
"I wonder what is in this sector? Just a peek won't hurt." Tourism kills too many good pilots.<br />
If a pilot leaves a sector with conflux targeting him, those flux will usually target the next closest pilot. On rare occasions, they will<br />
vanish unexplainably. Should you ever be forced to retreat from a battle, it is customary to warn every pilot in the sector via comm<br />
channel F3 that they may have incoming flux. This is especially important if you are traveling in a sector known to spawn c7 or<br />
greater as you spawning then leaving may very well kill a pilot hunting in sector who may not even be on your radar. Your flux<br />
could catch him off guard if he is busy with another flux.<br />
Do not enter any sector if you are unable to kill or tow (run from flux without leaving the sector) anything you spawn for a<br />
reasonable amount of time, and always F3 the sector if leaving your flux behind. Many pilots program a simple F3 macro of<br />
"dumping flux" to make it easier.<br />
Ammo vs Lasers: The Duelist<br />
"The skill of the pilot pulling the trigger is more important than their weapon load out." That said, projectile guns<br />
(ammo and plasma, hereafter referred to as ammo) and laser guns behave differently and lend themselves to different fighting<br />
styles. It is generally accepted that ammo guns make killing flux (fluxing) easier, while lasers make pilot vs. pilot combat (PvPing)<br />
F-6<br />
Copyright © by Conflux War Command Center All Right Reserved.<br />
120
easier. There are quite dramatic exceptions to both of these ideas, though. It simply depends on the pilot's skill. Using targeting<br />
computers (either the TRI combo or the duelist, hereafter referred to as duelist) help both types of weapon user, but is essential for<br />
a successful ammo user.<br />
Ammo<br />
With ammo, it is easier to joust a target, using the longer range of ammo to your advantage. You joust best when you make your<br />
attack run as straight as possible and continue on past your target until they turn and follow you for a couple of seconds. This<br />
makes for a straighter return joust when you flip 180° and afterburn back toward your opponent. A pair of tools that all pilots have<br />
but not many utilize are the "Target Location Arrow" (9) and "Current Drift Vector" (10) cones on your HUD.<br />
The TLA (9) cone shaped vectoring display shows the direction your current target is facing relative to your ship. Once you joust<br />
straight past a target, you can either keep flying straight a few seconds to give the target time to straighten itself out compared to<br />
your course, or you can use this tool paired with the CDV (10) cone to help you adjust your course to help straighten out the joust<br />
plane quicker.<br />
When you turn, be sure to line up the target squarely before you accelerate, or you will have drift in your jousting run. This drift<br />
joust technique can be useful against targets that use long ranged ammo weapons. Ammo using conflux are not very accurate and a<br />
good pilot can compensate for drift while conflux cannot. Plasma and multiple ammo using conflux require drift jousting as you<br />
can easily die in a single pass if you fly right into their fire. Once your target is in line, rolling can help you avoid ammo using flux's<br />
shots depending on the shape of your ship, but this also makes scoring hits more difficult for you as well especially if you have drift<br />
in your joust run.<br />
The more a target (or you) drifts, changes speed, and changes direction, the more difficult the shot will become. The most<br />
important aspect of using the duelist is to realize that it is a tool to help you vector your shots and to remember to "shoot the<br />
manta, not the duelist." Keep your eyes on the target and where your shots are landing and shoot at the target, rather than<br />
concentrating on getting the two circles perfectly aligned. Also, make use of the tiny dot inside the duelist; if your duelist is nice<br />
and tight, put that dot right on the flux.<br />
To help keep the target lined up, roll your ship until the attack angle is flat horizontally. This makes it so that when you<br />
compensate for the duelist's error, you only have to do so along one axis (X axis for instance). Afterburning on the approaching<br />
joust will help tighten up your duelist and will help lengthen your joust after passing the target. Some ammo weapons require that<br />
you manually either lead (shoot ahead) of the duelist or trail (shoot behind) it. Knowledge and manuals such as this are a fine<br />
starting place, but experience is the best teacher: practice, practice, and more practice.<br />
Lasers<br />
Laser users do not necessarily need to use a duelist for weaker flux, but it certainly does help. A laser configuration and a duelist is<br />
the most effective choice in sentient and PvP combat.<br />
Laser users can joust, but due to their shorter range, laser jousting can be a slower method of fighting. Against weaker opponents, a<br />
laser user can come to a complete stop and simply use their ship as a gun turret. Against stronger opponents, or multiple<br />
opponents, laser users may need to circle fight, keeping moving at all times as in a dogfight or may need to charge toward the<br />
target to bring it inside laser range quicker.<br />
To set up a circle fight, do not aim right at the opponent. Put your target a few inches above/below or to the right/left of your<br />
reticle (depending if your ship pitches or yaws faster). Pulling the control stick down (toward you) seems most natural to many<br />
pilots. At around 3000m distance, pull the target back into your reticle. Throttle down as needed based on your ship's power<br />
constraints and maneuverability (ships at lower throttle pivot much quicker) but remember to keep your speed up.<br />
F-7<br />
Copyright © by Conflux War Command Center All Right Reserved.<br />
121
Specifics<br />
Weapon load outs depend on your current ship configuration, financial situation, piloting style, and personal preference, and as<br />
such will not be discussed in this report. If you want to know "What guns should I use?" then just listen in popular F5 channels as<br />
there is usually a debate fought with what must be preprogrammed ammo/laser debate macros as it rarely differs from day to day.<br />
Which ever you choose to use, read the sections that apply to the other style as well because many of the same techniques are<br />
applicable to both weapon types.<br />
Conflux Aim<br />
The first shot a Conflux take will fly straight ahead of it's path. As long as you are not in a perfect joust, it will always miss on the<br />
initial volley. For every shot following, though, most evidence indicates that the aiming ability of Conflux is best likened to a TRI<br />
pilot using a Duelist perfectly lined up.<br />
This is why laser firing Conflux always hit, why ion firing Conflux usually hit but will miss at sharp angles, and why ammo/plasma<br />
firing Conflux have a much harder time scoring hits. The Conflux do not compensate for the Duelist's error the way human pilots<br />
can. This theory also explains why the heavier, slower accelerating eel will will appear to have a "worse" aim than the lighter,<br />
quicker phoc.<br />
F-8<br />
Copyright © by Conflux War Command Center All Right Reserved.<br />
122
The Enemy!<br />
Jellyfish<br />
Jellyfish: C-0<br />
Bounty:<br />
10 for lev 6+<br />
1600 for lev 5-<br />
Experience:<br />
10 for lev 6+<br />
1000 for lev 5-<br />
Speed: 120<br />
Shield/Armor: 1000k/210k<br />
Gun #/dmg/rng: 1/180k/1000m<br />
Noob laser = 235k/1000m; Noob shield = 5400k-6000k<br />
Jellyfish are an interesting evolution in Conflux design. They give up profile, firepower, maneuverability, speed, shielding, and<br />
armor in favor of a complex sensor array.<br />
Jellyfish cannot be considered a threat to any TRI ship. Often, many pilots will leave them alive for new pilots to kill because of the<br />
experience variance.<br />
It is widely believed that TRI Research will attempt to capture a live Jellyfish in the future.<br />
Squid<br />
Squid: C-1 C-2 C-3<br />
Bounty: 1,200 1,300 1,500<br />
Experience: 300 320 350<br />
Speed: 250 287 300<br />
Shield/Armor: 4500k/220k 4500k/220k 5000k/220k<br />
Gun #/dmg/rng: 1/180k/1000m 1/240k/1000m 1/300k/1200m<br />
Noob laser = 235k/1000m; Noob shield = 5400k-6000k<br />
General<br />
The basic conflux biological probe, the c1-c3 Squid is a common sight in regulated space lanes. They usually make trouble only for<br />
junior pilots and mining vessels. Although junior pilots are adequately equipped to deal with squid, it does take some time for them<br />
to develop the skills to master squid killing. Practicing against squid in the flux sim is recommended for low level pilots.<br />
Advantages<br />
Excellent accuracy<br />
Small profile<br />
Disadvantages<br />
Weak firepower<br />
Weak shields and armor<br />
Poor acceleration and top speed<br />
Tactics<br />
The good news for shuttle pilots is squid are fairly slow, and even a shuttle with basic equipment can usually outrun a squid, if<br />
necessary. A pilot equipped with flashfire(s) (FFs) can easily disengage a squid at will, if it is necessary.<br />
When attacking a squid with lasers, it is important to remember that when you are in its weapon range, it will hit you with 100%<br />
accuracy. Don’t bother with evasive maneuvers, as it will only make it harder for you to hit the squid in retaliation. The “trick” to<br />
killing a squid is simply hitting it enough to force it to turn. (When flux are hit below about 70% shields, they will “turn” (or<br />
F-9<br />
Copyright © by Conflux War Command Center All Right Reserved.<br />
123
“slide”) meaning that they try and evade your fire by turning and applying afterburner. Although this can make them harder to hit,<br />
they also are not firing on you in the meantime.) Learning to shoot accurately and consistently is all that it takes to beat a lone<br />
squid.<br />
Attacking a squid with ammunition based weapons is easier than lasers, because ammo has far greater range than the squid’s gun.<br />
Because of this, it is possible to make the squid start to slide before it even fires a shot at you! The trick to using ammunition based<br />
weapons is jousting. This means approaching the target dead on (as seen here), and after hitting the target, continuing to fly straight<br />
for a small distance, and then turning around and repeating. This makes aiming ammo weapons easier, and lessens your time of<br />
exposure to the squid’s laser weapon.<br />
For more on how to joust, drift joust, turret, and circle fight effectively, read Ammo vs Lasers: The Duelist.<br />
Fighting multiple squid with a shuttle is possible, but considerably more difficult. See Multiple Targets for more info.<br />
Missile Usage<br />
1 Purgatory or 1 Sledge or 3 Cutlasses per squid<br />
Snails<br />
Snail: C-4 C-5<br />
Bounty: 1,250 1,500<br />
Experience: 325 360<br />
Speed: 326 350<br />
Shield/Armor: 7000k/700k 7000k/700k<br />
Gun #/dmg/rng: 3/524k/3400m 3/524k/3400m<br />
LandLord = 740k/3120m; Shelter = 6009k<br />
General<br />
The snail bomber (c4-c5), to pilots that have never fought it before, seems fearsome. It travels faster than the squid, is much larger,<br />
and appears less frequently in regulated space lanes. Despite this, most would agree that a snail is an easier target than a squid,<br />
because despite its large upgrade in firepower, the snail's aim is so poor it can hardly hit anything. Even a junior pilot fighting a<br />
snail smartly can win the day, and without taking much if any damage.<br />
Advantages<br />
Moderate firepower<br />
Moderate shield and armor<br />
Disadvantages<br />
Moderate profile<br />
Poor aim<br />
Poor acceleration<br />
Poor top speed<br />
Tactics<br />
Fighting a snail with lasers is very easy, once you get the hang of it. Never fly right at the snail (i.e. don't joust), and always keep<br />
your speed up. If you do these two things, the snail will rarely hit you. When first approaching the snail, fly at an angle to it until<br />
you are inside your weapons range. Then turn and shoot at it while keeping your throttle up (like this). As long as you keep an eye<br />
on your velocity and don't let it drop to under v75 or so, you will be fine. Don't let a snail catch you at v0. The snail can absorb a<br />
bit more punishment than the squid, but as long as it keeps sliding when you hit it, it will not be able to fire back with any<br />
effectiveness.<br />
Although it is not difficult to kill a snail with ammo, it does require a bit more caution than attacking a squid. Since a snail has<br />
comparative ammunition weapons to those available to a lower level pilot, it can rip you up as much as you rip it up if you straight<br />
joust it. Thus, you need to drift joust a snail to kill it. By drift jousting, you simply angle a small amount for a short time when<br />
making the joust attack (like this). This will throw off both your's and the snail's aim, but with practice you can compensate for<br />
that, while the snail never will. Although it is possible to circle fight a snail with ammo, it is not recommended, because many of<br />
the circle fight situations where you hit the snail will also be the same time the snail hits you.<br />
For more on how to joust, drift joust, turret, and circle fight effectively, read Ammo vs Lasers: The Duelist.<br />
Fighting multiple snails with a shuttle is possible, but more difficult. Against multiples, it is imperative to keep your speed up. See<br />
F-10<br />
Copyright © by Conflux War Command Center All Right Reserved.<br />
124
Multiple Targets for more info.<br />
Missile Usage<br />
2 Purgatorys or 4 Cutlasses per snail<br />
c6 Manta<br />
Manta: C-6 C-7<br />
Bounty: 2,500 3,000<br />
Experience: 1000 1500<br />
Speed: 450 456<br />
Shield/Armor: 7000k/1350 9000k/1700k<br />
Gun #/dmg/rng: 2/540k/2200m 2/420k/4400m<br />
Thorn = 635k/1800m; Barrak = 450k/4400m<br />
Shelter = 6009k; Canopy = 12240k<br />
General<br />
With only a few out of the way sectors as exceptions, the c6 manta is the most powerful conflux that spawns in regulated space.<br />
Usually appearing off most major trade routes, it is often the hunter that has to seek out the manta. The manta is a giant leap up in<br />
flux capabilities over c1-c5s. The manta combines the snail's heavy punch and the squid's perfect accuracy. It is rolled up into a<br />
package that has substantially more armor and cruises at a blazing fast v450.<br />
Advantages<br />
Very good top speed<br />
Excellent accuracy<br />
Moderate firepower<br />
Thin profile<br />
Moderate shields and armor<br />
Disadvantages<br />
Moderate acceleration<br />
Wide profile<br />
Tactics<br />
Shuttle pilots should not attempt to engage manta. Pilots with low level shields and low speed cannot engage a manta with any<br />
degree of safety. With flashfires, however, shuttles can usually run from gate to gate if any mantas do spawn in their path. Once a<br />
pilot acquires a light fighter, equipped with ammo weapons, he has a tool that can take on even multiple mantas, with practice.<br />
The single most important thing that a pilot has to learn when first facing a manta is that he/she must use jousting. While<br />
techniques like this were optional when dealing with squid and snails, a manta simply requires jousting to beat.<br />
Engaging a c6 with ammo is simple in principle, but harder in practice. Right out of the jumpgate, you need to head for the manta<br />
that you want to attack. As a c6 manta uses laser weapons, as long as you are in its range (2200m) it will hit you with every shot.<br />
Thus, it is not helpful to drift joust a manta or try to dodge, as it will only throw off your aim and not the manta's. Start firing at<br />
about 6000-5500m. Regardless of how well you do, continue straight on until the manta is behind you and has accelerated up to<br />
your top speed. If you hit the manta substantially, it will have slid some distance. This will put drift into your joust, but you will<br />
have more distance on it than if you missed it or only did a little damage. On the second (third, fourth, etc) joust, the initial<br />
distance will be shorter than the first joust, so using AB to boost your speed is advisable. This also has the effect of tightening the<br />
duelist for a better shot.<br />
Although engaging a c6 with lasers is possible (especially with a medium fighter or above) it is not recommended unless you<br />
already know how to handle a c6 with ammo guns. A c6 is hard enough to learn to kill with ammo, and lasers (especially with the<br />
power problems of the LF/FT) make it much harder still. However, regardless of weapons used, it is not recommended to circle<br />
fight a c6 manta until your own aim is honed. It will simply rip you to shreds unless you can force it to slide and stop shooting you.<br />
For more on how to joust, drift joust, turret, and circle fight effectively, read Ammo vs Lasers: The Duelist.<br />
Fighting multiple mantas is possible, but more difficult. See Multiple Targets for more info.<br />
F-11<br />
Copyright © by Conflux War Command Center All Right Reserved.<br />
125
Missile Usage<br />
2 Purgatory or 1 Hellrazor or 1 Morning Star per c6 manta<br />
Kraken<br />
Kraken: C-8 C-9<br />
Bounty: 5,000 6,000<br />
Experience: 2000 2500<br />
Speed: 420 436<br />
Shield/Armor: 9000k/1300k 9000k/1300k<br />
Gun #/dmg/rng: 1/780k/3000m 1/780k/3000m<br />
FeatherFire = 810k/2400m; Haven = 15400k<br />
General<br />
Kraken are the antithesis of the modestly accelerating, ammo-based c7 manta. Kraken have a single, long ranged ion gun, which,<br />
although not quite as accurate, has far greater reach than the c6's laser. Although they hurt much less than a c7 in a straight joust,<br />
they make up for it with tiny profile and extremely high acceleration. If you do not force a krak to slide, it is quite possible that it<br />
will turn around and hit you as you accelerate away from it on your joust. However, even the phoenix heavy fighter's cruise is faster<br />
than a kraken at cruise speed, so it is not difficult to outrun them once you get some distance.<br />
Advantages<br />
Very good acceleration<br />
Excellent turn rate<br />
Excellent accuracy<br />
Excellent weapon range<br />
Tiny profile<br />
Moderate shields and armor<br />
Disadvantages<br />
Moderate top speed<br />
Moderate firepower<br />
Tactics<br />
Fighting a kraken takes a similar jousting style to that of a manta, but longer jousts are recommended, to help keep the kraken<br />
going straight, making it much easier to hit. Regardless of your gun type, circle fighting a kraken is never advised. With its<br />
extremely high circle speed and tiny profile, it is very hard to score consistent hits on a circling kraken, and it is almost impossible<br />
to escape a failed circle without using flashfires or taking very heavy damage.<br />
The trick to killing kraken with ammo weapons is just scoring consistent hits on them, which is hard, because unlike other c1-c7s,<br />
when kraken evade, they really evade. They essentially turn on rails, making it far harder to score multiple hits on them than mantas<br />
or snails.<br />
When using novas (or serializers) the trick to totally destroying kraken is to wait until they are very close to you. If you wait until at<br />
least 2000-3000m to open fire, it is possible to score multiple hits on them, even when they evade, because they are so close. With<br />
novas, only a few hits are needed. It is very easy to one pass kraks this way.<br />
Although it is possible to laser kraken, it is usually a fair bit harder than using ammo, because a laser's short range and long shot<br />
delay mean that you only have a few shots to hit the kraken on your joust, so good accuracy is needed. Successfully circle fighting a<br />
kraken requires very good aim. Kraken will miss you from very long range or at a steep angle.<br />
For more on how to joust, drift joust, turret, and circle fight effectively, read Ammo vs Lasers: The Duelist.<br />
Fighting multiple kraken is possible, but more difficult. See Multiple Targets for more info.<br />
Missile Usage<br />
2 Purgatory or 1 Morning Star per kraken<br />
F-12<br />
Copyright © by Conflux War Command Center All Right Reserved.<br />
126
Eels<br />
Eel: C-10<br />
Bounty: 10,000<br />
Experience: 2500<br />
Speed: 500<br />
Shield/Armor: 21500k/21500k<br />
Gun #/dmg/rng:<br />
2/2950k/4500<br />
m<br />
NovaMkI = 2800k/2555m; Alpaa = 20400k<br />
General<br />
Eels are very different from c1-c9 conflux, in many ways. Cruising at v500, they easily exhaust a fighter's afterburner fuel while<br />
simply trying to maintain distance, and unlike other flux, they have very tough shields and armor. But the thing that truly separates<br />
Eels from any lower flux is their massive firepower. With two or three shots they can strip a fighter’s shields, and a few more will<br />
take out your hull. If you screw up with any other conflux, you can go “oh s***” and fire off a flashfire, and most of the time, you<br />
are safe. Screw up fighting an eel, and sometime between the “oh” and “s***”, you are dead. Simply put, unless you have a very<br />
twitchy FF finger, you are dead by the time you decide to use one. However, besides the eel’s ability to obliterate a ship in only a<br />
few shots, it is not that dangerous if handled carefully due to its numerous weaknesses, notably its extremely poor gun accuracy.<br />
Advantages<br />
Excellent top speed<br />
Excellent weapon range<br />
Excellent shields and armor<br />
Disadvantages<br />
Moderate acceleration<br />
Poor accuracy<br />
Large profile<br />
Tactics<br />
When first dealing with an eel, think of it as a very large, fast, and somewhat more potent snail. The same basic techniques are used<br />
for fighting eels. The only guns that can rival the range an eel’s dual plasma weapons are the hitman and barrak. So unless you have<br />
a hitman/barrak and don't mind taking a shot or two on the chin, drift jousting or circle fighting an eel is the only option (i.e. don't<br />
joust).<br />
On your drift jousts, you need to score a hit on each pass, or the eel can close the distance on you and make things very<br />
uncomfortable very quickly. One technique of extending your range is to roll your ship after you've just jousted past the eel. This<br />
will put the eel in a "perpetual turn" behind you. While he's turning trying to "right" himself to your ship's orientation, you are<br />
gaining precious kilometers on him.<br />
When using lasers, circle fighting a lone eel is the best option. Make sure to give yourself a long, wide circle so you can bail out if<br />
things go badly. If you let yourself drift in too close and screw up, you can be dead before your flashfire can save you. As long as<br />
you get its shields below 70% and keep hitting it, it will turn and miss you consistently. However, just as when fighting a snail in a<br />
shuttle, be very, very careful of getting slow with an eel. If you miss a few times you will be dead. A useful technique to killing an<br />
eel quickly with lasers can be realized by using a very deep circle(ie, a large degree of pitch down away from the eel). If you let the<br />
eel come into the circle and cancel its forward velocity before you shoot it, when it dodges away from youit will not get out of<br />
range of your guns, and you can kill it very quickly without it escaping and recharging.<br />
Scoring reliable hits on an eel with ammo in a circle fight is somewhat more difficult, however. Although it can be done, drift<br />
jousting tends to be a more efficient and safer way to get the job done. Just be careful to never be caught at v0 while in an eel's gun<br />
range. Both long drift joust runs and quick turning short joust runs with a lot of drift are effective.<br />
Fighting multiple eel, or an eel with kraken escorts, was one of the harder combos until phocs came along. When dealing with<br />
either multi eel or eel and friends, long, slightly drifting jousts are critical. If you do a wide drift joust or a circle, the kraken/other<br />
eel will chew you up. Remember that when you can only shoot one flux, shoot the eel. Although an ignored kraken or manta can<br />
do some damage to you, whatever it will do is much less than what an eel would. These a situations are where ammo or novas tend<br />
to be very useful. With lasers it is hard to do sufficient damage to the eel in the required long joust, so these fights tend to take<br />
quite a long as a result.<br />
Missile Usage<br />
4 Morning Stars per eel<br />
F-13<br />
Copyright © by Conflux War Command Center All Right Reserved.<br />
127
Nautaloid<br />
Octopus: C-13 C-14 C-15<br />
Bounty: 31,000 33,000 35,000<br />
Experience: 5000 5250 5500<br />
Speed: 433 433 433<br />
Shield/Armor: 8000k/16000k 8000k/16000k 8000k/16000k<br />
Gun #/dmg/rng: 2/540k/2200m 2/420k/4400m 2/780k/3000m<br />
Thorn = 635k/1800m; Barrak = 450k/4400m; FeatherFire = 810k/2400m; Haven = 15400k<br />
General<br />
The Nautaloid is not a very exotic conflux, especially compared to the other conflux that it will often appear along side. It's flight<br />
charactaristics are similar to that of a kraken, but unlike the kraken it has both excellent protection and a reasonable amount of<br />
firepower. Despite this, as long as a pilot is both patient and careful, it is not difficult to bring this conflux down, given a<br />
reasonable amount of time.<br />
Advantages<br />
Moderate shields<br />
Excellent armor<br />
Excellent accuracy (Moderate for c14)<br />
Excellent weapons range (Moderate for c13)<br />
Very good firepower (c15)<br />
Very good acceleration<br />
Very good top speed<br />
Disadvantages<br />
Moderate firepower (c13, c14)<br />
Large profile<br />
Tactics<br />
As mentioned, as long as caution is applied when fighting this flux, it is not excessively difficult to take one down.<br />
Lasers: Both jousting and circle fighting will work with this flux, although some caution in circle fighting is advised when fighting<br />
the laser and ion variants, as they can hurt if you miss a few times in a row. Make sure to get its shields down below 70%, which<br />
will require a few direct hits to accomplish. Also, bear in mind that this flux can hit you from farther out than current TRI lasers<br />
can, so do not allow it to slip out of range for very long. Jousting, with some drift to accomidate the ammo variants of this flux<br />
may take longer, but it is as usual the safest way to engage.<br />
Ammo/Novas: This is a fairly easy flux to kill with ammo. Long jousts will work best and quickly devastate even its heavy armor.<br />
Be wary of immediately turning on the laser and feather variants of this flux, because it can often get in a few shots and damage<br />
your shields before you hit them and make them turn. In addition, this is a very heavy flux, so after it turns, it will drift<br />
signifigantly, making is somewhat harder to land a shot with a slower weapon. If you extend your joust, however, this should not<br />
be a problem.<br />
For more on how to joust, drift joust, turret, and circle fight effectively, read Ammo vs Lasers: The Duelist.<br />
Fighting multiple octopi is possible, but very difficult. See Multiple Targets for more info.<br />
Missile Usage<br />
Purgatories, although fast enough, failed to hit. Currently testing other types.<br />
F-14<br />
Copyright © by Conflux War Command Center All Right Reserved.<br />
128
Krill<br />
Krill: C-19 C-20 C-21<br />
Bounty: 43,000 44,000 45,000<br />
Experience: 7000 7250 7500<br />
Speed: 619 630 645<br />
Shield/Armor: 5000k/1000k 5000k/1000k 5000k/1000k<br />
Gun #/dmg/rng: 1/780k/3000m 1/780k/3000m 1/2950k/4500m<br />
FeatherFire = 810k/2400m; Nova = 2800k/2555m; Shelter = 6009k<br />
General<br />
The Krill resembles no other conflux class out there. The Krill is weaker and has a much larger profile than the Prawn. It is the jaw<br />
dropping maneuverability and acceleration that the Krill can draw upon when hit that makes this flux unique. When hit, it will veer<br />
off at incredible angles, and if missed it will literally circle around a ship before blowing it apart.<br />
Advantages<br />
Extraordinary speed<br />
Extraordinary maneuvrability<br />
Excellent shield recharge rate<br />
Disadvantages<br />
Weak shields and armor<br />
Low firepower (excepted c21)<br />
Moderate profile<br />
Tactics<br />
Lasers: Lasers are the only safe weapons to attack a Krill with, because they can shoot a Krill from the funny angles that it often<br />
attacks from, while taking advantage of the moderately large profile of the Krill. Also, missing in a joust with lasers will not be fatal<br />
since the pilot can just turn around and whack the Krill even if it coming in a hi-velocity slide. When engaging multiple Krill, try to<br />
either hit both Krill in a pass, or go into a fairly low velocity slide and deal with one krill at a time, driving one off, engaging the<br />
other, driving it off, engaging the returning Krill, and driving it off, repeating until both are dead.<br />
Ammo: Ammunition weapons can take on Krill, but multiple Krill are not advised, because mistakes are harder to deal with when<br />
using ammo, and multiple flux compound those mistakes. Try to keep jousts as long as possible, so that you can engage krill at<br />
favorable angles and ensure that you don’t miss and turn the fight into a hi-v circle, however, do be wary of the c21 plasma krill. Be<br />
prepared to only hit once or twice per joust, since a Krill really dodges when hit.<br />
Novas: Novas should not be used to hunt Krill. Although it is possible to kill a Krill with novas (and if you do it tends to come<br />
quickly), it leaves you extremely vulnerable to error. A Krill, like a Prawn, will very quickly dodge novas that come near it, and in<br />
doing so will transform the fight from a jousting situation into a hi-v circle (for the Krill, anyway. A standard TRI ship has to turret<br />
just to keep a bead on a Krill at close ranges) which makes it all but impossible to hit the Krill with Novas. The hunter in this case<br />
becomes the hunted, because he is completely out of options short of disengaging using multiple flashfires, or landing a lucky shot.<br />
If you absolutely must use novas, get as straight a joust as you can, and open fire only when you know you can hit.<br />
For more on how to joust, drift joust, turret, and circle fight effectively, read Ammo vs Lasers: The Duelist.<br />
Fighting multiple krill is possible, but very difficult. See Multiple Targets for more info.<br />
Missile Usage<br />
Outruns all classes of missiles, although dive-bombing is possible, especially due to its large frontal profile.<br />
F-15<br />
Copyright © by Conflux War Command Center All Right Reserved.<br />
129
Prawn<br />
Prawn: C-22 C-23 C-24<br />
Bounty: 47,000 47,500 48,000<br />
Experience: 8000 8250 8500<br />
Speed: 612 622 632<br />
Shield/Armor: 9000k/?k 9000k/?k 9000k/?k<br />
Gun #/dmg/rng: 2/540k/2200m 2/780k/3000m 2/780k/3000m<br />
Thorn = 635k/1800m; FeatherFire = 810k/2400m; Haven = 15400k<br />
General<br />
The Prawn is very much like a powered up c8 or c9 Kraken. It is a little bit smaller, but like many of the other new Conflux, the<br />
Prawn is extremely fast, making mistakes hard to recover from. Due to this speed and this flux's very small profile, caution is<br />
recommended when engaging.<br />
Advantages<br />
Extraordinary speed<br />
Excellent acceleration<br />
Tiny profile<br />
Excellent maneuvrability<br />
Disadvantages<br />
Weak shields and armor<br />
Poor/Moderate firepower (type A/B)<br />
Tactics<br />
Lasers: Lasers are the safest bet for engaging this flux. Because of its high speed, it can be hard to get a sufficiently straight joust to<br />
hit with slower guns, but thorns allow you to “reach out and touch” this flux from any angle with a reasonable degree of safety.<br />
Fortunately, you only need one shot from quad thorns to make this flux evade, giving you a few extra precious seconds. When<br />
fighting this flux, especially in multiples, the same tactics of kraken fighting apply, but hitting every flux on every pass is absolutely<br />
critical, because of their tendency to run a fighter or bomber down in a matter of seconds.<br />
Ammo: Ammunition based guns can be used with success on this Conflux, but doing your utmost to making a long joust and not<br />
missing on any pass is a key: Remember, if you miss on a joust you will be forced to turn and engage, even if the shot angle is<br />
extremely poor, because you can not run from this flux. That said, if you do get a good run, you can obliterate this flux in one pass<br />
due to its poor shielding and armor.<br />
Novas: Novas are not a safe bet to tackle this flux with. It has an uncanny knack to dodging novas when they get close, making it<br />
very hard to land a shot. Unless you are fast on the perpetual turn, it will mean the flux latching on to you, and you will either be<br />
faced with running (and dying) or turning and firing on a gust-sized 630v flux circling you with lasers from funny angles (that<br />
usually means dying as well)<br />
For more on how to joust, drift joust, turret, and circle fight effectively, read Ammo vs Lasers: The Duelist.<br />
Fighting multiple shrimp is possible, but very difficult. See Multiple Targets for more info.<br />
Missile Usage<br />
Outruns all classes of missiles, although dive-bombing is possible.<br />
F-16<br />
Copyright © by Conflux War Command Center All Right Reserved.<br />
130
Stingray<br />
Stingray: C-16 C-17 C-18<br />
Bounty: 38,000 39,000 40,000<br />
Experience: 6000 6250 6500<br />
Speed: 678 692 707<br />
Shield/Armor: 12100k/9800k 12100k/9800k 12100k/9800k<br />
Gun #/dmg/rng: 2/420k/4400m 2/540k/2200m 2/780k/3000m<br />
Barrak = 450k/4400m; Thorn = 635k/1800m; FeatherFire = 810k/2400m; Haven = 15400k<br />
General<br />
The Stingray, although it has a wide variety of good aspects, is clearly built (or grown) to do one thing: go extraordinarily fast. With<br />
the fastest type cruising at v707, it can run down any TRI ship, artifacts or not, eventually. When fighting a Stingray, you need to<br />
be able to deal with it without running away very far, because you simply won’t be able to. Engage a Stingray only with extreme<br />
caution, because even with liberal flashfiring, it is very hard to disengage.<br />
Advantages<br />
Extraordinary top speed<br />
Excellent accuracy (Moderate for c18)<br />
Excellent weapons range (Moderate for c16)<br />
Very good acceleration<br />
Very good armor and shields<br />
Thin profile<br />
Disadvantages<br />
Wide profile<br />
Moderate firepower<br />
Tactics<br />
Lasers: Like with most other of the new flux, lasers are your safest bet for engaging a Stingray. As always, if you slip up you can<br />
always just turn immediately and still be able to engage it. Avoid this, however, because stingray are very fast and have a very thin<br />
profile to hit, so circling a laser or feather variant can be risky if your aim is not excellent. Multiple Stingray can be engaged with<br />
lasers successfully, if the pilot is good, by either hitting both Stingray in one joust or alternating fire while moving slowly.<br />
Ammo: Ammunition-based guns work fine when engaging Stingray largely because they are so fast they do not tend to drift a great<br />
deal, even if you miss them on a joust. Be prepared to use a large amount of ammo, though, because a Stingray can dodge<br />
effectively but can still absorb a decent amount of punishment.<br />
Novas: As mentioned in the ammo section, Stingray tend to engage at flat angles, so missing with novas is not fatal. However, due<br />
to the Sting’s good ability to dodge, and powerful shields, it takes a fair amount of time to kill one with novas, because you usually<br />
only get in one shot per joust, but as long as you makes the jousts as long as you can, you will be able to get the shot in fairly easily.<br />
For more on how to joust, drift joust, turret, and circle fight effectively, read Ammo vs Lasers: The Duelist.<br />
Fighting multiple stingray is possible, but very difficult. See Multiple Targets for more info.<br />
Missile Usage<br />
Outruns all classes of missiles, although dive-bombing is possible.<br />
F-17<br />
Copyright © by Conflux War Command Center All Right Reserved.<br />
131
Shark<br />
Shark: C-25 C-26 C-27<br />
Bounty: ? ? ?<br />
Experience: 10000 10000 10000<br />
Speed: 652 652 671<br />
Shield/Armor: 97500k/?k 97500k/?k 97500k/?k<br />
Gun #/dmg/rng: 3/540k/2200m 3/780k/3000m 3/2950k/4500m<br />
FeatherFire = 810k/2400m; Nova= 2800k/2555m; Guardian = 99700k<br />
General<br />
The Shark is a behemoth. Although not radically larger than other flux, this flux is very heavy and very strong. Trying to shoot<br />
down a Shark with conventional guns is similar to attempting to stop an incoming asteriod with a hand-held pellet gun. With<br />
massive shields and a recharge rate that it estimated at over 1500k per second, bringing down a Shark takes a great deal of work,<br />
probably more than the 10,000 exp payout is worth.<br />
Advantages<br />
Extraordinary speed<br />
Extraordinary shield and armor<br />
Excellent firepower<br />
Disadvantages<br />
Moderate acceleration<br />
Large profile<br />
Tactics<br />
Lasers: Lasers do not have sufficient power or range to wear down a Shark’s shields. Even if you make a Shark turn away, it tends<br />
to come back with signifigantly recharged shields.<br />
Ammo: Although ammunition based weapons do pack the punch and range to defeat a Shark in long, straight joust, a Hitman rail<br />
gun does not have sufficient ammunition to kill a Shark, and Barraks do not have sufficent punch.<br />
Novas: Novas are the only gun known that has the punch and unlimited ammo that gives it the ability to defeat a Shark’s shield<br />
and incredible recharge rate. Be sure to make very long runs, despite its shield recharge rate, because getting multiple good shots in<br />
is absolutely critical to even making this flux turn.<br />
For more on how to joust, drift joust, turret, and circle fight effectively, read Ammo vs Lasers: The Duelist.<br />
Missile Usage<br />
Outruns all classes of missiles, although dive-bombing is possible<br />
F-18<br />
Copyright © by Conflux War Command Center All Right Reserved.<br />
132
Sentient Conflux<br />
General:<br />
Concerning the sentients, we must throw out everything we have previously known and been taught about the behavior and<br />
fighting methods of conflux.<br />
Sentients behave erratically, have greatly improved speed and shielding, but lack the weapons accuracy of their drone predecessors.<br />
Sentients can appear as any class of conflux from c0 to c12. Also, it seems their weapons load out has been changed from standard<br />
drone level weapons to various configurations as the sentients evolve.<br />
Fighting techniques related to the drone conflux do not apply to the sentients. You should approach fighting a sentient as you<br />
would approach fighting another TRI pilot. They have been known to run when damaged, change targets in the middle of combat,<br />
and even spare some TRI craft they should be able to dispatch with ease.<br />
Sentients can use our jumpgates to give chase or retreat whether the jumpgate is infested or not. They can "spawn" from nonjumpgate<br />
anomalies as well as from empty space. Additionally, while c7-c12 conflux are limited to certain sectors that are easily<br />
avoided, sentients appear seemingly at will in any sector of their choosing, even station sectors where we have never seen a single<br />
conflux drone.<br />
Classifications:<br />
Sentients have shown different abilities at different times and are given different classifications by TRIR which can be found here.<br />
Tactics:<br />
Effective battle tactics developed by the most experienced sent fighting pilots can be found here.<br />
Tactical Summary:<br />
Being a smart target in a sent fight is actually more valuable than being able to get kills. When they target you, they ALL target you.<br />
So, if you can burn your FFs in a circle fight or drift joust instead of running from them in a straight line, then 1) you are a hard<br />
target to hit so it's nearly as effective as being totally out of range and 2) you are keeping the sents at low velocity in a small area so<br />
others can GANK them.<br />
Heavy reliance on FF for defensive (and occasionally for the kill shot) purposes makes makes the Tensy and bombers pretty<br />
effective. Great firepower and armor makes the Nix pretty effective as well. The quick circle fighting/dodging of the Phoon helps<br />
it to be somewhat effective. Very high sentient velocity makes scouts and rangers largely ineffective.<br />
Often, when you jump out, the sents will not follow. So, when they get you to armor, it's time to head for a jumpgate and recharge<br />
a bit or dock. Going for a dock without jumping out/in is much riskier as you can always mess up and splash the station or get<br />
shot to death half a second from a safe dock.<br />
Missile Usage:<br />
Missiles will not usually hit sentients unless in a divebomb situation. And even then, sentients move so quickly that they don't<br />
usually hit. Missiles create lag and should not be used.<br />
F-19<br />
Copyright © by Conflux War Command Center All Right Reserved.<br />
133
Multiple Targets<br />
Fighting more than one conflux at a time can be easy, tricky, or impossible depending on the circumstances. This page will deal<br />
with multiple targets as separated into fighting alone with the various fighting styles, fighting using missiles as a wingman, fighting<br />
with a wingman, and fighting multiple c7-c10.<br />
Solo Styles<br />
Turreting<br />
When fighting multiple squid, you can turret fight. There are two approaches which you can choose between or mix successfully.<br />
You can target the strongest squid and focus your firepower on it while ignoring the others. Once you kill the squid, you can move<br />
on to the others. This works if you have a decent shield and the escorts are either farther away or c1s. If the escorts are hurting<br />
you, you can alternate your targets, scoring hits on 2 different squids. Remember, when you hit them, they don't hit you. Turreting<br />
is suicidal when dealing with multiple targets if any flux other than squid are involved.<br />
Circle Fighting and Drift Jousting<br />
When fighting multiple c1-c5, you can easily keep moving to avoid snail fire while focusing on killing the more accurate squids.<br />
Focus on higher level squids first as they do the most damage. If you are fighting 3 squids and no snails, these two methods may be<br />
tougher since you may stay within range of the squids for extended periods. Multiple high level squids can be a tough fight in a<br />
shuttle. You may have more success jousting, but the short laser range of size one lasers will make even that quite difficult for laser<br />
users.<br />
Jousting<br />
The concepts of jousting multiple flux apply whether you are jousting multiple squid, manta, or kraken (laser using flux) as long as<br />
they do not have c7 manta or eel as escorts (see the later topics on this page for how to deal with those combos). Should you come<br />
up against a pair of laser using flux with one or more snail escorts, ignore the snails as they can do little if any damage to you while<br />
you are jousting. So let us take for consideration 2 squid or 2 manta or 2 kraken (2 laser using flux fighting against one pilot in a<br />
Shuttle, Light/Medium Fighter, or Fighter, respectively). If the flux are separated, the pilot should try to kill the closest, deadliest<br />
flux quickly (if faced with 2 squid and a snail, attack the closest squid first). If the 2 flux are together at the start (or if they end up<br />
together after you engage the closest flux), then you must make long jousting runs focusing on just one of the flux. When you hit<br />
the flux, it will turn (or "slide") and not shoot you, but this turning also has the effect of slowing its turn. So, the flux you are not<br />
firing on will turn much quicker and be much closer to you. This method keeps both flux in the same joust plane, but puts<br />
considerable distance between them. This gives you the luxury of not being shot at by both flux at the same time. Use afterburner<br />
liberally to recharge, give yourself distance, and to straighten the joust run. When you turn, remain focused on the same flux who is<br />
now farther away from you. Accurate shooting is required, as you need to down the first flux as soon as possible to reduce the<br />
amount of punishment you take each joust run. You can also sometimes hit both of them in the same pass if they are seperated<br />
enough, but you should keep your jousting plane straightest with the initial damaged target. Destroying one flux is better than<br />
damaging two.<br />
This same concept can be used for three or more laser using flux, but it becomes more and more dangerous with each laser using<br />
flux beyond two that you face.<br />
Using Missiles as a Wingman<br />
Though more expensive and not as effective as a wingman, you can use missiles to improve your chances against multiple targets.<br />
Using missiles on any conflux but manta or kraken is a waste of money. Purgatory and Screwdrivers and MorningStars (a bundle of<br />
4 Screws) are the best missiles for using on conflux, though some pilots have success with others. Purgs, SDs, and MSs seem to<br />
work best if fired at an approaching conflux at a range of 5-6k. Then, turn to a slight angle and fly straight until the missiles kill the<br />
flux. Both manta and kraken will try to dodge missiles, manta doing so successfully more often due to their greater top speed. It<br />
takes 2 Purgs, 4SDs, or 1 MS to kill a manta or kraken. If you are running from flux, you can fire at targets behind you and meet<br />
with a fair amount of success.<br />
If the number of conflux attacking you is one greater than the number you can gun down, then you can use a missile to kill the<br />
extra flux. If there are two more flux than the number you can gun down, you can use two missiles, and so on to keep the others<br />
busy while you focus your guns on one.<br />
F-20<br />
Copyright © by Conflux War Command Center All Right Reserved.<br />
134
Fighting with a Wingman<br />
If you have a reliable wingman, you can kill a rather lot of conflux together. Two pilots can jump into a sector containing more<br />
than one pilot can deal with and with teamwork, can empty the sector in no time. The technique to use is to ensure that one pilot is<br />
leading ("towing") the flux, and the other pilot is not targeted by any flux ("free"). This scenario can be accomplished when both<br />
pilots jump into an empty sector and spawn conflux. The towing pilot then runs in the direction opposite from which the flux are<br />
coming. The free pilot can jump out and back in so that his flux now target the tow. The free pilot must make certain he did not<br />
spawn any new flux when he came back or he will need to jump out/in again until he is truly free from targets.<br />
The tow keeps towing the flux in a straight line and they should eventually pass by the free pilot who is close to the gate. The free<br />
pilot should always attack the fastest target first for the safety of the tow. Once the first flux is dead, the free pilot is now free again<br />
to try to kill the next flux. Depending on the speed of the tow and flux, he may have to afterburn or flashfire, or the tow may need<br />
to turn either gradually or sharply. A gradual turn allows for safety of the tow and lets the free pilot "cut the corner" because he<br />
knows where the tow is heading while the flux targeting him constantly update their flight path based on the tows current position.<br />
A sharp turn can be successful if the tow has sufficient shields to take whatever punishment the flux trailing can dish out in one<br />
pass. Once the free pilot has killed all but a couple of flux, the tow then gets the rest of the kills.<br />
It is always easier to pick off a flux from a tow if the free pilot lets the tow and flux pass him while he matches speed rather than<br />
try to joust the flux. The matching speed method can be dangerous as the flux usually score several hits if the free pilot does not<br />
really pound the flux. Often extensive afterburner or flashfire is needed to gain a safe distance on flux the free pilot has tagged.<br />
An understanding of the targeting methods of conflux will be helpful at this point. A conflux at 100% shields keep his current<br />
target until it leaves the sector (via jumping, disconnection, or death) unless another pilot scores a hit dropping its shields below<br />
100%. A conflux below 100% will retain its current target even if hit by a wingman. So, if a tow can hit ("tag") a conflux, then his<br />
wingman can fly up right behind it and get an easy kill as long as the flux's shields remain below 100%. If the flux's shields get to<br />
100%, any new tag will make the flux change targets. This is a useful tactic to allow a weaker craft to kill a conflux it would<br />
otherwise be unable to kill. For example, a Scout is towing two kraken with a Fighter wingman. The Fighter should tag one kraken<br />
down to 50-70% shields and then fly straight and "tow" it for his Scout to get the easy kraken kill (the Scout can easily turn and<br />
take the hits a lone kraken can dish out on a single pass). If both ships in the example were Fighters, one could tag the extra kraken<br />
off of the tow Fighter and allow his wingman to solo kill the first kraken while he "holds" the second kraken.<br />
This scenario works extremely well if the tow is a in Scout or Ranger and the free pilot is in a Fighter. You can perform the towed<br />
hunt technique with other classes of ships, but Scout(Ranger)/Fighter works best. (The faster Fighters can also serve as the tow<br />
rather well.)<br />
It is the tows responsibility to keep track of how many and which types of flux his is towing as sometimes lag can cause some flux<br />
to not appear on the wingman's radar. Also, it is the tows responsibility to cycle through the targets looking for new targets. A<br />
tourist can be more deadly than any conflux when group hunting. Imagine if a Fighter has just tagged an eel when someone jumps<br />
in, spawns another eel, and jumps back out. If the Fighter were closer to the new eel than the tow when this happened, then the<br />
Fighter is about to get attacked by an unexpected eel. Unexpected eels more often than not mean a pod ride for the unexpecting<br />
Fighter.<br />
This type of hunting works well with more than just a tow and a single wingman. However, if the group gets to be more than a tow<br />
and three Fighters, things can get rather confusing especially if the pilots are not used to working together as a team. It is important<br />
that the tow pilot go in the direction opposite the flux being towed and that all other pilots jump out/in in unison so that they all<br />
will be free.<br />
Fighting Multiple c7-c10<br />
When alone, sometimes it is better to go for the quicker, easier kill than to focus on the most deadly enemy. If you are solo fighting<br />
a c7 c8 c10 combo, it would be best to kill the c7 with guns quickly, then use a missile and a flashfire to kill the kraken, then come<br />
back and kill the eel with guns. Whereas, it might be more difficult to kill a kraken while an eel and a c7 are shooting at you. Each<br />
scenario will be slightly different because different flux spawn in different locations with each hunt.<br />
Once you can kill a kraken in one or two passes regularly, then in a c7 c8 c10 scenario, you should target the closer of either the<br />
manta or kraken. The more quickly you can destroy the first flux, the better your chances are of being able to kill the second flux<br />
with an eel shooting at you. While the eel is firing on you, you will need to adjust your jousts (vary speed and direction) to<br />
minimize the eel's ability to score hits. This will also throw off your own shots, so you need to know your weapon and your own<br />
aiming skills before trying it.<br />
Another way to dela with the same c7 c8 c10 combo would be to target the eel first and make very long jousting runs at the eel<br />
group as your Fighter is fast enough to keep pace against the smaller flux or extend range using AB. Focusing on one target is<br />
F-21<br />
Copyright © by Conflux War Command Center All Right Reserved.<br />
135
important as the quicker you can kill one target, the fewer guns you have shooting at you.<br />
When fighting 2 eels at the same time, it is easiest when they are separated either by spawning location or by using a missile to<br />
distract one for a minute or two. Don't expect missiles to do much damage to an eel as 3 MorningStars reduce it to no shields and<br />
20% armor if they hit. Eels high speed make them challenging missile targets. When faced with a pair of eels that are grouped,<br />
there are three methods you can use that do not require missiles. The first is to drift joust as normal and use liberal afterburners to<br />
keep from getting torn apart by the second eel which you are ignoring. The second is to try to score a hit on each eel each pass to<br />
keep them both from being able to shoot you on every pass. The third is to make very, very long joust runs (using an angle on your<br />
approach...a head-on eel joust is never advisable) and essentially treat each run as first pass on one eel. This last method will take<br />
longer, but is mostly likely the safest approach. All three methods have been repeatedly proven effective in combat with a pair of<br />
eels. Here, a member of New Dawn is saving a tourist from a pair of eels by tagging them both from behind then later destroying<br />
them.<br />
When hunting with a wingman (or wingmen), it is always best to kill off the fastest conflux first as a safety precaution for your tow.<br />
Kill c10, c7, c9, c8 in that order with c10 being very high priority due to their 500v top speed.<br />
Fighting Multiple c10-c12<br />
Multiple phocaena are much more difficult than any other flux combination. Like kraken, if you ignore them they will fire on you<br />
from behind. However, unlike kraken, these guys cruise faster than you, and do a little more damage per shot. Thus, very careful<br />
joust setup is required.<br />
First, when entering a sector with multiple phocs, run! Target the closest c12 (c11 if there is no 12) and run away from it. By the<br />
time you are about 30-40k away from the gate, all the phocs should be lined up behind you with some space between them, so it is<br />
possible to hit most or all of them in one joust. Even if you fail to do this, however, a phoc will take more time to turn on you than<br />
if it was attacking from an angle, giving you a bit of distance.<br />
At this point, just using very long drift jousts and hitting as many phocs as possible in each joust, and flashfiring when needed, will<br />
win the day.<br />
Lasers are simply not recommended for this, because they have a very short range, and more importantly, limited damage/sec.<br />
Non-nova ammo can work, but taking multiple phoc with it becomes difficult, because you need to “reach out and touch them” to<br />
give your moderate damge/sec rate the time it needs to do significant damage. This will start the phoc's slide early, making it more<br />
difficult to hit and allowing it to come out of the slide sooner meaning it will be closer behind you after you pass.<br />
Nova users can safely hold their fire until the phoc is within about 2000m, and then open up. If the phoc does not die in the first<br />
pass, it will end up tailing you at about 5500m, out of its weapons range. This makes it much easier to deal with multi phoc,<br />
because the need for constant flashfiring goes way down.<br />
Still, multiple phoc is a very challenging combo, and each fluxer has to find his or her own way of killing phocs, with his or her<br />
own preferred weapons and ship.<br />
For more on how to joust, drift joust, turret, and circle fight effectively, read Ammo vs Lasers: The Duelist.<br />
F-22<br />
Copyright © by Conflux War Command Center All Right Reserved.<br />
136
137
<strong>JUMPGATE</strong> ECONOMY<br />
Basics 101<br />
138
Basic Jumpgate Economy Theory<br />
1. Introduction<br />
This document is intended to give a basic introduction to trading and the<br />
economy in JumpGate.<br />
It aims to introduce newer pilots to the most basic concepts, and encourages<br />
more experienced pilots to think beyond the obvious trading features in the<br />
game. This guide does not cover more advanced strategies, piloting or ship<br />
equipment, nor provide a robust mathematical analysis of 'the economy'. It does<br />
not explicitly tell you 'how to do it', although it does include some examples.<br />
It starts by examining price/profit based trading and cargo missions, then looks<br />
further at demand, supply and production based trading. Boxed text indicates<br />
an example or more detailed explanation of a concept. Like many aspects of<br />
the game, trading and the economy are complex: far more complex than it may<br />
at first seem. Consequently, nobody has a perfect understanding of the subject<br />
- including the author.<br />
Version 1.02, 1 October 2003. Updated information on Custom Producers and<br />
pricing.<br />
2. Credits and Legal<br />
This guide was written by Tim (timski) Howgego, copyright 2001-2003. Errors<br />
and suggestions should be reported to tim (at) capsu (dot) org . Please put<br />
"Jumpgate" somewhere in the email subject field. Contributors are noted with<br />
the relevant text. Special thanks to baadf00d and Xindaan. This document is in<br />
the public domain: You may copy and repost this guide, but the content of the<br />
document, including the credits, must remain unchanged. Jumpgate copyright<br />
(c) 1999-2003 NetDevil Ltd. Other trademarks and copyright are owned by their<br />
respective trademark and copyright holders.<br />
3. Markets and Stations<br />
Every station has a public market screen. This screen lists items in the station's<br />
public inventory, with quantities and prices. These items are available for<br />
purchase by any pilot with the required rank, political rating and cash.<br />
Items are divided into categories - the important split is between commodities<br />
and ship equipment. Commodities are materials produced by stations which<br />
cannot be equipped to ships.<br />
Different stations have different volumes of different items available. Prices vary<br />
between certain stations. Stations will always buy an item, but not always at a<br />
profit.<br />
139
That is the basis of a simple trading system: Pilots purchase an item at one<br />
station, transport it to another station where they expect the price is higher, and<br />
hopefully sell for a profit. Such a concept should be familiar to anyone with<br />
previous experience of 'Elite style' space simulation games.<br />
Simple Trading Example<br />
A relatively new Solrain Premia pilot has 7,000 credits available, and four cargo<br />
spaces. They buy four units of Water from the Wake station market for about<br />
1,550 credits each. They launch and fly to Outpost station. On docking they sell<br />
the four units of Water to the station market for about 2,100 credits each. They<br />
have made a total profit of 2,200 credits.<br />
Most stations have two other markets: (1) A private hidden inventory, used by<br />
the station to store certain commodities. (2) Inventory held by other pilots that<br />
are docked - in their ships, on the station floor, or (in the case of storage<br />
depots) in store. The private hidden inventory cannot be seen, nor can items be<br />
purchased from it. Inventory held by other pilots cannot be seen, but can<br />
normally be traded between consenting pilots.<br />
4. Rank, Political Rating and Taxation<br />
Every item has a minimum rank and political rating that must be met in order for<br />
the item to be purchased by a pilot.<br />
Rank is constant through the galaxy. Rank is gained by gaining experience.<br />
Experience is gained by completing missions, killing conflux, collecting medals,<br />
holding beacons, retrieving artifacts, and a few other things.<br />
Political rating varies by faction. The rating used is that for the faction owning<br />
the station where you are purchasing items. Political rating is not relevant at<br />
neutral (unregulated) stations. Political rating is gained by completing missions<br />
for a faction. Each successful mission adds 3 political rating for that faction,<br />
regardless of the type or difficulty of the mission. Political rating over 100<br />
decays by about one point per hour online. Unlawful hostile acts reduce political<br />
rating dramatically, potentially to -100.<br />
All commodities have a minimum of rank 0 and political rating 0. All new pilots<br />
may purchase any commodity if they have the cash to do so. Equipment varies<br />
greatly. Only half of all equipment can be purchased at 0 rank and political<br />
rating, and that's mostly the worst stuff.<br />
Items can always be sold, regardless of rank and political rating.<br />
Know Your Political Rating and Tax Rate<br />
Political rating can be seen on your JOSSH profile. In game, it can be seen<br />
whilst docked at a station: Click the slider bar at the bottom of the screen.<br />
140
Tax rate can be calculated in-game by comparing the price displayed below an<br />
item on the main market screen, with the price shown when you click on the<br />
item prior to purchasing it. The difference is the tax paid, from which you can<br />
calculate the tax rate.<br />
Political rating is important initially because it is the main factor affecting<br />
taxation.<br />
All purchases from station markets are taxed. Sales are not taxed. Commodities<br />
have a base tax rate of 1%. Equipment has a base tax rate of 10%.<br />
At 0 political rating, the base rate is modified by +2%: Pilots with 0 political<br />
rating pay 3% tax of commodities and 12% on equipment. At political rating 125<br />
(the highest), the base rate is modified by -0.5%: Pilots with 125 political rating<br />
pay just 0.5% on commodities.<br />
Tax rate is modified by other factors, not all of which are fully understood. The<br />
most obvious other factor is the number of beacons held by your faction. Each<br />
beacon counts for a 0.01% reduction in the tax paid. So, a pilot with political<br />
rating 125, whose faction holds 50 beacons typically pays no tax on<br />
commodities. It is not (currently) possible to have a negative tax rate.<br />
Dangers of Trading at High Tax Rates<br />
Our Solrain Premia pilot has received a donation of 400,000 credits from a<br />
passing veteran. They decide to buy four units of Radium at Outpost and<br />
transport them to Hyperial. The market price to Outpost is 81,300 credits a unit,<br />
and Hyperial pays 84,000 credits. Great - a profit of 2,700 each. However, our<br />
new trader has a 0 political rating with Octavius. This means they are paying<br />
about 3% taxation on the purchase of Radium at Outpost. So, the actual price<br />
they pay is around 83,700 credits a unit, which gives less profit overall than the<br />
Water they shipped in earlier, but for a lot more effort.<br />
Rule of thumb: Generally, the cheaper the commodity, the greater the profit<br />
margin, the safer it is to trade with low political rating.<br />
Equipment is rarely profitable when sold via station markets. In addition,<br />
equipment is not insured whilst being transported as cargo, so deaths are very<br />
expensive. Inexperienced pilots should avoid the transport of equipment.<br />
Rank is primarily relevant to commodity traders because it restricts the<br />
availability of ships, and to a lesser extent, equipment. Lower ranking pilots can<br />
only access shuttles, which have small cargo capacities, as well as other<br />
disadvantages such as slow speed and poor defences. This varies slightly by<br />
faction, but generally: A level 21 pilot can potentially purchase a ship with ten<br />
times the capacity of the best ship available to pilots below level 10. Level 26<br />
pilots can purchase a ship with ten times the capacity of the level 21 ship.<br />
Largest Available Cargo Ships by Rank<br />
141
Rank Class<br />
Solrain Quantar Octavius<br />
Ship Capacity Ship Capacity Ship Capacity<br />
0 Shuttle Premia 4 Storm 2 Apteryx 1<br />
3 Shuttle - - - - Albatross 3<br />
6 Large Shuttle Premia SC 6 Breeze 7 Buzzard 8<br />
9 Light Fighter Interceptor 6 - - - -<br />
12 Fast Transport Vedetta 15 Whirlwind 14 Hawk 12<br />
21 Transport Traveler 60 Hurricane 52 Wyvern 48<br />
21 Light Miner Quarrier 62 Harmattan 65 Simurgh 60<br />
26 Tow Pioneer 500 Thunder 500 Condor 500<br />
38 Freighter Viceroy 750 Chinook 735 Roc 740<br />
Light Miners are primarily mining ships. While having larger cargo capacities<br />
than Transports, their lack of speed and poor handling tend to make them<br />
inferior craft for trading.<br />
Trading in shuttles tends to be relatively inefficient. If done carefully, shuttle<br />
pilots can make modest profits trading, but they cannot expect to compete with<br />
whose able to fly larger vessels, with more cash and higher political ratings.<br />
5. Price Basics<br />
The price of a specific item may vary between different stations. These<br />
variations are a combination of fixed differences and variable differences.<br />
Fixed differences primarily reflect long term demand and supply. Stations that<br />
demand or require an item, but do not produce it, tend to pay more than<br />
stations that produce it. The value of the fixed difference is commonly used as a<br />
profit margin on an item.<br />
Variable differences reflect short term shortages or surpluses of an item at the<br />
station. Shortage will raise the price, surplus will lower it. It takes about half a<br />
day for a complete adjustment in price, for example, from a situation where<br />
there is a shortage to large surplus. Price will gradually change, reducing<br />
slightly every six minutes. Since the station's inventory is in constant flux (pilots<br />
keep on buying and selling), prices also tend to be in a state of constant<br />
adjustment. Variable price differences are relatively small - typically less than<br />
5%. Clearly on large shipments of high value items, such small percentages<br />
can account for a lot of cash. Recent changes mean that variable differences<br />
tend to only be significant when stocks are low - typically less than 2000 units.<br />
Pricing Water<br />
Earlier we transported Water from Wake to Outpost for a fairly good (in<br />
percentage terms) profit. Why was there a price difference?<br />
142
Wake produces water, while Outpost does not. Outpost requires water to<br />
sustain the population of the station and nearby planet, and to produce<br />
manufactured food and beer.<br />
Water tends to be in shortage at Outpost because it gets used up quickly.<br />
So, we have a strong demand but no supply at Outpost, with a natural supply at<br />
Wake, which gives a fixed price difference. A tendency towards shortage of<br />
Water at Outpost is probably leading to a higher variable price difference. The<br />
profit margin is so high a percentage that variable price differences will account<br />
for a small proportion of total price difference.<br />
Price differences are commonly identified using data made available from<br />
JOSSH, http://www.jossh.com/ .<br />
Most pilots use third party utilities that process dynamic price/inventory data.<br />
Commonly used utilities include Slopey's WebTracker ( http://www.slopey.com/<br />
) and Gossip's Market Lister ( http://www.jumpgateweb.com/MarketLister/ ), but<br />
there are various others listed at the bottom. These sum fixed and variable price<br />
differences to give the same sort of value that would be displayed in-station.<br />
They tend to report data that is 5-30 minutes out of date, so often miss<br />
profitable runs. Most such utilities allow the calculation of a single commodity<br />
that appears to give the best profit when transported between a pair of stations<br />
specified. Careful analysis of options may reveal the true best profit to be a<br />
combination of different commodities.<br />
Alternatively, production patterns can be examined to reveal where there are<br />
likely to be fixed price differences. Again, there are utilities available to assist in<br />
processing JOSSH database data.<br />
Precisely how much do prices change?<br />
Here is Baadf00d's current price range theory (this aggregates fixed and<br />
variable differences):<br />
Stations that produce an item: Base Price -- Base Price * 103%<br />
Stations that neither produce nor demand: Base Price + 200 -- ( Base Price *<br />
105% ) + 200<br />
Station that demand but don't produce: Base Price + 500 -- ( Base Price * 107%<br />
) + 500<br />
Note that price changes are most obvious where stocks are small (below 'full<br />
stock' of 2000 units). Where high value items are over-stocked at demanding<br />
stations and under-stocked at production stations, it is theoretically possible for<br />
prices to be highest at producing stations. This accounts for many apparent<br />
oddities on the US server at the time of writing.<br />
Xindaan offers precise way of determining price based on stock:<br />
143
Producer: (Base_Price) * (1+ (1 - Stock/2000)*0.03)<br />
Neutral: (Base_Price) * (1 + (1 - Stock/2000)*0.05) + 200<br />
Consumer: (Base_Price) * (1 + (1 - Stock/2000)*0.07) + 500<br />
6. Cargo Missions<br />
Cargo missions involve finding a specific commodity, purchasing it, taking it to<br />
another station, and selling it onto that station's market to complete the mission.<br />
Only one unit of the commodity must be sold to complete the mission.<br />
Additional experience and credits are paid for additional units (the maximum<br />
number of additional units that may count towards the mission are shown in the<br />
mission description - this varies by rank). Sell everything at once to maximise<br />
bonuses.<br />
It will not always be profitable to undertake the mission. Evaluate the cost<br />
involved carefully before taking a cargo mission, particularly one for a high<br />
value commodity.<br />
Cargo missions are made available from a station producing a commodity and<br />
with more than one unit of that commodity in stock, to a station that demands<br />
that commodity but does not produce it and currently has less than 2000 units<br />
available (later condition may not apply to US server). Most stations make<br />
demands based on economic needs (see Demand and Supply below). Depots<br />
and neutral stations make some irrational demands. Cargo missions can never<br />
be taken from Depots (no production) or neutral stations (no mission computer).<br />
Brokering may be used to for fill a cargo mission. This involves taking the<br />
mission and flying to the destination without the cargo. On arrival, another pilot<br />
trades the commodity to you. You then sell to complete the mission. While in<br />
the station, you can place cargo on the floor, which effectively increases cargo<br />
space by 25 units. This increases the volume that small ships can sell to<br />
complete the mission above what they could have transported there<br />
themselves: Particularly useful for lower ranking pilots. Unfortunately brokering<br />
of cargo is difficult to organise for conventional cargo missions, mostly because<br />
the commodity is not available at the destination.<br />
Faction missions are often missions involving the delivery of cargo. They<br />
encourage organisation and brokering. Commodities sold as part of a faction<br />
mission are not immediately placed in the station's hidden inventory. Missions<br />
often request commodities that are available at the destination station.<br />
Brokering is therefore easier for faction missions. Faction missions are<br />
conventionally organised across f5 channels - first letter of faction, followed by<br />
bld - for example qbld for the Quantar faction mission.<br />
Faction Mission Brokering<br />
Faction missions are often designed to undertake reconstruction projects - often<br />
new buildings, equipment, or technology. Brokerage speeds up the completion<br />
144
of these projects by rewarding teamwork. Faction mission brokerage schemes<br />
have three main components: (1) A broker, who stays at the faction mission<br />
station buying and selling commodities; (2) Suppliers, who find or produce the<br />
commodities required for missions and supply them to the broker; and (3)<br />
Runners, who continually take faction missions. The later role is probably the<br />
easiest way to start, and below is a short set of instructions for 'runners':<br />
1. Fly to any station other than the faction mission station.<br />
2. Check the 'Faction Mission' on the mission screen. Remember what<br />
commodity the mission is asking for, but do not take it.<br />
3. Ask the broker over the public mission channel if they have the commodity<br />
from step 2 available.<br />
4. If the commodity is available, accept the mission and proceed to step 5. If it is<br />
not return to step 1 by flying to another station.<br />
5. Having taken the mission, launch and fly empty to the faction mission station.<br />
6. Dock and ask the broker over the local channel for the commodity you need.<br />
Note that the broker may only be prepared to sell you 50 units, since this is all<br />
that is needed to maximise progress on the project.<br />
7. The broker initiates trade. You (normally) pay for the commodities at this<br />
stage.<br />
8. Once trade is complete go straight to the market screen and sell everything<br />
at once to complete the mission.<br />
9. If the commodity is in shortage and/or is likely to be used quickly by the<br />
station, it is polite to inform the broker that you have sold, so that they may<br />
attempt to re-purchase the commodity.<br />
10. Return to step 1. You can take another mission such as a transport on the<br />
'dead' return run.<br />
If done as part of an organised system, faction missions can provide<br />
exceptionally good experience for lower ranking pilots.<br />
7.Demand and Supply<br />
So far, trading has been in response to a price difference or a server generated<br />
mission. These primarily reflect demand and supply. So where do these<br />
demands come from, and how are they met?<br />
Pilots demand equipment. Stations demand staple life sources (food and drink),<br />
luxuries, repair materials for ships and pilots, and materials to build<br />
145
econstruction projects. Most such items have to be produced. Production in<br />
turn demands other commodities.<br />
Most things start out as raw materials, sometimes called '1st tier commodities'.<br />
Most raw materials are produced by planets and made available at a small<br />
number of stations. Asteroid mining (of regular and pure 'roids) produces some<br />
raw materials, but rarely in large quantities.<br />
Sometimes the raw material can be used immediately to satisfy a demand:<br />
Textiles are a good example.<br />
Textile Demand and Supply<br />
The planet Hypsos produces Textiles as a raw material. A fixed amount is<br />
supplied to Hyperial station market at regular intervals. Textiles have no specific<br />
uses in production, but are required at most stations to cloth pilots and<br />
planetary populations.<br />
Our Premia pilot, having finally dropped off that Radium, sees an opportunity to<br />
cloth his fellow pilots. He buys up Textiles and transports them to Solrain Core.<br />
On arrival and sale, he'll not only be benefiting the station, but because he has<br />
shipped from a production point to a demand point, he'll see some profit as well.<br />
If the demand for textiles was not met, the only consequence is a Role-Play one<br />
- Solrains begin to get known across the galaxy for their outdated dress sense.<br />
Many of the demands shown below have far more noticeable consequences for<br />
other pilots.<br />
In most cases raw materials need to be fed into production processes. In some<br />
cases the result of one production process is needed for another process, and<br />
so on. The production dependencies of certain items are long and complex.<br />
8. Production<br />
Every production process requires some combination of specific commodities.<br />
These commodities must be present at a producing station, either on the public<br />
market or in the hidden inventory, for production to occur.<br />
On the EU server production is restricted to a small number of stations for any<br />
one item. On the US server 'trickle' production allows the production of many<br />
items at many stations, in addition to the main production stations.<br />
Stations produce things in regular cycles. These 'production cycles' last just<br />
over six minutes. (There is currently a double production cycle every tenth cycle<br />
- the reason for this is not clear.)<br />
Each station has a production capacity per cycle for each item it can produce.<br />
This is often referred to as the 'production index'. This is the maximum number<br />
146
of an item that will be produced if all the commodities required for production<br />
are present. It varies by item and station: Two stations that notionally produce<br />
the same thing may have different production indices. Production of large<br />
quantities at one may be quicker than at the other.<br />
Electronics Part I<br />
Electronics are made using a combination of Aluminum, Chemicals, Copper,<br />
Gold and Silicon.<br />
Amananth produces Electronics.<br />
If all five required commodities are present at Amananth station, production will<br />
start. Up to 27 units (the station's production index for Electronics - subject to<br />
change) may be produced each cycle. At the end of each cycle, the additional<br />
units of Electronics will be placed on the station market. Production will continue<br />
until one or more of the required commodities runs out.<br />
Note that the required commodities may be present in the station's hidden<br />
inventory, and not visible from the public market. For example, Amananth<br />
stores up to about 200 units of Silicon in its hidden inventory.<br />
Also note that cycles do not start the moment commodities are sold to the<br />
market - they are already running. The first batch of finished product may<br />
therefore take anywhere between a few seconds and six minutes to be<br />
produced.<br />
One unit of finished product is made using different volumes of each required<br />
commodity. On average 0.1 of each required commodity is used to make one<br />
unit of finished product. However, that average varies greatly.<br />
Certain stations are more efficient in their use of commodities in production than<br />
other stations.<br />
Electronics Part II<br />
One unit of Electronics is made from: 0.1 Aluminum, 0.1 Copper, 0.05 Gold, 0.2<br />
Silicon, and 0.05 Chemicals.<br />
If Amananth had a Tooling Center (see<br />
http://www.jossh.com/database/buildings/tooling_center.html ), production<br />
efficiency would increase, so the same volume of required commodities<br />
originally used to make 1 unit of Electronics would now make about 1.1 units.<br />
Non-station buildings are becoming increasingly important as sources of<br />
commodities and equipment. There are three that are particularly relevant -<br />
Nano Assemblers, Custom Producers, and Science Factories.<br />
147
Nano Assemblers dispense 'recycled' raw materials. Simply fly through the<br />
tunnel on the building and a unit of the relevant commodity will be added to your<br />
cargo.<br />
Custom Producers and Science Factories manufacture a specific item if you<br />
deliver all the relevant commodities required for production. Fly through the<br />
building's tunnel with at least one of each required component. Each set of<br />
components will be exchanged for one of a finished product.<br />
The use of such buildings is less efficient than production at stations because<br />
they use a whole unit of each required commodity. They also make a 10-15%<br />
loss if the finished product is sold straight to a station (see the Custom Producer<br />
Money Transfers box below). Production can however be controlled by the pilot,<br />
and increasingly high-demand items on EU server are only produced via<br />
Custom Producers.<br />
Custom Producer Money Transfers<br />
Post v1.0077, when you use a Custom Producer or Science Factory an amount<br />
of money is transferred to or from your account. This reflects the difference<br />
between the cost of the raw materials and the value of the finished product,<br />
thus preventing mindless 'cash-printing'.<br />
The apparent formula for determining money transfers from Custom Producers<br />
and Science Factories = (Sum of the Base Price of 1 of each component<br />
commodity) - (Base Price of item produced * 115%)<br />
For example:<br />
Thorn is made from:<br />
+ Laser Components @ 114000c base price<br />
+ Optics @ 24000c base price<br />
+ Xenon @ 2100c base price<br />
= Sum of base prices = 140100c<br />
Thorn base price = 161000c<br />
Thorn base price * 115% = 161000c * 115% = 188150c<br />
Custom Producer/Science Factory transfer = Sum of base price of components<br />
- (Base Price of Thorn * 115%) = 140100c - 185150c = -45050c<br />
9. Advanced Production<br />
Any one commodity may potentially be used for between none and many<br />
production processes at the same station.<br />
Each of those production processes conforms to the same rules in the previous<br />
section: all the required commodities need to be present at the station.<br />
148
If multiple production processes are running, a specific required commodity may<br />
be used up more quickly than was expected.<br />
Electronics Part III<br />
Aluminum is used to produce both Electronics and Construction Materials at<br />
Amananth.<br />
The requirements for Construction Materials are Aluminum, Lumber, Machined<br />
Parts, and Titanium.<br />
If all the requirements for both Electronics and Construction Materials are<br />
present at the station, both production processes will run. The initial supply of<br />
Aluminum will be used by both processes, and hence will be used up more<br />
quickly and result in fewer units of Electronics than would have been produced<br />
had Construction Materials not also been produced.<br />
It is often possible to manipulate the public market to target scarce resources<br />
towards a specific production process. For example, removing Lumber from the<br />
market by buying it all up will eventually stop all production of Construction<br />
Materials. Note that production will not stop immediately because it is likely<br />
some Lumber will have already been stockpiled in the station's hidden<br />
inventory.<br />
Note that many of the other requirements for Electronics production are also in<br />
part requirements of other production processes. These are not all avoidable<br />
using the method above. For example, RAM is produced at Amananth and<br />
requires only Copper and Silicon. Both commodities are required for<br />
Electronics, so it is impossible to prevent the production of RAM alongside<br />
Electronics.<br />
Information Sources<br />
By now you are probably asking how we know what makes what where and<br />
what-have-you.<br />
Basic production information (locations and requirements) is shown by JOSSH's<br />
database - http://www.jossh.com/database/ . For example, Electronics<br />
http://www.jossh.com/database/commodities/electronics.html .<br />
JOSSH does not show the production index, the size of the hidden inventory,<br />
the precise proportion of required commodities used to make a unit of finished<br />
product, or the station's overall efficiency. Watching markets change in<br />
response to the delivery of commodities will give you a basic understanding of<br />
the magnitude of these variables.<br />
JOSSH can be used to reveal multiple uses of the same commodity at a station,<br />
but it's awkward to use. This widget, http://www.capsu.org/jumpgate/<br />
(shameless plug) should help identify such uses quickly.<br />
149
Every production process is capped: There is a fixed level of stock at the<br />
station, beyond which production will cease. This is equal to the production<br />
index * 1000.<br />
However, it is possible that production almost never stops, because of the<br />
interaction of decay and production.<br />
Decay<br />
Items on the public market decay by 1% (subject to change) of stock per hour<br />
when stocks are over a certain level.<br />
The decay threshold varies for commodities and equipment, and between<br />
servers. It has been anywhere between 100 and 20,000. On EU server it was<br />
2,000 for commodities and 2,200 for equipment (but it changes...).<br />
If the decay threshold is at or below the production cap, and the item being<br />
produced is not well used, it is easy for production to eventually exceed the<br />
decay threshold. Once over the decay threshold, each hour 1% decays. That is<br />
then produced again in the next 10 cycles, before the next decay occurs. That<br />
wipes out almost precisely everything that had been produced in the previous<br />
hour.<br />
10. Transport and Meeting Demand<br />
In most cases, production occurs at different stations to those supplying the<br />
required commodities for production. Demand for the finished product is often at<br />
another station.<br />
This creates a requirement for transport, which forms the basis of all trading.<br />
Electronics Part IV<br />
Electronics are made at Amananth using Aluminum, Chemicals, Copper, Gold<br />
and Silicon:<br />
Aluminum can be mined (common or pure Aluminum 'roids), but mostly is<br />
supplied by Octavius stations. Chemicals are only supplied by Octavius Great<br />
Pillars and Outpost. Copper can again be mined (from common or pure 'roids),<br />
but is mostly supplied by Evenings End and GBS. Gold can be mined (precious<br />
or pure 'roids), but is mainly supplied by Solrain stations. Lastly Silicon can be<br />
mined (semifluxor or pure 'roids), but is commonly supplied by GBS and<br />
Klatsches Hold.<br />
Mining aside, that's quite a large requirement for transport.<br />
Also note there are a large number of different stations involved, and in this<br />
case the requirement to pass through several areas of unregulated space with<br />
heavy cargo. There are many advantages to involving other pilots.<br />
150
Every faction station that produces items requires Electronics for something, so<br />
once Electronics have been produced, there are plenty of places to take them.<br />
Most commodities are ultimately used in the production of equipment which<br />
pilots then use and (inevitably) lose. This theoretically creates a balanced<br />
universe, where traders are genuinely needed to maintain the operations of<br />
combat orientated pilots. In strategic terms there is a purpose to trading,<br />
beyond just moving things for the fun of it. That can create a lot of depth of<br />
gameplay, which is why some of us like JumpGate ;-) .<br />
Electronics Part V<br />
Electronics are used directly to produce a few high-end guns (such as Barraks,<br />
Featherfires and Hitmen), all missiles, targeting computers, scanners and<br />
cameras.<br />
Electronics are used indirectly in other items of equipment, since Electronics<br />
are required to make RF Transceivers. RF Transceivers are primarily required<br />
for radars and Beacon Control Units.<br />
It is possible to launch without something made from Electronics, but it's a<br />
brave pilot that does so.<br />
Electronics on their own are of no use to pilots. However, if you can use<br />
Electronics to produce an item of equipment which is in constant shortage, you<br />
suddenly become useful to other pilots. Understanding that role opens up a<br />
number of interesting career paths.<br />
11. Self Training<br />
Time to put all that into practice: I want you to make and sell Purgatory missiles<br />
(Purgs).<br />
This exercise presumes that Purgs are not already in production everywhere,<br />
and ideally not available on any public market. I cannot foresee the state of your<br />
economy: These are popular missiles that tend to be in shortage, but yet they<br />
can be produced and purchased by poorer middle-ranking pilots, which is why I<br />
suggest using them. On the EU server Purgs are now only made using a<br />
Custom Producer, so are no longer a good example. Much of the method<br />
outlined below will work as a training exercise regardless of what the item is,<br />
although it is ultimately pointless to produce something that is already overstocked,<br />
so try and find something which is poorly stocked but still produced at<br />
conventional stations.<br />
For this training, you will need to be at least rank 12, flying a fast transport or<br />
larger. Larger cargo capacity ships will give more scope for experimentation.<br />
You should have several hundred thousand credits available - preferably a<br />
million or more. You must have at least political rating 28 with Quantar. Good<br />
political rating everywhere else will help, particularly with Octavius.<br />
151
1. First, identify what is required to make Purgs, and where they are made.<br />
Then find out what is required to make each of those required commodities, and<br />
where they are all made. Progressively work backwards through the full<br />
production history, until you are familiar with everything that might be needed.<br />
Hint: JOSSH is useful for this.<br />
2. Now, examine the current stock of required commodities at producing<br />
stations. Do this first for those immediately required to produce Purgs. Do this<br />
for all three producing stations. Find out what is available on the station market<br />
and what is not, and what size any existing stockpiles are. Discount very small<br />
stock levels (under 100 units) since these may not last long enough for you to<br />
use them. Hint: You could fly to all the stations in question, but the use of<br />
inventory tracking utilities will save time.<br />
3. There are other factors in station choice, but for now, use the station that is<br />
missing the smallest number of commodities.<br />
4. Next, find out if any of the missing commodities are stockpiled at any of their<br />
production stations. If they are, all you will need to do is fetch them. Note:<br />
Normally avoid stripping commodities from non-producing stations. You will be<br />
making it harder for someone else to produce another item. You will also<br />
probably lose money. A possible exception is where the commodity has no use<br />
in production where it is found.<br />
5. If a commodity is not available at a producing station, you will need to first<br />
concentrate your efforts on producing that commodity. Again, identify what is<br />
missing at the production stations, and fill the smallest set of gaps at one<br />
station.<br />
Missing Commodities<br />
Assume that Barium and Fuel Cells are missing from the station we intend to<br />
produce Purgs at.<br />
The nearest producing station for Barium is Klatsches Hold, where there is<br />
plenty stockpiled. All we need to do is transport it to the Purg production station.<br />
Assume Fuel Cells are not available at any Octavius station. However,<br />
Chemicals, Gallium and Phosphorous are available at Octavius Core. So, by<br />
shipping Silicon from Klatsches Hold to Octavius Core, we can start the<br />
production of Fuel Cells at Octavius Core, which we can then buy up and<br />
transport to the station where we are making Purgs.<br />
6. Now assemble all the required commodities for Purgs at the production<br />
station, by transporting those that are missing from the current market inventory<br />
of the production station to that station. At this stage, assume the same<br />
proportion of each commodity is needed to make one Purg. Assemble as much<br />
as you can: four or five units of everything is adequate, but a hundred of each<br />
will give you more scope for experimentation and will, ultimately, create more<br />
missiles. There is scope here to involve other pilots - particularly if you need to<br />
152
ing commodities in from a range of stations, or you need to fly across<br />
unregulated space.<br />
7. Sell five or ten units of whatever is missing for Purg production at the<br />
producing station. If you only have a small quantity sell everything at this point.<br />
Everything you sell should almost immediately be brought up by the station<br />
(and placed in its hidden inventory) if Purgs were previously out of production.<br />
Now wait until the production cycle ends (up to six minutes). You should<br />
eventually see one or more Purgatory missiles on the market. Buy your Purgs<br />
quickly before anyone else spots them. Congratulations. You have produced<br />
something that was not available before, but is normally in heavy demand.<br />
Cycle Tips<br />
A good method of spotting that the market has cycled is to watch the stock level<br />
of a raw material which is produced at the station, but which is often shipped<br />
elsewhere (for example Grain or Water). Increased stock normally indicates that<br />
a cycle has been completed.<br />
The market inventory will eventually automatically update after a cycle.<br />
However, this process lags some time behind. You can force an update by<br />
clicking on a different market category, then clicking back on the category you<br />
want.<br />
If you are intending to buy a specific item, display all the items in the category,<br />
and try and adjust the sort order so that the item is visible in the upper part of<br />
the screen. This might save valuable seconds scrolling down the list prior to<br />
purchase.<br />
When you spot production has cycled, make a note of the time. Be back in six<br />
minutes for the next one.<br />
If you have a large volume of commodities available, follow steps 8 and 9. If<br />
not, just read them and jump to step 10 - they are only worth doing if you are<br />
trying to create large volumes of Purgs.<br />
8. Next try to determine what other production processes may use up the<br />
commodities required to make Purgs at the production station. (Hint: JOSSH<br />
can be used, but the usage section of this - http://www.capsu.org/jumpgate/ -<br />
may be easier ;-) .) Look at the complete requirements of everything that uses<br />
any of the commodities required to make Purgs. See if there is any easy way in<br />
which their production can (ultimately) be stopped by removing another<br />
commodity from the market. Look specifically for small volumes of other<br />
commodities that are relatively cheap. Buy them up and hold them until<br />
production of Purgs is complete.<br />
Why are we trying to stop their production?<br />
Those other production processes will use up commodities required for Purgs,<br />
and so reduce the final volume of Purgs we can make with the commodities we<br />
153
have shipped in. We are trying to focus our resources specifically on what we<br />
are trying to produce.<br />
Most Quantar missiles have the same requirements, so we probably cannot do<br />
much about those. But Rubber production could potentially be stopped, perhaps<br />
by buying up some Antimony or Chemicals.<br />
Note: This is probably a futile exercise if you are only expecting to produce a<br />
few Purgs. Production of other items will take time to finish because required<br />
commodities may already be stored in the station's hidden inventory.<br />
In future attempts, consider the extent of conflicting production processes in<br />
your choice of station. Perhaps consider re-distributing troublesome<br />
commodities to other stations (although they often come back as other pilots'<br />
cargo missions, so don't waste too much time... it will drive you mad).<br />
9. Make a note of the public market volume of the commodities used to make<br />
Purgs and those other things with conflicting production processes. Now sell all<br />
the Purg production commodities you are holding, and watch the market.<br />
The first thing to watch is what volume the station immediately purchased of the<br />
commodities you sold. You will start to see how large its hidden inventory is for<br />
those items. Note that you do not know what was in the hidden inventory to<br />
start with, so you cannot be entirely sure about its size.<br />
Let a few cycles run (remember to buy up the Purgs as they are produced).<br />
Watch how the volumes of commodities making Purgs and other production<br />
conflict items change. Watch how many Purgs and other production conflict<br />
items are produced. Keep an eye out for other pilots buying or selling, and<br />
remember that they may sell certain commodities which will go straight into the<br />
hidden inventory. The aim here is to start to understand how many Purgs the<br />
station produces each cycle, and what approximate proportion of required<br />
commodities are used up for each Purg. You should start to see certain<br />
patterns, like a consistent number of new purgs each cycle, and an above<br />
average use of Explosives. Be aware that much may be happening that is not at<br />
first clear. For example, stations tend to buy commodities up faster than they<br />
use them. If volumes of a commodity are large, you may experience decay.<br />
In future attempts, consider how to better balance the volumes of required<br />
commodities supplied to the station, so they all (eventually) run out at about the<br />
same time. Perhaps balance your deliveries so that production of Purgs does<br />
not exceed the amount you can buy and store. Experiment with different<br />
stations: Quantar Core, for example, may be more convenient and more<br />
efficient, but may be found to have a lower rate of production and more pilot<br />
activity. More pilot activity may be helpful, but sometimes results in commodities<br />
you want to stay on the market being moved elsewhere, the sale onto the<br />
market of commodities that somehow hinder Purg production, or other pilots<br />
buying up 'your' Purgs before you can get to them.<br />
154
10. You may now be sitting in a Quantar station with some of the last Purgs in<br />
the galaxy. This is quite a powerful position. You may be able to trade those<br />
Purgs to other pilots in the same station for a 50%, even 100%, mark-up, simply<br />
by announcing 'Purgs for sale' on the station's public channel. You may manage<br />
a larger profit by transporting them elsewhere and doing the same. You may<br />
attempt to identify a squad who will buy a large consignment from you, or an<br />
individual pilot who you can sell them to. Alternatively, sell them to one of your<br />
faction's front line home stations, and make your faction a little bit stronger<br />
(there is no financial profit in this). Or go out and hunt some big Conflux with<br />
them.<br />
Remember, what you have is only a bargaining counter when it is not available<br />
on the local market, and even more so, when it is not available on any public<br />
market. Unless you are specifically aiming to stock a station with Purgs for the<br />
benefit of all, measure your production efforts so that supply does not exceed<br />
demand.<br />
12. What Now?<br />
Some players are happy to follow cargo missions or the results of best profit<br />
calculators. This is fine to a point, but some will find it misses much of the<br />
game's depth.<br />
You should now know enough to consider meeting other objectives or slightly<br />
different careers. The next box gives a few suggestions.<br />
Things to Do<br />
Make More Cash - The best overall profits tend to be created by production.<br />
This is particularly true when producing a high value shortage item.<br />
Market Manipulation for Profit - Aim to create a profitable cargo run by<br />
encouraging shortage at one station and over-stocking at another. Farm a<br />
commodity for profit. Best done with high value commodities at low tax rates,<br />
between two neighbouring stations over a half a day.<br />
Reconstruction - Start by running for Faction Missions, but then try brokering<br />
and supplying commodities. Few experience points or credits involved in the<br />
later roles, but plenty of teamwork and tangible output.<br />
Get Focused - Find a specific shortage and take all the measures needed to<br />
address it. Find a station and attempt to get everything it makes into production.<br />
You will see a real tangible result to your actions.<br />
Broker - Supply equipment that other pilots cannot purchase because they have<br />
insufficient rank or political rating. Rarely a career, but a good occasional<br />
sideline.<br />
155
Support - Produce and supply shortage equipment to your friends or faction.<br />
When they get killed they'll be up and flying again in no time, which will give<br />
them an edge over their enemies. Alternatively run small consignments of<br />
equipment for individual pilots. If you anticipate a large battle, consider being<br />
ready to re-equip pilots as their pods (inevitably) return to the station.<br />
Smuggle - Supply one set of pilots without their enemies realising. You can<br />
supply their enemies too, so long as the first set of pilots do not know. And all<br />
the time you maintain an air of respectability among those who both groups are<br />
busy killing.<br />
Strip - Hinder the production of equipment or Faction Mission progress by<br />
removing certain commodities from stations. Remove carefully stockpiled<br />
equipment whilst your enemies are out getting killed, so when they return home<br />
it will take them longer than they expected to re-equip.<br />
Those suggestions become progressively more dangerous (and also fun), the<br />
further you go down the list.<br />
It helps if you have a character, with friends and enemies; if you can work with<br />
other pilots; and if, every so often, you are prepared to forget about making<br />
money and experience.<br />
A1. Appendix: Newbie Tips<br />
Taking a cargo mission that requires an hour of flight to find the commodity, or<br />
trying to trade expensive cargo with an appalling tax rate are some of the things<br />
that all new pilots do at some stage. They are part of a standard list that<br />
includes crashing into stations and asteroids, being killed by Mantas, and<br />
selling their engines without enough cash to buy new ones.<br />
Many pilots go through a second stage of newbie-dom when they first load up<br />
500 units of Uranium or Iridium and try and fly it to another station.<br />
New pilots need to address some issues before they can begin serious trading:<br />
- Rank - Primarily to allow ships with larger cargo capacity. Partly to allow the<br />
purchase of equipment.<br />
- Political Rating with all factions - Primarily to lower tax. Partly to allow the<br />
purchase of equipment.<br />
- Knowledge - Ability to fly main routes safely with reference to navigational<br />
hazards such as asteroids and Conflux. Knowledge of station docking<br />
approaches. Basic understanding of the markets and trading.<br />
- Cash - Primarily to allow the purchase of ship loads of most items. Partly to<br />
allow the purchase of larger cargo ships.<br />
A good way to do all that is to aim to level by collecting (Super)Nova medals.<br />
Muffy's guide to political rating powerlevelling strategy (<br />
156
http://umec.oesm.org/phpBB/viewtopic.php?topic=446&forum=25 ) gives an<br />
overview of what's involved.<br />
Consider taking small consignments of cheap (but high profit margin)<br />
commodities when flying between stations with another mission. These can be<br />
safely traded at high tax rates, and won't cost you your career should you crash<br />
with them.<br />
Octavius space is probably best for finding short local profitable cargo runs for<br />
low value commodities, like Grain and Chromium. Solrain has a few good runs<br />
within its own space. Quantar space should be avoided since there are few<br />
natural internal cargo routes. The best early inter-faction space cargo runs are<br />
probably between Octavius and Solrain space: The routes tend to be shorter<br />
than visits to other factions, commodities plentiful, and risk of Conflux attack<br />
relatively low on most routes. A good start for poor, high tax paying newbie<br />
traders (specifically Solrains who have the cash and cargo space to trade at the<br />
very start of their careers) is Wake to Outpost with Water and back with Helium<br />
- you can double your money after two return trips.<br />
When you buy a new ship, try it out in the simulator with a heavy load (try filling<br />
it with Iridium), to see how mass changes how the ship handles.<br />
157
Artifacts<br />
Information Thanks to Quorx ‘s Artifact<br />
Search Pattern Site.<br />
158
Artifact Coordinates<br />
Arti-coords are simple to get your hands on, just go to Quorx's arty patterns and use<br />
the pattern generator. Make sure to generate patterns for the right radar size, and<br />
for the US server. (EU artifacts spawn differently)<br />
so, how to use the patterns?<br />
A pattern is a series of coordinates in the sector, and if you travel from the first<br />
coordinate to the second and so on, until you reach the first cords again, you will<br />
have covered a large part of the volume of space that the artifact might have<br />
spawned within, with your radar. (A huge hollow sphere) How much of this volume<br />
you covered, is listed for each pattern in the generator, usually 80% or more is<br />
enough, as long as you keep a more thorough pattern at hand, if the artifact<br />
happens to spawn outside those 80%<br />
You follow the pattern by equipping a rotacol, and heading out to the sector you<br />
want to hunt in. then type "/rotacol x.xx y.yy z.zz".<br />
Now search through the available radar targets, and you will find one named<br />
"rotacol", that’s the spot. Head out to within 1km of it, and type the coordinates for<br />
the next point in the pattern, and go for it. Repeat this until you find an artifact or<br />
reach node 1 again.<br />
As soon as you travel one whole lap on the pattern without seeing a single artifact,<br />
you should change to a pattern with more points in it, thus having greater volume<br />
coverage.<br />
Once you find that arty, you can revert to your first pattern again.<br />
Remember that its the "legs" of the arty pattern that is important, not the end<br />
points, so unless you have traveled all the legs, even if you have visited all the<br />
points, you wont have searched through all of the pattern.<br />
(For example, you are done with a 4 point pattern when you have traveled in a<br />
straight line between points 1 and 2, AND 2 and 3, AND 3 and 4, AND 4 and 1. (
#3: SPEED<br />
all artifact patterns involve a lot of distance to fly, even the shortest patterns are at<br />
least 450k long, 650k if you want 100% coverage. The faster you travel, the faster<br />
you will complete the pattern.<br />
Needless to say, a ranger excels at finding artifacts fast, but some pilots prefer a<br />
tow, since it can hold more artifacts at once, lowering the frequency at which you<br />
need to return to station and empty your hold. A tow can also be enhanced with<br />
artifacts to quite impressive cruise speeds, and hold almost as large radars.<br />
(50k compared to the ranger's 54k)<br />
#4: NUMBERS<br />
searching for artifacts together in one sector can be very profitable, since the rate of<br />
artifact finds will increase drastically.<br />
However, you need to use patterns that are made for multiple pilots; just dividing a<br />
single pilot pattern between you will rarely work well. Also make sure to tell your<br />
partner when you find an artifact, and when you have retrieved it. While the risk is<br />
relatively small, there have been accidents where the new artifact has spawned<br />
directly in front of a hunter, who had no chance to avoid a fatal accident. While<br />
artifact retrieval is under way, all other pilots should come to a standstill and resume<br />
their search once the artifact has been collected.<br />
#5: JGRotPro<br />
JGRotPro gives you access to artifact patterns in game, it also enters the "/rotacol<br />
...." command for the node you select, saving a lot of time and effort. All through a<br />
simple and easy to use in game menu. Quorx artifact pattern generator does in fact<br />
also generate .dat files for use with JGRotPro. Simple, easy and fast.<br />
(The patterns that ship with JGRotPro itself are very bad and should not be used.<br />
#6: SECTOR?????<br />
It helps a lot to do your search in a sector near a depot or friendly POS, so you can<br />
empty your hold once it gets full.<br />
There are a lot of rumors going around about some sectors giving better finds than<br />
others, but so far no one has been able to prove this, and until such a fact is proven,<br />
I think it is safe to assume that all sectors give the same artifact spawns.<br />
Avoid sectors that spawn dangerous conflux, since an arty hunt-equipped ship is<br />
usually not very good at defending itself.<br />
A-2<br />
160
Artifact Treasures come from pre-collapse era<br />
wreckage found throughout the galaxy... See what<br />
treasures each wreckage yields and what use of its<br />
superior technology can be made to improve your<br />
ship!!!!<br />
161<br />
"Pyramids" come in Rusty,Green,Blue &Gold Color<br />
and yield superior equipment to anything presently<br />
manufactured... The size of the equipment yielded is<br />
related to what color... Different ships take different<br />
size equipment...<br />
Pre-Collapse Engines (PCE- 1,2,3,5) are found in<br />
"Pyramids" as well as Pre-Collapse Shields (PCS-<br />
1,2,3,4) and Pre-Collapse Power Plants (PCP 1,2,3,4)<br />
"Plugs" come in Rusty,Green,Blue & Gold Color<br />
and yield Booster Artifacts that increase<br />
performance of equipment on your ship... The size<br />
of the modX artifact which modifies existing<br />
equipment relates to how much boost received by it<br />
with Gold and Blue "Plugs" yielding the greatest<br />
size booster modX....<br />
Booster ModX treasures yielded by this wreckage<br />
include - (EB 1,2,3) Engine Boosters, (PB- 1,2,3)<br />
Power Boosters, (SB- 1,2,3) Shield Boosters, (CB-<br />
1,2,3) Capacitor Boosters.....<br />
"Saucers" come in Rusty,Green,Blue & Gold and<br />
yield Multi-System Efficiency Modx Artifacts that<br />
are used to enhance efficiency of varying ship<br />
systems...The degree of improved efficiency<br />
received depends on the size of the modx, and, the<br />
color of the "Saucer" gauges what size you will find<br />
inside the wreckage, with Blue and Gold yielding<br />
the greatest treausres...<br />
Multi-System/ Efficiency ModX Artifacts include-<br />
All Ship Booster (AB- 1,2,3,4), All Increased<br />
Efficiency (AE- 1,2), Engine-Shield Boost Combo<br />
(ESB), Engine Efficiency (EE- 1,2,3), Capacitor<br />
Storage Efficiency (CS- 1,2,3,4) , Weapons<br />
Efficiency Modx<br />
(WE- 1,2,3), Shield Efficiency (SE- 1,2,3) ....
"DSS" Artifacts<br />
yield Data Disks<br />
from the precollapse<br />
era that<br />
shed light on it's<br />
superior technology<br />
and how and why<br />
the collapse<br />
occurred.......<br />
"Cubes" yield<br />
Component<br />
Artifacts that<br />
are used to<br />
produce<br />
something<br />
else , such as<br />
repair guns<br />
etc....<br />
162
Engines<br />
PCE-1<br />
PCE-2<br />
PCE-3<br />
PCE-5<br />
Size: 1<br />
Mass: 2900<br />
Efficiency: 0.95<br />
Max Thrust: 1080K<br />
Size: 2<br />
Mass: 4260<br />
Efficiency: 0.95<br />
Max Thrust: 1970K<br />
Size: 3<br />
Mass: 5800<br />
Efficiency: 0.94<br />
Max Thrust: 2429k<br />
Size: 5<br />
Mass: 7500<br />
Efficiency: 0.95<br />
Max Thrust: 3800K<br />
Artifact Data<br />
"Obviously manufactured using advanced<br />
techniques, this pre-collapse engine is small<br />
enough to put on any current ship, and provides a<br />
level of power and efficiency unmatched in modern<br />
designs."<br />
"Although very rarely found, this type of precollapse<br />
engine is a very valuable find indeed.<br />
With the ability to fit into the very common size 2<br />
engine mounts, but provides a level of power only<br />
seen in size 3 systems. Coupled with a high<br />
efficiency, a pair of these engines could result in a<br />
very fast ship."<br />
"Another artifact engine, this model exhibits a<br />
number of technologies seen in the modx type<br />
artifacts. Basically this results in an engine with<br />
great power and excellent efficiency."<br />
"While this pre-collapse piece of technology is not<br />
much more powerful than modern designs, its<br />
efficiency is far greater. This means that the power<br />
plant requirements are much lower to use this<br />
engine compared to other size 5 engines of similar<br />
power."<br />
163
Power Plants<br />
PCP-1<br />
PCP-2<br />
PCP-3<br />
PCP-4<br />
Size: 1<br />
Mass: 2000<br />
Max Output: 2800K<br />
Size: 2<br />
Mass: 4600<br />
Max Output: 4060K<br />
Size: 3<br />
Mass: 5230<br />
Max Output: 9405K<br />
Size: 4<br />
Mass: 6700<br />
Max Output: 13700K<br />
"A small but comparatively powerful size 1 fusion<br />
power plant from a pre-collapse ship. This could<br />
be a very valuable addition to a ship with limited<br />
power plant space."<br />
"Artifacts such as this power plant show that precollapse<br />
engineers were masters of heat transfer,<br />
allowing them to pack more components in a<br />
smaller space. This allowed them to build highly<br />
developed systems such as this one, that provides<br />
more power than any modern design of its size."<br />
"An amazing example of pre-collapse technology,<br />
this power plant is far superior to the designs of<br />
compatible size offered by current manufacturers."<br />
"As typically exemplified in other pre-collapse<br />
systems that have been found, this power plant<br />
incorporates a number of components and<br />
manufacturing techniques that are beyond the<br />
current abilities of TRI members."<br />
164
Shields<br />
PCS-1<br />
Size: 1<br />
Mass: 2900<br />
Base Rate: 980<br />
Efficiency: 0.84<br />
Max Damage: 8400K<br />
Recharge Rate: 81000<br />
PCS-2<br />
PCS-3<br />
PCS-4<br />
Size: 2<br />
Mass: 3740<br />
Base Rate: 2000<br />
Efficiency: 0.85<br />
Max Damage: 18300K<br />
Recharge Rate: 138000<br />
Size: 3<br />
Mass: 3980<br />
Base Rate: 2700<br />
Efficiency: 0.95<br />
Max Damage: 25400K<br />
Recharge Rate: 157000<br />
Size: 4<br />
Mass: 6340<br />
Base Rate: 3000<br />
Efficiency: 0.78<br />
Max Damage: 37500K<br />
Recharge Rate: 163400<br />
"This artifact is a prime example of pre-collapse<br />
engineering. A compact package, compatible with<br />
current size 1 shield mounts, yet provides more<br />
protection than current systems of that size."<br />
"An extremely valuable find, this device fits in the<br />
very common size 2 shield slot. Its pre-collapse<br />
manufacture is without equal in the modern<br />
galaxy, as is its level of protection."<br />
"Another great find, this pre-collapse artifact will<br />
provide a great level of protection for any ship<br />
that has a size 3 or larger shield mount. As a<br />
bonus, this shield is very energy efficient."<br />
"Although only a few ships have the ability to<br />
mount a shield this size, given the level of<br />
protection it provides, it's amazing to think that<br />
pre-collapse ships equipped with it were ever<br />
destroyed."<br />
165
CB - Capacitor Boost<br />
PCM-CB1<br />
PCM-CB2<br />
PCM-CB3<br />
Size: 1<br />
Mass: 850<br />
3% increase to capacitor<br />
recharge rate.<br />
Size: 1<br />
Mass: 745<br />
5% increase to capacitor<br />
recharge rate.<br />
Size: 1<br />
Mass: 575<br />
8% increase to capacitor<br />
recharge rate.<br />
EB - Engine Boost<br />
PCM-EB1<br />
PCM-EB2<br />
Size: 1<br />
Mass: 350<br />
3% increase to engine<br />
thrust.<br />
Size: 1<br />
Mass: 285<br />
5% increase to engine<br />
thrust.<br />
"This artifact is actually a cooling system that<br />
seems to be designed to attach to the metal layers<br />
of the metal-dielectric-metal capacitors, thus<br />
increasing the conductivity and recharge rate by<br />
3%."<br />
"This device appears to be very similar to PCM-<br />
SB2 (with the exception that it is meant for<br />
capacitors), meaning that it adjusts the voltage<br />
precisely to what is needed by a capacitor for<br />
maximum recharge rate, resulting in a 5%<br />
improvement."<br />
"This artifact is a thermo-electric device that<br />
converts waste heat generated by the electrical<br />
current flowing into a capacitor into more energy,<br />
thus recharging it 8% faster."<br />
"This artifact appears to be a pre-collapse engine<br />
addon that uses a directed force field to isolate the<br />
exhaust ions from the metal walls of the exhaust<br />
nozzle. This increases the thrust of any engine by<br />
approximately 3%, by eliminating the exhaust<br />
energy lost to friction from the nozzle."<br />
"This device is a pre-collapse system that pulses<br />
power to the ionization chamber used in engines to<br />
ionize the exhaust mass. This increases the mass<br />
delivered to the acceleration stage of the engine,<br />
and thus the thrust from the engine goes up by<br />
about 5%. Of course this requires more power, as<br />
there is no free lunch."<br />
166
PCM-EB3<br />
Size: 1<br />
Mass: 1220<br />
8% increase to engine<br />
thrust.<br />
PB - Powerplant Boost<br />
PCM-PB1<br />
PCM-PB2<br />
PCM-PB3<br />
Size: 1<br />
Mass: 428<br />
3% increase to power plant<br />
output.<br />
Size: 1<br />
Mass: 325<br />
5% increase to power plant<br />
output.<br />
Size: 1<br />
Mass: 890<br />
8% increase to power plant<br />
output.<br />
"An artifact that is based on a very advanced (and<br />
unfortunately lost) technology that uses localized<br />
subspace fields to reduce the apparent mass of the<br />
particles in the acceleration stage on an engine.<br />
This results in a vastly increased exhaust velocity,<br />
and thus a huge 8% increase in thrust."<br />
"Another pre-collapse artifact that is based on<br />
directed force fields. In this case the force field is<br />
used to enhance the containment of the fusion<br />
reaction that provides the base energy source of<br />
any power plant. This increases the output of all<br />
known power plants by 3%."<br />
"PCM-PB2 is the designation for this pre-collapse<br />
modx that is a precision flow regulator for<br />
deuterium as it is sent to be fused. This increases<br />
the output of a power plant by up to 5%."<br />
"Another extremely advanced pre-collapse<br />
technology, this device creates highly tuned<br />
magnetic fields that reduce the losses inside the<br />
photo-electric panels to near zero. These losses<br />
were due to unwanted recombination of electrons<br />
and holes inside the semi-conductor, resulting in<br />
waste heat. Without these losses, power output is<br />
increased by 8%."<br />
167
SB - Shield Boost<br />
PCM-SB1<br />
PCM-SB2<br />
PCM-SB3<br />
Size: 1<br />
Mass: 650<br />
3% increase to shield<br />
recharge rate.<br />
Size: 1<br />
Mass: 780<br />
5% increase to shield<br />
recharge rate.<br />
Size: 1<br />
Mass: 1045<br />
8% increase to shield<br />
recharge rate.<br />
AB - All Boost<br />
PCM-AB1<br />
Size: 1<br />
Mass: 1162<br />
2% increase to power<br />
plant, engine thrust,<br />
capacitor and shield<br />
recharge rates.<br />
"Using a methodology that appears to be common<br />
to a number of pre-collapse artifacts, this system<br />
recaptures power that is lost during the recharge<br />
of zero-point energy barriers to improve shield<br />
recharge rate by 3%. This power normally would<br />
be lost as noise, but this device transfers the noise<br />
to the resonate frequency of the shield system."<br />
"In rought terms, this device appears to be a<br />
variable transformer that dynamically adjusts the<br />
voltage of the electrical power delivered to a<br />
shield system, resulting in a 5% improvement of<br />
recharge rate."<br />
"This device, while relatively simple to<br />
understand, appears to be very difficult to<br />
manufacture. It is in essence a secondary shield<br />
generator that reinforces the primary system,<br />
resulting in an 8% improvement in the rate the<br />
field is restored to full."<br />
"This is the least effective of a very useful class of<br />
artifacts that are power distribution 'conditioners'.<br />
This particular unit results in a 2% improvement<br />
in all of the following: effective power plant<br />
output, engine thrust, shield and capacitor<br />
recharge rates. This is achieved by adjusting the<br />
potential of electrical power as it is delivered to<br />
each subsystem."<br />
168
PCM-AB2<br />
Size: 1<br />
Mass: 1492<br />
4% increase to power<br />
plant, engine thrust,<br />
capacitor and shield<br />
recharge rates.<br />
PCM-AB3<br />
PCM-AB4<br />
Size: 1<br />
Mass: 1812<br />
6% increase to power<br />
plant, engine thrust,<br />
capacitor and shield<br />
recharge rates.<br />
Size: 1<br />
Mass: 2550<br />
9% increase to power<br />
plant, engine thrust,<br />
capacitor and shield<br />
recharge rates.<br />
EE - Engine Efficieny<br />
PCM-EE1<br />
PCM-EE2<br />
Size: 1<br />
Mass: 550<br />
2% reduction to engine<br />
power consumption.<br />
Size: 1<br />
Mass: 1100<br />
3% reduction to engine<br />
power consumption.<br />
"PCM-AB2 adds phase correction to the power<br />
delivery system of the PCM-AB1, resulting in a 4%<br />
increase in all of the following: effective power<br />
plant output, engine thrust, shield and capacitor<br />
recharge rates."<br />
"Another pre-collapse power distribution node,<br />
this model adds its own energy storage system to<br />
store unused power for delivery during peak<br />
demand. Results: 6% increase in all of the<br />
following: effective power plant output, engine<br />
thrust, shield and capacitor recharge rates."<br />
"The best in class of power distribution modx, this<br />
system has all the features of PCM-AB3, plus a<br />
system for recapturing high frequency noise and<br />
delivering it as useable energy. This gives an<br />
awesome 9% improvement in effective powerplant<br />
output, engine thrust, shield and capacitor<br />
recharge rates."<br />
"Another pre-collapse device, the PCM-EE1 does<br />
not increase the output of an engine, but rather<br />
reduces the power consumed by a given engine by<br />
2%. Like some other artifacts, it is also a force<br />
field based system, that reduces the parasitic load<br />
of stray ions hitting the conductors of the electromagnetic<br />
acceleration stage of an engine."<br />
"An artifact that is used to regulate the flow of<br />
ions to the acceleration phase of an engine. This<br />
reduces the power used by the engine for a given<br />
thrust level by 3%."<br />
169
PCM-EE3<br />
Size: 1<br />
Mass: 2000<br />
4% reduction to engine<br />
power consumption.<br />
SE - Shield Efficiency<br />
PCM-SE1<br />
PCM-SE2<br />
PCM-SE3<br />
Size: 1<br />
Mass: 485<br />
2% reduction to shield<br />
recharge power<br />
consumption.<br />
Size: 1<br />
Mass: 980<br />
3% reduction to shield<br />
recharge power<br />
consumption.<br />
Size: 1<br />
Mass: 2300<br />
4% reduction to shield<br />
recharge power<br />
consumption.<br />
WE - Weapon Efficiency<br />
PCM-WE1<br />
Size: 1<br />
Mass: 685<br />
2% reduction (per shot) to<br />
weapon power<br />
consumption<br />
"PCM-EE3 is a pre-collapse system the recaptures<br />
engine power lost in the IR and visible light range<br />
and feeds this power back to the engine. This<br />
results in reducing the power requirements for a<br />
given thrust level by 4%."<br />
"This modx reduces the electrical load of a shield<br />
by 2%, leaving the excess power to be diverted to<br />
other systems. Since most shield systems are highpass<br />
filters, using only higher frequency electrical<br />
power, this system diverts the DC component of<br />
the EMF back to the main bus, boosting DC<br />
current to other devices."<br />
"This very advanced pre-collapse modx seems to<br />
create a field that captures background energy in<br />
the UV and Gamma range and feeds it to the<br />
shield system. This reduces the energy required to<br />
recharge a shield by 3%."<br />
"This artifact reduces the energy needed to<br />
recharge a shield by up to 4%. This appears to be<br />
achieved through the generation of a cancellation<br />
field that prevents the shield from interfering with<br />
its own power converters."<br />
"A multi-connection power coupler, the device<br />
uses some relatively simple electronics to tune the<br />
high energy pulses required to fire a weapon, thus<br />
reducing the energy drained from a ship's<br />
capacitor by approximately 2% per shot."<br />
170
PCM-WE2<br />
Size: 1<br />
Mass: 1400<br />
4% reduction (per shot) to<br />
weapon power<br />
consumption.<br />
PCM-WE3<br />
Size: 1<br />
Mass: 1650<br />
6% reduction (per shot) to<br />
weapon power<br />
consumption.<br />
AE - All Efficiency<br />
PCM-AE1<br />
PCM-AE2<br />
Size: 1<br />
Mass: 1090<br />
3% increase in efficiency<br />
of engines, shield and<br />
capacitor.<br />
Size: 1<br />
Mass: 1370<br />
4.5% increase in efficiency<br />
of engines, shield and<br />
capacitor.<br />
CS - Capacitor Storage<br />
PCM-CS1<br />
Size: 1<br />
Mass: 720<br />
3.5% increase to total<br />
capacitor energy storage.<br />
"Substantially the same as PCM-WE1, this model<br />
adds the common pre-collapse phase correction<br />
technology to further decrease weapon power for<br />
a total reduction of 4% per shot."<br />
"A modx that incorporates a feed-back amplifier<br />
as well as pulse shaping circuitry in order to meet<br />
the precise energy needs of a given weapon,<br />
reducing capacitor drain by 6% per shot."<br />
"Similar in function to PCM-AB devices, this<br />
device focuses on increasing the efficiency of<br />
engines, shields and capacitors by 3% by<br />
delivering power to each system only in the<br />
frequency range best used by that system."<br />
"This device appears to improve upon the PCM-<br />
AE1 by capturing reflections in the transmission<br />
lines and converting them to useable power. The<br />
total result is a 4.5% improvement in efficiency of<br />
engines, shields and capacitors."<br />
"This pre-collapse device allows energy that is<br />
normally considered lost to parasitic capacitances<br />
(in conductors, couplers, etc) to be captured and<br />
used for weapons, thus increasing the total energy<br />
stored by the capacitor system by 3.5%."<br />
171
PCM-CS2<br />
PCM-CS3<br />
Size: 1<br />
Mass: 1560<br />
5% increase to total<br />
capacitor energy storage.<br />
Size: 1<br />
Mass: 2560<br />
7% increase to total<br />
capacitor energy storage.<br />
CM - Counter-Mass<br />
PCM-CM1<br />
PCM-CM2<br />
PCM-CM3<br />
PCM-CM4<br />
Size: 1<br />
Mass: 100<br />
8% Mass reduction<br />
Size: 1<br />
Mass: 100<br />
11% Mass reduction<br />
Size: 1<br />
Mass: 150<br />
15% Mass Reduction<br />
Size: 1<br />
Mass: 150<br />
20% Mass reduction<br />
"The PCM-CS2 is in essence a self tuning inductor<br />
to correct the phase of the circuit made by the<br />
power plant and capacitor, thus improving the<br />
energy storage of the capacitor by 5%."<br />
"Another advanced pre-collapse technology. This<br />
dynamic magnetic field inducing device increases<br />
the permittivity of the dielectric used in a<br />
capacitor, thus increasing its ability to store<br />
energy by up to 7%."<br />
"This artifact appears to be an Antimatter countermass,<br />
and thus has the effect of removing8% of<br />
mass from the ship's cargo hold, but must be<br />
equipped as a modx so that the field can be<br />
energized. This counter mass."<br />
"A more advanced counter-mass than -CM1, this<br />
modx appears to remove 11% from a ship's mass,<br />
but must be equipped as a modx so that the field<br />
can be energized."<br />
"This pre-collapse device uses a ship's shield<br />
system to reinforce the counter-mass effect via a<br />
subspace field, reducing a ship's mass by 15%, but<br />
must be equipped as a modx so that the field can<br />
be energized."<br />
"The most powerful of the counter-mass artifacts,<br />
this device creates a strong field that reduces mass<br />
by a massive 20%, but must be equipped as a<br />
modx so that the field can be energized."<br />
172
ESB & RCM ModX<br />
PCM-ESB<br />
PCM-RCM<br />
Size: 1<br />
Mass: 800<br />
5% increase in efficiency<br />
of engines, and 2% for<br />
shields.<br />
Size: 1<br />
Mass: 1200<br />
20% reduction to power<br />
consumption of radar and<br />
ECM.<br />
"This device bridges the power input systems of<br />
the engine and shield subsystems of a ship with a<br />
'noise' frequency conversion device that converts<br />
power to sine waves of useable frequency. This<br />
results in an efficiency gain of 5% for the engines<br />
and 2% for the shields."<br />
"Again pre-collapse power conditioning<br />
technology is applied to a different set of<br />
subsystems. This time for radar and ECM<br />
applications, this device reduces the power used<br />
by both subsystems by a monumental 20%, due to<br />
the narrow power requirements of these devices."<br />
Data Storage Systems<br />
"One of a number of types of pre-collapse data storage and retrieval systems that are<br />
often studied by scientists for information about pre-collapse technology, culture and<br />
history. This one appears to be in [poor/average/very good/near perfect] condition."<br />
PC-DSS1<br />
"Poor"<br />
PC-DSS2<br />
"Poor"<br />
PC-DSS3<br />
"Poor"<br />
PC-DSS4<br />
"Poor"<br />
PC-DSS1 PC-DSS2 PC-DSS3 PC-DSS4<br />
173
PC-DSS1<br />
"Rare"<br />
PC-DSS1<br />
"Perfect"<br />
PC-DSS2<br />
"Rare"<br />
PC-DSS2<br />
"Perfect"<br />
PC-DSS3<br />
"Rare"<br />
PC-DSS3<br />
"Perfect"<br />
Component Artifacts<br />
PC-DSS4<br />
"Rare"<br />
PC-DSS4<br />
"Perfect"<br />
"An interesting piece of technology from pre-collapse civilization, which may be useful as<br />
a component to make a new piece of equipment."<br />
PC-UC1 PC-UC2 PC-UC3 PC-UC4<br />
PC-UC5 PC-UC6 PC-UC7 PC-UC8<br />
PC-UC9 PC-UC10 PC-UC11 PC-UC12<br />
PC-UC13 PC-UC14 PC-UC15 PC-UC16<br />
174
MINING<br />
A Basic Overview<br />
175
To: Venurian Prospecting Ltd<br />
Dear Sirs,<br />
As a Quantar, mining has always been a part of my life. I remember the<br />
day my dear old dad gave me my first toy Bussard Mining Scoop. I slept<br />
with it everyday until the day I was able to bronze it and hang it off<br />
of my first Wayfinder.<br />
Recently I've attained enough status in the Quantar ranks to purchase a<br />
Hurricane, decked out with two of your fine Financiers. Truly, this is<br />
a miner's dream. I flew out to Aman space and happily drained every<br />
piece of rock I could find of it's soul. Besides a minor docking<br />
incident, causing me to purchase a second Hurricane and set of<br />
Financiers, business for me has been good.<br />
However, sitting out in space staring at the hypnotic embers coming off<br />
my lasers as the precious metals flow into my holds, my mind got to<br />
wandering. Reaching over and opening another Quantar Ice, I decided<br />
there has to be a better way.<br />
For so long we have focused on bigger and faster ways to mine. If you<br />
have a Cracker, you want a Broker, and so on. In many ways, I find this<br />
more of a Solrain philosophy. Quantarians believe in purity of their<br />
soul, as well as their ore. Mining Radioactive and Semifluxor roids for<br />
their value leaves a lot of other unnecessary ore in your holds, when<br />
your day is done.<br />
What I propose is this: I, along with others in the mining community,<br />
work with Venurian Prospecting Ltd on a study to develop more precise<br />
mining lasers. Smaller, more precise lasers designed specifically for a<br />
type of asteroid would be marketable.<br />
Things to consider:<br />
* Make a series of size 1 lasers, that "purify" the ore mined from<br />
Rads, Semis, and Precious Metal roids. Ice roids are already fairly<br />
pure, so a special laser would be unnecessary. They would need to be<br />
smaller in size in order to be more precise.<br />
* Study how the modified lasers affect the capacity and regeneration of<br />
roids.<br />
* Study what would occur to the remaining minerals in the roid, if only<br />
a specific mineral is mined.<br />
Sincerely,<br />
Mentali Nikademus<br />
Squad DDZ<br />
176
MINING 101<br />
Old ND archived thread on mining & another on medals<br />
PlanetNetDevil has just put up a very nice, though highly spindoctored guide to mining. (see<br />
that here; my critique of that guide is here)<br />
Where are roids?: There are moderate concentrations of EVERY roid type in EVERY sector.<br />
(including station sectors; exceptions are the neutral station sectors)<br />
Most newbies understand that nearer the pulsar sector you get the easier it is to find the rare<br />
roids - BUT, that doesn't mean that sectors closer to stations aren't barren of rare roids...As i<br />
once assumed. And i'm sure everyone else thought some sectors were barren.<br />
Looking for roids: The one tool not mentioned so far that's perfect for exploration is the<br />
HallMonitor solrain radar. This puppy has a 10k range setting that's just perfect for figuring<br />
out which roids are within ZOOM range. (zoom range being 10k)<br />
Roid recognition: The hardest trick is learning to tell the asteroids apart. When i was a<br />
newbie, i routinely mistook Precious metal for Ice and visa-versa. I also mistook Semifluxor<br />
with precious as well...Of course, radioactive roids were the easiest to drool...erm...spot. The<br />
best advice i can give for ID'ing ice, precious & fluxor is to think of "Brightness". (ice roids can<br />
be spotted from 10k distance without using Zoom; precious are less bright, and semifluxor are<br />
scarily dark)<br />
1. Radiactive Ore (c6000-6400**)<br />
uranium, cesium, plutonium and radium.<br />
2. SemiFluxor Ore (c5000-5400**)<br />
erbium, gallium, indium, silicon, and germanium.<br />
3. Precious Ore (c3500-c3800**)<br />
gold, platinum, silver, and palladium.<br />
177
4. Ice Ore (c1600-2000**)<br />
cobalt, boron, lithium and water.<br />
5. Common Ore (c1000-1200**)<br />
chromium, magnesium, copper, aluminum, zinc, titanium, and iron.<br />
**usually goes for (the stated cr amt) per unit depending on what faction station<br />
you're at (Quantar stations usually pay the least); Also note that each asteroid type<br />
has it's own composition of all 5 types (radore;semiore;precore;iceore;common):<br />
• rad roid (49%;9%;5%;1%;36%)<br />
• semi roid (1%;63%;3%;1%;32%)<br />
• prec roid (2%;2%;43%;1%;52%)<br />
• ice roid (1%;1%;1%;96%;1%)<br />
• common roid (1%;1%;3%;2%;93%)<br />
*note that these aren't covered in this thread*<br />
approaching a roid: k...I tend to approach roids in a spiral, getting ever closer, but not ever<br />
pointing directly at the roid in question...I've died way too much overcompensating on a direct<br />
run...But, if yer daring, i find with the starter shield you can ram into a roid going 20 velocity<br />
and you'll be okay at 35% shields.<br />
You cannot target roids in the radar, the maximum range you can see them is 10,000<br />
distance, but at least these types are permanently fixed in place. Though not really important,<br />
except maybe for more advanced mining, is the mining laser ranges. (i deal with this in the<br />
advanced mining thread)<br />
Docking 101:uhhhhh...pretty sure pitch/yaw/roll is NOT affected by hauling cargo. Also point<br />
out that the best turning rate is left/right (Yaw); Hauling 2 units of common ore has mass<br />
equal to your Storm class ship. The importance of coming to a FULL stop cannot be<br />
emphasized enough (coming from me, who routinely thought that hotdogging it into the<br />
docking rings was considered "Cool" and would win me respect from my peers, i hope you<br />
learn that discretion is considered the better part of valour by all pilots when docking)<br />
The storm with money engines slows a 2 unit haul reasonably quickly...As for optimal<br />
approach vectors? Well, assuming you have a rotacol, the best routes for docking are:<br />
QuantarCore 6000m distance<br />
SolrainCore 6000m distance<br />
(docking is a no brainer once you approach from that position)<br />
Also. Do remember that your average haul will have a mass almost equal to your Storm class<br />
vessel. (all ore types, except ice have the same mass - heavy)<br />
Upgrading your ship: http://www.mindphyre.com/UMEC/PIC/JG/shipsnov2001/QuantMiner.jpg<br />
Solrain gear (lowlvlrequirement)...low priced..all within 5000-10000 range (Radar being most<br />
expensive)<br />
Mining is dangerous, so i wouldn't recommend upgrading your cracker laser. it's rate of<br />
extraction is .006 units/sec compared to .008 units/sec for the Broker; The cracker is FREE<br />
and is still double the duster/excavator rates...And, if yer new at mining, DO NOT accept gifts<br />
of Banker lasers (the agony of losing such a treasure isn't worth the quadruple increase in<br />
mining speed)<br />
Advanced Navigation: When using the /rotacol command once you've equipped the actual<br />
Modx item, keep in mind that you will not see the waypoint switch automatically to your set<br />
coord (you'll have to cycle the target list...the one custom waypoint you can set is right before<br />
jg wp's)<br />
MOST IMPORTANT: Your storm class mining vessel turns best using Yaw (left/right; pitching<br />
up/down is NOT recommended)<br />
Even more important (concerns not only mining): Do not, i repeat DO NOT, map your<br />
movement or combat keys to any keys you might use while chatting...more than once i<br />
accidently accelerated while chatting as i mined. boo hoo<br />
1.<br />
179
PIRACY<br />
CLASSIFIED<br />
Due to TRI Restrictions, only a brief story regarding piracy is being allowed into<br />
this guide. There will be no mention of equipment needed such as the burglar or<br />
insight gun, nor the use of them for piracy goals<br />
180
Piracy a matter of style<br />
After being informed that I pirate incorrectly, i came to a small realization.<br />
Its all about style.<br />
Now youve got your hardline PvPers, your midliners, your carebears, and your<br />
random WTFs.<br />
Does it really matter if your a carebear? Not particularly, no. Its all about style. If<br />
you dont want to fight, and you dont approach it with an attitude like "I dont want to<br />
fight, so you cant bother me", you generally dont run into problems. You go about it<br />
in your style. Whether it be "formalized diplomatic relations" or you just chill, and<br />
talk with the people who could in the future be takin a shot at you, your going about<br />
it in your own style.<br />
Just like the PvPers, and the way they choose their targets. The ones that run into<br />
problems are the ones with no style. Take AQM for instance. They go after anyone<br />
that isnt quant. Thats style. For them to pull it off is a show of even more style.<br />
Those people that straddle the fence, imo, have the most style of all. They manage<br />
to keep a group of carebears, and a group of PvPers, workin together, and not bring<br />
the whole world onto their shoulders.<br />
Now, this brings me to my point: What exactly is the reaction to a style that was<br />
never really used before.<br />
To use myself as an example, I pirate. But i generally dont stay around and fight.<br />
Catch me if you can. 10 bucks says i can out-fly you without firing a shot. And i use<br />
a Light Fighter. I run a cyclone with 3 insights, a scanner, a burglar, and a FF. If you<br />
cant kill me, i won by default. My challenge to those who want to kill me, is catch<br />
me. Out-fly me. I dont take extreme amounts of cargo from people, primarily<br />
because i only have 5 cargo space, but also in my mind is keeping it fair to people.<br />
The entire idea of Pay or Die has been used like a hooker on the corner of Packer<br />
Ave, and i have very little to prove with a kill ratio stat. Im not out to thump my<br />
chest, im out to be a nuisance to haulers. Skimming off the top of their runs.<br />
So boys and girls, heres my style.<br />
You wanna kill me? Come catch me. I dont stay in any one place, and i dont stand<br />
around for a boxing match. Show me that your a better pilot. Show me that you can<br />
coordinate better than I can. Im not here for a contest of aim and who can hit who<br />
more often. I carry 4 size 2 missiles. Theres my armament. If i can kill you with that,<br />
then i definately out-flew you. If i can escape you, with a slightly faster ship, and far<br />
less modx, then i won. Thats MY game.<br />
181
1. The Universe<br />
Fiction FAQ<br />
1.1. What do Octavians and Quantar look like under the armor?<br />
1.2. Who built the jumpgates? How long have they been in operation?<br />
1.3. What´s life like planetside in the TRI universe?<br />
1.4. How come nothing in JG orbits something else?? Where are our stars?<br />
1.5. Capital ships... I know there out there! If we find some can I pilot one?<br />
1.6. Can pilots travel jump gates without being genetically modified, say by some outside<br />
force?<br />
1.7. How come space has drag?<br />
1.8. What is the average level of technology, planetside?<br />
1.9. Why is there sound in outer space?<br />
2. The Stations<br />
2.1. What about these neutral stations? I was outside one while it was being renovated,<br />
and there has to be some info as to what happened during the collapse, as well as their<br />
former use.<br />
2.2. What´s TRI´s presence in a station? Are there TRI police keeping law and order, or<br />
is there just a TRI consulate and the station is faction run, or is there no TRI presence at<br />
all (except, of course, the mission assignment computers)?<br />
2.3. How easy (if at all) is it for non-TRI enrolled personnel (i.e. non-pilots) to get onto<br />
stations? Obviously they can´t leave on the ships, but do TRI limit access to pilots?<br />
2.4. Is there gravity in stations? If so is it as strong as planetside? Are sections in null G?<br />
2.5. Especially with the new mission computers offering missions to the neutral stations,<br />
why don’t the neutral stations have mission computers or simulators?<br />
3. Factions (General)<br />
4. Amananth<br />
5. Hyperial<br />
3.1. Describe how the factions became and settled in the regions they reside in now.<br />
4.1. Where are the Amananthii? Why don´t we ever sees them? Are they part of the TRI?<br />
4.2. Tell me a little bit more about Canis9502.<br />
5.1. Where are the Hyperials? Why don´t we ever sees them? Are they part of the TRI?<br />
5.2. How long ago was the "faith wars" with Hyperial? If Hyperial does not have jump<br />
capable pilots, how did they fight?<br />
5.3. Were there 1 or 2 GVB Wars?<br />
5.4. What kind of government does Hyperial have? Who is in charge?<br />
5.5. Does Hyperial have royalty?<br />
182
6. Octavius<br />
7. Quantar<br />
8. Solrain<br />
6.1. What is the agenda for Octs - Mercenary/war race or exploration race?<br />
6.2. What is the Octavius society like?<br />
7.1. Is there only one Quantar god? A lot of Quantars now pledge themselves with a<br />
player made god<br />
7.2. What is the Quantar society like?<br />
8.1. What is the Solrain society like?<br />
9. Technical Questions<br />
9.1. Talk a little bit about the genetic modification pilots undergo.<br />
9.2. What causes a gravitational anomaly to be formed? (That´s a regular anomaly, not a<br />
jumpgate.)<br />
9.3. Why do lasers have such a limited range? (I’d have thought the damage would drop<br />
with distance rather than the beam just stopping.)<br />
9.4. What's going on with the physics in our galaxy? How do storms fit in?<br />
10. The Conflux<br />
10.1. Why are Conflux pink?<br />
10.2. Will their story be revealed?<br />
10.3. Why does the screen slow down when flux are abound in this world?<br />
10.4. What is the nature of gate-blocking conflux?<br />
11. The Great Collapse<br />
11.1. What happened during the collapse? How long ago did it occur?<br />
12. The Reconstruction Initiative<br />
12.1. What are the factional tensions of TRI Officially/historically since the great collapse?<br />
12.2. Is the TRI calendar going to be explained?<br />
12.3. Can you explain the governmental system of the TRI and the five factions?<br />
183
1. The Universe<br />
1.1. What do Octavians and Quantar look like under the armor?<br />
Octavians, Quantar, Solrains and Hyperials look the same as you and me. Most<br />
everyone in the galaxy agrees on that all sentient beings originated on a single<br />
planet. Every world has a story of it´s founding. Sadly, most of the details of the<br />
original home were lost centuries ago during the collapse, but genetic, linguistic,<br />
anthropological, and botanical studies all prove that there a "home world" that all<br />
life descended from. With the exception of the conflux, there has never been any<br />
evidence of xenoforms discovered.<br />
1.2. Who built the jumpgates? How long have they been in operation?<br />
The TRI did. Jump technology is post-collapse. Although it seems possible that<br />
there was some pre-collapse method of faster than light travel, nobody knows if it<br />
actually existed. The first jump gates were built around 20 of our years ago. It<br />
wasn´t until recent years that the TRI began recruiting a large corp of pilots.<br />
The first pilot squad the TRI sanctioned were known as the "Thrice Seven".<br />
Those 21 pilots oversaw the construction of the initial gates, opened the trade<br />
routes between the planets, and made possible for future pilots to travel between<br />
the stars. The Thrice Seven eventually went on long range explorations between<br />
the jump gates. If you wish to find them, start at a jump gate at the end of known<br />
space and travel in a straight line for 8 or 10 years.<br />
1.3. What´s life like planetside in the TRI universe?<br />
Describe life on the planet Earth, in one paragraph. On Earth some people live in<br />
palatial homes made of advancaded materials. They spend their lives hooked<br />
into a a planetary network of information. In other places on Earth people live in<br />
caves, and hunt as their ancestors do. Unlike in some sci-fi shows, life on a<br />
planet is never monolithic in it´s lifestyle or living conditions. In other words, your<br />
question is a little too vauge. ;)<br />
1.4. How come nothing in JG orbits something else?? Where are our stars?<br />
What you see in your screen is what your ship displays. Your ship´s computer is<br />
a semi-sentient AI that sorts important and non important information. Nonessential<br />
plaentary bodies are left off of your display, and the navigational<br />
computer represents space that can be flown through. When you think you are<br />
flying a straight course, you may actually be flying an eliptical path around a sun<br />
and not even realize it.<br />
184
1.5. Capital ships... I know there out there! If we find some can I pilot one?<br />
Capital ships are outside current technology because of the way jump drives<br />
work. Jump drives emit a field of gravitons that focus the jump. This field can only<br />
be extended around a limited area making large ships impossible to send<br />
through a jump gate. Although a capital ship that never left a sector is possible,<br />
there has never been a pressing need for one. (And no company wishes to<br />
finance the manufacture of a ship with a limited use).<br />
1.6. Can pilots travel jump gates without being genetically modified, say by<br />
some outside force?<br />
There has never been a recorded instance of this happening.<br />
Of course you can send anyone or anything through a jumpgate... if you like the<br />
smell of charred meat, and don´t mind having your brain explode over your<br />
cockpit.<br />
1.7. How come space has drag?<br />
Space doesn’t. Ships experience something similar to "drag" as a result of the<br />
gravitons emitted by their engines. Graviton particles limit forward momentum.<br />
1.8. What is the average level of technology, planetside?<br />
Obviously there are differences between the factions. Generally speaking the<br />
level of technology is what one would expect to be found toward the end of the<br />
21st century (nano-implants, reto-viral engineering, etc) with some exceptions.<br />
On Solrain, for example, there is a planetary transportation system that is precollapse.<br />
The material the tubes are made out of is an unknown substance that<br />
can´t be cut with even the most powerful of energy tools. There are many<br />
aspects of planetary life that utilize pre-collapse technology. There are other<br />
technologies that are so old, such as the internal combustion engine, that the<br />
workings of them really aren´t understood... although amature hobbiests will try<br />
to work with them.<br />
Every planet has it´s own information network, but interfacing with this network<br />
varies from one culture to the next. The Solrain use nano-implants to stay<br />
connected, while the Quantar utilize "digi-pads". Each planetary network has<br />
access to the subspace network, but access to the subspace network is too<br />
expensive for daily use by individuals.<br />
1.9. Why is there sound in outer space?<br />
There isn´t! The sounds being heard by pilots are actually the output of a<br />
sophisticated computer system which is translating graviton emissions into a<br />
format humans can more readily react to and understand, similar to how radar<br />
converts electromagnetic waves into a format we can grasp. Since missile<br />
launches trigger certain predictable graviton emissions, as do explosions, as do<br />
engine thrusts, these emissions in turn become predictable sounds. A standard<br />
in all TRI ships, many pilots opt to replace the TRI-issued graviton-to-sound<br />
translations with customized alternatives.<br />
185
2. The Stations<br />
2.1. What about these neutral stations? I was outside one while it was<br />
being renovated, and there has to be some info as to what happened<br />
during the collapse, as well as their former use.<br />
All stations have been manufactured pre-collapse. They are part of TRI space,<br />
but are disputed when it comes to which faction owns them.<br />
2.2. What´s TRI´s presence in a station? Are there TRI police keeping law<br />
and order, or is there just a TRI consulate and the station is faction run, or<br />
is there no TRI presence at all (except, of course, the mission assignment<br />
computers)?<br />
The staff of a station can range from a hundred workers, to over 3,000. Each<br />
station has a security force, a diplomatic garrison, a trade consulate, shops,<br />
medical facilities, and living quarters. Some stations include factories, ore<br />
processing facilities, holo-vid studios, or almost anything that you could find<br />
planet-side. Security on stations is very strict, preventing outbreaks of open<br />
violence amongst pilots.<br />
2.3. How easy (if at all) is it for non-TRI enrolled personnel (i.e. non-pilots)<br />
to get onto stations? Obviously they can´t leave on the ships, but do TRI<br />
limit access to pilots?<br />
Working in space is one of the highest paying and prestigious job a person can<br />
hope for. Access to space depends upon the faction. For the Solrains, anyone<br />
can visit space if they can afford the ticket. For the Quantar, you must be<br />
selected by the Spacing Tribune to be allowed a passport.<br />
2.4. Is there gravity in stations? If so is it as strong as planetside? Are<br />
sections in null G?<br />
Depends upon the station. No station has a gravity of a full G, for the sake of the<br />
pilots who would perish in that condition, but most stations will keep at least a<br />
minimal level of gravity (around half a G). Gravity is maintained by same<br />
gravitons that jump engines emit, allowing full control of local gravity fields<br />
depending upon the need of a portion of the station.<br />
186
3. Factions (General)<br />
4. Amananth<br />
2.5. Especially with the new mission computers offering missions to the<br />
neutral stations, why don’t the neutral stations have mission computers or<br />
simulators?<br />
Establishing a link with the subspace information network is difficult and costly.<br />
Since support staff serving on board neutral stations must undergo the same<br />
genetic modification as pilots, there are few skilled workers available. The TRI<br />
has never found it cost efficient to establish a link.<br />
It has to do with how subspace networks operate. Nothing is able to travel faster<br />
than the speed of light, correct? How then is information and communication<br />
transmitted? It´s done by sending an digital signal through a jumpgate. Focused<br />
energy pulses are directed at a jumpgate. Communication relays then receive the<br />
packets of data coming through the jumpgate and re-transmit it inside the sector.<br />
Now, how this relates to neutral stations is that every time a pilot docks at a<br />
neutral station, the AI transmits to the pilot´s computer it´s current need. The first<br />
time you dock with a station connected to the subspace network, the mission<br />
computers across the galaxy are updated with the needs of the neutral station.<br />
It´s not a real time connection, and because of that neutral stations have no idea<br />
what the needs of connected stations are.<br />
3.1. Describe how the factions became and settled in the regions they<br />
reside in now.<br />
Historians have argued this issue for generations. The truth of the matter is that<br />
nobody really knows. What is known is that there is no mention of factions prior<br />
to the Great Collapse.<br />
4.1. Where are the Amananthii? Why don´t we ever sees them? Are they<br />
part of the TRI?<br />
The Amananthii were first discovered when one of the Thrice Seven, Enkidoh<br />
Kahn of Octavius, entered Amananth space. He discovered the station and the<br />
planet it orbits. The planet itself is, as far as can be determined, completely<br />
metallic. Electromagnetic interference and it´s dense atmosphere prevent us<br />
from learning any more about it. Probes sent down to the planet simply vanish<br />
(along with any pilot who attempts to enter the atmosphere). The station had it´s<br />
terminals already connected to the TRI´s subspace network. Also on board were<br />
20 children, kept in stasis until Kahn boarded the station. Those children were<br />
split up amongst the factions, studied, and then given new identities by the TRI.<br />
TRI has stated that the children were normal in every respect except that they<br />
could survive both life on a planet and hyperspace jumps. It´s not uncommon for<br />
pilots to claim to be one of the children (now in their early 20´s) but nobody really<br />
believes them. The TRI rates information about the children of Amananth Top<br />
Secret. The Amananth have not objected to being considered part of the TRI, but<br />
they haven´t said they were either. in fact, except for the semi-sentient AI on the<br />
station, there has never been any communication between the TRI and<br />
Amananth [at least officially -Gossip].<br />
187
5. Hyperial<br />
4.2. Tell me a little bit more about Canis9502.<br />
Canis9502 is the most recent of additions to our galaxy, discovered in the year<br />
102. You can read about the discovery here (provide link to<br />
http://www.jossh.com/jgeng/ArticleReader?p=sector/archive&n=canis_followup1.<br />
html). In Canis9502, there is wreckage of what is believed to be another<br />
Amananth station.<br />
5.1. Where are the Hyperials? Why don´t we ever sees them? Are they part<br />
of the TRI?<br />
After the Hyperial war with the Quantar, the Hyperials retreated from space.<br />
Although shuttle runs do occur between their home planet and their base.<br />
Hyperials stick to their tradition. Hyperial is wary of the influence of TRI on their<br />
society, therefore there are no "native" Hyperial pilots in TRI. Hyperials who work<br />
on the station are friendly enough, if you pay them. The rumors of Hyperial<br />
trafficking in Quantar body parts has yet to be proven.<br />
5.2. How long ago was the "faith wars" with Hyperial? If Hyperial does not<br />
have jump capable pilots, how did they fight?<br />
The war took place approximately 15 of our years ago. At the time, the Hyperials<br />
had a number of pilots. It was not until after the war that they retreated to their<br />
own home space.<br />
5.3. Were there 1 or 2 GVB Wars?<br />
There were two. The first war was fought before the Great Collapse but has<br />
retained powerful historical meaning. The second GVB War was fought after the<br />
establishment of TRI and ended with the humbling of Hyperial and the<br />
destruction of its fleet. The first war can be thought of like the Crusades of<br />
Europe against Islam, the second war is like the Gulf War of 1990.<br />
5.4. What kind of government does Hyperial have? Who is in charge?<br />
The year after the end of the first "faith war", Hyperial adopted a democratic<br />
constitution. The present constitution dates from the end of the second GVB<br />
wars, the Federal Republic of Hyperial being formally established six months<br />
later. The country is a parliamentary democracy with a bicameral legislature.<br />
Executive authority lies with the Federal Government, led by the Federal<br />
President (at present, Dr. Kelvin Rauder). Each of the states has its own<br />
legislature with power to pass laws on all matters not expressly reserved for the<br />
competence of the Federal Government. However, the power of local<br />
government executives, who are selected by higher officials, and the narrow<br />
parameters of action set by the central government strictly circumscribe the<br />
effectiveness of citizen participation. Local governments have little independence<br />
in initiating policies; as a rule, local policy is derived from authorizing legislation<br />
or a ministerial order at the national level.<br />
188
6. Octavius<br />
7. Quantar<br />
5.5. Does Hyperial have royalty?<br />
Yes, according to this article<br />
(http://server2038.virtualave.net/majorfreak/PJG/hyperial01a.htm). Hyperial<br />
royalty is considered closest to the German system of nobility for comparison<br />
purposes, and not the English counterpart many people are more familiar with.<br />
Though the formal power of the Hyperial nobility was demolished with the first<br />
establishment of the Republic, it still remains an extensive social networking<br />
force.<br />
6.1. What is the agenda for Octs - Mercenary/war race or exploration race?<br />
Asking "what is the agenda of the Octs" (or any faction) would be like asking<br />
"what is the agenda of America?". There are many Octavians who believe that<br />
warfare is their life mission. Others believe in exploration. It is up to each<br />
individual. No culture is ever monolithic in it’s goals or beliefs.<br />
6.2. What is the Octavius society like?<br />
The Octavians are people of nature. They love the rocks, the trees, the life and<br />
diversoity of the universe...so much so that thy are willing to kill to preserve it.<br />
Octavian politics are run by a system of guilds, or trade associations. They have<br />
the most controlled economy of any of the factions. Promotion in Octavian<br />
society is not based on individual achievement, but what you offer to society as a<br />
whole. Every Octavian is expected to lay down his or her life for the betterment of<br />
their people. The closest cultural equivalent to the Octavians would be a<br />
combination of 21st century environmental activists, 12th century mongols, and<br />
20th century Russians.<br />
7.1. Is there only one Quantar god? A lot of Quantars now pledge<br />
themselves with a player made god<br />
If your not a Quant, you don´t know. The Quantar keep their religious beliefs very<br />
private. It does appear to be a monotheistic religion, but little is known of it. It<br />
expects strict discipline, and forms a tight bond between the Quantar.<br />
7.2. What is the Quantar society like?<br />
The Quantar are somewhat similar to Islamic culture at it´s peak around the 11th<br />
century. They are a deeply religious people, who place a high level of regard for<br />
scholariship and learning. The Quantar have a highly developed artistic side to<br />
their culture. Even the most common appliance in Quantar space combines form<br />
and function to a high degree. The Quantar find Solrain and Octavian society<br />
highly chaotic and uncivilized. Although individual liberty is not highly valued, the<br />
system of family/tribal councils are decntralized to a degree that tyranny is<br />
impossible.<br />
189
8. Solrain<br />
9. Technical Questions<br />
8.1. What is the Solrain society like?<br />
Solrain society is probally the most like America, but with a greater emphasis on<br />
capitalisim rather than religion. The Solrain, politically, are a republic. Anyone<br />
can vote in Solrain society, but the right to vote must be purchased. Solrains<br />
have rights very similar to those enjoyed by Americans (right to speech, right to<br />
assembly, etc.) but one major difference is that Corporate entities are considered<br />
to be individuals with regards to rights. In other words, a major corp on Solrain<br />
has the right of free speech, protection from searches, the right to vote and even<br />
the right to be elected to a position of power. (imagine if the coca-cola<br />
corporation, for example, could be elected mayor of Antlanta. When a<br />
corporation wins an election, they will appoint a management team to make<br />
decisions. Currently corporations hold about 30-40% of all elected offices.)<br />
9.1. Talk a little bit about the genetic modification pilots undergo.<br />
Gravitons (particles that allow for the formation of jump gates) have a negative<br />
impact on the normal brain. Genetic modification is needed to allow for survival<br />
under heavy gravitonic circumstances. The modifications leave pilots smarter,<br />
stronger and more durable than the rest of their species... sadly it also prevents<br />
them from landing on a planet ever again. Under normal gravity conditions, the<br />
enhanced synapses of the brain will cause an "over load" of sorts, leading to a<br />
physical condition similar to a stroke. Conspiracy theorists have said that this is<br />
to keep pilots from becoming too strong a political force, but few believe this. The<br />
TRI insists they are working on a retro-virus to correct this problem, but for over<br />
two decades there have been no results.<br />
A pilot could land on a smaller body with lesser gravity. The danger of flying to<br />
close to a large mass is minimized since the gravity inside the ship is artifically<br />
maintained by the engines.<br />
9.2. What causes a gravitational anomaly to be formed? (That´s a regular<br />
anomaly, not a jumpgate.)<br />
Unknown. Although theoretical physics are are more advanced in the TRI<br />
universe than our own, there is still no proof as to what causes gravitational<br />
anomalies.<br />
9.3. Why do lasers have such a limited range? (I’d have thought the<br />
damage would drop with distance rather than the beam just stopping.)<br />
It’s a result of the method of focus used. The Tri-focus lenses create a pulse<br />
beam that maintains it’s strength but at a cost of limiting it’s range.<br />
190
10. The Conflux<br />
9.4. What's going on with the physics in our galaxy? How do storms fit in?<br />
As revealed recently (102.07), TRI knows that the laws of the universe/physics<br />
have changed, are continuing to change, and that's why the jumpgates are<br />
unstable.<br />
This is also what causes new sectors to be found in space. Storms are simply<br />
visible manifestations of the changes in our galaxy taking place. The many<br />
storms in the Amananth area contributed to the stabilization of the new sector<br />
near Aman Hook.<br />
10.1. Why are Conflux pink?<br />
Most likely too many pilots have been feeding them ham sandwiches.<br />
10.2. Will their story be revealed?<br />
A few years ago the first Conflux appeared in known space. Nobody is sure what<br />
the motivations, goals or origin of the Conflux are, but their story will defiantly be<br />
told through the course of the game.<br />
10.3. Why does the screen slow down when flux are abound in this world?<br />
Possibly you are overwhelmed with the shock of your impending death. Thus, the<br />
galaxy slows down in order to let life flash past your eyes.<br />
10.4. What is the nature of gate-blocking conflux?<br />
The conflux use biological "living technology". They can assimilate other life<br />
forms, but they also can infest nonliving material. "Conflux have some means of<br />
infesting a station or gate (and people as well). Through data collected by pilots<br />
during the Conflux's first attempt on Amananth station, it has been determined<br />
the Conflux do so by implanting a nanotechnological 'virus' into the appropriate<br />
medium. This is done by landing on a station or jumpgate. After a short period, a<br />
complete infestation appears. If left unchecked, it is likely assimilation will follow<br />
shortly thereafter. Assimilation is complete and total as we have been able to tell<br />
from Aeolsah." (Dr. Q'son, Research Board, 102.6.30.)<br />
191
11. The Great Collapse<br />
11.1. What happened during the collapse? How long ago did it occur?<br />
Imagine the fall of Rome if not for Christian and Moslem scholars preserving the<br />
records of Greece and Rome (a pretty near thing. Both groups of scholars came<br />
about by one of those lucky historical accidents. Ask me about "White<br />
Martyrdom" some day if you´re bored). What would we know of early Western<br />
Culture. How would we have known at what point western civilization fell, and<br />
what the reasons were. The same is true in the JumpGate Universe. For some<br />
reason, and most agree that *something* destroyed all electronic records, the<br />
only kind kept by the time of the collapse, civilization came to a screeching halt,<br />
all across the galaxy. We know that pre-collapse culture achieved a high level of<br />
technology and a peaceful society. Scholars will continue to debate this issue<br />
until evidence is found one way or another.<br />
12. The Reconstruction Initiative<br />
12.1. What are the factional tensions of TRI Officially/historically since the<br />
great collapse?<br />
If you believe TRI officials, there is no tension. Anyone who has ever stared<br />
down an enemy missile knows different. The truth is no faction trusts the other.<br />
Remember, each faction is as diverse in it´s belief as a country is on Earth. You<br />
have militants on all sides. You have Solrains who don´t believe in free<br />
enterprise. You have Octavians who loathe combat. Each individual is different,<br />
but there are some cultural differences that lead to tension.<br />
12.2. Is the TRI calendar going to be explained?<br />
A standard method of recording time is something the TRI is still arguing on.<br />
Each faction has it’s own calendar and it’s own method of time keeping. The TRI<br />
encourage pilots to continue to debate this issue until it is resolved.<br />
12.3. Can you explain the governmental system of the TRI and the five<br />
factions?<br />
TRI has complete authority on all matters outside a planets atmosphere. TRI has<br />
no right to interfere with the development of a faction’s planet. In theory. The<br />
truth is more complex. There is give and take on both sides, with a level of<br />
continually friction. TRI council meetings are full of heated exchanges.<br />
192
Chapter C-1<br />
/COMMANDS<br />
/ai : spawns one c1 conflux in offline sim only<br />
/assist: will page a GM or EP for help<br />
/assistoff :cancels help request to a GM<br />
/away : ignore incoming f4 messages with an auto reply<br />
/away : turns off your away message<br />
/bcu : displays if you have a bcu equiped or not in the chat window<br />
/bounty : displays your maximum possible bounty in chat window<br />
/build : To construct a station, execute the command /build with a BuildKit in your<br />
ship's cargo hold. If you have more than oneBuildKit in your hold, one of them will<br />
activate at random. A new station owner automatically finds himself docked at his<br />
POS when the construction process completes. Smaller stations may also be<br />
upgraded by activation of larger-type BuildKits from within the POS itself. For<br />
example, the owner of a 2-point station may dock at his station with a BuildKit-4 in<br />
his ship's cargo hold. Using /build in this situation will upgrade the POS from a 2point<br />
to a 4-point station, adding room for two more expansion modules.<br />
/cargo : displays your current cargo in chat window<br />
/credits : displays your current credits in chat window<br />
/dockoff : turns off docking modx<br />
/exp : displays your current experience points in chat window<br />
/give x : will give credits to another pilot while in flight (pilot must be targeted), (x=<br />
number of credits)<br />
/gms :displays a list of GMs currently online<br />
/hear : removes callsign from the file ignore.txt in your Jumpgate<br />
install directory, and negates /ignore<br />
/help : displays /commands (not complete)<br />
/home : enables a pilot to “home” at an unreg station or POS<br />
/ignore : adss callsign to the file ignore.txt in your Jumpgate install<br />
directory, and you’ll no longer receive text messages from them<br />
C-1<br />
193
kick : will remove you from a POS in the event of being stuck for<br />
having too much cargo<br />
/list : displays a list of the standard comm channels<br />
/mentor : This will send the pilot an invitation to become your student.<br />
(Both parties must be docked at a station for this invitation to be sent.) Once a pilot<br />
has been awarded Mentor status, they will begin to receive messages from TRI each<br />
time new pilots log in. Mentors will also receive a message every time one of their<br />
students logs in to the Jumpgate universe.<br />
/mentor off :To leave your Mentor, type /mentoroff.<br />
/mentor off : removes student from your roster<br />
/mission : displays your current mission<br />
/noprice : The /noprice command is used to cancel an existing custom price for a<br />
specific type of goods. "/noprice FlashFire" would nullify any custom price previously<br />
set for FlashFires, causing the market to again use the TRI base price.<br />
/publish : The /publish command toggles whether the characteristics of your POS are<br />
displayed in the external JOSSH interface. Stations set to "Invite Only" mode will not<br />
be displayed on JOSSH regardless of the /publish setting.<br />
/q : quickly logs out and exits the program (will count as death if in combat)<br />
/quit : quickly logs out and exits the program (will count as death if in combat)<br />
/reg : displays your current registration (HG or civ) in chat window<br />
/registry : displays your current registration (HG or civ) in chat window<br />
/rotacol x y z : sets one rotacol waypoint per sector (x y z=co-ordinates you wish to<br />
set)<br />
/ rotacoloff : erases rotacol waypoint currently set in that sector<br />
/sec : displays which sector you are located in the chat window<br />
/sector : displays which sector you are located in the chat window<br />
/set price : By default, a POS market uses TRI base prices for all commodities and<br />
equipment. The owner may set custom prices for up to twenty types of goods using<br />
the /setprice command. To set the price for Matter Converters at the station to<br />
c800000, the owner would enter /setprice Matter Converters 800000. Be certain to<br />
enter the name correctly, though the command is not case-sensitive. An<br />
acknowledgement message will display when the command is used correctly.<br />
/shipname : sets the name of a ship you put into<br />
storage in a POS hangar; displayed only in the Ship Configuration screen when<br />
selecting a ship to switch into<br />
C-2<br />
194
sq claim : Issuing the /sq claim command in a sector will transfer the claim to your<br />
squad if the sector is unclaimed, or if no members of the claiming squad are present<br />
to defend their claim. If members of the claiming squad are present, all TRI<br />
regulations on combat between members of your squads are rescinded within the<br />
disputed sector only.<br />
/students : A Mentor may tutor up to 10 students at a time. Mentors may check their<br />
student roster by typing /students.<br />
/tags : displays your current registration (HG or civ) in chat window<br />
/time : displays how long you have until your pilot account expires(PayPal<br />
subscribers only)<br />
/unpublish : removes your station from the JOSSH POS inventory list<br />
/unignore : removes callsign from the file ignore.txt in your Jumpgate<br />
install directory, and negates /ignore<br />
/voice : removes callsign from the file ignore.txt in your Jumpgate<br />
install directory, and negates /ignore<br />
/wing : This pilot will be informed that you have requested to become<br />
their wingman. The second pilot must then type the same command, /wing name,<br />
but with the initiating pilot's name<br />
/wingoff : To leave a wing, type /wingoff. A wing is also broken if either pilot<br />
disconnects.<br />
C-3<br />
195
Chapter K-1<br />
KEYBOARD Commands<br />
The default keyboard layout for in-flight controls, assuming no Joystick is present. If<br />
joystick is present, ignore the commands in green.<br />
Pitch<br />
numpad 8 and 2<br />
Yaw<br />
numpad 4 and 6<br />
Roll<br />
, and .<br />
Look around<br />
numbers 1 to 5<br />
Chase view<br />
number 6<br />
Free look toggle<br />
~<br />
Fire gun<br />
space<br />
Fire missile<br />
O<br />
Next target<br />
T<br />
Previous target<br />
Y<br />
Nearest target<br />
U<br />
Toggle radar group<br />
E<br />
Toggle radar range<br />
R<br />
Afterburners<br />
numpad 9<br />
Brakes<br />
numpad 3<br />
Initiate jump<br />
(only in jumpgates)<br />
J<br />
Toggle Guns<br />
G<br />
Toggle Missiles<br />
N<br />
Change firing mode<br />
F<br />
Center<br />
numpad 5<br />
Zoom<br />
Z<br />
Navigation map<br />
M<br />
HUD toggle<br />
H<br />
Scan<br />
(only with scanner MODx)<br />
S<br />
Snap picture<br />
(only with camera MODx)<br />
P<br />
Boosters<br />
(only with booster MODx)<br />
B<br />
Anti-missile shockwave<br />
(only with anti-missile MODx)<br />
X<br />
Scroll chat up<br />
Page Up<br />
Scroll chat down<br />
Page Down<br />
Toggle frame rate<br />
A<br />
options<br />
ESC<br />
196
Medals<br />
TRI pilots who have completed basic, demanding, or extraordinary feats are<br />
rewarded with the following medals. Medals are badges of honor, and should be<br />
worn with pride by any who receive them.<br />
Available Medals<br />
Complete Medal Type Requirements<br />
Spirit of Unity<br />
Merit of Defense<br />
Safety Belt<br />
Miner's Heart<br />
Ring of Commitment<br />
Tactical Pride<br />
Honor's Mark<br />
Flame of Courage<br />
Leap of Faith<br />
Path of Light<br />
Unity Stripe<br />
Unity Stripe I<br />
Unity Stripe II<br />
Unity Stripe III<br />
Unity Stripe IV<br />
Unity Stripe V<br />
Basic Skill Medal Conflux Rips<br />
Basic Skill Medal Opposing Faction Rips<br />
Basic Skill Medal Landings<br />
Basic Skill Medal Ore Sold<br />
Basic Skill Medal Duty Hours<br />
Basic Skill Medal Missile Hits<br />
Basic Skill Medal Completed Missions<br />
Basic Skill Medal Bounty Collected<br />
Basic Skill Medal Jumpgates Traveled<br />
Basic Skill Medal Beacons Controlled<br />
Basic Skill Medal Kill 100 Conflux<br />
Basic Skill Medal Kill 500 Conflux<br />
Basic Skill Medal Kill 1000 Conflux<br />
Basic Skill Medal Kill 5000 Conflux<br />
Basic Skill Medal Kill 10000 Conflux<br />
Basic Skill Medal Kill 50000 Conflux<br />
197
Unity Stripe VI<br />
Closed Eye<br />
The Ironic Trust<br />
Shame's Mark<br />
Wire of Instability<br />
Black Dwarf<br />
Badge of Irony<br />
Skill Star<br />
Glory Star<br />
Gates of Heaven<br />
Key of Heaven<br />
Streets of Heaven<br />
Title of Heaven<br />
Nuke Splinter<br />
Basic Skill Medal Kill 100000 Conflux<br />
Demerit Claims<br />
Demerit Same Faction Rips<br />
Demerit Failed Missions<br />
Demerit Disconnects<br />
Combination<br />
Demerit<br />
Combination<br />
Demerit<br />
Combination Skill<br />
Medal<br />
Combination Skill<br />
Medal<br />
Full Demerit Set<br />
5 Black Dwarfs<br />
Full Basic Medal Set<br />
5 Skill Stars<br />
Important Medal c1000000 Earned<br />
Unusual Medal c10000000 Earned<br />
Rare Medal c100000000 Earned<br />
Precious Medal c1000000000 Earned<br />
Important Medal Radioactive Mineral Sale<br />
Nuke Shard Unusual Medal Radioactive Mineral Sale<br />
198
Nuke Gem<br />
Ice Splinter<br />
Ice Shard<br />
Ice Gem<br />
Dark Splinter<br />
Dark Shard<br />
Dark Gem<br />
Cross of the<br />
Counselor<br />
Cross of the Mentor<br />
Cross of the<br />
Preceptor<br />
Rare Medal Radioactive Mineral Sale<br />
Important Medal Ice Mineral Sale<br />
Unusual Medal Ice Mineral Sale<br />
Rare Medal Ice Mineral Sale<br />
Important Medal Semifluxor Mineral Sale<br />
Unusual Medal Semifluxor Mineral Sale<br />
Rare Medal Semifluxor Mineral Sale<br />
Important Medal Help a Student level<br />
Important Medal Help a Student to level 10<br />
Important Medal Help 10 Students to level 10<br />
199
Empowered Player<br />
Ruby Nova<br />
Sapphire Nova<br />
Emerald Nova<br />
Amethyst Nova<br />
Amber Nova<br />
Silver Supernova<br />
Gold Supernova<br />
Adamantine<br />
Supernova<br />
Ember of Courage<br />
Fire of Courage<br />
Privileged Position Honorary TRI Status<br />
Important Medal High Political Rating<br />
Important Medal High Political Rating<br />
Important Medal High Political Rating<br />
Important Medal High Political Rating<br />
Important Medal High Political Rating<br />
Unusual Medal High Political Rating<br />
Rare Medal High Political Rating<br />
Precious Medal High Political Rating<br />
Important Medal Bounty Collected<br />
Unusual Medal Bounty Collected<br />
200
Blaze of Courage<br />
Phlogiston of<br />
Courage<br />
Rising Star<br />
Starburst<br />
Sarath's Shine<br />
Luck of the Planet<br />
Luck of the Moon<br />
Luck of the Star<br />
Luck of the Nebula<br />
Luck of the<br />
Impossible<br />
Ruby Optimus<br />
Rare Medal Bounty Collected<br />
Precious Medal Bounty Collected<br />
Important Medal Fast Ranking<br />
Unusual Medal Fast Ranking<br />
Rare Medal Fast Ranking<br />
Important Medal Order Joined<br />
Important Medal Order Joined<br />
Unusual Medal Order Joined<br />
Rare Medal Order Joined<br />
Precious Medal Order Joined<br />
Precious Medal Level 50 Earned<br />
Emerald Optimus Precious Medal Level 50 Earned<br />
201
Sapphire Optimus<br />
Foundation of The<br />
Trust<br />
National Honors<br />
Hamalzah's Divine<br />
Grace<br />
Golden Heart<br />
Night's Blade<br />
The Mane of<br />
Hamalzah<br />
Solrain Star<br />
Emperors' Emissary<br />
Precious Medal Level 50 Earned<br />
Prestigious Award Exceptional behavior on<br />
behalf of Solrain<br />
Prestigious Award Exceptional behavior on<br />
behalf of Octavius<br />
Prestigious Award Exceptional behavior on<br />
behalf of Quantar<br />
Prestigious Award Exceptional behavior on<br />
behalf of Solrain<br />
Prestigious Award Exceptional behavior on<br />
behalf of Octavius<br />
Prestigious Award Exceptional behavior on<br />
behalf of Quantar<br />
Prestigious Honors GM Assigned Medal<br />
Prestigious Honors GM Assigned Medal<br />
Quantar's Flame Prestigious Honors GM Assigned Medal<br />
202
The Order of Opal<br />
The Order of Topaz<br />
The Order of Fenris<br />
Fight Club<br />
Defender of the<br />
Barrier<br />
TRINN Star<br />
Test Pilot Service<br />
Medal<br />
Test Pilot Service<br />
Medal II<br />
Sarath's Shoulder<br />
Explorer's Star<br />
Unusual Recognition Meritorious service on behalf<br />
of Amananth<br />
Unusual Recognition Exceptional behavior on<br />
behalf of Hyperial<br />
Prestigious Honors Ripped a Dev during Combat<br />
Event<br />
Prestigious Honors Victor in a Combat<br />
Tournament Event<br />
Prestigious Honors Service against Infestations<br />
Service Award Journalistic Service<br />
Prestigious Honors Meritorious service during<br />
Beta Testing<br />
Prestigious Honors Dedicated service during<br />
Episode 2 Testing<br />
Prestigious Honors Extraordinarily Helpful to a<br />
Recruit<br />
Rare Combination<br />
Skill Medal<br />
All artifact Pendants<br />
203
Gules Pendant<br />
Vert Pendant<br />
Azure Pendant<br />
Or Pendant<br />
Sarath's Laughter<br />
Sarath's Rage<br />
Sarath's Pride<br />
Sarath's Wit<br />
Keval's Thanks<br />
Shar's Dive<br />
Shar's Drift<br />
Rare Medal Retrieved an Antique Artifact<br />
Rare Medal Retrieved a Rusty Artifact<br />
Rare Medal Retrieved a Superior Artifact<br />
Rare Medal Retrieved a Perfect Artifact<br />
Prestigious Honors GM Assigned Medal<br />
Prestigious Honors GM Assigned Medal<br />
Prestigious Honors GM Assigned Medal<br />
Prestigious Honors GM Assigned Medal<br />
Prestigious Honors GM Assigned Medal<br />
Prestigious Honors GM Assigned Medal<br />
Prestigious Honors GM Assigned Medal<br />
204
Fish Hook<br />
Dead Fish<br />
Samon's Legacy<br />
Seeker of<br />
Knowledge<br />
Aeolsah's Sacrifice<br />
Tache's Crest<br />
Echoes of Hope<br />
Watt's Sun<br />
Medal of Hermod<br />
Traveler's Choice<br />
Speedway Supreme<br />
Prestigious Honors GM Assigned Medal<br />
Prestigious Honors GM Assigned Medal<br />
Prestigious Honors GM Assigned Medal<br />
Prestigious Honors GM Assigned Medal<br />
Prestigious Honors GM Assigned Medal<br />
Prestigious Honors GM Assigned Medal<br />
Prestigious Honors GM Assigned Medal<br />
Prestigious Honors GM Assigned Medal<br />
Prestigious Honors Exceptional Piloting Skill<br />
during Race Event<br />
Prestigious Honors GM Assigned medal<br />
Prestigious Honors GM Assigned Medal<br />
205
Roid Runner<br />
Ronin's Choice<br />
Optimal Speed<br />
All Nations Flag<br />
Cormonra's<br />
Commendation<br />
Prestigious Honors GM Assigned Medal<br />
Prestigious Honors GM Assigned Medal<br />
Prestigious Honors GM Assigned Medal<br />
Prestigious Honors GM Assigned Medal<br />
Prestigious Honors GM Assigned Medal<br />
206
Titles<br />
TRI has many pilots worthy of note for their efforts. However, the pilot who is<br />
granted a title is at the top (or bottom) of the pile during the last 24 hours of<br />
analyzed official statistics. Only one pilot may hold any given title at any one time,<br />
and no more than one. Should you encounter an officially recognized TRI pilot, it<br />
would be wise to show the proper respect.<br />
Available Titles<br />
Complete Title Type Requirements<br />
Affluent Profits<br />
Expert<br />
Cowardly Bounty<br />
Hunter<br />
Small Trophy Highest Networth<br />
Tarnished Small<br />
Trophy<br />
Fatality Expert Tarnished<br />
Midsize Trophy<br />
Grand Master<br />
Assassin<br />
Grand Master<br />
Bounty Hunter<br />
Grand Master<br />
Veteran<br />
Lowest Average Bounty<br />
Per Hour<br />
Highest Death Count<br />
Midsize Trophy Highest Kill Count<br />
Trophy Average Bounty<br />
Trophy (Hours x 10) + Experience<br />
Master Assassin Midsize Trophy Highest Average Kills Per<br />
Hour<br />
Master Bounty<br />
Hunter<br />
Small Trophy Highest Average Bounty<br />
Per Hour<br />
Master Veteran Midsize Trophy Highest Average<br />
Experience Per Hour<br />
Exterminator of the<br />
Void<br />
Midsize Trophy Most Conflux Kills<br />
207
Master Warrior Pendant Highest Kill Ratio<br />
Munitions Combat<br />
Specialist<br />
Munitions Sniping<br />
Specialist<br />
Pendant Highest Gunshot Hits<br />
Pendant Highest Gun Accuracy<br />
Operations Expert Small Trophy Most Missions Completed<br />
Profits Expert Small Trophy Most Credits Per Hour<br />
Projectile Combat<br />
Specialist<br />
Projectile Sniping<br />
Specialist<br />
Pusillanimous<br />
Bounty Hunter<br />
Superior Operations<br />
Expert<br />
Pendant Most Missile Hits<br />
Pendant Highest Missile Accuracy<br />
Tarnished Small<br />
Trophy<br />
Lowest Average Bounty<br />
Small Trophy Highest Mission Success<br />
Ratio<br />
Transport Specialist Pendant Highest Insurance Rating<br />
208
Commodities<br />
there are all kinds of goods, gizmos, and gadgets in this universe. below are listed<br />
TRI's main concerns, and a few miscellaneous things. any and all of these are<br />
available for trading at your neighborhood space station.<br />
Available Commodities<br />
Common Name ID Classification<br />
Al<br />
Aluminum<br />
Trivalent Metallic Element<br />
Ammo Components<br />
Ammunition<br />
Sb Metalloid Element<br />
Antimony<br />
Armor Components<br />
Armor<br />
Ba Metallic Element<br />
Barium<br />
B Metalloid Element<br />
Boron<br />
C Element<br />
Carbon<br />
Cs Metallic Element<br />
Cesium<br />
CH Construction Material<br />
Chemicals<br />
Cr Metallic Element<br />
Chromium<br />
Co Metallic Element<br />
Cobalt<br />
O-1 Ore<br />
Common Metals<br />
Com Components<br />
Composites<br />
CFX BioMaterial<br />
Conflux Biomass<br />
CM Construction Material<br />
Construction Materials<br />
209
Copper<br />
CPUs<br />
Electronics<br />
Erbium<br />
Explosives<br />
Fiber Optics<br />
Fuel Cells<br />
Gallium<br />
Germanium<br />
Gold<br />
Grain<br />
Gravitational Components<br />
Helium<br />
Ice<br />
Indium<br />
Iridium<br />
Iron<br />
Laser Components<br />
Lithium<br />
Lumber<br />
Machined Parts<br />
Cu Metallic Element<br />
CPU Computing Material<br />
EL Computing Material<br />
Er Metallic Element<br />
Exp Components<br />
FO Components<br />
FU Fuel Source<br />
Ga Metallic Element<br />
Ge Metalloid Element<br />
Au Metallic Element<br />
GRN Staple Life Source<br />
GravC Components<br />
He Noble Gas<br />
O-3 Ore<br />
In Metallic Element<br />
Ir Metallic Element<br />
Fe Metallic Element<br />
LC Components<br />
Li Metallic Element<br />
L Construction Material<br />
MP Components<br />
210
Magnesium<br />
Magnetics<br />
Manufactured Foods<br />
Matter Converters<br />
Medical Supplies<br />
Molybdenum<br />
Nitrogen<br />
Octavia Light<br />
Optics<br />
Organic Foods<br />
Palladium<br />
Phosphorous<br />
Platinum<br />
Plutonium<br />
Precious Metals<br />
Prosthetics<br />
Proximity Fuses<br />
Quanus Ice<br />
Radioactive Metals<br />
Radium<br />
RAM<br />
Mg Metallic Element<br />
Mag Components<br />
MF Staple Life Source<br />
MC Components<br />
MED Life Repair<br />
Mo Transition Element<br />
N Gas<br />
OBR Staple Life Source<br />
Op Components<br />
OF Staple Life Source<br />
Pd Transition Element<br />
P Nonmetallic Element<br />
Pt Transition Element<br />
Pu Radioactive Metallic Element<br />
O-5 Ore<br />
SyO BioMaterial<br />
PF Components<br />
QBR Staple Life Source<br />
O-2 Ore<br />
Ra Radioactive Metallic Element<br />
RAM Computing Material<br />
211
RF Transceivers<br />
Rubber<br />
Semifluxors<br />
Silicon<br />
Silver<br />
Solrain Stout<br />
Synthetics<br />
Textiles<br />
Titanium<br />
Trap<br />
Uranium<br />
Vanadium<br />
Water<br />
X-0013-S<br />
X-1901-L<br />
X-3555-L<br />
X-4533-L<br />
X-7770-L<br />
X-8821-L<br />
X-9450-C<br />
Xenon<br />
RFT Components<br />
RU Components<br />
O-4 Ore<br />
Si Metalloid Element<br />
Ag Metallic Element<br />
SBR Staple Life Source<br />
Sy Components<br />
TX Construction Material<br />
Ti Transition Element<br />
UXB Cargo Bomb<br />
U Radioactive Metallic Element<br />
V Transition Element<br />
H²O Staple Life Source<br />
X-0013-S Shipping Crate<br />
X-1901-L Classified Container (C/HMC)<br />
X-3555-L Classified Container (C/HMC)<br />
X-4533-L Classified Container (C/HMC)<br />
X-7770-L Classified Container (C/HMC)<br />
X-8821-L Classified Container (C/HMC)<br />
X-9450-C Optical Data Disc<br />
Xe Noble Gas<br />
212
Zinc<br />
Zn Transition Element<br />
213
List of Custom Producers in the Various Faction Spaces<br />
OCTAVIAN SPACE<br />
• Octavian Core<br />
Tooling center (nopers)<br />
1 Naval Yard (see below)<br />
Nano Assembler (Laser Components c131100/per)<br />
Custom Producer (Centerfuge 5: Indium, Uranium, Fuel Cells, MC - no<br />
fee/refund)<br />
Custom Producer (Sentinel: Germanium, Silver, RF - c14250 refund)<br />
• Outpost Station<br />
3 Naval Yards (see below)<br />
Custom Producer (Octavian Light: Water, Grain - no fee/refund)<br />
• Great Pillars<br />
1 Naval Yard (see below)<br />
Science Factory (Duelist: Copper, Gallium, Electronics - no fee/refund)<br />
QUANTAR SPACE<br />
• Quantar Core<br />
Tooling Center (nopers)<br />
1 Naval Yard (see below)<br />
1 Custom Producer (Ivy: Germanium, Silver, RF - c14250 refund)<br />
• Corridor<br />
3 Naval Yards (see below)<br />
Science Factory (Abattis: Germanium, Gold, Magnetics - c162851 refund)<br />
• Tripoint<br />
1 Naval Yard (see below)<br />
Nano Assembler (Fiber Optics c36340/per)<br />
SOLRAIN SPACE<br />
• Solrain Core<br />
Tooling Center (nopers)<br />
1 Naval Yard (see below)<br />
Custom Producer (Echo: Germanium, Silver, RF - c14250 refund)<br />
• Wake Station<br />
2 Naval Yard (see below)<br />
• Cornea Station<br />
2 Naval Yards (see below)<br />
Nano Assembler (Grav comps c345000/per)<br />
Science Factory (Proxy Fuses: Explosives, Machined Parts, RF transceivers -<br />
c50401 refund)<br />
• Octavian<br />
Exclusive shipyards: Peregrine (GreatPillars); Hawk (Outpost); Chiropteran<br />
(Outpost); Raptor (Oct Core); Griffin (Outpost)<br />
• Quantar<br />
Exclusive shipyards: Simoon (Corridor); Whirlwind (Corridor); Tempest<br />
(Tripoint); Tornado (Quantar Core); Squall (Corridor)<br />
• Solrain<br />
Exclusive shipyards: Quicksilver (Cornea); Phaeton (Cornea); Invader<br />
(Wake); Barracuda (Solrain Core); Vedette (Wake)<br />
CP-1<br />
214
Orrus Minor<br />
Orrus Major<br />
Imperial Gates<br />
Imperial Crossroads<br />
The Dark Fork<br />
Octavius Core<br />
Octavius Great Pillars<br />
Vorgus 2<br />
The Outer Rim<br />
The Rim<br />
The Divide<br />
Arkan's Cloud<br />
The Outer Edge<br />
The Quadrangle<br />
The Edge<br />
Sark's Passage<br />
Quantar Hook<br />
Quantar TriPoint<br />
Long Walk<br />
Tictac's Hook<br />
Lothars Landing<br />
Omni V<br />
Omni IV<br />
Rounds of Quantos<br />
Path of Hordes<br />
Inner Roh-Cloud<br />
Quanaus Crossing<br />
Third Gate<br />
Square of Quantos<br />
The Fields<br />
Tranquillus Major<br />
Outer Roh-Cloud<br />
Hook of Roh<br />
Quantar Depot<br />
Tranquillus Minor<br />
The Dark Path<br />
The Inner Oasis<br />
Solrain Core<br />
The Dark End<br />
Orus' Leg<br />
The Outer Oasis<br />
Midpoint Rift<br />
The Azure Chun<br />
Orus' Tail<br />
Upper Third<br />
Inner Third<br />
The Outer Depths<br />
Tribular Cannal<br />
Octavius Depot<br />
Inner Lighthouse<br />
Diluted Reaches<br />
Solrain Wake<br />
Wanderer's Pond<br />
The Sea of Solrain<br />
The Cerulean Clouds<br />
Imperial Causeway<br />
Versalus Hook<br />
Blasted Corner<br />
Primus Point<br />
Dark Gateway<br />
The Stith<br />
Greater Locks<br />
The Bronci Rift<br />
Purian Lake<br />
Outer Lighthouse Morian Harbour<br />
Lesser Arm<br />
Hirbel's Channel<br />
The Narrow Cannal<br />
Octavian Shore<br />
Light Crossroads<br />
The Connexion Inner Gyre<br />
GBS Outskirts<br />
Light Lost<br />
Zealots Refuge<br />
Dark Crossroads<br />
Saron's Shoulder<br />
Light Gateway<br />
Outer Ring<br />
Klatsches Hold<br />
The Gurge Pulsar<br />
Outer Gyre<br />
Four Fingers<br />
Aman Gate<br />
Evenings End<br />
The Dark<br />
Saron's Eye Inner Storm<br />
Greater Arm<br />
Last Parsec<br />
Sea of Shadows<br />
Quantar Gate<br />
Outer Storm<br />
Great Venure Belt<br />
Inner Cloud<br />
The Lesser Locks<br />
Aman Hook<br />
The Split<br />
The Last Point Ring View<br />
Ekoo's Stop<br />
The Main Gate<br />
Hyperion Gate<br />
Inner Aman<br />
Amananth<br />
Octavius Outpost<br />
The Gyre<br />
Mokks Battlefield<br />
Far Point<br />
Quantar Core<br />
Callow Passage<br />
Solrain Depot<br />
Quantar Corridor<br />
Solrain Cornea<br />
The Reaches Outer Cloud<br />
The Rear Gate<br />
The Dark Trail<br />
T&P<br />
Hyperial<br />
215<br />
Outer Third<br />
Hyperian Hook<br />
Far Gate
Joystick Controls<br />
look around<br />
previous target<br />
fire gun<br />
next target<br />
fire missile<br />
pitch and yaw<br />
nearest target<br />
afterburners<br />
7<br />
brakes<br />
6<br />
Quick Reference Card<br />
8<br />
5<br />
initiate jump**<br />
1<br />
3<br />
H<br />
4<br />
2<br />
TM<br />
toggle radar group<br />
toggle frame rate<br />
esc<br />
toggle frame rate<br />
scan*<br />
zoom<br />
F1 F2 F3 F4 F5 F6 F7 F8 F9 F10 F11 F12<br />
~ 1 2 3 4 5 6 7 8 9 0 - = bkspc<br />
tab Q W E R T Y U I O P [ ] \<br />
caps<br />
lock<br />
shift<br />
toggle radar range next target<br />
look around chase view<br />
A S D F G H J K L ; ' enter<br />
Z X C V B N M , . ?<br />
ctrl alt space<br />
alt<br />
ctrl<br />
anti-missile shockwave*<br />
roll<br />
Squad Chat Whisper Chat<br />
Faction Chat Sector Chat Booth Chat<br />
throttle<br />
change firing mode<br />
scroll chat up<br />
scroll chat down<br />
fire gun<br />
prnt<br />
scrn<br />
toggle guns<br />
scrl<br />
lock<br />
paus<br />
ins hom pgup<br />
del end pgdw<br />
boosters*<br />
* Equiped MODx required<br />
** Initiate jump (only when inside a jumpgate)<br />
num<br />
lock<br />
/ *<br />
7 8 9<br />
4 5 6<br />
1 2 3<br />
0<br />
del<br />
Keyboard Controls<br />
target <br />
nearest target fire missile snap picture*<br />
previous target initiate jump** target aggerssor<br />
HUD toggle<br />
throttle up<br />
throttle down<br />
Macros<br />
map<br />
toggle missiles<br />
center rotation<br />
target under reticle<br />
-<br />
+<br />
entr<br />
shift<br />
afterburners<br />
brakes<br />
roll<br />
pitch & yaw<br />
R<br />
NETDEVIL<br />
NetDevil is a trademark belonging to NetDevil LLP and is registered in Colorado. Copyright (C) 1999, 2000, 2001 NetDevil LLP. All Rights Reserved.<br />
216
HUD<br />
Griza: I have conflux on radar<br />
Hern: on my way<br />
Griza: thx<br />
chat text display<br />
target holo-model<br />
D28881<br />
distance to target<br />
desired throttle level<br />
actual thrust<br />
shield gauge<br />
armor / hull gauge<br />
cargo capacity<br />
velocimeter<br />
distance to target<br />
target transponder data<br />
STRETCH / QUANTAR / 198,462<br />
VELOCITY: 350<br />
SHIELDS: 25%<br />
HULL: 100%<br />
target statistics<br />
target alignment reference<br />
jumpgate indicator<br />
V232.50<br />
C0.000<br />
D28881<br />
chat text<br />
target location arrow<br />
current drift vector<br />
S100%<br />
A100%<br />
radar display plane<br />
radar objects<br />
shield level indicator<br />
:1<br />
missile lock indicator<br />
x15000<br />
ALL<br />
radar display data<br />
armor level indicator<br />
capacitor charge<br />
fuel gauge<br />
targeting crosshairs<br />
firing mode<br />
projectile inventory<br />
gun display<br />
CALEFACTOR<br />
MORNING STAR<br />
missile display<br />
targeting reticle<br />
mission indicator<br />
MISSION:<br />
No mission assigned.<br />
217
Communication<br />
function key chat to:<br />
F1<br />
F2<br />
F3<br />
F4<br />
F5<br />
F6<br />
F7<br />
F8<br />
F9<br />
F10<br />
faction sector<br />
squad galaxy<br />
public sector<br />
whisper galaxy<br />
booth galaxy<br />
macro<br />
macro<br />
macro<br />
macro<br />
macro<br />
Official Comm Channels<br />
channel purpose<br />
:help<br />
:new<br />
:newb<br />
:chat<br />
:sol<br />
:oct<br />
:quan<br />
:flux<br />
:jobs<br />
To record a macro, press<br />
Shift+F key (F6, F7, F8, F9,<br />
or F10). This is the F key<br />
that the macro will be<br />
recorded to. You are now<br />
in record mode. Now type<br />
which channel you want<br />
the message to be displayed<br />
in, dropping the F. For<br />
example, if you want it to<br />
play in F3, type '3'. Type<br />
your message exactly as<br />
you would if you were using<br />
the channel normally.<br />
Comm Line Commands<br />
command<br />
/bounty<br />
/cargo<br />
/credits<br />
/give<br />
/mission<br />
/exp<br />
/ignore [callsign]<br />
/q<br />
/time<br />
/voice [callsign]<br />
/hear [callsign]<br />
The default channel all new recruits join automatically. Used for general help questions and responses.<br />
This is an alternate help channel, used when there is too much traffic on the default :help channel.<br />
This is an alternate help channel, used when there is too much traffic on the default :help channel.<br />
This is a general chat and conversations channel. This can be used for all forms of general discussion.<br />
This is an alternate help channel for help specific to the Solrain faction.<br />
This is an alternate help channel for help specific to the Octavian faction.<br />
This is an alternate help channel for help specific to the Quantar faction.<br />
Conlux infestation channel , information on current Conflux whereabouts, hunting strategy, & anything Conflux related.<br />
Offering services and hiring assistance for all manner of odd jobs, this is the jobs channel.<br />
:roid Asteroid farming intelligence, conversations, locations of valuable asteroids, mining tips, and anything asteroid related.<br />
To join one of these booths, type: :name where name is replaced with the name of the booth you wish to join.<br />
description<br />
Displays your maximum possible bounty.<br />
Displays your current cargo loadout.<br />
Displays your current amount of credits.<br />
Transfers funds while in flight, to targeted pilot.<br />
Displays your current mission details.<br />
Displays your current amount of experience.<br />
Adds callsign to your local ignore.txt<br />
Quick logout. Counts as a death if you are in space.<br />
Reports how long you have until your pilot account expires.<br />
Removes callsign from your local ignore.txt.<br />
Removes callsign from your local ignore.txt.<br />
Chat Color Key<br />
color description<br />
Grey<br />
Red<br />
Green<br />
Blue<br />
Aqua<br />
Orange<br />
White<br />
Lime<br />
Purple<br />
Yellow<br />
echo galaxy<br />
Octavian faction sector<br />
Quantar faction sector<br />
Solrain faction sector<br />
squad galaxy<br />
public sector<br />
whisper galaxy<br />
booth galaxy<br />
system galaxy<br />
system you<br />
218