Alcatel One Touch 511 & 525 user guide - Vodafone New Zealand
Alcatel One Touch 511 & 525 user guide - Vodafone New Zealand
Alcatel One Touch 511 & 525 user guide - Vodafone New Zealand

You also want an ePaper? Increase the reach of your titles
YUMPU automatically turns print PDFs into web optimized ePapers that Google loves.
© ALCATEL BUSINESS SYSTEMS 2002.<br />
All rights reserved. <strong>Alcatel</strong> reserves the<br />
right to alter the material or technical<br />
specifications of its products without prior<br />
notice.<br />
3DS 08962AAAA01<br />
www.alcatel.com<br />
English
CONTENTS<br />
Safety and precautions p. 4<br />
Information p. 8<br />
1.Your telephone p. 9<br />
1.1 Keys p. 9<br />
1.2 Icons p. 11<br />
1.3 Symbols used in the User Guide p. 12<br />
2. Getting started p. 13<br />
2.1 SIM Card and battery p. 13<br />
2.2 Switching your phone on p. 16<br />
2.3 Switching your phone off p. 16<br />
3. Calls p. 17<br />
3.1 Making a call p. 17<br />
3.2 Calling your voice mail p. 18<br />
3.3 Receiving a call p. 18<br />
3.4 Options available while calling p. 19<br />
3.5 Double line management p. 22<br />
4. Call memory p. 23<br />
5. MENU p. 24<br />
6. Events p. 27<br />
1<br />
7. Directories p. 28<br />
7.1 Accessing your directories p. 28<br />
7.2 Creating a directory file p. 30<br />
7.3 Classifying a file in a family p. 31<br />
7.4 Available options p. 32<br />
7.5 The voice recognition function p. 34<br />
7.6 Assigning a ring tone to a family p. 35<br />
7.7 Temporary SIM card p. 36<br />
8. Messages p. 37<br />
8.1 Accessing messages p. 37<br />
8.2 Reading your messages p. 38<br />
8.3 Writing a message p. 43<br />
8.4 Data entry system: predictive mode p. 45<br />
8.5 Sending a message p. 48<br />
8.6 Deleting your messages p. 49<br />
9. My setup p. 50<br />
9.1 Sounds p. 50<br />
9.2 Pictures p. 55<br />
9.3 Black/White background (Negat.Screen) p. 55<br />
9.4 Downloaded data (Downloaded) p. 56<br />
9.5 Zoom p. 57<br />
9.6 Numbers p. 57<br />
10. Alarms p. 59<br />
10.1 Wake up p. 59<br />
10.2 Appointments p. 60<br />
10.3 Birthdays p. 60<br />
10.4 Options p. 60<br />
2
11. Memo p. 61<br />
11.1 Recording a voice memo p. 61<br />
11.2 Using a voice memo p. 61<br />
11.3 Deleting a voice memo p. 62<br />
12. Calculator/Converter p. 63<br />
12.1 Calculator p. 63<br />
12.2 Convert p. 64<br />
13. Setup p. 66<br />
13.1 Services p. 66<br />
13.2 Clock p. 74<br />
13.3 Languages p. 74<br />
13.4 Dictionary p. 74<br />
13.5 Input mode p. 75<br />
13.6 Display p. 75<br />
13.7 Pickup p. 75<br />
13.8 Automatic power off p. 76<br />
13.9 Double line management p. 76<br />
13.10 Keypad lock p. 76<br />
14.WAP p. 77<br />
14.1 Accessing WAP Services p. 77<br />
14.2 Available options p. 78<br />
14.3 Setting up your access p. 80<br />
14.4 Launching WAP p. 82<br />
15. Games p. 83<br />
16. Warranty p. 87<br />
17. Accessories p. 91<br />
3<br />
SAFETY AND<br />
PRECAUTIONS<br />
We recommend that you read this chapter carefully before use.The<br />
manufacturer disclaims any liability for damage which may result as a<br />
consequence of improper use or use contrary to the instructions<br />
contained herein.<br />
• TRAFFIC SAFETY:<br />
Given recent studies, which show that using a mobile<br />
telephone while driving a vehicle constitutes a real risk, even<br />
when the hands-free kit is used (car kit, headset…), drivers<br />
are requested to refrain from using their mobile telephone<br />
when the vehicle is not parked.<br />
Your mobile phone when powered emits radiation which may<br />
interfere with the vehicle electronic systems such as anti-lock brakes<br />
(ABS, airbag).As a result, you should:<br />
-avoid placing the phone on the dashboard.<br />
- connect the phone to an external antenna.The antenna should be<br />
mounted and located away from the driver and passengers or<br />
separated from them by a metal screen (e.g. the car roof).<br />
- check with the car manufacturer that the dashboard is adequately<br />
shielded from mobile phone RF energy.<br />
• CONDITIONS OF USE:<br />
Switch the phone off before boarding an aircraft to avoid<br />
prosecution. Switch the phone off when you are in health care<br />
facilities, except in designated areas. As with many other types of<br />
equipment now in regular use, mobile telephones can interfere with<br />
other electrical or electronic devices, or equipment using radio<br />
frequency. When the phone is switched on, avoid placing it near a<br />
medical aid device, if you carry one, such as a pacemaker, one hearing<br />
4
aid or insulin pump.When using the phone you should hold it against<br />
the ear on the opposite side to the device, if any.<br />
Do not switch the phone on when you are near gas or flammable<br />
liquids. Strictly obey all signs and instructions posted in a fuel depot,<br />
gas station, or chemical plant, or in any potentially explosive<br />
atmosphere. Do not let small children use the phone without<br />
supervision. Do not attempt to open or repair it yourself. Use only<br />
<strong>Alcatel</strong> batteries, battery chargers, and accessories that are<br />
compatible with your phone model. (See Accessories List, chapter<br />
17). <strong>Alcatel</strong> will not be held responsible if this is not respected. Do<br />
not allow your phone to be exposed to unfavourable environmental<br />
conditions (humidity, rain, infiltration of liquids, dust, sea air, etc).The<br />
manufacturer’s recommended operating temperature range is -10°C<br />
to + 55°C. Over 55°C the legibility of the phone’s display may be<br />
impaired, though this is temporary and not serious.<br />
• BATTERY:<br />
Before removing the battery from your phone, please make sure that<br />
the phone is switched off.Take precautions with the battery and do<br />
not attempt to open the battery (chemical substances may cause<br />
burns). Do not pierce, disassemble nor cause a short-circuit in a<br />
battery. Do not burn or dispose of a used battery in household waste<br />
or store it at temperatures above 60 °C. Batteries must be disposed<br />
of in accordance with locally applicable environmental legislation.<br />
Batteries should not be used for any other purpose than the one<br />
intended. Never use damaged batteries.<br />
5<br />
• RADIO WAVES:<br />
Before a phone model is available for sale to the public, compliance<br />
with the International <strong>guide</strong>lines (ICNIRP) or European Directive<br />
1999/5/EC (R&TTE) must be shown. The protection of the health<br />
and the safety for the <strong>user</strong> and any other person constitute an<br />
essential element of these <strong>guide</strong>lines or this directive.<br />
THIS MOBILE PHONE MEETS THE INTERNATIONAL AND EU<br />
REQUIREMENTS FOR EXPOSURE TO RADIO WAVES.<br />
Your mobile phone is a radio transmitter and receiver. It is designed<br />
and manufactured not to exceed the limits for exposure to radiofrequency<br />
(RF) energy recommended by International <strong>guide</strong>lines<br />
(ICNIRP) (1) and by the Council of the European Union<br />
(Recommendation 1999/519/EC) (2). These limits are part of<br />
comprehensive <strong>guide</strong>lines and establish permitted levels of RF energy<br />
for the general population. The <strong>guide</strong>lines were developed by<br />
independent scientific organisations through periodic and thorough<br />
evaluation of scientific studies.The limits include a substantial safety<br />
margin designed to assure the safety of all persons, regardless of age<br />
and health.<br />
The exposure standard for mobile phones employs a unit of<br />
measurement known as the Specific Absorption Rate, or SAR. The<br />
SAR limit stated in the International <strong>guide</strong>lines or recommended by<br />
!<br />
(1) ICNIRP <strong>guide</strong>lines are applicable in the following areas:<br />
Central America (except Mexico), South & North<br />
Africa, Asia Pacific (except Taiwan, Korea, and<br />
Australia).<br />
(2) European recommendation (1999/519/EC) is<br />
applicable in the following areas: Europe, Eastern<br />
Europe, Israel.<br />
6
the Council of the European Union is 2 W/kg (1).Tests for SAR are<br />
conducted using standard operating positions with the phone<br />
transmitting at its highest certified power level in all tested frequency<br />
bands. Although the SAR is determined at the highest certified<br />
power level, the actual SAR level of the phone while operating can be<br />
well below the maximum value. This is because the phone is designed<br />
to operate at multiple power levels so as to use only the power<br />
required to reach the network. In general, the closer you are to a<br />
base station antenna, the lower the power output of the phone.<br />
The highest tested SAR value for this mobile phone for use at the ear<br />
and compliance against the standard is 0.6 W/kg. While there may be<br />
differences between the SAR levels on various phones and at various<br />
positions, they all meet the relevant International <strong>guide</strong>lines and EU<br />
requirements for RF exposure.<br />
Your telephone is equipped with a built-in antenna. For optimal<br />
operation, you should avoid touching it or degrading it.<br />
!<br />
(1) The SAR limit for mobile phones used by the public is<br />
2 watts/kilogram (W/kg) averaged over ten grams of<br />
body tissue. The international <strong>guide</strong>lines or European<br />
limit incorporate a substantial margin of safety to give<br />
additional protection for the public and to account for<br />
any variations in measurements.<br />
7<br />
• Web site: www.alcatel.com<br />
• Wap address: wap.alcatel.com<br />
• <strong>Alcatel</strong> hotline No.: see “<strong>Alcatel</strong> Services” leaflet (calls charged at<br />
applicable local rate in your country).<br />
Your telephone is designed to make and receive calls. It operates on<br />
GSM networks with 900 MHz and 1800 MHz bands.<br />
The marking indicates that your telephone complies with EC<br />
directive 1999/5/EC (R&TTE) and the accessories with applicable EC<br />
directives.The entire copy of the Declaration of Conformity for your<br />
telephone can be obtained through <strong>Alcatel</strong> website: www.alcatel.com.<br />
Your telephone is identified by an IMEI number shown on the<br />
packaging label and in the product’s memory. We recommend that<br />
you note the number the first time you use your telephone by<br />
entering , , , , and keep it safely. It may be<br />
requested if your telephone is stolen. This number allows your<br />
mobile telephone to be blocked preventing a third person from using<br />
it, even with a different SIM card.<br />
April 2002<br />
INFORMATION<br />
8
1 YOUR<br />
Delete<br />
Switch on<br />
Switch off<br />
Back<br />
Voicemail<br />
Vibrator<br />
Backlighting<br />
WAP access (1)<br />
1.1<br />
Keys<br />
TELEPHONE<br />
05:13<br />
18-04-2002<br />
Network<br />
ok<br />
Delete (short keypress).<br />
Return to the previous screen (short keypress).<br />
Return to the main screen (long keypress).<br />
9<br />
Answer<br />
Hang up<br />
Call memory<br />
Voice reco.<br />
Menu<br />
Scroll<br />
Messages<br />
Directory<br />
Volume<br />
Lock / Unlock<br />
keypad<br />
!<br />
OK<br />
OK<br />
Switch phone On/Off from the main screen (long<br />
keypress).<br />
Access the MENU / Confirm the option (short keypress).<br />
Access the “Operator” services (long keypress).<br />
Volume control during a call.<br />
Scroll to select an option.<br />
Access the directory (keypress downwards).<br />
Access the messages (keypress upwards).<br />
Answer/Hang up<br />
Access the call memory (Redial) (short keypress).<br />
Use the voice recognition function (long keypress).<br />
Access your voice mail (long keypress).<br />
Switch On/Off the backlighting (long keypress).<br />
Access WAP (long keypress) (1).<br />
Lock or unlock the keypad (long keypress).<br />
Enter upper / lower case letters, digits, punctuation marks,<br />
access the bar of symbols.<br />
Activate / deactivate the vibrator (long keypress).<br />
(1) Depending on your phone model.<br />
10
1.2<br />
!<br />
Icons (1)<br />
Battery charge level.<br />
Vibrator mode: your telephone vibrates but emits no ring<br />
tone nor beep. (See page 52)<br />
Silent mode: your telephone emits no ring tone, no beep<br />
and does not vibrate. (See page 52)<br />
Events (Information to consult): voice messages, all<br />
unanswered calls, unread short messages, unlistened voice<br />
memos, downloaded data (see page 27), and WAP alerts (2).<br />
Short message list is full: your telephone cannot store<br />
any more messages.You must access the short message list<br />
and delete at least one message. (See page 49)<br />
Call Forwarding activated: your calls are forwarded.<br />
(See page 69)<br />
Programmed appointments, birthdays, or wake-up.<br />
(See pages 59, 60)<br />
Signal strength indicator.<br />
(1) Icons and other illustrations shown in this User Guide<br />
are for information only.<br />
(2) Check the availability of this service with your<br />
operator.<br />
11<br />
1.3 Symbols used in the User Guide<br />
!<br />
Indicates the line number when the SIM card has two<br />
distinct telephone numbers (1).<br />
Preferred tariff area. (1)<br />
Keypad locked.<br />
“Manual Network Search” mode.<br />
(See page 73)<br />
Roaming within your subscription country.<br />
Indicates that the GPRS mode is possible (1).<br />
The following symbols are used throughout the <strong>guide</strong>:<br />
OK<br />
OK<br />
Briefly press the centre of the scroll key to confirm an<br />
option.<br />
Move the scroll key up or down to select an option.<br />
Use the keypad keys to enter digits, letters, and<br />
punctuation marks.<br />
(1) Depending on your phone model. Check the<br />
availability of this service with your operator.<br />
12
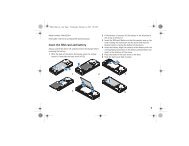
!<br />
2 GETTING<br />
2.1 SIM Card and battery<br />
You must insert a SIM card in order to use your phone.<br />
1<br />
Fit SIM card with the<br />
chip facing downwards<br />
STARTED<br />
Inserting and removing the SIM card (1)<br />
2<br />
Slide the SIM card into<br />
its compartment. Check<br />
that it is properly<br />
inserted<br />
(1) The telephone is compatible with 3 V, 3/5V, and 1.8/3 V<br />
SIM cards. Former 5 V SIM cards can no longer be<br />
used. Contact your operator.<br />
13<br />
1<br />
2<br />
Push the SIM card with<br />
your finger to release it<br />
2<br />
Inserting the battery<br />
1<br />
Insert the battery<br />
1<br />
Close the cover and<br />
slide it as shown<br />
Removing the battery<br />
2<br />
1<br />
Press the button and<br />
pull the cover<br />
2 CLICK<br />
14<br />
2<br />
1 Press<br />
Click into place<br />
Remove the battery
!<br />
1<br />
Charging the battery<br />
Connect the battery<br />
charger<br />
2<br />
The on-screen indicator<br />
stops flashing when<br />
charging is over<br />
• A short beep will sound when charging begins.<br />
Use exclusively <strong>Alcatel</strong> chargers that are<br />
compatible with your phone model.<br />
When you first use your phone you must charge the<br />
battery for approximately 3 hours.<br />
For optimal backlighting, your battery must be fully<br />
charged.<br />
15<br />
Disconnect the battery<br />
charger once charging is<br />
complete<br />
• The charging indicator icon may take several minutes to start to<br />
flash if your battery is new or very low.<br />
• The mains socket outlet must be close to the phone and easily<br />
accessible.<br />
1<br />
2<br />
2.2 Switching your phone on<br />
Switch your phone<br />
on (long keypress)<br />
If you are prompted to enter the time and date, enter the new data<br />
if necessary, then confirm by OK .<br />
If cell broadcast messages are displayed, use the OK key to browse<br />
through them in full or press the<br />
screen.<br />
key to return to the main<br />
While the phone is searching for a network, is displayed.<br />
(???-??? is displayed if your SIM card is rejected by the network, in this<br />
case please contact your operator).<br />
2.3 Switching your phone off<br />
From the main screen, press the key (long keypress).<br />
!<br />
Pin Code<br />
Please enter<br />
PIN Code:<br />
..................<br />
Enter your PIN code if<br />
you are prompted to<br />
If you do not know your PIN code, please contact your<br />
network operator.<br />
Do not leave your PIN code near your phone and store<br />
your card in a safe place when you are not using it.<br />
16<br />
OK<br />
Confirm<br />
05:13<br />
18-04-2002<br />
Network<br />
Main screen
3 CALLS<br />
3.1 Making a call<br />
!<br />
If you make a mistake, you can delete digits by pressing the<br />
key.<br />
To enter characters "+" or "P" (pause), make a long keypress<br />
on (the following characters scroll: 0, +, •, P).<br />
17<br />
Hello<br />
Dial the number Make the call Talk<br />
Hang up<br />
To make an emergency call, if your telephone is within the area<br />
covered by a network, dial 112 or the emergency number provided<br />
by your operator.<br />
To make an international call:<br />
Display the "+"<br />
prefix (long<br />
keypress)<br />
Cntry/area<br />
OK<br />
Albania<br />
Algeria<br />
Andorra<br />
OK OK<br />
Display the list of countries Select the<br />
country/area<br />
Confirm<br />
You may find the country’s or the area’s name by pressing the key<br />
associated with the first character of its name.<br />
Once the “Country/area” code is displayed, dial the rest of the<br />
number and make the call.<br />
3.2 Calling your voice mail<br />
Your voice mail works like an answering machine that you can<br />
consult at any time.<br />
Access the voice mail with a long keypress on , the screen will<br />
then dispay the message “Call?”, confirm by pressing<br />
to make the call.<br />
OK or press<br />
!<br />
3.3 Receiving a call<br />
!<br />
To use your voice mail abroad, contact your operator<br />
before leaving.<br />
If your operator's voice mail access number is not shown,<br />
dial the number that was supplied to you with your<br />
subscription. To later modify this number, use the<br />
“Numbers” MENU option. (See page 57)<br />
When receiving a call, answer by pressing , speak, then hang up by<br />
pressing .<br />
The caller's number is displayed if it was transmitted by the<br />
network (check the availability of this service with your<br />
operator).<br />
18
OK<br />
3.4<br />
!<br />
the vibrator is activated: the telephone will not ring.<br />
the vibrator and ring tone are switched off.<br />
To switch off the ring tone, press when the telephone rings.You<br />
can take a call by pressing . If you press again, the call will be<br />
rejected.<br />
Options available while calling<br />
Volume<br />
Handsfree<br />
Hold call (1)<br />
Dial (1)<br />
Save Number<br />
Increase or decrease the sound level<br />
Activate/deactivate the handsfree mode<br />
(the symbol is then replaced by )<br />
Caution: move the handset away from<br />
your ear before activating this mode<br />
because the amplified volume could cause<br />
hearing damage<br />
Place an ongoing call on hold (you can later<br />
resume the call by pressing the OK key)<br />
Make a second call (an ongoing call will be<br />
automatically put on hold and you can<br />
switch between calls by pressing the OK<br />
key)<br />
Store a phone number in one of your<br />
directories: SIM or Product (Mobile)<br />
(1) Check the availability of this service with your<br />
operator.<br />
19<br />
A beep will inform you of a second incoming call.<br />
If you accept the new call by pressing the key, the ongoing call<br />
is automatically put on hold; you can then swap between the calls by<br />
pressing the OK key and then the OK key.<br />
To refuse the second call, press the key twice.<br />
!<br />
Handling a second incoming call (1)<br />
18:06<br />
MARIE AUDREY<br />
18:08<br />
MARIE<br />
... AUDREY<br />
Directory Access the directory<br />
Messages<br />
Services (1)<br />
Read your messages<br />
Access the services supported by your<br />
network operator<br />
Back Return to the previous screen<br />
OK<br />
(1) Check the availability of this service with your<br />
operator.<br />
20<br />
18:08<br />
MARIE ... Swap calls<br />
AUDREY<br />
OK
!<br />
Conference calls (1)<br />
Your telephone allows you to converse with several persons at the<br />
same time.<br />
MARIE ...<br />
AUDREY<br />
You are handling 2 calls Select “Conference”<br />
Confirm<br />
MARIE<br />
AUDREY<br />
The conference starts<br />
OK<br />
• A third call comes in<br />
FREDERICK<br />
(1) Check the availability of this service with your<br />
operator.<br />
21<br />
Swap calls<br />
End 2nd call<br />
Conference<br />
MARIE<br />
AUDREY<br />
FREDERICK<br />
A third call comes in Answer the call and speak with<br />
your new correspondent<br />
Confirm<br />
OK<br />
OK<br />
Select "Conference" Confirm The 3rd person joins the conference<br />
3.5 Double line management (1)<br />
Your SIM card can contain two lines with two different phone<br />
numbers.<br />
By default, you are automatically on line 1. To switch from line 1 to<br />
line 2, open “Menu/Setup/Double line/Line choice” (1).<br />
Whichever line is selected (1 or 2) you can receive calls intended for<br />
both lines.<br />
Calls made will be invoiced on the selected line.<br />
!<br />
Swap calls<br />
End 2nd call<br />
Conference<br />
OK<br />
Pressing the key hangs up the communication you had with the<br />
correspondent you have selected.<br />
To end the conference call, click on the<br />
“End Conf. Call” option.<br />
OK key and select the<br />
During a call, you can use the<br />
volume.<br />
OK key to adjust the<br />
(1) Check the availability of this service with your<br />
operator.<br />
22<br />
MARIE<br />
AUDREY<br />
FREDERICK
4<br />
To access the call memory, press , the screen will display the last<br />
numbers called preceded by the following symbols:<br />
= Answered incoming call.<br />
= Unanswered incoming call.<br />
= Outgoing call.<br />
Select the number you want by pressing<br />
make the call.<br />
OK then press to<br />
OK<br />
!<br />
CALL MEMORY<br />
Using available options<br />
Save Number<br />
Modify Num.<br />
Clear<br />
CallMem<br />
Back<br />
Store the selected phone number in the<br />
directory<br />
Modify the selected phone number<br />
Clear all the numbers in the call memory<br />
Return to the previous screen<br />
The caller's number is displayed if it was transmitted by the<br />
network (check the availability of this service with your<br />
operator).<br />
To return to the main screen, press the key (long<br />
keypress).<br />
23<br />
5<br />
MENU<br />
From the main screen, press the OK key to go to the MENU.<br />
05:13<br />
18-04-2002<br />
Network<br />
OK OK<br />
Main screen Select “Menu” Confirm<br />
Selection of a MENU function<br />
Directory<br />
Messages<br />
Vibrator<br />
My setup<br />
My setup<br />
OK Sounds<br />
Pictures<br />
Negat.Screen<br />
OK<br />
List of functions Select an option Confirm<br />
Return to the screens<br />
Previous screen: Press (short keypress).<br />
Main screen: Press (long keypress).<br />
24<br />
Menu<br />
Services<br />
Sounds<br />
Mode<br />
Volume<br />
Ring Tones
!<br />
Organisation of functions<br />
For each of the listed functions, refer to the appropriate chapter in<br />
this User Guide.<br />
Events:<br />
Access your voice mail, unanswered incoming calls, unread<br />
short messages, voice memos, and information downloaded in<br />
the handset as well as WAP alerts (1).<br />
Directory:<br />
Access / create directory files and make calls from your<br />
directory.<br />
Messages (SMS):<br />
Read, write and send your short messages.<br />
Vibrator:<br />
Activate / deactivate the vibrator.<br />
My setup:<br />
Customise your ring tones, icons, On/Off and main screens,<br />
your direct dial numbers, your keypad and prefixes and the<br />
black/white screen background (Negat.Screen).<br />
(1) Depending on your model, the language and availability<br />
of this service with your operator.<br />
25<br />
My tribe:<br />
Access an instant messaging WAP site (1).<br />
Alarms:<br />
Set your telephone's alarms (appointments, birthdays, wakeup).<br />
Memo:<br />
Record and listen to voice messages.<br />
Games:<br />
Access the games proposed.<br />
Calculator/Converter:<br />
Perform currency conversions (Euros/currencies, etc.) and<br />
basic calculations.<br />
Setup:<br />
Set up your telephone (displays, formats, etc.) and take<br />
advantage of the features provided by your operator (security,<br />
call forwarding, etc.).<br />
You can customise your main MENU by changing the order of the<br />
options. For example, you can choose to display “Sounds” at the<br />
beginning of your Menu: select this option, make a long keypress on<br />
the key to place it in the first position in your new list. The<br />
icon is displayed after the selected option.<br />
To cancel this duplicated item, select it in the list and make a long<br />
keypress on the key.<br />
!<br />
(1) Depending on your phone model.<br />
26
6<br />
EVENTS<br />
You can access events sent to your telephone that you have not yet<br />
read or listened to.<br />
!<br />
Messages (Msg.):<br />
Access unread messages. (See page 37)<br />
Unanswered incoming calls (Call):<br />
Display the calling parties’ numbers that tried to reach you<br />
with no success. (See page 23)<br />
Voice mail (Vocal):<br />
Call your voice mail to listen to your new voice messages.<br />
(See page 18)<br />
Alerts (WAP) (1):<br />
Access the WAP alerts you have received.<br />
Voice memos (Memo):<br />
Listen to the voice memos you have recorded. (See page 61)<br />
Information downloaded (Dnload):<br />
Consult the information that you have downloaded.<br />
(1) Check the availability of this service with your<br />
operator.<br />
27<br />
7 DIRECTORIES<br />
7.1 Accessing your directories<br />
• Access directories from the main screen by pressing<br />
downwards.<br />
• Or from the MENU (cf. page 24) by pressing<br />
“Directory”.<br />
OK then selecting<br />
Directory<br />
Messages<br />
Vibrator<br />
My setup<br />
OK OK<br />
VERONICA<br />
BRIAN<br />
FLORENCE<br />
OK<br />
To search for the name you are looking for<br />
Two directories are available, the SIM directory and the product<br />
directory (Mobile).<br />
For easy consultation, all your contacts are stored in a joint list.<br />
The icon displayed in front of a name indicates whether the name<br />
belongs to the SIM directory or to the Mobile’s:<br />
SIM directory<br />
Product directory (Mobile).<br />
28<br />
SIM Dir.<br />
OK
Searching for a name by its first letter<br />
You can also search for the name of the person you wish to contact<br />
by pressing the key associated with the first letter of his/her name.<br />
Example: Press the key twice to find the first name beginning<br />
with “B”, then scroll the list to the name you are looking for using the<br />
OK key. In some languages, depending on the input mode, this<br />
search is performed using the “Search name” option. (See page<br />
32)<br />
Calling from the directory<br />
You can assign 3 different numbers to the same name: Home, Mobile,<br />
Office (see page 30). If you want to call a party who has several<br />
numbers, first you must choose the number you wish in the list.<br />
SIM Dir.<br />
VERONICA<br />
DENNIS<br />
HELEN<br />
Choose the appropriate number<br />
Displaying a phone number<br />
SIM Dir.<br />
VERONICA<br />
DENNIS<br />
HELEN<br />
SIM Dir.<br />
VERONICA<br />
HOME<br />
MOBILE<br />
OK View<br />
Create<br />
Zoom<br />
OK<br />
29<br />
OK<br />
or<br />
VERONICA<br />
0148............<br />
0663............<br />
139............<br />
7.2 Creating a directory file<br />
If your directories are empty, the “Directory empty! Create a<br />
file?” message will be displayed.<br />
From the list of names in your directories, press the<br />
create a file.<br />
OK key to<br />
Each name in a directory can have up to 3 numbers: Home, Mobile,<br />
Office.<br />
Files created in the SIM directory can be consulted from a different<br />
mobile phone.<br />
!<br />
View<br />
Create<br />
Zoom<br />
Create<br />
Enter name:<br />
OK<br />
OK<br />
If you use your telephone abroad, you should store the<br />
numbers in the directory in the international format with<br />
the “+” prefix. (See page 17)<br />
30<br />
Create<br />
In SIM<br />
In Mobile<br />
OK
!<br />
Home:<br />
!<br />
Create<br />
Mobile:<br />
Create<br />
Office:<br />
Create<br />
You do not have to fill in all the information, but at least one<br />
number must be entered for each name.<br />
Up to 250 phone numbers can be stored in the product<br />
directory. The SIM directory's capacity depends on the<br />
operator.<br />
7.3 Classifying a file in a family<br />
(1) If the caller’s number is displayed.<br />
31<br />
Switch from one to another<br />
by pressing the OK key<br />
or OK key.<br />
To differentiate your files, you can classify them in groups called<br />
“families”: Private , Profession. , Other , or None. A<br />
different ring tone can be assigned to each family. This classification<br />
will allow you to easily distinguish a professional call from a private<br />
call (1). It is possible to screen incoming calls by family. (See pages 71,<br />
72)<br />
The files you created may be organised in alphabetical order, by family<br />
(Private , Profession. , Other , or None) or by directory (SIM<br />
then Mobile). (See page 30)<br />
7.4 Available options<br />
From the list of names in your directory, you can access the following<br />
options by pressing the OK key:<br />
OK<br />
!<br />
View<br />
Create<br />
Zoom<br />
Search name<br />
Modify<br />
Organise<br />
Display the contents of each file<br />
Create a file<br />
Modify the file contents<br />
Delete Delete the selected file<br />
Classify<br />
Change the character size (1)<br />
Find a name in a list (1) according to the<br />
entry mode<br />
Display names:<br />
- In alphabetical order<br />
- By family: Private, Professional, Other or<br />
None<br />
- By directory: SIM then Mobile<br />
Classify the selected file in the appropriate<br />
family<br />
Ring tones Assign a melody to a family<br />
(1) Depending on the language.<br />
32
Copying from one directory to another<br />
You can copy a file or all the contents of a directory to another.<br />
You may choose to keep or to delete the original directory or file.<br />
Ring tones<br />
Copy<br />
Copy all<br />
OK<br />
Copy Copy a file from a directory into the other<br />
Copy all Copy the whole directory into the other<br />
Voice reco.<br />
Memory<br />
Record a voice recognition command for a<br />
file<br />
Display the available memory in your<br />
directories<br />
Back Return to the previous screen<br />
OK<br />
Keep origin<br />
Delete origin<br />
33<br />
SIM -> Mobile<br />
Mobile -> SIM<br />
OK<br />
OK<br />
SIM Dir.<br />
VERONICA<br />
BRIAN<br />
FLORENCE<br />
7.5<br />
Select a contact from the directory for which you would like to<br />
record a voice recognition command.<br />
!<br />
The voice recognition function<br />
Recording a voice recognition command<br />
SIM Dir.<br />
ALAN<br />
VERONICA<br />
AUDREY<br />
SIM Dir.<br />
ALAN<br />
HOME<br />
MOBILE<br />
OK OK<br />
Copy<br />
Copy all<br />
Voice reco.<br />
OK<br />
Select a file Select “Voice reco.”<br />
OK<br />
Select the number Say the name<br />
Voice reco.<br />
ALAN<br />
Repeat word!<br />
Say the name again to confirm<br />
the voice recognition recording<br />
OK<br />
Contacts for which you have stored a voice recognition<br />
command are identified by the icon.<br />
10 names can be accessed by using the voice recognition<br />
function.<br />
34<br />
Voice reco.<br />
ALAN<br />
Say the word<br />
Saved for<br />
ALAN<br />
The function is activated<br />
OK
7.6<br />
Using the voice recognition command<br />
From the main screen<br />
Long keypress<br />
Say the name of the person to be called.<br />
Delete a voice recognition command<br />
To delete a voice recognition command go into “Directory” from<br />
the name, press<br />
options.<br />
OK and select the “Voice. reco” and “Delete”<br />
Assigning a ring tone to a family<br />
You can assign a ring tone to a family, so when you receive a call from<br />
a contact classified in a particular family, the ring tone for the<br />
incoming call will be the one assigned to that family. An icon is also<br />
assigned to each family, allowing you to easily recognise your<br />
correspondent’s family. (See page 31)<br />
35<br />
7.7 Temporary SIM card<br />
When you create a file, you can include 3 different numbers (Home,<br />
Mobile, Office).<br />
If you change your SIM card, an information message will be displayed<br />
when the telephone is switched on.You must then decide if this card<br />
will become your main SIM card or if it is being inserted temporarily:<br />
<strong>New</strong> SIM<br />
(C): Main<br />
OK: Temporary<br />
• Keypress on : the SIM card you just inserted becomes your<br />
main card. You can create the files with up to three numbers<br />
(Home, Mobile, Office). If you reinsert your old SIM card, you will<br />
no longer find the three numbers that were formerly associated<br />
with the same name.<br />
• Keypress on OK : the SIM you just inserted is considered as<br />
“Temporary”.You will be able to create or modify files with one<br />
number only. If you then reinsert the first card (your main card),<br />
you will find the three number association it originally contained.<br />
36
8 MESSAGES<br />
8.1<br />
!<br />
(1)<br />
• Make a keypress upwards on the OK key from the main screen.<br />
• Or press the<br />
“Messages”.<br />
OK key from the MENU (see page 24) and select<br />
OK<br />
Accessing messages<br />
Unread<br />
Read/Saved<br />
Write<br />
My canned<br />
Read the new messages<br />
Complete a canned message or create<br />
your own canned messages<br />
Delete Delete your messages by category<br />
Zoom<br />
Parameters<br />
View the read messages<br />
Create a new message<br />
Change character size (2)<br />
Set parameters, especially the number of the<br />
service centre if it is not automatically<br />
displayed (you cannot send a message<br />
without this number)<br />
(1) Check the availability of this service with your<br />
operator.<br />
(2) Depending on the language.<br />
37<br />
8.2<br />
The messages are stored in your SIM card and classified in two<br />
groups: unread messages and read/saved messages.<br />
“Unread” messages<br />
When a new message is received, a screen message “Do you want<br />
to read your new messages?” and the icon are displayed and<br />
an audible signal (1) is emitted.<br />
The icon disappears when all new “Events” (messages, calls, ...)<br />
have been consulted.<br />
• Read immediately<br />
If you want to read immediately the messages, press the OK key.<br />
!<br />
Do you want to<br />
read your new<br />
messages?<br />
Network<br />
Reading your messages<br />
08:30<br />
Unread<br />
OK 0607...<br />
0613...<br />
OK<br />
(1) To deactivate the audible signal (see page 50).<br />
38<br />
Unread<br />
09/03 09:03<br />
: 0613....<br />
Don’t wait
• Read later<br />
If you want to read your messages later, press the key.<br />
!<br />
Do you want to<br />
read your new<br />
messages?<br />
Network<br />
08:30<br />
05:13<br />
18-04-2002<br />
Network<br />
OK<br />
Events<br />
Directory<br />
Messages<br />
Vibrator<br />
OK<br />
The capacity of your SIM card depends on your operator.<br />
The icon is displayed when there are too many stored<br />
messages: please delete some.<br />
39<br />
OK<br />
Menu<br />
1 Msg.<br />
0 Call<br />
0 Vocal<br />
Services<br />
While reading a message, you can access the following options using<br />
the OK key:<br />
OK<br />
!<br />
Available options<br />
Delete<br />
Answer<br />
Forward (1)<br />
Save Number<br />
Save icon (2) Store an icon in the list of icons<br />
Save<br />
Animation (2)<br />
Save<br />
sound (2)<br />
Save<br />
canned (1)<br />
Delete the selected message<br />
Write a message in reply to a message you<br />
received<br />
Forward the selected message after<br />
modifying the recipient's name or the<br />
parameters<br />
Store the original message number or the<br />
destination number in the directory<br />
Store an animation in the list of animations<br />
Store a sound in the list of sounds<br />
Store this message as a canned message<br />
(1) Except protected objects (sounds, images).<br />
(2) If the received message contains sounds, images, icons,<br />
animations.<br />
40
!<br />
Parameters<br />
“Read/Saved” messages<br />
Update the following parameters:<br />
Serv. Centre: your operator’s service<br />
centre number (may be provided<br />
automatically)<br />
E-mail centre (1): calling number for<br />
sending an e-mail (can be automatically<br />
presented to you)<br />
Format: in which the message is to be<br />
delivered to your correspondent (SMS,<br />
e-mail, fax, etc.)<br />
Validity: time during which the network<br />
presents the message again to your recipient<br />
in case of unsuccessful delivery<br />
Receipt: activate/deactivate the acknowledgement<br />
receipt request<br />
Zoom Change the character size (2)<br />
Back Return to the current message<br />
These messages can be read messages, written messages which are<br />
sent or not sent, or messages that are stored.<br />
(1) Check the availability of this service with your<br />
operator.<br />
(2) Depending on the language.<br />
41<br />
Received:<br />
All messages that you received, read, and stored.<br />
Your friends can send you messages containing icons, animations,<br />
smileys, sounds, and texts. When you receive those messages, you<br />
may also store these objects so that you can use them later.<br />
If a message contains several icons, sounds, or animations, select the<br />
object using the OK key and confirm with the OK key.<br />
You can call one of the numbers that appears in a message you have<br />
received by pressing .<br />
To send:<br />
All written and not yet sent messages.<br />
Sent:<br />
All written, sent and stored messages.<br />
If “Receipt” was activated in the “Parameters” option, when you<br />
view the sent messages, the following symbols are displayed:<br />
!<br />
Message sent in expectation of an acknowledgement<br />
receipt.<br />
Message sent and acknowledgement received.<br />
Message unsuccessfully delivered (in this case you should<br />
send the message again).<br />
We recommend that you clear your stored messages on a<br />
regular basis to avoid saturating your SIM card.<br />
42
8.3<br />
• Make a keypress upwards on the OK key from the main screen.<br />
• Or press the<br />
“Messages”.<br />
OK key from the MENU (see page 24) and select<br />
You can create a message or amend a stored message.<br />
You can create a message with text only but can also assign icons or<br />
sounds, or smileys. (See page 47)<br />
Directory<br />
Messages<br />
Vibrator<br />
My setup<br />
Writing a message<br />
Messages<br />
OK Unread (5)<br />
Read/Saved (4)<br />
Write<br />
OK<br />
43<br />
1 Message(s)<br />
Do you<br />
The shape of the cursor will tell you whether you are in:<br />
- predictive mode<br />
- normal mode<br />
(data entry system, see page 45) or<br />
To switch from one mode to the other, make a long<br />
keypress on the key.<br />
While writing the message, depending on the selected entry mode,<br />
you can access the following options by pressing the OK key.<br />
The underlined options (see page 44) will be displayed only in the<br />
predictive mode.<br />
OK<br />
Send to Send the message<br />
Insert Icon<br />
Insert Sound<br />
Insert Smiley Add smileys<br />
Add icons (only valid for non protected EMS<br />
icons)<br />
Add sounds (only valid for non protected<br />
EMS sounds)<br />
Preview Preview the message<br />
Save message Save the message<br />
OtherWords<br />
Insert digits Insert digits<br />
Punctuation<br />
Predictive/<br />
Normal mode<br />
Add word<br />
Access the list of other suggested words<br />
Insert a punctuation mark<br />
Switch from normal to predictive mode<br />
Add a word to the dictionary (depending on<br />
the language)<br />
Language Modify the dictionary language<br />
Back Return to the previous screen<br />
Exit Return to the main screen<br />
44
8.4<br />
!<br />
!<br />
Data entry system (1): predictive mode<br />
To make it easier to write short messages, your phone has an assisted<br />
data entry system: in predictive mode (1), the cursor looks like a<br />
thick bar .To create a word, you only need to press once the key<br />
for each letter contained in the word.<br />
The character displayed may not correspond to the one<br />
you requested; the system suggests the most usual word.<br />
Do not worry about the words initially suggested, go on<br />
typing, the system will make better suggestions as you type.<br />
When you have finished typing your word:<br />
• If the suggested word is the one you want:<br />
Press to validate and insert a space.<br />
• If the word suggested is not the one you want:<br />
Press to scroll for other suggestions and validate your choice<br />
of word by pressing .<br />
(1) Depending on the language.<br />
45<br />
Delete<br />
Space<br />
!<br />
You may also use the following keys:<br />
05:13<br />
18-04-2002<br />
Network<br />
ok<br />
Other words<br />
There is a dictionary in which you can add (1), modify or delete<br />
words. To add a word while writing a message, press the<br />
and select the “Add word” option (1).<br />
OK key<br />
(1) Depending on the language.<br />
46<br />
Access the<br />
options<br />
Accept displayed<br />
word or number<br />
(press<br />
downwards only)<br />
Scroll the word<br />
or text<br />
Upper case/lower<br />
case/numbers /<br />
access to symbol bar<br />
Switch between<br />
Normal/Predictive<br />
mode (long<br />
keypress)
Icons, sounds, smileys<br />
Your messages can be customised with icons, sounds or smileys to<br />
reflect your emotion:<br />
Ironic Sad Glad<br />
Confused Amazed Happy<br />
Indifferent Crying In love<br />
Devil Angry Laughing<br />
Inquiring Show-off Joking<br />
You can also create your own smileys using the alphabetical<br />
characters (example: :-)).<br />
While writing the message, the sound or icon that you inserted is<br />
represented by a symbol ( or ).<br />
You can add more icons and sounds to your phone by downloading<br />
them from the Internet. (See page 56)<br />
The recipient of the message must have a compatible EMS (Enhanced<br />
Message Service) mobile phone in order to display icons and smileys,<br />
and listen to the sounds attached to your message.<br />
47<br />
8.5<br />
You can send a message:<br />
• To a recipient in your directories. (See page 28)<br />
• Manually by keying in your correspondent’s number.<br />
!<br />
Send to<br />
Insert Icon<br />
Insert Sound<br />
To:<br />
255<br />
Messages<br />
Sending a message (1)<br />
OK<br />
• To several recipients by selecting the group of recipients (choose<br />
the “Distrib.list” option).<br />
The list should have been created beforehand.<br />
• To a recipient with an e-mail address, if you have stored the email<br />
centre number using the “Parameters” option. (See page 41)<br />
(1) Messages exceeding 160 characters, input of icons,<br />
sounds and smileys may result in the billing of several<br />
SMS. The number of SMS will be indicated on the<br />
screen while typing and there will be a beep for every<br />
new message.<br />
48<br />
Addresses<br />
Directory<br />
Dial<br />
Distrib.list<br />
OK<br />
OK<br />
255:<br />
3 Messages<br />
Sent
8.6 Deleting your messages<br />
You can delete several messages at once by selecting the “Delete”<br />
option.<br />
You can then access the following options:<br />
OK<br />
!<br />
All<br />
Sent<br />
Received<br />
Before...<br />
Delete all messages<br />
Only delete messages that you have sent<br />
Only delete messages you have received and<br />
read<br />
Only delete messages (sent and received)<br />
prior to a date you have specified<br />
The icon means that the message list is full.You must<br />
delete at least one of them to receive new messages.<br />
49<br />
9<br />
• From the main screen, press the OK key to access the MENU.<br />
• Select “My Setup” then one of the proposed options.<br />
OK<br />
9.1 Sounds<br />
MY SETUP<br />
Directory<br />
Messages<br />
Vibrator<br />
My setup<br />
From the “Sounds” menu, press the<br />
options.<br />
OK key to access the various<br />
My setup<br />
Sounds<br />
Pictures<br />
Negat.Screen<br />
OK<br />
50<br />
OK<br />
Sounds<br />
Mode<br />
Volume<br />
Ring tones<br />
My setup<br />
Sounds<br />
Pictures<br />
Negat.Screen
!<br />
OK<br />
Mode<br />
Volume<br />
Ring tones<br />
Msg. sound<br />
ON sound<br />
OFF sound<br />
Downloaded<br />
(1)<br />
Compose<br />
Key beeps<br />
Select the mode (see below)<br />
Adjust the volume with OK<br />
Select a ring tone for an incoming call with<br />
OK<br />
Choose a sound to announce an incoming<br />
message<br />
Choose the sound which will be played<br />
when the phone is switched on<br />
Choose the sound which will be played<br />
when the phone is switched off<br />
Access a WAP site to download new<br />
melodies<br />
Compose a melody<br />
Activate/deactivate the beep played with<br />
each short or long keypress<br />
(1) Depending on your phone model. Check the<br />
availability of this service with your operator.<br />
51<br />
Mode<br />
You can choose from the following modes:<br />
Sound Normal ring tone (increasing volume).<br />
Vibrator No sound is emitted (ring tone, message or<br />
appointment alert, low battery beep), but the<br />
vibrating system is activated. The icon is<br />
displayed on the main screen.<br />
Vibr.+sound Simultaneous activation of the vibrator and normal<br />
ring tone (increasing volume).<br />
Vibr., sound Activation of the vibrator followed by the normal<br />
ring tone.<br />
Vibra...sound Vibrator is activated followed by several beeps,<br />
then by a normal ring tone.<br />
Silent No sound is emitted and the vibrator is<br />
deactivated.The icon is displayed.<br />
Compose my melody<br />
From the “Compose” option, you can create your own tunes.<br />
52
To compose your melody, use the keypad as shown below:<br />
Primary notes of an<br />
octave (C, D,E,F,G,A,<br />
B)<br />
Change octave<br />
My setup<br />
Sounds<br />
Pictures<br />
Negat.Screen<br />
OK<br />
OK<br />
Save<br />
Save&Quit<br />
Last 5 notes<br />
ok<br />
Add a pause<br />
53<br />
Sounds<br />
OFF sound<br />
Downloaded<br />
Compose<br />
Change duration<br />
OK<br />
Add a sharp<br />
While you are composing your tune, use the<br />
the following options:<br />
OK key to access<br />
OK<br />
!<br />
Available options<br />
Save<br />
Save&Quit<br />
Last 5 notes<br />
Instrument<br />
Save your tune<br />
Save your tune and return to the previous<br />
screen<br />
Play all Listen to the entire melody<br />
Modify title<br />
Tempo<br />
Listen to the last five notes<br />
Change the title of the melody<br />
Choose an instrument: piano, flute,<br />
xylophone, organ, guitar, bass, strings, brass,<br />
cello, and saxophone<br />
Choose the tempo: allegro, andante, lento<br />
Delete Delete the selected melody<br />
Back Return to the previous screen<br />
To return to the main screen, press the key (long<br />
keypress).<br />
54
9.2 Pictures<br />
My setup<br />
Sounds<br />
Pictures<br />
Negat.Screen<br />
9.3 Black/White background (Negat.Screen)<br />
Choose your display mode: black text on a white background or<br />
white text on black background.<br />
My setup<br />
Sounds<br />
Pictures<br />
Negat.Screen<br />
!<br />
OK<br />
My setup<br />
Sounds<br />
Pictures<br />
Negat.Screen<br />
(1) Depending on your phone model. Check the<br />
availability of this service with your operator.<br />
55<br />
Pictures<br />
Main screen<br />
On/Off scr.<br />
Downloaded<br />
Main screen: is displayed when your telephone is switched on<br />
and/or when no feature is in use (call, sending short messages, etc.).<br />
You can personalise your screen by changing the icon and display<br />
format for the date.<br />
On/Off scr.: allows you to customise the On/Off screens of your<br />
mobile phone with a welcome message, an animation, or an icon.<br />
Downloaded: access a WAP (1) site to download images.<br />
9.4 Downloaded data (1) (Downloaded)<br />
Downloading may be performed from your mobile (WAP), the<br />
Internet or from a voice server. Once you are connected to WAP or<br />
a website offering this service on the Internet (1), select the object<br />
you wish to download and perform the downloading. When it is<br />
completed, you will receive an SMS containing the object you<br />
selected.<br />
The saved data will then appear in the appropriate lists (sounds, main<br />
screen icons, icons, smileys, on/off screens, canned messages) (2).<br />
!<br />
<strong>New</strong> icon!<br />
Icon 04/07<br />
OK See<br />
Save<br />
Delete<br />
OK<br />
OK Save<br />
Delete<br />
OK<br />
(1) Check the availability of this service with your<br />
operator.<br />
(2) If your mobile has no available memory, this means that<br />
too many icons, sounds, etc. are stored, you should<br />
delete some.<br />
56
9.5 Zoom (1)<br />
Your telephone can display two different sized characters (small or<br />
large). If you want to display more information (Wap, Directory,<br />
Messages, MENU), select the “Zoom” function.<br />
My setup<br />
Downloaded<br />
Zoom<br />
Numbers<br />
9.6<br />
!<br />
Numbers<br />
My Number<br />
Save your telephone number, if it is not already recorded on your SIM<br />
card). Enter the number - confirm by pressing OK .<br />
Voicemail<br />
OK<br />
(1) Depending on your phone model and the language.<br />
57<br />
My setup<br />
Pictures<br />
Negat.Screen<br />
Downloaded<br />
Zoom<br />
Numbers<br />
Change your voice mail number (enter the number, confirm by<br />
pressing OK ).<br />
Direct dial numbers: once entered these numbers can be directly<br />
accessed from the main screen with a long keypress on the following<br />
keys , , , , , , . (1).<br />
Create or modify direct dial numbers<br />
Activate/cancel the prefix which will be added automatically before<br />
the phone number when making the call (enter the prefix, confirm<br />
by pressing OK ).<br />
!<br />
Keypad<br />
Keypad<br />
4 RAY<br />
6 DIANA<br />
7 FRANK<br />
Modify<br />
Tel. number:<br />
0123...<br />
OK<br />
Prefix<br />
OK<br />
Modify<br />
Delete<br />
Back<br />
OK<br />
OK<br />
Keypad<br />
4 RAY<br />
6 DIANA<br />
7 FRANK<br />
Confirm<br />
Directory<br />
Back<br />
(1) Depending on your phone model.<br />
58<br />
OK<br />
Modify<br />
Key number:<br />
4<br />
Create<br />
Enter the<br />
key name:<br />
RAY
10<br />
Access the alarms features from the MENU (see page 24) by pressing<br />
the OK key.<br />
05:13<br />
18-04-2002<br />
Network<br />
10.1<br />
Wake up<br />
ALARMS<br />
OK<br />
59<br />
Messages<br />
Vibrator<br />
My setup<br />
Alarms<br />
Set the alarm time and confirm by pressing OK .<br />
Alarms<br />
Wake up<br />
Appointment<br />
Birthdays<br />
Once this feature is activated, the icon appears on the main<br />
screen. Under “Options”, you can choose to program the alarm<br />
clock with a melody. The alarm will sound whether the phone is<br />
switched on or off, but pressing any key will shut it off.<br />
10.2<br />
You can schedule your appointments (enter the date and time –<br />
confirm by pressing OK – enter the purpose of the appointment –<br />
confirm by pressing<br />
(once, daily, weekly).<br />
OK ) and program how often they occur<br />
Once an appointment is scheduled, the icon appears. You can<br />
schedule up to five appointments.The alarm will sound whether the<br />
phone is switched on or off, but pressing any key will shut it off.<br />
You can also change or cancel an appointment. In addition, you can<br />
program a short message to be sent (with icons, and/or a melody) at<br />
the appointment time.<br />
10.3<br />
You schedule birthdays in the same way as appointments but on an<br />
annual basis.You can schedule up to five birthday dates.<br />
10.4<br />
Appointments<br />
Birthdays<br />
Options<br />
The "snooze" function can be activated when you program any<br />
alarm.The alarm will be repeated at regular ten minute intervals after<br />
the first sounding.<br />
60
11<br />
The voice memo feature acts as a dictaphone and allows you to<br />
record personal messages.<br />
• From the main screen, press the<br />
choose “Memo”. (See page 24)<br />
OK to access the menu, then<br />
11.1<br />
11.2<br />
Memo<br />
Create<br />
NotListened (1)<br />
Listened (1)<br />
MEMO<br />
Recording a voice memo<br />
OK<br />
OK<br />
16/06/01 12:52<br />
Message<br />
recorded!<br />
OK<br />
Using a voice memo<br />
61<br />
Memo<br />
Speak<br />
(C) to cancel<br />
Speak<br />
(C) to cancel<br />
Memo<br />
Create<br />
NotListened (2)<br />
Listened (1)<br />
You can use a voice memo to personalise the sounds played by your<br />
telephone:<br />
• when your telephone is switched on or off,<br />
• when there is an incoming call from a correspondent classified in<br />
a directory family.<br />
• when an appointment, an alarm or a birthday becomes due.<br />
11.3 Deleting a memo<br />
To delete a voice memo, go to “Menu/Memo/Listened/Delete”.<br />
!<br />
Memo<br />
Create<br />
NotListened<br />
Listened (2)<br />
OK<br />
WARNING: Whenever you listen to a voice memo, the<br />
“Handsfree” mode is automatically activated.<br />
Move the handset away from your ear before activating this<br />
mode because the amplified volume could cause hearing<br />
damage.<br />
62<br />
OK<br />
Memo<br />
16/06/01 12:52<br />
OK OK OK<br />
OK<br />
(C) to cancel<br />
Memo<br />
Use vocal<br />
memo as ring<br />
tone?<br />
Listened<br />
10.06-14:00-1<br />
10.06-17:00-2<br />
Play<br />
Name<br />
Delete<br />
Name<br />
Delete<br />
Memo->Melody
12<br />
You can access the calculator and the currency converter from the<br />
main screen in two different ways:<br />
• Enter a figure directly on the keypad, then press the<br />
select the “Calculator” or “Convert” option.<br />
OK key and<br />
• Press the OK in the Menu and select the “Calc/Conv” option.<br />
12.1 Calculator<br />
!<br />
10<br />
10<br />
+<br />
3<br />
Calculator<br />
Calculator<br />
CALCULATOR/<br />
CONVERTER<br />
+ -<br />
* /<br />
+ -<br />
* /<br />
OK<br />
OK<br />
To enter decimals ("."), use the key (long keypress).<br />
To return to the main screen, press the<br />
keypress).<br />
key (long<br />
63<br />
10<br />
13<br />
Calculator<br />
Calculator<br />
+ -<br />
* /<br />
+ -<br />
* /<br />
OK<br />
12.2 Convert<br />
The currency converter allows you to:<br />
!<br />
05:13<br />
18-04-2002<br />
Network<br />
Rapidly convert into Euros (for the Euro zone only) from<br />
the main screen (1) :<br />
OK<br />
15.24<br />
100.00<br />
Convert<br />
€<br />
FF<br />
Convert a sum of money<br />
(1) The currency converter uses the final conversion rates<br />
for the EURO (€) set on 31/12/1998, which are used<br />
in accordance with the official conversion rules.<br />
(2) Depending on your phone model.<br />
64<br />
OK<br />
Convert<br />
Save Number<br />
Calculator<br />
In the menu “Convert”, select the type of conversion (“Euro” (2)<br />
or “Curren/Curren”), enter the sum to be converted then press<br />
OK<br />
to display the result.
From “Convert”, select the option “Currency” to display the list<br />
of currencies.<br />
To choose the currencies to be converted from this table access the<br />
following options with OK :<br />
OK<br />
!<br />
Modify the currencies to be converted<br />
Confirm<br />
Create<br />
Modify<br />
Back<br />
Select the currency<br />
Add a new currency (which can<br />
subsequently be changed)<br />
Modify a currency which you have created<br />
Delete Delete a currency you have already created<br />
Return to the previous screen<br />
When you have selected or created the first currency,<br />
repeat the same operation for the second currency, then<br />
enter the exchange rate for these 2 currencies.<br />
To return to the main screen, press the key (long<br />
keypress).<br />
65<br />
13<br />
13.1<br />
!<br />
SETUP<br />
Access the “Setup” option from the MENU (see page 24) by pressing<br />
the OK key.<br />
Memo<br />
Games<br />
Calc/Conv<br />
Setup<br />
Services<br />
Security<br />
OK<br />
PIN Code (1) SIM card protection code requested each time the<br />
phone is switched on if the code is activated.<br />
Activate/ Activate (or cancel) this code.<br />
Deactivate<br />
Change Update the code (4 to 8 digits).<br />
PIN2 Code (1) Protection code for certain functions on the SIM<br />
card (Billing / Cost / FDN, etc.) requested when<br />
these functions are used if this code is activated.<br />
Change Update the code (4 to 8 digits).<br />
(1) Contact your operator if necessary.<br />
66<br />
Setup<br />
Services<br />
Clock<br />
Languages
Netwrk Change the code requested to access the “Call<br />
Code (1) Barring” options associated with network. (See<br />
page 71)<br />
MENU code Protection code for certain MENU functions<br />
(Services/Setup/Language), requested when these<br />
functions are used if this code is activated.<br />
Activate/ Activate (or cancel) this code.<br />
Deactivate<br />
Change Update the code (4 to 8 digits).<br />
Prod.Code Protection code for your telephone, requested<br />
each time it is switched on if this code is activated.<br />
Activate/ Activate (or cancel) this code.<br />
Deactivate<br />
Change Update the code (4 to 8 digits).<br />
Change SIM Define the SIM card as the main card (see page 36).<br />
!<br />
Billing<br />
Duration Call time management.<br />
Last call Duration of the last call.<br />
Avail.Duration Remaining time available in relation to time<br />
indicated under the “InclusiveTime” (for <strong>user</strong>'s<br />
information only).<br />
(1) Check the availability of this service with your<br />
operator.<br />
67<br />
Cumul. dur. Total duration of calls made.<br />
InclusiveTime Duration subscribed (enter the time - confirm by<br />
OK ).<br />
Reset Reset (immediately or periodically) the total<br />
duration of calls made.<br />
Beep durat. Activate/cancel the beep which sounds during a call<br />
at an interval set by the <strong>user</strong> (enter the interval -<br />
confirm by OK ).<br />
Expense (1) Management of call charges.<br />
Last call Cost of last charged call.<br />
Credit Remaining credit in relation to “Set Credit”.<br />
Cumul. cost Total cost of charged calls.<br />
Set Credit Maximum credit beyond which all charged calls are<br />
barred (enter credit - confirm by OK ).<br />
Reset Reset the total cost of charged calls.<br />
Unit value Cost of one telecom unit in the chosen currency<br />
(select the “Others?” option for another<br />
currency and press the<br />
point).<br />
key to enter a decimal<br />
!<br />
(1) Check the availability of this service with your<br />
operator.<br />
68
GPRS (1)<br />
Cumulative Total number of bytes sent and received.<br />
Last Number of sent/received bytes for the last GPRS<br />
call.<br />
Reset to 0 Reset the total number of bytes sent/received.<br />
All All your calls are forwarded. The<br />
displayed.<br />
icon is<br />
Conditional Calls are forwarded if the line is busy, the call is not<br />
answered or the phone is outside the network<br />
range.<br />
If busy Only if your line is busy.<br />
No reply Only if you do not answer.<br />
Unreach. Only if the phone is out of the network range.<br />
Data Data calls are forwarded to the specified number.<br />
Fax Fax calls are forwarded to the specified number.<br />
Status List of call forwarding operations activated from<br />
this phone.<br />
Cancel All Cancel all activated call forwarding.<br />
!<br />
Forward (1)<br />
(1) Depending on your phone model. Check the<br />
availability of this service with your operator.<br />
69<br />
!<br />
Calls<br />
Call wait (1) Activate/cancel signalling of a second incoming call<br />
by a beep while you are in communication.<br />
Conceal ID Activate/cancel the option which makes your<br />
(CLIR) (1) calls anonymous (your number will not be<br />
transmitted by the network to the parties you call).<br />
Caller ID Activate/cancel display of the caller's number (or<br />
(CLIP) (1) name if it is stored in the directory) with every call.<br />
Auto Redial (2)<br />
Activate/ Activate/cancel automatic call back if the first call<br />
Deactivate was unsuccessful.<br />
Forbidden No List of numbers for which automatic call back failed<br />
(10 unsuccessful attempts).<br />
Reset Reset the blacklist.<br />
Ntwk. (Completion of Calls to Busy Subscribers)<br />
Redial (1) Automatic call back of the last dialled busy number.<br />
(1) Check the availability of this service with your<br />
operator.<br />
(2) Depending on your phone model.<br />
70
Outgoing Activate/cancel the call barring. This option is<br />
applicable in the following cases:<br />
Except Calls to numbers not stored in your phone<br />
Dir. directories are barred.<br />
All (1) All outgoing calls are barred.<br />
International(1)Outgoing international calls are barred.<br />
Exc.-> Outgoing calls except those to the subscription<br />
Home (1) country are barred.<br />
ExceptFDN (1) Calls to numbers other than the specific FDN<br />
directory (contained in the SIM card) are barred.<br />
Activate/ All calls which do not begin with one of the<br />
Deactivate numbers stored in the "FDN" directory are barred.<br />
Change If the “ExceptFDN” option is activated, you can<br />
update the "FDN" directory after entering PIN2<br />
code (update "FDN" directory by pressing OK ).<br />
View View the list of FDN numbers.<br />
Exc. All calls other than those to numbers included in<br />
“Private” the “Private” family are barred.<br />
!<br />
Call Barring<br />
(1) Check the availability of this service with your<br />
operator.<br />
71<br />
Exc. All calls other than those to numbers included in<br />
“Prof.” the “Profession.” family are barred.<br />
Exc. All calls other than those to numbers included in<br />
“Other” the “Other” family are barred.<br />
Incoming Activate/cancel incoming call barring.This option is<br />
applicable in the following cases:<br />
Except All calls from a number not stored in your<br />
Dir. directories are barred.<br />
All (1) All incoming calls are barred.<br />
If abroad (1) Incoming calls are barred if you are abroad.<br />
Exc. All calls other than those from numbers included in<br />
“Private” the “Private” family are barred.<br />
Exc. All calls other than those from numbers included in<br />
“Prof.” the “Profession.” family are barred.<br />
Exc. All calls other than those from numbers included in<br />
“Other” the “Other” family are barred.<br />
Status List of call barring operations activated.<br />
!<br />
(1) Check the availability of this service with your<br />
operator.<br />
72
!<br />
Networks<br />
SMS CB (1) Messages broadcast over the network (weather<br />
forecast, traffic, etc.) are automatically displayed on<br />
the main screen. You can find the last SMS CB<br />
message in “Menu/Messages/Last CB”.<br />
CB list List of the message codes to be displayed.<br />
Reception Depending on the selected option, the phone<br />
displays messages broadcast by the network.<br />
Full The phone permanently scans the network and<br />
displays broadcast messages according to your<br />
"CB list" option.<br />
Limited The phone intermittently scans the network and<br />
displays broadcast messages according to your<br />
"CB list" option.<br />
None The phone does not receive any broadcast<br />
messages.<br />
Searching Search for a home network.<br />
Available List of available networks in your radio<br />
environment.<br />
Mode Depending on the option, the search mode is:<br />
Automatic First network searched for is the last one used.<br />
Manual User chooses the network from a list.<br />
(1) Check the availability of this service with your<br />
operator.<br />
73<br />
Preferred List of networks for priority connection (update<br />
this list with OK ).<br />
Forbidden List of forbidden networks (update the list with<br />
OK ).<br />
Direct access<br />
Profile access (See page 82)<br />
13.2<br />
Time/Date Setting your telephone's date and time.<br />
Format Date and time display format.<br />
13.3<br />
Message display languages (select by pressing OK ). The<br />
“Automatic” option chooses the language of your SIM card (if it is<br />
available in the phone).<br />
13.4<br />
!<br />
WAP<br />
Clock<br />
Languages (1)<br />
Dictionary (2)<br />
There is a dictionary to which you can add your own words to those<br />
already contained in the assisted data entry system.<br />
(1) Depending on your phone model.<br />
(2) Depending on your phone model and language.<br />
74
When you consult your dictionary, you can add, modify or delete<br />
words using the options available by pressing the OK key.<br />
13.5<br />
13.6<br />
13.7<br />
!<br />
Input mode<br />
Access to different entry modes (1).<br />
Display<br />
Backlight Backlighting intensity (press OK to adjust); we<br />
recommend using the minimum necessary intensity<br />
to save battery power. However, you can use the<br />
key (long keypress) to activate the<br />
backlighting.<br />
Contrast Display contrast (press OK to adjust).<br />
Pick up<br />
Pick up Allows you to choose the way a call will be<br />
answered.<br />
Automatic Automatically (without pressing a key) after<br />
approximately 2 rings (this option is only available<br />
if your phone is connected to an audio accessory).<br />
(1) Depending on the language.<br />
75<br />
Key = After pressing the key.<br />
Any key After pressing any key on the keypad (1 to #).<br />
13.8<br />
Power off When this option is activated, the phone is<br />
automatically switched off if it is not used (i.e. no<br />
keypresses, no calls, no incoming messages) after an<br />
amount of time chosen by the <strong>user</strong> (enter the<br />
duration, confirm by OK ).<br />
13.9<br />
This function allows you to move from line 1 to line 2 (1).<br />
(See page 22)<br />
13.10<br />
Keypad lock When this option is activated, the keypad will be<br />
automatically locked if you have not used your<br />
phone for a certain length of time.<br />
!<br />
Automatic power off<br />
Double line<br />
Keypad lock<br />
(1) Check the availability of this service with your<br />
operator.<br />
76
14<br />
14.1<br />
!<br />
WAP (1)<br />
WAP (Wireless Application Protocol) is a service that allows you to<br />
obtain information such as weather conditions, stock market<br />
averages, traffic conditions, etc.<br />
You can access mobile Internet services from the main screen by<br />
pressing:<br />
• the key (long keypress)<br />
• or OK key and then selecting “Services”<br />
Menu<br />
Accessing WAP Services (2)<br />
Services<br />
Services<br />
OK<br />
WAP<br />
Entertainment<br />
Taxi<br />
OK<br />
(3)<br />
(1) Check the availability of this service with your<br />
operator.<br />
(2) Depending on your phone model and the language.<br />
(3) Depending on the operator, this screen may not be<br />
displayed. (To switch between modes, see page 82).<br />
77<br />
Wap<br />
Homepage<br />
Bookmarks<br />
Profiles<br />
OK<br />
14.2 Available options (1)<br />
While viewing a WAP page, you can access a number of options by<br />
pressing either:<br />
• the OK key (long keypress)<br />
• the key (short keypress)<br />
!<br />
Launch<br />
Bookmarks<br />
Profiles<br />
Go to URL<br />
Launch the WAP browser to the default<br />
profile, if it has already been configured<br />
Access your favourite sites<br />
Set up the connection parameters for your<br />
WAP service access providers. In most cases,<br />
your browser connection is already set up<br />
Access the WAP site directly by entering the<br />
address<br />
(1) Depending on your phone model.<br />
When browsing, you can exit the WAP mode anytime by<br />
pressing the key.<br />
78
OK<br />
!<br />
...<br />
HomePage<br />
Enter address<br />
Add<br />
bookmark<br />
Bookmarks<br />
Show URL<br />
Connect.<br />
Status<br />
Alert List<br />
Zoom Change the character size<br />
Exit WAP<br />
Specific options on the current page<br />
Return directly to the home page<br />
Access a site directly by entering its<br />
address<br />
Add a favourite site to your bookmarks<br />
Access your favourite sites (bookmarks)<br />
Display the address of the site you are<br />
currently visiting (1)<br />
Display the information bar for your<br />
Internet session (1)<br />
Display the list of your alerts (2)<br />
Finish consulting Internet services and<br />
return to the main screen<br />
Back Return to the previous screen<br />
(1) Depending on your phone model.<br />
(2) Check the availability of this service with your<br />
operator.<br />
79<br />
14.3 Setting up your access (1)<br />
Select a profile from the list of profiles and access the following<br />
options by pressing the OK key.<br />
OK<br />
!<br />
Launch<br />
Activate<br />
Create<br />
Modify<br />
Delete<br />
Back<br />
Launch WAP even if no profile is preselected<br />
Select a preset profile and go back to the<br />
profile list (2)<br />
Create a new profile (3)<br />
Modify the profile parameters (2)<br />
Delete a profile that you created (2)<br />
Return to the previous screen<br />
(1) Enter the information provided by your operator.<br />
(2) Depending on the profile type.<br />
(3) Depending on your phone model.<br />
80
When creating or modifying a profile, you can choose the GPRS (1),<br />
GSM or GPRS/GSM (1) transmission mode.<br />
If you choose the GPRS/GSM transmission mode, the GSM mode is<br />
activated only if the GPRS mode is not available.<br />
To create a new profile, you must enter the following parameters (2):<br />
•Profile name<br />
• Homepage<br />
• IP address<br />
• Security : Normal (port 9201) / Secure (port 9203)<br />
• GPRS/GSM (choice of transmission mode)<br />
•Validate<br />
If you have chosen the GPRS (1) transmission mode, you must enter<br />
the following parameters:<br />
• Authenticat (PAP, CHAP or None)<br />
If you choose PAP or CHAP you must enter<br />
the <strong>user</strong> name and password<br />
• APN<br />
•Validate<br />
!<br />
(1) Depending on your phone model. Check the<br />
availability of this service with your operator.<br />
(2) Depending on your phone model.<br />
81<br />
If you choose the GSM transmission mode, you must enter the<br />
following parameters:<br />
• GSM <strong>user</strong> name (Login)<br />
• Password<br />
• Access number<br />
•Access Type (Digital/Analogue)<br />
•Validate<br />
If you choose the GPRS/GSM transmission mode, you must fill in<br />
both the GPRS parameters and the GSM parameters.<br />
14.4 Launching WAP (1)<br />
By selecting Setup/Services/WAP, you can access a menu that<br />
allows you to modify the parameters to launch your browser:<br />
• “Direct” access: when you select Services/WAP from the<br />
main screen, your WAP homepage is automatically accessed.<br />
• “Profile” access: when you select Services/WAP from the<br />
main screen, the following screen is displayed:<br />
!<br />
Wap<br />
Homepage<br />
Bookmarks<br />
Profiles<br />
(1) Enter the information supplied by your operator.<br />
82
15<br />
You can access the games from the MENU by pressing the OK key.<br />
You have the option of setting the parameters for the Games in the<br />
“Config.” option (keypad, sounds, difficulty...).<br />
Starshot, a hero from deep space, travels throughout the galaxy to<br />
discover new entertainment. Help him with his faithful companion<br />
Willfly (the little rocket) to foil the traps set by the terrible Wolfgang.<br />
!<br />
GAMES<br />
Games<br />
Calc/Conv<br />
Setup<br />
Events<br />
The game software programs built into your telephone<br />
have been designed and developed by INFOGRAMES.They<br />
are protected by copyright laws. Any non-authorized<br />
reproduction of this software as well as any alterations to<br />
the copyright notices or other rights appearing on the<br />
software are strictly prohibited.<br />
© 2002 Infogrames<br />
83<br />
While at the commands of the Willfly rocket, you must avoid<br />
obstacles encountered on Killer Expo planet and at the same time<br />
eliminate the enemies you come across throughout the 4 levels in<br />
order to save Starshot.<br />
To steer, use the , , , keys.<br />
To fire, use the key.<br />
During the game, you can display:<br />
• Your position ,<br />
• Your result,<br />
• Your shield points ,<br />
• Your life points .<br />
Willfly’s mission will be made easier if the numerous bonuses are<br />
collected: Weapon , Shield , Invulnerability , Star .<br />
Warning: some bonuses have been hidden by the scary Wolfgang!<br />
If you think you are the best, send your high scores to your friends.<br />
Your name will certainly be shown in their “High scores” tables<br />
(1).<br />
!<br />
Killer Expo<br />
(1) Requires the sending of SMS.<br />
84
Eyes & Stars<br />
For this strategy game, you must align 4 pawns (horizontally, vertically<br />
or diagonally). Your opponent, over several rounds, is the terrible<br />
Wolfgang. You have the option of choosing your pawns to face the<br />
enemy.<br />
To align the pawns, use the , , ,<br />
keys.<br />
To confirm the placement of a pawn, use the key.<br />
Run run run<br />
Saved by Willfly, Starshot must pass the platforms to get out of the<br />
labyrinth.<br />
Starshoot can run on these platforms, climb up and down the<br />
ladders, hang and move along the cables, jump from one platform to<br />
the other and finally control the stars that he collected on the way<br />
in order to dig a hole to trap his opponents.<br />
Note: you must absolutely find the key to to move through the 7<br />
stages of each of the 4 levels.<br />
85<br />
To move from one platform to the next, climb up and down the<br />
ladders, hang and move along the cables, use the , ,<br />
, keys.<br />
To throw a star, jump from one platform to the other, use the<br />
key.<br />
During the game, you can display:<br />
• Your result,<br />
• Your star points ,<br />
• Your life points .<br />
• Key (once it has been found)<br />
If you think you are the best, send your high scores to your friends<br />
(1). Your name will perhaps be displayed in their “High scores”<br />
tables.<br />
!<br />
(1) Requires the sending of SMS.<br />
86
16<br />
WARRANTY<br />
Congratulations on choosing this mobile phone - we hope that you<br />
will be totally satisfied with it.<br />
Notwithstanding any other applicable statutory warranties, this<br />
mobile phone and the battery are guaranteed against any<br />
manufacturing defect for a period of ONE (1) year from the date of<br />
purchase shown on your invoice. Nevertheless if the statutory<br />
warranty in force in your country exceeds one (1) year, the statutory<br />
warranty is not affected by the manufacturer’s warranty. The present<br />
warranty terms also apply to the accessories but for a period of SIX<br />
(6) months from the date of purchase shown on your invoice.<br />
Under the terms of this warranty, you must inform your dealer or<br />
any maintenance centre (see list of maintenance centres at our<br />
website - www.alcatel.com) without delay, of any defect and present<br />
the invoice given to you at the time of purchase.<br />
The dealer will decide whether to replace or repair, as appropriate,<br />
all or any part of the equipment (telephone or accessory) found to<br />
be defective. This warranty covers the cost of parts and labour but<br />
excludes any other costs. Repair or replacement may be carried out<br />
using reconditioned components offering equivalent functionality.<br />
Servicing under the terms of this warranty, especially repair,<br />
modification or replacement of parts shall entitle to a three month<br />
warranty unless there are statutory provisions to the contrary.<br />
87<br />
This warranty shall not apply to damage or defects (to your<br />
telephone and/or accessory) caused by:<br />
• use not conforming with the instructions for use or installation,<br />
• non observation of the technical and safety standards applicable in<br />
the country where the equipment is used,<br />
• improper maintenance of batteries and other sources of energy,<br />
and of the overall electric installation,<br />
• accidents or the consequences of theft, (of the vehicle), acts of<br />
vandalism, lightning, fire, humidity, infiltration of liquids,<br />
atmospheric influences,<br />
• combination or integration of the equipment in hardware not<br />
supplied or not recommended by <strong>Alcatel</strong>, without express written<br />
consent for such,<br />
• modifications, alterations, or repairs carried out by parties not<br />
authorised by <strong>Alcatel</strong>, the dealer or the approved maintenance<br />
centre,<br />
• use of the equipment for a purpose other than that for which it<br />
was designed,<br />
• normal wear,<br />
• deterioration caused by external causes (RF interference<br />
produced by other equipment, fluctuations in mains voltage and/or<br />
voltages on telephone lines, etc),<br />
• modifications made to the equipment even if they are unavoidable<br />
due to changes in regulations and/or modification of network<br />
parameters,<br />
• connection faults resulting from unsatisfactory radio transmission<br />
or caused by the absence of radio relay coverage.<br />
Equipment on which markings or serial numbers have been removed<br />
or altered, and handsets on which labels have been removed or<br />
deteriorated shall be excluded from the warranty.<br />
88
Apart from the statutory warranty, the above provisions constitute<br />
the only claims which can be made against the manufacturer and<br />
dealer on the grounds of equipment defects, this warranty excludes<br />
any other explicit or implied warranty associated with the sale of the<br />
equipment.<br />
89<br />
CHARACTER SET<br />
To enter a word, press the key which corresponds to the desired<br />
letter several times until the wanted letter appears.<br />
: space.<br />
A short keypress on the key will display the symbol bar with<br />
the cursor automatically placed on the “•”.The<br />
to move from left to right.<br />
OK key allows you<br />
Up Down<br />
90
17<br />
The latest generation of <strong>Alcatel</strong> mobile telephones offers a large range<br />
of accessories:<br />
!<br />
Charger<br />
C 55<br />
Battery<br />
B 58<br />
ACCESSORIES (1)<br />
Travel charger<br />
C 57<br />
Headset<br />
M 13<br />
(1) Depending on your phone model and availability.<br />
The chargers designed for your mobile phone meet with<br />
the standard for safety of information technology<br />
equipment.They should be used for this purpose only.<br />
91<br />
Cigar lighter charger<br />
C 56<br />
Carrying case<br />
HC 26<br />
!<br />
Only use your mobile phone with <strong>Alcatel</strong> batteries,<br />
battery chargers, and accessories that are<br />
compatible with your phone model.<br />
Removable front covers<br />
FP xx<br />
!<br />
Basic car kit<br />
MP 79<br />
Input keyboard<br />
KB 1<br />
Basic car cradle<br />
MP 85<br />
Online purchase: www.alcatel.com<br />
92<br />
Antenna kit<br />
A 3<br />
Easy-to-install handsfree<br />
car kit<br />
MP 86
We recommend that you carry out the following checks before<br />
contacting the Customer Care Service:<br />
My mobile phone will not<br />
switch on<br />
The >> symbol is<br />
displayed: my mobile<br />
phone is not connected<br />
to a network:<br />
SIM card error<br />
TROUBLESHOOTING<br />
Outcoming calls cannot<br />
be made or no incoming<br />
calls are received<br />
- Press the key during at least two<br />
seconds<br />
- Check your battery charge level<br />
- Try to reach the network by moving<br />
to a different location (if you are inside<br />
a building, stay near a window)<br />
- Check your mobile coverage with<br />
your operator<br />
- Make sure your SIM card is valid by<br />
checking with your operator<br />
- Make sure the SIM card is correctly<br />
inserted<br />
- Check with your operator that your<br />
SIM card is 3V compatible, former 5V<br />
SIM cards can no longer be used<br />
- Make sure your mobile phone is<br />
connected to the network<br />
- Check your subscription with your<br />
operator (credit, SIM card validity)<br />
93<br />
I cannot create a file in my<br />
directory<br />
I cannot access my voice<br />
mail<br />
I cannot send messages<br />
The main screen displays a<br />
black envelope icon<br />
I have already entered 3<br />
incorrect PIN codes<br />
The icon is still<br />
showing<br />
I cannot save my new<br />
downloaded items<br />
- Check that the directory is not full,<br />
delete some files<br />
- Make sure that your voicemail number<br />
is stored in the “Numbers” option<br />
- Check the service centre number<br />
with your operator<br />
- Your correspondent’s phone could be<br />
incompatible with the transmission<br />
mode you are using (EMS standard for<br />
any transmission of icons, sounds,...)<br />
- Check that your short message<br />
memory is not full<br />
- Too many short messages are stored<br />
in your SIM memory, delete some!<br />
- Contact your operator to get your<br />
PUK code to unblock your mobile<br />
- Go to “Menu/Events” and check all<br />
events<br />
- Delete voice memos or old<br />
downloaded items by going to“Menu/<br />
My setup/Downloaded”<br />
94