Shade characteristics of natural teeth

You also want an ePaper? Increase the reach of your titles
YUMPU automatically turns print PDFs into web optimized ePapers that Google loves.
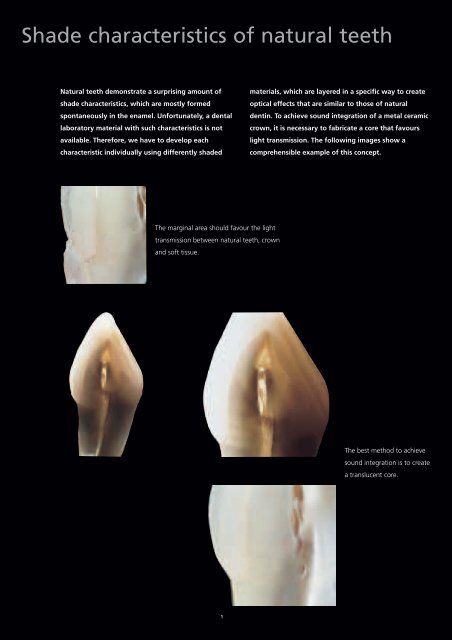
<strong>Shade</strong> <strong>characteristics</strong> <strong>of</strong> <strong>natural</strong> <strong>teeth</strong><br />
Natural <strong>teeth</strong> demonstrate a surprising amount <strong>of</strong><br />
shade <strong>characteristics</strong>, which are mostly formed<br />
spontaneously in the enamel. Unfortunately, a dental<br />
laboratory material with such <strong>characteristics</strong> is not<br />
available. Therefore, we have to develop each<br />
characteristic individually using differently shaded<br />
materials, which are layered in a specific way to create<br />
optical effects that are similar to those <strong>of</strong> <strong>natural</strong><br />
dentin. To achieve sound integration <strong>of</strong> a metal ceramic<br />
crown, it is necessary to fabricate a core that favours<br />
light transmission. The following images show a<br />
comprehensible example <strong>of</strong> this concept.<br />
The marginal area should favour the light<br />
transmission between <strong>natural</strong> <strong>teeth</strong>, crown<br />
and s<strong>of</strong>t tissue.<br />
The best method to achieve<br />
sound integration is to create<br />
a translucent core.<br />
1
A metal core will always work against us, because it will block<br />
light transmission thus creating dark areas in the internal layers<br />
<strong>of</strong> the <strong>teeth</strong>, which results in a higher opacity in the exterior<br />
layers <strong>of</strong> the crown.<br />
If a metal core has to be used, it is imperative to create a<br />
ceramic shoulder. The picture clearly illustrates how the metal<br />
substructure is blocking the light, while the light passes freely<br />
through the other areas until it reaches the preparation, thus<br />
creating a s<strong>of</strong>t transition area that favours the integration <strong>of</strong><br />
the restoration.<br />
In this Special Edition, we will identify<br />
the different shade <strong>characteristics</strong> that<br />
are present in <strong>natural</strong> <strong>teeth</strong> and explain<br />
a step-by-step procedure to reproduce<br />
these <strong>characteristics</strong> using ceramic<br />
materials.<br />
2
White, orange and brown enamel cracks<br />
We can observe this shade characteristic quite frequently in<br />
the dental enamel <strong>of</strong> adjoining <strong>teeth</strong>. The shade and<br />
appearance <strong>of</strong> enamel cracks vary. While the shade variation<br />
does not present that much <strong>of</strong> a<br />
problem, its influence on the<br />
appearance <strong>of</strong> the restoration<br />
appears to be more <strong>of</strong> a difficulty.<br />
The appearance <strong>of</strong> an enamel<br />
crack or fissure changes in<br />
response to the light refraction<br />
angle. In other words, if an enamel<br />
crack is exposed to frontal light, it<br />
Fig. 1a<br />
looks like a fine, clearly defined line (Fig. 1a). If, in contrast,<br />
the enamel crack is exposed to lateral light, light refraction is<br />
more pronounced (Fig. 1b). Virtually all <strong>natural</strong> enamel cracks<br />
Fig. 1b<br />
are located in the enamel. Therefore, the corresponding<br />
shade characteristic <strong>of</strong> a restoration should be created in the<br />
same area, i.e. in the final layer <strong>of</strong> the layering pattern, when<br />
the underlying layers have already<br />
been covered with a translucent<br />
material. It is very important to<br />
use the entire thickness <strong>of</strong> the<br />
translucent layer to reproduce the<br />
fissure, since this will provide it<br />
with a three-dimensional, true-tonature<br />
appearance. If we limit ourselves<br />
to staining only the intermediate<br />
layers, the enamel crack will demonstrate a twodimensional<br />
appearance and thus not correspond to the<br />
<strong>natural</strong> model.<br />
The enamel crack is created after the internal layering has<br />
been built up to the point at which only the translucent<br />
material has to be applied to complete the morphology. At<br />
this stage, the dentin, incisal and other shade <strong>characteristics</strong><br />
have already been built up.<br />
The next step is to build up the morphology <strong>of</strong> the tooth<br />
using Transpa neutral. The layer should extend to the area<br />
where the enamel crack is to be placed.<br />
3
Transpa neutral is applied here to build up a wall outlining<br />
the future morphology <strong>of</strong> the fissure. This wall has to be as<br />
perpendicular as possible to the surface <strong>of</strong> the basic build-up.<br />
If the angle is enlarged, a frontal view would show a gap<br />
rather than a delicate crack.<br />
Now a thin line is applied to the wall using a brush dipped<br />
into Stains Crack Liner. It is important that Transpa neutral is<br />
still humid when the characterization is applied. Otherwise<br />
the Crack Liner would be quickly absorbed by the Transpa<br />
neutral material and, as a result, the crack would be too<br />
pronounced.<br />
Now the morphology <strong>of</strong> the crown is completed using<br />
Transpa neutral. Applying the translucent material carefully is<br />
very important to prevent the materials from moving and thus<br />
compromising the outline <strong>of</strong> the fissure.<br />
Transpa neutral is applied up to the location <strong>of</strong> the next crack<br />
and the crack is again built up as described above.<br />
4
Here, however, the crack is created using pure dentin<br />
material. For this purpose, the brush is dipped into the dentin<br />
material and the characterization is applied to the area that<br />
has previously been prepared with Transpa neutral. Cracks<br />
that have been created with dentin material look s<strong>of</strong>ter and<br />
refract less light than cracks created with Crack Liner.<br />
Another way <strong>of</strong> developing a crack is to carve a small groove<br />
into the ceramic material using a spatula after the layering<br />
has been completed. However, this technique is usually<br />
applied for more rectilinear cracks, since it is very difficult to<br />
define the crack's course using a spatula. This groove should<br />
extend down to the opaquer.<br />
After the groove has been applied, one <strong>of</strong> the walls is stained<br />
in the desired shade. In this case orange is used, which has<br />
been slightly diluted with a small amount <strong>of</strong> glazing paste.<br />
Glazing paste is preferable to a liquid to prevent the pigments<br />
from excessively penetrating the ceramic material. Once the<br />
stains have been applied and the ceramic material has slightly<br />
set, the two sides <strong>of</strong> the groove are pushed together and the<br />
morphology <strong>of</strong> the tooth is completed.<br />
5
Appearance <strong>of</strong> the restoration after firing.<br />
After the crown has been polished and glazed, we can<br />
examine the final appearance <strong>of</strong> the fissures. In the picture<br />
the tooth is exposed to lateral light, namely to light coming<br />
from the mesial. Now we can see the exceptional behaviour<br />
<strong>of</strong> Crack Liner. The mesial part <strong>of</strong> the crack is much more<br />
saturated than the distal part, as the crack blocks the light in<br />
the same way as the enamel <strong>of</strong> <strong>natural</strong> <strong>teeth</strong> does.<br />
If we examine the enamel<br />
cracks in back light, we can<br />
clearly see how the cracks<br />
efficiently block the light.<br />
6
The same technique can<br />
be applied to create more<br />
pronounced cracks with<br />
infiltrations.<br />
However, purer pigments or<br />
more intensive shades such<br />
as brown, as was applied in<br />
this case, are used.<br />
After the stains have been applied, the enamel crack is<br />
completed using Transpa neutral, as described above.<br />
The final result.<br />
7
Clear areas<br />
This characteristic is found to a lesser or higher degree in<br />
99 % <strong>of</strong> all <strong>natural</strong> <strong>teeth</strong>. Therefore, creating it should be<br />
regarded as an additional stage <strong>of</strong> the layering procedure<br />
rather than part <strong>of</strong> the shade characterization procedure.<br />
Usually, the characteristic appears as a clear area in the<br />
enamel or dentin. In some cases, however, it is more<br />
pronounced, looking like a stain caused by decalcification.<br />
Basically, we could integrate this shade characteristic into the<br />
first dentin layers <strong>of</strong> the build-up. A saturated white dentin<br />
material could be used to create the desired shade effect. The<br />
disadvantage <strong>of</strong> this approach, however, is that any error<br />
regarding the location <strong>of</strong> the characterization or selection<br />
<strong>of</strong> shade cannot be corrected without having to redo the<br />
entire layering. It is therefore advisable to include this shade<br />
characteristic in the final layer, which is easy to access.<br />
However, if the brightness <strong>of</strong> an area in the final layer is<br />
manipulated, the opacity <strong>of</strong> this area will also increase. In<br />
other words, we would lose translucency in the area <strong>of</strong> the<br />
shade characteristic. For this reason, the characteristic in<br />
question should be incorporated into an intermediate layer.<br />
In this case, we will design a stripe-shaped bright area. For<br />
this purpose, we will use a whitish translucent material, such<br />
as Effect Material 2 from the Impulse 1 Kit. For accurate<br />
visual control, the ceramic material has been dyed yellow.<br />
All we have to do is to apply a small amount <strong>of</strong> Effect<br />
Material 2 on that area <strong>of</strong> the dentin material where the<br />
shade characteristic is to be<br />
located. The intensity <strong>of</strong><br />
this shade characteristic is<br />
regulated with the thickness <strong>of</strong><br />
the ceramic layer. If a more<br />
pronounced characterization is<br />
required, a more translucent<br />
material with a higher degree <strong>of</strong><br />
saturation is used, such as Effect<br />
Material 3, rather than applying a<br />
thicker layer <strong>of</strong> Effect Material 2.<br />
This shade characteristic is<br />
applied on top <strong>of</strong> the basic<br />
layering. In this case, the<br />
dentin, incisal, and shade<br />
<strong>characteristics</strong> <strong>of</strong> the incisal edge<br />
have already been applied.<br />
In addition, a decalcification spot in the distal margin <strong>of</strong><br />
the incisal edge will be created. For this purpose, a highly<br />
saturated translucent white<br />
material is applied, such as<br />
Effect Material 4 from the<br />
Impulse 1 Kit. As the desired<br />
characterization should be very<br />
pronounced, we will try to<br />
reproduce it with an intermediate<br />
layer and a final layer. In this way,<br />
light can reach the Effect material,<br />
thus creating a pronounced<br />
characterization.<br />
8
The tooth morphology is<br />
now completed using<br />
Transpa neutral. The area to<br />
which Effect Material 4 has<br />
been applied should not be<br />
covered.<br />
Appearance <strong>of</strong> the<br />
restoration after firing.<br />
After polishing and glazing, the two characterizations are clearly visible.<br />
9
Opalescent incisal edge<br />
Highly opalescent incisal edges are very common in young<br />
<strong>teeth</strong>. Reproducing this characteristic is difficult, but not<br />
impossible. The opalescence results in a concentration <strong>of</strong> light<br />
in the incisal edge, which is also known as incisal halo. The<br />
incisal halo in a <strong>natural</strong> tooth is a spontaneous occurrence,<br />
due to the special light refraction in dental enamel. Unfortunately,<br />
the opalescent materials do not refract the light as<br />
intensely as <strong>natural</strong> enamel. Therefore, we have to use<br />
pigmented materials to reproduce the incisal halo.<br />
Immediately after the translucent area <strong>of</strong> the opalescent<br />
edge has been reproduced,<br />
the incisal halo is<br />
created using Incisal<br />
Edge, a material<br />
that has been<br />
especially developed<br />
for this purpose.<br />
Again, this material<br />
should be allowed to<br />
mix with the previously applied Effect Material 1.<br />
For this shade characterization, the incisal edge <strong>of</strong> the<br />
completed build-up has<br />
to be reduced<br />
following the<br />
pattern <strong>of</strong> the<br />
previously designed<br />
mamelons, which<br />
are then covered<br />
with transparent<br />
material up to the<br />
reduced area.<br />
Next, Effect Material<br />
1 from the Impulse<br />
1 Kit is applied. It is<br />
important that this<br />
material does not<br />
excessively mix with<br />
the materials <strong>of</strong> the<br />
build-up.<br />
The opalescent incisal edge and the appearance <strong>of</strong> the incisal<br />
halo are clearly visible immediately after application.<br />
10
Abrasion <strong>of</strong> the incisal edge<br />
Abrasion is the wear <strong>of</strong> the incisal edge (mostly the palatal<br />
area) caused by <strong>natural</strong> functions. If abrasion is present in the<br />
enamel, the morphology <strong>of</strong> the tooth is altered, together<br />
with the shade in the area <strong>of</strong> the abrasion. The latter<br />
occurrence is quite obvious, as abrasion causes a loss in<br />
enamel and exposes the dentin. Moreover, these areas <strong>of</strong>ten<br />
show signs <strong>of</strong> infiltration resulting in areas that demonstrate<br />
pronounced pigmentation.<br />
In this case, we will create a wear pattern using a highly<br />
saturated shade.<br />
Next, Occlusal Dentin brown and Occlusal Dentin orange are<br />
mixed in a 1:1 ratio. A small quantity <strong>of</strong> white stains is added<br />
to the mixture to render<br />
it slightly opaque. This<br />
mixture is used to fill the<br />
entire groove <strong>of</strong> the wear<br />
pattern to give it the<br />
appearance <strong>of</strong> internal dentin<br />
that has filtered between the enamel and dentin.<br />
This characteristic is reproduced<br />
after the crown has been<br />
completely layered. Once<br />
the palatal area has been<br />
contoured, a groove in<br />
the form <strong>of</strong> the intended<br />
wear pattern is created<br />
using a spatula.<br />
If the wear pattern should appear less aggressive, the 1:1<br />
mixture <strong>of</strong> Occlusal Dentin<br />
brown and orange can be<br />
substituted by dentin<br />
material to which a small<br />
amount <strong>of</strong> dentin-coloured<br />
<strong>Shade</strong> material has been<br />
added to heighten the<br />
degree <strong>of</strong> saturation. The intensity can be regulated by the<br />
amount <strong>of</strong> <strong>Shade</strong> used.<br />
The wall <strong>of</strong> the groove is<br />
now stained using Crack<br />
Liner to block out the light<br />
in this area. Additionally,<br />
some white stains may be applied. In this case, the stains<br />
were applied to the distal area <strong>of</strong> the wear pattern.<br />
Another more intensive shade,<br />
such as in this case brown,<br />
may be applied to the bottom<br />
<strong>of</strong> the groove and to a<br />
wall <strong>of</strong> the wear pattern.<br />
Orange or khaki are yet<br />
other possibilities.<br />
11
Mamelons in the incisal edge<br />
This shade characteristic is mostly evident in young <strong>teeth</strong>.<br />
However, the characteristic is maintained even in mature<br />
<strong>teeth</strong>. Consequently, mamelons are outlined in most<br />
restorations, even if they are not evident at the time <strong>of</strong> shade<br />
determination. Mamelons cause the incisal edge to appear<br />
richer, which will favour the integration <strong>of</strong> the restoration<br />
into the oral environment. If the mamelon shade has not<br />
been determined by the dentist, it is advisable to use a somewhat<br />
subdued shade, such as the salmon-coloured mamelon<br />
material <strong>of</strong> the Impulse Kit.<br />
For best results, the underlying material and the mamelon<br />
material should be slightly moist during application, as the<br />
pigments <strong>of</strong> the two materials may then slightly mix thus<br />
creating a s<strong>of</strong>t transition area.<br />
Next, Transpa blue <strong>of</strong> the<br />
Impulse 1 Kit is applied to<br />
this area.<br />
Then, small grooves are carved<br />
into the incisal edge by means<br />
<strong>of</strong> a brush.<br />
The salmon-coloured mamelon<br />
material is applied to the basic<br />
build-up consisting <strong>of</strong> dentin<br />
and incisal material.<br />
These grooves are filled with<br />
an opalescent material, such<br />
as Effect Material 1 <strong>of</strong> the<br />
Impulse 1 Kit.<br />
In a first step, the mesial and<br />
distal angle <strong>of</strong> the incisal edge<br />
are slightly reduced.<br />
Using the desired mamelon material, in this case salmon,<br />
wedge-shaped lines that are thinning out towards the incisal<br />
edge are drawn, with the wider<br />
area in the center <strong>of</strong> the<br />
mamelon. Usually, three<br />
mamelons are present in<br />
<strong>natural</strong> <strong>teeth</strong>. However, the<br />
number <strong>of</strong> mamelons is unimportant.<br />
Consequently, four or five mamelons may be<br />
created.<br />
12
If the mamelons need to be more<br />
pronounced, a small quantity<br />
<strong>of</strong> Brilliant Dentin may be<br />
applied. Given the opacity <strong>of</strong><br />
this material, only a trace <strong>of</strong> it is<br />
required.<br />
Finally, the incisal edge is<br />
completed by applying a layer<br />
<strong>of</strong> Transpa neutral. We have to<br />
be keep in mind that the more<br />
Transpa neutral is applied, the<br />
less pronounced the shade<br />
characterization will be.<br />
Completed crown.<br />
13
Areas <strong>of</strong> light absorption<br />
Natural <strong>teeth</strong> <strong>of</strong>ten demonstrate horizontal stripes that<br />
appear grey. This characteristic is reproduced in the dentin.<br />
Next, the grooves are filled<br />
using Transpa neutral.<br />
The basic build-up has to be<br />
completed before this characteristic<br />
is designed.<br />
After the grooves have been<br />
filled, the tooth morphology is<br />
completed in the usual manner<br />
using Transpa neutral.<br />
In this case, two short, horizontal stripes will be created. For<br />
this purpose, two grooves are<br />
drawn on the surface<br />
using the tip <strong>of</strong> the<br />
brush. It is important<br />
that the grooves do not<br />
demonstrate perpendicular<br />
walls. Otherwise<br />
the characterization will be<br />
too pronounced.<br />
The completed restoration: The horizontal stripes made <strong>of</strong><br />
pure Transpa neutral absorb more light and thus appear grey.<br />
14
<strong>Shade</strong> <strong>characteristics</strong> <strong>of</strong> our patients<br />
Whenever we look at the shade <strong>of</strong><br />
the permanent <strong>teeth</strong> <strong>of</strong> our patients,<br />
we can observe specific shade<br />
<strong>characteristics</strong>. The intensity <strong>of</strong> these<br />
<strong>characteristics</strong> may vary from case to<br />
case, but they are present in each<br />
patient. These shade <strong>characteristics</strong><br />
must be maintained when<br />
fabricating anterior restorations in<br />
particular. If only a single anterior<br />
crown is required, the shade<br />
<strong>characteristics</strong> <strong>of</strong> the remaining <strong>teeth</strong><br />
have to be taken into consideration.<br />
If all the anterior <strong>teeth</strong> are replaced,<br />
however, dental technicians have<br />
much more creative freedom in the<br />
fabrication <strong>of</strong> the individual buildups.<br />
Younger <strong>teeth</strong> always<br />
demonstrate increased<br />
brightness and translucency<br />
due to their high<br />
opalescence.<br />
The opalescent area and<br />
the incisal halo <strong>of</strong> this<br />
restoration were designed as<br />
described above (clinical<br />
case <strong>of</strong> the Dr. Erika Téllez).<br />
Moreover, pronounced<br />
shade <strong>characteristics</strong> may<br />
be found in very young<br />
<strong>teeth</strong>. Decalcified areas and<br />
areas <strong>of</strong> light absorption<br />
frequently appear<br />
together (clinical case <strong>of</strong><br />
Dr. Oriol Llena).<br />
15
Clinical preparation<br />
Several shade <strong>characteristics</strong><br />
may occur at the same time.<br />
In this case, a complicated<br />
layering procedure was<br />
required to obtain optimum<br />
results (clinical case <strong>of</strong><br />
Dr. Oriol Llena).<br />
Here, two crowns for <strong>teeth</strong><br />
11 and 12 were fabricated.<br />
The two lateral anteriors,<br />
whose dentin areas are very<br />
different from each other,<br />
were used as a reference.<br />
The challenge was to create<br />
two restorations that would<br />
enhance the patient’s look<br />
while simultaneously<br />
matching the lateral<br />
incisors (clinical case <strong>of</strong><br />
Dr. Oriol Llena).<br />
16
When an entire anterior group <strong>of</strong> <strong>teeth</strong> is restored, the room<br />
for creativity is larger as the dental team may design the<br />
shade <strong>characteristics</strong> according to their preferences.<br />
In this case, the entire anterior region from canine to<br />
canine was restored with d.SIGN veneers (clinical case <strong>of</strong><br />
Dr. Eduardo Anitua).<br />
17
I would like to round <strong>of</strong>f this presentation by providing an overview<br />
<strong>of</strong> the impressive range <strong>of</strong> possibilities that IPS d.SIGN <strong>of</strong>fers, using<br />
the case studies below as examples.<br />
Oral situation before treatment.<br />
The image <strong>of</strong> the patient’s smile is the image <strong>of</strong> our work.<br />
By examining the crowns closely, we realize how important<br />
the shade <strong>characteristics</strong> are to imitate the <strong>natural</strong> tooth.<br />
18
Initial situation before treatment.<br />
Situation after the treatment has been completed.<br />
Detail image <strong>of</strong> IPS d.SIGN restorations.<br />
19
Clinical case <strong>of</strong> Dr. Erika Téllez, showing an IPS d.SIGN veneer on tooth 12, an IPS Empress crown on tooth 11 and 21 and an<br />
IPS d.SIGN metal crown on tooth 22.<br />
20
Crown after having been cemented in place.<br />
21
*Material taken out from the book<br />
"Sombras, un mundo de color"<br />
August Bruguera<br />
C/Vialmari, 56 local 1<br />
Barcelona 08015<br />
Spain<br />
bruguera.lab@infomed.es<br />
22
Descriptions and data constitute no warranty <strong>of</strong><br />
attributes and are not binding.<br />
Printed in Liechtenstein © Ivoclar Vivadent AG<br />
575240/0503/2/e/BVD
d.SIGN ®<br />
Special Edition<br />
IPS<br />
A. Bruguera