Sport Utility Stroller OWNER'S MANUAL - BOB Trailers and Strollers
Sport Utility Stroller OWNER'S MANUAL - BOB Trailers and Strollers
Sport Utility Stroller OWNER'S MANUAL - BOB Trailers and Strollers

Create successful ePaper yourself
Turn your PDF publications into a flip-book with our unique Google optimized e-Paper software.
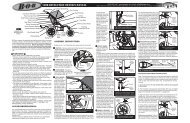
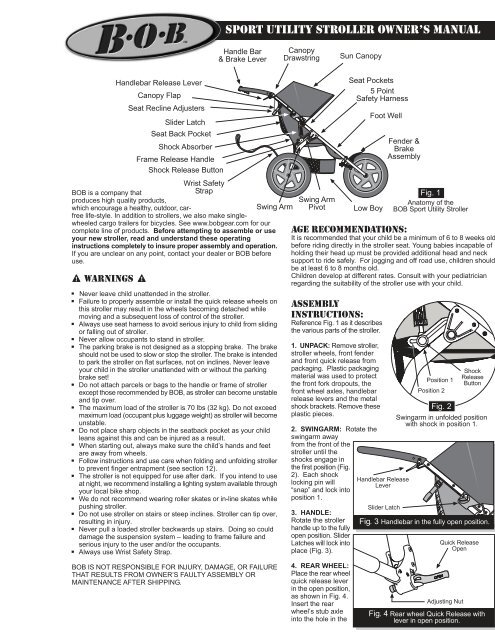
<strong>Sport</strong> <strong>Utility</strong> <strong>Stroller</strong> OWNER’S <strong>MANUAL</strong>7. PARKINGBRAKE: Thebrake is a parkingbrake, it preventsthe stroller frommoving whileloading <strong>and</strong>unloading. Theparking brake is notdesigned as astopping brake. Wedo not recommendusing the brake toslow or stop thestroller. The brakeis intended to parkthe stroller on flatsurfaces not oninclines. Neverleave your child inthe strollerunattended with orwithout the parkingbrake set!After installing the frontwheel, the brake caliper willneed to be placed in theclosed position. Close thebrake quick release (Fig.10) by squeezing the brakepads against the wheel withone h<strong>and</strong>, then rotate thebrake quick release lever inthe counter clockwisedirection with your otherh<strong>and</strong> until it pointsdownward.To set the parking brake,squeeze the brake lever<strong>and</strong> press <strong>and</strong> hold thebutton down, then releaseBrakeBodyBrakePad3/16” (5mm)Fig. 15 Clearance between brake pad & rimBrake PadNut10mm CaliperMounting NutFig.16 Brake pads shown aligned to rimlever (Fig. 13 & 14). When the brake is properly set, the button willremain depressed <strong>and</strong> the lever will appear as shown in Fig. 14. Torelease the parking brake, simply squeeze the brake lever <strong>and</strong> thebutton will “pop” up. For the parking brake to work correctly, it iscritical that the brake be adjusted properly.Squeeze the brake lever <strong>and</strong> verify that the brake pads contact therim as shown in Fig. 16. If they are misaligned, use a 10mm wrenchto loosen brake pad nuts, slide pads into correct position <strong>and</strong> tightensecurely. The cable tension is pre-adjusted at the factory yet the brakecable will need periodic adjustment (as the cable stretches slightly<strong>and</strong> the black cable housing compresses over time). To adjust cabletension, there are two barrel adjusters in the brake assembly (Fig.10& 13). To tighten the cable, loosen the lock ring <strong>and</strong> turn the barreladjuster in the counter clockwise direction. Secure the barrel adjusterin the new position by tightening the lock ring against the caliper orbrake lever body. There should be a 3/16”(5mm) clearance betweenthe rim <strong>and</strong> brake pads as shown in Fig. 15. If gap is not equal oneach brake pad, the brake caliper can easily be repositioned on theframe by loosening the caliper mounting nut (Fig. 16) with a 10mmwrench, adjust to the gap shown in Fig. 15 <strong>and</strong> re-tighten the samenut. If you do not underst<strong>and</strong> these instructions, or feel the brake isadjusted incorrectly, take the stroller to your dealer for proper adjustment.If your brake pads (Fig. 10) are worn, see your dealer for replacements.8. SUN CANOPY: The stroller features a two position canopy. Tofully open the canopy, rotate the assembly forward until the fabric istaut. The rear canopy flap should be freed from the Velcro to giveadditional sun protection. To reduce the size of the sun canopy, pullthe canopy toward the h<strong>and</strong>lebar. The additional fabric can be gatheredby pulling the canopy drawstring (Fig. 1) <strong>and</strong> securing the cord lock.TireRimFig. 17 Place straps over shoulders<strong>and</strong> secure to buckle.ShoulderStrapCrotchStrapBuckle9. SEAT SAFETY HARNESS:Set parking brake before placingchild in stroller. To secure yourchild in the seat, put one shoulderstrap over each shoulder <strong>and</strong> snapthe male buckle into the femalereceiver on the crotch strap (Fig.17). Adjust shoulder straps to besnug <strong>and</strong> secure (Fig. 18).Connect <strong>and</strong> adjust the sternumstrap (red), see Fig. 19.WARNING: Never placepassengers in the stroller withoutsecuring them in the harness.Unrestrained passengers canaffect the control of the stroller.Passenger weight limit - 70 lbs(32 kg)Passenger height limit - 44 in (122cm)10. RECLINING SEAT:Set parking brake before makingany seat adjustments. To reclinethe seat, rotate the ladder lockbuckles (Fig. 20) forward thusreleasing the reclining straps. Toraise the seat, pull the recliningstrap loops until you obtain thedesired position. The seat backcan be adjusted to reclineanywhere between the fully uprightposition <strong>and</strong> the fully reclinedposition (Fig. 20 & 21).11. SHOCK ABSORBERS: Fig. 20 Seat in fully upright position.The suspension system featurestwo shock positions to provide acomfortable ride for kids of differentRecliningStrapweights. The two positions areLoopsshown in Fig. 2. Position 1 isintended for occupants up to 40lbs. (18 kg), while position 2 isintended for occupants from 40 to70 lbs. (18 to 32 kg) total. Thestroller features a metal shockbracket with a sliding track <strong>and</strong>Fig. 21 Seat in fully reclined position.spring loaded shock pin thatautomatically locks in place whenit aligns with either of the two shock positions. Shock positionadjustments should be made with the stroller unloaded. The shockswill lock into position 1 when unfolding the stroller. To use the stiffershock position, move the shock from position 1 to position 2 bydepressing the shock releasebutton (Fig. 2) with one h<strong>and</strong>,<strong>and</strong> with the other h<strong>and</strong>, liftslightly <strong>and</strong> pull the shockbackward. When the shock pinis properly aligned in position2, the pin will “snap” intoplace. Repeat thisprocess for the secondshock. To move theshock from position 2 toposition 1, reverse theabove process for bothshocks.ShoulderStrapFig. 18 Securely adjust shoulder strapsFig. 19 Connect Sternum StrapFig. 22<strong>Stroller</strong> with h<strong>and</strong>le foldedSternumStrapSeat RecliningLadder LockBuckles12. FOLDING:Remove child from stroller. Remove the contents of the LowBoy cargo pouch. The shock absorbers must be in position 1 (Fig.2) before folding. Press both the right <strong>and</strong> left h<strong>and</strong>lebar release
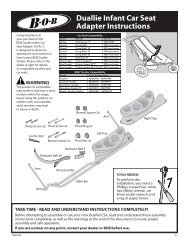
(800) 893-2447 www.bobgear.com email- info@bobgear.comPhone: (208) 375-5171 Fax: (208) 375-5172, <strong>BOB</strong> <strong>Trailers</strong>, Inc. 5475 Gage St. Boise, Idaho 83706MA0601levers (Fig. 3), <strong>and</strong> fold theh<strong>and</strong>lebar forward as shown in Fig.22. Locate the frame releaseh<strong>and</strong>le underneath the seat (Fig.23) <strong>and</strong> pull upwards sharply. Thiswill allow the lower frame to foldtogether, as shown in Fig. 24.The folded stroller can bemade even more compact byremoving the front <strong>and</strong> rearwheels. To remove the frontwheel, open the brake quickrelease (Fig. 10), open frontwheel quick release, then pull thewheel forward (see section 6). Notethat it is often easier to open the brake quick release before you foldthe h<strong>and</strong>lebar. The rear wheels are removed by opening the rearwheel quick release (Fig. 4), <strong>and</strong> pulling each wheel directly to theside.The Wrist Safety Strap can be used to keep thestroller in the folded position for transport <strong>and</strong>storage. With the stroller folded, loop theend of the wrist safety strap aroundthe h<strong>and</strong>lebar <strong>and</strong> back to thecross tube <strong>and</strong> fix theVelcro surfaces together(Fig. 25).13. TIREPRESSURE:IMPORTANT: Checktire pressure beforeevery use. If your strollerhas plastic wheels, neverexceed maximumpressure specified onrim (30 p.s.i). If youhave alloy wheels,keep tires inflatedwithin rangeembossed on thesidewall of the tire(usually 25-35 p.s.i.).14. STROLLERCARE &MAINTENANCE:The fabric is 100%polyester with a stainresistant treatment that makes cleanup easy. Use a sponge with asolution of mild soap <strong>and</strong> lukewarm water (maximum temperature of100 deg. F / 38 deg. C). Rinse thoroughly with clean water to removesoap then air dry. Do not use detergent.Regular maintenance should include: Verifying tire pressure, verifyingthat all screws <strong>and</strong> fasteners are tight, <strong>and</strong> wiping parts clean with arag. To reduce thepossibility ofsqueaks,periodically applya small amount oflubricant (Triflow,3-in-one, or lightsewing machineoil) to the pivotaxles <strong>and</strong> interiorfaces of the pivotbrackets, asshown in Fig. 26.STORAGE: It isbest to store yourstroller indoorswhen it is not in use.H<strong>and</strong>lebarApply Lubricantto Interior Facesof BracketApply Lubricantto AxlePull UpSharplyFrameRelease H<strong>and</strong>leFig. 23Pull h<strong>and</strong>le upwards sharplyto fold swingarm.Fig. 24<strong>Stroller</strong> in fully folded positionCross TubeWrist StrapVelcroFig. 25 Secure stroller in folded positionFig. 26Lubrication PointsThis will prolong its attractive appearance. Extended exposure to thesun's ultraviolet rays can fade <strong>and</strong> damage the fabric, tires, <strong>and</strong> plasticparts.CARGO: The stroller is equipped with two small seat pockets foryour child, a seatback pocket <strong>and</strong> a Low Boy cargo pouch under thestroller. Adding weight to the seatback changes the center of gravityof the stroller, <strong>and</strong> increases the possibility that it will tip over backwards.For this reason, loads in the seatback pocket should never exceedtwo pounds (1 kg.). Although the seatback is padded, it is importantto remember that this is what your child leans against. Never placesharp or injurious objects into the seatback pocket. Maximum loadfor Low Boy is 10 lbs (7 Kg).LIMITED WARRANTY<strong>BOB</strong> <strong>Trailers</strong> Inc. takes pride in its workmanship <strong>and</strong> strives tomanufacture the best products possible. Therefore, we warranty our<strong>Sport</strong> <strong>Utility</strong> <strong>Stroller</strong>s against defects in material <strong>and</strong> workmanshipsubject to the conditions listed below. Since no product is indestructible,it does not cover defects attributable to or resulting from normal wear,abuse or alteration.. Frame is warranted for 5 years.. Components <strong>and</strong> fabric are warranted for one year.. Warranty is only valid for the original purchaser..Proof of purchase is required to exercise this warranty.. Labor <strong>and</strong> freight charges are not included.. Normal wear, neglect, abuse, accidents, improper assembly ormaintenance, or the installation of parts or accessories not compatiblewith the original intended use of the stroller, as sold, are not coveredby this Warranty.. Warranty claims must be made through an authorized dealer.. This warranty is limited to the repair or replacement of the defectivepart. <strong>BOB</strong> shall in no event be responsible for consequential orspecial damages.. This Limited Warranty is the only express or implied warrantyapplicable to <strong>BOB</strong>. Any implied warranties, including warrantiesof merchantability <strong>and</strong> fitness shall be limited in scope <strong>and</strong> durationin accordance with this limited warranty.STROLLER ACCESSORIES<strong>BOB</strong> offers a complete line of accessories for your <strong>Sport</strong> <strong>Utility</strong> <strong>Stroller</strong>.Visit our website for full details, specs <strong>and</strong> images:www.bobgear.comHANDLEBAR CONSOLEAt your finger tips storage for two water bottles or drinks <strong>and</strong> othersmall items. 4 Velcro straps for easy attachment.WARM FUZZYWarm Fuzzy Seat Insert -The ultimate in plushness & comfort. Thick,polypropylene fleece will give you <strong>and</strong> your child a warm fuzzy!WEATHER SHIELDYour little one will be dry & comfortable in bad weather, strolling withthe <strong>BOB</strong> Weather Shield!INFANT CAR SEAT ADAPTERAllows quick attachment of leading br<strong>and</strong> infant car seats to yourstroller so you don’t have to wait to take your infant on a stroll with<strong>BOB</strong>! Once installed, easily folds with stroller.SUN PROTECTORReduces up to 65% of solar heat <strong>and</strong> glare as well as UVA/UVB rays.Also protects children from brisk winds <strong>and</strong> flying insects.
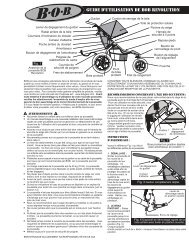
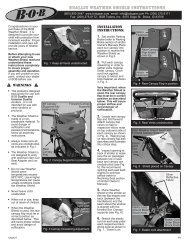
tracking instructions(800) 893-2447 www.bobgear.com email- info@bobgear.comPhone: (208) 375-5171 Fax: (208) 375-5172, <strong>BOB</strong> <strong>Trailers</strong>, Inc. 5475 Gage St. Boise, Idaho 83706MA0501AWe have added an enhanced feature to our jogging strollers thatallows the customer to fine tune the tracking of their stroller. Thisdocument is designed to supplement to the Owner’s Manual. Proceedwith initial setup <strong>and</strong> use of your stroller <strong>and</strong> only refer to thisdocument if you believe there is a tracking problem with yourstroller.All fixed three wheeled vehicles can be easily influenced to deviatefrom a straight path. In some cases strollers can have or develop atendency to pull to the right/left due to many different factors includingtire pressure, wheel installation, road conditions <strong>and</strong> manufacturingtolerances. If you find your <strong>BOB</strong> stroller to significantly track or pullto the left or right during use on flat terrain, follow the sequence ofinstructions below.Tracking Adjustment Instructions:The fine-tuning of desired tracking should be performed in the followingsequence.1) Confirm the rear wheels are installed correctly. Refer to step 4 ofthe Owner’s Manual for installation instructions.front wheel, secure thewheel <strong>and</strong> brake quickrelease levers.b. Perform roll test again.If the stroller stillconsistently pulls to the leftor right when pushedstraight, proceed to nextstep.7) Fine tune tracking ofstroller is accomplished byusing the adjustment knobsshown in Fig. 4.Rotate axle 90 oFig. 2 Rotate Axle2) Confirm the front wheel is installed correctly. Refer to step 6 of theOwner’s Manual for correct installation instructions. When tighteningthe quick release make sure the front wheel is pushed straight <strong>and</strong>equally toward the back of the dropouts.Wheel ReorientedWith Quck ReleaseLever On OppositeSide3) Check the tire pressure, making sure the tire pressure is exactlythe same on all three tires.4) Roll test the stroller as described below. It is recommended youhave someone assist with this task in order to catch <strong>and</strong> return thestroller. Fig. 1 illustrates the roll test process.Fig. 3 Reorient Front WheelTop View Of <strong>Stroller</strong>Wheel axlesperpendicularto straight line90 oFig. 1 <strong>Stroller</strong> Roll Test<strong>Stroller</strong> pullsto righta. Empty the stroller. Do not roll test with a child or any occupantin the stroller.b. Find a location on level ground approximately 16 ft. long. It ishelpful to use an existing straight-line as a frame of reference suchas the edge of the sidewalk or a painted line in a playground.c. Align the stroller so the rear wheels are perpendicular to thestraight line. Push <strong>and</strong> release the stroller trying carefully not toinfluence its direction to the left or right so it rolls straight down thetest path. This step should be performed more than once to makesure the stroller was not biased left or right by the pushing action.d. If the stroller consistently pulls to the left or right when pushedstraight, proceed with the steps below until tracking is satisfactory.Fig 1. illustrates how to interpret the results.Reference convention: Left <strong>and</strong> right are described as viewed fromthe operator’s frame of reference (behind the stroller). Example: Theparking brake lever is on the left side of the h<strong>and</strong>lebar.5) Rotate the front axle. Often tracking can be corrected by simplyrotating the front wheel axle.a. Open the front wheel quick release, step 6 of the Owner’s Manual.Rotate axle 90 degrees in dropout, Fig. 2 <strong>and</strong> retighten quickrelease.b. Perform roll testing again. If the stroller still consistently pulls tothe left or right when pushed straight, proceed to next step.6) Reorient the front wheel. Many times the tracking can be correctedby removing the front wheel <strong>and</strong> flipping it around <strong>and</strong> reinstalling it.a. Open the front wheel <strong>and</strong> front brake quick releases, step 6 ofthe Owner’s Manual. Remove the front wheel <strong>and</strong> flip it around sothe quick release lever is on the opposite side, Fig. 3. Reinstall the16’<strong>Stroller</strong> pullsto leftIf your stroller pulls to theright, proceed as follows:a. Open quick release leveron front wheel, step 6 inthe Owners Manual. It isnot necessary to removethe front wheel.b. Turn the right knobclockwise 1-full turn, asshown in Fig. 5, therebypushing the right side ofthe wheel forward.Retighten quick release.c. Repeat Roll test. Ifstroller still pulls to the right,repeat steps A <strong>and</strong> B.If your stroller pulls to theleft, proceed as follows:a. Open quick release leveron front wheel, step 6 inthe Owners Manual. It isnot necessary to removethe front wheel.b. Turn the left knobclockwise 1-full turn, asshown in Fig. 6, therebypushing the left side of thewheel forward. Retightenquick release.c. Repeat Roll test. Ifstroller still pulls to the left,repeat steps A <strong>and</strong> B.LeftAdjust Knob(Fig. 6)Fig 4. Adjust KnobsTurn Knob Clockwise1 Full turnFig. 5 Right Adjust KnobTurn Knob Clockwise1 Full turnFig. 6 Left Adjust KnobFrontWheelRightAdjust Knob(Fig. 5)