

Philips SalonPro AC Sèche-cheveux - Mode d’emploi - FAS
Philips SalonPro AC Sèche-cheveux - Mode d’emploi - FAS
Philips SalonPro AC Sèche-cheveux - Mode d’emploi - FAS

You also want an ePaper? Increase the reach of your titles
YUMPU automatically turns print PDFs into web optimized ePapers that Google loves.
<strong>SalonPro</strong><br />
HP4897, HP4892,<br />
HP4891, HP4890<br />
1<br />
2 3 4 5<br />
6 7 8 9<br />
10<br />
www.philips.com
ENGLISH<br />
4222 002 61512<br />
Introduction<br />
The <strong>Philips</strong> Salon Pro is a powerful hairdryer with a professional design and<br />
performance. Moreover, this hairdryer has features that protect your hair from<br />
damage and give you the reassurance of the best results.<br />
The ion function produces negatively charged ions, which prevent static and flyaway<br />
hair, leaving it frizz-free, manageable and shiny.<br />
Next to the ion function, this hairdryer contains a ceramic element that produces a<br />
gentler warmth than a conventional heating element, thus protecting your hair from<br />
overdrying.<br />
You can visit our website at wwww.philips.com for more information about this<br />
product or other <strong>Philips</strong> products.<br />
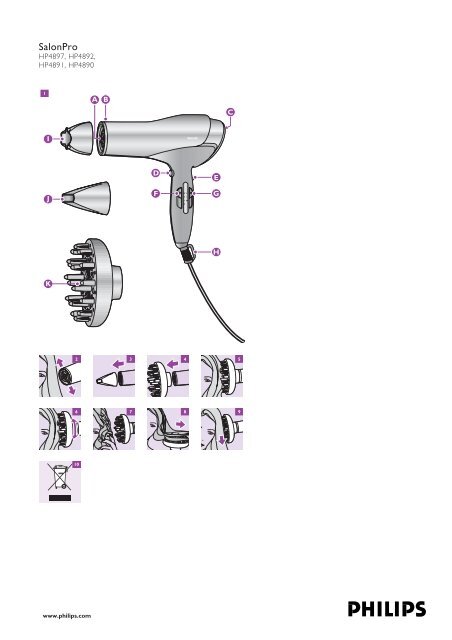
General description (fig. 1)<br />
A Ceramic element (HP4892/91/90 only)<br />
B Ion indicator light<br />
C Removable air inlet grille<br />
D Cool shot button<br />
E Ion slide switch<br />
- 0 = Off<br />
- I = On<br />
F Airflow slide switch<br />
- 0 = Off<br />
- I = Low airflow specially intended for styling<br />
- II = Medium airflow for drying<br />
- III = High airflow for ultra-fast drying<br />
G Temperature slide switch<br />
- 6 = Hot setting<br />
-= Warm setting<br />
- 4 = Cool setting<br />
H Hanging loop<br />
I Standard nozzle (HP4897/91/90 only)<br />
J Professional nozzle (HP4892 only)<br />
K Volume diffuser (HP4892/91 with ceramic tips)<br />
Important<br />
Read these instructions for use carefully before using the appliance and save them for<br />
future reference.<br />
◗ Check if the voltage indicated on the appliance corresponds to the local mains<br />
voltage before you connect the appliance.<br />
◗ Check the condition of the mains cord regularly.<br />
◗ Do not use the appliance if the plug, the cord or the appliance itself is damaged.<br />
◗ If the mains cord is damaged, it must be replaced by <strong>Philips</strong>, a service centre<br />
authorised by <strong>Philips</strong> or similarly qualified persons in order to avoid a hazard.<br />
◗ Keep this appliance away from water! Do not use this product near or over<br />
water contained in baths, washbasins, sinks etc. When used in a bathroom,<br />
unplug the appliance after use since the proximity of water presents a risk,<br />
even when the hairdryer is swit<strong>che</strong>d off.<br />
◗ For additional protection, we advise you to install a residual current device<br />
(RCD) with a rated residual operating current not exceeding 30mA in the<br />
electrical circuit supplying the bathroom. Ask your installer for advice.<br />
◗ Keep the appliance out of the reach of children.<br />
◗<br />
◗<br />
◗<br />
◗<br />
◗<br />
◗<br />
◗<br />
Never block the air grilles.<br />
This appliance is equipped with an overheat protection device. If the appliance<br />
overheats, it will switch off automatically. Unplug the appliance and let it cool<br />
down for a few minutes. Before you switch the appliance on again, <strong>che</strong>ck the<br />
grilles to make sure they are not blocked by fluff, hair, etc.<br />
Always switch the appliance off before putting it down, even if it is only for a<br />
moment.<br />
Always unplug the appliance after use.<br />
Do not wind the mains cord round the appliance.<br />
You may notice a characteristic odour when using this hairdryer with the ion<br />
function swit<strong>che</strong>d on. This is caused by the ions that are generated and it is<br />
not harmful to the human body.<br />
Do not probe the ion generator or ceramic heating element with metal<br />
objects.<br />
Using the appliance<br />
Drying<br />
1 Put the plug in the wall socket.<br />
2 Switch the appliance on by selecting the desired airflow setting: low, medium<br />
or high.<br />
3 Set the temperature slide switch to the cool, warm or hot setting.<br />
4 Switch the ion function on or off by means of the ion slide switch.<br />
The ion function reduces frizz and static electricity and is particularly suitable for dry<br />
and almost-dry hair.<br />
5 Dry your hair by making brushing movements with the dryer at a small<br />
distance from your hair (fig. 2).<br />
2/9
ENGLISH<br />
◗<br />
Tip: Finishing off your drying session with a cool airflow will make your hair<br />
shinier.<br />
Concentrator<br />
The concentrator enables you to direct the airflow straight at the brush or comb with<br />
which you are styling your hair.<br />
1 Connect the concentrator by simply snapping it onto the appliance.<br />
Disconnect it by pulling it off (fig. 3).<br />
Volume diffuser<br />
The volume diffuser has been specially developed to gently dry both straight<br />
and curly or wavy hair.<br />
◗ The volume diffuser emits a gentle airflow and allows you to give your style<br />
volume and bounce.<br />
1 Connect the diffuser by simply snapping it onto the appliance and align the<br />
arrows on the diffuser and the barrel. Disconnect it by pulling it off (fig. 4).<br />
◗ To add volume at the roots, insert the pins into your hair in such a way that<br />
they touch your scalp (fig. 5).<br />
2 Make rotating movements with the appliance to distribute the warm air evenly<br />
through your hair (fig. 6).<br />
The ceramic tips of the diffuser (HP4892/91 only) protect the hair from damage.<br />
Drying tips<br />
Curly or wavy hair<br />
1 Hold the diffuser at a distance of 10-15 cm from your head to let the hair dry<br />
gradually (fig. 7).<br />
2 In the meantime you can style your hair with your free hand or with a comb.<br />
3 You can also scrunch locks of hair in your hand to model the curls and waves<br />
while drying. This will prevent the curls from sagging or becoming frizzy.<br />
Long hair<br />
◗ To dry long hair, you can spread out locks of hair on top of the diffuser (fig.<br />
8).<br />
◗ Alternatively, you can comb the hair downwards with the pins of the diffuser<br />
while drying (fig. 9).<br />
Troubleshooting<br />
If problems should arise with your hairdryer and you are unable to solve them by<br />
means of the troubleshooting guide below, please contact the nearest <strong>Philips</strong> service<br />
centre or the <strong>Philips</strong> Customer Care Centre in your country.<br />
Problem<br />
The appliance does not<br />
work at all.<br />
Cause<br />
Perhaps the socket to<br />
which the appliance has<br />
been connected is not live.<br />
The appliance may have<br />
overheated and swit<strong>che</strong>d<br />
itself off.<br />
The appliance may not be<br />
suitable for the voltage to<br />
which it has been<br />
connected.<br />
The mains cord of the<br />
appliance may be<br />
damaged.<br />
4222 002 61512<br />
Solution<br />
Make sure the socket is<br />
live.<br />
Unplug the appliance and<br />
let it cool down for a few<br />
minutes. Before you<br />
switch the appliance on<br />
again, <strong>che</strong>ck the grilles to<br />
make sure they are not<br />
blocked by fluff, hair, etc.<br />
Make sure that the<br />
voltage indicated on the<br />
type plate of the<br />
appliance corresponds to<br />
the local mains voltage.<br />
If the mains cord is<br />
damaged, it must be<br />
replaced by <strong>Philips</strong>, a<br />
service centre authorised<br />
by <strong>Philips</strong> or similarly<br />
qualified persons in order<br />
to avoid a hazard.<br />
Cleaning<br />
Always unplug the appliance before cleaning it.<br />
Never rinse the appliance with water.<br />
1 Remove the inlet grille to remove hairs and dust.<br />
2 Clean the appliance with a dry cloth.<br />
3 Clean the attachment with a moist cloth or by rinsing it under the tap.<br />
Storage<br />
Always unplug the appliance before storing it.<br />
◗ Put the appliance in a safe place and let it cool down.<br />
◗ Do not wind the mains cord round the appliance.<br />
◗ The appliance can be stored by hanging it from its hanging loop.<br />
◗<br />
Environment<br />
Do not throw the appliance away with the normal household waste at the end<br />
of its life, but hand it in at an official collection point for recycling. By doing<br />
this you will help to preserve the environment<br />
(fig. 10).<br />
Guarantee & service<br />
If you need information or if you have a problem, please visit the <strong>Philips</strong> website at<br />
www.philips.com or contact the <strong>Philips</strong> Customer Care Centre in your country (you<br />
will find its phone number in the worldwide guarantee leaflet). If there is no<br />
Customer Care Centre in your country, turn to your local <strong>Philips</strong> dealer or contact<br />
the Service Department of <strong>Philips</strong> Domestic Appliances and Personal Care BV.<br />
3/9
FRANÇAIS<br />
4222 002 61512<br />
Introduction<br />
Salon Pro de <strong>Philips</strong> est un sè<strong>che</strong>-<strong>che</strong>veux puissant avec un design professionnel pour<br />
une performance optimale. Grâce aux caractéristiques de l'appareil vos <strong>che</strong>veux<br />
seront protégés pendant le séchage, pour garantir les meilleurs résultats.<br />
La fonction ions émet des ions chargés négativement qui préviennent l'électricité<br />
statique et les frisottis en laissant vos <strong>che</strong>veux doux, soyeux et brillants.<br />
A part la fonction ions, ce sè<strong>che</strong>-<strong>che</strong>veux est doté d'un élément en céramique qui<br />
émet une chaleur plus douce qu'un élément de chauffage conventionnel, pour éviter<br />
d'abîmer les <strong>che</strong>veux.<br />
Vous pouvez visiter notre site web à: www.philips.com pour plus d'informations sur<br />
ce produit ou sur d'autres produits <strong>Philips</strong>.<br />
Description générale (fig. 1)<br />
A Elément en céramique (HP4892/91/90 uniquement)<br />
B Indicateur lumineux ions<br />
C Grille d'entrée d'air détachable<br />
D Bouton jet d'air froid<br />
E Sélecteur Ions<br />
- 0 = Arrêt<br />
- I = Mar<strong>che</strong><br />
F Bouton coulissant pour le flux d'air<br />
- 0 = Arrêt<br />
- I = Flux d'air doux spécialement conçu pour coiffer vos <strong>che</strong>veux<br />
- II = Flux d'air moyen pour sé<strong>che</strong>r vos <strong>che</strong>veux<br />
- III = Flux d'air puissant pour sé<strong>che</strong>r rapidement vos <strong>che</strong>veux<br />
G Thermostat<br />
- 6 = Position air chaud<br />
- 5 = Position température modérée<br />
- 4 = Position air froid<br />
H Anneau de suspension<br />
I Concentrateur standard (HP4897/91/90 uniquement)<br />
J Concentrateur professionnel (HP4892 uniquement)<br />
K Diffuseur de volume (HP4891 et HP4892 avec pointes en céramique)<br />
Important<br />
Avant d'utiliser l'appareil, lisez les instructions ci-dessous et conservez ce mode<br />
d'<strong>emploi</strong> pour un usage ultérieur.<br />
◗ Avant de bran<strong>che</strong>r l'appareil, vérifiez que la tension indiquée sur l'appareil<br />
correspond bien à la tension de votre secteur.<br />
◗ Vérifiez régulièrement le cordon d'alimentation.<br />
◗ N'utilisez pas le sè<strong>che</strong>-<strong>che</strong>veux si la fi<strong>che</strong>, le cordon ou l'appareil est<br />
endommagé.<br />
◗ Si le cordon d'alimentation est endommagé, il ne doit être remplacé que par<br />
<strong>Philips</strong> ou par un Centre Service Agréé pour éviter tout accident.<br />
◗ Tenez l'appareil à l'écart de l'eau. Ne l'utilisez pas près d'une baignoire, d'un<br />
lavabo ou d'un évier. Si vous utilisez l'appareil dans la salle de bain,<br />
débran<strong>che</strong>z-le après usage car la proximité de l'eau peut présenter un risque<br />
pour l'utilisateur même si l'appareil est à l'arrêt.<br />
◗ Pour plus de protection, il est conseillé de bran<strong>che</strong>r l'appareil sur une prise de<br />
courant protégée par un disjoncteur différentiel de 30mA maxi, si vous utilisez<br />
l'appareil dans la salle de bains. Demandez conseil à votre électricien.<br />
◗ Tenez l'appareil hors de portée des enfants.<br />
◗<br />
◗<br />
◗<br />
◗<br />
◗<br />
◗<br />
◗<br />
Veillez à ne jamais obstruer les grilles d'entrée d'air.<br />
Cet appareil est équipé avec un système de protection. En cas de surchauffe,<br />
l'appareil se mettra automatiquement à l'arrêt. Débran<strong>che</strong>z alors l'appareil et<br />
attendez quelques minutes afin qu'il refroidisse. Après avoir vérifié que les<br />
grilles d'entrée d'air ne sont pas obstruées par des pelu<strong>che</strong>s ou des <strong>che</strong>veux<br />
etc., vous pouvez à nouveau bran<strong>che</strong>r l'appareil.<br />
Arrêtez toujours l'appareil avant de le poser, même si vous le faites pour un<br />
court instant.<br />
Débran<strong>che</strong>z toujours l'appareil après utilisation.<br />
Afin de ne pas vriller le cordon d'alimentation, ne l'enroulez pas autour de<br />
l'appareil.<br />
Lorsque la fonction ion est activée, le sè<strong>che</strong>-<strong>che</strong>veux, à cause des ions<br />
générés, peut dégager une odeur spécifique. Cela n'est pas nocif pour votre<br />
santé.<br />
Ne dirigez pas le générateur d'ions ou l'élément chauffant en céramique vers<br />
des objets métalliques.<br />
Utilisation de l'appareil<br />
Séchage<br />
1 Bran<strong>che</strong>z l'appareil.<br />
2 Mettez l'appareil en mar<strong>che</strong> en sélectionnant le réglage pour le flux d'air<br />
désiré: doux, moyen ou puissant.<br />
3 Positionnez le thermostat sur le réglage froid, modéré ou chaud.<br />
4/9
FRANÇAIS<br />
4 Mettez en mar<strong>che</strong> ou arrêtez la fonction ion à l'aide du sélecteur ions.<br />
La fonction ions réduit l'électricité statique. Il est recommandé de l'utiliser sur<br />
<strong>che</strong>veux secs ou légèrement humides.<br />
5 Sé<strong>che</strong>z vos <strong>che</strong>veux avec des mouvements doux en tenant l'appareil à courte<br />
distance de vos <strong>che</strong>veux (fig. 2).<br />
◗<br />
Suggestion: Pour plus de brillance, finissez le séchage par un jet d'air froid.<br />
Concentrateur d'air<br />
Le concentrateur vous permet de diriger le flux d'air vers la brosse ou le peigne avec<br />
lequel vous modelez vos <strong>che</strong>veux.<br />
1 Fixez le concentrateur sur l'appareil. Déta<strong>che</strong>z-le en tirant dessus (fig. 3).<br />
Diffuseur volume<br />
Le diffuseur a été spécialement conçu pour sé<strong>che</strong>r en douceur les <strong>che</strong>veux lisses et<br />
bouclés ou ondulés.<br />
◗ Le diffuseur émet un flux d'air doux et vous permet de donner du volume à<br />
votre coiffure.<br />
1 Fixez le diffuseur sur l'appareil en alignant les flè<strong>che</strong>s au-dessus du diffuseur et<br />
de la barre. Déta<strong>che</strong>z-le en tirant dessus (fig. 4).<br />
◗ Pour donner du volume aux racines, faites pénétrer les pointes du diffuseur<br />
dans vos <strong>che</strong>veux jusqu'à ce qu'elles tou<strong>che</strong>nt le cuir <strong>che</strong>velu (fig. 5).<br />
2 Faites des mouvements circulaires avec l'appareil pour diffuser l'air chaud dans<br />
vos <strong>che</strong>veux (fig. 6).<br />
Les pointes en céramique du diffuseur (HP4892/91) protègent les <strong>che</strong>veux.<br />
Dépannage<br />
Si vous avez des problèmes avec votre sè<strong>che</strong>-<strong>che</strong>veux et vous ne pouvez pas les<br />
résoudre à l'aide du petit guide ci-dessous, adressez-vous à un Centre Service Agréé<br />
<strong>Philips</strong> ou au Service Consommateurs <strong>Philips</strong> de votre pays.<br />
Problème<br />
L'appareil ne fonctionne<br />
pas.<br />
Cause<br />
La prise n'est peut-être<br />
pas alimentée.<br />
L'appareil a probablement<br />
surchauffé et s'est arrêté<br />
automatiquement.<br />
L'appareil n'a<br />
probablement pas été<br />
connecté sur la tension<br />
correcte.<br />
Le cordon d'alimentation<br />
de l'appareil est<br />
probablement<br />
endommagé.<br />
4222 002 61512<br />
Solution<br />
Vérifiez si la prise est sous<br />
tension (à l'aide d'un autre<br />
appareil par exemple).<br />
Débran<strong>che</strong>z l'appareil et<br />
attendez quelques minutes<br />
qu'il refroidisse. Avant de<br />
le bran<strong>che</strong>r à nouveau,<br />
vérifiez que la grille ne soit<br />
pas bloquée par des<br />
pelu<strong>che</strong>s, <strong>che</strong>veux, etc.<br />
Assurez-vous que la<br />
tension indiquée sur<br />
l'appareil correspond bien<br />
à la tension de votre<br />
secteur.<br />
Si le cordon d'alimentation<br />
est endommagé, il ne doit<br />
être remplacé que par<br />
<strong>Philips</strong> ou par un Centre<br />
Service Agréé pour éviter<br />
tout accident.<br />
Suggestions de séchage<br />
Cheveux bouclés ou ondulés<br />
1 Tenez le diffuseur à une distance de 10 à 15 cm de la tête pour laisser les<br />
<strong>che</strong>veux sé<strong>che</strong>r graduellement (fig. 7).<br />
2 Pendant ce temps, vous pouvez modeler vos <strong>che</strong>veux avec l'autre main ou à<br />
l'aide d'un peigne.<br />
3 Vous pouvez aussi frotter les mè<strong>che</strong>s avec les doigts pour modeler les boucles<br />
ou les ondulations pendant le séchage. Cela évitera aux boucles de tomber ou<br />
de crêper.<br />
Cheveux longs<br />
◗ Pour sé<strong>che</strong>r les <strong>che</strong>veux longs, vous pouvez répandre quelques mè<strong>che</strong>s audessus<br />
du diffuseur (fig. 8).<br />
◗ Sinon, vous pouvez peigner vos <strong>che</strong>veux vers le bas avec les picots du<br />
diffuseur pendant le séchage (fig. 9).<br />
Nettoyage<br />
Débran<strong>che</strong>z toujours l'appareil avant de le nettoyer.<br />
Ne rincez jamais l'appareil à l'eau.<br />
1 Déta<strong>che</strong>z la grille d'entrée d'air pour enlever les <strong>che</strong>veux et la poussière.<br />
2 Nettoyez l'appareil avec un chiffon sec.<br />
3 Nettoyez l'accessoire avec un chiffon humide ou rincez-le à l'eau.<br />
Rangement<br />
Débran<strong>che</strong>z toujours l'appareil avant de le ranger.<br />
◗ Posez l'appareil dans un endroit sûr et laissez-le refroidir.<br />
◗ Afin de ne pas vriller le cordon, ne l'enroulez pas autour de l'appareil.<br />
◗ L'appareil peut être rangé en l'accrochant par son anneau de suspension.<br />
◗<br />
Environnement<br />
Ne jetez pas l'appareil en fin de vie avec les ordures ménagères, mais déposezle<br />
à un endroit prévu à cet effet par les pouvoirs publics pour son recyclage.<br />
Vous aiderez, ainsi, à protéger l'environnement (fig. 10).<br />
Garantie et service<br />
Pour plus d'informations, visitez notre site Internet : www.philips.com ou veuillez<br />
contacter le Service Consommateurs <strong>Philips</strong> de votre pays (vous trouverez le numéro<br />
de téléphone dans le dépliant sur la garantie internationale). S'il n'y a aucun Service<br />
Consommateurs <strong>Philips</strong> dans votre pays, contactez votre distributeur ou le Service<br />
Department of <strong>Philips</strong> Domestic Appliances and Personal Care BV.<br />
5/9
4222 002 61512<br />
q4 Á«ñ<br />
Æœñ«œ ‚d! e|dÄ të b|uÅ 5£LDî<br />
Á“U3« Ë bOMë «b3 ‚d! “« «ñ ÁU~
4222 002 61512<br />
v
4222 002 61512<br />
ةيبرعلا<br />
المركز<br />
يخولك المركز لتوجيه الهواء المتدفق مباشرة نهو الفرشاة أوالمشط المستخدم لتصفيف شعرك.<br />
دليل حل المشاكل<br />
اذا واجهت مشاكل مع جهاز تجفيف الشعر و أصبهت غير قادرة على حلها من خلال دليل حل المشاكل<br />
المبين أدناه، الرجاء الاتصال بأقرب مركز لخدمة فيليبس أو بمركز فيليبس لخدمة العملاء في بلدك.<br />
قومي بتركيب المركز من خلال وصله الى الجهاز. قومي بفصله من خلال سهبه عن الجهاز( رسم ٣).<br />
المشكلة<br />
السبب<br />
الهل<br />
١<br />
ناشر حجم الشعر<br />
ان ناشر حجم الشعر طور خصيصا لتجفيف الشعر اجملعد أو المالس أو المموج بلطف.<br />
لا يعمل الجهاز ابدا.<br />
قد يكون قابس الهاءط الموصول به<br />
الجهاز لا يهتوي على تيار حي.<br />
قد يكون الجهاز قد تعرض لسخونة<br />
زاءدة وتم الايقاف التلقاءي الذاتي.<br />
قد لا يكون الجهاز ملاءم للتيار<br />
الفولتي الذي تم توصيله به.<br />
تأكدي بأن قابس الهاءط مزودا<br />
بالتيار.<br />
قومي بفصل الجهاز و دعيه يبرد<br />
قليلا لبضعة دقاءق. قبل تشغيل<br />
الجهاز من جديد، تأكدي بأن الشبك<br />
غير عالقا به أي وبر أو ريش أو شعر،<br />
الخ.<br />
تأكدي بأن التيار الكهرباءي المشر<br />
اليه على صفيهة الطراز للجهاز<br />
يتوافق مع التيار الكهرباءي المباشر.<br />
١٠<br />
٢<br />
æ<br />
æ<br />
يصدر ناشر حجم الشعر تدفق هواء لطيف و يمنه تسريهتك الهجم و الهيوية.<br />
١قومي بوصل ناشر الشعر من خلال تركيبه الى الجهاز حيش تلتقي الأسهم المشار اليها على ناشر الشعر و على<br />
قضيب الجهاز. افصلي ناشر الشعر من خلال سهبه من الجهاز (رسم ٤).<br />
لاضافة حجم الشعر عند الجذور، أدخلي الدبابيس داخل شعرك بهيش تلامس فروة رأسك (رسم ٥).<br />
قومي بهركات دورانية بواسطة الجهاز لتوزيع الهواء الدافىء بتساو داخل شعرك (رسم ٦).<br />
ان الروءوءوس السيراميكية لناشر حجم الشعر (فقط طراز (HP4892/91 تحمي الشعر من التلف.<br />
نصاءه للتجفيف<br />
الشعر اجملعد أو المموج<br />
قد يكون السلك الكهرباءي للجهاز<br />
تالفا.<br />
اذا تلف سلك الكهرباء، يجب استبداله<br />
من قبل فيليبس أو مركز خدمة<br />
مصدق من فيليبس أو أشخاص<br />
موءهلين لتجنب حدوش حوادش<br />
فادحة.<br />
١ احملي ناشر الشعر على مسافة ١٠ أو ١٥ سم من رأسك ليتسنى للشعر أن يجف تدريجيا( رسم ٧).<br />
٢ خلال هذا الوقت، يمكنك تصفيف تسريهة شعرك بواسطة يدك الهرة أو بواسطة مشط .<br />
٣<br />
يمكنك أيضا عصر خصل من الشعر بواسطة يدك و ذلك لتصميم تجاعيد و تموجات في الشعر خلال تجفيفه. ذلك<br />
سوف يجنب تجاعيد الشعر الشعر من الارتخاء أو التدلي..<br />
æ<br />
æ<br />
الشعر الطويل<br />
لتجفيف الشعر الطويل، يمكنك توزيع خصل الشعر على القسم الأعلى من ناشر الشعر( رسم ٨).<br />
كبديل لذلك، يمكنك تمشيط شعرك بواسطة مشط باتجاه الأسفل بواسطة دبابيس ناشر الشعر خلال عملية التجفيف<br />
) رسم .(٩<br />
التنظيف<br />
افصلي دوما الجهاز عن التيار الكهرباءي قبل تنظيفه.<br />
لا تشطفي ابدا الجهاز بالماء.<br />
انزعي الشبك الداخلي لازالة الشعر والغبار.<br />
قومي بتنظيف الجهاز بواسطة قطعة قماش مبللة.<br />
قومي بتنظيف الملهق بواسطة قطعة قماش مبللة أو بشطفها تحت ماء الصنبور الجاري.<br />
١<br />
٢<br />
٣<br />
التخزين<br />
افصلي دوما الجهاز عن التيار الكهرباءي قبل تخزينه.<br />
æ<br />
æ<br />
æ<br />
ضعي الجهاز في مكان آمن ودعيه يبرد.<br />
لا تلفي السلك الكهرباءي حول الجهاز.<br />
يمكن تخزين الجهاز من خلال تعليقه بواسطة حلقة التعليق الخاصة به.<br />
æ<br />
البيئة<br />
لا ترمي الجهاز في نفايات المنزل العادية عند انتهاء عمرها، بل قم بتسليمها الى نقطة تسليم رسمية لاعادة<br />
الاستعمال. بذلك تكون قد حرصت على حماية البيئة ) رسم ١٠).<br />
الضمان و الخدمة<br />
اذا احتجت لأية معلومات أو كانت لديك مشكلة، الرجاء زيارة عنوان الانترنت الخاص بشركة فيليبس<br />
أو اتصل بمركز فيليبس لخدمة العملاء في بلدك (سوف تجد رقم الهاتف مدون في نشرة الضمان<br />
العالمي). اذا لم يتواجد مركز لخدمة العملاء في بلدك، الرجاء مراجعة وكيل فيليبس أو اتصل بمركز الخدمة التابع لشركة<br />
فيليبس للأدوات المنزلية و العناية الشخصية.<br />
www.philips.com<br />
8/9
4222 002 61512<br />
ةيبرعلا<br />
مقدمة<br />
ان جهاز فيليبس صالون برو هو مجفف للشعر قوي ويتميز بأداء احترافي وتصميم احترافي. بالاضافة، ان هذا الجهاز<br />
مزود بمزايا تحمي شعرك من الضرر وتعطيك تأكيدات لأفضل النتاءج.<br />
ان وظيفة الأيونات تصدر أيونات مشهونة سلبيا والتي تجنب تلف الشعر وتعرضه للاستتاتية حيش تتركه خاليا من<br />
التجاعيد وتمنهه اللمعان والبريق.<br />
اضافة الى وظيفة الأيونات ان مجفف الشعر هذا يهتوي على عنصر سيراميكي الذي يصدر بدوره دفء ألطف من العنصر<br />
الهراري العادي وبذلك يهمي الشعر من زيادة التجفيف.<br />
يمكنك زيارة موقعنا على الانترنت www.philips.com للمزيد من المعلومات حول هذا المنتج أو أية منتجات أخرى<br />
من فيليبس.<br />
وصف عام (رسم ١)<br />
A<br />
B<br />
C<br />
D<br />
E<br />
- 0 = ايقاف<br />
- I = تشغيل<br />
.. عنصر سيراميكي (فقط طراز (HP4892/91/90<br />
. موءشر الأيونات الضوءي<br />
. شبك هواء داخلي قابل للانفصال<br />
. مفتاه دفعة هواء بارد<br />
. مفتاه الأيونات الجانبي<br />
F<br />
- 0 = ايقاف<br />
-<br />
II -<br />
III -<br />
G<br />
6 -<br />
5 -<br />
4 -<br />
H<br />
I<br />
J<br />
K<br />
١<br />
٢<br />
٣<br />
٤<br />
٥<br />
æ<br />
æ<br />
æ<br />
æ<br />
æ<br />
æ<br />
æ<br />
æ<br />
æ<br />
æ<br />
æ<br />
æ<br />
æ<br />
æ<br />
. مفتاه جانبي لتدفق الهواء<br />
= I تدفق هواء منخفض خاص لتصفيف الشعر<br />
= تدفق هواء متوسط لتجفيف الشعر<br />
= تدفق هواء عالي لتجفيف الشعر بسرعة فاءقة<br />
. مفتاه جانبي للهرارة<br />
= وضع ساخن<br />
= وضع دافىء<br />
= وضع بارد<br />
حلقة تعليق<br />
. فتهة هواء قياسية (فقط طراز (HP4897/91/90<br />
. فتهة هواء احترافية (فقط طراز (HP4892<br />
. ناشر لهجم الشعر (فقط طراز HP4892/91 مع روءوس سيراميكية).<br />
مهم جدا<br />
اقرأ هذه الارشادات جيدا قبل استخدام الجهاز و احتفظ بهم كمرجع في المستقبل.<br />
تأكدي بأن التيار الكهرباءي المشار اليه على الجهاز يلاءم التيار الكهرباءي المحلي في بلدك قبل توصيل الجهاز.<br />
تفهصي بانتظام حالة السلك الكهرباءي.<br />
لا تستعملي الجهاز اذا كان المقبس أو السلك الكهرباءي أو الجهاز ذاته تالفا.<br />
اذا تلف سلك الكهرباء، يجب استبداله من قبل فيليبس أو مركز خدمة مصدق من فيليبس أو أشخاص موءهلين لتجنب<br />
حدوش حوادش فادحة.<br />
حافظي على الجهاز بعيدا عن الماء! لا تستخدمي هذا الجهاز بقرب أو فوق الماء المتواجدة في الهمامات أو المغاسل،<br />
الخ. عند استخدام الجهاز في الهمام، قومي بفصل الجهاز عن الكهرباء بعد الاستخدام حيش أن وجوده قرب الماء يشكل<br />
خطرا كبيرا حتى عندما لا يكون الجهاز مستخدما.<br />
لمزيد من الهماية، ننصهك بتركيب نظام لآمن للتيار الكهرباءي لا يتعدى ٣٠ أمبير في قابس الكهرباء داخل الهمام.<br />
استشيري المسوءول الكهرباءي.<br />
دع الجهاز بعيدا عن متناول الأطفال.<br />
لا تقومي أبدا باعاقة مجرى شبك الهواء.<br />
ان هذا الجهاز مزود بنظام حماية من السخونة العالية الزاءدة. اذا تعرض الجهاز لسخونة عالية زاءدة فسوف يقوم<br />
بالايقاف التلقاءي. قومي بفصل الجهاز عن الكهرباء ودعيه يبرد قليلا لبضعة دقاءق. وقبل تشغيل الجهاز من جديد<br />
تأكدي بأن شبك الهواء ليس معاقا من قبل الشعر أو الريش، الخ.<br />
قومي دوما بتوقيف الجهاز عنالعمل قبل وضعه جانبا، حتى لو كان ذلك للهظة واحدة فقط.<br />
دوما انزعي مقبس الجهاز من الكهرباء بعد الاستعمال.<br />
لا تلفي السلك الكهرباءي حول الجهاز.<br />
قد تلاحظين صدور راءهة عند استخدام مجفف الهواء مع وظيفة الأيونات. تصدر هذه الراءهة بسبب الأيونات ولا<br />
تسبب أي ضرر للجسم.<br />
لا تعبشي بمولد الأيونات أو بالعنصر الهراري السيراميكي بواسطة أدوات معدنية.<br />
استخدام الجهاز<br />
التجفيف<br />
ضعي المقبس في قابس الهاءط<br />
قومي بتشغيل الجهاز من خلال اختيار وضع تدفق الهواء: منخفض أو متوسط أو عالي.<br />
قومي بضبط درجة الهرارة بواسطة المفتاه الجانبي الى وضع بارد أو دافىء أو ساخن.<br />
قومي بتشغيل وظيفة الأيونات أو ايقافها بواسطة مفتاه الأيونات الجانبي.<br />
ان وظيفة الايونات تقلل نسبة التدلي والكهرباء الاستاتية وملاءمة خصيصا للشعر الجاف والمبلل قليلا.<br />
قومي بتجفيف شعرك من خلال القيام بهركات تمشيط بواسطة مجفف الشعر على مسافة قصيرة من شعرك<br />
(رسم ٢).<br />
æ نصيهة: ان انهاء عملية تجفيف شعرك بدفعة هواء بارد تجعل من شعرك لماعا وبراقا أكثر.<br />
9/9


