DHN Montageanleitung Mounting instructions Instrucciones de ...
DHN Montageanleitung Mounting instructions Instrucciones de ...
DHN Montageanleitung Mounting instructions Instrucciones de ...

Create successful ePaper yourself
Turn your PDF publications into a flip-book with our unique Google optimized e-Paper software.
<strong>Montageanleitung</strong><br />
<strong>Mounting</strong> <strong>instructions</strong><br />
<strong>Instrucciones</strong> <strong>de</strong> montaje<br />
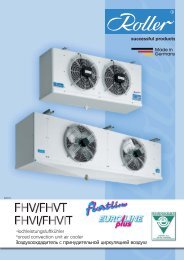
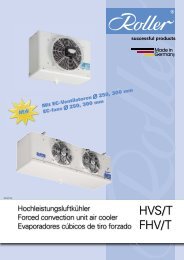
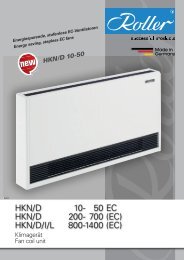
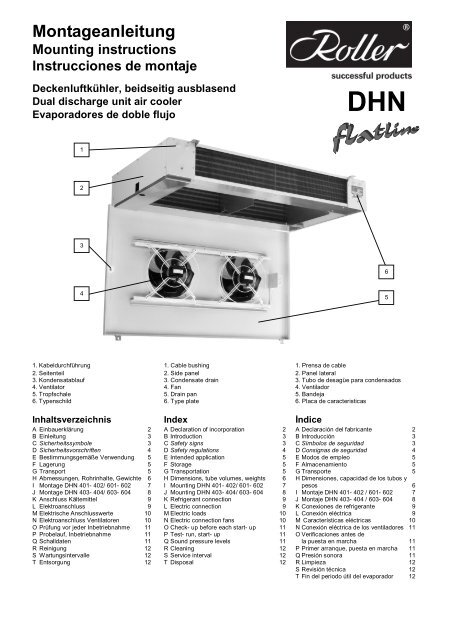
Deckenluftkühler, beidseitig ausblasend<br />
Dual discharge unit air cooler<br />
Evaporadores <strong>de</strong> doble flujo<br />
1<br />
2<br />
3<br />
4<br />
1. Kabeldurchführung<br />
2. Seitenteil<br />
3. Kon<strong>de</strong>nsatablauf<br />
4. Ventilator<br />
5. Tropfschale<br />
6. Typenschild<br />
Inhaltsverzeichnis<br />
A Einbauerklärung 2<br />
B Einleitung 3<br />
C Sicherheitssymbole 3<br />
D Sicherheitsvorschriften 4<br />
E Bestimmungsgemäße Verwendung 5<br />
F Lagerung 5<br />
G Transport 5<br />
H Abmessungen, Rohrinhalte, Gewichte 6<br />
I Montage <strong>DHN</strong> 401- 402/ 601- 602 7<br />
J Montage <strong>DHN</strong> 403- 404/ 603- 604 8<br />
K Anschluss Kältemittel 9<br />
L Elektroanschluss 9<br />
M Elektrische Anschlusswerte 10<br />
N Elektroanschluss Ventilatoren 10<br />
O Prüfung vor je<strong>de</strong>r Inbetriebnahme 11<br />
P Probelauf, Inbetriebnahme 11<br />
Q Schalldaten 11<br />
R Reinigung 12<br />
S Wartungsintervalle 12<br />
T Entsorgung 12<br />
1. Cable bushing<br />
2. Si<strong>de</strong> panel<br />
3. Con<strong>de</strong>nsate drain<br />
4. Fan<br />
5. Drain pan<br />
6. Type plate<br />
In<strong>de</strong>x<br />
A Declaration of incorporation 2<br />
B Introduction 3<br />
C Safety signs 3<br />
D Safety regulations 4<br />
E Inten<strong>de</strong>d application 5<br />
F Storage 5<br />
G Transportation 5<br />
H Dimensions, tube volumes, weights 6<br />
I <strong>Mounting</strong> <strong>DHN</strong> 401- 402/ 601- 602 7<br />
J <strong>Mounting</strong> <strong>DHN</strong> 403- 404/ 603- 604 8<br />
K Refrigerant connection 9<br />
L Electric connection 9<br />
M Electric loads 10<br />
N Electric connection fans 10<br />
O Check- up before each start- up 11<br />
P Test- run, start- up 11<br />
Q Sound pressure levels 11<br />
R Cleaning 12<br />
S Service interval 12<br />
T Disposal 12<br />
<strong>DHN</strong><br />
1. Prensa <strong>de</strong> cable<br />
2. Panel lateral<br />
3. Tubo <strong>de</strong> <strong>de</strong>sagüe para con<strong>de</strong>nsados<br />
4. Ventilador<br />
5. Ban<strong>de</strong>ja<br />
6. Placa <strong>de</strong> caracteristicas<br />
Ìndice<br />
A Declaración <strong>de</strong>l fabricante 2<br />
B Introducción 3<br />
C Símbolos <strong>de</strong> seguridad 3<br />
D Consignas <strong>de</strong> seguridad 4<br />
E Modos <strong>de</strong> empleo 5<br />
F Almacenamiento 5<br />
G Transporte 5<br />
H Dimensiones, capacidad <strong>de</strong> los tubos y<br />
pesos 6<br />
I Montaje <strong>DHN</strong> 401- 402 / 601- 602 7<br />
J Montaje <strong>DHN</strong> 403- 404 / 603- 604 8<br />
K Conexiones <strong>de</strong> refrigerante 9<br />
L Conexión eléctrica 9<br />
M Características eléctricas 10<br />
N Conexión eléctrica <strong>de</strong> los ventiladores 11<br />
O Verificaciones antes <strong>de</strong><br />
la puesta en marcha 11<br />
P Primer arranque, puesta en marcha 11<br />
Q Presión sonora 11<br />
R Limpieza 12<br />
S Revisión técnica 12<br />
T Fin <strong>de</strong>l periodo útil <strong>de</strong>l evaporador 12<br />
6<br />
5
A Einbauerklärung A Declaration of<br />
incorporation<br />
2<br />
Einbauerklärung im Sinne <strong>de</strong>r EG Maschinenrichtlinie 2006/42/EG, Anhang II B<br />
Translation of <strong>de</strong>claration of incorporation as <strong>de</strong>fined by the EC machinery Directive 2006/42/EC, Annex II B<br />
Traducción <strong>de</strong> <strong>de</strong>claración <strong>de</strong>l fabricante según la Directiva <strong>de</strong> maquinaria CE 2006/42/CE, Anexo II B<br />
Der Hersteller Walter Roller GmbH & Co.<br />
erklärt hiermit, dass die Bauart <strong>de</strong>r<br />
The manufacturer Lin<strong>de</strong>nstrasse 27- 31<br />
<strong>de</strong>clares hereby that the construction of<br />
El fabricante<br />
70839 Gerlingen, Germany<br />
<strong>de</strong>clara que el mo<strong>de</strong>lo <strong>de</strong> los<br />
Ventilator-Luftkühler/ Forced convection unit air coolers/ Evaporadores <strong>de</strong> tiro forzado<br />
<strong>DHN</strong>, DLK/T, FHV/T, FHVI/T, FKN/T, HVS/T, HVIS/T, SV, UV/T, UWD, VW/VM/VD, RDVN, WPV<br />
Ventilatorbelüfteten Verflüssiger/ Forced convection air cooled refrigerant con<strong>de</strong>nsers/ Con<strong>de</strong>nsadores frigoríficos axiales<br />
KVN<br />
Ventilator-Konvektoren zur Raumklimatisierung/ Fan coil units for room airconditioning/ Ventilo-convectores para aire acondicionado/<br />
HKN/S/D, HKNI/L, HKNDI/L<br />
die grundlegen<strong>de</strong>n Anfor<strong>de</strong>rungen <strong>de</strong>r Maschinenrichtlinie 2006/42/EG erfüllen. Folgen<strong>de</strong> Anfor<strong>de</strong>rungen nach<br />
Anhang I <strong>de</strong>r Richtlinie sind angewandt und eingehalten:<br />
meet the basic requirements of the directive of machinery 2006/42/EG. The following requirements according to Annex I are applied and complied.<br />
se cumplen los requisitos fundamentales <strong>de</strong> la Directiva sobre Maquinaria 2006/42/CE. Los posteriores requisitos <strong>de</strong>l Anexo I <strong>de</strong> la Directiva se han seguido y<br />
aplicado.<br />
General principe Nr.1.<br />
Nr. 1.3.4, 1.3.7.<br />
Die Inbetriebnahme ist solange untersagt, bis festgestellt wur<strong>de</strong>, dass die Maschine, in die dieses<br />
Maschinenteil eingebaut wer<strong>de</strong>n soll, gegebenenfalls <strong>de</strong>n Bestimmungen <strong>de</strong>r EG Maschinenrichtlinie<br />
2006/42/EG entspricht.<br />
The machine in which the part is incorporated mustn’t be put into service until the conformity of itself according to EC Machinery directive 2006/42/EC has been<br />
<strong>de</strong>clared.<br />
La puesta en servicio está prohibida hasta que esté completamente montada en la parte <strong>de</strong> la instalación que le correspon<strong>de</strong>, no siendo <strong>de</strong>clarada hasta entonces<br />
conforme a la Normativa sobre Maquinaria 2006/42/CE.<br />
Die verwen<strong>de</strong>ten Einzelkomponenten sind konform mit <strong>de</strong>n jeweiligen auf sie zutreffen<strong>de</strong>n folgen<strong>de</strong>n weiteren<br />
EG-Richtlinien: 2006/95/EG (Nie<strong>de</strong>rspannung), 2004/108/EG (EMV) und 97/23/EG (Druckgeräte).<br />
The incorporated component parts are in conformity with the following additional EC Directives: 2006/95/EC (Low Voltage), 2004/108/EC (EMC) and 97/23/EC<br />
(Pressure Equipment).<br />
Los componentes <strong>de</strong> construcción incorporados son conformes a las Directivas CE adicionales siguientes: 2006/95/CE (Baja Tensión), 2004/108/CE (CEM) y<br />
97/23/CE (Equipos bajo presión).<br />
Die speziellen technischen Unterlagen nach Anhang VII Teil B wur<strong>de</strong>n vorbereitet.<br />
The special technical files according to annex VII section B have been prepared.<br />
Los datos técnicos especiales han sido establecidos <strong>de</strong> acuerdo al anexo VII, sección B.<br />
Die <strong>Montageanleitung</strong> nach Anhang VI wur<strong>de</strong> verfasst.<br />
The mounting <strong>instructions</strong> according to annex VI has been written.<br />
Las <strong>Instrucciones</strong> <strong>de</strong> montaje se han redactado <strong>de</strong> acuerdo con el anexo VI.<br />
<strong>Montageanleitung</strong> und Einbauerklärung sind <strong>de</strong>r unvollständigen Maschine beigelegt.<br />
<strong>Mounting</strong> <strong>instructions</strong> and <strong>de</strong>claration of incorporation are attached to the machine.<br />
Las <strong>Instrucciones</strong> <strong>de</strong> montaje y la Declaración <strong>de</strong>l Fabricante se adjuntan con cada aparato.<br />
A Declaración <strong>de</strong>l<br />
fabricante<br />
Einzelstaatlichen Stellen wer<strong>de</strong>n auf begrün<strong>de</strong>ten Antrag, die speziellen Unterlagen zur unvollständigen<br />
Maschine, innerhalb einer angemessenen Frist übermittelt. Die Dokumente wer<strong>de</strong>n auf <strong>de</strong>m Postweg<br />
zugesandt.<br />
The technical special files will be transmitted to officials by foun<strong>de</strong>d claim within in an a<strong>de</strong>quate time. The documents will be sent by mail.<br />
Particularmente para peticiones oficiales se pue<strong>de</strong>n emplear otro tipo <strong>de</strong> soportes seguros para enviar la información en el caso <strong>de</strong> pérdida <strong>de</strong> una parte <strong>de</strong> la<br />
misma. La documentación pue<strong>de</strong> ser enviada por correo electrónico.<br />
Dokumentationsverantwortlicher ist: Andreas Bin<strong>de</strong>r, Lin<strong>de</strong>nstr. 27- 31, 70839 Gerlingen, Deutschland.<br />
Responsible for documentation is: Andreas Bin<strong>de</strong>r, Lin<strong>de</strong>nstr. 27- 31, 70839 Gerlingen, Germany.<br />
El responsable <strong>de</strong> la presente documentación es: Sr. Andreas Bin<strong>de</strong>r, Lin<strong>de</strong>nstr. 27- 31, 70839 Gerlingen, Alemania
B Einleitung<br />
Die <strong>de</strong>utsche Fassung <strong>de</strong>r<br />
<strong>Montageanleitung</strong> ist das Original.<br />
Alle Sicherheitstexte und Hinweise sind<br />
kursiv gesetzt.<br />
Bewahren Sie diese <strong>Montageanleitung</strong> auf,<br />
sie ist Teil <strong>de</strong>r Dokumentation <strong>de</strong>r<br />
Kälteanlage.<br />
Die jeweils aktuelle Fassung dieser<br />
<strong>Montageanleitung</strong> kann auf unserer Website<br />
http://www.walterroller.<strong>de</strong> heruntergela<strong>de</strong>n<br />
wer<strong>de</strong>n.<br />
C Sicherheitssymbole<br />
Vorsicht!<br />
Bei Nichteinhaltung <strong>de</strong>r Vorschriften<br />
droht Verletzung und To<strong>de</strong>sgefahr.<br />
Vorsicht!<br />
Bei Nichteinhaltung <strong>de</strong>r Vorschriften<br />
droht durch Hochspannung<br />
Verletzungs- o<strong>de</strong>r To<strong>de</strong>sgefahr.<br />
Achtung!<br />
Gesetze und Vorschriften müssen<br />
eingehalten wer<strong>de</strong>n.<br />
Hinweis<br />
auf sicherheitsgerechten Transport!<br />
Hinweis<br />
auf sicherheitsgerechte Wartung!<br />
B Introduction<br />
This mounting instruction is a translation of<br />
the german original <strong>Montageanleitung</strong>.<br />
All safety information and advice is printed in<br />
italics.<br />
Keep these <strong>instructions</strong>; they are part of the<br />
refrigerating plant.<br />
You can download the latest revision of<br />
these mounting <strong>instructions</strong> on our website<br />
http://www.walterroller.com.<br />
C Safety signs<br />
Caution!<br />
Risk of injury or peril to life if<br />
<strong>instructions</strong> aren’t followed.<br />
Caution!<br />
Risk of injury or peril to life from<br />
high voltage if <strong>instructions</strong> aren’t<br />
followed.<br />
Attention!<br />
Laws and regulations have to be<br />
obeyed.<br />
Advice<br />
for safe transport!<br />
Advice<br />
for safe servicing!<br />
B Introducción<br />
Estas <strong>Instrucciones</strong> <strong>de</strong> Montaje han sido<br />
traducidas <strong>de</strong>l original en Alemán<br />
<strong>Montageanleitung</strong>.<br />
Las indicaciones e instrucciones <strong>de</strong><br />
seguridad se han escrito en letra cursiva.<br />
Conserve estas instrucciones, son parte<br />
<strong>de</strong> la información técnica <strong>de</strong> la instalación<br />
frigorífica.<br />
Pue<strong>de</strong> Vd. <strong>de</strong>scargar la última edición <strong>de</strong><br />
estas instrucciones <strong>de</strong> montaje en nuestra<br />
página web: http://www.walterroller.com.<br />
C Símbolos <strong>de</strong> seguridad<br />
¡Atención!<br />
No respetar las indicaciones <strong>de</strong><br />
peligro pue<strong>de</strong> causar lesiones o ser<br />
mortal.<br />
¡Atención!<br />
Alta tensión. No respetar las<br />
indicaciones <strong>de</strong> peligro pue<strong>de</strong><br />
causar lesiones o ser mortal.<br />
¡Atención!<br />
Las indicaciones y la legislación<br />
<strong>de</strong>ben ser respetadas.<br />
Indicaciones<br />
¡Sobre las directivas <strong>de</strong> transporte<br />
conforme a las reglas <strong>de</strong> seguridad!<br />
Indicaciones<br />
¡Sobre las directivas <strong>de</strong><br />
mantenmiento conforme a las reglas<br />
<strong>de</strong> seguridad!<br />
3
D Sicherheitsvorschriften<br />
1.Vorschriften<br />
Bei <strong>de</strong>r Montage und Inbetriebnahme sind<br />
alle Sicherheits- und Unfallverhütungsvorschriften<br />
sowie die Richtlinien und<br />
Normen im Einbauland zu beachten.<br />
2. Persönliche<br />
Voraussetzungen<br />
Die Anlage darf nur von autorisiertem und<br />
qualifiziertem Fachpersonal montiert und<br />
gewartet wer<strong>de</strong>n.<br />
Der Elektroanschluss darf nur von einer<br />
Elektrofachkraft gemäß <strong>de</strong>n elektrotechnischen<br />
Regeln vorgenommen wer<strong>de</strong>n.<br />
Als qualifiziertes Fachpersonal gilt, wer mit<br />
<strong>de</strong>m beschriebenen Produkt vertraut ist und<br />
auf Grund seiner fachlichen Ausbildung,<br />
Kenntnisse und Erfahrungen sowie Kenntnis<br />
<strong>de</strong>r einschlägigen Bestimmungen, die ihm<br />
übertragenen Arbeiten beurteilen und<br />
mögliche Gefahren erkennen kann.<br />
3. Persönliche<br />
Schutzausrüstung<br />
Die Schutzausrüstung bei Montage und<br />
Wartung muss <strong>de</strong>n sicherheitstechnischen<br />
Vorschriften entsprechen.<br />
4. Unfallschutz<br />
Bei Montage, Wartung und Reparatur<br />
muss <strong>de</strong>r Gefahrenbereich für unbefugte<br />
Personen, insbeson<strong>de</strong>re Kin<strong>de</strong>r, weiträumig<br />
abgesichert wer<strong>de</strong>n.<br />
Vor allen Arbeiten an <strong>de</strong>r Anlage Strom<br />
abschalten und gegen unbefugtes<br />
Einschalten sichern.<br />
Vorsicht an Wän<strong>de</strong>n und Decken in <strong>de</strong>nen<br />
Strom-, Gas- und Wasserleitungen verlegt<br />
sein könnten.<br />
5. Eigenmächtige Umbauten<br />
Umbauten und Verän<strong>de</strong>rungen an <strong>de</strong>r<br />
Anlage sind nicht gestattet.<br />
6. Sicherheit<br />
Nach <strong>de</strong>m Einbau in die Kälteanlage<br />
müssen die vom Gerät ausgehen<strong>de</strong>n<br />
Sicherheitsrisiken nochmals bewertet<br />
wer<strong>de</strong>n.<br />
Achtung!<br />
Bei Nichteinhaltung <strong>de</strong>r<br />
Vorschriften droht Gefahr für<br />
Leib und Leben.<br />
4<br />
D Safety regulations<br />
1.Regulations<br />
During installation and start-up, all<br />
regulations for safety and acci<strong>de</strong>nt<br />
prevention as well as rules and standards of<br />
the individual country have to be observed.<br />
2. Personal<br />
qualification<br />
The unit may only be mounted and<br />
serviced by authorized and skilled<br />
personnel.<br />
The electrical connection may only be<br />
ma<strong>de</strong> by a licensed electrician according to<br />
the electro technical regulations.<br />
Skilled personal is who is familiar with the<br />
<strong>de</strong>scribed product and is able to recognize<br />
possible dangers at the assigned tasks<br />
because of his professional education,<br />
experience and knowledge of the relevant<br />
regulations.<br />
3. Personal protective<br />
equipment<br />
The protective equipment for mounting and<br />
servicing has to comply with the security<br />
regulations.<br />
4. Acci<strong>de</strong>nt prevention<br />
During mounting, servicing and repairing<br />
the danger area has to be guar<strong>de</strong>d safely<br />
from unauthorized persons, especially<br />
children.<br />
Prior to working on the unit, switch- off<br />
electricity and secure against unauthorized<br />
connecting.<br />
Be careful with walls and ceilings which<br />
could possibly contain electric wires or gas<br />
and water piping.<br />
5. Unauthorized<br />
modification<br />
Modifications and alterations on the unit<br />
are not allowed.<br />
6. Safety<br />
After the incorporation into the refrigeration<br />
plant the safety risks of the unit have to be<br />
rerated.<br />
Attention!<br />
Not observing regulations means<br />
danger for life and limb.<br />
D Consignas <strong>de</strong> seguridad<br />
1. Prescripciones<br />
El montaje y la puesta en marcha están<br />
sometidos a las consignas <strong>de</strong> seguridad y a<br />
las prescripciones <strong>de</strong> prevención <strong>de</strong><br />
acci<strong>de</strong>ntes, lo mismo que a las directivas <strong>de</strong>l<br />
país don<strong>de</strong> se realice la puesta en marcha.<br />
2. Calificación<br />
<strong>de</strong>l personal<br />
La unidad sólo <strong>de</strong>be ser instalada y<br />
mantenida por personal autorizado.<br />
El conexionado eléctrico sólo <strong>de</strong>be ser<br />
efectuado por un técnico cualificado<br />
conforme a las normas electrotécnicas.<br />
El personal técnico cualificado es quién<br />
está familiarizado con el producto <strong>de</strong>scrito y<br />
es capaz <strong>de</strong> reconocer los posibles peligros<br />
<strong>de</strong> las tareas asignadas <strong>de</strong>bido a su<br />
formación profesional, experiencia y<br />
conocimiento.<br />
3. Equipo <strong>de</strong><br />
protección personal<br />
El equipo <strong>de</strong> protección durante el montaje<br />
y el mantenimiento <strong>de</strong>be ser conforme a las<br />
prescripciones <strong>de</strong> seguridad técnica.<br />
4. Prevención <strong>de</strong><br />
acci<strong>de</strong>ntes<br />
Durante el montaje, mantenimiento o<br />
reparación, las personas no autorizadas, en<br />
particular los menores, <strong>de</strong>ben mantenerse<br />
fuera <strong>de</strong>l alcance <strong>de</strong> la zona <strong>de</strong> peligro.<br />
Desconecte la unidad antes <strong>de</strong> cada<br />
intervención, asegurándose que no se<br />
pueda conectar por personal no autorizado.<br />
Asegúrese que los muros y pare<strong>de</strong>s no<br />
contengan conducciones eléctricas, <strong>de</strong> gas<br />
o <strong>de</strong> agua.<br />
5. Modificaciones<br />
arbitrarias<br />
Las modificaciones y cambios en la unidad<br />
no están autorizados.<br />
6. Seguridad<br />
Después <strong>de</strong>l montaje en la instalación<br />
frigorífica se <strong>de</strong>berán volver a leer los<br />
capítulos <strong>de</strong> seguridad y riesgo.<br />
¡Atención!<br />
La no observancia <strong>de</strong> las<br />
instrucciones concernientes a la<br />
instalación amenaza su persona<br />
física y su vida.
E Bestimmungsgemäße<br />
Verwendung<br />
Die bestimmungsgemäße Verwendung <strong>de</strong>s<br />
Luftkühlers besteht im Abkühlen bzw. Erhitzen<br />
und För<strong>de</strong>rn von feuchter Luft. Ebenso<br />
umfasst die bestimmungsgemäße<br />
Verwendung <strong>de</strong>s Luftkühlers das<br />
gegebenenfalls nötige Abtauen und das<br />
Ableiten <strong>de</strong>s anfallen<strong>de</strong>n Kon<strong>de</strong>nsates.<br />
Die Montage und <strong>de</strong>r Anschluss müssen<br />
nach dieser Anleitung erfolgen.<br />
Der Deckenluftkühler <strong>DHN</strong> darf nur in<br />
technisch einwandfreiem Zustand, mit einer<br />
technisch einwandfreien Kälteanlage betrieben<br />
wer<strong>de</strong>n.<br />
Die Anlage ist für alle Kältemittel <strong>de</strong>r<br />
Sicherheitsgruppe A1 nach EN 378-1<br />
geeignet. Diese Kältemittel sind in <strong>de</strong>r<br />
Druckgeräterichtlinie <strong>de</strong>r Gruppe 2<br />
zugeordnet.<br />
Zulässiger Betriebsdruck PS siehe<br />
Typenschild.<br />
Die auf <strong>de</strong>m Typenschild angegebenen<br />
Umgebungstemperaturbereiche sind<br />
einzuhalten.<br />
(Position <strong>de</strong>s Typenschil<strong>de</strong>s siehe Frontseite)<br />
Beachten Sie auch <strong>de</strong>n geson<strong>de</strong>rten<br />
Temperatureinsatzbereich <strong>de</strong>s Ventilators.<br />
Folgen<strong>de</strong> Luftverunreinigungen sind zu<br />
mei<strong>de</strong>n:<br />
� Abrasive (abtragen<strong>de</strong>) Partikel.<br />
� Stark korrosiv wirken<strong>de</strong> Verunreinigungen<br />
z.B. Salznebel.<br />
� Hohe Staubbelastung z.B. Absaugung<br />
von Sägespänen.<br />
� Brennbare Gase/ Partikel.<br />
Der Kühler darf nicht in <strong>de</strong>r Nähe von<br />
brennbaren Stoffen und Komponenten<br />
betrieben wer<strong>de</strong>n.<br />
Der Kühler darf nicht in explosiver<br />
Atmosphäre betrieben wer<strong>de</strong>n.<br />
Der Kühler darf keine sicherheitsrelevanten<br />
Aufgaben übernehmen.<br />
Alle nicht bestimmungsgemäßen<br />
Verwendungen sind verboten<br />
F Lagerung<br />
Anlage bis zur Montage trocken und<br />
wettergeschützt in <strong>de</strong>r Originalverpackung<br />
lagern.<br />
G Transport<br />
Zum Transport sollte die Original-<br />
verpackung verwen<strong>de</strong>t wer<strong>de</strong>n.<br />
Nur an <strong>de</strong>n vorgesehenen<br />
Transportvorrichtungen mit geeignetem<br />
Hebezeug transportieren.<br />
Gewichtangabe siehe Kapitel H.<br />
Anlage vorsichtig transportieren, Schläge<br />
und Stöße vermei<strong>de</strong>n.<br />
E Inten<strong>de</strong>d application<br />
The inten<strong>de</strong>d application of the air cooler is<br />
the cooling or heating and blowing of humid<br />
air. A <strong>de</strong>frost operation and the drain of the<br />
con<strong>de</strong>nsate is inten<strong>de</strong>d application, too.<br />
<strong>Mounting</strong> and connecting has to be done<br />
according to these <strong>instructions</strong>.<br />
The ceiling type unit air cooler <strong>DHN</strong> may<br />
only be operated in excellent technical<br />
condition with a technical sound refrigerating<br />
plant.<br />
The unit is suitable for all refrigerants of<br />
safety group A1 according to EN 378-1.<br />
These refrigerants are assigned to group 2 in<br />
the Pressure Equipment Directive (PED).<br />
Allowable operating pressure PS see type<br />
plate.<br />
The ambient temperature ranges given on<br />
the type plate have to be maintained.<br />
(Position of the type plate see front page)<br />
Consi<strong>de</strong>r the different operating conditions<br />
of the fan.<br />
The following pollutions of the air have to be<br />
avoi<strong>de</strong>d:<br />
� Abrasive particles.<br />
� Strong corrosive pollutions e.g. salt spray<br />
mist.<br />
� High dust loading, e.g. exhaustion of saw<br />
dust.<br />
� Flammable gases/ particles.<br />
The cooler may not be run next to<br />
flammable materials or components.<br />
The cooler may not be run in explosive<br />
ambient.<br />
The cooler mustn’t take over security<br />
relevant duties.<br />
Use for purpose other than <strong>de</strong>signed for is<br />
forbid<strong>de</strong>n.<br />
F Storage<br />
The unit has to be warehoused dry and<br />
weather protected in the original packing until<br />
installation.<br />
G Shipping<br />
The original packing should be used for<br />
transport.<br />
Should only be moved with inten<strong>de</strong>d lifting<br />
<strong>de</strong>vice using appropriate fixtures. For weight<br />
specifications see chapter H.<br />
Move the unit carefully avoiding jolts and<br />
impacts.<br />
E Modos <strong>de</strong> empleo<br />
Este aparato está indicado para funciones<br />
<strong>de</strong> refrigeración ó calefacción y regulación<br />
<strong>de</strong> la humedad <strong>de</strong>l aire. El sistema <strong>de</strong><br />
<strong>de</strong>sescarche y la ban<strong>de</strong>ja <strong>de</strong> con<strong>de</strong>nsados<br />
complementan las tareas <strong>de</strong>rivadas <strong>de</strong> las<br />
funciones <strong>de</strong>scritas.<br />
El montaje y el conexionado se <strong>de</strong>ben<br />
efectuar conforme a las instrucciones <strong>de</strong>l<br />
manual <strong>de</strong> uso.<br />
El evaporador <strong>de</strong> plafón <strong>DHN</strong> se <strong>de</strong>be <strong>de</strong><br />
encontrar en un estado <strong>de</strong> funcionamiento<br />
irreprochable, con una instalación frigorífica<br />
que se encontrará igualmente en el mismo<br />
estado.<br />
La unidad se ha previsto para funcionar<br />
con fluidos frigoríficos <strong>de</strong>l Grupo <strong>de</strong><br />
Seguridad A1 según la EN 378-1. Estos<br />
refrigerantes están asignados al grupo 2 en<br />
el Reglamento <strong>de</strong> Aparatos a Presión<br />
(RAP).<br />
Máxima presión <strong>de</strong> servicio admisible PS<br />
ver en la placa <strong>de</strong> características.<br />
Los rangos <strong>de</strong> temperatura ambiente se<br />
indican en la placa <strong>de</strong> características.<br />
(Posición <strong>de</strong> la placa en la primera página).<br />
Comprobar las condiciones <strong>de</strong><br />
funcionamiento <strong>de</strong>l ventilador.<br />
Se <strong>de</strong>be evitar aire conteniendo las<br />
siguientes sustancias contaminantes:<br />
� Partículas abrasivas.<br />
� Sustancias altamente corrosivas, por<br />
ejemplo ambientes salinos.<br />
� Altas concentraciones <strong>de</strong> polvo, por<br />
ejemplo serrín.<br />
� Gases o partículas inflamables,<br />
Este evaporador no está preparado para<br />
funcionar con materias o componentes<br />
inflamables.<br />
Este evaporador no está preparado para<br />
funcionar en ambientes explosivos.<br />
Este evaporador no pue<strong>de</strong> asumir tareas<br />
en condiciones <strong>de</strong> segurida<strong>de</strong>s relevantes.<br />
Todos los usos que no respeten los<br />
modos <strong>de</strong> empleo están prohibidas.<br />
F Almacenamiento<br />
La unidad se <strong>de</strong>be almacenar en lugar<br />
seco y protegido <strong>de</strong> la intemperie, en su<br />
embalaje original hasta el momento <strong>de</strong>l<br />
montaje.<br />
G Transporte<br />
Para efectuar el transporte se <strong>de</strong>be<br />
utilizar el embalaje original.<br />
Transportar únicamente con los medios<br />
a<strong>de</strong>cuados y en los puntos <strong>de</strong> transporte<br />
previstos para este efecto.<br />
Especificaciones <strong>de</strong> pesos: ver capítulo H.<br />
Transporte la unidad con pru<strong>de</strong>ncia,<br />
evitando choques y golpes.<br />
5
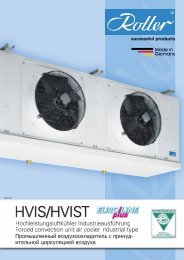
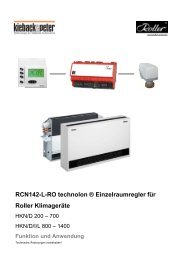
H Abmessungen,<br />
Rohrinhalte, Gewichte<br />
6<br />
H Dimensions,<br />
tube volumes, weights<br />
H Dimensiones, capacidad<br />
<strong>de</strong> los tubos y pesos<br />
Typ Abmessungen in mm Rohrinhalte Gewichte<br />
Mo<strong>de</strong>l Dimensions in mm Tube volumes Weights<br />
Mo<strong>de</strong>lo Dimensiones en mm Volumen interno Pesos<br />
<strong>DHN</strong> 4.. <strong>DHN</strong> 6..<br />
<strong>DHN</strong> … N/L/S A B C D E dm³ kg kg<br />
401 601 963 640 - - 390 3,4 35 33<br />
402 602 1565 1242 - - 390 6,4 60 57<br />
403 603 2167 1844 611 1233 390 9,3 85 78<br />
404 604 2769 2446 1213 1233 390 12,3 110 102
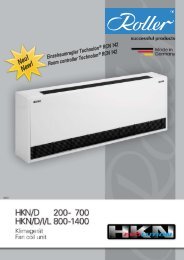
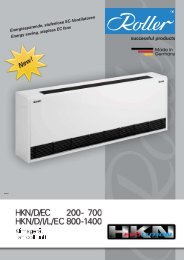
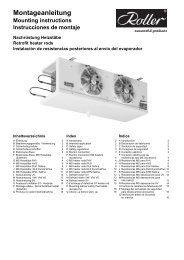
I Montage <strong>DHN</strong><br />
401- 402/ 601- 602<br />
Die Anlage darf nur von autorisiertem<br />
Fachpersonal montiert wer<strong>de</strong>n.<br />
Vorsicht an Wän<strong>de</strong>n und Decken in <strong>de</strong>nen<br />
Strom-, Gas- und/ o<strong>de</strong>r Wasserleitungen<br />
verlegt sein können.<br />
Bei <strong>de</strong>r Montage alle Befestigungspunkte<br />
verwen<strong>de</strong>n.<br />
1. Auspacken.<br />
2. Ventilatorblech abschrauben.<br />
3. Schrauben entfernen.<br />
4. Anlage montieren<br />
(Maße siehe Seite 6).<br />
5. Ventilatorblech montieren.<br />
I <strong>Mounting</strong> <strong>DHN</strong><br />
401- 402/ 601- 602<br />
The unit may only be installed by<br />
authorized and skilled personnel.<br />
Be careful at walls and ceilings that could<br />
contain electric wires, gas and water piping.<br />
When installing, use all the provi<strong>de</strong>d<br />
mounting points.<br />
1. Unpack.<br />
2. Unscrew and remove fan shield.<br />
3. Remove screws.<br />
4. Install unit<br />
(for dimensions see page 6).<br />
5. Install fan panel.<br />
I Montaje <strong>DHN</strong><br />
401- 402/ 601- 602<br />
La unidad <strong>de</strong>berá ser instalada sólo por<br />
personal autorizado.<br />
Asegúrese que los muros y pare<strong>de</strong>s no<br />
contengan conducciones eléctricas, <strong>de</strong> gas o<br />
<strong>de</strong> agua.<br />
¡Para el montaje, utilizar todos los puntos<br />
<strong>de</strong> fijación!<br />
1. Desembalar.<br />
2. Desmontar el panel <strong>de</strong> ventiladores.<br />
3. Desenroscar los tornillos.<br />
4. Montaje <strong>de</strong> la unidad<br />
(dimensiones en página 6).<br />
5. Montar el panel <strong>de</strong> ventiladores.<br />
7
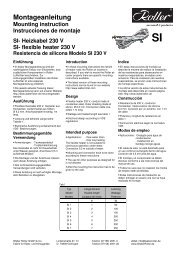
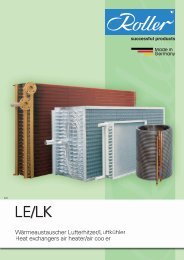
J Montage <strong>DHN</strong><br />
403- 404/ 603- 604<br />
Die Anlage darf nur von autorisiertem<br />
Fachpersonal montiert wer<strong>de</strong>n.<br />
Vorsicht an Wän<strong>de</strong>n und Decken in <strong>de</strong>nen<br />
Strom-, Gas- und/ o<strong>de</strong>r Wasserleitungen<br />
verlegt sein können.<br />
Bei <strong>de</strong>r Montage alle Befestigungspunkte<br />
verwen<strong>de</strong>n.<br />
1. Auspacken.<br />
8<br />
2. Ventilatorblech abschrauben.<br />
3. Schrauben entfernen.<br />
4. Anlage montieren<br />
(Maße siehe Seite 6).<br />
5. Ventilatorblech montieren.<br />
J <strong>Mounting</strong> <strong>DHN</strong><br />
403- 404/ 603- 604<br />
The unit may only be installed by<br />
authorized and skilled personnel.<br />
Be careful at walls and ceilings that could<br />
contain electric wires, gas and water piping.<br />
When installing, use all the provi<strong>de</strong>d<br />
mounting points.<br />
1. Unpack.<br />
2. Unscrew and remove fan shield.<br />
3. Remove screws.<br />
4. Install unit<br />
(for dimensions see page 6).<br />
5. Install fan panel.<br />
J Montaje <strong>DHN</strong><br />
403- 404/ 603- 604<br />
La unidad <strong>de</strong>berá ser instalada sólo por<br />
personal autorizado.<br />
Asegúrese que los muros y pare<strong>de</strong>s no<br />
contengan conducciones eléctricas, <strong>de</strong> gas o<br />
<strong>de</strong> agua.<br />
¡Para el montaje, utilizar todos los puntos<br />
<strong>de</strong> fijación!<br />
1. Desembalar.<br />
2. Desmontar el panel <strong>de</strong> ventiladores.<br />
3. Desenroscar los tornillos.<br />
4. Montaje <strong>de</strong> la unidad<br />
(dimensiones en página 6).<br />
5. Montar el panel <strong>de</strong> ventiladores.
K Anschluss Kältemittel<br />
Die Anlage ist für alle Kältemittel <strong>de</strong>r<br />
Sicherheitsgruppe A2 nach EN 378-1 geeignet.<br />
Diese Kältemittel sind in <strong>de</strong>r<br />
Druckgeräterichtlinie <strong>de</strong>r Gruppe 2 zugeordnet.<br />
1. Seitenteil abnehmen und Rohrverschlüsse<br />
abnehmen.<br />
2. Expansionsventil nach <strong>de</strong>ssen<br />
<strong>Montageanleitung</strong> montieren.<br />
Verteilerrohre nicht knicken.<br />
3. Kältemittelrohrleitung fachgerecht<br />
anschließen.<br />
4. Seitenteil montieren.<br />
Typ<br />
Mo<strong>de</strong>l<br />
Mo<strong>de</strong>lo<br />
Anschlüsse<br />
Connections<br />
Conexiones<br />
Eintritt<br />
Inlet<br />
Entrada<br />
L Elektroanschluss<br />
Zuleitung mit genügend Sicherheitsabstand<br />
zum rotieren<strong>de</strong>n Ventilator verlegen!<br />
Bringen Sie immer einen Schutzleiter an.<br />
Schließen Sie <strong>de</strong>n Kühler nur an<br />
Stromkreise an, die mit einem allpolig<br />
trennen<strong>de</strong>n Schalter abschaltbar sind.<br />
Verwen<strong>de</strong>n Sie nur Leitungen, die <strong>de</strong>n<br />
vorgeschriebenen Installationsvorschriften<br />
hinsichtlich Spannung, Strom,<br />
Isolationsmaterial, Belastbarkeit etc.<br />
entsprechen.<br />
Austritt<br />
Outlet<br />
Salida<br />
<strong>DHN</strong> … N/L/S mm mm<br />
401/ 601 12* 22<br />
402/ 602 12* 22<br />
403/ 603 15* 28<br />
404/ 604 15* 28<br />
K Refrigerant connection<br />
The unit is suitable for all refrigerants of the<br />
safety group A1 according to EN 378-1.<br />
These refrigerants are assigned to group 2<br />
in Pressure Equipment Directive (PED).<br />
1. Remove si<strong>de</strong> panel and tube seals.<br />
2. Fit the expansion valve observing its<br />
mounting instruction.<br />
Don’t bend or buckle the distributor tubes.<br />
3. Connect the refrigerant piping properly.<br />
4. Fit the si<strong>de</strong> panel.<br />
* Mehrfacheinspritzung mit Schra<strong>de</strong>rventil am Austritt.<br />
* Multiple injection wtih schra<strong>de</strong>r valve at the outlet.<br />
* Inyección múltiple a la salida <strong>de</strong> la válvula.<br />
L Electric connection<br />
Mount supply wire with enough safety<br />
disctance to the fans.<br />
Always mount the protective earth conductor!<br />
Mount the unit only to circuits that are<br />
equipped with circuit breaker.<br />
Use only wires that are in conformity to<br />
installation rules in case of voltage, current,<br />
insulation materials, capacity, etc.<br />
K Conexiones <strong>de</strong><br />
refrigerante<br />
La unidad se ha previsto para funcionar con<br />
fluidos frigoríficos <strong>de</strong>l Grupo <strong>de</strong> Seguridad A1<br />
según la EN 378-1. Estos refrigerantes están<br />
asignados al grupo 2 en el Reglamento <strong>de</strong><br />
Aparatos a Presion (RAP).<br />
1. Sacar la parte lateral y quitar los<br />
capuchones <strong>de</strong> los tubos.<br />
2. Montar la válvula <strong>de</strong> expansión según las<br />
instrucciones <strong>de</strong> montaje.<br />
No <strong>de</strong>formar las tuberías <strong>de</strong>l distribuidor.<br />
3. Abocardar la tubería correctamente.<br />
4. Montar nuevamente la tapa lateral.<br />
L Conexión eléctrica<br />
¡Realice el cableado adicional<br />
manteniendo suficiente distancia <strong>de</strong><br />
seguridad a los ventiladores!<br />
Instale siempre un cable conductor a<br />
tierra<br />
La unidad se alimentará con una línea<br />
exclusiva equipada con interruptor <strong>de</strong><br />
corte<br />
Utilice solamente mangueras eléctricas<br />
que cumplan la normativa eléctrica <strong>de</strong><br />
voltaje, intensidad, aislamiento, capacidad,<br />
etc.<br />
9
M Elektrische<br />
Anschlusswerte<br />
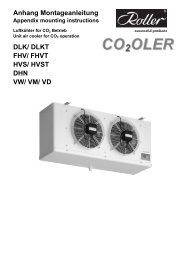
N Elektroanschluss<br />
Ventilatoren<br />
10<br />
Thermokontakt intern verdrahtet.<br />
1. Motor<strong>de</strong>ckel öffnen.<br />
M Electric loads<br />
Typ Ventilatoren ~ 230 V, 50/60 Hz<br />
Mo<strong>de</strong>l Fans ~ 230 V, 50/60 Hz<br />
Mo<strong>de</strong>lo Ventilatores ~ 230V 50/60 Hz<br />
<strong>DHN</strong><br />
2. Elektrische Anschlussleitung mit<br />
genügen<strong>de</strong>r Länge in Seitenraum<br />
verlegen (ca. 1 m), damit das<br />
Ventilatorblech beidseitig abgeklappt<br />
wer<strong>de</strong>n kann.<br />
3. Elektrische Anschlussleitung nach<br />
Schaltplan anschließen.<br />
4. Motor<strong>de</strong>ckel anschließen.<br />
5. Richtige Drehrichtung beachten.<br />
M Características<br />
eléctricas<br />
Anzahl x Ø Leistung Stromaufn. Drehzahl<br />
Number x Ø Input cap. Curr.cons. r.p.m.<br />
Número x Ø Potencia Intensidad r.p.m.<br />
W A min -1<br />
401 S 601 S 1 x 350 80/ 100 0,60/ 0,66 670/ 680<br />
401 L 601 L 1 x 350 70/ 90 0,33/ 0,40 920/ 1060<br />
401 N 601 N 1 x 350 160/ 210 0,70/ 0,92 1280/ 1350<br />
402 S 602 S 2 x 350 80/ 100 0,60/ 0,66 670/ 680<br />
402 L 602 L 2 x 350 70/ 90 0,33/ 0,40 920/ 1060<br />
402 N 602 N 2 x 350 160/ 210 0,70/ 0,92 1280/ 1350<br />
403 S 603 S 3 x 350 80/ 100 0,60/ 0,66 670/ 680<br />
403 L 603 L 3 x 350 70/ 90 0,33/ 0,40 920/ 1060<br />
403 N 603 N 3 x 350 160/ 210 0,70/ 0,92 1280/ 1350<br />
404 S 604 S 4 x 350 80/ 100 0,60/ 0,66 670/ 680<br />
404 L 604 L 4 x 350 70/ 90 0,33/ 0,40 920/ 1060<br />
404 N 604 N 4 x 350 160/ 210 0,70/ 0,92 1280/ 1350<br />
N Electric connection of<br />
fans<br />
Thermo contact internally wired.<br />
1. Open motor cover.<br />
2. Place electrical connecting lead in the si<strong>de</strong><br />
compartment allowing sufficent length<br />
(approx. 1 m) to permit the fan shield to be<br />
hinged on either si<strong>de</strong>.<br />
3. Connect lead in accordance with the<br />
wiring diagram.<br />
4. Close motor cover.<br />
5. Check for correct direction of rotation.<br />
<strong>DHN</strong> … N/L<br />
N Conexión eléctrica <strong>de</strong><br />
los ventiladores<br />
Termo-contacto conexionado<br />
internamente.<br />
1. Sacar la tapa <strong>de</strong>l motor.<br />
2. Dejar alre<strong>de</strong>dor <strong>de</strong> 1m. <strong>de</strong> cable en el<br />
espacio lateral, suficiente para po<strong>de</strong>r<br />
abatir el panel <strong>de</strong> ventiladores hacia<br />
ambos lados.<br />
3. Conexionar el cable eléctrico según el<br />
esquema eléctrico.<br />
4. Montar la tapa <strong>de</strong>l motor.<br />
5. Comprobar el sentido <strong>de</strong> rotación.<br />
<strong>DHN</strong> … S
O Prüfung vor je<strong>de</strong>r<br />
Inbetriebnahme<br />
Der Elektroanschluss muss fachgerecht<br />
abgeschlossen sein.<br />
Die Anschlussdaten müssen mit <strong>de</strong>m<br />
Typenschild übereinstimmen.<br />
Seitenteile und Deckel <strong>de</strong>r Anschlussdosen<br />
müssen montiert sein.<br />
Achtung!<br />
Anlage darf nur in betriebssicheren Zustand in<br />
Betrieb genommen wer<strong>de</strong>n.<br />
P Probelauf,<br />
Inbetriebnahme<br />
Anlage einschalten.<br />
Ventilator Drehrichtung überprüfen.<br />
Stromaufnahme <strong>de</strong>r Ventilatoren mit <strong>de</strong>n<br />
Typenschilddaten vergleichen.<br />
Überprüfung <strong>de</strong>r Überhitzung <strong>de</strong>s Kältemittels<br />
am Austritt.<br />
Herstellerangaben <strong>de</strong>s Expansionsventils<br />
beachten!<br />
Einstellung <strong>de</strong>s Expansionsventils auf die<br />
Überhitzung:<br />
Δtsup = 0,5....................0,7 x DT1<br />
DT1 ≥ 12 K DT1 ≥ 6 K<br />
Δtsup Überhitzung <strong>de</strong>s Kältemittels am<br />
Austritt.<br />
DT1 Eintrittstemperaturdifferenz =<br />
Lufteintrittstemperatur<br />
- Verdampfungstemperatur<br />
am Austritt<br />
(Sättigungstemperatur).<br />
Q Schalldaten<br />
Mittlerer Schalldruckpegel in 3 m Abstand im<br />
Freifeld (halbkugelförmige Schallausbreitung).<br />
O Check-up before<br />
each start- up<br />
The electric connection has to be completed<br />
properly.<br />
The electrical load has to comply with the<br />
name plate.<br />
Si<strong>de</strong> panels and junction box cover have to be<br />
in place.<br />
Attention!<br />
The plant may only be started if safe to operate.<br />
P Test- run, Start- up<br />
Turn the unit on.<br />
Check rotating direction of fans.<br />
Compare current consumption of the fan<br />
motors with the type plate specification.<br />
Check superheat of the refrigerant at the outlet.<br />
Check manufacturer’s specification of<br />
expansion valve!<br />
Adjusting expansion valve to superheating:<br />
Δtsup = 0,5....................0,7 x DT1<br />
DT1 ≥ 12 K DT1 ≥ 6 K<br />
Δtsup Superheating of the refrigerant at the<br />
outlet.<br />
DT1 Inlet temperature difference =<br />
Air inlet temperature<br />
- evaporating temperature<br />
at the outlet<br />
(saturation temperature).<br />
Q Sound pressure level<br />
Mean sound pressure level at a distance of<br />
3 m semi- reverberant field.<br />
Typ Schalldruckpegel<br />
Mo<strong>de</strong>l Sound pressure level<br />
Mo<strong>de</strong>lo Presión sonora<br />
<strong>DHN</strong> dB(A)<br />
401 S 601 S 41<br />
401 L 601 L 46<br />
401 N 601 N 54<br />
402 S 602 S 43<br />
402 L 602 L 48<br />
402 N 602 N 56<br />
403 S 603 S 45<br />
403 L 603 L 50<br />
403 N 603 N 58<br />
404 S 604 S 46<br />
404 L 604 L 51<br />
404 N 604 N 59<br />
O ¡Verificación antes <strong>de</strong> la<br />
puesta en marcha!<br />
El cableado eléctrico <strong>de</strong>be estar<br />
correctamente instalado.<br />
El tipo <strong>de</strong> tensión <strong>de</strong>be correspon<strong>de</strong>r con el<br />
indicado en la placa <strong>de</strong> características.<br />
Los paneles laterales así como la junta <strong>de</strong> la<br />
caja <strong>de</strong> conexiones <strong>de</strong>ben estar<br />
correctamente montados.<br />
¡Atención!<br />
La instalación no <strong>de</strong>be ser puesta en marcha<br />
sin encontrarse en un estado irreprochable.<br />
P Primer arranque,<br />
puesta en marcha<br />
Alimentar con tensión la unidad.<br />
Controlar el sentido <strong>de</strong> rotación <strong>de</strong> cada<br />
ventilador.<br />
Comparar la corriente <strong>de</strong> alimentación con lo<br />
indicado en la placa <strong>de</strong> características.<br />
Verificar el recalentamiento <strong>de</strong>l fluido<br />
frigorífico en la salida.<br />
¡Ajustar según las indicaciones <strong>de</strong>l<br />
fabricante <strong>de</strong> la válvula!<br />
Ajuste <strong>de</strong>l recalentamiento <strong>de</strong> la válvula <strong>de</strong><br />
expansión:<br />
Δtsup = 0,5....................0,7 x DT1<br />
DT1 ≥ 12 K DT1 ≥ 6 K<br />
Δtsup Recalentamiento <strong>de</strong>l fluido<br />
frigorífico en la salida.<br />
DT1 Diferencia <strong>de</strong> temperatura en la<br />
entrada= Temperatura <strong>de</strong><br />
entrada <strong>de</strong> aire- temperatura <strong>de</strong><br />
evaporación a la salida<br />
(Temperatura <strong>de</strong> saturación).<br />
Q Presión sonora<br />
Presión sonora medida a una distancia <strong>de</strong> 3<br />
m en campo semi- reverberante.<br />
11
R Reinigung<br />
Anlage darf nur von autorisiertem<br />
Fachpersonal gewartet wer<strong>de</strong>n.<br />
Vor allen Arbeiten an <strong>de</strong>r Anlage:<br />
Strom abschalten und gegen unbefugtes<br />
Einschalten sichern.<br />
Die Häufigkeit <strong>de</strong>r Reinigung <strong>de</strong>s Luftkühlers<br />
hängt vom Einsatzgebiet ab. Eine Reinigung<br />
sollte zumin<strong>de</strong>st quartalsweise durchgeführt<br />
wer<strong>de</strong>n.<br />
Reinigung <strong>de</strong>s Ventilators:<br />
Beschädigung <strong>de</strong>s Ventilators bei Reinigung<br />
Fehlfunktion möglich.<br />
Reinigen Sie <strong>de</strong>n Ventilator nicht mit einem<br />
Wasserstrahl o<strong>de</strong>r Hochdruckreiniger.<br />
Verwen<strong>de</strong>n Sie keine säure-, laugen- und<br />
lösungsmittelhaltigen Reinigungsmittel.<br />
Überprüfen Sie <strong>de</strong>n Ventilator auf Unwucht.<br />
Reinigung <strong>de</strong>s Lamellenblockes:<br />
Demontieren Sie <strong>de</strong>n Ventilator zur<br />
Reinigung <strong>de</strong>s Lamellenblockes.<br />
Reinigen Sie das Gerät mit Wasser o<strong>de</strong>r<br />
speziell für Kupfer- Aluminium<br />
Wärmetauschern freigegebenen<br />
Reinigungsmitteln.<br />
Die Lamellen sind scharfkantig, achten Sie<br />
darauf, dass die Lamellen nicht verbogen<br />
wer<strong>de</strong>n.<br />
S Wartungsintervalle<br />
Anlage darf nur von autorisiertem<br />
Fachpersonal gewartet und repariert wer<strong>de</strong>n.<br />
Min<strong>de</strong>stens halbjährlich sind folgen<strong>de</strong><br />
Wartungstätigkeiten durchzuführen:<br />
12<br />
Befestigung <strong>de</strong>r Anlage.<br />
Befestigung <strong>de</strong>s Ventilators.<br />
Berührungsschutz<br />
Elektroanschlüsse.<br />
Befestigung <strong>de</strong>s Schutzleiters.<br />
Kon<strong>de</strong>nswasserbohrung <strong>de</strong>s Ventilators.<br />
Kon<strong>de</strong>nsatablauf <strong>de</strong>s Kühlers.<br />
Dichtigkeit <strong>de</strong>r Anlage.<br />
Überhitzungseinstellung.<br />
T Entsorgung<br />
Beachten Sie bei <strong>de</strong>r Entsorgung <strong>de</strong>s<br />
Gerätes alle relevanten, in ihrem Land<br />
gelten<strong>de</strong>n Anfor<strong>de</strong>rungen und Bestimmungen.<br />
Technische Än<strong>de</strong>rungen und<br />
Verbesserungen vorbehalten.<br />
R Cleaning<br />
Unit may only be serviced and repaired by<br />
authorized and skilled personnel.<br />
Prior to working on the unit, switch off the<br />
electricity and secure against unauthorized<br />
connecting.<br />
The frequency of cleaning of the air cooler<br />
<strong>de</strong>pends on its application. A cleaning should<br />
be done at least every three months.<br />
Cleaning of the fan:<br />
Damage to the fan and malfunction afterwards<br />
is possible.<br />
Don’t clean the fan by means of a high<br />
pressure cleaner.<br />
Don’t use purifier that contains acid, base<br />
or dilution.<br />
Cleaning of the coil block<br />
Disassemble the fan to clean the coil block.<br />
Clean the <strong>de</strong>vice by means of water or<br />
special copper aluminium heat exchanger<br />
purifier.<br />
The fins are sharp – edged. Pay attention<br />
that the fins don’t get <strong>de</strong>formed.<br />
S Service interval<br />
The unit may only be serviced and repaired<br />
by authorized and skilled personnel.<br />
At least every 6 months the following services<br />
have to be done.<br />
Check the:<br />
<strong>Mounting</strong> of the unit.<br />
<strong>Mounting</strong> of the fans.<br />
Protection cover.<br />
Electric connections.<br />
<strong>Mounting</strong> of the protection conductor.<br />
Con<strong>de</strong>nsate draining hole of the fan.<br />
Con<strong>de</strong>nsate draining of the cooler<br />
Leaks in the unit.<br />
Adjustment of the superheat.<br />
T Disposal<br />
When disposing the <strong>de</strong>vice, please comply<br />
with all relevant requirements and regulations<br />
applicable in your country.<br />
Subject to technical alterations and<br />
improvements.<br />
R Limpieza<br />
La unidad no <strong>de</strong>be ser instalada más que<br />
por personal autorizado.<br />
Desconecte la unidad antes <strong>de</strong> cada<br />
intervención, asegurándose que no se pueda<br />
conectar por personal no autorizado.<br />
La frecuencia <strong>de</strong> limpieza <strong>de</strong>pen<strong>de</strong>rá <strong>de</strong> la<br />
aplicación. Se recomienda al menos 1 vez<br />
cada tres meses.<br />
Limpieza <strong>de</strong> los ventiladores:<br />
Es posible un fallo en los ventiladores<br />
<strong>de</strong>spués <strong>de</strong> haber efectuado la limpieza.<br />
No efectúe la limpieza <strong>de</strong> los ventiladores<br />
con agua o aire a presión.<br />
No utilice limpiadores agresivos, con<br />
ácidos, bases ó disoluciones.<br />
Compruebe su funcionamiento <strong>de</strong>spués <strong>de</strong><br />
cada limpieza.<br />
Limpieza <strong>de</strong> las aletas <strong>de</strong> la batería:<br />
Desmontar cada ventilador para limpiar las<br />
aletas <strong>de</strong> la batería.<br />
Limpiar la carrocería <strong>de</strong>l aparato con agua<br />
ó con productos específicos para el cobrealuminio.<br />
Las aletas tienen cantos afilados, ponga<br />
especial atención en esto y en no<br />
<strong>de</strong>formarlas.<br />
S Revisión técnica<br />
La unidad no <strong>de</strong>be ser instalada ni<br />
reparada mas que por personal autorizado.<br />
Se <strong>de</strong>ben realizar las siguientes revisiones al<br />
menos cada 6 meses:<br />
Fijación <strong>de</strong> la unidad<br />
Fijación <strong>de</strong> los ventiladores.<br />
Rejillas <strong>de</strong> protección.<br />
Conexionado eléctrico.<br />
Contactores y protectores térmicos.<br />
Con<strong>de</strong>nsaciones en los ventiladores.<br />
Desagüe <strong>de</strong>l evaporador<br />
Estanquidad <strong>de</strong>l recinto.<br />
Ajuste <strong>de</strong>l recalentamiento.<br />
T Fin <strong>de</strong>l periodo útil <strong>de</strong>l<br />
evaporador<br />
Cuando el aparato se <strong>de</strong>ba sustituir por<br />
este motivo, cumpla con la normativa y las<br />
regulaciones para eliminación <strong>de</strong> residuos<br />
vigente en su país.<br />
Reservado el <strong>de</strong>recho <strong>de</strong> cambio y <strong>de</strong><br />
mejoras técnicas.<br />
Walter Roller GmbH & Co.<br />
Fabrik für Kälte- und Klimageräte<br />
Lin<strong>de</strong>nstr. 27-31<br />
D- 70839 Gerlingen<br />
Postfach 10 03 30<br />
D- 70828 Gerlingen<br />
Telefon (0 71 56) 20 01- 0<br />
Telefax (0 71 56) 20 01- 26<br />
E-mail info@walterroller.<strong>de</strong><br />
http://www.walterroller.<strong>de</strong><br />
10.2010 88000139