

Nomen Products . Steckelhörn 12 . 20457 Hamburg . Germany ...
Nomen Products . Steckelhörn 12 . 20457 Hamburg . Germany ...
Nomen Products . Steckelhörn 12 . 20457 Hamburg . Germany ...

You also want an ePaper? Increase the reach of your titles
YUMPU automatically turns print PDFs into web optimized ePapers that Google loves.
Pflegehinweise<br />
fürs Bordhandbuch<br />
Wir freuen uns, daß Sie sich für die <strong>Nomen</strong><br />
Klampe entschieden haben und wünschen<br />
Ihnen viel Freude mit dem Produkt.<br />
Um die einwandfreie Funktion der Klampe<br />
über viele Jahre zu gewährleisten, bitten<br />
wir Sie, die folgenden einfachen Pflegehinweise<br />
zu beachten:<br />
1. Während der Saison<br />
Achten Sie darauf, daß die Kugel zwischen<br />
den Klampenarmen immer geschmiert ist.<br />
Wenn nötig, verwenden Sie Silikonspray<br />
zum Nachschmieren (ohne Demontage).<br />
2. Einmal im Jahr<br />
Am Ende der Saison sollten die Klampen<br />
demontiert, und wie nachfolgend<br />
beschrieben gewartet werden. Das ist<br />
sehr einfach und schnell gemacht.<br />
Demontage, Abb. 1 - Schieben Sie die<br />
Gelenkbolzen mit einem Holz- oder<br />
Kunststoffstab aus ihren Sitzen heraus.<br />
Bolzen fetten, Abb. 2 - Versehen Sie die<br />
Gelenkbolzen und die Gelenkbohrungen<br />
mit einem seewasserbeständigen Fett (z.B.<br />
Winschenfett oder Silikon Paste). Damit<br />
stellen Sie sicher, daß die Bolzen jederzeit<br />
leicht zu demontieren sind.<br />
Kugel schmieren - Die elastische Kugel bitte<br />
nur mit Silikon Spray oder Silikon Paste (hält<br />
länger) behandeln.<br />
Zusammenbau, Abb. 3 - Setzen Sie beide<br />
Klampen-arme gleichzeitig, zusammen mit<br />
der Kugel, auf die Klampenbasis.<br />
Dann zunächst einen Bolzen ohne Werkzeug<br />
mit der Hand einsetzen. Die O-Ringe<br />
erzeugen dabei einen leichten Widerstand.<br />
Abb. 4 - Zum Einsetzen des zweiten Bolzens<br />
den noch losen Klampenarm in Richtung<br />
Kugel drücken, damit die Bohrungen von<br />
Arm und Basis zueinander passen.<br />
Gleichzeitig den Bolzen kräftig<br />
hineindrücken. Abb.<br />
Achtung! Bitte versuchen Sie nicht, die<br />
Bolzen mit einem Hammer in die Bohrung<br />
zu treiben! Das Aluminium kann dabei<br />
Schaden nehmen.<br />
Ersatzteile - können Sie direkt bei <strong>Nomen</strong><br />
bestellen. (am besten per fax oder e-mail)<br />
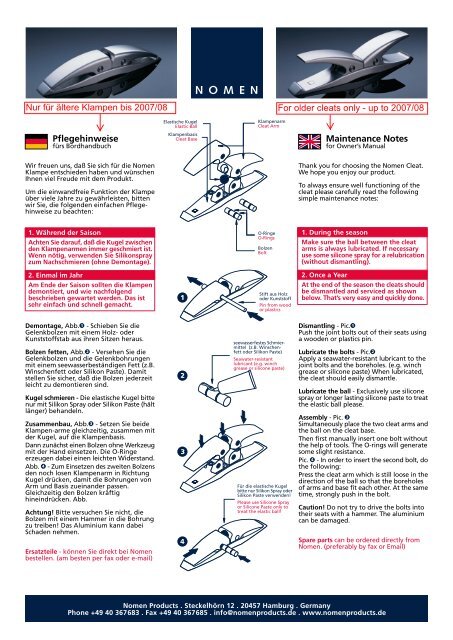
Elastische Kugel<br />
Elastic Ball<br />
Klampenbasis<br />
Cleat Base<br />
1<br />
2<br />
3<br />
4<br />
NOMEN<br />
Klampenarm<br />
Cleat Arm<br />
O-Ringe<br />
O-Rings<br />
Bolzen<br />
Bolt<br />
Stift aus Holz<br />
oder Kunststoff<br />
Pin from wood<br />
or plastics<br />
seewasserfestes Schmiermittel<br />
(z.B. Winschenfett<br />
oder Silikon Paste)<br />
Seawater-resistant<br />
lubricant (e.g. winch<br />
grease or silicone paste)<br />
Für die elastische Kugel<br />
bitte nur Silikon Spray oder<br />
Silikon Paste verwenden!<br />
Please use Silicone Spray<br />
or Silicone Paste only to<br />
treat the elastic ball!<br />
Maintenance Notes<br />
for Owner’s Manual<br />
Thank you for choosing the <strong>Nomen</strong> Cleat.<br />
We hope you enjoy our product.<br />
To always ensure well functioning of the<br />
cleat please carefully read the following<br />
simple maintenance notes:<br />
1. During the season<br />
Make sure the ball between the cleat<br />
arms is always lubricated. If necessary<br />
use some silicone spray for a relubrication<br />
(without dismantling).<br />
2. Once a Year<br />
At the end of the season the cleats should<br />
be dismantled and serviced as shown<br />
below. That’s very easy and quickly done.<br />
Dismantling - Pic. 1<br />
Push the joint bolts out of their seats using<br />
a wooden or plastics pin.<br />
Lubricate the bolts - Pic. 2<br />
Apply a seawater-resistant lubricant to the<br />
joint bolts and the boreholes. (e.g. winch<br />
grease or silicone paste) When lubricated,<br />
the cleat should easily dismantle.<br />
Lubricate the ball - Exclusively use silicone<br />
spray or longer lasting silicone paste to treat<br />
the elastic ball please.<br />
Assembly - Pic. 3<br />
Simultaneously place the two cleat arms and<br />
the ball on the cleat base.<br />
Then first manually insert one bolt without<br />
the help of tools. The O-rings will generate<br />
some slight resistance.<br />
Pic. 4 - In order to insert the second bolt, do<br />
the following:<br />
Press the cleat arm which is still loose in the<br />
direction of the ball so that the boreholes<br />
of arms and base fit each other. At the same<br />
time, strongly push in the bolt.<br />
Caution! Do not try to drive the bolts into<br />
their seats with a hammer. The aluminium<br />
can be damaged.<br />
Spare parts can be ordered directly from<br />
<strong>Nomen</strong>. (preferably by fax or Email)<br />
<strong>Nomen</strong> <strong>Products</strong> . <strong>Steckelhörn</strong> <strong>12</strong> . <strong>20457</strong> <strong>Hamburg</strong> . <strong>Germany</strong><br />
Phone +49 40 367683 . Fax +49 40 367685 . info@nomenproducts.de . www.nomenproducts.de