

Sony ZS-RS60BT - ZS-RS60BT Istruzioni per l'uso Inglese
Sony ZS-RS60BT - ZS-RS60BT Istruzioni per l'uso Inglese
Sony ZS-RS60BT - ZS-RS60BT Istruzioni per l'uso Inglese

You also want an ePaper? Increase the reach of your titles
YUMPU automatically turns print PDFs into web optimized ePapers that Google loves.
4-559-899-12(1)<br />
Basic O<strong>per</strong>ations<br />
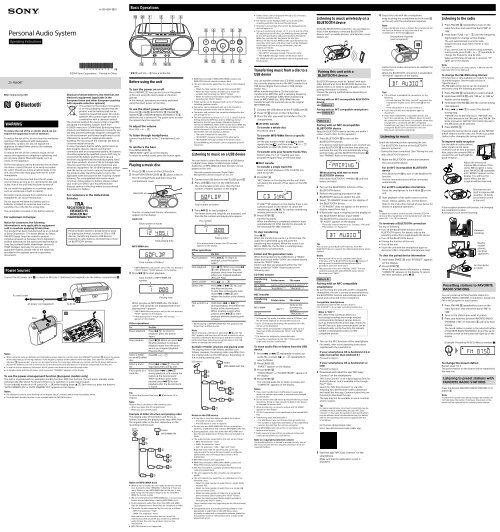
Personal Audio System<br />
O<strong>per</strong>ating Instructions<br />
Folder names can be displayed with up to 32 characters,<br />
including quotation marks.<br />
File names can be displayed with up to 32 characters,<br />
including quotation marks and file extensions.<br />
Characters and symbols that cannot be displayed by the<br />
unit will appear as “_”.<br />
This unit conforms to version 1.0, 1.1, 2.2, 2.3 and 2.4 of the<br />
ID3 tag format for MP3 files, the WMA tag format defined<br />
by the ASF specification (Advanced Systems Format) for<br />
WMA files, and the AAC tag format for AAC files.<br />
When a file has the ID3, WMA or AAC tag information, the<br />
song title, artist name, and album name will be displayed.<br />
If a file does not have the tag information, the unit<br />
displays as follows:<br />
File name instead of the song title.<br />
“NO ARTIST” message instead of the artist name.<br />
“NO ALBUM” message instead of the album name.<br />
ID3, WMA and AAC tag information can be displayed up to<br />
64 characters.<br />
Listening to music wirelessly on a<br />
BLUETOOTH device<br />
Using the BLUETOOTH connection, you can listen to<br />
music from wirelessly connected BLUETOOTH<br />
devices such as mobile phones, smartphones, music<br />
players, etc.<br />
4 Touch the unit with the smartphone.<br />
Keep touching the smartphone to the N mark <br />
on the unit until the smartphone responds.<br />
Note<br />
If your smartphone screen is locked, the smartphone will<br />
not function. Release the lock, then touch the<br />
smartphone to the N mark again.<br />
Smartphone responds<br />
(unit recognized)<br />
Listening to the radio<br />
1 Press FM/AM repeatedly to turn on the<br />
radio function and select the band “FM” or<br />
“AM.”<br />
2 Hold down TUNE + or until the frequency<br />
digits begin to change on the display.<br />
The unit automatically scans the radio<br />
frequencies and stops when it finds a clear<br />
station.<br />
If you cannot tune to a station using automatic<br />
tuning mode, press TUNE + or repeatedly to<br />
change the frequency step by step.<br />
When an FM stereo broadcast is received, “ST”<br />
lights up on the display.<br />
<strong>ZS</strong>-<strong>RS60BT</strong><br />
WARNING<br />
To reduce the risk of fire or electric shock, do not<br />
expose this apparatus to rain or moisture.<br />
To reduce the risk of fire, do not cover the ventilation<br />
opening of the appliance with newspa<strong>per</strong>s,<br />
tablecloths, curtains, etc. Do not expose the<br />
appliance to naked flame sources (for example,<br />
lighted candles).<br />
To reduce the risk of fire or electric shock, do not<br />
expose this apparatus to dripping or splashing, and<br />
do not place objects filled with liquids, such as<br />
vases, on the apparatus.<br />
As the main plug is used to disconnect the unit from<br />
the mains, connect the unit to an easily accessible<br />
AC outlet. Should you notice an abnormality in the<br />
unit, disconnect the main plug from the AC outlet<br />
immediately.<br />
The unit is not disconnected from the AC power<br />
source (mains) as long as it is connected to the wall<br />
outlet, even if the unit itself has been turned off.<br />
Do not install the appliance in a confined space,<br />
such as a bookcase or built-in cabinet.<br />
Excessive sound pressure from earphones and<br />
headphones can cause hearing loss.<br />
Do not expose the batteries (battery pack or<br />
batteries installed) to excessive heat such as<br />
sunshine, fire or the like for a long time.<br />
The nameplate is located on the bottom exterior.<br />
For customers in Europe<br />
Notice for customers: the following<br />
information is only applicable to equipment<br />
sold in countries applying EU directives<br />
This product has been manufactured by or on behalf<br />
of <strong>Sony</strong> Corporation, 1-7-1 Konan Minato‐ku Tokyo,<br />
108-0075 Japan. Inquiries related to product<br />
compliance based on European Union legislation<br />
shall be addressed to the authorized representative,<br />
<strong>Sony</strong> Deutschland GmbH, Hedelfinger Strasse 61,<br />
70327 Stuttgart, Germany. For any service or<br />
guarantee matters, please refer to the addresses<br />
provided in the separate service or guarantee<br />
documents.<br />
Power Sources<br />
©2014 <strong>Sony</strong> Corporation Printed in China<br />
Disposal of waste batteries and electrical and<br />
electronic equipment (applicable in the<br />
European Union and other European countries<br />
with separate collection systems)<br />
This symbol on the product, the battery<br />
or on the packaging indicates that the<br />
product and the battery shall not be<br />
treated as household waste. On certain<br />
batteries this symbol might be used in<br />
combination with a chemical symbol.<br />
The chemical symbols for mercury (Hg) or lead (Pb)<br />
are added if the battery contains more than<br />
0.0005% mercury or 0.004% lead. By ensuring these<br />
products and batteries are disposed of correctly, you<br />
will help prevent potentially negative consequences<br />
for the environment and human health which could<br />
otherwise be caused by inappropriate waste<br />
handling. The recycling of the materials will help to<br />
conserve natural resources.<br />
In case of products that for safety, <strong>per</strong>formance or<br />
data integrity reasons require a <strong>per</strong>manent<br />
connection with an incorporated battery, this battery<br />
should be replaced by qualified service staff only. To<br />
ensure that the battery and the electrical and<br />
electronic equipment will be treated pro<strong>per</strong>ly, hand<br />
over these products at end-of-life to the applicable<br />
collection point for the recycling of electrical and<br />
electronic equipment. For all other batteries, please<br />
view the section on how to remove the battery from<br />
the product safely. Hand the battery over to the<br />
applicable collection point for the recycling of waste<br />
batteries. For more detailed information about<br />
recycling of this product or battery, please contact<br />
your local Civic Office, your household waste<br />
disposal service or the shop where you purchased<br />
the product or battery.<br />
For customers in the United Arab<br />
Emirates<br />
Personal Audio System is designed to be used<br />
for playing back music sources on CDs or USB<br />
devices, transferring music to USB devices,<br />
listening to radio stations, and listening to music<br />
on BLUETOOTH devices.<br />
Connect the AC power cord , or insert six R14 (size C) batteries (not supplied) into the battery compartment .<br />
To a wall outlet<br />
AC power cord (supplied)<br />
Rear<br />
To AC IN<br />
Notes<br />
When using the radio on batteries and the battery power drops to a certain level, the OPR/BATT indicator dims or the power<br />
of the radio may go off during playback. If this happens, replace all the batteries with new ones. Even after the OPR/BATT<br />
indicator becomes dim, you can use the radio function for some time, although you cannot use the CD player. Before you<br />
replace the batteries, be sure to remove any CD and disconnect any USB devices or optional components from the unit.<br />
To use the unit on batteries, disconnect the AC power cord from the unit and the wall outlet.<br />
In standby mode with the AC power cord connected, “STANDBY” appears on the display.<br />
To use the power-management function (European models only)<br />
This unit is equipped with an automatic standby function. With this function, the unit enters standby mode<br />
automatically after about 15 minutes if there is no o<strong>per</strong>ation or audio signal output.<br />
To turn standby mode on or off, press VOL while holding down . Each time you press the buttons,<br />
“AUTO STANDBY ON” or “AUTO STANDBY OFF” appears on the display.<br />
Notes<br />
The displayed content starts flashing on the display about 2 minutes before entering standby mode.<br />
The automatic standby function is not available with the FM/AM function.<br />
* and VOL + have a tactile dot.<br />
Before using the unit<br />
To turn the power on or off<br />
Press OPERATE . You can also turn on the power<br />
of this unit using the direct power-on function<br />
(below).<br />
In this manual, o<strong>per</strong>ations are mainly explained<br />
using the direct power-on function.<br />
To use the direct power-on function<br />
Press CD , USB , BLUETOOTH , FM/AM ,<br />
AUDIO IN or FAVORITE RADIO STATIONS (1-3) <br />
while the unit is turned off. The power turns on with<br />
the relevant function selected.<br />
To adjust the volume<br />
Press VOL + or .<br />
To listen through headphones<br />
Connect headphones to the (headphones) jack<br />
.<br />
To reinforce the bass<br />
Press MEGA BASS .<br />
“MEGA BASS” lights up on the display.<br />
To return to normal sound, press the button again.<br />
Playing a music disc<br />
1 Press CD to turn on the CD function.<br />
2 Press PUSH OPEN/CLOSE , place a disc in<br />
the CD compartment and then close the<br />
compartment cover.<br />
Label side up<br />
The disc is loaded and the disc information<br />
appears on the display.<br />
Audio CD<br />
Total number of tracks<br />
MP3/WMA disc<br />
Total number of folders*<br />
Total playing time<br />
* If MP3/WMA files are present only in the root directory<br />
(“ROOT” folder), “1FLDR” appears on the display.<br />
3 Press to start playback.<br />
Track number or MP3/WMA file<br />
number<br />
Playing time<br />
When you play an MP3/WMA disc, the folder<br />
name* 1 and song title are displayed before the<br />
playing time* 2 appears.<br />
* 1 If MP3/WMA files are present only in the root directory,<br />
“ROOT” appears on the display.<br />
* 2 If the playing time is longer than 100 minutes, “--:--”<br />
appears on the display.<br />
Other o<strong>per</strong>ations<br />
To<br />
Do this<br />
Pause playback Press . To return to<br />
playback, press the button<br />
again.<br />
Stop playback Press . When you press <br />
after playback is stopped,<br />
playback starts from the point<br />
where you stopped playback<br />
(Resume Play).<br />
Select a folder<br />
on an MP3/WMA<br />
disc<br />
Press + or .<br />
Select a track/<br />
file<br />
Find a point in a<br />
track/file<br />
Press or . You can<br />
skip tracks/files one by one.<br />
Hold down or <br />
during playback, and release the<br />
button at the desired point.<br />
When locating a point while<br />
paused, press to start<br />
playback after the desired point<br />
is found.<br />
Tip<br />
To cancel the Resume Play, press while the CD is<br />
stopped.<br />
Note<br />
Resume Play is cancelled in the following cases:<br />
When you open the CD compartment.<br />
When you turn off the power.<br />
Example of folder structure and playing order<br />
The playing order of the folders and files is as<br />
follows. However, the playing order may differ from<br />
the original order on the disc, depending on the<br />
recording method used.<br />
Folder<br />
MP3/WMA file<br />
Notes on MP3/WMA discs<br />
When a disc is loaded, the unit reads all the files on that<br />
disc. During this time, “READING” is flashing. If there are<br />
many folders or non-MP3/WMA files on the disc, it may<br />
take a long time for play to begin or for the next MP3/<br />
WMA file to start to play.<br />
We recommend that non-MP3/WMA files or unnecessary<br />
folders are excluded when creating MP3/WMA discs.<br />
During playback, audio files other than MP3 and WMA<br />
files are skipped even if those files are included in a folder.<br />
The audio formats supported by this unit are as follows:<br />
MP3: File extension “.mp3”<br />
WMA: File extension “.wma”<br />
Note that even if the file name has the correct file<br />
extension but the actual file was created in a different<br />
audio format, this unit may produce noise or may<br />
malfunction.<br />
MP3 PRO format is not supported.<br />
WMA files encoded in WMA DRM, WMA Lossless and<br />
WMA PRO formats cannot be played back.<br />
This unit cannot play audio files on a disc in the following<br />
cases:<br />
When the total number of audio files exceeds 999.<br />
When the total number of folders on a single disc<br />
exceeds 256 (including the “ROOT” folder).<br />
When the directory level (folder depths) exceeds 8<br />
(including the “ROOT” folder).<br />
Folder names can be displayed with up to 32 characters,<br />
including quotation marks.<br />
File names can be displayed with up to 32 characters,<br />
including quotation marks and file extensions.<br />
Characters and symbols that cannot be displayed by the<br />
unit will appear as “_”.<br />
This unit conforms to version 1.0, 1.1, 2.2, 2.3 and 2.4 of the<br />
ID3 tag format for MP3 files and the WMA tag format<br />
defined by the ASF specification (Advanced Systems<br />
Format) for WMA files. When a file has the ID3 or WMA tag<br />
information, the song title, artist name, and album name<br />
will be displayed. If a file does not have the tag<br />
information, the unit displays as follows:<br />
File name instead of the song title.<br />
“NO ARTIST” message instead of the artist name.<br />
“NO ALBUM” message instead of the album name.<br />
ID3 and WMA tag information can be displayed up to 64<br />
characters.<br />
Listening to music on a USB device<br />
You can listen to audio files stored on a USB device<br />
(a digital music player or USB storage media).<br />
Audio files in MP3, WMA and AAC formats* can be<br />
played on this unit.<br />
* Files with copyright protection (Digital Rights<br />
Management) cannot be played on this unit.<br />
1 Connect the USB device to the (USB) port .<br />
2 Press USB to turn on the USB function.<br />
The volume label scrolls once, then the total<br />
number of folders appears on the display.<br />
Total number of folders<br />
3 Press to start playback.<br />
The folder name and song title are displayed, and<br />
then the file number and playing time appear.<br />
File number<br />
Playing time*<br />
* If the playing time is longer than 100 minutes, “--:--”<br />
appears on the display.<br />
Other o<strong>per</strong>ations<br />
To<br />
Do this<br />
Pause playback Press . To return to<br />
playback, press the button<br />
again*.<br />
Stop playback Press . When you press <br />
after playback is stopped,<br />
playback starts from the point<br />
where you stopped playback<br />
(Resume Play).<br />
Select a folder Press + or .<br />
Select a file Press or . You can<br />
skip files one by one.<br />
To skip files continuously, hold<br />
down or and<br />
release the button at the desired<br />
file.<br />
Find a point in a<br />
file<br />
Hold down or <br />
during playback, and release the<br />
button at the desired point.<br />
When locating a point while<br />
paused, press to start<br />
playback after the desired point<br />
is found.<br />
* When playing a VBR MP3/WMA/AAC file, playback may<br />
restart from a different point.<br />
Note<br />
When removing a USB device, hold down until “NO<br />
DEV” appears, and then turn off the unit or switch to other<br />
functions beforehand. Removing the USB device without<br />
<strong>per</strong>forming these steps may corrupt the data on the USB<br />
device or damage the device itself.<br />
Example of folder structure and playing order<br />
The playing order of the folders and files is as<br />
follows. However, the playing order may differ from<br />
the original order on the USB device, depending on<br />
the recording method used.<br />
USB device<br />
Folder<br />
MP3/WMA/AAC file<br />
Notes on the USB device<br />
It may take a long time before playback starts when:<br />
the folder structure is complex.<br />
the USB device is close to capacity.<br />
Do not save non-MP3/WMA/AAC files or unnecessary<br />
folders to a USB device that contains MP3/WMA/AAC files.<br />
During playback, audio files other than MP3, WMA and<br />
AAC files are skipped even if those files are included in a<br />
folder.<br />
The audio formats supported by this unit are as follows:<br />
MP3: file extension “.mp3”<br />
WMA: file extension “.wma”<br />
AAC: file extension “.m4a,” “.3gp” and “.mp4”<br />
Note that even if the file name has the correct file<br />
extension but the actual file was created in a different<br />
audio format, this unit may produce noise or may<br />
malfunction.<br />
MP3 PRO format is not supported.<br />
WMA files encoded in WMA DRM, WMA Lossless and<br />
WMA PRO formats cannot be played back.<br />
AAC files encoded in copyright-protected AAC format<br />
cannot be played back.<br />
This unit supports the AAC-LC (AAC Low Complexity)<br />
profile.<br />
This unit cannot play audio files on a USB device in the<br />
following cases:<br />
When the total number of audio files in a single folder<br />
exceeds 999.<br />
When the total number of audio files on a single USB<br />
device exceeds 5,000.<br />
When the total number of folders on a single USB<br />
device exceeds 256 (including the “ROOT” folder).<br />
When the directory level (folder depths) exceeds 8<br />
(including the “ROOT” folder).<br />
These numbers may vary depending on the file and folder<br />
structure.<br />
Compatibility with all encoding/writing software is not<br />
guaranteed. If audio files on the USB device were<br />
originally encoded with incompatible software, those files<br />
may produce noise or interrupted sound, or may not be<br />
played back at all.<br />
Transferring music from a disc to a<br />
USB device<br />
You can transfer a whole disc (CD SYNC transfer) or<br />
the currently playing track or file (REC1 transfer) to a<br />
USB device (digital music player or USB storage<br />
media, etc.).<br />
When transferring from a CD, the tracks are<br />
transferred as MP3 files with a sampling frequency<br />
of 44.1 kHz at 128 kbps (CBR). When transferring<br />
from an MP3/WMA disc, MP3/WMA files are<br />
transferred with the same bit rate as the original<br />
MP3/WMA files.<br />
1 Connect the USB device to the (USB) port .<br />
2 Press CD to turn on the CD function.<br />
3 Place the disc you want to transfer in the CD<br />
compartment.<br />
ĄCD Ą SYNC transfer<br />
To transfer a whole disc<br />
Proceed to step 4.<br />
To transfer MP3/WMA files in a specific<br />
folder<br />
Set the play mode to folder play ( ) or folder<br />
repeat play ( , ), and then press + or <br />
repeatedly to select the folder you want.<br />
To transfer only your favorite tracks/files<br />
Perform step 1 to 5 of “Creating your own<br />
program (Program Play)” on the back page.<br />
ĄREC1 Ą transfer<br />
To transfer a single track/file<br />
Select and start playback of the track/file you<br />
want to transfer.<br />
4 Press REC .<br />
“REC” flashes on the display and the unit starts<br />
calculating the amount of free space on the USB<br />
device.<br />
If “LOW ***M” appears on the display, there is not<br />
sufficient space on the device. To cancel the<br />
transferring, press . To continue transferring<br />
anyway, proceed to step 5.<br />
5 Press ENTER .<br />
Transferring starts.<br />
When transferring is completed, playback stops<br />
automatically (CD SYNC transfer) or proceeds to<br />
the next track/file (REC1 transfer).<br />
To stop transferring<br />
Press .<br />
When the transferring source is a CD-DA track, the<br />
audio file is generated up to the point the<br />
transferring was stopped. When the source is an<br />
MP3 or WMA file, the file that is currently being<br />
transferred is not generated.<br />
Folder and file generation rules<br />
When first transferring to a USB device, a “MUSIC”<br />
folder and its sub folder “SONY” are created directly<br />
below the “ROOT” folder.<br />
Folders and files are generated within the “CD”<br />
folder under the “SONY” folder based on the<br />
following rules.<br />
CD SYNC transfer<br />
Transferring<br />
Folder name File name<br />
source<br />
MP3/WMA Same as the transferring source* 1, 2<br />
CD-DA “ALBUM001”* 3 “TRACK001”* 4<br />
REC1 transfer<br />
Transferring<br />
source<br />
Folder name File name<br />
MP3/WMA<br />
“REC1”* 5<br />
Same as the<br />
transferring<br />
source* 2<br />
CD-DA “TRACK001”* 4<br />
* 1 In Program Play mode, the folder name is “FLDRxxx,” and<br />
the file name depends on the transferring source.<br />
* 2 Up to 32 characters (including a file extension for a file<br />
name) can be displayed.<br />
* 3 Folder names are assigned in sequential order up to a<br />
maximum of 256 (including the “ROOT” and “MUSIC”<br />
folders).<br />
* 4 File names are assigned in sequential order.<br />
* 5 A new file is transferred to the “REC1” folder each time<br />
single track transfer is <strong>per</strong>formed.<br />
To erase audio files or folders from the USB<br />
device<br />
1 Press or repeatedly to select an<br />
audio file, or press + or – repeatedly to<br />
select a folder.<br />
2 Press ERASE .<br />
“ERASE?” appears on the display.<br />
3 Press ENTER .<br />
“TRACK ERASE?” or “FOLDER ERASE?” appears on<br />
the display.<br />
4 Press ENTER .<br />
The selected audio file or folder is erased, and<br />
“COMPLETE” appears on the display.<br />
Notes<br />
If you start transferring in shuffle play or repeat play<br />
mode, the selected play mode is automatically changed<br />
to normal play.<br />
Do not remove the USB device during transferring or erase<br />
o<strong>per</strong>ations. Doing so may corrupt the data on the device<br />
or damage the device itself.<br />
While transferring, no sound is output and “HI-SPEED”<br />
appears on the display.<br />
CD-TEXT information is not transferred in the created MP3<br />
files.<br />
Transferring stops automatically if:<br />
the USB device runs out of space during transferring.<br />
the number of audio files and folders on the USB device<br />
reaches the limit that the unit can recognize.<br />
Non-MP3/WMA/AAC format files or sub folders in the<br />
folder are not erased.<br />
Radio sound and sound from an optional component<br />
cannot be transferred to a USB device.<br />
Note on copyright-protected content<br />
The transferred music is limited to private use only. Use of<br />
the music beyond this limit requires <strong>per</strong>mission from the<br />
copyright holders.<br />
Pairing this unit with a<br />
BLUETOOTH device<br />
BLUETOOTH devices must be “paired” with each<br />
other beforehand. Once BLUETOOTH devices are<br />
paired, there is no need for pairing again, unless the<br />
pairing information is cleared.<br />
Choose the pairing method below depending on<br />
your device.<br />
Pairing with an NFC-incompatible BLUETOOTH<br />
device:<br />
see Pattern A<br />
Pairing with an NFC-compatible smartphone:<br />
see Pattern B<br />
Pattern A<br />
Pairing with an NFC-incompatible<br />
BLUETOOTH device<br />
Keep the BLUETOOTH device and the unit within 1<br />
meter of each other for this o<strong>per</strong>ation.<br />
1 Press BLUETOOTH to turn on the<br />
BLUETOOTH function.<br />
If no devices have been paired, such as when you<br />
press BLUETOOTH for the first time after you<br />
purchase the unit, the unit automatically enters<br />
pairing mode, and the BLUETOOTH indicator ( )<br />
and “PAIRING” flash on the display.<br />
When pairing with two or more<br />
BLUETOOTH devices<br />
Hold down BLUETOOTH (–PAIRING) until two<br />
beeps are heard.<br />
2 Turn on the BLUETOOTH function of the<br />
BLUETOOTH device.<br />
3 Perform the pairing procedure on the<br />
BLUETOOTH device to detect the unit.<br />
4 Select “<strong>ZS</strong>-<strong>RS60BT</strong>” shown on the display of<br />
the BLUETOOTH device.<br />
If “<strong>ZS</strong>-<strong>RS60BT</strong>” does not appear on the device’s<br />
display, repeat from step 2.<br />
5 If Passcode* input is required on the display of<br />
the BLUETOOTH device, input “0000.”<br />
The BLUETOOTH connection is established.<br />
“BT AUDIO” appears on the display.<br />
* “Passcode” may be referred to as “Passkey,” “PIN code,”<br />
“PIN number,” or “Password.”<br />
Tip<br />
You can pair up to 8 BLUETOOTH devices. If the 9th<br />
BLUETOOTH device is paired, the oldest paired device will be<br />
deleted.<br />
Notes<br />
Pairing mode of the unit is cancelled after about<br />
5 minutes, and the BLUETOOTH indicator ( ) flashes. If<br />
pairing mode is cancelled while <strong>per</strong>forming this<br />
procedure, start over from step 1.<br />
The passcode of the unit is fixed as “0000.” The unit<br />
cannot be paired with a BLUETOOTH device whose<br />
Passcode is not “0000.”<br />
Pattern B<br />
Pairing with an NFC-compatible<br />
smartphone<br />
By just touching the unit with an NFC-compatible<br />
smartphone, the unit is turned on and switched to<br />
the BLUETOOTH function automatically and then<br />
paired and connected to the smartphone.<br />
Compatible smartphones<br />
Smartphones with the NFC function built-in<br />
(OS: Android 2.3.3 or later, excluding Android 3.x)<br />
What is “NFC”?<br />
NFC (Near Field Communication) is a<br />
technology enabling short-range wireless<br />
communication between various devices,<br />
such as mobile phones and IC tags. Thanks to<br />
the NFC function, data communication can be<br />
achieved easily just by touching the relevant<br />
symbol or designated location on NFC<br />
compatible devices.<br />
1 Turn on the NFC function of the smartphone.<br />
For details, refer to the o<strong>per</strong>ating instructions<br />
supplied with the smartphone.<br />
If your smartphone OS is Android 2.3.3 or<br />
later, but earlier than Android 4.1<br />
Proceed to step 2.<br />
If your smartphone OS is Android 4.1 or<br />
later<br />
Proceed to step 4.<br />
2 Download and install the app “NFC Easy<br />
Connect” on the smartphone.<br />
“NFC Easy Connect” is an original app by <strong>Sony</strong> for<br />
Android phones, and is available at the Google<br />
Play Store.<br />
Search for “NFC Easy Connect” or scan the<br />
following two-dimensional code to download<br />
and install the free app. Communication fees are<br />
required to download the app.<br />
The App may not be available in some countries<br />
and/or regions.<br />
Tip<br />
For some smartphones, One-touch connection may be<br />
available without downloading the app “NFC Easy<br />
Connect.” In that case, the o<strong>per</strong>ation and specifications<br />
may be different from the description here. For details,<br />
refer to the o<strong>per</strong>ating instructions supplied with the<br />
smartphone.<br />
For the two-dimensional code:<br />
Use a two-dimensional code reader app.<br />
3 Start the app “NFC Easy Connect” on the<br />
smartphone.<br />
Make sure that the application screen is<br />
displayed.<br />
Follow the on-screen instructions to establish the<br />
connection.<br />
When the BLUETOOTH connection is established,<br />
“BT AUDIO” appears on the display.<br />
Tips<br />
If it is difficult to establish the connection, try the<br />
following.<br />
Activate the app “NFC Easy Connect” and move the<br />
smartphone slightly across the N mark on the<br />
unit.<br />
If the smartphone is in a case, remove it.<br />
Touch the unit with the smartphone again to<br />
disconnect.<br />
If you have multiple NFC-compatible devices, just<br />
touch the smartphone to a different device to switch<br />
the connection to that device. For example, when your<br />
smartphone is connected with NFC-compatible<br />
headphones, just touch the smartphone to the unit to<br />
change the BLUETOOTH connection to the unit<br />
(One-touch connection switching).<br />
Listening to music<br />
Check the following before o<strong>per</strong>ating the unit.<br />
The BLUETOOTH function of the BLUETOOTH<br />
device is turned on.<br />
Pairing has been completed. (See “Pairing this unit<br />
with a BLUETOOTH device”.)<br />
1 Make the BLUETOOTH connection between<br />
the unit and the device.<br />
For an NFC-incompatible BLUETOOTH<br />
device<br />
Press BLUETOOTH to turn on the BLUETOOTH<br />
function.<br />
The last connected device will be connected<br />
automatically.<br />
For an NFC-compatible smartphone<br />
Touch the smartphone to the N-Mark on the<br />
unit.<br />
2 Start playback of an audio source such as<br />
music, videos, games, etc., on the device.<br />
Refer to the instruction manual of your device for<br />
details on playback o<strong>per</strong>ations.<br />
Tip<br />
To adjust the volume, set the volume of the BLUETOOTH<br />
device or the smartphone to the moderate level, and then<br />
press VOL or + on the unit.<br />
To terminate a BLUETOOTH connection<br />
Do any of following.<br />
Turn off the BLUETOOTH function of the<br />
BLUETOOTH device. For details, refer to the<br />
o<strong>per</strong>ating instructions supplied with the device.<br />
Turn off the BLUETOOTH device.<br />
Change the function of the unit.<br />
Turn off the unit.<br />
Touch the unit with the smartphone again to<br />
disconnect (NFC-compatible smartphones only).<br />
To clear the paired device information<br />
1 Hold down ERASE until “BT RESET” appears<br />
on the display.<br />
2 Press ENTER .<br />
When the paired device information is cleared,<br />
“COMPLETE” appears on the display. To cancel<br />
the reset o<strong>per</strong>ation, press .<br />
Note<br />
The unit of frequency of tuned stations is MHz for the FM<br />
band and kHz for the AM band.<br />
To change the FM/AM tuning interval<br />
(This function is only available on models for some<br />
countries/regions. See the radio section in<br />
“Specifications.”)<br />
The FM/AM tuning interval can be changed if<br />
necessary using the following procedure.<br />
1 Press FM/AM repeatedly to select a band.<br />
2 Hold down ENTER until “FM-xx” or “AM-xx”<br />
flashes on the display.<br />
3 Hold down FM/AM until the current tuning<br />
step appears.<br />
4 Press or to select the desired<br />
tuning step.<br />
“FM 50K” (for 50 kHz interval) or “FM 100K” (for<br />
100 kHz interval) in the FM band, and “AM 9K” (for<br />
9 kHz interval) or “AM 10K” (for 10 kHz interval) in<br />
the AM band can be selected.<br />
5 Press ENTER .<br />
Changing the tuning interval erases all the FM/AM<br />
preset stations stored in the unit. Reset your preset<br />
stations after changing the tuning interval.<br />
To improve radio reception<br />
Use the radio in a place where<br />
radio signals can be easily<br />
received, such as near a window.<br />
Also, adjust the antenna (FM) or<br />
reorient the unit itself (AM) for<br />
good reception.<br />
Adjust the antenna to<br />
improve FM reception. If the<br />
stereo FM reception is noisy,<br />
press FM MODE repeatedly<br />
until “MONO” appears on the<br />
display. You will lose the<br />
stereo effect, but the<br />
reception will be improved.<br />
Reorient the unit<br />
itself to improve AM<br />
reception. (A ferrite<br />
bar antenna is built<br />
in the unit.)<br />
If the reception problem still <strong>per</strong>sists, try changing<br />
the installation location.<br />
Avoid places such as the following:<br />
Between<br />
buildings<br />
Nearby<br />
mobile<br />
phones,<br />
electrical<br />
appliances<br />
On steel desks<br />
or tables<br />
Presetting stations to FAVORITE<br />
RADIO STATIONS<br />
You can preset up to three favorite stations to<br />
FAVORITE RADIO STATIONS (1-3) buttons. Assign one<br />
FM or AM program for each button.<br />
1 Press FM/AM repeatedly to turn on the<br />
radio function and select the band “FM” or<br />
“AM.”<br />
2 Tune to the station you want to preset.<br />
3 Press and hold the desired FAVORITE RADIO<br />
STATIONS (–SET) (1-3) button until you hear<br />
a beep.<br />
The tuned station is preset to the selected button<br />
of FAVORITE RADIO STATIONS (1-3) and the same<br />
number as that of the button will light up on the<br />
display.<br />
(Example: Presetting FM 87.50 MHz to number )<br />
To change the preset station<br />
Repeat steps 1 to 3.<br />
The preset station on the button will be replaced by<br />
the new one.<br />
Listening to preset stations with<br />
FAVORITE RADIO STATIONS<br />
Press the desired FAVORITE RADIO STATIONS (1-3)<br />
button .<br />
Note<br />
To prevent the preset from being changed by mistake, do<br />
not hold down the button. If doing so, the preset on the<br />
button will be replaced by the currently tuned station.
Using the display<br />
Checking the information of an audio CD<br />
Press twice to cancel Resume Play.<br />
The total number of tracks and total playing time<br />
appear on the display.<br />
Checking MP3/WMA/AAC file information<br />
Press DISPLAY repeatedly while playing an<br />
MP3/WMA file on the disc or an MP3/WMA/AAC<br />
file on the USB device.<br />
The display changes as follows:<br />
Song title ( )* 1, 2<br />
<br />
<br />
Artist name ( )* 1<br />
<br />
Album name ( )* 1<br />
<br />
Current file number and playing time* 3<br />
* 1 If the file does not have corresponding ID3, WMA or AAC<br />
tag information, the file name, “NO ARTIST,” and “NO<br />
ALBUM” scroll on the display instead of the song title,<br />
artist name, and album name.<br />
* 2 The function name is displayed for 2 seconds before the<br />
song title appears.<br />
* 3 The artist name or album name will change to this in a<br />
few seconds.<br />
Checking the connected BLUETOOTH<br />
device name<br />
Press DISPLAY while connecting the<br />
BLUETOOTH device.<br />
Checking the radio information<br />
Press DISPLAY repeatedly while listening to<br />
the radio.<br />
The display changes as follows:<br />
Preset number* 1, 2 Frequency<br />
* 1 A preset number is displayed only when you are listening<br />
to the preset radio station.<br />
* 2 The display automatically returns to the frequency display<br />
after 2 seconds have elapsed.<br />
Selecting play mode<br />
You can set the unit to play tracks or files repeatedly<br />
or in random order while a disc/USB device is<br />
stopped.<br />
Press PLAY MODE repeatedly.<br />
Each time you press the button, the indication<br />
changes as follows:<br />
Normal play (None)<br />
<br />
<br />
Single repeat ( 1)<br />
<br />
All repeat ( )<br />
<br />
Selected folder play ( )*<br />
<br />
Selected folder repeat play ( , )*<br />
<br />
Shuffle play ( )<br />
<br />
Program play (PGM)<br />
<br />
Program repeat play (<br />
, PGM)<br />
* These functions are available only when playing MP3/<br />
WMA files on an MP3/WMA disc or MP3/WMA/AAC files<br />
on a USB device.<br />
Playing tracks/files repeatedly (Repeat<br />
Play)<br />
You can set the unit to repeatedly play CD-DA tracks<br />
on an audio CD, MP3/WMA files on a CD-R/CD-RW<br />
disc, or MP3/WMA/AAC files on a USB device in<br />
normal and program play modes.<br />
1 Press CD or USB to turn on the CD or<br />
USB function.<br />
2 Proceed as follows.<br />
To repeat<br />
Do this<br />
A single track/<br />
file<br />
1 Press PLAY MODE <br />
repeatedly until “ 1” appears.<br />
2 Press or to select<br />
a track/file that you want to<br />
repeat.<br />
3 Press .<br />
All tracks/files<br />
1 Press PLAY MODE <br />
repeatedly until “<br />
” appears.<br />
2 Press .<br />
A selected folder<br />
on an MP3/WMA<br />
disc or USB<br />
device<br />
1 Press PLAY MODE <br />
repeatedly until “ ” and “ ”<br />
appear.<br />
2 Select a folder by pressing +<br />
or .<br />
3 Press .<br />
Programmed<br />
tracks/files<br />
1 Program tracks/files (see<br />
“Creating your own program<br />
(Program Play)”).<br />
2 Press PLAY MODE until<br />
“PGM” and “<br />
” appear on the<br />
display.<br />
3 Press .<br />
To cancel Repeat Play<br />
Press to stop playback, and then press PLAY<br />
MODE repeatedly until “ ” (or “ 1”) disappears<br />
from the display.<br />
Playing tracks/files in random order<br />
(Shuffle Play)<br />
You can set the unit to play CD-DA tracks on an<br />
audio CD, MP3/WMA files on a CD-R/CD-RW disc or<br />
MP3/WMA/AAC files on a USB device in random<br />
order.<br />
1 Press CD or USB to turn on the CD or<br />
USB function.<br />
2 Press PLAY MODE repeatedly until “ ”<br />
appears on the display.<br />
3 Press to start Shuffle Play.<br />
To cancel Shuffle Play<br />
Press to stop playback, and then press PLAY<br />
MODE repeatedly until “<br />
” disappears from the<br />
display.<br />
Tip<br />
During Shuffle Play, you cannot select the previous track/file<br />
by pressing .<br />
Creating your own program (Program<br />
Play)<br />
You can arrange the playing order of up to 25<br />
tracks/files on a disc/USB device.<br />
1 Press CD or USB to turn on the CD or<br />
USB function.<br />
2 Press PLAY MODE repeatedly until “PGM”<br />
appears on the display.<br />
3 Press or to select a track/file.<br />
When you want to specify a folder that contains<br />
MP3/WMA/AAC files, press<br />
+ or first to<br />
select a folder, and then press or to<br />
select a file.<br />
Other O<strong>per</strong>ations<br />
4 Press ENTER .<br />
The track/file is programmed.<br />
The program step number appears, followed by<br />
the total playing time.<br />
(Example: audio CD)<br />
Step number<br />
Last programmed track number<br />
Total playing time*<br />
* “--:--” appears when programming an MP3/WMA<br />
disc/USB device or when the total playing time is<br />
longer than 100 minutes.<br />
5 Repeat steps 3 and 4 to program additional<br />
tracks/files.<br />
6 Press to start Program Play.<br />
To play the same program again, press .<br />
Note that the created program is cleared in the<br />
following cases:<br />
When you open the CD compartment.<br />
When you connect another USB device.<br />
When you turn off the power of the unit in the<br />
CD function.<br />
Note<br />
If you try to program 26 tracks/files or more, “FULL” flashes<br />
on the display.<br />
To display programmed track/file<br />
information<br />
After creating your own program, you can check<br />
information about programmed tracks/files.<br />
Press DISPLAY repeatedly and the display<br />
changes as follows:<br />
Total number of steps Last programmed track/<br />
file number and the total playing time*<br />
* “--:--” appears for MP3/WMA discs and USB devices.<br />
To cancel Program Play<br />
Press to stop playback, and then press PLAY<br />
MODE repeatedly until “PGM” disappears from<br />
the display.<br />
To delete all tracks/files in the current<br />
program<br />
Stop playback, and then press . “NO STEP”<br />
appears and you can create a new program,<br />
following the procedure “Creating your own<br />
program (Program Play).”<br />
Presetting radio stations<br />
You can store radio stations in the unit’s memory.<br />
You can preset up to 30 radio stations, 20 for FM and<br />
10 for AM.<br />
1 Press FM/AM repeatedly to turn on the<br />
radio function and select the band “FM” or<br />
“AM.”<br />
2 Hold down FM/AM until “AUTO” flashes on<br />
the display.<br />
3 Press ENTER to store the station.<br />
The stations are stored in memory from lower<br />
frequencies to higher ones.<br />
If a station cannot be preset<br />
automatically<br />
You need to preset a station with a weak signal<br />
manually.<br />
1 Press FM/AM repeatedly to select a band.<br />
2 Tune to the desired station.<br />
3 Hold down ENTER until “FM-xx” or “AM-xx”<br />
flashes on the display.<br />
(Example: FM)<br />
4 Press PRESET + or until the preset<br />
number for the station you want flashes on<br />
the display.<br />
5 Press ENTER to store the station.<br />
If another station is already assigned to the<br />
selected preset number, that station is replaced<br />
by the new one.<br />
Tip<br />
The preset radio stations remain in the unit’s memory even<br />
in the following situations.<br />
The AC power cord is unplugged.<br />
The batteries are removed.<br />
Listening to preset radio stations<br />
1 Press FM/AM repeatedly to turn on the<br />
radio function and select the band “FM” or<br />
“AM.”<br />
2 Press PRESET + or to select a stored<br />
preset number for the desired radio station.<br />
Using the Sleep Timer<br />
You can set the unit to turn off automatically after a<br />
set time has elapsed.<br />
1 Press SLEEP .<br />
The default setting (“90”) appears and the<br />
“SLEEP” indicator lights up on the display.<br />
2 Press SLEEP repeatedly to select the<br />
desired setting.<br />
Each time you press the button, the duration (in<br />
minutes) changes on the display, and the<br />
selected setting is confirmed automatically after<br />
about 4 seconds.<br />
Tip<br />
You can check the time left until the unit turns off by<br />
pressing SLEEP again after setting the sleep timer.<br />
Connecting optional components<br />
You can enjoy the sound from an optional<br />
component, such as a portable digital music player,<br />
through the speakers of this unit.<br />
Be sure to turn off the power of each component<br />
before making any connections.<br />
For details, refer to the instruction manual of the<br />
component to be connected.<br />
1 Connect the AUDIO IN jack to the line<br />
output jack of the portable digital music<br />
player or other component using an audio<br />
connection cable (not supplied).<br />
2 Turn the connected component on.<br />
3 Press AUDIO IN and start playing sound on<br />
the connected component.<br />
The sound from the connected component is<br />
output from the speakers.<br />
To connect the unit to a TV or video recorder/<br />
player, use an extension cable (not supplied) with<br />
a stereo-mini jack on one end and two phono<br />
plugs on the other end.<br />
Additional Information<br />
Compatible devices<br />
Compatible USB devices<br />
Compatibility requirements for the USB devices are<br />
as follows. Before using a device with this unit,<br />
check that it meets the requirements.<br />
Compliance with USB 2.0 (Full Speed)<br />
Supports Mass Storage mode*<br />
* Mass Storage mode is a mode that allows a USB device<br />
to become accessible to a host device, enabling file<br />
transfers. Most USB devices support Mass Storage<br />
mode.<br />
Notes on the USB device<br />
When a USB device is connected, the unit reads all the<br />
files on the device. If there are many folders or files on the<br />
device, it may take a long time for the unit to finish<br />
reading them.<br />
Do not connect a USB device to the unit through a USB<br />
hub.<br />
With some connected USB devices, after an o<strong>per</strong>ation is<br />
<strong>per</strong>formed, there may be a delay before it is <strong>per</strong>formed by<br />
this unit.<br />
This unit may not support all the functions provided with<br />
a connected USB device.<br />
The playback order on this unit may differ from the<br />
playback order on a connected USB device.<br />
Compatible BLUETOOTH devices<br />
Compatibility requirements for the devices are as<br />
follows. Before using a device with this unit, check<br />
that it meets the requirements.<br />
Devices must conform to BLUETOOTH Standard<br />
version 2.1 + EDR.<br />
Devices must support A2DP (Advanced Audio<br />
Distribution Profile) and AVRCP (Audio/Video<br />
Remote Control Profile).<br />
NFC capability (required only when using the NFC<br />
pairing function of the unit).<br />
For the latest information on compatible<br />
BLUETOOTH devices, including NFC-compatible<br />
smartphones, check the websites below.<br />
For customers in Europe:<br />
http://www.sony.eu/support<br />
For customers in Latin America:<br />
http://esupport.sony.com/LA<br />
For customers in other countries/regions:<br />
http://www.sony-asia.com/support<br />
What is BLUETOOTH wireless<br />
technology?<br />
BLUETOOTH wireless technology is a short-range<br />
wireless technology that enables wireless data<br />
communication between digital devices, such as a<br />
computer and digital camera. BLUETOOTH wireless<br />
technology o<strong>per</strong>ates within a range of about 10 m.<br />
Connecting two devices as necessary is common,<br />
but some devices can be connected to multiple<br />
devices at the same time.<br />
You do not need to use a cable for connection, nor is<br />
it necessary for the devices to face one another,<br />
such is the case with infrared technology. For<br />
example, you can use such a device in a bag or<br />
pocket.<br />
BLUETOOTH standard is an international standard<br />
supported by thousands of companies all over the<br />
world, and employed by various companies<br />
worldwide.<br />
Maximum communication range<br />
Maximum communication range may shorten under<br />
the following conditions.<br />
There is an obstacle such as a <strong>per</strong>son, metal, or<br />
wall between the unit and BLUETOOTH device.<br />
A wireless LAN device is in use near the unit.<br />
A microwave oven is in use near the unit.<br />
A device that generates electromagnetic radiation<br />
is in use near the unit.<br />
The unit is placed on a shelf made of steel.<br />
Optimal <strong>per</strong>formance<br />
Limited <strong>per</strong>formance<br />
The unit<br />
Steel cabinet<br />
Interference from other devices<br />
Because BLUETOOTH devices and wireless LAN<br />
(IEEE802.11b/g/n) use the same frequency,<br />
microwave interference may occur and resulting in<br />
communication speed deterioration, noise, or invalid<br />
connection if the unit is used near a wireless LAN<br />
device. In such a case, <strong>per</strong>form the following.<br />
Use the unit at least 10 m away from the wireless<br />
LAN device.<br />
If the unit is used within 10 m of a wireless LAN<br />
device, turn off the wireless LAN device.<br />
Use the BLUETOOTH device as close to the unit as<br />
possible.<br />
Interference to other devices<br />
Microwaves emitting from a BLUETOOTH device may<br />
affect the o<strong>per</strong>ation of electronic medical devices.<br />
Turn off the unit and other BLUETOOTH devices in<br />
the following locations, as it may cause an accident.<br />
where inflammable gas is present, in a hospital,<br />
train, airplane, or a gas station<br />
near automatic doors or a fire alarm<br />
Notes<br />
To be able to use the BLUETOOTH function, the<br />
BLUETOOTH device to be connected requires the same<br />
profile as the unit’s.<br />
Note also that even if the same profile exists, devices may<br />
vary in function depending on their specifications.<br />
Due to the characteristic of BLUETOOTH wireless<br />
technology, the sound played on the unit is slightly<br />
delayed from the sound played on the BLUETOOTH device<br />
during listening to the music.<br />
This unit supports security capabilities that comply with<br />
the BLUETOOTH standard to provide a secure connection<br />
when the BLUETOOTH wireless technology is used, but<br />
security may not be enough depending on the setting. Be<br />
careful when communicating using BLUETOOTH wireless<br />
technology.<br />
We do not take any responsibility for the leakage of<br />
information during BLUETOOTH communication.<br />
A device featuring the BLUETOOTH function is required to<br />
conform to the BLUETOOTH standard specified by<br />
Bluetooth SIG, and be authenticated. Even if the<br />
connected device conforms to the above mentioned<br />
BLUETOOTH standard, some devices may not be<br />
connected or work correctly, depending on the features or<br />
specifications of the device.<br />
Noise or sound skips may occur depending on the<br />
BLUETOOTH device connected with the unit, the<br />
communication environment or the usage environment.<br />
The USB device is not recognized.<br />
Turn off the unit and reconnect the USB device,<br />
then turn on the unit.<br />
The USB device is not functioning pro<strong>per</strong>ly. Refer<br />
to the USB device o<strong>per</strong>ation manual for details on<br />
how to deal with this problem.<br />
Play does not start.<br />
Turn off the unit and reconnect the USB device.<br />
Play does not start from the first track.<br />
Set the play mode to Normal Play.<br />
MP3/WMA/AAC files cannot be played<br />
back.<br />
The audio files may have inappropriate file<br />
extensions. The file extensions supported by this<br />
unit are as follows:<br />
MP3: file extension “.mp3”<br />
WMA: file extension “.wma”<br />
AAC: file extension “.m4a,” “.3gp” and “.mp4”<br />
The audio files may have been created in formats<br />
other than MP3/WMA/AAC formats.<br />
The USB storage device uses a file system other<br />
than FAT16 or FAT32.*<br />
The files are encrypted or protected by passwords.<br />
* This unit supports FAT16 and FAT32, but some USB storage<br />
media may not support both file systems.<br />
For details, refer to the o<strong>per</strong>ation manual of the USB<br />
storage device in question or contact the manufacturer.<br />
BLUETOOTH device<br />
There is no sound.<br />
Make sure that this unit is not too far from the<br />
BLUETOOTH device (or smartphone), or that this<br />
unit is not receiving interference from a wireless<br />
LAN, another 2.4 GHz wireless device, or a<br />
microwave oven.<br />
Check that the BLUETOOTH connection was<br />
completed pro<strong>per</strong>ly between this unit and the<br />
BLUETOOTH device (or smartphone).<br />
Perform pairing again (See “Pairing this unit with a<br />
BLUETOOTH device”).<br />
Keep away from metal objects or surfaces.<br />
Make sure that the BLUETOOTH function is<br />
activated on the BLUETOOTH device (or<br />
smartphone).<br />
The sound skips or the correspondence<br />
distance is short.<br />
If a device that generates electromagnetic<br />
radiation, such as a wireless LAN, other<br />
BLUETOOTH device(s), or a microwave oven is<br />
nearby, move away if possible. Or use the device<br />
and the unit away from such sources.<br />
Remove any obstacle between this unit and the<br />
device or move the device and the unit away from<br />
the obstacle.<br />
Locate this unit and the device as close to each<br />
other as possible.<br />
Re-position this unit.<br />
Try using the BLUETOOTH device or smartphone in<br />
another position.<br />
A connection cannot be established.<br />
Depending on the device to be connected, it may<br />
require some time to start communication.<br />
Perform pairing again (See “Pairing this unit with a<br />
BLUETOOTH device”).<br />
Check that the BLUETOOTH device is compatible<br />
with this unit. For the latest information on<br />
compatible BLUETOOTH devices, check the<br />
information on the website. The URL is listed<br />
under “Compatible BLUETOOTH devices.”<br />
Pairing fails.<br />
Bring the BLUETOOTH device closer to the unit.<br />
Delete the model name of this unit from the<br />
BLUETOOTH device and <strong>per</strong>form pairing again<br />
(See “Pairing this unit with a BLUETOOTH device”).<br />
Check that the BLUETOOTH device is compatible<br />
with this unit. For the latest information on<br />
compatible BLUETOOTH devices, check the<br />
information on the website. The URL is listed<br />
under “Compatible BLUETOOTH devices.”<br />
Pairing using the NFC function fails.<br />
Try pairing manually (See “Pairing this unit with a<br />
BLUETOOTH device”). Some NFC-compatible<br />
smartphones may not be paired using the NFC<br />
function of this unit, depending on the features or<br />
specifications of the device.<br />
Relaunch “NFC Easy Connect” and move the<br />
smartphone slowly over the N mark .<br />
Check that the smartphone meets the<br />
compatibility requirements (See “Compatible<br />
smartphones”).<br />
Radio<br />
The sound is weak or reception is poor.<br />
Replace all the batteries with new ones.<br />
Move the unit away from nearby TVs.<br />
For FM reception, extend the antenna to its full<br />
length, and reorient it for best FM reception. For<br />
AM reception, reorient the unit itself to find the<br />
best reception.<br />
If you are in a building, listen near a window.<br />
If a mobile phone is placed close to the unit, a<br />
loud noise may be heard from the unit. Keep the<br />
phone away from the unit.<br />
The TV picture is unstable.<br />
If you are listening to an FM program near a TV<br />
with an indoor antenna, move the unit away from<br />
the TV.<br />
After trying the suggested remedies, if the problem<br />
<strong>per</strong>sists, unplug the AC power cord or remove all the<br />
batteries. After all the indications on the display<br />
disappear, plug in the AC power cord again, or<br />
re-insert the batteries. If the problem <strong>per</strong>sists,<br />
consult your nearest <strong>Sony</strong> dealer.<br />
Precautions<br />
Discs that this unit CAN play<br />
Audio CD (CD-DA* 1 tracks)<br />
CD-R/CD-RW that contains MP3/WMA files and<br />
is finalized* 2 correctly.<br />
*1 CD-DA is the abbreviation for Compact Disc Digital Audio.<br />
It is a recording standard used for audio CDs.<br />
*2 Finalizing is the process to make the CD-R/CD-RW discs<br />
playable on the consumer disc player products, and the<br />
finalizing can be enabled or disabled as optional settings<br />
during disc creation in most recording software.<br />
Discs that this unit CANNOT play<br />
CD-R/CD-RW other than those recorded in audio<br />
CD format or formats conforming to ISO 9660<br />
Level 1/Level 2 or Joliet<br />
CD-R/CD-RW of poor recording quality, CD-R/<br />
CD-RW with scratches or that is dirty, or CD-R/<br />
CD-RW recorded using an incompatible recording<br />
device<br />
CD-R/CD-RW that is unfinalized or finalized<br />
incorrectly<br />
Notes on discs<br />
Clean the CD with a cleaning cloth if<br />
the disc is dirty. Wipe the disc from<br />
the center out. If there are scratches,<br />
dirt or fingerprints on the disc, a<br />
tracking error may occur.<br />
Do not use solvents such as<br />
benzine, thinner, commercially<br />
available cleaners or anti-static<br />
spray intended for vinyl LPs.<br />
Do not expose the CD to direct sunlight or heat<br />
sources such as hot air ducts, or leave it in a car<br />
parked in direct sunlight as there can be a<br />
considerable rise in tem<strong>per</strong>ature inside the car.<br />
Do not stick pa<strong>per</strong> or a sticker on the CD, or<br />
scratch the surface of the CD.<br />
After playing, store the CD in its case.<br />
Note on DualDiscs<br />
A DualDisc is a two sided disc product which<br />
mates DVD recorded material on one side with<br />
digital audio material on the other side. However,<br />
since the audio material side does not conform to<br />
the Compact Disc (CD) standard, playback on this<br />
product is not guaranteed.<br />
Music discs encoded with copyright<br />
protection technologies<br />
This product is designed to playback discs that<br />
conform to the Compact Disc (CD) standard.<br />
Recently, various music discs encoded with<br />
copyright protection technologies are marketed<br />
by some record companies. Please be aware that<br />
among those discs, there are some that do not<br />
conform to the CD standard and may not be<br />
playable by this product.<br />
On safety<br />
As the laser beam used in the CD player section is<br />
harmful to eyes, do not attempt to disassemble<br />
the casing. Refer servicing to qualified <strong>per</strong>sonnel<br />
only.<br />
Should any solid object or liquid fall into the unit,<br />
unplug the unit, and have it checked by qualified<br />
<strong>per</strong>sonnel before o<strong>per</strong>ating it any further.<br />
Discs with non-standard shapes (e.g., heart,<br />
square, star) cannot be played on this unit.<br />
Attempting to do so may damage the unit. Do not<br />
use such discs.<br />
On power sources<br />
For AC o<strong>per</strong>ation, use the supplied AC power cord;<br />
do not use any other cord.<br />
Unplug the unit from the wall outlet if it is not to<br />
be used for an extended <strong>per</strong>iod of time.<br />
When not using the batteries, remove them to<br />
avoid damage that can be caused by battery<br />
leakage or corrosion.<br />
On placement<br />
Do not leave the unit in a location near heat<br />
sources, in a place subject to direct sunlight,<br />
excessive dust or mechanical shock, or in a car<br />
subject to the direct rays of the sun.<br />
Do not place the unit on an inclined or unstable<br />
surface.<br />
Do not place anything within 10 mm of the rear of<br />
the cabinet. The ventilation openings must be<br />
unobstructed for the unit to o<strong>per</strong>ate pro<strong>per</strong>ly and<br />
prolong the life of its components.<br />
Since a strong magnet is used for the speakers,<br />
keep <strong>per</strong>sonal credit cards using magnetic coding<br />
or spring-wound watches away from the unit to<br />
prevent possible damage from the magnet.<br />
On o<strong>per</strong>ation<br />
If the unit is brought directly from a cold to a<br />
warm location, or is placed in a very damp room,<br />
moisture may condense on the lens inside the CD<br />
player section. Should this occur, the unit will not<br />
o<strong>per</strong>ate pro<strong>per</strong>ly. In this case, remove the CD and<br />
wait about an hour for the moisture to evaporate.<br />
On handling the unit<br />
Do not leave the CD compartment open to avoid<br />
dust and debris contamination.<br />
On cleaning the cabinet<br />
Clean the cabinet, panel and controls using a soft<br />
cloth slightly moistened with a mild detergent<br />
solution. Do not use any type of abrasive pad,<br />
scouring powder, or solvent, such as alcohol or<br />
benzine.<br />
If you have any questions or problems concerning<br />
your unit, consult your nearest <strong>Sony</strong> dealer.<br />
Specifications<br />
CD player section<br />
System<br />
Compact disc digital audio system<br />
Laser diode pro<strong>per</strong>ties<br />
Emission duration: Continuous<br />
Laser output: Less than 44.6 μW<br />
(This output is the value measurement at a distance of<br />
200 mm from the objective lens surface on the optical<br />
pick-up block with 7 mm a<strong>per</strong>ture.)<br />
Number of channels<br />
2<br />
Frequency response<br />
20 Hz 20,000 Hz +1/–2 dB<br />
Wow and flutter<br />
Below measurable limit<br />
BLUETOOTH section<br />
Communication System<br />
BLUETOOTH Specification Version 2.1 + EDR<br />
Output<br />
BLUETOOTH Specification Power Class 2<br />
Maximum communication range<br />
Line of sight approx. 10 m* 1<br />
Frequency band<br />
2.4 GHz band (2.4000 GHz 2.4835 GHz)<br />
Modulation method<br />
FHSS<br />
Supported BLUETOOTH Profiles* 2<br />
A2DP (Advanced Audio Distribution Profile)<br />
AVRCP* 3 (Audio/Video Remote Control Profile)<br />
Supported codec* 4<br />
SBC (Subband Codec)<br />
* 1 The actual range will vary depending on factors such as<br />
obstacles between devices, magnetic fields around a<br />
microwave oven, static electricity, reception sensitivity,<br />
aerial <strong>per</strong>formance, o<strong>per</strong>ating system, application software,<br />
etc.<br />
* 2 BLUETOOTH standard profiles provide the specifications for<br />
BLUETOOTH communication between devices.<br />
* 3 Some o<strong>per</strong>ations may not be available depending on the<br />
device.<br />
* 4 Codec: Audio signal compression and conversion format.<br />
Radio section<br />
Frequency range<br />
Models for Europe, Thailand, Kuwait, UAE, Kenya,<br />
Mauritius, Nigeria, Tanzania, and Uganda<br />
FM: 87.5 MHz 108 MHz (50 kHz step)<br />
AM: 531 kHz 1,602 kHz (9 kHz step)<br />
Models for Bolivia, Chile, Paraguay, Peru, and Uruguay<br />
FM: 87.5 MHz 108 MHz (100 kHz step)<br />
87.5 MHz 108 MHz (50 kHz step)<br />
AM: 530 kHz 1,610 kHz (10 kHz step)<br />
531 kHz 1,602 kHz (9 kHz step)<br />
Models for Malaysia, Vietnam, India, Pakistan, Bahrain,<br />
Iran, Lebanon, Qatar, Yemen, Angola, Cameroon, Cote<br />
d’Ivoire, Egypt, Ethiopia, Ghana, Madagascar,<br />
Mozambique, Senegal, Sudan, Zambia, and Zimbabwe<br />
FM: 87.5 MHz 108 MHz (50 kHz step)<br />
87.5 MHz 108 MHz (100 kHz step)<br />
AM: 531 kHz 1,602 kHz (9 kHz step)<br />
530 kHz 1,610 kHz (10 kHz step)<br />
Other models<br />
FM: 87.5 MHz 108 MHz (100 kHz step)<br />
AM: 530 kHz 1,710 kHz (10 kHz step)<br />
Intermediate frequency<br />
FM: 128 kHz<br />
AM: 45 kHz<br />
Antennas<br />
FM: Telescopic antenna<br />
AM: Built-in ferrite bar antenna<br />
Input<br />
AUDIO IN<br />
Stereo mini jack<br />
(USB) port<br />
Type A, maximum current 500 mA, USB 2.0 Full Speed<br />
compatible<br />
Output<br />
(headphones) stereo mini jack<br />
For 16 32 impedance headphones<br />
Supported audio formats<br />
Supported bit rates<br />
MP3 (MPEG 1 Audio Layer-3):<br />
32 kbps 320 kbps, VBR<br />
WMA:<br />
48 kbps 192 kbps, VBR<br />
AAC*:<br />
8 kbps 320 kbps, VBR<br />
* USB function only<br />
Sampling frequencies<br />
MP3 (MPEG 1 Audio Layer-3):<br />
32/44.1/48 kHz<br />
WMA:<br />
32/44.1/48 kHz<br />
AAC*:<br />
32/44.1/48 kHz<br />
* USB function only<br />
General<br />
Speaker<br />
Full range, 8 cm dia., 6 , cone type (2)<br />
Power output<br />
2.0 W + 2.0 W (at 6 , 10% harmonic distortion)<br />
Power requirements<br />
Models for Europe, Bolivia, Chile, Paraguay, Peru, and<br />
Uruguay<br />
230 V AC, 50 Hz (AC power supply)<br />
9 V DC (6 R14 (size C) batteries)<br />
Models for Latin America (except for Bolivia, Chile,<br />
Paraguay, Peru, and Uruguay)<br />
120 V AC, 60 Hz (AC power supply)<br />
9 V DC (6 R14 (size C) batteries)<br />
Thai model<br />
220 V AC, 50 Hz (AC power supply)<br />
9 V DC (6 R14 (size C) batteries)<br />
Other models<br />
220 V 240 V AC, 50/60 Hz (AC power supply)<br />
9 V DC (6 R14 (size C) batteries)<br />
Power consumption<br />
15 W<br />
0.9 W (during standby mode)<br />
Battery Life* 1, * 2<br />
Playback of CD<br />
Approx. 9 hours<br />
Playback of USB device<br />
Approx. 11 hours (at 100 mA load)<br />
Approx. 3 hours (at 500 mA load)<br />
FM reception<br />
Approx. 26 hours<br />
BLUETOOTH<br />
Approx. 13 hours<br />
* 1 Measured by <strong>Sony</strong> standards. The actual battery life<br />
may vary depending on the circumstances of the unit<br />
or o<strong>per</strong>ating conditions.<br />
* 2 When using <strong>Sony</strong> alkaline batteries.<br />
Dimensions<br />
Approx. 320 mm × 133 mm × 215 mm (W/H/D) (incl.<br />
projecting parts)<br />
Mass<br />
Approx. 2.3 kg (incl. batteries)<br />
Supplied accessories<br />
AC power cord (1)<br />
Design and specifications are subject to change without<br />
notice.<br />
License and Trademark Notice<br />
MPEG Layer-3 audio coding technology and<br />
patents licensed from Fraunhofer IIS and<br />
Thomson.<br />
Windows Media is either a registered trademark<br />
or trademark of Microsoft Corporation in the<br />
United States and/or other countries.<br />
This product is protected by certain intellectual<br />
pro<strong>per</strong>ty rights of Microsoft Corporation. Use or<br />
distribution of such technology outside of this<br />
product is prohibited without a license from<br />
Microsoft or an authorized Microsoft subsidiary.<br />
The BLUETOOTH word mark and logos are owned<br />
by the Bluetooth SIG, Inc. and any use of such<br />
marks by <strong>Sony</strong> Corporation is under license.<br />
The N Mark is a trademark or registered trademark<br />
of NFC Forum, Inc. in the United States and in<br />
other countries.<br />
Android and Google Play are trademarks of<br />
Google Inc.<br />
Other trademarks and trade names are those of<br />
their respective owners. In this manual, and ®<br />
marks are not specified.<br />
Troubleshooting<br />
General<br />
The power does not turn on.<br />
Make sure the AC power cord is connected to the<br />
wall outlet securely.<br />
Make sure the connector of AC power cord is<br />
inserted into the AC IN jack securely.<br />
Check if the batteries are inserted correctly,<br />
matching the polarities.<br />
Replace all the batteries with new ones when the<br />
OPR/BATT indicator dims.<br />
There is no sound.<br />
Make sure the appropriate function is selected for<br />
the music or sound source you want to listen to.<br />
Unplug the headphones when listening through<br />
speakers.<br />
The sound is noisy.<br />
Is someone using a mobile phone or other<br />
equipment emitting radio waves near the unit? If<br />
so, move the unit and the BLUETOOTH device<br />
away from such devices. Devices such as mobile<br />
phones, etc., can affect BLUETOOTH<br />
communication.<br />
A small humming noise is heard from the<br />
radio.<br />
This is not a malfunction. You may hear a small<br />
humming noise from the radio depending on the<br />
status of the power supply.<br />
“NOT IN USED” appears.<br />
You pressed an invalid button.<br />
CD/MP3/WMA player<br />
The CD player does not play even when a<br />
CD is in place.<br />
Place the CD with the label side up.<br />
Clean the CD.<br />
Take out the CD and leave the CD compartment<br />
open for about an hour to dry moisture<br />
condensation.<br />
The CD-R/CD-RW is blank or unfinalized.<br />
There are no playable MP3/WMA files on the disc.<br />
There is a problem with the quality of the CD-R/<br />
CD-RW, recording device or application software.<br />
Replace all the batteries with new ones when the<br />
OPR/BATT indicator dims.<br />
“NO CD” appears when the disc is loaded.<br />
No disc is set in the CD compartment. Set a disc.<br />
The CD may have a reading problem. Replace the<br />
disc.<br />
The CD may be placed upside down. Place the<br />
disc with the label side up.<br />
An unplayable disc (DVD, BD, etc.) is loaded.<br />
Replace the disc.<br />
“NO TRACK” appears on the display when<br />
the disc is loaded.<br />
No audio files recorded in supported formats, or a<br />
file to be played back has an unsupported file<br />
extension.<br />
“DISC ERR” appears when the disc is loaded.<br />
The CD may be dirty. Clean the disc.<br />
The CD may have scratches. Replace the disc.<br />
The CD may have a reading problem. Replace the<br />
disc.<br />
A blank disc may be set in the CD compartment.<br />
The sound drops out.<br />
Reduce the volume.<br />
Clean the CD, or replace it if the CD is badly<br />
damaged.<br />
Place the unit in a location free from vibrations.<br />
Clean the lens with a commercially available<br />
blower.<br />
The sound may drop out or noise may be heard<br />
when using a poor quality CD-R/CD-RW or if there<br />
is a problem with the recording device or<br />
application software.<br />
Starting playback takes more time than<br />
usual.<br />
The following discs take a longer time to start<br />
playback.<br />
A disc recorded with a complicated tree<br />
structure.<br />
A disc that has many folders or non-MP3/WMA<br />
files.<br />
USB device<br />
The USB device does not work pro<strong>per</strong>ly.<br />
If you connect an incompatible USB device, the<br />
following problems may occur.<br />
The USB device is not recognized.<br />
File or folder names are not displayed on this<br />
unit.<br />
Playback is not possible.<br />
The sound skips.<br />
There is noise.<br />
The sound output is distorted.<br />
“OVER CURRENT” appears and the unit<br />
turns off automatically.<br />
An abnormal level has been detected in the<br />
electrical current from the (USB) port . In this<br />
case, remove the USB device from the (USB) port<br />
and reconnect the USB device, and then turn<br />
on the unit again. If this problem <strong>per</strong>sists after<br />
turning on the power of the unit, contact your<br />
nearest <strong>Sony</strong> dealer.<br />
There is no sound.<br />
The USB device may be connected incorrectly.<br />
Turn off the unit and reconnect the USB device.<br />
Then turn on the unit.<br />
There is noise, skipping, or distorted sound.<br />
Turn off the unit and reconnect the USB device.<br />
Then turn on the unit again.<br />
The music data itself contains noise, or the sound<br />
is distorted. Noise may have entered during the<br />
creation of audio files. Try re‐creating audio files<br />
and use them to play on this unit.<br />
The USB device cannot be connected to the<br />
(USB) port .<br />
The connector on the USB device or the USB cable<br />
is being inserted backwards. Insert it to the <br />
(USB) port in the correct direction.<br />
“READING” is displayed for an extended<br />
time, or it takes a long time before playback<br />
starts.<br />
The reading process can take a long time in the<br />
following cases:<br />
There are many folders or files on the USB<br />
device.<br />
The file structure is complex.<br />
The memory is almost full.<br />
The internal memory is fragmented.<br />
To avoid the above problems, we recommend that<br />
you adhere to the following guidelines:<br />
Keep the total number of folders on a USB<br />
device to 100 or less.<br />
Keep the total number of files <strong>per</strong> folder to 100<br />
or less.<br />
Erroneous display<br />
The data stored on the USB device may be<br />
corrupted. Send the music data to the USB device<br />
again.<br />
This unit can display only numbers and letters of<br />
the alphabet. Other characters will not be<br />
displayed correctly.<br />
“REC ERROR” appears.<br />
An error occurred during transferring. Turn off the<br />
unit and remove the USB device from the unit.<br />
Then check the following:<br />
Check the remaining storage space on the USB<br />
device. If there is insufficient space for the<br />
transferring, delete any unnecessary files or<br />
folders.<br />
Check that the data to be transferred is not<br />
corrupted.<br />
Check that the file format to be transferred is<br />
compatible with the unit.<br />
If the message still <strong>per</strong>sists, contact your nearest<br />
<strong>Sony</strong> dealer.


