

Sony RMT-VP1K - RMT-VP1K Istruzioni per l'uso Spagnolo
Sony RMT-VP1K - RMT-VP1K Istruzioni per l'uso Spagnolo
Sony RMT-VP1K - RMT-VP1K Istruzioni per l'uso Spagnolo

Create successful ePaper yourself
Turn your PDF publications into a flip-book with our unique Google optimized e-Paper software.
4-558-992-01(1)<br />
&<br />
IR <br />
Remote Commander &<br />
IR Receiver Kit<br />
Télécommande et<br />
kit de récepteur IR<br />
<br />
<br />
/O<strong>per</strong>ating Instructions/<br />
Mode d’emploi/Manual de instrucciones/<br />
<strong>RMT</strong>-<strong>VP1K</strong><br />
©2014 <strong>Sony</strong> Corporation<br />
Printed in China<br />
<br />
<br />
1<br />
4<br />
2 5<br />
10<br />
<br />
2<br />
3<br />
<br />
2<br />
<br />
1<br />
2<br />
<br />
A<br />
3<br />
11<br />
b<br />
6<br />
MULTI<br />
a<br />
7<br />
12<br />
8<br />
14<br />
9<br />
13<br />
MULTI<br />
<br />
<br />
<br />
<br />
<br />
<br />
<br />
<br />
<br />
<br />
<br />
ˎ <br />
ˎ <br />
ˎ <br />
<br />
<br />
<br />
<br />
<br />
<br />
<br />
<br />
<br />
<br />
<br />
<br />
<br />
<br />
<br />
<br />
<br />
<br />
<br />
<br />
<br />
<br />
<br />
<br />
<br />
<br />
<br />
<br />
<br />
<br />
<br />
44<br />
<br />
<br />
<br />
<br />
<br />
<br />
<br />
<br />
<br />
<br />
ˎ <br />
<br />
ˎ <br />
<br />
ˎ <br />
ˎ <br />
ˎ <br />
<br />
ˎˎ<br />
ˎ <br />
<br />
ˎ <br />
<br />
<br />
<br />
ˎ <br />
<br />
<br />
<br />
<br />
<br />
<br />
<br />
<br />
<br />
ˎ <br />
<br />
<br />
<br />
<br />
ˎ <br />
<br />
<br />
ˎ <br />
<br />
<br />
<br />
<br />
<br />
ˎ <br />
<br />
ˎ <br />
<br />
ˎ <br />
<br />
ˎ <br />
<br />
ˎ <br />
<br />
<br />
ˎ <br />
<br />
<br />
ˎ <br />
<br />
<br />
ˎ URL<br />
<br />
http://www.sony.co.jp/support<br />
<br />
ˎ <br />
ˎ 360<br />
ˎ <br />
ch1 ch3<br />
ˎ <br />
<br />
<br />
<br />
<br />
1 2 TC RESET3 <br />
4 5 REC (START/STOP)<br />
6 7 8 <br />
9 <br />
<br />
10 11 12 <br />
13 14 <br />
Ch1<br />
Ch2/Ch3<br />
<br />
1 <br />
<br />
Ch2/Ch3<br />
2 <br />
<br />
<br />
42<br />
<br />
1 <br />
2 <br />
<br />
<br />
<br />
1 <br />
<br />
ˎ <br />
<br />
<br />
-1-a<br />
ˎ <br />
90<br />
<br />
2 <br />
<br />
<br />
ˎ <br />
OFF<br />
ˎ (b)<br />
<br />
<br />
<br />
ˎ <br />
<br />
ˎ <br />
<br />
<br />
<br />
<br />
<br />
1 <br />
2 <br />
<br />
ˎ OFF<br />
<br />
ˎ <br />
<br />
<br />
<br />
RECSTART/STOP<br />
RECSTART/STOP<br />
<br />
<br />
<br />
LED<br />
LEDCh1TC<br />
RESET5OFFTC RESET<br />
TC RESET<br />
<br />
ˎ <br />
<br />
A<br />
<br />
<br />
<br />
<br />
ˎ <br />
<br />
ˎ <br />
<br />
ˎ <br />
<br />
ˎ <br />
<br />
ˎ <br />
<br />
<br />
T<br />
W<br />
<br />
<br />
<br />
ˎ <br />
ˎ <br />
<br />
<br />
<br />
ˎ <br />
<br />
TC RESET<br />
ˎ <br />
ˎ <br />
<br />
<br />
<br />
Ch2:<br />
Ch3:<br />
<br />
ˎ <br />
<br />
360 360<br />
3015<br />
4522.5<br />
4020<br />
32 mm 122 mm 18.6 mm<br />
<br />
37.1 mm 27 mm<br />
350 mm<br />
<br />
<br />
30 g<br />
25 g<br />
<br />
<strong>RMT</strong>-VP11IR<br />
<strong>RMT</strong>-RC11<br />
1<br />
6 mm 12 mm40 mm<br />
<br />
<br />
<br />
<br />
ˎ <br />
<br />
ˎ <br />
<br />
ˎ 1<br />
<br />
<br />
<br />
<br />
<br />
<br />
<br />
<br />
<br />
<br />
<br />
<br />
7<br />
<br />
<br />
<br />
ˎ <strong>RMT</strong>-<strong>VP1K</strong><br />
ˎ <br />
ˎ <br />
Before o<strong>per</strong>ating the product, please read this manual thoroughly<br />
and retain it for future reference.<br />
WARNING<br />
To reduce the risk of fire or electric shock,<br />
1) do not expose the unit to rain or moisture.<br />
2) do not place objects filled with liquids, such as vases, on the<br />
apparatus.<br />
Do not expose the batteries to excessive heat such as sunshine, fire<br />
or the like.<br />
CAUTION<br />
Replace the battery with the specified type only.<br />
Otherwise, fire or injury may result.<br />
Dispose of used batteries according to the instructions.<br />
For Customers in the U.S.A.<br />
CAUTION<br />
You are cautioned that any changes or modifications not expressly<br />
approved in this manual could void your authority to o<strong>per</strong>ate this<br />
equipment.<br />
Note:<br />
This equipment has been tested and found to comply with the<br />
limits for a Class B digital device, pursuant to Part 15 of the FCC<br />
Rules.<br />
These limits are designed to provide reasonable protection against<br />
harmful interference in a residential installation. This equipment<br />
generates, uses, and can radiate radio frequency energy and, if<br />
not installed and used in accordance with the instructions, may<br />
cause harmful interference to radio communications. However,<br />
there is no guarantee that interference will not occur in a particular<br />
installation. If this equipment does cause harmful interference to<br />
radio or television reception, which can be determined by turning<br />
the equipment off and on, the user is encouraged to try to correct<br />
the interference by one or more of the following measures:<br />
––<br />
Reorient or relocate the receiving antenna.<br />
––<br />
Increase the separation between the equipment and receiver.<br />
––<br />
Connect the equipment into an outlet on a circuit different from<br />
that to which the receiver is connected.<br />
––<br />
Consult the dealer or an ex<strong>per</strong>ienced radio/TV technician for help.<br />
This device complies with Part 15 of the FCC Rules. O<strong>per</strong>ation<br />
is subject to the following two conditions: (1) This device may<br />
not cause harmful interference, and (2) this device must accept<br />
any interference received, including interference that may cause<br />
undesired o<strong>per</strong>ation.<br />
For the Customers in Europe<br />
Disposal of Old Electrical & Electronic Equipment<br />
(Applicable in the European Union and other<br />
European countries with separate collection<br />
systems)<br />
This symbol on the product or on its packaging<br />
indicates that this product shall not be treated as<br />
household waste. Instead it shall be handed over to<br />
the applicable collection point for the recycling of electrical and<br />
electronic equipment. By ensuring this product is disposed of<br />
correctly, you will help prevent potential negative consequences<br />
for the environment and human health, which could otherwise<br />
be caused by inappropriate waste handling of this product. The<br />
recycling of materials will help to conserve natural resources. For<br />
more detailed information about recycling of this product, please<br />
contact your local Civic Office, your household waste disposal<br />
service or the shop where you purchased the product.<br />
Notice for the customers in the countries applying EU Directives<br />
Manufacturer: <strong>Sony</strong> Corporation, 1-7-1 Konan Minato-ku Tokyo, 108-<br />
0075 Japan<br />
For EU product compliance: <strong>Sony</strong> Deutschland GmbH, Hedelfinger<br />
Strasse 61, 70327 Stuttgart, Germany<br />
Notes on use<br />
Batteries<br />
••<br />
Depending on how long ago the batteries were manufactured,<br />
they may have a shorter life even if they were provided as new<br />
batteries with this unit. We recommend having spare batteries.<br />
Battery capacity also decreases as the tem<strong>per</strong>ature drops, so allow<br />
the batteries to return to normal room tem<strong>per</strong>ature to restore<br />
them to their normal charge.<br />
Replacing the batteries<br />
••<br />
If the o<strong>per</strong>able distance from the remote commander to the<br />
camera becomes shorter, replace both batteries with new ones.<br />
O<strong>per</strong>ating tem<strong>per</strong>ature<br />
••<br />
Rapid changes in tem<strong>per</strong>ature cause condensation to form inside<br />
this unit. Before bringing this unit directly from a cold outdoor<br />
environment into a warm indoor environment, seal it in a plastic<br />
bag while you are outdoors and try to remove as much air as you<br />
can from inside the bag. Indoors, remove the unit from the bag<br />
when it has fully reached the surrounding tem<strong>per</strong>ature.<br />
Other cautions<br />
••<br />
Be sure not to drop this unit or spill liquid on it.<br />
••<br />
This unit is not waterproof. If it comes into contact with water,<br />
wipe it dry with a clean cloth and take it to your nearest dealer of<br />
<strong>Sony</strong> immediately.<br />
••<br />
Never attempt to disassemble this unit. For repairs, always take it<br />
to a dealer of <strong>Sony</strong>.<br />
••<br />
Never leave this unit where it may be subjected to very high<br />
tem<strong>per</strong>atures, such as in direct sunlight inside a car, or to high<br />
humidity.<br />
••<br />
Do not touch this unit with wet hands. This may cause electric<br />
shock.<br />
Cleaning<br />
••<br />
When dirty, clean this unit with a clean, dry cloth. Never use a<br />
cleaning fluid that includes an organic solvent such as thinners,<br />
benzine, etc.<br />
••<br />
After using this unit at a beach or where there is a sea breeze,<br />
wipe it clean with a dry cloth.<br />
Compatibility<br />
••<br />
See the following URL for information about the compatibility of<br />
this unit with Interchangeable Lens Digital Cameras.<br />
http://www.sony.net<br />
Features<br />
••<br />
This unit can o<strong>per</strong>ate basic recording functions (still image/video<br />
recording and zooming).<br />
••<br />
The receiver can receive a signal from any direction in a<br />
360-degree radius.<br />
••<br />
You can change the initiating and receiving infrared signal<br />
with the channel selector switches on the receiver and remote<br />
commander. (ch1 to ch3)<br />
••<br />
The <strong>RMT</strong>-<strong>VP1K</strong> is a Remote Commander Kit (referred below as “this<br />
unit”) for o<strong>per</strong>ating devices that have a <strong>Sony</strong> Multi Terminal. This<br />
unit may not be compatible with all devices equipped with a <strong>Sony</strong><br />
Multi Terminal. Please see the website of <strong>Sony</strong> for compatible<br />
models.<br />
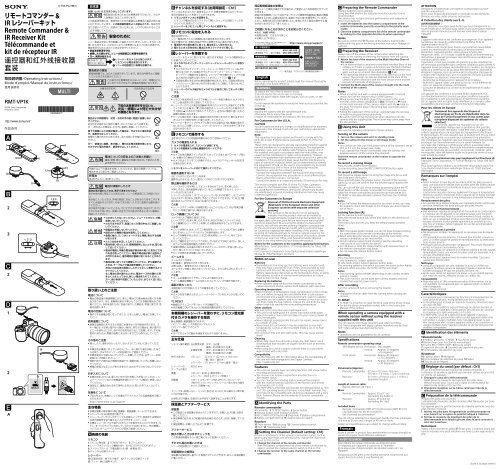
Identifying the Parts<br />
Remote commander<br />
1 Transmitter 2 TC RESET button 3 Zoom button<br />
4 Release button (with locking function)<br />
5 REC (START/STOP) button 6 Strap hole 7 Battery compartment<br />
8 Battery compartment lid 9 Channel selector switch<br />
Receiver<br />
10 Front sensor 11 Multi plug 12 Channel selector switch<br />
13 Foot 14 Tripod screw hole<br />
Setting the Channel (Default setting: Ch1)<br />
If there is interference of the remote commander signals, such as<br />
when using more than one of these units, change the channel of<br />
this unit to Ch2 or Ch3.<br />
1 Change the channel of the remote commander.<br />
Slide the battery compartment lid of the remote commander to<br />
open it, and set the channel selector switch to Ch2 or Ch3.<br />
2 Change the receiver to the same channel as the remote<br />
commander.<br />
Preparing the Remote Commander<br />
Prepare batteries (not supplied).<br />
Using two AAA alkaline dry batteries manufactured by <strong>Sony</strong> is<br />
recommended.<br />
This device may not give the best <strong>per</strong>formance with batteries of<br />
other manufacturers.<br />
1 Insert the batteries into the battery compartment of the<br />
remote commander correctly according to the polarity mark<br />
inside.<br />
2 Close the battery compartment lid of the remote commander<br />
by sliding it in the opposite direction to when opening it.<br />
Notes<br />
Be sure to confirm the poles of the battery. Inserting the<br />
battery with the pole in the wrong direction may cause leakage or<br />
ruptures.<br />
Preparing the Receiver<br />
Always turn off the power of the camera when attaching the<br />
receiver to the camera or removing the receiver from the camera.<br />
1 Attach the foot of the receiver to the Multi Interface Shoe of<br />
the camera.<br />
••<br />
If an external flash is attached to the Multi Interface Shoe of the<br />
camera, or if there is a pop-up function near the Multi Interface<br />
shoe, use the supplied clip to attach the receiver wherever you<br />
want, such as on a tripod. (See illustration -1-a)<br />
••<br />
The o<strong>per</strong>ating distance is extended in the direction on the front<br />
sensor. The receiver can also be attached to the shoe of the<br />
camera in other directions with the front sensor of the receiver<br />
turned in increments of 90 degrees.<br />
2 Connect the Multi plug of the receiver straight into the multi<br />
terminal of the camera.<br />
Notes<br />
••<br />
When using this unit with a camera equipped with a remote<br />
sensor, turn off the remote sensor of the camera.<br />
••<br />
When connecting the Multi plug of the receiver to the multi<br />
terminal of the camera (shaped as in (b)), if there is a mark<br />
on the multi terminal of the camera, align it with the mark on<br />
the plug. Forcing the plug in the wrong way round will cause a<br />
malfunction.<br />
••<br />
Pulling the cable part of the receiver could damage the receiver,<br />
so hold the plug part when detaching.<br />
••<br />
Be careful not to knock the receiver when attaching it to the<br />
camera with the supplied clip. The receiver may come away from<br />
the clip and fall.<br />
Using this Unit<br />
Also see the o<strong>per</strong>ating instructions of your camera.<br />
Turning on the camera<br />
1 Turn on the camera and set it to standby mode.<br />
2 Set the camera to the movie or still image mode.<br />
Notes<br />
••<br />
You cannot use this unit if the power switch of the camera is set to<br />
OFF, or if it is in the power save mode.<br />
••<br />
If you o<strong>per</strong>ate the remote commander near the camera, the<br />
eyepiece sensors of the camera may respond.<br />
Point the remote commander at the receiver to o<strong>per</strong>ate the<br />
camera.<br />
To record a moving image<br />
Press the REC (START/STOP) button.<br />
To stop recording, press the REC (START/STOP) button again.<br />
To record a still image<br />
Half-press the release button to bring the image into focus, and<br />
then fully press the button.<br />
When you half-press the release button, the LED of the receiver<br />
lights up, so you can confirm that the infrared signal reaches the<br />
receiver.<br />
You can turn off the LED of the receiver by pressing down the TC<br />
RESET button of the remote commander for 5 seconds or more<br />
when the remote commander and receiver are both set to Ch1.<br />
(TC RESET is also executed with cameras that have the TC RESET<br />
function.)<br />
Notes<br />
••<br />
If you half-press the release button for too short a time, you may<br />
be unable to shoot still images or the images you shoot may be<br />
out of focus.<br />
Locking function (A)<br />
Set the camera to bulb shooting.<br />
Press the release button fully down and slide it in the direction of<br />
the arrow.<br />
The locking function lets you keep the release button pressed<br />
down.<br />
Notes<br />
••<br />
With the release button locked, you do not have to keep pointing<br />
the transmitter of the remote commander at the receiver.<br />
••<br />
When unlocking the release button, point the transmitter of the<br />
remote commander at the receiver first.<br />
••<br />
Not all cameras support bulb shooting. See the o<strong>per</strong>ating<br />
instructions of your camera for details.<br />
••<br />
Do not press or slide the release button with excessive force, or<br />
the remote commander may break.<br />
••<br />
Do not leave the release button locked.<br />
Zooming<br />
Press the zoom button.<br />
T side (telephoto): Subject appears closer.<br />
W side (wide angle): Subject appears farther away.<br />
The zooming speed is slow when you press the zoom button lightly,<br />
and quick when you press the button all the way down.<br />
Notes<br />
••<br />
The zooming speed changes depending on the camera models<br />
and lens models.<br />
••<br />
The zoom function can be used with camera models and lens<br />
models that support power zoom.<br />
After recording<br />
Turn the camera off before removing the receiver.<br />
Notes<br />
••<br />
Unplug the receiver cable from the camera when carrying the<br />
camera.<br />
TC RESET<br />
••<br />
TC RESET is a function to reset the time code of the movie image.<br />
••<br />
For details about compatible models, refer to the Instruction<br />
Manual of the camera.<br />
When o<strong>per</strong>ating a camera equipped with a<br />
remote sensor without using the receiver<br />
supplied with this unit<br />
You can o<strong>per</strong>ate still image recording and video recording.<br />
Ch2: Interchangeable lens digital camera manufactured by <strong>Sony</strong><br />
Ch3: Video camera manufactured by <strong>Sony</strong><br />
Notes<br />
••<br />
O<strong>per</strong>ations are not guaranteed for all cameras.<br />
Specifications<br />
Remote commander o<strong>per</strong>ating range<br />
360-degree sensor Horizontal: 360 degrees<br />
Vertical: Approx. 30 degrees<br />
(± 15 degrees)<br />
Front sensor Horizontal: Approx. 45 degrees<br />
(± 22.5 degrees)<br />
Vertical: Approx. 40 degrees<br />
(± 20 degrees)<br />
Dimensions (Approx.)<br />
Remote Commander: 32 mm × 122 mm × 18.6 mm<br />
(1 5/16 in. × 4 7/8 in. × 3/4 in.) (w/h/d)<br />
Receiver :<br />
37.1 mm × 27 mm (1 1/2 in. × 1 1/8 in.)<br />
(diameter/height)<br />
Length of receiver cable<br />
Approx. 350 mm (13 7/8 in.)<br />
Mass<br />
Remote Commander: Approx. 30 g (1.1 oz)<br />
(excluding the battery)<br />
Receiver:<br />
Approx. 25 g (0.9 oz)<br />
(excluding the clip)<br />
Included items<br />
Remote commander (<strong>RMT</strong>-VP1) (1), IR receiver (<strong>RMT</strong>-RC1) (1),<br />
Clip (with base for the IR receiver) (1),<br />
Set of printed documentation<br />
The clip can be attached to a tripod pan handle that has a diameter<br />
of 6 mm to 12 mm and a length of 40 mm or more.<br />
Design and specifications are subject to change without notice.<br />
Avant d’utiliser ce produit, lisez attentivement ce mode d’emploi et<br />
conservez-le pour toute référence ultérieure.<br />
AVERTISSEMENT<br />
Pour réduire les risques d’incendie ou d’électrocution,<br />
1) n’exposez pas l’appareil à la pluie ou à l’humidité ;<br />
2) ne placez pas d’objets remplis de liquides (vases, etc.) sur<br />
l’appareil.<br />
N’exposez pas les piles à une chaleur excessive, notamment aux<br />
rayons directs du soleil, à une flamme, etc.<br />
ATTENTION<br />
Remplacez la batterie par une batterie correspondant au type<br />
spécifié uniquement.<br />
Sinon vous risquez de provoquer un incendie ou des blessures.<br />
Éliminez vos piles usées selon les instructions.<br />
À l’intention des clients aux É.-U.<br />
AVERTISSEMENT :<br />
Par la présente, vous êtes avisé du fait que tout changement ou<br />
toute modification ne faisant pas l’objet d’une autorisation expresse<br />
dans le présent manuel pourrait annuler votre droit d’utiliser<br />
l’appareil.<br />
Note :<br />
L’appareil a été testé et est conforme aux exigences d’un appareil<br />
numérique de Classe B, conformément à la Partie 15 de la<br />
réglementation de la FCC.<br />
Ces critères sont conçus pour fournir une protection raisonnable<br />
contre les interférences nuisibles dans un environnement<br />
résidentiel. L’appareil génère, utilise et peut émettre des<br />
fréquences radio; s’il n’est pas installé et utilisé conformément aux<br />
instructions, il pourrait provoquer des interférences nuisibles aux<br />
communications radio.<br />
Cependant, il n’est pas possible de garantir que des interférences<br />
ne seront pas provoquées dans certaines conditions particulières. Si<br />
l’appareil devait provoquer des interférences nuisibles à la réception<br />
radio ou à la télévision, ce qui peut être démontré en allumant et<br />
éteignant l’appareil, il est recommandé à l’utilisateur d’essayer de<br />
corriger cette situation par l’une ou l’autre des mesures suivantes :<br />
––<br />
Réorienter ou déplacer l’antenne réceptrice.<br />
––<br />
Augmenter la distance entre l’appareil et le récepteur.<br />
––<br />
Brancher l’appareil dans une prise ou sur un circuit différent de<br />
celui sur lequel le récepteur est branché.<br />
––<br />
Consulter le détaillant ou un technicien expérimenté en radio/<br />
téléviseurs.<br />
Cet appareil est conforme à la section 15 des règlements FCC.<br />
Son fonctionnement est soumis aux deux conditions suivantes :<br />
(1) cet appareil ne doit pas provoquer d’interférences nuisibles,<br />
(2) cet appareil doit accepter toute interférence, y compris celles<br />
susceptibles de provoquer son fonctionnement indésirable.<br />
Pour les clients en Europe<br />
Traitement des appareils électriques et<br />
électroniques en fin de vie (Applicable dans les<br />
pays de l’Union Européenne et aux autres pays<br />
européens disposant de systèmes de collecte<br />
sélective)<br />
Ce symbole, apposé sur le produit ou sur son<br />
emballage, indique que ce produit ne doit pas être<br />
traité avec les déchets ménagers. Il doit être remis à un point de<br />
collecte approprié pour le recyclage des équipements électriques<br />
et électroniques. En vous assurant que ce produit sont mis au rebut<br />
de façon appropriée, vous participez activement à la prévention<br />
des conséquences négatives que leur mauvais traitement pourrait<br />
provoquer sur l’environnement et sur la santé humaine. Le<br />
recyclage des matériaux contribue par ailleurs à la préservation<br />
des ressources naturelles. Pour toute information complémentaire<br />
au sujet du recyclage de ce produit, vous pouvez contacter votre<br />
municipalité, votre déchetterie locale ou le point de vente où vous<br />
avez acheté le produit.<br />
Avis aux consommateurs des pays appliquant les Directives UE<br />
Fabricant: <strong>Sony</strong> Corporation, 1-7-1 Konan Minato-ku Tokyo, 108-0075<br />
Japon<br />
Pour toute question relative à la conformité des produits dans l’UE:<br />
<strong>Sony</strong> Deutschland GmbH, Hedelfinger Strasse 61, 70327 Stuttgart,<br />
Allemagne<br />
Remarques sur l’emploi<br />
Piles<br />
••<br />
Selon le temps écoulé depuis leur fabrication, les piles peuvent<br />
avoir une autonomie réduite, bien qu’elles aient été livrées neuves<br />
avec cet appareil. Il est conseillé de toujours avoir à disposition<br />
des piles de rechange.<br />
L’autonomie des piles diminue également lorsque la température<br />
descend. Les piles reviennent à leur capacité de recharge normale<br />
lorsqu’elles sont revenues à une température ambiante normale.<br />
Remplacement des piles<br />
••<br />
Si la portée de la télécommande vers l’appareil photo/caméscope<br />
diminue, remplacez les deux piles par des piles neuves.<br />
Température de fonctionnement<br />
••<br />
Des variations rapides de température forment de la condensation<br />
à l’intérieur de cet appareil. Si cet appareil passe sans transition<br />
d’un environnement froid à un environnement chaud, mettez-le<br />
dans un sac en plastique lorsque vous êtes encore à l’extérieur et<br />
essayez d’extraire la plus grande quantité d’air possible du sac.<br />
Une fois à l’intérieur, retirez l’appareil du sac dès la température<br />
ambiante atteinte.<br />
Autres précautions à prendre<br />
••<br />
Ne laissez pas tomber cet appareil et ne renversez pas de liquide<br />
dessus.<br />
••<br />
Cet appareil n’est pas étanche. S’il devait être mouillé, essuyez-le<br />
avec un chiffon propre et portez-le immédiatement au revendeur<br />
<strong>Sony</strong> le plus proche.<br />
••<br />
N’essayez jamais de démonter cet appareil. Pour toute réparation,<br />
portez-le toujours au revendeur <strong>Sony</strong>.<br />
••<br />
Ne laissez jamais cet appareil à un endroit exposé à de très hautes<br />
températures (dans une voiture en plein soleil par exemple), ni à<br />
un taux d’humidité élevé.<br />
••<br />
Ne touchez pas l’appareil avec les mains mouillées. Ceci peut<br />
causer une électrocution.<br />
Nettoyage<br />
••<br />
Lorsque cet appareil est sale, nettoyez-le avec un chiffon sec<br />
et propre. N’utilisez jamais de détergent liquide composé d’un<br />
solvant biologique tel que les diluants, benzine, etc.<br />
••<br />
Après avoir utilisé cet appareil à la plage ou à un endroit exposé<br />
aux embruns marins, nettoyez-le avec un chiffon sec.<br />
Compatibilité<br />
••<br />
Reportez-vous à l’URL suivante pour plus d’informations sur la<br />
compatibilité de cet appareil avec un appareil photo à objectif<br />
interchangeable.<br />
http://www.sony.net<br />
Caractéristiques<br />
••<br />
Cet appareil peut commander les fonctions d’enregistrement de<br />
base (prise de photos, enregistrement de films et zoom).<br />
••<br />
Le récepteur peut recevoir un signal de toutes les directions dans<br />
un rayon de 360°.<br />
••<br />
Vous pouvez modifier le signal infrarouge de déclenchement et<br />
de réception à l’aide des commutateurs de sélection de canal sur<br />
le récepteur et la télécommande. (ch1 à ch3)<br />
••<br />
Le <strong>RMT</strong>-<strong>VP1K</strong> est un kit à télécommande (appelé ci-dessous<br />
« cet appareil ») pouvant être utilisé sur des appareils dotés d’un<br />
connecteur à usages multiples <strong>Sony</strong>. Cet appareil peut ne pas<br />
être compatible avec certains appareils dotés d’un connecteur à<br />
usages multiples <strong>Sony</strong>. Veuillez consulter le site de <strong>Sony</strong> pour les<br />
modèles compatibles.<br />
Identification des éléments<br />
Télécommande<br />
1 Émetteur 2 Touche TC RESET 3 Touche de zoom<br />
4 Déclencheur (avec fonction de verrouillage)<br />
5 Touche REC (START/STOP) 6 Trou de sangle<br />
7 Logement des piles 8 Couvercle du logement des piles<br />
9 Commutateur de sélection de canal<br />
Récepteur<br />
10 Capteur avant 11 Multiprise<br />
12 Commutateur de sélection de canal 13 Sabot<br />
14 Trou de vis de trépied<br />
Réglage du canal (par défaut : Ch1)<br />
En cas d’interférences des signaux de la télécommande, à<br />
l’utilisation de plusieurs appareils par exemple, utilisez le canal Ch2<br />
ou Ch3 de cet appareil.<br />
1 Changez le canal de la télécommande.<br />
Faites glisser le couvercle du logement des piles de la<br />
télécommande pour l’ouvrir, puis réglez le commutateur de<br />
sélection de canal sur Ch2 ou Ch3.<br />
2 Changez le récepteur sur le même canal que celui de la<br />
télécommande.<br />
Préparation de la télécommande<br />
Préparez les piles (non fournies).<br />
L’utilisation de deux piles sèches alcalines AAA fabriquées par <strong>Sony</strong><br />
est conseillée.<br />
Cet appareil peut ne pas fonctionner de manière optimale avec des<br />
piles d’autres marques.<br />
1 Insérez les piles dans le logement de la télécommande en<br />
vous basant sur le repère de polarité indiqué à l’intérieur.<br />
2 Fermez le couvercle du logement des piles de la<br />
télécommande en le faisant glissant dans le sens contraire à<br />
celui de l’ouverture.<br />
Remarques<br />
Veillez à bien orienter les pôles des piles. L’insertion d’une pile<br />
dans le mauvais sens peut entraîner une fuite ou une rupture de la<br />
pile.<br />
(Suite à la page arrière)
1<br />
4<br />
2 5<br />
3<br />
6<br />
10<br />
11<br />
<br />
2<br />
3<br />
<br />
2<br />
<br />
1<br />
a<br />
2<br />
b<br />
<br />
A<br />
MULTI<br />
7<br />
12<br />
9<br />
8<br />
13<br />
14<br />
MULTI<br />
(Suite de la page précédente)<br />
Préparation du récepteur<br />
Mettez toujours l’appareil photo/caméscope hors tension avec<br />
d’installer ou de retirer le récepteur de l’appareil photo/caméscope.<br />
1 Fixez le sabot du récepteur à la griffe multi-interface de<br />
l’appareil photo/caméscope.<br />
••<br />
Si un flash externe est relié à la griffe multi-interface de<br />
l’appareil photo/caméscope, ou s’il y a une fonction rétractable<br />
à proximité de la griffe multi-interface, utilisez le clip fourni pour<br />
fixer le récepteur à l’endroit désiré, tel que sur un trépied.<br />
(Voir l’illustration -1-a)<br />
••<br />
La portée est plus grande si dirigé vers le capteur avant. Le<br />
récepteur peut également être fixé à la griffe de l’appareil<br />
photo/caméscope dans d’autres directions avec le capteur<br />
avant du récepteur orienté à 90°, 180°, 270° ou 360°.<br />
2 Raccordez la multiprise du récepteur tout droit dans<br />
le connecteur à usages multiples de l’appareil photo/<br />
caméscope.<br />
Remarques<br />
••<br />
Lorsque cet appareil est utilisé avec un appareil photo ou<br />
caméscope équipé d’un capteur infrarouge, éteignez le capteur<br />
infrarouge de l’appareil photo ou du caméscope.<br />
••<br />
Lorsque vous raccordez la multiprise du récepteur au connecteur à<br />
usages multiples de l’appareil photo/caméscope (forme indiquée<br />
dans (b)), si le connecteur à usages multiples de l’appareil photo/<br />
caméscope est doté d’un repère , alignez le repère sur la fiche.<br />
L’insertion de la fiche dans le mauvais sens en forçant peut causer<br />
une défectuosité.<br />
••<br />
Puisque le fait de tirer sur le câble du récepteur pourrait<br />
endommager le récepteur, tenez la fiche pour débrancher le<br />
câble.<br />
••<br />
Faites attention de ne pas cogner le récepteur quand vous le fixez<br />
à l’appareil photo/caméscope à l’aide du clip fourni. Le récepteur<br />
peut se détacher du clip et tomber.<br />
Utilisation de cet appareil<br />
Reportez-vous également au mode d’emploi de l’appareil photo/<br />
caméscope.<br />
Mise sous tension de l’appareil photo/caméscope<br />
1 Mettez l’appareil photo/caméscope sous tension puis en<br />
mode d’attente.<br />
2 Mettez l’appareil photo/caméscope en mode film ou photo.<br />
Attention<br />
••<br />
Vous ne pourrez pas utiliser cet appareil si l’interrupteur<br />
d’alimentation de l’appareil photo/caméscope est sur OFF ou s’il<br />
est en mode d’économie d’énergie.<br />
••<br />
Si vous utilisez la télécommande à proximité de l’appareil photo/<br />
caméscope, les capteurs oculaires de l’appareil photo/caméscope<br />
risquent de s’activer.<br />
Dirigez la télécommande vers le récepteur pour commander<br />
l’appareil photo/caméscope.<br />
Pour filmer<br />
Appuyez sur la touche REC (START/STOP).<br />
Pour arrêter l’enregistrement, appuyez une nouvelle fois sur la<br />
touche REC (START/STOP).<br />
Pour prendre une photo<br />
Appuyez à mi-course sur le déclencheur pour faire la mise au point,<br />
puis appuyez à fond dessus.<br />
Lorsque vous appuyez à mi-course sur le déclencheur, la LED<br />
du récepteur s’allume. Vous pouvez ainsi vérifier que le signal<br />
infrarouge arrive au récepteur.<br />
Vous pouvez éteindre la LED du récepteur en appuyant sur la<br />
touche TC RESET de la télécommande pendant au moins cinq<br />
secondes lorsque la télécommande et le récepteur sont réglés tous<br />
les deux sur Ch1. (TC RESET est également exécuté sur des appareils<br />
photo/caméscopes munis de la fonction TC RESET.)<br />
Remarques<br />
••<br />
Si vous appuyez à mi-course sur le déclencher pendant une durée<br />
trop courte, il sera peut-être impossible de prendre des photos ou<br />
les images prises seront floues.<br />
Fonction de verrouillage (A)<br />
Réglez l’appareil photo/caméscope sur la prise de vue en pose B.<br />
Appuyez à fond sur le déclencheur et faites-le glisser dans le sens<br />
de la flèche.<br />
La fonction de verrouillage <strong>per</strong>met de maintenir le déclencheur<br />
appuyé.<br />
Remarques<br />
••<br />
Il n’est pas nécessaire de diriger en <strong>per</strong>manence l’émetteur de<br />
la télécommande vers le récepteur lorsque le déclencheur est<br />
verrouillé.<br />
••<br />
Pour libérer le déclencheur, dirigez en premier lieu l’émetteur de<br />
la télécommande vers le récepteur.<br />
••<br />
Tous les appareils photo/caméscopes ne prennent pas en charge<br />
la prise de vue en pose B. Reportez-vous au mode d’emploi de<br />
votre appareil photo/caméscope pour plus d’informations.<br />
••<br />
N’exercez pas de force excessive lorsque vous appuyez ou faites<br />
glisser le déclencheur sinon la télécommande pourrait se briser.<br />
••<br />
Ne laissez pas le déclencheur verrouillé.<br />
Zoom<br />
Appuyez sur la touche de zoom.<br />
Côté T (téléobjectif) : le sujet apparaît plus près.<br />
Côté W (grand-angle) : le sujet apparaît plus loin.<br />
La vitesse du zoom est lente lorsque vous appuyez légèrement sur<br />
la touche de zoom et rapide lorsque vous appuyez à fond dessus.<br />
Attention<br />
••<br />
La vitesse du zoom dépend du modèle d’appareil photo/<br />
caméscope et d’objectif.<br />
••<br />
La fonction de zoom peut être utilisée avec des modèles<br />
d’appareil photo/caméscope et d’objectif qui prennent en charge<br />
un zoom électrique.<br />
Après l’enregistrement<br />
Éteignez l’appareil photo/caméscope avant de retirer le récepteur.<br />
Attention<br />
••<br />
Débranchez le câble du récepteur de l’appareil photo/caméscope<br />
avant de transporter l’appareil photo/caméscope.<br />
TC RESET<br />
••<br />
TC RESET est une fonction que réinitialise le code temporel de<br />
l’image vidéo.<br />
••<br />
Pour plus d’informations sur les modèles compatibles, reportezvous<br />
au mode d’emploi de l’appareil photo/caméscope.<br />
Lorsqu’un appareil photo/caméscope équipé<br />
d’un capteur infrarouge est utilisé sans utiliser<br />
le récepteur fourni avec cet appareil<br />
Vous pouvez commander la prise de photos ou l’enregistrement de<br />
films.<br />
Ch2 : appareil photo numérique à objectif interchangeable fabriqué<br />
par <strong>Sony</strong><br />
Ch3 : caméscope fabriqué par <strong>Sony</strong><br />
Remarques<br />
••<br />
Le fonctionnement n’est pas garanti sur tous les appareils photo/<br />
caméscopes.<br />
Spécifications<br />
Plage de fonctionnement de la télécommande<br />
Capteur de 360° Horizontal : 360 degrés<br />
Vertical : Environ 30 degrés (± 15 degrés)<br />
Capteur avant Horizontal : Environ 45 degrés (± 22,5 degrés)<br />
Vertical : Environ 40 degrés (± 20 degrés)<br />
Dimensions (environ)<br />
Télécommande : 32 mm × 122 mm × 18,6 mm<br />
(1 5/16 po. × 4 7/8 po. × 3/4 po.) (l/h/p)<br />
Récepteur : 37,1 mm × 27 mm<br />
(1 1/2 po. × 1 1/8 po.) (diamètre/hauteur)<br />
Longueur du câble du récepteur<br />
Environ 350 mm (13 7/8 po.)<br />
Poids<br />
Télécommande : Environ 30 g (1,1 oz) (sans pile)<br />
Récepteur : Environ 25 g (0,9 oz) (sans le clip)<br />
Articles inclus<br />
Télécommande (<strong>RMT</strong>-VP1) (1), Récepteur IR (<strong>RMT</strong>-RC1) (1), Clip<br />
(avec base pour le récepteur IR) (1), Jeu de documents imprimés<br />
Le clip peut être fixé à une poignée de pan de trépied de 6 mm à<br />
12 mm de diamètre et de 40 mm ou plus de longueur.<br />
La conception et les spécifications peuvent être modifiées sans<br />
préavis.<br />
Antes de poner en funcionamiento el producto, lea detalladamente<br />
todo este manual y guárdelo para poderlo consultar en el futuro.<br />
POR FAVOR LEA DETALLADAMENTE ESTE MANUAL DE<br />
INSTRUCCIONES ANTES DE CONECTAR Y OPERAR ESTE EQUIPO.<br />
RECUERDE QUE UN MAL USO DE SU APARATO PODRÍA ANULAR LA<br />
GARANTÍA.<br />
AVISO<br />
Para reducir el riesgo de incendios o descargas eléctricas,<br />
1) no exponga la unidad a la lluvia o la humedad.<br />
2) no coloque sobre el aparato objetos que contengan líquidos<br />
como, por ejemplo, jarrones.<br />
No exponga las pilas a fuentes de calor excesivo, como la luz solar<br />
directa, el fuego o similares.<br />
PRECAUCIÓN<br />
Sustituya la batería únicamente por otra del tipo especificado.<br />
De lo contrario, es posible que se produzcan incendios o lesiones.<br />
Tire las pilas/baterías usadas de acuerdo con las instrucciones.<br />
Para los clientes en Europa<br />
Tratamiento de los equipos eléctricos y electrónicos<br />
al final de su vida útil (aplicable en la Unión<br />
Europea y en países europeos con sistemas de<br />
tratamiento selectivo de residuos)<br />
Este símbolo en el equipo o en su embalaje indica<br />
que el presente producto no puede ser tratado<br />
como residuos doméstico normal. Debe entregarse<br />
en el correspondiente punto de recogida de equipos eléctricos<br />
y electrónicos. Al asegurarse de que este producto se desecha<br />
correctamente, usted ayuda a prevenir las consecuencias<br />
potencialmente negativas para el medio ambiente y la salud<br />
humana que podrían derivarse de la incorrecta manipulación<br />
en el momento de deshacerse de este producto. El reciclaje de<br />
materiales ayuda a conservar los recursos naturales. Para recibir<br />
información detallada sobre el reciclaje de este producto, póngase<br />
en contacto con el ayuntamiento, el punto de recogida más cercano<br />
o el establecimiento donde ha adquirido el producto.<br />
Aviso para los clientes de países en los que se aplican las<br />
directivas de la UE<br />
Fabricante: <strong>Sony</strong> Corporation, 1-7-1 Konan Minato-ku Tokyo, 108-<br />
0075 Japón<br />
Para la conformidad del producto en la UE: <strong>Sony</strong> Deutschland<br />
GmbH, Hedelfinger Strasse 61, 70327 Stuttgart, Alemania<br />
Notas sobre la utilización<br />
Pilas/baterías<br />
••<br />
Dependiendo del tiempo transcurrido desde la fabricación de las<br />
pilas/baterías, su duración puede ser más corta, incluso aunque<br />
se suministren como nuevas con esta unidad. Le recomendamos<br />
que tenga a mano pilas/baterías de repuesto.<br />
La capacidad de la pilas/baterías también se reduce a medida<br />
que desciende la tem<strong>per</strong>atura, por lo que deberá dejar que las<br />
pilas/baterías vuelvan a la tem<strong>per</strong>atura ambiental normal para<br />
que se restablezca su carga normal.<br />
Reemplazo de las pilas/baterías<br />
••<br />
Si el alcance de o<strong>per</strong>ación del controlador remoto a la cámara se<br />
acorta, reemplace ambas pilas/baterías por otras nuevas.<br />
Tem<strong>per</strong>atura de funcionamiento<br />
••<br />
Los cambios rápidos de la tem<strong>per</strong>atura causarán la condensación<br />
en el interior de esta unidad. Antes de trasladar esta unidad<br />
directamente de un entorno exterior frío a otro interior cálido,<br />
séllela en una bolsa de plástico cuando se encuentre en<br />
exteriores, y trate de eliminar al máximo el aire del interior de la<br />
bolsa. En interiores, extraiga la unidad de la bolsa cuando haya<br />
alcanzado plenamente la tem<strong>per</strong>atura del entorno.<br />
Otras precauciones<br />
••<br />
Tenga cuidado de no dejar caer esta unidad y de no verter líquido<br />
sobre ella.<br />
••<br />
Esta unidad no es resistente al agua. Si entra en contacto con el<br />
agua, séquela con un paño limpio y llévela inmediatamente a su<br />
proveedor <strong>Sony</strong> más cercano.<br />
••<br />
No intente nunca desarmar esta unidad. En caso de necesitar<br />
reparación, llévela siempre a un proveedor <strong>Sony</strong>.<br />
••<br />
No <strong>per</strong>mita nunca que esta unidad se vea sometida a<br />
tem<strong>per</strong>aturas muy altas, como a la luz solar directa en el interior<br />
de un automóvil, ni a gran humedad.<br />
••<br />
No toque esta unidad con las manos húmedas. Podría recibir una<br />
descarga eléctrica.<br />
Limpieza<br />
••<br />
Cuando se ensucie, limpie esta unidad con un paño limpio y seco.<br />
No utilice nunca ningún líquido de limpieza que incluya disolvente<br />
orgánico, como diluyente de pintura, bencina, etc.<br />
••<br />
Después de haber utilizado esta unidad en una playa o en lugares<br />
sometidos a brisa marina, frótela con un paño seco.<br />
Compatibilidad<br />
••<br />
Con respecto a la información sobre compatibilidad de esta<br />
unidad con cámaras digitales de lentes intercambiables, visite la<br />
URL siguiente.<br />
http://www.sony.net<br />
Características<br />
••<br />
Esta unidad puede gobernar las funciones básicas de grabación<br />
(grabación de imágenes fijas/vídeo y zoom).<br />
••<br />
El receptor puede recibir una señal de cualquier dirección en un<br />
radio de 360 grados.<br />
••<br />
Puede cambiar el iniciar y recibir la señal de infrarrojos con los<br />
selectores de canales del receptor y el controlador remoto. (ch1 a<br />
ch3)<br />
••<br />
El <strong>RMT</strong>-<strong>VP1K</strong> es un juego de controlador remoto (a partir de ahora<br />
“esta unidad”) para gobernar dispositivos que posean un terminal<br />
de uso múltiple <strong>Sony</strong>. Esta unidad puede no ser compatible con<br />
todos los dispositivos equipados con terminal de uso múltiple<br />
<strong>Sony</strong>. Con respecto a los modelos compatibles, visite el sitio Web<br />
de <strong>Sony</strong>.<br />
Identificación de partes<br />
Controlador remoto<br />
1 Transmisor 2 Botón TC RESET 3 Botón de zoom<br />
4 Botón de disparo (con función de bloqueo)<br />
5 Botón REC (START/STOP) 6 Orificio para correa<br />
7 Compartimiento de las pilas/baterías<br />
8 Tapa del compartimiento de las pilas/baterías<br />
9 Selector de canales<br />
Receptor<br />
10 Sensor frontal 11 Clavija múltiple 12 Selector de canales<br />
13 Pata 14 Orificio roscado para trípode<br />
Ajuste del canal<br />
(Ajuste predeterminado: Ch1)<br />
Si hay interferencias de señales del controlador remoto, como<br />
cuando se utilice más de una de estas unidades, cambie el canal de<br />
esta unidad a Ch2 o Ch3.<br />
1 Cambie el canal del controlador remoto.<br />
Deslice la tapa del compartimiento de las pilas/baterías del<br />
controlador remoto para abrirla, y ajuste el selector de canales a<br />
Ch2 o Ch3.<br />
2 Cambie el receptor al mismo canal que el del controlador<br />
remoto.<br />
Preparación del controlador remoto<br />
Prepare pilas/baterías (no suministradas).<br />
Se recomienda utilizar dos pilas alcalinas AAA fabricadas por <strong>Sony</strong>.<br />
Este dispositivo puede no ofrecer el máximo rendimiento con pilas<br />
o baterías de otros fabricantes.<br />
1 Inserte las pilas/baterías en el compartimiento de las mismas<br />
del controlador remoto de acuerdo con las marcas de<br />
polaridad de su interior.<br />
2 Cierre la tapa del compartimiento de las pilas/baterías del<br />
controlador remoto deslizándola en dirección opuesta a la de<br />
a<strong>per</strong>tura de la misma.<br />
Notas<br />
Cerciórese de confirmar los polos de las pilas/baterías.<br />
La inserción de las pilas/baterías con los polos erróneamente<br />
orientados podría causar la fuga del electrolito o rupturas.<br />
Preparación del receptor<br />
Antes de fijar el receptor a la cámara o de desmontar el receptor de<br />
la misma, desconecte siempre la alimentación de la cámara.<br />
1 Fije la pata del receptor a la zapata de interfaz múltiple de la<br />
cámara.<br />
••<br />
Si hay un flash externo fijado a la zapata de interfaz múltiple<br />
de la cámara, o si hay alguna función emergente cerca de la<br />
zapata de interfaz múltiple, utilice la pinza suministrada para<br />
fijar el receptor donde desee, como en un trípode. (Consulte la<br />
ilustración -1-a)<br />
••<br />
La distancia de funcionamiento se extiende en la dirección del<br />
sensor frontal. El receptor también puede fijarse a la zapata de<br />
la cámara en otras direcciones con el sensor frontal del receptor<br />
girado en incrementos de 90 grados.<br />
2 Conecte la clavija múltiple del receptor directamente en el<br />
terminal de uso múltiple de la cámara.<br />
Notas<br />
••<br />
Cuando utilice esta unidad con una cámara equipada con un<br />
sensor remoto, desconecte la alimentación del sensor remoto de<br />
la cámara.<br />
••<br />
Cuando conecte la clavija múltiple del receptor al terminal de uso<br />
múltiple de la cámara (de la forma mostrada en (b)), si hay una<br />
marca en el terminal de uso múltiple de la cámara, alinéelo con<br />
la marca de la clavija. La inserción de la clavija por la fuerza al<br />
revés causará un mal funcionamiento.<br />
••<br />
Tirar de de la parte del cable del receptor podría dañar el receptor,<br />
por lo tanto sujete la parte clavija cuando desconecte.<br />
••<br />
Tenga cuidado de no golpear el receptor cuando lo fije<br />
a la cámara con la pinza suministrada. El receptor podría<br />
desprenderse de la pinza y caer.<br />
Utilización de esta unidad<br />
Consulte también el manual de instrucciones de su cámara.<br />
Encendido de la cámara<br />
1 Encienda la cámara y póngala en el modo de es<strong>per</strong>a.<br />
2 Ponga la cámara en el modo de película o imagen fija.<br />
Precaución<br />
••<br />
No podrá utilizar esta unidad si el interruptor de alimentación de<br />
la cámara está en OFF, o si está en el modo de ahorro de energía.<br />
••<br />
Si acciona el controlador remoto cerca de la cámara, es posible<br />
que los sensores del ocular de la cámara no respondan.<br />
Apunte el controlador remoto hacia el receptor para gobernar la<br />
cámara.<br />
Para grabar imágenes en movimiento<br />
Pulse el botón REC (START/STOP).<br />
Para detener la grabación, pulse de nuevo el botón REC (START/<br />
STOP).<br />
Para grabar una imagen fija<br />
Pulse el botón de disparo hasta la mitad para enfocar la imagen, y<br />
después púlselo a fondo.<br />
Cuando pulse el botón de disparo hasta la mitad, el LED del<br />
receptor se iluminará, por lo que podrá confirmar que la señal<br />
infrarroja ha alcanzado el receptor.<br />
Puede apagar LED del receptor manteniendo pulsado el botón TC<br />
RESET del controlador remoto durante 5 segundos o más cuando<br />
tanto el controlador remoto como el receptor estén ajustados a Ch1.<br />
(TC RESET también se ejecutará con cámaras que posean la función<br />
TC RESET.)<br />
Notas<br />
••<br />
Si pulsa el botón de disparo hasta la mitad durante un tiempo<br />
demasiado corto, es posible que no sea capaz de tomar imágenes<br />
fijas o que las imágenes tomadas queden desenfocadas.<br />
Función de bloqueo (A)<br />
Ajuste la cámara a toma con obturación manual.<br />
Pulse el botón de disparo a fondo y deslícelo en el sentido de la<br />
flecha.<br />
La función de bloqueo le <strong>per</strong>mite mantener el botón de disparo<br />
presionado.<br />
Notas<br />
••<br />
Con el botón de disparo bloqueado, no tendrá que seguir<br />
apuntando el transmisor del controlador remoto hacia el receptor.<br />
••<br />
Cuando desbloquee el botón de disparo, apunte el transmisor del<br />
controlador remoto hacia el receptor.<br />
••<br />
No todas las cámaras admiten la toma con obturación manual.<br />
Con respecto a los detalles, consulte el manual de instrucciones<br />
de su cámara.<br />
••<br />
No pulse ni deslice el botón de disparo con demasiada fuerza<br />
porque podría rom<strong>per</strong> el controlador remoto.<br />
••<br />
No deje el botón de disparo bloqueado.<br />
Utilización del zoom<br />
Pulse el botón del zoom.<br />
Lado T (telefoto): el motivo aparecerá más cerca.<br />
Lado W (gran angular): el motivo aparecerá más alejado.<br />
La velocidad de zoom será lenta cuando pulse ligeramente el botón<br />
del zoom, y rápida cuando pulse el botón a fondo.<br />
Precaución<br />
••<br />
La velocidad de zoom cambia dependiendo del modelo de la<br />
cámara y del modelo de objetivo.<br />
••<br />
La función de zoom puede utilizarse con modelos de cámaras y<br />
objetivos que admiten zoom motorizado.<br />
Después de la grabación<br />
Antes de desconectar el receptor, desconecte la alimentación de la<br />
cámara.<br />
Precaución<br />
••<br />
Antes de transportar la cámara, desenchúfele el cable del<br />
receptor.<br />
TC RESET<br />
••<br />
TC RESET es una función para reponer el código de tiempo de la<br />
imagen de la película.<br />
••<br />
Para los detalles sobre los modelos compatibles, consulte el<br />
manual de instrucciones de la cámara.<br />
Cuando utilice una cámara equipada con<br />
sensor remoto sin utilizar el receptor<br />
suministrado con esta unidad<br />
Puede gobernar la grabación de imágenes fijas y grabación de<br />
vídeo<br />
Ch2: Cámara digital de objetivo intercambiable fabricada por <strong>Sony</strong><br />
Ch3: Videocámara fabricada por <strong>Sony</strong><br />
Notas<br />
••<br />
Las o<strong>per</strong>aciones no se garantizan en todas las cámaras.<br />
Especificaciones<br />
Alcance de o<strong>per</strong>ación del controlador remoto<br />
Sensor de Horizontal: 360 grados<br />
360 grados Vertical: Aprox. 30 grados (± 15 grados)<br />
Sensor frontal Horizontal: Aprox. 45 grados (± 22,5 grados)<br />
Vertical: Aprox. 40 grados (± 20 grados)<br />
Dimensiones (Aprox.)<br />
Controlador remoto: 32 mm × 122 mm × 18,6 mm (an/al/prf)<br />
Receptor:<br />
37,1 mm × 27 mm (diámetro/altura)<br />
Longitud del cable del receptor<br />
Aprox. 350 mm<br />
Peso<br />
Controlador remoto: Aprox. 30 g<br />
(excluyendo las pilas/baterías)<br />
Receptor:<br />
Aprox. 25 g (excluyendo la pinza)<br />
Elementos incluidos<br />
Controlador remoto (<strong>RMT</strong>-VP1) (1), Receptor de infrarrojos<br />
(<strong>RMT</strong>-RC1) (1), Pinza (con base para el receptor de infrarrojos) (1),<br />
Juego de documentación impresa<br />
La pinza podrá fijarse a un mango de panoramización que posea<br />
un diámetro de 6 mm a 12 mm y una longitud de 40 mm o más.<br />
El diseño y las especificaciones están sujetos a cambio sin previo<br />
aviso.<br />
<br />
<br />
<br />
<br />
<br />
<br />
<br />
<br />
<br />
<br />
<br />
<br />
<br />
<br />
<br />
• <br />
<br />
<br />
<br />
<br />
• <br />
<br />
<br />
• <br />
<br />
<br />
<br />
<br />
<br />
• <br />
• <br />
<br />
• <br />
<br />
• <br />
<br />
• <br />
<br />
• <br />
<br />
• <br />
<br />
<br />
• <br />
<br />
<br />
<br />
• <br />
<br />
• <br />
• <br />
<br />
• <br />
<br />
<br />
<br />
<br />
<br />
• <br />
<br />
• <br />
• <br />
<br />
• <br />
<br />
<br />
<br />
<br />
<br />
<br />
<br />
<br />
<br />
<br />
<br />
<br />
<br />
<br />
<br />
<br />
<br />
<br />
<br />
<br />
<br />
<br />
<br />
<br />
<br />
<br />
<br />
<br />
<br />
<br />
<br />
<br />
<br />
• <br />
<br />
<br />
<br />
• <br />
<br />
<br />
<br />
<br />
<br />
• <br />
<br />
• <br />
<br />
<br />
<br />
• <br />
<br />
• <br />
<br />
<br />
<br />
<br />
<br />
<br />
<br />
• <br />
<br />
• <br />
<br />
<br />
<br />
<br />
<br />
<br />
<br />
<br />
<br />
<br />
<br />
<br />
<br />
<br />
• <br />
<br />
<br />
<br />
<br />
<br />
<br />
• <br />
<br />
• <br />
• <br />
<br />
• <br />
<br />
• <br />
<br />
<br />
<br />
<br />
<br />
<br />
<br />
• <br />
• <br />
<br />
<br />
<br />
• <br />
<br />
<br />
• <br />
• <br />
<br />
<br />
<br />
<br />
<br />
<br />
<br />
•


