JGC-MS-8110 - E2 Fachhandels & Reparatur Servicecenter | Start
JGC-MS-8110 - E2 Fachhandels & Reparatur Servicecenter | Start
JGC-MS-8110 - E2 Fachhandels & Reparatur Servicecenter | Start

Erfolgreiche ePaper selbst erstellen
Machen Sie aus Ihren PDF Publikationen ein blätterbares Flipbook mit unserer einzigartigen Google optimierten e-Paper Software.
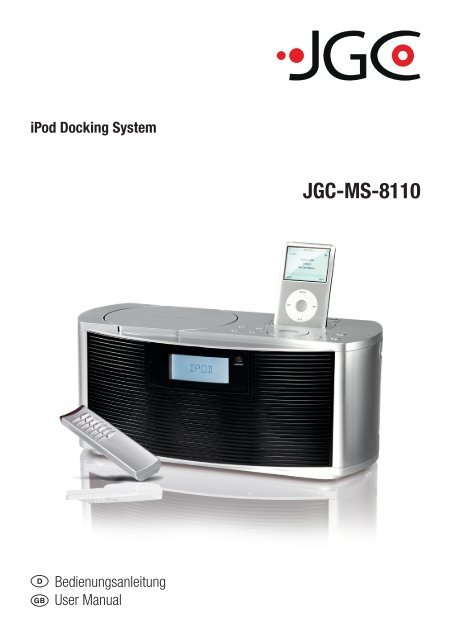
iPod Docking System<br />
D<br />
GB<br />
Bedienungsanleitung<br />
User Manual<br />
<strong>JGC</strong>-<strong>MS</strong>-<strong>8110</strong><br />
<strong>JGC</strong>-<strong>MS</strong>-<strong>8110</strong>-IM-DE-EN-V2.indb 1 24/08/2009 4:51 PM
DEUTSCH<br />
2<br />
INHALTSVERZEICHNIS<br />
INHALTSVERZEICHNIS ............................................................................................................................2<br />
WICHTIGE SICHERHEITSANWEISUNGEN ..................................................................................................3-5<br />
BEDIENELEMENTE .................................................................................................................................6-7<br />
VORBEREITUNG .....................................................................................................................................8<br />
GRUNDFUNKTIONEN ..............................................................................................................................9<br />
UHRZEIT EINSTELLEN .............................................................................................................................10<br />
RADIOBETRIEB ......................................................................................................................................11<br />
DISC FORMATE/DISC EINLEGEN ..............................................................................................................12<br />
AUDIO-CD ABSPIELEN ............................................................................................................................13<br />
MP3 DISC ABSPIELEN ............................................................................................................................14-15<br />
USB SPEICHERGERÄT UND SD/MMC KARTE ............................................................................................16<br />
IPOD .....................................................................................................................................................17<br />
AUX-IN ANSCHLUSS ...............................................................................................................................18<br />
REINIGUNG UND PLEGE ..........................................................................................................................19<br />
FEHLERBEHEBUNG ................................................................................................................................20-21<br />
TECHNISCHE DATEN ..............................................................................................................................22<br />
GARANTIE .............................................................................................................................................23-24<br />
Korrekte Entsorgung dieses Produktes:<br />
Diese Kennzeichnung weist darauf hin, dass Elektrogeräte in der EU nicht mit dem normalen<br />
Haushaltsmüll entsorgt werden dürfen.<br />
Benutzen Sie bitte die Rückgabe- und Sammelsysteme in Ihrer Gemeinde oder wenden Sie<br />
sich an den Händler, bei dem das Produkt gekauft wurde.<br />
Bitte entsorgen Sie die Batterien umweltgerecht. Werfen Sie Batterien nicht in den Hausmüll.<br />
Benutzen Sie bitte die Rückgabe- und Sammelsysteme in Ihrer Gemeinde oder wenden Sie<br />
sich an den Händler, bei dem das Produkt gekauft wurde.<br />
<strong>JGC</strong>-<strong>MS</strong>-<strong>8110</strong>-IM-DE-EN-V2.indb 2 24/08/2009 4:51 PM
Erklärung der Symbole<br />
WICHTIGE SICHERHEITSANWEISUNGEN<br />
VORSICHT<br />
Gefahr eines<br />
elektrischen Schlages.<br />
Nicht öffnen!<br />
Warnung: Um die Gefahr eines elektrischen Schlages<br />
zu reduzieren, Gehäuse nicht entfernen. Keine für den<br />
Anwender brauchbaren Teile im Innern.<br />
<strong>Reparatur</strong> qualifiziertem Servicepersonal überlassen.<br />
Dieses Gerät verwendet einen Klasse 1 Laser.<br />
Das Blitzsymbol im gleichseitigen<br />
Dreieck macht den Anwender auf<br />
nicht isolierte “gefährliche Spannung“<br />
in diesem Gerät aufmerksam,<br />
die stark genug sein kann, einen<br />
elektrischen Schlag bei einer Person zu<br />
verursachen.<br />
Das „i“ im Rahmen gibt Ihnen wichtige<br />
Hinweise zum Gebrauch des Gerätes<br />
und der Fehlersuche.<br />
Allgemeines<br />
• Vor Inbetriebnahme entsprechende Hinweise und Sicherheitsanweisungen aufmerksam durchlesen.<br />
• Gebrauchsanweisung in Reichweite aufbewahren, um diese bei Bedarf jederzeit zu Rate ziehen können.<br />
• Bei Weitergabe dieses Gerätes an Dritte diese Gebrauchsanweisung mit aushändigen.<br />
• Besonders die Warnungen auf, bzw. in dem Gerät und in dieser Gebrauchsanweisung beachten.<br />
• Das Gerät nur für den vorgesehenen Zweck verwenden. Unsachgemäßer Gebrauch kann zu Gefährdungen<br />
und Unfällen führen.<br />
• Dieses Gerät eignet sich nur für den privaten Haushaltsgebrauch und ist nicht für kommerziellen Einsatz<br />
vorgesehen.<br />
• Dieses Gerät ist nicht dafür bestimmt, durch Personen (einschließlich Kinder) mit eingeschränkten<br />
physischen, sensorischen oder geistigen Fähigkeiten oder mangels Erfahrung und/oder mangels Wissen<br />
benutzt zu werden, es sei denn, sie werden durch eine für ihre Sicherheit zuständige Person beaufsichtigt<br />
oder erhielten von ihr Anweisungen, wie das Gerät zu benutzen ist.<br />
• Kinder sollten beaufsichtigt werden, um sicherzustellen, dass sie nicht mit dem Gerät spielen.<br />
• Unter keinen Umständen das Gehäuse öffnen.<br />
• Vorsicht Lautstärke! Seien Sie vorsichtig bei der Wahl der Lautstärke. Überhöhte Lautstärken führen zu<br />
irreparablen Hörschäden.<br />
• Auf keinen Fall versuchen das Gerät selbst zu reparieren. Zur Wartung und <strong>Reparatur</strong> an einen Fachhändler<br />
oder einen qualifizierten Kundendienst wenden.<br />
• Während des Betriebes und der Reinigung des Gerätes, das Gerät oder Teile des Gerätes nie in Wasser oder<br />
andere Flüssigkeiten eintauchen. Das Gerät zur Reinigung niemals unter fließendes Wasser halten.<br />
• Keine Gegenstände in das Gerät einführen.<br />
<strong>JGC</strong>-<strong>MS</strong>-<strong>8110</strong>-IM-DE-EN-V2.indb 3 24/08/2009 4:51 PM<br />
3<br />
DEUTSCH
DEUTSCH<br />
4<br />
WICHTIGE SICHERHEITSANWEISUNGEN<br />
Aufstellort<br />
• Das Gerät ist nur für den Gebrauch im geschützten Innenbereich vorgesehen. Nicht im Freien verwenden!<br />
• Gerät vor extremer Hitze (über 35°C) und Kälte (unter 5°C), direktem Sonnenlicht und Staub schützen.<br />
• Verwenden Sie das Gerät nicht in sehr trockener Umgebung. Dies kann zu elektrostatischer Entladung<br />
führen.<br />
• Es besteht Lebensgefahr durch Stromschlag! Nicht in direkter Nähe von Wasser - z.B. Badewanne,<br />
Waschbecken, Spüle, Waschkübel -, in einem feuchten Keller, oder in der Nähe eines Schwimmbeckens<br />
benutzen.<br />
• Das Gerät nur in gemäßigten Breitengraden verwenden, Tropen und besonders feuchtes Klima vermeiden.<br />
• Keine Gegenstände mit offenen Flammen, wie z.B. Kerzen, auf das Gerät stellen.<br />
• Keine mit Flüssigkeit gefüllten Gegenstände, wie z.B. Vasen, auf das Gerät stellen.<br />
• Stellen Sie sicher, dass die Belüftung des Gerätes nicht durch Abdecken der Lüftungsöffnungen, durch z.B.<br />
Zeitungen, Tischtücher, Vorhänge etc., behindert wird.<br />
• Um das Gerät muss mindestens ein Freiraum von ca. 10 cm vorhanden sein, um eine ausreichende<br />
Belüftung sicherzustellen.<br />
• Bereiche mit unzureichender Belüftung meiden (z.B. in Bücherschränken, hinter Vorhängen, zwischen<br />
Möbelstücken).<br />
• Das Gerät von jeglichen Hitzequellen, wie z.B. Öfen, Kochplatten und anderen Hitze produzierenden Geräten/<br />
Gegenständen, fernhalten.<br />
• Um das Risiko von Feuer und elektrischen Schlag zu reduzieren, setzen Sie das Gerät weder Feuer (Kamin,<br />
Grill, Kerzen, Zigaretten, usw.) noch Wasser aus (Tropfwasser, Spritzwasser, Vasen, Wannen, Teiche, usw.).<br />
Netzanschluss<br />
• Vor Anschluss an das Stromnetz sicherstellen, dass Netzspannung und Stromart mit den Angaben auf dem<br />
Typenschild übereinstimmen.<br />
• Der Netzstecker dient als Trennvorrichtung. Achten Sie darauf, dass der Netzstecker immer gut zugänglich<br />
und erreichbar ist.<br />
• Nur der Netzstecker kann das Gerät vollständig vom Stromnetz trennen.<br />
• Ziehen Sie den Netzstecker nur am Stecker selbst aus der Steckdose. Ziehen Sie nicht am Kabel.<br />
• Beschädigungen des Netzkabels durch Knicken und Kontakt mit scharfen Kanten vermeiden.<br />
• Ziehen Sie den Netzstecker bei Nichtgebrauch, bei Störungen des Betriebes und vor jeder Reinigung.<br />
• Ziehen Sie den Netzstecker bei Gewitter und bei längerer Abwesenheit, um die Elektronik vor Überspannung<br />
und Zerstörung zu schützen.<br />
• Wenn das Netzkabel oder das Gehäuse des Gerätes beschädigt sind oder wenn das Gerät heruntergefallen<br />
ist, darf das Gerät nicht benutzt werden, bevor es von einem Fachmann überprüft worden ist.<br />
• Ein beschädigtes Netzkabel darf nur vom Hersteller, einer von ihm beauftragen Werkstatt oder einer ähnlich<br />
qualifizierten Person ersetzt werden, um Gefährdungen zu vermeiden.<br />
• Schützen Sie das Netzkabel und das Gehäuse vor Beschädigung.<br />
• Achtung: Im Fall einer Fehlfunktion aufgrund elektrostatischer Entladung und elektrischer kurzzeitiger<br />
Spitzen, setzen Sie das Gerät zurück, indem Sie es vom Netz trennen.<br />
• Achtung: Im Fall einer Fehlfunktion aufgrund elektrostatischer Entladung und elektrischer kurzzeitiger<br />
Spitzen, setzen Sie das USB- Gerät zurück, indem Sie es vom Gerät trennen.<br />
<strong>JGC</strong>-<strong>MS</strong>-<strong>8110</strong>-IM-DE-EN-V2.indb 4 24/08/2009 4:51 PM
WICHTIGE SICHERHEITSANWEISUNGEN<br />
Kondensation<br />
• Wenn das kalte Gerät in eine warme und eventuell leicht feuchte Umgebung gebracht wird, so kann sich<br />
im Inneren Kondenswasser bilden. Kondenswasser könnte die ordnungsgemäße Funktion des Gerätes<br />
beeinflussen. In extremen Fällen könnte Kondenswasser einen Schaden durch Kurzschluss verursachen.<br />
Lassen Sie das Gerät 1-2 Stunden in warmer, trockener Umgebung stehen, um mögliches Kondenswasser<br />
zu trocknen, bzw. entweichen zu lassen, bevor Sie es in Betrieb nehmen.<br />
Batterien<br />
• Achtung: Es besteht Explosionsgefahr bei unsachgemäßem Austausch der Batterien.<br />
• Batterien nie kurzschließen!<br />
• Wechseln Sie immer den gesamten Batteriesatz. Mischen Sie keine alten und neuen Batterien, bzw.<br />
Batterien mit unterschiedlichem Ladungszustand.<br />
• Achten Sie darauf die Batterien korrekt einzusetzen. Beachten Sie die Polung (+) Plus / (-) Minus auf der<br />
Batterie und auf dem Gehäuse. Unsachgemäß eingesetzte Batterien können zum Auslaufen führen oder in<br />
extremen Fällen einen Brand oder eine Explosion auslösen.<br />
• Wird das Gerät für längere Zeit nicht benutzt, sollten die Batterien entnommen werden, da die<br />
Fernbedienung durch eventuelles Auslaufen der Batterien beschädigt werden kann. Bei nachlassender<br />
Leistung den Batteriesatz erneuern.<br />
• Setzen Sie Batterien niemals übermäßiger Hitze (z.B. pralle Sonne, Feuer) aus und werfen Sie sie niemals in<br />
Feuer. Die Batterien könnten explodieren.<br />
• Nicht aufladbare Batterien dürfen nicht wieder aufgeladen werden.<br />
• Wieder aufladbare Batterien müssen vor dem Aufladen aus der Fernbedienung entnommen werden.<br />
• Ausschließlich Batterien von bester Qualität verwenden. Minderwertige Batterien können durch Auslaufen<br />
Schäden verursachen.<br />
• Sollten Batterien einmal ausgelaufen sein, diese mit Hilfe eines Tuches aus dem Batteriefach entnehmen<br />
und bestimmungsgemäß entsorgen. Vermeiden Sie Haut- und Augenkontakt mit der Batteriesäure. Sollten<br />
Sie doch einmal Augenkontakt mit Batteriesäure erfahren, spülen Sie die Augen mit viel Wasser aus und<br />
kontaktieren umgehend einen Arzt. Bei Kontakt der Batteriesäure mit der Haut, waschen Sie die Stelle mit<br />
viel Wasser und Seife ab.<br />
• Batterien sind sehr gefährlich, wenn sie verschluckt werden. Halten Sie Batterien und das Gerät jederzeit von<br />
Kindern fern. Wenn Batterien verschluckt werden, sofort ärztliche Hilfe holen.<br />
<strong>JGC</strong>-<strong>MS</strong>-<strong>8110</strong>-IM-DE-EN-V2.indb 5 24/08/2009 4:51 PM<br />
5<br />
DEUTSCH
DEUTSCH<br />
6<br />
BEDIENELEMENTE<br />
Abspielgerät Fernbedienung<br />
Nr. Bauteil/Taste Funktion Nr. Bauteil/Taste Funktion<br />
1 Infrarotsensor Empfängt Signal von<br />
Fernbedienung<br />
6 CD-Fachabdeckung<br />
2 LCD Anzeige Anzeige 7 iPod-Anschluss Zum Anschließen eines iPod-<br />
Gerätes<br />
3 Lautsprecher<br />
(beidseitig)<br />
Tonwiedergabe 8 Tasten<br />
VOL +/-<br />
4 USB Anschluss Zum Anschließen von USB-<br />
Speichergeräten<br />
5 SD/MMC<br />
Kartenschlitz<br />
19<br />
18 171615<br />
14 13<br />
6<br />
7<br />
8<br />
9<br />
10<br />
31<br />
32<br />
33<br />
34<br />
35<br />
36<br />
37<br />
9 Taste REPEAT/<br />
ENTER<br />
Für SD/MMC Speicherkarten 10 Taste PROG/<br />
MENU/CLOCK<br />
1<br />
2<br />
3<br />
4<br />
5<br />
11<br />
12<br />
20<br />
21<br />
22<br />
23<br />
Nicht abgebildet: Ø3,5mm Stereoklinkenkabel<br />
-<br />
Lautstärke einstellen<br />
Wiederholdungseinstellung/<br />
Eingabetaste<br />
Programm erstellen /<br />
Uhrzeit einstellen/<br />
iPod Menüsteuerung<br />
<strong>JGC</strong>-<strong>MS</strong>-<strong>8110</strong>-IM-DE-EN-V2.indb 6 24/08/2009 4:51 PM<br />
24<br />
25<br />
26<br />
27<br />
28<br />
29<br />
30
Nr. Bauteil/Taste Funktion Nr. Bauteil/Taste Funktion<br />
11 Taste Nächsten Titel abspielen/<br />
Titelabschnitt suchen/<br />
Radiosender suchen<br />
12 Taste Wiedergabe<br />
starten/pausieren<br />
13 Taste STOP/<br />
BAND<br />
Wiedergabe anhalten/<br />
Frequenzband auswählen<br />
14 Taste Vorherigen Titel wiedergeben/<br />
Titelabschnitt suchen/<br />
Radiosender suchen<br />
15 Taste FOLDER<br />
+ /<br />
16 Taste FOLDER<br />
- /<br />
17 Taste<br />
FUNCTION<br />
18 Taste<br />
STANDBY/ON<br />
19 CD-Fach<br />
Entriegelung<br />
20 Buchse<br />
AUX-IN<br />
21 Kopfhörerbuchse<br />
(3,5mm)<br />
22 UKW<br />
Wurfantenne<br />
23 Netzkabel mit<br />
Netzstecker<br />
24 Taste<br />
FUNCTION<br />
Nächsten Ordner anwählen/<br />
iPod Menüsteuerung<br />
Vorherigen Ordner anwählen/<br />
iPod Menüsteuerung<br />
25 Taste<br />
/BAND<br />
26 Taste TUNING<br />
+ /<br />
BEDIENELEMENTE<br />
Wiedergabe anhalten/<br />
Frequenzband auswählen<br />
Nächsten Titel abspielen/<br />
Titelabschnitt suchen/<br />
Radiosender suchen<br />
27 Taste VOL+ Lautstärke erhöhen<br />
28 Taste REPEAT/<br />
ENTER<br />
29 Taste /<br />
FOLDER +<br />
30 Taste<br />
MEMORY/<br />
MENU<br />
Funktionsmodus auswählen 31 Taste<br />
STANDBY/ON<br />
Gerät einschalten/<br />
Gerät in Standby schalten<br />
32 Taste PLAY/<br />
PAUSE<br />
CD-Fach öffnen 33 Taste<br />
TUNING -/<br />
Anschluss eines<br />
externen Gerätes über<br />
Stereoklinkenkabel<br />
Zum Anschließen von Kopf-<br />
oder Ohrhörer<br />
Antenne für UKW<br />
Radiobetrieb<br />
Wiederholdungseinstellung/<br />
Eingabetaste<br />
Nächsten Ordner anwählen/<br />
iPod Menüsteuerung<br />
Radiosender speichern/<br />
iPod Menüsteuerung<br />
Gerät einschalten/<br />
Gerät in Standby schalten<br />
Wiedergabe<br />
starten/pausieren<br />
Vorherigen Titel wiedergeben/<br />
Titelabschnitt suchen/<br />
Radiosender suchen<br />
34 Taste VOL- Lautstärke verringern<br />
35 Taste CLOCK/<br />
PROGRAM<br />
36 Taste /<br />
FOLDER-<br />
Programm erstellen /<br />
Uhrzeit einstellen<br />
Vorherigen Ordner anwählen/<br />
iPod Menüsteuerung<br />
Stromversorgung zum Gerät 37 Taste SLEEP Einschlaffunktion<br />
Funktionsmodus auswählen<br />
<strong>JGC</strong>-<strong>MS</strong>-<strong>8110</strong>-IM-DE-EN-V2.indb 7 24/08/2009 4:51 PM<br />
7<br />
DEUTSCH
DEUTSCH<br />
8<br />
VORBEREITUNG<br />
Lieferumfang<br />
• 1x Abspielgerät mit Netzkabel und Netzstecker<br />
• 1x Fernbedienung<br />
• 1x Ø3,5mm-Stereoklinkenkabel<br />
• 2x Batterien 1,5V LR03/AAA für Fernbedienung<br />
• 1x Bedienungsanleitung<br />
Gerät auspacken<br />
• Entfernen Sie das Gerät und Zubehör vorsichtig von der Verpackung. Es empfiehlt sich die Verpackung für<br />
späteres Verstauen zurückzubehalten. Möchten Sie die Verpackung entsorgen, so tun Sie dies nach den<br />
geltenden gesetzlichen Bestimmungen. Haben Sie Fragen zur richtigen Entsorgung, fragen Sie bei Ihrer<br />
Gemeinde nach.<br />
• Überprüfen Sie den Verpackungsinhalt auf Vollständigkeit und Beschädigungen. Sollte der Verpackungsinhalt<br />
unvollständig oder Beschädigungen feststellbar sein, kontaktieren Sie umgehend Ihre Verkaufstelle.<br />
Netzanschluss<br />
• Verbinden Sie das Gerät nur mit einem Stromnetz, das die gleiche Spannung führt, wie auf dem Typenschild<br />
angegeben. Der Anschluss an falsche Spannung kann zu Geräteschäden führen und der Garantieanspruch<br />
erlischt zugleich.<br />
• Stecken Sie den Netzstecker in eine geeignete Steckdose. Ist die Verbindung hergestellt, schaltet sich das<br />
Gerät in den Standby Modus.<br />
• Um das Gerät vollständig auszuschalten, den Netzstecker von der Steckdose trennen.<br />
Batterien einsetzen oder Batterien ersetzen<br />
• Schieben Sie die Batteriefachabdeckung an der Unterseite der Fernbedienung<br />
in Pfeilrichtung auf und entfernen Sie die Abdeckung.<br />
• Gegebenfalls alte Batterien entfernen und zwei neue Batterien vom Typ 1,5V<br />
LR03/AAA in die Mulden einlegen.<br />
• Dabei auf die richtige Polarität (+/-), wie im Batteriefach angegeben, achten.<br />
Die Batteriefachabdeckung aufschieben und einrasten.<br />
• Entfernen Sie die Batterien aus dem Batteriefach, wenn Sie die Fernbedienung<br />
über einen längeren Zeitraum nicht verwenden.<br />
• Lesen Sie auch die Sicherheitsanweisungen zum Umgang mit Batterien (siehe<br />
Kapitel Wichtige Sicherheitsanweisungen).<br />
Abb.1<br />
Hinweise zur Fernbedienung<br />
• Achten Sie darauf, dass sich keine Gegenstände zwischen der Infrarot-LED der Fernbedienung und dem<br />
Infrarotsensor (1) am Gerät befinden.<br />
• Beachten Sie, dass direktes Sonnenlicht oder Raumbeleuchtung die korrekte Funktion der Fernbedienung<br />
beeinflussen kann. Wenn die Fernbedienung nicht richtig funktioniert, versuchen Sie den Raum abzudunkeln<br />
oder den Abstand zwischen Gerät und Fernbedienung zu reduzieren. Wenn das Problem weiterhin besteht,<br />
wechseln Sie die Batterien der Fernbedienung aus.<br />
• Die Tasten auf der Fernbedienung decken sich von ihrer Funktion mit den Tasten auf dem Gerät. Alle<br />
Hauptfunktionen können mit der Fernbedienung gesteuert werden.<br />
• Die nachfolgenden Funktionen werden mit der Fernbedienung vorgenommen und erklärt, falls nicht anders<br />
angegeben.<br />
<strong>JGC</strong>-<strong>MS</strong>-<strong>8110</strong>-IM-DE-EN-V2.indb 8 24/08/2009 4:51 PM
GRUNDFUNKTIONEN<br />
Gerät ein- und ausschalten<br />
• Drücken Sie die Taste STANDBY/ON (31), um das Gerät einzuschalten. Die LCD Anzeige (2) wird sich<br />
einschalten und kurz HELLO anzeigen. Das Gerät wird automatisch zum letzten gewählten Betriebsmodus<br />
zurückkehren.<br />
• Um das Gerät auszuschalten, drücken Sie die Taste STANDBY/ON. Das Gerät schaltet sich in den Standby<br />
Modus. Die LCD Anzeige wird kurz GOODBYE und anschließend die Uhrzeit anzeigen. Die Uhrzeit muss zuvor<br />
programmiert worden sein, ansonsten wird nur „--:--“ angezeigt.<br />
Betriebsmodi wählen<br />
• Drücken Sie die Taste FUNCTION (24), um zwischen den Betriebsmodi TUNER, CD, USB, CARD, IPOD oder<br />
AUX zu wählen.<br />
Eine kurze Übersicht finden Sie untenstehend:<br />
TUNER Radio<br />
CD Abspielen von CDs<br />
USB Wiedergabe von Audio-Dateien von USB Speichergeräten<br />
CARD Wiedergabe von Audio-Dateien von SD/MMC Speicherkarten<br />
IPOD Wiedergabe über ein iPod Gerät<br />
AUX Wiedergabe über ein an das Stereoklinkenkabel angeschlossenes<br />
Wiedergabegerät (z.B. MP3 Player)<br />
Abspielen und Pausieren<br />
• Drücken Sie die Taste PLAY/PAUSE (32), um die Wiedergabe von CD, USB, CARD, IPOD oder AUX zu<br />
starten. Durch nochmaliges Betätigen kann die Wiedergabe pausiert werden.<br />
Wiedergabe stoppen<br />
• Drücken Sie die Taste /BAND (25), um die Wiedergabe von CD, USB, CARD, IPOD oder AUX zu stoppen.<br />
Im Radiomodus kann mit dieser Taste zwischen den Frequenzbändern FM (UKW) und AM (MW) ausgewählt<br />
werden.<br />
Lautstärke<br />
• Mit den Tasten VOL+ (27) und VOL- (34) kann die Lautstärke reguliert werden. + erhöht die Lautstärke<br />
und - verringert diese. Betätigen Sie die Tasten mehrmals und stellen Sie eine Lautstärke von 01 (MIN) bis<br />
30 (MAX) ein.<br />
• Achtung! Eine zu hohe Lautstärke kann zu irreparabler Gehörschädigung führen.<br />
Kopfhörer<br />
• Das Gerät besitzt eine 3,5 mm Kopfhörerbuchse (21), an die Sie die meisten handelsüblichen Kopf- oder<br />
Ohrhörer (nicht im Lieferumfang enthalten) anschließen können.<br />
• Wenn der Kopf- oder Ohrhörer an der Kopfhörerbuchse angeschlossen ist, werden die eingebauten<br />
Lautsprecher automatisch deaktiviert.<br />
• Sobald Sie die Kopf- oder Ohrhörer von der Kopfhörerbuchse trennen, werden die Lautsprecher aktiviert.<br />
<strong>JGC</strong>-<strong>MS</strong>-<strong>8110</strong>-IM-DE-EN-V2.indb 9 24/08/2009 4:51 PM<br />
9<br />
DEUTSCH
DEUTSCH<br />
10<br />
UHRZEIT EINSTELLEN<br />
Uhrzeit einstellen<br />
• Wenn das Gerät zum ersten Mal in Betrieb genommen wird, erscheint nach<br />
dem Herstellen der Stromversorgung „--:--“ blinkend in der Anzeige. Das<br />
Gerät muss sich zur Uhrzeiteinstellung im Standby Modus befinden.<br />
• Im Standby Modus halten Sie die Taste CLOCK/PROGRAM (35) für 2<br />
Sekunden fest. 24 HOUR erscheint in der Anzeige, davon 24 blinkend.<br />
• Betätigen Sie die Taste TUNING -/ (33) oder TUNING + / (26), um<br />
zwischen der 24 Stunden-Anzeige (24H) oder 12 Stunden-Anzeige (12H) zu<br />
wählen.<br />
• Wählen Sie die 12 Stunden-Anzeige, so wird in der Anzeige zusätzlich AM für<br />
vormittags und PM für nachmittags angezeigt.<br />
• Mit der Taste CLOCK/PROGRAM die Eingabe bestätigen. In der Anzeige wird<br />
nun 00:00 erscheinen, davon die Stundenanzeige blinkend. Mit den Tasten<br />
TUNING -/ und TUNING + / (Die Tasten können auch festgehalten<br />
werden.), die Stundenzahl einstellen und wiederum mit der Taste CLOCK/<br />
PROGRAM die Eingabe bestätigen. Die Minutenanzeige blinkt nun. Stellen Sie<br />
auf gleiche Weise die Minutenzahl ein.<br />
• Speichern Sie die Uhreinstellungen durch Betätigen der Taste CLOCK/<br />
PROGRAM.<br />
• Erfolgt für ca. 10 Sekunden keine Eingabe, so schaltet sich die Anzeige, ohne<br />
unbestätigte Eingaben zu speichern, aus.<br />
Abb. 2<br />
Abb. 3<br />
Abb. 4<br />
Abb.5<br />
Wenn Sie das Gerät vom Stromnetz trennen, so bleibt die Uhrzeit nur für ganz kurze Zeit erhalten<br />
und muss danach wieder von neuem programmiert werden.<br />
Uhrzeit im Betriebsmodus anzeigen<br />
• Halten Sie im Betriebsmodus die Taste CLOCK/PROGRAM (35) für ca. 2 Sekunden fest, um die Uhrzeit in<br />
der Anzeige anzuzeigen. Nach ca. 5 Sekunden wird die Uhrzeit wieder ausgeblendet.<br />
Schlaffunktion - SLEEP<br />
• Zum Einschlafen mit Musik kann eine Zeit von 90 Minuten bis 10 Minuten eingestellt werden. Nach dem<br />
Ablauf der Zeit schaltet sich das Gerät automatisch ab.<br />
• Betätigen Sie die Taste SLEEP (37) so oft, bis die erwünschte Zeit in der Anzeige angezeigt wird. Folgende<br />
Zeiteinstellungen sind möglich: 90, 80, 70, 60, 50, 40, 30, 20 und 10 Minuten. Ist eine Einschlafzeit<br />
programmiert worden, erscheint SLEEP zusätzlich in der Anzeige.<br />
• Um die Schlaffunktion zu deaktivieren, die Taste SLEEP so oft drücken, bis die Kontrollanzeige SLEEP in der<br />
Anzeige erlischt.<br />
Ist die Abspielzeit des Titels beim Abspielen mit CD, USB, CARD, AUX oder iPOD kürzer als die<br />
eingestellte Einschlafzeit, so wird das Abspielen am Ende des Liedes beendet.<br />
<strong>JGC</strong>-<strong>MS</strong>-<strong>8110</strong>-IM-DE-EN-V2.indb 10 24/08/2009 4:51 PM
RADIOBETRIEB<br />
Antennen<br />
• Für den UKW-Empfang ist das Gerät mit einer UKW-Wurfantenne (22) ausgestattet. Legen Sie diese zum<br />
bestmöglichen Empfang entsprechend aus. Nie mit einer anderen Antenne verbinden.<br />
• Für den MW-Bereich ist eine Ferritantenne in das Gerät eingebaut. Drehen Sie das Gerät, um den Empfang<br />
zu verbessern.<br />
Radiosender manuell einstellen<br />
• Für Sender mit schwachem Signal oder weit entfernte Sender, stellen Sie den<br />
Sender manuell ein.<br />
• Drücken Sie die Taste STANDBY/ON (31), um das Gerät einzuschalten.<br />
• Betätigen Sie die Taste FUNCTION (24), so oft, bis TUNER und die<br />
Kontrollanzeige TUNER in der Anzeige erscheinen.<br />
• Das Frequenzband kann durch Betätigen der Taste /BAND (25),<br />
ausgewählt werden. Je nach Auswahl des gewünschten Frequenzbandes wird<br />
in der Anzeige FM für UKW und AM für MW angezeigt.<br />
• Durch mehrfaches Drücken der Tasten TUNING -/ (33) und TUNING +<br />
/ (26), können Sender manuell gesucht werden. Bei jedem Tastendruck<br />
erhöht bzw. verringert das Gerät die Frequenz um 0,05MHz bei UKW bzw.<br />
9KHz bei MW.<br />
• Bei Sendern mit Stereoempfang erscheint in der Anzeige zusätzlich die<br />
Kontrollanzeige ST.<br />
Abb. 6<br />
Abb. 7<br />
Sender automatisch suchen<br />
• Werden Sender nicht automatisch gefunden, so stellen Sie diese manuell ein.<br />
• Halten Sie die Taste TUNING -/ (33) und TUNING + / (26) für ca. 2 Sekunden fest, um<br />
automatisch den nächst höher- oder tiefer liegenden Sender zu finden. Durch Betätigung der gleichen Tasten<br />
kann die Suche gestoppt werden. Wiederholen Sie die Suche, bis Sie den gewünschten Sender gefunden<br />
haben.<br />
• Hinweis: Während der Suche wird die Tonwiedergabe ausgeschaltet.<br />
Sender speichern<br />
• Das Gerät bietet die Möglichkeit 30 UKW und 10 MW Sender für den einfachen Zugriff zu speichern.<br />
• Bestimmen Sie das gewünschte Frequenzband und stellen Sie den gewünschten Radiosender ein.<br />
• Drücken Sie die Taste MEMORY/MENU (30). In der Anzeige erscheint<br />
die Nummer des nächsten Speicherplatzes (blinkend). Mit den Tasten<br />
/FOLDER+ (29) und /FOLDER- (36) kann die gewünschte<br />
Speicherplatznummer angewählt werden und durch Drücken der Taste<br />
Abb. 8<br />
MEMORY/MENU abgespeichert werden. Während des Speicherns erscheint<br />
in der Anzeige die Kontrollanzeige MEM.<br />
• Weitere Sender nach den gleichen Schritten abspeichern.<br />
• Wollen Sie einen Speicherplatz neu besetzen, so tun Sie dies nach den zuvor beschriebenen Schritten. Der<br />
unerwünschte Sender des Speicherplatzes wird automatisch überschrieben.<br />
<strong>JGC</strong>-<strong>MS</strong>-<strong>8110</strong>-IM-DE-EN-V2.indb 11 24/08/2009 4:51 PM<br />
11<br />
DEUTSCH
DEUTSCH<br />
12<br />
DISC FORMATE/DISC EINLEGEN<br />
Sender aufrufen<br />
• Rufen Sie durch Betätigung der Tasten /FOLDER+ (29) und /<br />
FOLDER- (36) den Speicherplatz des gespeicherten Senders auf. Der Sender<br />
wird automatisch eingestellt.<br />
Beachten Sie, dass ein aufgesetzer iPod im Radiomodus nicht aufgeladen wird.<br />
Abb. 9<br />
Wichtige Hinweise zu MP3, CD-R/RW<br />
• Abspielqualität und -leistung sind nicht garantiert, werden nicht-standardisierte Formatdefinitionen/<br />
Produktion von MP3, CD-R/RW Disks verwendet.<br />
• Wiedergabe von MP3, CD-R/RW Disks können von den Aufnahmebedingungen abhängen.<br />
• Bringen Sie keine Kleber, Etiketten etc. auf keiner Seite einer CD-R/RW Disk an, da dies zu Fehlfunktionen<br />
führen kann.<br />
• Legen Sie keine unbeschriebene CD-R/RW Disk in das Gerät ein. Es dauert über 30 Sekunden, um die Disk<br />
zu lesen. Während dem Lesevorgang kann das Öffnen des CD-Faches die Disk beschädigen.<br />
• CD-ROM, CD-I, CDV, VCD, DVD Disks oder Computer CDs können durch das Gerät nicht gelesen werden.<br />
Legen Sie keine solchen Formate ein.<br />
Disk einlegen<br />
• Drücken Sie die CD-Fach Entriegelung (19), um das CD-Fach zu öffnen. Entfernen Sie den eventuell<br />
angebrachten Papierschutz.<br />
• Eine CD mit dem Etikett oder der Beschriftung nach oben zeigend so in das CD-Fach einlegen, dass der<br />
Antriebshalter durch das Loch in der CD ragt. Das CD-Fach durch Herunterdrücken der<br />
CD-Fachabdeckung (6) wieder schließen.<br />
• Vorsicht! Berühren Sie nie die Linse im Inneren des CD-Faches.<br />
• Schließen Sie das CD-Fach und vergewissern sich, dass es einrastet.<br />
• Schalten Sie das Gerät ein und wählen durch Drücken der Taste FUNCTION (24) CD aus.<br />
• Die CD wird nun eingelesen, die Anzeige zeigt dabei READING an. Ist das<br />
eingelegte Medium lesbar, so wird der erste Titel automatisch wiedergegeben.<br />
Ist die CD nicht lesbar, so zeigt die Anzeige NO DISC an.<br />
• Um eine CD nach dem Abspielen zu entfernen, die Wiedergabe anhalten, das<br />
CD-Fach öffnen und die CD beidseitig am Rand festhalten und entfernen.<br />
Abb. 10<br />
<strong>JGC</strong>-<strong>MS</strong>-<strong>8110</strong>-IM-DE-EN-V2.indb 12 24/08/2009 4:51 PM
Audio-CD abspielen<br />
• Wie zuvor beschrieben, legen Sie eine Audio-CD ein und schalten das Gerät in<br />
den CD Wiedergabemodus.<br />
• In der Anzeige werden die erste Titelnummer und die Abspielzeit angezeigt.<br />
Zusätzlich erscheint die Kontrollanzeige DISC in der Anzeige.<br />
• Abspielen/Pausieren: Drücken Sie die Taste PLAY/PAUSE (32), um die<br />
Wiedergabe zu pausieren und abzuspielen. Ist die Wiedergabe pausiert, blinkt<br />
die Abspielzeit in der Anzeige.<br />
AUDIO-CD ABSPIELEN<br />
Abb. 11<br />
Abb.12<br />
• Stoppen: Um die Wiedergabe zu stoppen, drücken Sie die Taste<br />
/BAND (25). Die Anzeige zeigt die Gesamttitelnummer und die<br />
Gesamtspielzeit an.<br />
Abb.13<br />
• Titel vor und zurück: Mit den Tasten TUNING -/ (33) und TUNING + / (26), können Sie Titel<br />
überspringen bzw. vor- oder zurückspringen. Durch einmaliges Betätigen der Taste TUNING -/ , wird<br />
der spielende Titel wieder von vorne wiedergegeben. Durch zweimaliges Betätigen wird der vorherige Titel<br />
wiedergegeben. Durch Betätigung der Taste TUNING + / , wird der nächste Titel abgespielt.<br />
• Vor- und zurückspulen: Durch Festhalten der Tasten TUNING -/ und TUNING + / , können<br />
•<br />
Sie Titel vor -und zurückspulen. Wenn die gewünschte Stelle gefunden wurde, Taste loslassen, um mit der<br />
Wiedergabe fortzufahren. Während des Spulens wird die Tonwiedergabe auf null gestellt.<br />
Titel wiederholen: Durch einmaliges Drücken der Taste REPEAT/ENTER (28) kann der momentan<br />
spielende Titel endlos wiederholt werden. In der Anzeige erscheint die Kontrollanzeige RPT.<br />
• CD wiederholen: Durch zweimaliges Drücken der Taste REPEAT/ENTER kann die CD endlos wiederholt<br />
werden. In der Anzeige erscheint die Kontrollanzeige RPT ALL.<br />
• Zufallswiedergabe: Durch dreimaliges Drücken der Taste REPEAT/ENTER können die Titel in<br />
Zufallswiedergabe wiedergegeben werden. In der Anzeige erscheint die Kontrollanzeige RDM.<br />
• Wiedergabemodi deaktivieren: Je nach Modus, betätigen Sie die Taste REPEAT/ENTER so oft, bis die<br />
Kontrollanzeigen RPT, RPT ALL oder RDM in der Anzeige erlöschen. Die entsprechende Funktion ist somit<br />
deaktiviert. Wird die CD gestoppt oder andersweitig angehalten, so werden die Wiedergabemodi ebenfalls<br />
deaktiviert.<br />
Die Wiedergabemodi „RPT“, „RPT ALL“ und „RDM“ lassen sich auch einschalten, wenn wie<br />
Wiedergabe pausiert ist.<br />
Programm abspielen<br />
• Das Gerät bietet die Möglichkeit 20 Titel in beliebiger Reihenfolge abzuspielen. Gehen Sie dazu in<br />
nachfolgend beschriebener Reihenfolge vor.<br />
• Legen Sie eine CD wie zuvor beschrieben in das CD-Fach ein.<br />
• Schalten Sie das Gerät durch Betätigung der Taste /BAND (25) in den Stopp-Modus.<br />
<strong>JGC</strong>-<strong>MS</strong>-<strong>8110</strong>-IM-DE-EN-V2.indb 13 24/08/2009 4:51 PM<br />
13<br />
DEUTSCH
DEUTSCH<br />
14<br />
MP3 DISC ABSPIELEN<br />
• Betätigen Sie die Taste CLOCK/PROGRAM (35) einmal. In der Anzeige<br />
werden 00 P--01, davon 00 blinkend, und die Kontrollanzeige MEM<br />
angezeigt.<br />
• Wählen Sie mit den Tasten TUNING -/ (33) und TUNING + / (26),<br />
einen zu programmieren gewünschten Titel der CD aus. Durch Betätigen der<br />
Taste CLOCK/PROGRAM die Auswahl abspeichern. Der zweite Speicherplatz<br />
wird geöffnet und kann wie zuvor wiederum belegt werden.<br />
Abb. 14<br />
• Sie können bis 20 Speicherplätze belegen. Sind alle Speicherplätze belegt, so zeigt die Anzeige PROGFUL an.<br />
• Programm abspielen: Spielen Sie das Programm durch Drücken der Taste PLAY/PAUSE (32) ab.<br />
• Programm stoppen: Durch einmaliges Drücken der Taste /BAND (25) kann die Wiedergabe des<br />
Programms gestoppt werden.<br />
• Programm löschen: Das Programm lässt sich durch zweimaliges Betätigen der Taste /BAND oder<br />
Öffnen des CD-Faches oder Wechseln in einen anderen Betriebsmodus löschen. Die Kontrollanzeige MEM<br />
erlischt in der Anzeige.<br />
MP3 Disc abspielen<br />
• Legen Sie eine MP3 Disc ein und schalten das Gerät in den CD<br />
Wiedergabemodus.<br />
• In der Anzeige wird die erste Titelnummer, die Abspielzeit und zusätzlich MP3<br />
angezeigt.<br />
Abb. 15<br />
• Abspielen/Pausieren: Drücken Sie die Taste PLAY/PAUSE (32), um die Wiedergabe zu pausieren und<br />
abzuspielen. Ist die Wiedergabe pausiert, blinkt die Abspielzeit in der Anzeige.<br />
• Stoppen: Um die Wiedergabe zu stoppen, drücken Sie die Taste /BAND (25). Die Anzeige zeigt die<br />
Gesamttitelnummer und die Gesamtordnerzahl an. Zusätzlich erscheint die Kontrollanzeige FOLDER (Ordner).<br />
• Titel vor und zurück: Mit den Tasten TUNING -/ (33) und TUNING + / (26), können Sie Titel<br />
überspringen bzw. vor- oder zurückspringen. Durch einmaliges Betätigen der Taste TUNING -/ , wird<br />
der spielende Titel wieder von vorne wiedergegeben. Durch zweimaliges Betätigen wird der vorherige Titel<br />
wiedergegeben. Durch Betätigung der Taste TUNING + / , wird der nächste Titel abgespielt.<br />
• Vor- und zurückspulen: Durch Festhalten der Tasten TUNING -/ und TUNING + / , können<br />
Sie Titel vor -und zurückspulen. Wenn die gewünschte Stelle gefunden wurde, Taste loslassen, um mit der<br />
Wiedergabe fortzufahren. Während des Spulens wird die Tonwiedergabe auf null gestellt.<br />
• Ordner suchen/überspringen: Durch Festhalten der Tasten /FOLDER+ (29) und /FOLDER- (36)<br />
für 2 Sekunden kann von einem Ordner zum nächsten bzw. dem vorherigen Ordner gesprungen werden. Der<br />
erste Titel des angewählten Ordners wird automatisch abgespielt. Im Stopp-Modus den angewählten Ordner<br />
durch Drücken der Taste PLAY/PAUSE wiedergeben.<br />
Durch ständiges Festhalten der Tasten<br />
fortschreitend übersprungen.<br />
/FOLDER + und /FOLDER- werden die Ordner<br />
• 10 Titel vor- oder zurück: Durch kurzes Drücken der Tasten<br />
das Gerät um 10 Titel vor bzw. zurück.<br />
/FOLDER + und /FOLDER- springt<br />
<strong>JGC</strong>-<strong>MS</strong>-<strong>8110</strong>-IM-DE-EN-V2.indb 14 24/08/2009 4:51 PM
MP3 DISC ABSPIELEN<br />
• Titel wiederholen: Durch einmaliges Drücken der Taste REPEAT/ENTER (28) kann der momentan<br />
spielende Titel endlos wiederholt werden. In der Anzeige erscheint die Kontrollanzeige RPT.<br />
• Ordner wiederholen: Durch zweimaliges Drücken der Taste REPEAT/ENTER kann der momentan<br />
spielende Ordner endlos wiederholt werden. In der Anzeige erscheint die Kontrollanzeige RPT FOLDER.<br />
• CD wiederholen: Durch dreimaliges Drücken der Taste REPEAT/ENTER kann die CD endlos wiederholt<br />
werden. In der Anzeige erscheint die Kontrollanzeige RPT ALL.<br />
• Zufallswiedergabe: Durch viermaliges Drücken der Taste REPEAT/ENTER können die Titel in<br />
Zufallswiedergabe wiedergegeben werden. In der Anzeige erscheint die Kontrollanzeige RDM.<br />
• Wiedergabemodi deaktivieren: Je nach Modus, betätigen Sie die Taste REPEAT/ENTER so oft, bis<br />
die Kontrollanzeigen RPT, RPT FOLDER, RPT ALL oder RDM in der Anzeige erlöschen. Die entsprechende<br />
Funktion ist somit deaktiviert. Wird die Disc gestoppt oder andersweitig angehalten, so werden die<br />
Wiedergabemodi ebenfalls deaktiviert.<br />
Die Wiedergabemodi „RPT“, „RPT FOLDER“, „RPT ALL“ und „RDM“ lassen sich auch einschalten,<br />
wenn wie Wiedergabe pausiert ist.<br />
Programm abspielen<br />
• Das Gerät bietet die Möglichkeit 99 Titel in beliebiger Reihenfolge abzuspielen. Je nach Wunsch können Titel<br />
mehr als einmal programmiert werden. Gehen Sie dazu in nachfolgend beschriebener Reihenfolge vor.<br />
• Legen Sie eine Disc wie zuvor beschrieben in das CD-Fach ein.<br />
• Schalten Sie das Gerät durch Betätigung der Taste /BAND (25) in den Stopp-Modus.<br />
• Betätigen Sie die Taste CLOCK/PROGRAM (35) einmal. In der Anzeige<br />
werden F00 P--01, davon F00 blinkend, und MEM angezeigt.<br />
• Wählen Sie mit den Tasten /FOLDER + (29) und /FOLDER- (36)<br />
einen gewünschten Ordner aus und bestätigen die Eingabe durch Drücken der<br />
Abb. 16<br />
Taste CLOCK/PROGRAM. T00 blinkt in der Anzeige.<br />
• Wählen Sie mit den Tasten TUNING -/ (33) und TUNING + / (26), einen zu programmieren<br />
gewünschten Titel der Disc aus und speichern diesen durch Betätigung der Taste oder CLOCK/PROGRAM.<br />
Der zweite Speicherplatz (F00 P--02) wird geöffnet und kann wie zuvor wiederum belegt werden.<br />
• Sind alle 99 Speicherplätze belegt, so zeigt die Anzeige PROGFUL an. Um das Programm abspielen zu<br />
können, müssen nicht alle Speicherplätze belegt sein.<br />
• Programm abspielen: Spielen Sie das Programm durch Drücken der Taste PLAY/PAUSE (32) ab.<br />
• Programm stoppen: Durch einmaliges Drücken der Taste /BAND kann die Wiedergabe des<br />
Programms gestoppt werden.<br />
• Programm löschen: Das Programm lässt sich durch zweimaliges Betätigen der Taste /BAND oder<br />
Öffnen des CD-Faches oder Wechseln in einen anderen Betriebsmodus löschen. Die Kontrollanzeige MEM<br />
erlischt in der Anzeige.<br />
<strong>JGC</strong>-<strong>MS</strong>-<strong>8110</strong>-IM-DE-EN-V2.indb 15 24/08/2009 4:51 PM<br />
15<br />
DEUTSCH
DEUTSCH<br />
16<br />
USB SPEICHERGERÄT UND SD/MMC KARTE<br />
USB Speichergerät anschließen<br />
• Verwenden Sie kein Verlängerungskabel, um das USB Speichergerät mit dem Wiedergabegerät zu verbinden.<br />
• USB Speichergeräte müssen FAT formatiert sein. NTFS formatierte Geräte werden nicht erkannt.<br />
• Über USB Speichergeräte lassen sich die Audioformate Audio CD, MP3 abspielen.<br />
• Der USB Anschluss (4) ist mit den Standards 1.1 und 2.0 verwendbar.<br />
• Das Gerät unterstützt nur USB-Speicher mit einer Kapazität von bis zu 8 GB.<br />
• Aufgrund von sich ändernden Technologien kann es vorkommen, dass bestimmte USB-Speicher nicht<br />
kompatibel mit diesem Gerät sind.<br />
• Klappen Sie die USB/SD-Abdeckung hoch und stecken Sie den USB Stecker des Speichergerätes in den<br />
USB Anschluss (4) am Gerät.<br />
• Schalten Sie das Gerät ein und wählen durch Betätigen der Taste FUNCTION (24) USB aus. Das Gerät wird<br />
nun das USB Speichergerät einlesen und mit dem Abspielen des ersten Titels beginnen.<br />
• Sind keine lesbaren Formate vorhanden, so zeigt die Anzeige NOFILE an.<br />
• Ist kein USB Speichergerät mit dem Abspielgerät verbunden, so zeigt die Anzeige NO USB an.<br />
• Beim Abspielen über USB erscheint in der Anzeige die Kontrollanzeige USB.<br />
SD/MMC Karte anschließen<br />
• SD oder MMC Speicherkarten müssen FAT formatiert sein. NTFS formatierte Karten werden nicht erkannt.<br />
• Über SD und MMC Karten lassen sich die Audioformate Audio CD, MP3 abspielen.<br />
• Das Gerät unterstützt nur SD/MMC-Karten mit einer Kapazität von bis zu 8 GB.<br />
• Aufgrund von sich ändernden Technologien kann es vorkommen, dass bestimmte SD/MMC-Karten nicht<br />
kompatibel mit diesem Gerät sind.<br />
• Klappen Sie die USB/SD-Abdeckung hoch und stecken Sie eine SD oder MMC Karte in den SD/MMC<br />
Kartenschlitz (5). Beim Einstecken darauf achten, dass die Kontakte der Karte in Richtung Gerätevorderseite<br />
zeigen.<br />
• Schalten Sie das Gerät ein und wählen durch Betätigen der Taste FUNCTION (24) CARD aus. Das Gerät wird<br />
nun die SD oder MMC Karte einlesen und mit dem Abspielen des ersten Titels beginnen.<br />
• Kann die Karte nicht gelesen werden, so zeigt die Anzeige NOFILE an.<br />
• Ist keine SD/MMC-Karte mit dem Abspielgerät verbunden, so zeigt die Anzeige NO CARD an.<br />
• Beim Abspielen einer SD oder MMC Karte erscheint in der Anzeige die Kontrollanzeige CARD.<br />
Es wird empfohlen, das Abspielen zuerst durch Drücken der Taste /BAND (25) anzuhalten, bevor<br />
die USB/SD MMC-Verbindung getrennt wird.<br />
Abspielen vom USB Speichergerät oder SD/MMC Karte<br />
• Das Abspielen und die Titelprogrammierung funktionieren auf gleiche Weise wie in den Kapiteln „AUDIO-CD<br />
ABSPIELEN“ und „MP3 DISC ABSPIELEN“ beschrieben.<br />
• Vor dem Abspielen sollten Sie sich vergewissern, welche Formate das USB Speichergerät bzw. die SD oder<br />
MMC Karte enthält, damit kontrolliertes Abspielen stattfinden kann.<br />
<strong>JGC</strong>-<strong>MS</strong>-<strong>8110</strong>-IM-DE-EN-V2.indb 16 24/08/2009 4:51 PM
IPOD<br />
iPod Übersicht<br />
• iPod ist eine eingetragene Marke der Apple Inc.<br />
• Dieses Wiedergabegerät ist mit einem iPod-Dock ausgerüstet, welches Ihnen erlaubt, Musik von Ihrem iPod<br />
über die Lautsprecher des Gerätes wiederzugeben und auch die Batterie zu laden. Das Gerät ist mit einem<br />
universellen iPod-Anschluss ausgestattet. Modelle mit 30 Anschlusskontakten sind nachfolgend erwähnt:<br />
- iPod Mini 1./2. Generation<br />
- iPod Nano 1./2./3./4. Generation<br />
- iPod 4. Generation<br />
- iPod classic<br />
- iPod 5. Generation (Video)<br />
- iPod touch 1./2. Generation<br />
Bevor Sie Ihren iPod anschließen, beachten Sie ebenfalls die iPod Bedienungsanleitung bezüglich<br />
Sicherheitshinweise und Gebrauch mit anderen Geräten.<br />
iPod aufsetzen/abnehmen<br />
• Stecken Sie Ihren iPod vorsichtig auf den iPod-Anschluss (7) auf. iPod müssen dabei in Richtung<br />
Gerätevorderseite zeigen.<br />
• Mit Dock-Adapter: Stecken Sie den richtigen Adapter (nicht im Lieferumfang enthalten) auf den Anschluss.<br />
Setzen Sie anschließend den iPod auf. Der iPod darf sich dabei nicht in einer Schutzhülle oder einem<br />
Schutzgehäuse befinden.<br />
• Zum Abnehmen, den iPod vorsichtig hochziehen und abnehmen.<br />
Es wird empfohlen, das Abspielen zuerst durch Drücken der Taste /BAND (25) anzuhalten, bevor<br />
Sie den iPod abheben.<br />
iPod-Betrieb<br />
• Schalten Sie das Wiedergabegerät ein. Zusätzlich muss beim iPod touch auf das Musik Symbol geklickt<br />
werden.<br />
• Wählen Sie durch Betätigen der Taste FUNCTION (24) IPOD aus und der erste Titel wird automatisch<br />
abgespielt.<br />
• Der iPod kann zum Abspielen auch mit den iPod-Funktionstasten gesteuert werden. Die iPod-Tastatur, wenn<br />
nötig, zuerst entsperren.<br />
• Lautstärke einstellen: Mit den Tasten VOL+ (27) und VOL- (34) kann die Lautstärke einreguliert werden.<br />
+ erhöht die Lautstärke und - verringert diese.<br />
• Abspielen/Pausieren: Drücken Sie die Taste PLAY/PAUSE (32), um die Wiedergabe zu pausieren und<br />
abzuspielen. Wiedergabe und Pause werden in der Anzeige des iPods angezeigt.<br />
• Stoppen: Um die Wiedergabe zu stoppen, drücken Sie die Taste /BAND (25).<br />
• Titel vor und zurück: Mit den Tasten TUNING -/ (33) und TUNING + / (26), können Sie Titel<br />
überspringen bzw. vor- oder zurückspringen. Durch einmaliges Betätigen der Taste TUNING -/ (33),<br />
wird der spielende Titel wieder von vorne wiedergegeben. Durch zweimaliges Betätigen wird der vorherige<br />
Titel wiedergegeben. Durch Betätigung der Taste TUNING + / (26), wird der nächste Titel abgespielt.<br />
<strong>JGC</strong>-<strong>MS</strong>-<strong>8110</strong>-IM-DE-EN-V2.indb 17 24/08/2009 4:51 PM<br />
17<br />
DEUTSCH
DEUTSCH<br />
18<br />
AUX-IN ANSCHLUSS<br />
• Vor- und zurückspulen: Durch Festhalten der Tasten TUNING -/ (33) und TUNING + / (26),<br />
können Sie Titel vor -und zurückspulen. Wenn die gewünschte Stelle gefunden wurde, Taste loslassen, um<br />
mit der Wiedergabe fortzufahren.<br />
• iPod-Menü bedienen: Mit den Tasten /FOLDER + (29), /FOLDER- (36), REPEAT/ENTER (28)<br />
und MEMORY/MENU (30) kann das Menü des iPods gesteuert werden.<br />
Beispiel: Drücken Sie die Taste MEMORY/MENU, um das Menü des iPods aufzurufen. Mit den Tasten<br />
/FOLDER +, /FOLDER- , die entsprechende Menüauswahl treffen und mit der Taste REPEAT/<br />
ENTER bestätigen.<br />
• iPod-Batterie aufladen: Der iPod wird aufgeladen, während sich das Gerät in folgenden Abspielmodi<br />
befindet: USB, CARD, IPOD, AUX und im Standby Modus.<br />
iPod-Geräte die nicht diesem Dock entsprechen, werden nicht aufgeladen.<br />
Externes Gerät über den AUX-IN-Anschluss anschließen<br />
• Über den AUX-IN-Anschluss (20) an der Geräterückseite lässt sich ein externes Abspielgerät (z.B. MP3-<br />
Player) mit diesem Abspielgerät verbinden und Musik über die Lautsprecher wiedergeben.<br />
• Vorsicht! Bevor Sie Ihr externes Abspielgerät (z.B. MP3-Player) anschließen, beachten Sie ebenfalls dessen<br />
Bedienungsanleitung bezüglich Sicherheitshinweise und Gebrauch mit anderen Geräten.<br />
• Verwenden Sie zum Anschluss das dem Lieferumfang beiliegende Ø3,5mm Stereoklinkenkabel.<br />
• Schalten Sie das Wiedergabegerät (Standby Modus) und das externe Gerät aus.<br />
• Verbinden Sie das Klinkenkabel mit der Buchse AUX-IN (20) an der Geräterückseite und stecken das<br />
andere Ende in den Kopfhörerausgang oder den LINE-OUT Ausgang des Abspielgerätes. Sollte das externe<br />
Gerät eine kleinere oder größere Buchse aufweisen, so verwenden Sie einen passenden Adapter (nicht im<br />
Lieferumfang enthalten).<br />
• Schalten Sie das externe Gerät zuerst ein und stellen dessen Lautstärke auf null zurück. Schalten Sie dann<br />
dieses Gerät ein und stellen die Lautstärke ebenfalls auf null.<br />
• Betätigen der Taste FUNCTION (24) so oft, bis in der Anzeige AUX angezeigt wird.<br />
• Regulieren Sie nun die Lautstärke bei beiden Geräten ein. Wird das externe Gerät über den LINE-OUT<br />
Ausgang am externen Gerät mit dem Wiedergabegerät verbunden, so regeln Sie die Lautstärke am<br />
Wiedergabegerät.<br />
• Regeln Sie die Wiedergabe am externen Gerät.<br />
• Beachten Sie, dass wenn Sie nur dieses Gerät ausschalten, das externe Wiedergabegerät weiterspielt.<br />
<strong>JGC</strong>-<strong>MS</strong>-<strong>8110</strong>-IM-DE-EN-V2.indb 18 24/08/2009 4:51 PM
Allgemeine Reinigung<br />
• Ziehen Sie vor jeder Reinigung den Netzstecker aus der Steckdose.<br />
• Achtung! Kein Wasser darf in das Gerät eintreten.<br />
• Das Gehäuse mit einem leicht angefeuchteten Tuch reinigen.<br />
• Keine scharfen, scheuernden oder abtragenden Reinigungsmittel verwenden.<br />
• Keine Chemikalien (z.B. Benzin, Alkohol) zur Reinigung des Gehäuses verwenden.<br />
• Achten Sie bei der Reinigung darauf, das iPod-Dock nicht zu beschädigen.<br />
REINIGUNG UND PLEGE<br />
Behandlung der Compact-Disc<br />
• Obwohl Compact-Discs so gefertigt sind, dass ihnen eine gewisse Menge an Staub und Kratzern nichts<br />
ausmacht, sollten sie mit der gleichen Sorgfalt wie normale Schallplatten behandelt werden.<br />
• Compact-Discs vor Staub, Kratzern usw. schützen.<br />
• Compact-Discs bei Nichtbenutzung immer in den Disc-Hüllen aufbewahren.<br />
• Um einen ausgezeichneten Klang zu erhalten, Compact-Discs ab und zu mit einem weichen Tuch, von innen<br />
nach außen - nicht in kreisförmiger Bewegung - abwischen. Zur Reinigung auf keinen Fall Benzin oder<br />
Verdünner verwenden.<br />
• Compact-Disc nur an ihren Rändern anfassen!<br />
• Audio-Compact Disc: Ausschließlich Compact-Discs mit nebenstehendem Emblem<br />
verwenden.<br />
• Keine Fremdgegenstände in das CD-Fach legen, da hierdurch die Mechanik zerstört<br />
werden kann.<br />
• Um Verschmutzung durch Staub zu vermeiden, den CD-Fachdeckel nicht länger als<br />
notwendig offen stehen lassen.<br />
• Die Linse im CD-Fach auf keinen Fall berühren.<br />
• Ist die Compact-Disc stark verschmutzt oder weist sie starke Fingerabdrücke auf, kann<br />
es passieren, dass das Abspielen verzögert wird oder an einer anderen Stelle beginnt.<br />
• Die Digitalsignale auf der Compact-Disc werden von einem Laser durch eine optische<br />
Linse gelesen (nicht berühren). Auf dieser kann sich - wenn der Player von einem kalten<br />
Platz zu einem warmen Platz transportiert wird oder wenn ein kalter Raum schnell<br />
geheizt wird - Feuchtigkeit niederschlagen, so dass der CD-Player eventuell nicht<br />
ordnungsgemäß arbeitet. In diesem Fall empfehlen wir, das Gerät vor dem Gebrauch ca.<br />
1 Stunde zu akklimatisieren. Dazu die CD entnehmen. Wenn sich das Problem dadurch<br />
nicht beseitigen lässt, an einen Fachhändler wenden.<br />
Abb. 16<br />
<strong>JGC</strong>-<strong>MS</strong>-<strong>8110</strong>-IM-DE-EN-V2.indb 19 24/08/2009 4:51 PM<br />
19<br />
DEUTSCH
DEUTSCH<br />
20<br />
FEHLERBEHEBUNG<br />
Wenn ein Fehler auftritt, überprüfen Sie zuerst unten stehende Tabelle, bevor Sie sich an Ihren Händler wenden<br />
oder das Gerät einschicken. Die Adresse und Hotlinenummer finden Sie auf der Garantiekarte. Öffnen Sie das<br />
Gerät nicht und versuchen Sie nicht, es selbst zu reparieren. Sie verlieren die Garantieansprüche und es besteht<br />
Unfallgefahr! Beachten Sie die Garantiebedingungen auf den folgenden Seiten.<br />
Fehler Möglicher Grund Abhilfe<br />
Radiobetrieb<br />
Kein Radiosignal. Gerät befindet sich nicht im<br />
Radiomodus.<br />
Stören bei Wiedergabe von UKW<br />
oder MW Radio.<br />
Stereo Kontrollanzeige ST leuchtet<br />
im UKW-Berieb nicht auf.<br />
Schalten Sie das Gerät in den<br />
Radiomodus.<br />
Sender nicht richtig eingestellt. Stellen Sie den Sender neu ein.<br />
UKW: Antenne nicht richtig<br />
ausgerollt.<br />
MW: Gerät ist nicht richtig<br />
ausgerichtet.<br />
UKW Signal ist nicht stark genug<br />
oder der Sender ist ein Mono-<br />
Sender.<br />
UKW oder MW Radio hat kein Ton. Das Gerät befindet sich nicht im<br />
Radiomodus.<br />
CD Player<br />
Legen Sie die Antenne richtig aus.<br />
Richten Sie das Gerät neu aus.<br />
Legen Sie die Antenne neu aus<br />
oder suchen Sie einen anderen<br />
passenden Sender.<br />
Stellen Sie den Radiomodus ein.<br />
Lautstärke steht auf MIN. Erhöhen Sie die Lautstärke.<br />
CD Player arbeitet nicht. Die Einheit befindet sich nicht im<br />
CD-Wiedergabemodus.<br />
CD setzt während dem Abspielen<br />
aus.<br />
USB Betrieb<br />
USB Speichergerät wird nicht<br />
erkannt.<br />
CD ist nicht richtig eingelegt oder<br />
keine CD ist eingelegt.<br />
CD ist nicht kompatibel mit diesem<br />
Gerät. Audio-Formate die das Gerät<br />
nicht wiedergeben kann.<br />
Wählen Sie den CD-<br />
Wiedergabemodus an.<br />
Legen Sie eine CD ein.<br />
Kontrollieren Sie, dass das Label<br />
der CD nach oben zeigt und die CD<br />
richtig auf der Aufnahme sitzt.<br />
Legen Sie eine passende CD mit<br />
abspielfähigen Audio-Formaten ein.<br />
CD ist verschmutzt oder verkratzt. Reinigen Sie die CD oder spielen<br />
eine andere CD ab.<br />
USB-Speichergerät nicht korrekt<br />
mit Abspielgerät verbunden.<br />
Kontrollieren Sie die Verbindung<br />
zwischen USB-Speichergerät und<br />
Abspielgerät.<br />
<strong>JGC</strong>-<strong>MS</strong>-<strong>8110</strong>-IM-DE-EN-V2.indb 20 24/08/2009 4:51 PM
Dateien werden nicht gelesen. USB-Speichergerät falsch<br />
formatiert.<br />
SD/MMC Betrieb<br />
FEHLERBEHEBUNG<br />
USB-Speichergerät muss FAT<br />
formatiert sein.<br />
Achtung! Formatieren löscht alle<br />
Daten auf dem USB-Speichergerät.<br />
Unbekanntes Dateiformat. Das Abspielgerät kann nur<br />
die Formate Audio CD, MP3<br />
wiedergeben.<br />
Karte wird nicht erkannt. Karte nicht korrekt mit Abspielgerät<br />
verbunden.<br />
Schieben Sie die Karte bis<br />
zum Anschlag korrekt in den<br />
Kartenschlitz.<br />
Karte verkehrt eingeschoben. Kontakte müssen nach unten und<br />
zur Vorderseite des Gerätes zeigen.<br />
Dateien werden nicht gelesen. Karte falsch formatiert. Karte muss FAT formatiert sein.<br />
Achtung! Formatieren löscht alle<br />
Daten auf der Karte.<br />
iPod<br />
Tasten der Abspieleinheit und<br />
der Fernbedienung zeigen keine<br />
Reaktion.<br />
AUX-IN<br />
Unbekanntes Dateiformat. Das Abspielgerät kann nur<br />
die Formate Audio CD, MP3<br />
wiedergeben.<br />
iPod ist nicht richtig aufgesetzt. Überprüfen Sie die Verbindung<br />
zwischen iPod und Abspielgerät.<br />
Batterien der Fernbedienung sind<br />
verbraucht.<br />
Tauschen Sie die Batterien aus.<br />
Keine Tonwiedergabe. Lautstärke nicht richtig eingestellt. Die Lautstärke muss je nach Gerät<br />
beim extern angeschlossenen<br />
Gerät und dem Abspielgerät<br />
eingestellt werden.<br />
Weist das externe Gerät einen<br />
LINE-OUT-Ausgang auf, so<br />
stellen Sie die Lautstärke beim<br />
Abspielgerät ein.<br />
Es erfolgt keine Wiedergabe. Verbindung fehlerhaft. Kontrollieren Sie die Verbindung<br />
zum Gerät. Verwenden Sie das<br />
beiliegende Stereoklinkenkabel.<br />
<strong>JGC</strong>-<strong>MS</strong>-<strong>8110</strong>-IM-DE-EN-V2.indb 21 24/08/2009 4:51 PM<br />
21<br />
DEUTSCH
DEUTSCH<br />
22<br />
TECHNISCHE DATEN<br />
Stromversorgung AC 230-240V~, 50Hz<br />
Leistungsaufnahme 55 W<br />
Fernbedienung 3 V 2 x 1,5V LR03/AAA Batterien (im Lieferumfang enthalten)<br />
Lasertyp Klasse 1<br />
Abmessungen 360(W) x 160(H) x 212(T) mm<br />
Radio<br />
UKW 87,5 - 108 MHz<br />
MW 522 - 1620 kHz<br />
Laufwerk für 8 cm und 12 cm Durchmesser; nur kreisförmig, keine<br />
Sonderformen<br />
CD-Formate CD Audio, CD-R, CD-RW<br />
Speicherformate USB Typ 1.1, Typ 2.0; SD/MMC-Speicherkarte<br />
Unterstützte Speichergröße Max. 8 GB<br />
Hergestellt für <strong>JGC</strong>-Company GmbH<br />
Heckhofweg 146<br />
50739 Köln<br />
Kundendienst <strong>E2</strong> <strong>Servicecenter</strong> GmbH<br />
Telefon<br />
Montag - Freitag 10-18 Uhr<br />
Tragen Sie hier die Seriennummer Ihres<br />
Gerätes ein:<br />
Max-Planck-Strasse 13<br />
50858 Köln-Marsdorf<br />
01805- 22 17 84<br />
(EUR 0,14 /Min. aus dem deutschen Festnetz; ggf. abweichender<br />
Mobilfunktarif)<br />
<strong>JGC</strong>-<strong>MS</strong>-<strong>8110</strong>-IM-DE-EN-V2.indb 22 24/08/2009 4:51 PM
Kunden Info<br />
Herstellergarantie<br />
Wir freuen uns, dass Sie sich für den Erwerb eines Produktes unseres Hauses entschieden haben<br />
und wünschen Ihnen viel Spaß und Freude mit diesem hochwertigen Produkt. Unsere strenge<br />
Fertigungskontrolle gewährleistet die hohe Qualität unserer Geräte. Für den Fall, dass Sie dennoch<br />
eine berechtigte Beanstandung haben, gewähren wir eine Garantie für die Dauer von<br />
GARANTIE<br />
3 Jahren<br />
ab Kaufdatum zu den nachfolgenden Bedingungen:<br />
AUFBEWAHREN<br />
Die Garantiedauer beträgt 3 Jahre ab Kaufdatum.<br />
JAHRE 3 KAUFNACHWEIS<br />
Service-Telefon:<br />
O18O5 / 22 17 84 (€ 0,14 per Min)<br />
MIT<br />
E 2 <strong>Servicecenter</strong> GmbH,<br />
BITTE<br />
Max-Planck-Strasse 13,<br />
50858 Köln-Marsdorf<br />
www.e2service.de<br />
DOKUMENT!<br />
ACHTUNG: Unfrei eingeschickte Sendungen werden nicht angenommen! WICHTIGES<br />
Diese Garantie lässt Ihre gesetzlichen Gewährleistungsansprüche als Verbraucher gegenüber<br />
dem Verkäufer des Gerätes unberührt. Diese Rechte werden durch die von uns gewährte<br />
Herstellergarantie nicht eingeschränkt. Die von uns gewährte Garantie hat nur Gültigkeit für den<br />
privaten Gebrauch des Gerätes und beschränkt sich auf das Gebiet der Bundesrepublik Deutschland.<br />
Es liegt im Ermessen von <strong>JGC</strong>, ob die Garantie durch <strong>Reparatur</strong> oder Austausch des Gerätes bzw.<br />
des defekten Teiles erfüllt wird. Weitere Ansprüche sind ausgeschlossen. Sollten Sie Fragen zu <strong>JGC</strong><br />
Produkten haben, sparen Sie sich den zeitraubenden Weg zum Händler und wenden sich direkt an<br />
unsere Servicehotline oder unser <strong>Servicecenter</strong>. Ein Team von hochqualifizierten Produktberatern<br />
und Technikern steht Ihnen Montag bis Freitag von 10 – 18 Uhr zur Verfügung.<br />
Sollten Sie Ihr Gerät einsenden, ist eine kurze Beschreibung Ihrer Beanstandung erforderlich, das<br />
unterstützt die schnelle Abwicklung. Senden Sie Ihr Gerät ausnahmslos nur zu unserem autorisierten<br />
Servicepartner und verwenden Sie bitte hierzu den beiliegenden Retourenzettel. Sollte dieser<br />
Retourenzettel fehlen, wenden Sie sich bitte an die oben genannte Servicehotline.<br />
<strong>JGC</strong>-<strong>MS</strong>-<strong>8110</strong>-IM-DE-EN-V2.indb 23 24/08/2009 4:51 PM<br />
23<br />
DEUTSCH
DEUTSCH<br />
24<br />
GARANTIE<br />
Kunden Info<br />
Herstellergarantie<br />
Zur Durchführung einer Garantiereparatur benötigt unser Servicepartner unbedingt den<br />
Kaufnachweis, entweder als Originalrechnung oder den vom Händler maschinengedruckten<br />
Kassenbeleg. Weiterhin muss die Seriennummer am Gerät lesbar sein. Ohne Kaufnachweis<br />
können wir leider keine kostenlosen Garantieleistungen erbringen. Wir empfehlen Ihnen, die<br />
Originalverpackung aufzubewahren, um im Garantiefall einen sicheren Transport des Gerätes zu<br />
gewährleisten.<br />
Garantie-<strong>Reparatur</strong>en dürfen ausschließlich von der <strong>E2</strong> <strong>Servicecenter</strong> GmbH oder von dieser<br />
autorisierten Vertragswerkstätten ausgeführt werden. Bei <strong>Reparatur</strong>en, die selbst oder von anderen<br />
Werkstätten ausgeführt werden, entfällt jeglicher Garantieanspruch und es besteht kein Anspruch<br />
auf Kostenerstattung.<br />
Kein Garantieanspruch besteht:<br />
bei unsachgemäßer Behandlung<br />
bei mechanischer Beschädigung des Gerätes von außen<br />
bei Transportschäden<br />
für Verschleißteile<br />
bei Bedienungsfehlern und zweckfremder Benutzung<br />
bei Aufstellung des Gerätes in Feuchträumen oder im Freien<br />
bei Schäden, die auf höhere Gewalt, Krieg, Wasser, Blitzschlag, Überspannung und andere<br />
von <strong>JGC</strong> nicht zu verantwortende Gründe zurückzuführen sind<br />
bei übermäßiger Nutzung, insbesondere bei anderer als privater Nutzung<br />
bei Missachtung der Bedienungsanleitung und Installationsfehlern<br />
wenn das Gerät keinen technischen Defekt aufweist<br />
für Transport- und Fahrtkosten sowie durch Auf- und Abbau des Gerätes entstandene Kosten<br />
Die Garantie umfasst keine weitergehende Haftung unsererseits, insbesondere keine Haftung für<br />
Schäden, die nicht am Gerät selbst entstanden sind oder die durch den Ausfall des Gerätes bis zur<br />
Instandsetzung entstehen (z.B. Wegekosten, Handlingkosten, etc.). Hierdurch wird jedoch unsere<br />
gesetzliche Haftung, insbesondere nach dem Produkthaftungsgesetz, nicht eingeschränkt oder<br />
ausgeschlossen. Ebenfalls haftet <strong>JGC</strong> nicht für den indirekten bzw. in Folge auftretenden Verlust<br />
von Tonträgern (CD/DVD etc.) oder ähnlichem Material, sowie Zusatzgeräten jeglicher Art (Netzteile,<br />
Lautsprecher etc.).<br />
Von uns erbrachte Garantieleistungen verlängern die Garantiefrist von 3 Jahren ab Kaufdatum nicht,<br />
auch nicht hinsichtlich eventuell ausgetauschter Komponenten.<br />
Wir wünschen Ihnen viel Spaß mit Ihrem neuen Gerät und hoffen, dass auch Ihr Nächstes<br />
wieder ein <strong>JGC</strong> Produkt sein wird. WICHTIGES DOKUMENT! BITTE MIT KAUFNACHWEIS 3 JAHRE AUFBEWAHREN<br />
<strong>JGC</strong>-<strong>MS</strong>-<strong>8110</strong>-IM-DE-EN-V2.indb 24 24/08/2009 4:51 PM
ENGLISH<br />
25<br />
TABLE OF CONTENTS<br />
TABLE OF CONTENTS.............................................................................................................................25<br />
IMPORTANT SAFETY INSTRUCTIONS .......................................................................................................26-28<br />
CONTROL ELEMENTS.............................................................................................................................29-30<br />
PREPARATION ........................................................................................................................................31<br />
BASIC FUNCTIONS .................................................................................................................................32<br />
SETTING THE TIME .................................................................................................................................33<br />
USING THE RADIO ..................................................................................................................................34<br />
DISC FORMATS / INSERTING THE DISC ....................................................................................................35<br />
PLAYING AUDIO-CDS ..............................................................................................................................36<br />
PLAYING MP3 DISCS ..............................................................................................................................37-38<br />
USB STORAGE DEVICES AND SD/MMC CARDS ........................................................................................39<br />
IPOD .....................................................................................................................................................40<br />
AUX-IN JACK .........................................................................................................................................41<br />
CLEANING AND MAINTENANCE ...............................................................................................................42<br />
TROUBLESHOOTING ...............................................................................................................................43-44<br />
TECHNICAL DATA ...................................................................................................................................45<br />
WARRANTY ...........................................................................................................................................46-47<br />
Proper disposal of this product.<br />
This label indicates that, in the EU, electronic devices cannot be disposed of with regular<br />
household waste.<br />
Please use the return or collections systems of your municipality or contact the seller where<br />
you purchased this product.<br />
Please dispose of batteries environmentally friendly. Do not dispose of batteries with regular<br />
household waste. Please use the return or collections systems of your municipality or contact<br />
the seller where you purchased this product.<br />
<strong>JGC</strong>-<strong>MS</strong>-<strong>8110</strong>-IM-DE-EN-V2.indb 25 24/08/2009 4:51 PM
Symbol legend<br />
CAUTION<br />
Danger of<br />
electric shock.<br />
Do not open!<br />
Warning: In order to prevent the danger of electric<br />
shock, do not remove the outer casing.<br />
There are no useful parts for the user inside the<br />
device.<br />
Leave repairs for qualified service personnel only.<br />
IMPORTANT SAFETY INSTRUCTIONS<br />
This device uses a Class 1 laser.<br />
The lightening symbol in the triangle<br />
indicates to the user that there is<br />
uninsulated and therefore “dangerous<br />
voltage” in this device that could be<br />
strong enough to cause a serious<br />
electric shock.<br />
The “i” in the frame provides you with<br />
important tips for using the device as<br />
well as for troubleshooting.<br />
General<br />
• Read the corresponding instructions and safety instructions carefully prior to using the device for the first<br />
time.<br />
• Keep these operating instructions within reach for future reference as needed.<br />
• When passing on this device to a third party, also hand over these operating instructions.<br />
• Pay particular attention to the warnings on the device and in the operating instructions.<br />
• Only use this device for its intended purpose. Improper use can lead to hazards and accidents.<br />
• This device is only suitable for private household use and is not intended for commercial use.<br />
• This device is not intended for use by persons (including children) with reduced physical, sensory or mental<br />
capabilities, or lack of experience and knowledge, unless they have been given supervision or instruction<br />
concerning use of the device by a person responsible for their safety.<br />
• Children should be supervised to ensure that they do not play with the device.<br />
• Do not open the casing under any circumstances.<br />
• Caution with the sound level! Be careful when setting the volume. Extreme sound levels can lead to<br />
irreparable hearing damage.<br />
• Do not under any circumstances attempt to repair the device yourself. For servicing and repairs, please<br />
consult an authorised dealer or qualified customer service centre.<br />
• Never immerse electrical parts of the device in water during cleaning or operation. Never hold the device<br />
under running water.<br />
• Do not insert foreign objects inside this device.<br />
<strong>JGC</strong>-<strong>MS</strong>-<strong>8110</strong>-IM-DE-EN-V2.indb 26 24/08/2009 4:51 PM<br />
26<br />
ENGLISH
ENGLISH<br />
27<br />
IMPORTANT SAFETY INSTRUCTIONS<br />
Installation location<br />
• This device is only intended for usage indoors where it is protected. Do not use it outside!<br />
• Protect this device from extreme heat (over 35°C) and cold (under 5°C) as well as from direct sunlight and<br />
dust.<br />
• Do not use this device in a very dry environment. This can result in electrostatic discharges.<br />
• Danger of electrocution! Never use this device right next to water – e.g. bath tub, sink, water bucket, in a<br />
damp basement or near a swimming pool.<br />
• Only use this device in temperate latitudes; avoid using it in tropical and in especially damp climates.<br />
• Do not place any objects with open flames, such as candles, on top of this device.<br />
• Do not place any objects filled with liquids, such as vases, on top of this device.<br />
• Make sure that the ventilation of the device is not hindered due to the ventilation openings being covered up<br />
by for example, newspapers, tablecloths, curtains, etc.<br />
• Leave at least 10 cm of clearance around the device to guarantee proper ventilation.<br />
• Avoid using it in areas with insufficient ventilation (e.g. on book shelves, behind curtains, between pieces of<br />
furniture).<br />
• Keep this device away from all heat sources like for example, ovens, hot plates and other heat-producing<br />
devices / objects.<br />
• In order to reduce the risk of fire and electric shock, do not expose this device to fire (fireplace, barbeque,<br />
candles, cigars, etc.) or water (dripping water, splashing water, vases, bath tubs, ponds, etc.).<br />
Power supply<br />
• Prior to connecting to the power supply, make sure that the power supply and the type of power correspond<br />
to the information on the label.<br />
• The power plug is used as the disconnect device. Please be sure that the power plug is in operable<br />
condition.<br />
• Only removing the power plug can separate the device completely from the mains supply.<br />
• Only unplug from the power outlet by the plug itself. Do not pull on the cord.<br />
• Avoid damages to the power cord that may be caused by kinks or contact with sharp corners.<br />
• Unplug the power cord when not in use, during disruption in operation and before cleaning.<br />
• Unplug the power cord during lightning storms and prolonged absence in order to protect the electronics<br />
against overvoltage and damage.<br />
• If the power cord or the casing of the device is damaged or if the device is dropped, the device may not be<br />
used before it is examined by a professional electrician.<br />
• A damaged power cord may only be replaced by the manufacturer or a workshop commissioned by the<br />
manufacturer or by a similarly qualified person in order to avoid hazards.<br />
• Protect the power cord and the housing from damage.<br />
• Attention: In case of a defect due to electrostatic discharges and power surges, reset the device by<br />
unplugging it.<br />
• Attention: In case of a defect due to electrostatic discharges and power surges, reset the USB device by<br />
unplugging it from the playback device.<br />
<strong>JGC</strong>-<strong>MS</strong>-<strong>8110</strong>-IM-DE-EN-V2.indb 27 24/08/2009 4:51 PM
IMPORTANT SAFETY INSTRUCTIONS<br />
Condensation<br />
• Should this device be cold and be brought into a warm and possibly damp environment, condensation<br />
can build up inside it. Condensation can hinder the proper functioning of the device. In extreme cases,<br />
condensation can also result in damages caused by a short circuit. Leave the device in a warm, dry<br />
environment for about 1-2 hours in order to dry up or release any possible condensation before you use it<br />
again.<br />
Batteries<br />
• Attention: There is a danger of explosion if the batteries are not exchanged properly.<br />
• Do not short-circuit the batteries!<br />
• Always change the entire battery pack. Do not mix old and new batteries, or batteries with different charge<br />
state.<br />
• Make sure the batteries are correctly inserted. Pay close attention to the (+) plus / (-) minus polarities on the<br />
batteries and on the casing. Improperly inserted batteries can result in leakage or in extreme cases, could<br />
cause a fire or an explosion.<br />
• If the device is not to be used for a longer period of time, then the batteries should be removed to avoid the<br />
risk of damages caused by leaking batteries. If the device no longer functions well, replace all the batteries.<br />
• Never expose batteries to excessive heat (e.g. bright sun, fire), and never throw them into fire. The batteries<br />
could explode.<br />
• Non-rechargeable batteries must not be recharged.<br />
• Rechargeable batteries are to be removed from the remote control before being charged.<br />
• Only use top-quality batteries. Cheap batteries could leak and result in damages.<br />
• If the batteries leak, remove them with a cloth and dispose of them accordingly. Prevent battery acid from<br />
coming into contact with skin and eyes. If you do get battery acid in your eyes, flush them thoroughly with<br />
lots of water and consult a physician immediately. If battery acid comes into contact with your skin, wash the<br />
affected area with lots of water and soap.<br />
• Batteries are very dangerous if swallowed. Please keep the batteries and this device away from children at<br />
all times. If a battery is swallowed, seek medical attention immediately.<br />
<strong>JGC</strong>-<strong>MS</strong>-<strong>8110</strong>-IM-DE-EN-V2.indb 28 24/08/2009 4:51 PM<br />
28<br />
ENGLISH
ENGLISH<br />
29<br />
CONTROL ELEMENTS<br />
Playback device Remote control<br />
19<br />
No. Part No./button Function No. Part No./button Function<br />
1 Infrared sensor Receives the signal from<br />
the remote control<br />
6 CD compartment<br />
cover<br />
2 LCD display Display 7 iPod connection To connect an iPod device<br />
3 Speakers (both<br />
sides)<br />
4 USB connection To connect USB storage<br />
devices<br />
5 SD/MMC card<br />
reader<br />
18 171615<br />
14 13<br />
31<br />
32<br />
33<br />
34<br />
35<br />
36<br />
37<br />
Sound reproduction 8 VOL +/- button To set the volume<br />
9 REPEAT/ENTER<br />
button<br />
For SD/MMC memory cards 10 PROG/MENU/<br />
CLOCK button<br />
1<br />
2<br />
3<br />
4<br />
5<br />
6<br />
7<br />
8<br />
9<br />
10<br />
11<br />
12<br />
20<br />
21<br />
22<br />
23<br />
Not shown: Ø3.5 mm – stereo cable<br />
-<br />
Repeat setting /<br />
enter key<br />
24<br />
25<br />
26<br />
27<br />
28<br />
29<br />
30<br />
To create a program /<br />
to set the time /<br />
iPod menu settings<br />
<strong>JGC</strong>-<strong>MS</strong>-<strong>8110</strong>-IM-DE-EN-V2.indb 29 24/08/2009 4:51 PM
CONTROL ELEMENTS<br />
No. Part No./button Function No. Part No./button Function<br />
11 Button Play the next title / search<br />
for a specific track segment<br />
/ search for a radio station<br />
25 /BAND<br />
button<br />
12 Button <strong>Start</strong> / pause playback 26 TUNING+ /<br />
button<br />
13 STOP/BAND<br />
button<br />
To stop playback/<br />
for choosing a frequency<br />
14 Button Play the previous title /<br />
search for a specific track<br />
segment / search for a radio<br />
station<br />
15 FOLDER + /<br />
button<br />
16 FOLDER - /<br />
button<br />
17 FUNCTION<br />
button<br />
18 STANDBY/ON<br />
button<br />
19 CD compartment<br />
release<br />
Select the next file /<br />
iPod menu control<br />
Select the previous file /<br />
iPod menu control<br />
Stop playback /<br />
Select a frequency<br />
Play the next title / search<br />
for a specific track segment<br />
/ search for a radio station<br />
27 VOL+ button Increase the volume<br />
28 REPEAT/ENTER<br />
button<br />
29 /FOLDER +<br />
button<br />
30 MEMORY/MENU<br />
button<br />
Select function mode 31 STANDBY/ON<br />
button<br />
Switch on the device /<br />
switch to standby mode<br />
To open the CD<br />
compartment<br />
20 AUX-IN jack To connect an external<br />
device using a stereo cable<br />
21 Headphone jack<br />
(3.5mm)<br />
To connect earphones or<br />
headphones<br />
32 PLAY/PAUSE<br />
button<br />
33 TUNING -/<br />
button<br />
Repeat setting /<br />
enter key<br />
Select the next folder /<br />
iPod menu control<br />
Save radio station /<br />
iPod menu control<br />
Switch on the device /<br />
switch to standby mode<br />
<strong>Start</strong> / pause playback<br />
Play the previous title /<br />
search for a specific track<br />
segment / search for a radio<br />
station<br />
34 VOL- button Reduce the volume<br />
35 CLOCK/<br />
PROGRAM<br />
button<br />
22 FM wire aerial Antenna for FM radio 36 /FOLDER-<br />
button<br />
23 Power cord with<br />
power plug<br />
24 FUNCTION<br />
button<br />
Create a program /<br />
set the time<br />
Select the previous folder /<br />
iPod menu control<br />
Power supply for the device 37 SLEEP button Sleep function<br />
Select function mode<br />
<strong>JGC</strong>-<strong>MS</strong>-<strong>8110</strong>-IM-DE-EN-V2.indb 30 24/08/2009 4:51 PM<br />
30<br />
ENGLISH
ENGLISH<br />
31<br />
PREPARATION<br />
Delivery contents<br />
• 1x playback device with power cord and with power plug<br />
• 1x remote control<br />
• 1x Ø3.5 mm stereo cable<br />
• 2x 1.5V LR03/AAA batteries for the<br />
remote control<br />
• 1x operating instructions<br />
Unpacking the device<br />
• Take the device and accessories carefully out of the packaging. We recommend retaining the packaging for<br />
storage purposes at a later date. If you choose to dispose of the packaging, then please do so according<br />
to the applicable legal regulations. Should you have questions regarding disposal, please consult your local<br />
authority.<br />
• Check the packaging contents for completeness and damages. Should the contents in the packaging not be<br />
complete or be damaged, immediately contact your retail outlet.<br />
Power Supply<br />
• Only connect the device to power supply with the same voltage indicated on the label. Connecting the device<br />
to the wrong voltage can result in damages, thus rendering the guarantee invalid.<br />
• Connect the power plug to a suitable power outlet. Once the connection has been established, the device<br />
switches automatically to stand-by mode.<br />
• In order to switch off the device completely, pull the power plug out of the power outlet.<br />
Inserting / replacing the batteries<br />
• Push the battery compartment cover on the bottom of the remote control in the<br />
direction of the arrow and remove the cover.<br />
• If necessary, remove the old batteries and insert two new batteries, type 1.5 V<br />
LR03/AAA, into the battery recess.<br />
• When doing so, pay attention to the correct polarity (+/-) displayed in the<br />
battery compartment. Slide on the battery compartment cover and click it into<br />
place.<br />
• Remove the batteries from the battery compartment if you know that you will<br />
not use the remote control for a longer period of time.<br />
• Read the safety instructions for using batteries (see chapter Important Safety<br />
Instructions).<br />
Instructions for remote control<br />
• Make sure that no objects are located between the infrared LED of the remote and the infrared sensor (1) on<br />
the device.<br />
• Please note that direct sunlight or room lighting influences the correct function of the remote control. If the<br />
remote control does not work properly, try to darken the area or reduce the distance between the device and<br />
the remote control. If the problem persists, replace the batteries in the remote control.<br />
• The buttons on the remote correspond to their function with the buttons on the device. All main functions<br />
can be performed with the remote control.<br />
• The following functions are carried out and explained with the remote control unless otherwise indicated.<br />
<strong>JGC</strong>-<strong>MS</strong>-<strong>8110</strong>-IM-DE-EN-V2.indb 31 24/08/2009 4:51 PM<br />
Fig.1
BASIC FUNCTIONS<br />
Turning the device on and off<br />
• Press the STANDBY/ON (31) button to turn on the device. The LCD display (2) will go on and will display<br />
HELLO briefly. The device will automatically return to the last operating mode selected.<br />
• In order to turn off the device, press the STANDBY/ON button. The device switches automatically to standby<br />
mode. The LCD display will display GOODBYE briefly and will then display the time. The time must be<br />
pre-programmed otherwise only “--:--“ will be displayed.<br />
Selecting an operating mode<br />
• Press the FUNCTION (24) button in order to select between the operating modes TUNER, CD, USB, CARD,<br />
IPOD or AUX.<br />
A short overview of these modes is listed below:<br />
TUNER Radio<br />
CD CD playback<br />
USB Playback of audio files from USB storage devices<br />
CARD Playback of audio files from SD/MMC memory cards<br />
IPOD Playback via an iPod device<br />
AUX Playback via a playback device connected using a stereo cable (e.g.<br />
MP3 player)<br />
Playback and pause<br />
• Press the PLAY/PAUSE (32) button in order to begin CD, USB, CARD, IPOD or AUX playback. Pressing<br />
this button again will pause playback.<br />
Stop playback<br />
• Press the /BAND (25) button in order to stop CD, USB, CARD, IPOD or AUX playback. In radio mode, this<br />
button can be used to switch between the FM and AM frequencies.<br />
Volume<br />
• The volume can be regulated with the VOL+ (27) and VOL- (34) buttons. + increases the volume and -<br />
reduces it. Pressing these buttons repeatedly allows you to set the volume from 01 (MIN) to 30 (MAX).<br />
• Attention! Too high of a volume can lead to irreparable hearing impairment.<br />
Headphone<br />
• The device has a 3.5mm headphone jack (21). You can connect most standard earphones or headphones<br />
(not included).<br />
• If a headphone or earphone plug is connected to the headphone jack, the built-in speakers will automatically<br />
be muted.<br />
• As soon as the headphone or earphone plug is disconnected, the speakers will be activated.<br />
<strong>JGC</strong>-<strong>MS</strong>-<strong>8110</strong>-IM-DE-EN-V2.indb 32 24/08/2009 4:51 PM<br />
32<br />
ENGLISH
ENGLISH<br />
33<br />
SETTING THE TIME<br />
Setting the time<br />
• When using the device for the first time, the time display blinks “--:--“ after<br />
connection to the power supply. The device must be in stand-by mode to set<br />
the time. To set the time, proceed as follows:<br />
• In stand-by mode, hold down the button or CLOCK/PROGRAM (35) for 2<br />
seconds. 24 HOUR will be shown in the display with the 24 blinking.<br />
• Push the TUNING -/ (33) or TUNING + / (26) button in order to<br />
switch between a 24-hour (24H) or 12-hour clock display.<br />
• When you select the 12-hour display, then the display will also show AM for<br />
morning and PM for afternoon.<br />
• Confirm your selection with the CLOCK/PROGRAM button. Now 00:00 will<br />
be shown in the display with the hour display blinking. Set the hour with the<br />
TUNING -/ and TUNING + / buttons (the buttons can also be held<br />
down) and then confirm the setting with the CLOCK/PROGRAM button. Now<br />
the minute display blinks. Set the minutes using the same procedure.<br />
• Save the clock settings by pressing the CLOCK/PROGRAM button.<br />
• If no buttons are pressed for 10 seconds, the display switches off without<br />
saving unconfirmed settings.<br />
Fig. 2<br />
Fig. 3<br />
Fig. 4<br />
Fig.5<br />
When you disconnect the device from the power supply, the time is only saved for a very short time<br />
and then must be re-programmed.<br />
Displaying the time in operation mode<br />
• In order to display the time, hold down the button CLOCK/PROGRAM (35) for approx. 2 seconds. The time<br />
will be shown on the display for approx. 5 seconds.<br />
Sleep function – SLEEP<br />
• To fall asleep while listening to music, you can set the duration from 90 minutes down to 10 minutes. After<br />
the set time has elapsed, the device goes off automatically.<br />
• Press the button SLEEP (37) repeatedly until the desired time is shown in the display. The following time<br />
settings are possible: 90, 80, 70, 60, 50, 40, 30, 20 and 10 minutes. If a sleep time setting is programmed,<br />
SLEEP will also be shown in the display.<br />
• In order to deactivate the sleep function, press the SLEEP button repeatedly until control indicator SLEEP is<br />
no longer shown on the display.<br />
Should the playback time of a specific track using a CD, USB, CARD, AUX or iPOD be shorter than<br />
the set sleep time, then playback will stop at the end of the song.<br />
<strong>JGC</strong>-<strong>MS</strong>-<strong>8110</strong>-IM-DE-EN-V2.indb 33 24/08/2009 4:51 PM
USING THE RADIO<br />
Aerials<br />
• For FM reception, this device is equipped with an FM wire aerial (22). Lay it out in such a way as to receive<br />
the best possible reception. Never connect this aerial with other aerials.<br />
• For the AM frequency, a ferrite antenna is integrated into the device. Turn the device accordingly to improve<br />
reception.<br />
Setting the radio station manually<br />
• Radio stations with a weak signal or that are further away can be set<br />
manually.<br />
• Press the STANDBY/ON (31) button to turn on the device.<br />
• Press the FUNCTION (24) button repeatedly until TUNER and the control<br />
indicator TUNER is shown in the display.<br />
• The frequency can be selected by pressing the button /BAND (25).<br />
Depending on your frequency selection, either FM or AM will be shown in the<br />
display.<br />
• By pressing the buttons TUNING -/ (33) and TUNING + / (26), you<br />
can manually search through the stations. Each time the button is pressed the<br />
frequency will be increased or reduced by 0.05 MHz for FM and 9 KHz for AM.<br />
• When stations with stereo reception are set, then the display also shows the<br />
control indicator ST.<br />
Searching for stations automatically<br />
• If a particular station is not found automatically, then set it manually.<br />
• Hold down the button TUNING -/ (33) or TUNING + / (26) for approx. 2 seconds to automatically<br />
search for the next higher or lower station frequency. Pressing the same button(s) will stop the automatic<br />
search. Repeat the search until the desired station has been found.<br />
• Note: During the search, the sound is turned off.<br />
Saving the station<br />
• This device can save 30 FM and 10 AM stations for easier access.<br />
• Set the desired frequency and then the desired radio station.<br />
• Press the button MEMORY/MENU (30). The blinking number of the next<br />
memory location will be shown in the display. The desired memory location<br />
number can be selected with the buttons /FOLDER + (29) and /<br />
FOLDER- (36). Save the setting by pressing the button MEMORY/MENU.<br />
During the saving process, the control indicator MEM is shown in the display.<br />
• Additional stations can be saved with the same procedure.<br />
• If you would like to re-program an already saved memory location, then do so using the previously described<br />
procedure. The station that was previously saved in that memory location will automatically be overwritten.<br />
<strong>JGC</strong>-<strong>MS</strong>-<strong>8110</strong>-IM-DE-EN-V2.indb 34 24/08/2009 4:51 PM<br />
Fig. 6<br />
Fig. 7<br />
Fig. 8<br />
34<br />
ENGLISH
ENGLISH<br />
35<br />
DISC FORMATS / INSERTING THE DISC<br />
Recalling a station<br />
• You can recall a memory location of a previously saved station by pushing<br />
the buttons /FOLDER + (29) and /FOLDER- (36). The station will<br />
automatically be set.<br />
Please make sure that a connected iPod is not charged in radio mode.<br />
Important information to MP3, CD-R/RW<br />
• The playback quality and performance cannot be guaranteed if non-standardised format definitions /<br />
productions of MP3 and CD-R/RW discs are used.<br />
• Playback of MP3 and CD-R/RW discs could be dependent on the recording conditions.<br />
• Do not put glue, labels, etc. anywhere on a CD-R/RW disc as this can lead to malfunctions.<br />
• Do not insert any blank CD-R/RW discs into the device. It takes over 30 seconds to read the disc. Opening<br />
the CD compartment during the reading operation can damage the disc.<br />
• CD-ROM, CD-I, CDV, VCD, DVD or computer CD discs cannot be read by this device. Do not insert such<br />
formats.<br />
Inserting the disc<br />
• Press the CD compartment release switch (19) to open the CD compartment. Remove any attached<br />
protective paper.<br />
• Lay the CD into the CD compartment in such a way that the label or writing is facing upwards and the<br />
holder pokes through the hole in the CD. Close the CD compartment by pushing down the CD compartment<br />
cover (6).<br />
• Caution! Never touch the lens inside the CD compartment.<br />
• Close the CD compartment and make sure that it clicks into place.<br />
• Switch on the device and select CD using the button FUNCTION (24).<br />
• The CD will now be read, during which time READING will be shown in<br />
the display. If the inserted medium is readable, then the first track will<br />
automatically be played. If the CD is not readable then the NO DISC will be<br />
•<br />
shown in the display.<br />
In order to remove a CD after it is finished, stop playback, open the CD<br />
compartment and remove the CD by holding it on two sides of the edge.<br />
Fig. 10<br />
<strong>JGC</strong>-<strong>MS</strong>-<strong>8110</strong>-IM-DE-EN-V2.indb 35 24/08/2009 4:51 PM<br />
Fig. 9
Playing audio CDs<br />
• As previously described, lay an audio CD in the compartment and turn the<br />
device to CD playback mode.<br />
• The first track number and the playback time will be shown in the display. The<br />
display also shows the control indicator DISC.<br />
• Playback/pause: Press the PLAY/PAUSE (32) button, in order to begin<br />
or pause playback. If playback has been paused, then the playback time<br />
elapsed will blink in the display.<br />
• Stopping playback: To stop playback, press the button /BAND (25). The<br />
display shows the total number of tracks and the total playback time.<br />
PLAYING AUDIO-CDS<br />
Fig. 11<br />
Fig.12<br />
Fig.13<br />
• Next or previous track: Push the TUNING -/ (33) or TUNING + / (26) button in order to skip<br />
to the next or to the previous track. By pushing on the TUNING -/ button, the current track will be<br />
repeated from the beginning. When the button is pushed twice, then the previous track will be played. By<br />
pushing on the TUNING + / button the next track will be played.<br />
• Rewinding and forwarding: By holding down the buttons TUNING -/ and TUNING + / , you<br />
can rewind or forward the track currently playing. Once you have found the desired spot, let go of the button<br />
to continue playback. During spooling, the sound is automatically set to zero.<br />
• Repeat the track: When the button REPEAT/ENTER (28) is pushed once then the current playing track will<br />
be continuously repeated. The control indicator RPT is shown in the display.<br />
• Repeat the CD: When the REPEAT/ENTER button is pushed twice, then the CD will be continuously<br />
repeated. The control indicator RPT ALL is shown in the display.<br />
• Random playback: When the REPEAT/ENTER button is pushed three times, then the tracks will be played<br />
in a random order. The control indicator RDM is shown in the display.<br />
• Deactivating the playback modes: Depending on the mode, you can press on the button REPEAT/<br />
ENTER repeatedly until the control indicator RPT, RPT ALL or RDM is gone from the display. This deactivates<br />
the corresponding function. These playback modes are also deactivated when the CD is stopped or<br />
otherwise interrupted.<br />
The playback modes “RPT”, “RPT ALL” and “RDM” can also be turned on when playback is put on<br />
pause.<br />
Playing a set program<br />
• This device offers the possibility of playing up to 20 tracks in a preset order. To do this, proceed as follows.<br />
• Put a CD into the CD compartment as previously described.<br />
• Switch the device to stop mode by pressing the button /BAND (25).<br />
<strong>JGC</strong>-<strong>MS</strong>-<strong>8110</strong>-IM-DE-EN-V2.indb 36 24/08/2009 4:51 PM<br />
36<br />
ENGLISH
ENGLISH<br />
37<br />
PLAYING MP3 DISCS<br />
• Press the button CLOCK/PROGRAM (35) once. 00 P--01 and the control<br />
indicator MEM will be shown in the display; the digits 00 will blink.<br />
• Using the buttons TUNING -/ (33) and TUNING + / (26), you can<br />
choose which tracks or CD you wish to program. The selection will be saved<br />
by pressing the button CLOCK/PROGRAM. The second memory location will<br />
be opened and can be set as previously described.<br />
Fig. 14<br />
• You can set up to 20 memory location spaces. Once all memory location spaces are taken, then PROGFUL will<br />
be shown in the display.<br />
• Playing a set program: To play the preset program, press the button PLAY/PAUSE (32).<br />
• Stopping a set program: To stop playback of a set program, push the button /BAND (25) once.<br />
• Deleting a set program: The set program can be deleted by pressing the button /BAND twice or<br />
by opening the CD compartment or switching to another operating mode. The control indicator MEM will<br />
disappear from the display.<br />
Playing MP3 discs<br />
• Insert an MP3 disc and switch the device to CD playback mode.<br />
• The first track number, the playback time and the control indicator MP3 will be<br />
shown in the display.<br />
Fig. 15<br />
• Playback/pause: Press the PLAY/PAUSE (32) button in order to begin or pause playback. If playback<br />
has been paused, then the playback time elapsed will blink in the display.<br />
• Stopping playback: To stop playback, press the button /BAND (25). The display shows the total<br />
number of tracks and the total number of folders. The display also shows the control indicator FOLDER.<br />
• Next or previous track: Push the buttons TUNING -/ (33) or TUNING + / (26) to jump to the<br />
next or to the previous track. By pushing on the TUNING -/ button, the current track will be repeated<br />
from the beginning. When the button is pushed twice, then the previous track will be played. By pushing on<br />
the TUNING + / button, the next track will be played.<br />
• Rewinding and forwarding: By holding down the buttons TUNING -/ and TUNING + / , you<br />
•<br />
can rewind or forward the current track. Once the desired place has been found, let go of the button to<br />
continue playback. During spooling, the sound is automatically set to zero.<br />
Searching or skipping to the next folder: You can skip to the next or to a previous folder by pushing the<br />
buttons /FOLDER + (29) and /FOLDER- (36) for 2 seconds. The first track of the selected folder<br />
will automatically be played. To play the selected folder from stop mode, press the button<br />
PLAY/PAUSE .<br />
You can skip to the next or to a previous folder by holding down the buttons<br />
/FOLDER-.<br />
/FOLDER + and<br />
• 10 tracks forward or back: You can skip 10 tracks forward or backwards by pushing the buttons<br />
/FOLDER + and /FOLDER-.<br />
<strong>JGC</strong>-<strong>MS</strong>-<strong>8110</strong>-IM-DE-EN-V2.indb 37 24/08/2009 4:51 PM
PLAYING MP3 DISCS<br />
• Repeat the track: When the REPEAT/ENTER (28) button is pushed once then the current track will be<br />
continuously repeated. The control indicator RPT is shown in the display.<br />
• Repeat the Folder: When the REPEAT/ENTER button is pushed twice then the current folder will be<br />
continuously repeated. The control indicator RPT FOLDER is shown in the display.<br />
• Repeat the CD: When the REPEAT/ENTER button is pushed three times, the CD will be continuously<br />
repeated. The control indicator RPT ALL is shown in the display.<br />
• Random playback: When the REPEAT/ENTER button is pushed four times, the tracks will be played in a<br />
random order. The control indicator RDM is shown in the display.<br />
• Deactivating the playback modes: Depending on the mode, you can press the REPEAT/ENTER button<br />
repeatedly until the control indicator RPT, RPT FOLDER, RPT ALL or RDM is gone from the display. This<br />
also deactivates the corresponding function. These playback modes are also deactivated when the disc is<br />
stopped or otherwise interrupted.<br />
The playback modes “RPT”, “RPT FOLDER”, “RPT ALL” and “RDM” can also be turned on when<br />
playback is put on pause.<br />
Playing a set program<br />
• This device offers the possibility of playing up to 99 tracks in a preset order. If desired, the same tracks can<br />
be programmed more than once. To do this, proceed as follows.<br />
• Insert a disc into the CD compartment as previously described.<br />
• Switch the device to stop mode by pressing the button /BAND (25).<br />
• Press the button CLOCK/PROGRAM (35) once. F00 P--01 and the control<br />
indicator MEM will be shown in the display; the digits F00 will blink.<br />
• Select a folder using the buttons /FOLDER + (29) and<br />
/FOLDER- (36) and confirm the selection with the button CLOCK/<br />
Fig. 16<br />
PROGRAM. T00 blinks in the display.<br />
• Using the buttons TUNING -/ (33) and TUNING + / (26), choose which tracks of the disc you wish<br />
to program and save them by pressing the button CLOCK/PROGRAM. The second memory location (F00<br />
P--02) will be opened and can be set as previously described.<br />
• Once all of the 99 memory location spaces are taken, then PROGFUL will be shown in the display. All<br />
memory location spaces do not have to be full to play the set program.<br />
• Playing a set program: To play the preset program, press the button PLAY/PAUSE (32).<br />
• Stopping a set program: Playback of the set program can be stopped by pressing the button /BAND<br />
once.<br />
• Deleting a set program: The set program can be deleted by pressing the button /BAND twice or<br />
by opening the CD compartment or switching to another operating mode. The control indicator MEM will<br />
disappear from the display.<br />
<strong>JGC</strong>-<strong>MS</strong>-<strong>8110</strong>-IM-DE-EN-V2.indb 38 24/08/2009 4:51 PM<br />
38<br />
ENGLISH
ENGLISH<br />
39<br />
USB STORAGE DEVICES AND SD/MMC CARDS<br />
Connecting a USB storage device<br />
• Do not use an extension cable to connect the USB storage device to the playback device.<br />
• USB storage devices must be FAT formatted. NTFS-formatted devices will not be recognised.<br />
• USB storage devices can be used to play audio formats such as audio CD and MP3.<br />
• The USB connection (4) can be used with standards 1.1 and 2.0.<br />
• This device only supports USB storage with a capacity of up to 8 GB.<br />
• Due to changing technologies, it may happen that certain USB storage devices are not compatible with this<br />
device.<br />
• Lift the USB/SD cover and insert the USB plug of the storage device into the USB port (4) on the device.<br />
• Switch on the device and select USB using the button FUNCTION (24). The device will now read the USB<br />
storage device and begin playing the first track.<br />
• If the formats are not readable, then NOFILE will be shown in the display.<br />
• If there is no USB storage device connected to the playback device, then NO USB will be shown in the<br />
display.<br />
• During playback via USB, the control indicator USB is shown in the display.<br />
Connecting a SD/MMC card<br />
• SD or MMC memory cards must be FAT-formatted. NTFS-formatted devices will not be recognised.<br />
• Audio formats such as audio CD, MP3 can be played via SD and MMC cards.<br />
• This device only supports SD/MMC cards with a capacity of up to 8 GB.<br />
• Due to changing technologies, it may happen that certain SD/MMC cards are not compatible with this<br />
device.<br />
• Lift the USB/SD cover and insert an SD or MMC card into the SD/MMC card reader (5). When inserting the<br />
card, make sure that the contacts are facing the front of the device.<br />
• Switch on the device and select CARD using the button FUNCTION (24). The device will now read the SD or<br />
MMC card and will begin playing the first track.<br />
• If the card is not readable then the NOFILE will be shown in the display.<br />
• If there is no SD/MMC card connected to the playback device, then NO CARD will be shown in the display.<br />
• During the playback of an SD or MMC card, the control indicator CARD is shown in the display.<br />
It is recommended to stop playback by pressing the button /BAND (25) before disconnecting<br />
the USB/SD MMC device.<br />
Playback of a USB storage device or SD/MMC cards<br />
• The playback and track programming procedure is the same as described in the chapter “PLAYING AUDIO-<br />
CDS” and “PLAYING MP3 DISCS”.<br />
• Before playing the USB storage device, SD or MMC card make sure that you are aware of the formats so<br />
that you can control the quality of the playback.<br />
<strong>JGC</strong>-<strong>MS</strong>-<strong>8110</strong>-IM-DE-EN-V2.indb 39 24/08/2009 4:51 PM
iPod Overview<br />
• iPod is a trademark of the Apple Inc.<br />
• This playback device is equipped with an iPod dock that enables you to listen to music from your iPod<br />
through the device’s loudspeakers as well as to recharge the batteries. This device is equipped with a<br />
universal iPod connection. Models with 30 contacts are listed below:<br />
- iPod mini 1 st / 2nd generation<br />
- iPod Nano 1 st /2 nd /3 rd /4 th generation<br />
- iPod 4 th generation<br />
- iPod classic<br />
- iPod 5 th generation (video)<br />
- iPod touch 1 st / 2nd generation<br />
Before connecting your iPod, please read the iPod operating instructions, especially the safety<br />
instructions with regards to usage with other devices.<br />
IPOD<br />
Attaching/Removing the iPod<br />
• Place your iPod carefully onto the iPod connection (7). The iPod must face the front of the device.<br />
• With a dock-adaptor: Attach the correct adaptor (not included in delivery) to the connection. Then set the<br />
iPod on it. The iPod should not be in a protective cover or in a protective casing.<br />
• For removal, carefully lift the iPod and take it off.<br />
It is recommended to stop playback by pressing the button /BAND (25) first before removing the<br />
iPod.<br />
Using the iPod<br />
• Turn on the playback device. When using an iPod touch, press the music symbol.<br />
• Select IPOD using the button FUNCTION (24) and the first track will begin playing.<br />
• The iPod can also be controlled using the iPod function buttons. First unlock the iPod keyboard if necessary.<br />
• Setting the volume: The volume can be regulated with the VOL+ (27) and VOL- (34) buttons. + increases<br />
the volume and - reduces it.<br />
• Playback/pause: Press the PLAY/PAUSE (32) button in order to begin or pause playback. Playback<br />
and pause will be displayed in the display of the iPod.<br />
• Stopping playback: To stop playback, press the button /BAND (25).<br />
• Next or previous track: Push the buttons TUNING -/ (33) and TUNING + / (26) to skip to<br />
the next or to the previous track. By pushing on the TUNING -/ button (33), the current track will be<br />
repeated from the beginning. When the button is pushed twice, then the previous track will be played. By<br />
pushing on the TUNING + / button (26), the next track will be played.<br />
<strong>JGC</strong>-<strong>MS</strong>-<strong>8110</strong>-IM-DE-EN-V2.indb 40 24/08/2009 4:51 PM<br />
40<br />
ENGLISH
ENGLISH<br />
41<br />
AUX-IN JACK<br />
• Rewinding and forwarding: By holding down the buttons TUNING -/ (33) and TUNING + / (26),<br />
you can rewind or forward the current track. Once the desired place has been found, let go of the button to<br />
continue playback.<br />
• Operating the iPod menu: The iPod menu can be operated using the buttons /FOLDER + (29),<br />
/FOLDER- (36), REPEAT/ENTER (28) and MEMORY/MENU (30).<br />
Example: To access the iPod menu, press the button MEMORY/MENU. Using the buttons /FOLDER +,<br />
/FOLDER-, make the corresponding menu selection and confirm it with the REPEAT/ENTER button.<br />
• Charging your iPod battery: The iPod is charged while the device is in the following playback modes:<br />
USB, CARD, IPOD, AUX and Standby.<br />
iPod devices that are not compatible with this dock will not be recharged.<br />
Connecting an external device via the AUX-IN connection<br />
• An external playback device (e.g. MP3 player) can be connected to this playback device via the AUX-IN<br />
connection (20) on the back of the device and music can be played from it through the loudspeakers.<br />
• Caution! Before connecting your external playback device (e.g. MP3 player), please also read the operating<br />
instructions, especially the safety instructions with regards to usage with other devices.<br />
• When connecting, use the Ø3.5 mm stereo cable provided.<br />
• Turn off the playback device (standby mode) and the external device.<br />
• Connect the stereo cable with the AUX-IN jack (20) on the back of the device and put the other end into the<br />
headphones jack or the LINE-OUT jack of the playback device. If the external device has a smaller or larger<br />
jack, then use a corresponding adaptor (not included in delivery).<br />
• First turn on the external device and switch the volume to zero. Turn this playback device on and also set the<br />
volume to zero.<br />
• Press the FUNCTION (24) button repeatedly until AUX is shown in the display.<br />
• Now you can regulate the volume of both devices. If the external device is connected to the playback device<br />
via the LINE-OUT jack on the external device, then regulate the volume on the playback device.<br />
• Playback is controlled using the external device.<br />
• Make sure that if you turn off this device only, the external playback device will continue playing.<br />
<strong>JGC</strong>-<strong>MS</strong>-<strong>8110</strong>-IM-DE-EN-V2.indb 41 24/08/2009 4:51 PM
General cleaning<br />
• Disconnect the power plug prior to each cleaning.<br />
• Attention! Do not let any water get into the device.<br />
• Clean the outer casing with a slightly damp cloth.<br />
• Do not use aggressive, abrasive or corrosive cleaning detergents.<br />
• Do not use chemicals such as petrol or alcohol to clean the outer casing.<br />
• When cleaning, be careful not to damage the iPod dock.<br />
CLEANING AND MAINTENANCE<br />
Handling the compact disc<br />
• Although compact discs are made so that they can withstand a certain amount of dust and scratches, you<br />
should still handle them with the same care as you would give normal LPs.<br />
• Protect compact discs from dust, scratches, etc.<br />
• Always store compact discs in their corresponding cases when they are not in use.<br />
• To guarantee excellent sound, wipe off the compact disc now and then with a soft cloth, from the inside to<br />
the outside – not in circular motions. Do not under any circumstance use petrol or paint thinner for cleaning.<br />
• Only hold the compact disc by its edges!<br />
• Audio compact disc: Only use compact discs with the adjacent emblem.<br />
• Do not insert any foreign objects into the CD compartment as they could damage the<br />
inner mechanics.<br />
• To avoid getting the CD compartment dirty from dust, do not leave the cover open longer<br />
than necessary.<br />
• Never touch the lens inside the CD compartment.<br />
• If the compact disc is very dirty or has many fingerprints on it, this could hinder playback<br />
or cause it to start playback in another spot.<br />
• The digital signals on the compact disc are read by a laser via an optical lens (do not<br />
touch). Condensation could build up on this lens if the player is brought from a cold area<br />
to a warm area or if a cold room is heated up quickly. This condensation could result<br />
in the CD player no longer functioning properly. In this case, we recommend letting the<br />
device acclimatise for approx. 1 hour prior to using it. Remove the CD when doing so. If<br />
the problem has not been solved by doing this, then consult an authorised professional.<br />
Fig. 16<br />
<strong>JGC</strong>-<strong>MS</strong>-<strong>8110</strong>-IM-DE-EN-V2.indb 42 24/08/2009 4:51 PM<br />
42<br />
ENGLISH
ENGLISH<br />
43<br />
TROUBLESHOOTING<br />
If an error occurs, check the table below first, before you contact your dealer or send in the device. The address<br />
and hotline number can be found on the warranty card. Do not open the device and do not try to repair it yourself.<br />
You will lose the warranty claim and it is dangerous! Refer to the warranty conditions on the following pages.<br />
Problem Possible cause Solution<br />
Radio<br />
No radio signal. The device is not in radio mode. Switch the device to radio mode.<br />
Disturbances when playing FM or<br />
AM radio.<br />
The stereo control indicator ST<br />
doesn’t light up in FM mode.<br />
FM or AM radio doesn’t have any<br />
sound.<br />
CD player<br />
The station is not properly tuned. Tune the station again.<br />
FM: The aerial is not rolled out<br />
properly.<br />
AM: The device is not positioned<br />
correctly.<br />
The FM signal is not strong enough<br />
or the station is a mono station.<br />
Lay the aerial out properly.<br />
Turn the device accordingly.<br />
Reposition the aerial or try to find<br />
another station with a stronger<br />
signal.<br />
The device is not in radio mode. Switch the device to radio mode.<br />
The volume is on MIN. Increase the volume.<br />
The CD player doesn’t work. The device is not in CD playback<br />
mode.<br />
The CD is not inserted properly or<br />
there is no CD.<br />
The CD is not compatible with this<br />
device. The audio format cannot be<br />
played with this device.<br />
Select CD playback mode.<br />
Insert a CD. Make sure that the<br />
CD label is facing upwards and<br />
that the CD is lying on the holder<br />
properly.<br />
Insert a CD with a compatible<br />
audio format.<br />
The CD cuts out during playback. The CD is dirty or scratched. Clean the CD or play another CD.<br />
USB<br />
USB storage device is not<br />
recognised.<br />
USB storage device is not<br />
connected to the playback device<br />
properly.<br />
Check the connection between<br />
the USB storage device and the<br />
playback device.<br />
<strong>JGC</strong>-<strong>MS</strong>-<strong>8110</strong>-IM-DE-EN-V2.indb 43 24/08/2009 4:51 PM
Files are not being read. The USB storage device is not<br />
formatted properly.<br />
SD/MMC cards<br />
The card is not recognised. The card is not connected to the<br />
playback device properly.<br />
TROUBLESHOOTING<br />
The USB storage device has to be<br />
FAT-formatted.<br />
Attention! Formatting will delete<br />
all data on the USB storage device.<br />
Unknown file format. The playback device can only play<br />
audio CD, MP3 formats.<br />
The card has been inserted the<br />
wrong way.<br />
Push the card into the card reader<br />
as far as it will go.<br />
The contacts must face down and<br />
towards the front of the device.<br />
Files are not being read. The card is not formatted properly. The card has to be FAT-formatted.<br />
Attention! Formatting will delete<br />
all data on the card.<br />
iPod<br />
The buttons on the playback device<br />
and the remote control do not<br />
react.<br />
AUX-IN<br />
Unknown file format. The playback device can only play<br />
audio CD, MP3 formats.<br />
The iPod is not positioned correctly. Check the connection between the<br />
iPod and the playback device.<br />
The batteries in the remote control<br />
are depleted.<br />
Exchange the batteries.<br />
No sound. The volume is not set properly. Depending on the device, the<br />
volume must be set on the<br />
externally connected device as well<br />
as on the playback device.<br />
If the external device has a LINE-<br />
OUT jack, then set the volume on<br />
the playback device.<br />
There is no playback. The connection is faulty. Check the connection to the<br />
playback device. Use the supplied<br />
stereo cable.<br />
<strong>JGC</strong>-<strong>MS</strong>-<strong>8110</strong>-IM-DE-EN-V2.indb 44 24/08/2009 4:51 PM<br />
44<br />
ENGLISH
ENGLISH<br />
45<br />
TECHNICAL DATA<br />
Power supply AC 230-240V~, 50Hz<br />
Power consumption 55 W<br />
Remote control 3 V 2 x 1.5V LR03/AAA batteries (included)<br />
Laser type Class 1<br />
Dimensions 360(W) x 160(H) x 212(D) mm<br />
Radio<br />
FM 87.5 - 108 MHz<br />
AM 522 - 1620 kHz<br />
Disc drive for 8cm und 12cm diameter; only circular form, no other forms<br />
CD format CD Audio, CD-R, CD-RW<br />
Memory format USB Type 1.1, Type 2.0; SD/MMC memory card<br />
Supported memory size Max. 8 GB<br />
Manufactured for <strong>JGC</strong>-Company GmbH<br />
Heckhofweg 146<br />
50739 Köln<br />
Customer Service <strong>E2</strong> <strong>Servicecenter</strong> GmbH<br />
Telephone<br />
Monday-Friday,10:00 - 18:00<br />
Please enter the serial number of your<br />
device here:<br />
Max-Planck-Strasse 13<br />
50858 Köln-Marsdorf<br />
01805- 22 17 84<br />
(Euro 0.14/min from German landline; other charges may apply from<br />
mobile phone)<br />
<strong>JGC</strong>-<strong>MS</strong>-<strong>8110</strong>-IM-DE-EN-V2.indb 45 24/08/2009 4:51 PM
Customer Info<br />
Manufacturer’s Warranty<br />
Thank you for your purchase of one of our products. We hope you will enjoy using our high-quality<br />
product. Our strict production control ensures the high quality of our devices. However, in the event<br />
that you wish to submit a qualified claim, we grant a<br />
3 years<br />
warranty as of the date of purchase, subject to the following conditions:<br />
This warranty does not affect your statutory warranty claims as consumer toward the seller of the<br />
device. These rights are not affected by our manufacturer‘s warranty. The warranty granted by us<br />
is valid only for domestic use of the device and is limited to the area of the Federal Republic of<br />
Germany.<br />
The warranty term is 3 years as of the date of purchase.<br />
WARRANTY<br />
It is within <strong>JGC</strong>’s discretion to fulfil the warranty by repair or replacement of the device or defect<br />
component. Other claims are excluded. In case of questions regarding <strong>JGC</strong> products you no longer<br />
need to take the time to go to the seller but may call our service hotline or service center directly. A<br />
team of highly qualified product consultants and technicians is available from Monday through Friday<br />
from 10:00 a.m. to 6:00 p.m.<br />
Service Hotline:<br />
O18O5 / 22 17 84 (€ 0,14 per min)<br />
E 2 <strong>Servicecenter</strong> GmbH,<br />
Max-Planck-Strasse 13,<br />
50858 Köln-Marsdorf<br />
www.e2service.de<br />
When mailing your device, please also include a short description of the problem as this will facilitate<br />
handling. Please mail your device, without exception, only to our authorised service partner and use<br />
only the enclosed return coupon. If the return coupon is missing please contact the above service<br />
hotline.<br />
ATTENTION: Mailings that are not pre-paid will not be accepted!<br />
<strong>JGC</strong>-<strong>MS</strong>-<strong>8110</strong>-IM-DE-EN-V2.indb 46 24/08/2009 4:51 PM<br />
IMPORTANT DOCUMENT! PLEASE STORE FOR 3 YEARS WITH PROOF OF PURCHASE<br />
46<br />
ENGLISH
ENGLISH<br />
47<br />
WARRANTY<br />
Customer Info<br />
Manufacturer’s Warranty<br />
Our service partner requires proof of purchase, either as original receipt or cash receipt printed by<br />
the seller to perform warranty repairs. The serial number on the device must also be readable. We<br />
are unable to perform warranty services free of charge without proof of purchase. We recommend<br />
keeping the original packaging in order to ensure safe transport of the device in case of a warranty<br />
claim.<br />
Warranty repairs may be performed exclusively by <strong>E2</strong> <strong>Servicecenter</strong> GmbH or contractual partners<br />
authorised by it. Repairs performed by the customer or other shops void the warranty; a claim for<br />
cost reimbursement does not exist.<br />
The warranty is void or does not cover:<br />
in case of improper use<br />
in case of mechanical damages to the device from outside forces<br />
in case of transportation damages<br />
for wear parts<br />
in case of operating errors and misuse<br />
when placing the device in wet rooms or outdoors<br />
in case of damages resulting from force, war, water, lightning, excess voltage, and other<br />
reasons not within the scope of <strong>JGC</strong>’s responsibility.<br />
in case of excessive use, in particular in case of non-domestic use<br />
in case of disregard of the user instructions and installation errors<br />
if the device does not have a technical defect<br />
for transport and travel costs as well as costs incurred by installing and uninstalling the device<br />
The warranty does not include any subsequent liability on our part, in particular no liability for<br />
damages to the device itself or incurred by the loss of the device until the time of repair (e.g.<br />
travel costs, handling costs, etc.). However, this does not limit or exclude our statutory warranty, in<br />
particular pursuant to the Product Liability Act. Also <strong>JGC</strong> is not liable for indirect or subsequent loss<br />
of sound recordings (CD / DVD etc.) or similar material, and ancillary equipment of any kind (power<br />
supplies, speakers, etc.).<br />
Any warranty services provided by us do not extend the warranty term of 3 years as of the date of<br />
purchase, also not in terms of possibly exchanged components.<br />
We wish you much joy with your new device and hope that your next one will be another<br />
<strong>JGC</strong> product.<br />
<strong>JGC</strong>-<strong>MS</strong>-<strong>8110</strong>-IM-DE-EN-V2.indb 47 24/08/2009 4:51 PM<br />
IMPORTANT DOCUMENT! PLEASE STORE FOR 3 YEARS WITH PROOF OF PURCHASE