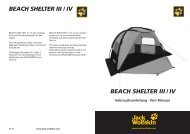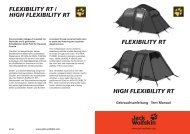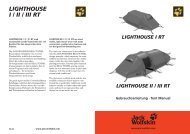
www.jack-wolfskin.com
www.jack-wolfskin.com
www.jack-wolfskin.com

Erfolgreiche ePaper selbst erstellen
Machen Sie aus Ihren PDF Publikationen ein blätterbares Flipbook mit unserer einzigartigen Google optimierten e-Paper Software.
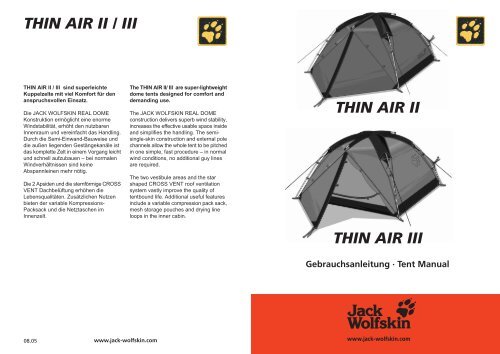
THIN AIR II / III sind superleichte<br />
Kuppelzelte mit viel Komfort für den<br />
anspruchsvollen Einsatz.<br />
Die JACK WOLFSKIN REAL DOME<br />
Konstruktion ermöglicht eine enorme<br />
Windstabilität, erhöht den nutzbaren<br />
Innenraum und vereinfacht das Handling.<br />
Durch die Semi-Einwand-Bauweise und<br />
die außen liegenden Gestängekanäle ist<br />
das komplette Zelt in einem Vorgang leicht<br />
und schnell aufzubauen – bei normalen<br />
Windverhältnissen sind keine<br />
Abspannleinen mehr nötig.<br />
Die 2 Apsiden und die sternförmige CROSS<br />
VENT Dachbelüftung erhöhen die<br />
Lebensqualitäten. Zusätzlichen Nutzen<br />
bieten der variable Kompressions-<br />
Packsack und die Netztaschen im<br />
Innenzelt.<br />
The THIN AIR II/ III are super-lightweight<br />
dome tents designed for <strong>com</strong>fort and<br />
demanding use.<br />
The JACK WOLFSKIN REAL DOME<br />
construction delivers superb wind stability,<br />
increases the effective usable space inside<br />
and simplifies the handling. The semisingle-skin<br />
construction and external pole<br />
channels allow the whole tent to be pitched<br />
in one simple, fast procedure – in normal<br />
wind conditions, no additional guy lines<br />
are required.<br />
The two vestibule areas and the star<br />
shaped CROSS VENT roof ventilation<br />
system vastly improve the quality of<br />
tentbound life. Additional useful features<br />
include a variable <strong>com</strong>pression pack sack,<br />
mesh storage pouches and drying line<br />
loops in the inner cabin.<br />
<strong>www</strong>.<strong>jack</strong>-<strong>wolfskin</strong>.<strong>com</strong>
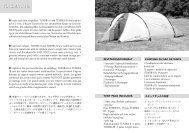
THIN AIR II<br />
ZELTPACKSACKINHALT<br />
· 1 Innenzelt/Außenzelt-Kombination<br />
· 10 Heringe, Reparaturmaterialien<br />
& Nahtabdichter im Heringspackbeutel<br />
· 1 Stangenpackbeutel<br />
· 3 Alustangen<br />
· 1 Reparaturhülse<br />
CONTENTS OF TENT PACK SACK<br />
· 1 Inner tent/flysheet <strong>com</strong>bination<br />
· 10 pegs, repair materials &<br />
seam sealant in peg bag<br />
· 1 pole bag<br />
· 3 aluminium pole sections<br />
· 1 pole repair sleeve<br />
THIN AIR III<br />
BELÜFTUNG<br />
Ihr Zelt ist mit ausreichenden<br />
Belüftungsmöglichkeiten ausgestattet.<br />
Achten Sie immer auf eine gute<br />
Luftzirkulation um mit ausreichend<br />
Sauerstoff versorgt zu werden und die<br />
Gefahr der Kondenswasserbildung zu<br />
vermindern. Dennoch ist<br />
Kondenswasserbildung unvermeidbar.<br />
Verwechseln Sie Kondenswasser bitte nicht<br />
mit eindringender Feuchtigkeit.<br />
PFLEGE<br />
Reinigen Sie Ihr Zelt in aufgebautem<br />
Zustand ausschließlich mit Wasser und<br />
wenig Seife. Befreien Sie vor allem die<br />
Reißverschlüsse regelmäßig von Schmutz<br />
und Sand. Auf keinen Fall in die<br />
Waschmaschine oder Reinigung geben,<br />
da hier die Beschichtung irreversibel<br />
zerstört werden kann. Geeignete<br />
Silikonschmiermittel schützen Stangen vor<br />
Korrosion und Reißverschlüsse vor dem<br />
Einfrieren.<br />
FEUER<br />
Offenes Feuer und Flammen sind eine<br />
Gefahr für Zeltgewebe. Vermeiden Sie<br />
offenes Feuer in unmittelbarer Nähe des<br />
Zeltes.<br />
VENTILATON<br />
Your tent is equipped with sufficient<br />
ventilation options. Try to ensure that there<br />
is always a good flow of air through the<br />
tent to reduce the risk of oxygen shortage<br />
and condensation build-up. However,<br />
condensation cannot <strong>com</strong>pletely be<br />
avoided. Please do not confuse<br />
condensation with actual water penetration<br />
through the fabric of the tent.<br />
CARE AND MAINTENANCE<br />
Clean your tent when pitched, using only<br />
a little soap and water. Zips in particular<br />
should be cleaned regularly to remove dirt<br />
and grit. On no account should the tent be<br />
machine washed or dry cleaned, since this<br />
could cause irreversible damage to the<br />
protective coating on the tent fabric.<br />
Suitable silicone-based lubricants protect<br />
poles from corrosion and prevent zips<br />
freezing.<br />
FIRE PREVENTION<br />
Open fires and flames are a hazard for tent<br />
materials. Avoid naked flames in the<br />
immediate vicinity of the tent.<br />
JACK WOLFSKIN entwickelt seine Produkte ständig weiter. Wir behalten uns vor, einzelne Komponenten zu verändern. Abbildungen<br />
der Aufbauanleitung können vom aktuellen Produkt abweichen.<br />
At JACK WOLFSKIN we are continually improving and upgrading our products. We therefore reserve the right to make changes<br />
to individual <strong>com</strong>ponents. Diagrams used for the pitching instructions may differ slightly from the actual product.
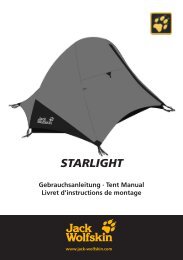
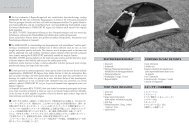
Beim ersten Aufbau: Sie sollten Ihr neues<br />
Zelt erst einmal probeweise aufbauen, und<br />
sich vor Antritt der ersten Reise mit allen<br />
Aufbauschritten vertraut machen.<br />
Wählen Sie zunächst einen geeigneten<br />
Standort für Ihr Zelt aus (1) und entfernen<br />
Sie dort alle spitzen Gegenstände, die den<br />
Zeltboden beschädigen könnten. Breiten<br />
Sie Ihr Zelt flach auf dem Boden aus und<br />
fügen Sie die Segmente der Alustangen<br />
sorgfältig zusammen, so dass diese fest<br />
ineinander sitzen (2).<br />
Achten Sie darauf, dass während des<br />
Aufbaus alle Reißverschlüsse geschlossen<br />
sind. Nur die Reißverschlüsse der außen<br />
liegenden Belüftungskanäle müssen<br />
unbedingt geöffnet sein (3).<br />
Pitching your tent for the first time:<br />
We re<strong>com</strong>mend you to do a dry run pitching<br />
your new tent, in order to be<strong>com</strong>e familiar<br />
with all the pitching instructions before your<br />
first trip.<br />
Choose a suitable pitching site (1),<br />
removing all sharp objects which may<br />
damage the groundsheet. Spread out the<br />
tent on the ground and carefully connect<br />
all pole sections, ensuring a tight fit (2).<br />
Ensure that all zips are closed when<br />
pitching the tent. Note: the zips on the<br />
external ventilation channels MUST be left<br />
open (3).
Führen Sie die Stangen nun in folgender<br />
Reihenfolge vorsichtig in die<br />
entsprechenden außen liegenden<br />
Belüftungs- bzw. Stangenkanäle ein (1):<br />
Zuerst die beiden langen Hauptstangen in<br />
die breiten Kreuzkanäle. Zum Schluss die<br />
kurze Dachstange in den zu oberst<br />
liegenden Querkanal (2). Setzen Sie die<br />
beiden Hauptstangen unter Spannung,<br />
indem Sie die spitzen Stangenenden<br />
jeweils in die dafür vorgesehenen Ösen<br />
an den Bodeneckpunkten einstecken und<br />
mit den Kunstoffclips am Zeltdach fixieren<br />
(3/4).<br />
Slide the poles carefully into their respective<br />
external ventilation/pole channels in the<br />
following order (1): First, insert the two<br />
longer pole sections into the wide crossover<br />
channels. Then slide the second long pole<br />
section into the crossover channel above.<br />
Finally, slide the short roof pole section<br />
into the uppermost (diagonal) channel (2).<br />
Place the two main pole sections under<br />
tension by slotting the pointed ends of the<br />
poles into their respective eyelets located<br />
at the lower corner points of the tent and<br />
fix in place with the plastic clips (3/4).
Fixieren Sie die Dachstangenenden mit<br />
den beiden schwarzen Kunststoffhülsen<br />
(1). Eine der beiden Hülsen ist über Band<br />
und Schnalle verstellbar (2). Das erleichtert<br />
das Fixieren und ermöglicht das finale<br />
Spannen der Dachstange (3).<br />
Wenden Sie keine Gewalt an. Wenn Sie<br />
auf Widerstand stoßen während Sie die<br />
Stangen einführen oder spannen, machen<br />
Sie das Problem ausfindig und beheben<br />
Sie es.<br />
Anchor the ends of the roof pole by slotting<br />
them into the two black plastic cups (1).<br />
One of the two cups is equipped with a<br />
tape and buckle adjuster (2) to simplify the<br />
attachment procedure and the final<br />
tensioning of the roof pole section (3).<br />
Do not use force. If any resistance is met<br />
when the poles are inserted or tensioned,<br />
check and remedy the problem.
Fixieren Sie nachfolgend die vier<br />
Befestigungsschlaufen an den<br />
Bodeneckpunkten mit Heringen (1).<br />
Ziehen Sie nun an den übrigen<br />
Befestigungsschlaufen die beiden Apsiden<br />
aus und befestigen diese mit weiteren<br />
Heringen (2). Spannen Sie Ihr Zelt<br />
anschließend mit Hilfe der dafür<br />
vorgesehenen Abspannleinen und der<br />
restlichen Heringe sturmstabil aus (3). Die<br />
Ausrichtung der Abspannleinen sollte dem<br />
Stangen- und Nahtverlauf der Kreuzkuppel<br />
folgen.<br />
Peg out the four anchor loops located at<br />
the lower corners of the tent (1). Next, take<br />
hold of the remaining anchor loops, pull<br />
out the two vestibules and peg them out<br />
(2). Finally, use the guy lines and the<br />
remaining pegs to tension the tent and<br />
render it wind stable (3).<br />
The guy lines should be pegged out in line<br />
with the poles and seams of the dome<br />
construction.<br />
When wet the tent material may stretch.<br />
Re-guy if necessary.<br />
Bei Nässe kann sich das Zeltmaterial<br />
dehnen. Es muss dann etwas<br />
nachgespannt werden.
Achten Sie beim Abbau unbedingt darauf,<br />
dass die Dachstange vor den beiden<br />
Hauptstangen entspannt wird. Dazu die<br />
verstellbare Kunststoffhülse lösen. Um das<br />
Einpacken und den nächsten Aufbau zu<br />
erleichtern, fassen Sie die Abspannleinen<br />
so kurz wie möglich und beachten Sie<br />
folgende Schritte:<br />
Legen Sie das Zelt längs halbiert auf die<br />
Seite (1) und und schlagen Sie die Apsiden<br />
ein (2).<br />
Dritteln Sie das Zelt erst längs (3) und dann<br />
quer (4).<br />
Schließlich wird das Zelt mit Hilfe des<br />
Gestängesacks eingerollt (5/6).<br />
When dismantling the tent, make sure that<br />
the tension on the roof pole is released<br />
before moving on to the two main pole<br />
sections. To release the tension, loosen<br />
the adjuster tapes on the plastic cups. In<br />
order to simplify the packing and future<br />
pitching procedures, roll the guy lines up<br />
as short as possible and take note of the<br />
following steps:<br />
Fold the tent in two, lay it on its side (1)<br />
and fold in the vestibule sections (2).<br />
Fold the tent lengthways into three (3) and<br />
then crossways (4).<br />
Finally, roll the tent up around the pole bag<br />
(5/6).
REPARATUREN<br />
Reparaturmaterialien für kleine<br />
Reparaturen unterwegs liegen bei.<br />
Produktionsfehler werden im Rahmen der<br />
Garantieleistungen repariert. Andere<br />
Reparaturen führen wir gegen eine Gebühr<br />
gerne aus. Schicken Sie das gereinigte<br />
Zelt mit klarer Reparaturkennzeichnung/-<br />
anweisung und Ihrem Kaufbeleg über Ihren<br />
Fachhändler ein.<br />
LAGERUNG<br />
Bevor Sie Ihr Zelt längere Zeit lagern, muss<br />
es vollkommen durchgetrocknet sein, sonst<br />
besteht Gefahr von Schimmel-und<br />
Stockfleckenbildung.<br />
UV STRAHLUNG<br />
Ultraviolette (UV) Strahlung zerstört mit<br />
der Zeit alle modernen Zeltmaterialien.<br />
Das spezielle Polyester-Zeltmaterial erhöht<br />
die Lebensdauer gegenüber<br />
herkömmlichen Nylon-Zeltmaterialien, kann<br />
aber auch auf Dauer der Natur nicht trotzen.<br />
Bitte vermeiden Sie deshalb dauerhafte<br />
intensive Sonneneinwirkung. Jack Wolfskin<br />
übernimmt keine Garantie für Schäden<br />
durch UV Strahlung.<br />
REPAIRS<br />
Repair materials for minor repairs during<br />
usage are provided. Production faults will<br />
be repaired under the terms of our<br />
guarantee. Our service department will be<br />
pleased to perform other repairs for a small<br />
charge. Please send in your cleaned tent<br />
via your nearest dealer, enclosing clear<br />
repair instructions and proof of purchase.<br />
STORAGE<br />
Allow your tent to dry thoroughly while still<br />
assembled before storing it for any longer<br />
period. This will prevent mildew and damp<br />
stains forming.<br />
UV LIGHT<br />
Ultraviolet (UV) radiation reduces the<br />
tearstrength of all tent materials in the<br />
course of time. The special polyester tent<br />
material increases the service life in<br />
<strong>com</strong>parison with conventional nylon<br />
materials. Tent materials, however, cannot<br />
permanently defy the effects of nature.<br />
Therefore, please avoid subjecting the tent<br />
to intensive sunlight for extended periods<br />
of time.<br />
JACK WOLFSKIN will not assume any<br />
liability for damage caused by ultraviolet<br />
light.<br />
WEITERE TIPPS<br />
Die stramme Grundspannung der Stangen,<br />
des Überzeltes und der Abspannleinen<br />
sind die Vorraussetzung für besten Stand<br />
und Sturmstabilität Ihres Zeltes.<br />
Überprüfen Sie den Sitz der Stangen in<br />
den Stangenkanälen und spannen Sie<br />
Apsiden und Abspannleinen immer straff<br />
aus.<br />
Investieren Sie beim Aufbau ruhig ein paar<br />
Minuten mehr an Zeit und Mühe, dann<br />
können Sie beim nächsten Wettereinbruch<br />
ganz „entspannt“ sein.<br />
NAHTDICHTER<br />
Die wichtigsten Nähte sind mit einer<br />
speziellen Nahtbandversiegelung versehen.<br />
Es empfiehlt sich Nahtstellen, in die Bänder<br />
oder Gummilitzen mit eingefasst sind und<br />
die so die Bandabklebung unterbrechen<br />
von innen und außen zusätzlich mit<br />
beiliegendem PU Nahtdichter abzudichten.<br />
Eine Garantie für die Verklebung ist<br />
ausgeschlossen.<br />
FURTHER TIPS<br />
Correct initial tensioning of the poles, the<br />
flysheet and the guy lines are the<br />
prerequisites for a secure pitch and<br />
optimum wind stability.<br />
Check that the poles are correctly<br />
positioned and seated in their channels<br />
and always tension the flysheet and the<br />
guylines correctly. Take your time; a few<br />
minutes spent checking the tent during<br />
pitching will mean that you can relax when<br />
the weather next turns bad!<br />
SEAM SEALANT<br />
The important seams are specially tape<br />
sealed. However we do re<strong>com</strong>mend<br />
additional sealing with the PU seam sealant<br />
provided, particularly at those points of the<br />
seam where tapes or rubber tensioning<br />
loops are integrated into seam and thus<br />
interrupt the continuity of the tape seal. We<br />
offer no guarantee on the seam taping of<br />
the seams.