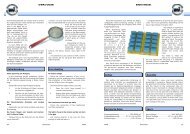
Anleitung - AMW
Anleitung - AMW
Anleitung - AMW

Erfolgreiche ePaper selbst erstellen
Machen Sie aus Ihren PDF Publikationen ein blätterbares Flipbook mit unserer einzigartigen Google optimierten e-Paper Software.
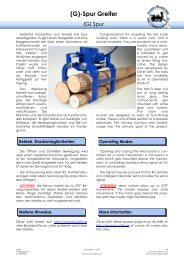
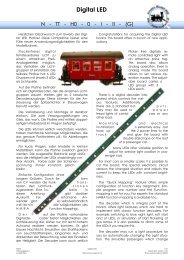
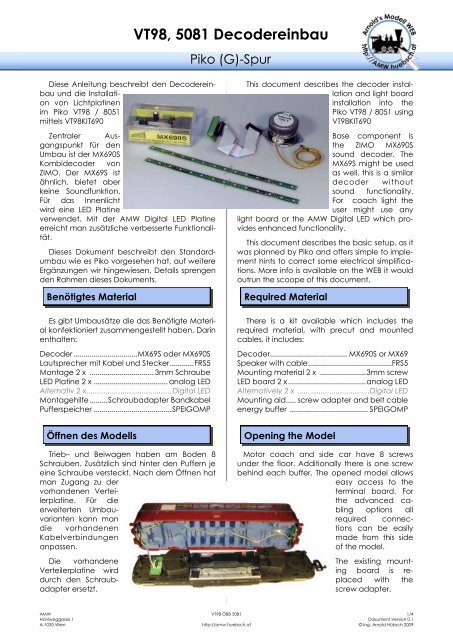
VT98, 5081 Decodereinbau<br />
Piko (G)-Spur<br />
Diese <strong>Anleitung</strong> beschreibt den Decodereinbau<br />
und die Installation<br />
von Lichtplatinen<br />
im Piko VT98 / 8051<br />
mittels VT98KIT690<br />
Zentraler Ausgangspunkt<br />
für den<br />
Umbau ist der MX690S<br />
Kombidecoder von<br />
ZIMO. Der MX69S ist<br />
ähnlich, bietet aber<br />
keine Soundfunktion.<br />
Für das Innenlicht<br />
wird eine LED Platine<br />
verwendet. Mit der <strong>AMW</strong> Digital LED Platine<br />
erreicht man zusätzliche verbesserte Funktionalität.<br />
Dieses Dokument beschreibt den Standardumbau<br />
wie es Piko vorgesehen hat, auf weitere<br />
Ergänzungen wir hingewiesen, Details sprengen<br />
den Rahmen dieses Dokuments.<br />
Benötigtes Material<br />
Es gibt Umbausätze die das Benötigte Material<br />
konfektioniert zusammengestellt haben. Darin<br />
enthalten:<br />
Decoder ................................MX69S oder MX690S<br />
Lautsprecher mit Kabel und Stecker ............ FRS5<br />
Montage 2 x ................................ 3mm Schraube<br />
LED Platine 2 x ..................................... analog LED<br />
Alternativ 2 x ........................................ Digital LED<br />
Montagehilfe ......... Schraubadapter Bandkabel<br />
Pufferspeicher ....................................... SPEIGOMP<br />
This document describes the decoder installation<br />
and light board<br />
installation into the<br />
Piko VT98 / 8051 using<br />
VT98KIT690<br />
Base component is<br />
the ZIMO MX690S<br />
sound decoder. The<br />
MX69S might be used<br />
as well, this is a similar<br />
decoder without<br />
sound functionality.<br />
For coach light the<br />
user might use any<br />
light board or the <strong>AMW</strong> Digital LED which provides<br />
enhanced functionality.<br />
This document describes the basic setup, as it<br />
was planned by Piko and offers simple to implement<br />
hints to correct some electrical simplifications.<br />
More info is available on the WEB it would<br />
outrun the scoope of this document.<br />
Required Material<br />
There is a kit available which includes the<br />
required material, with precut and mounted<br />
cables, it includes:<br />
Decoder....................................... MX690S or MX69<br />
Speaker with cable ..........................................FRS5<br />
Mounting material 2 x ....................... 3mm screw<br />
LED board 2 x ....................................... analog LED<br />
Alternatively 2 x ..................................Digital LED<br />
Mounting aid..... screw adapter and belt cable<br />
energy buffer ....................................... SPEIGOMP<br />
Öffnen des Modells<br />
Trieb– und Beiwagen haben am Boden 8<br />
Schrauben. Zusätzlich sind hinter den Puffern je<br />
eine Schraube versteckt. Nach dem Öffnen hat<br />
man Zugang zu der<br />
vorhandenen Verteilerplatine.<br />
Für die<br />
erweiterten Umbauvarianten<br />
kann man<br />
die vorhandenen<br />
Kabelverbindungen<br />
anpassen.<br />
Die vorhandene<br />
Verteilerplatine wird<br />
durch den Schraubadapter<br />
ersetzt.<br />
Opening the Model<br />
Motor coach and side car have 8 screws<br />
under the floor. Additionally there is one screw<br />
behind each buffer. The opened model allows<br />
easy access to the<br />
terminal board. For<br />
the advanced cabling<br />
options all<br />
required connections<br />
can be easily<br />
made from this side<br />
of the model.<br />
The existing mounting<br />
board is replaced<br />
with the<br />
screw adapter.<br />
<strong>AMW</strong> VT98 ÖBB 5081 1/4<br />
Hohlweggasse 1 Dokument Version 0.1<br />
A-1030 Wien http://amw.huebsch.at © Ing. Arnold Hübsch 2009
VT98, 5081 Decoder Installation<br />
Lautsprecher Montage<br />
Im Motorwagen ist unter dem<br />
hinteren Führerstand. Der FRS5<br />
Lautsprecher wird in die vorbereitete<br />
Ausnehmung mit den beiden<br />
Schrauben montiert.<br />
Die obersten beiden Kontakte<br />
des rechten Steckers am MX690S<br />
werden mit dem Lautsprecher<br />
verbunden. Das konfektionierte<br />
Kabel hat einen 2 poligen Stecker.<br />
Speaker Installation<br />
In the motor coach underneath<br />
the rear driver seat there is a<br />
mounting space for a FRS5<br />
speaker. Install the speaker with<br />
the 2 3mm screws there.<br />
The upper two pins of the right<br />
connector on the MX690S go to<br />
the speaker. Just use the preconfigured<br />
cable with the 2 way<br />
plug.<br />
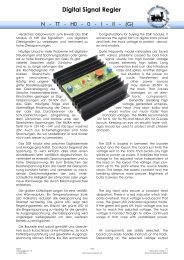
Decoder Montage und Anschluß<br />
An den MX690S Decodern sind die beiden<br />
Montageverlängerungen abzubrechen. Der so<br />
verkürzte Decoder kann von unten in den Toilettenraum<br />
eingeschoben werden.<br />
Der linke 16polige Stecker wird mit dem<br />
F l a c h b a n d k a b e l<br />
verbunden. Diese<br />
läuft unter dem<br />
Wagenboden zum<br />
Schraubadapter.<br />
Der Anschluß<br />
kann auch mittels<br />
Lötverbindungen<br />
hergestellt werden.<br />
Verwenden Sie zur<br />
Isolation Schrumpfschläuche.<br />
Die von Piko vorgesehene Standardverkabelung<br />
hat alle Scheinwerfer des Triebwagens und<br />
des Steuerwagens gekoppelt. Die Anschlüsse<br />
7,10,14 (Zählweise Decoder Pin) werden nur<br />
beschaltet wenn man die Scheinwerfer hinten<br />
des Triebwagens extra schaltbar ausführen will.<br />
Dazu sind kleine Lötarbeiten an der hinteren<br />
Lampenverteilerplatine nötig.<br />
Das Bild rechts zeigt die Beschaltung in Standardausführung.<br />
sw/sw Schiene,<br />
rt/bl Motor, ws<br />
Licht vorne, bl<br />
g e m e i n s a m e r<br />
(+), ge Licht<br />
hinten, gn Innenlicht.<br />
Die roten<br />
Lichter schalten<br />
automatisch mit.<br />
Decoder Installation, Connection<br />
Remove the mounting extensions from the<br />
MX690S decoder. The now shorter decoder fits<br />
nicely in the toilet and is invisible from outside.<br />
Connect the left side 16 pin terminal with the<br />
belt cable. This runs<br />
under the coach<br />
floor to the screw<br />
clamp adapter.<br />
It is also possible to<br />
connect the cable<br />
directly with soldering.<br />
Insulate the<br />
connections with<br />
shrink hoses.<br />
The cabling from Piko has all head lights from<br />
motor coach and side car coupled. The connections<br />
7, 10, 14 (counting scheme decoder<br />
pin) are not used in this mode. To allow extra<br />
switch off of the rear motor coach headlights<br />
small soldering work is necessary on the distributer<br />
boards at the rear end of the motor coach.<br />
The right picture shows the standard cabling.<br />
b l / b l t r a c k<br />
pickup, rd/bl<br />
motor, white ligt<br />
front, blue common<br />
(+), yellow<br />
light rear, green<br />
coach light. The<br />
red light goes<br />
with white.<br />
2/4 VT98 ÖBB 5081 <strong>AMW</strong><br />
Dokument Version 0.1 Hohlweggasse 1<br />
© Ing. Arnold Hübsch 2009 http://amw.huebsch.at A-1030 Wien
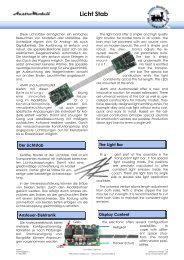
VT98, 5081 Decodereinbau<br />
Innenlicht<br />
Die Innenbeleuchtung für Trieb- und Steuerwagen<br />
wird an die im Fahrzeug bereits vorhandene<br />
blau/grüne Leitung angeschlossen. Der<br />
Bausatz enthält zwei gelbe LED Platinen<br />
Alternativ kann die <strong>AMW</strong> Digital LED Platine<br />
genutzt werden. Die gelb/weiße Variante erlaubt<br />
das einstellen der Lichtfarbe indem weiße<br />
oder gelbe LEDs gedimmt werden. Der<br />
Anschluß der Digital LED Platine erfolgt direkt an<br />
das Schienensignal.<br />
Coach Light<br />
Coach light is connected to the green/blue<br />
preinstalled cable. The kit includes two yellow<br />
LED boards.<br />
Alternatively the coach light can be done<br />
with the <strong>AMW</strong> Digital LED board. This offers free<br />
adjustment of the light color by dimming either<br />
the yellow or white LEDs.<br />
Steuerwagen<br />
Der Steuerwagen ist schnell<br />
ergänzt. Lediglich das graue<br />
Dach abnehmen und die Lichtplatine<br />
an den Kabeln die im<br />
WC von Piko vorbereitet liegen<br />
anschließen.<br />
Die LED Platine hat einen<br />
Gleichrichter daher ist die Orientierung<br />
der Drähte unerheblich.<br />
Sidecar<br />
The sidecar conversion is quick<br />
and easy, Just remove the gray<br />
roof and install the light board<br />
on the prepared wired which<br />
hide in the toilet.<br />
The LED board has a rectifier on<br />
board, so the wires can be connected<br />
both ways.<br />
Mögliche CV Werte<br />
Nachfolgend einige CV Werte die im Umbaukit<br />
bereits voreingestellt sind :<br />
Possible CV Values<br />
There are some CV values which are preconfigured<br />
on kit sounddecoders:<br />
Funktion<br />
Function<br />
MX690S<br />
Anfahr-Massensimulation start acceleration CV3=20<br />
Bremsverzögerung breaking CV3=10<br />
Rangierbeleuchtung auf F1 shunting light on F1 CV33=3<br />
Fernlicht Taste F6<br />
Dimmwert<br />
high beam on F6<br />
CV119=131<br />
CV60=60<br />
weiche Beschleunigung soft acceleration start CV121=22<br />
sanftes Anhalten soft breaking CV122=11<br />
Halbgeschwindigkeit, Aufhebung er Massensimulation<br />
F3<br />
Half speed and disabling of mass simulation<br />
on F3<br />
CV124=103<br />
Konstanter Bremsweg distance fixed breaking CV141<br />
Abschaltbares Licht Motorwagen hinten Turn off light motor coach rear side CV35=12<br />
CV127=2 CV128=1<br />
Innenlicht umrangieren auf F2 Rearrange inner light to F2 CV36=16<br />
<strong>AMW</strong> VT98 ÖBB 5081 3/4<br />
Hohlweggasse 1 Dokument Version 0.1<br />
A-1030 Wien http://amw.huebsch.at © Ing. Arnold Hübsch 2009
VT98, 5081 Decoder Installation<br />
Erweiterter Umbau<br />
Alternativ zum vorgestellten Umbau kann<br />
man die Schleifer im Steuerwagen in Betrieb<br />
nehmen und einen Decoder im Wagen z.B.: die<br />
Digital LED Platine direkt versorgen. Somit kann<br />
das Verbinden der beiden Wagen entfallen und<br />
der Triebwagen leicht ohne Steuerwagen eingesetzt<br />
werden. Ebenso ist das erwähnte Abschalten<br />
der hinteren Stirnlampen des Triebwagens<br />
umsetzbar, Der Decoder ist bereits vorprogrammiert.<br />
Enhanced Installation<br />
Alternatively to the described installation the<br />
pickups of the side car may be used to power<br />
the light. Using a decoder for example the Digital<br />
LED board the headlights are driven correctly.<br />
This method avoids the connection between<br />
Motor– and side car and allows flexible<br />
easy coupling of the two parts. The extra turn off<br />
feature for the rear headlights of the motor<br />
coach is already preconfigured in the decoder.<br />
Sicherheitshinweise<br />
Bitte behandeln Sie die Bauteile sorgfältig. Es<br />
ist kein Spielzeug für kleine Kinder. Achten Sie<br />
auf mögliche Kurzschlüsse um Schäden an<br />
Decodern zu vermeiden.<br />
Security Advices<br />
Please handle these components with care.<br />
It is not a toy for little children! Check for shortcuts<br />
as that might damage the decoder.<br />
Weiterführendes<br />
Ergänzende Hinweise, Praxisbeispiele, Bilder<br />
finden Sie auf http://amw.huebsch.at. Am <strong>AMW</strong><br />
befindet sich die jeweils aktuellste Ausgabe<br />
dieser Dokumentation. In der Fußzeile dieses<br />
Dokuments finden sie einen Versionshinweis. Auf<br />
http://atw.huebsch.at gibt es einen Umbaubericht,<br />
der auch die erwähnten erweiterten Möglichkeiten<br />
beschreibt.<br />
Bausätze mit vorprogrammiertem Decoder<br />
und allen benötigten Teilen führen alle ZIMO<br />
Fachhändler.<br />
More information<br />
Supplemental information, installation advices,<br />
pictures can be accessed via http://<br />
amw.huebsch.at. The most recent update of<br />
this document is hosted there as well. The footer<br />
line of this document indicates the document<br />
version. At http://atw.huebsch.at there is a<br />
report about the installation, it describes also<br />
some of the extensions.<br />
All ZIMO dealers carry the kit which includes a<br />
preconfigured decoder and all necessary components.<br />
<strong>AMW</strong><br />
Ing. Arnold Hübsch<br />
Hohlweggasse 1/4<br />
A-1030 Wien<br />
E-Mail: office@huebsch.at<br />
http://amw.huebsch.at<br />
+43 (699) 226 77 335<br />
Fachhändler<br />
4/4 VT98 ÖBB 5081 <strong>AMW</strong><br />
Dokument Version 0.1 Hohlweggasse 1<br />
© Ing. Arnold Hübsch 2009 http://amw.huebsch.at A-1030 Wien