
Erfolgreiche ePaper selbst erstellen
Machen Sie aus Ihren PDF Publikationen ein blätterbares Flipbook mit unserer einzigartigen Google optimierten e-Paper Software.
Über dieses HandbuchDiese Bedienungsanleitung enthält wichtige Informationen und Warnungen zum Umgangmit dem ZE-NC2010. Bitte fügen Sie diese Bedienungsanleitung Ihrem Bordbuch hinzu, umjederzeit darauf Zugriff zu haben. HINWEIS:■ Texte mit diesem Symbol weisen Sie auf besondere Informationen hin, die für eine ordnungsgemäßeBedienung äußerst wichtig sind.INHALTSVERZEICHNISSICHERHEITSHINWEISE.....................................................................................................3TASTEN DES BEDIENTEILS............................................................................................ 4-5TASTEN DER FERNBEDIENUNGEN............................................................................... 6-9GRUNDLEGENDE BEDIENUNG.................................................................................. 10-11HAUPTMENÜ UND EINSTELLUNGEN........................................................................ 12-19RADIO Modus............................................................................................................. 20-22CD/DVD Modus................................................................................................................23CD/MP3/WMA-MODUS.....................................................................................................24SD/USB Modus.................................................................................................................25iPOD Modus.....................................................................................................................26BLUETOOTH Modus.................................................................................................. 27-33NAVIGATIONS Modus......................................................................................................34EXTERNE WIEDERGABEQUELLEN..................................................................................34CAN-BUS............................................................................................................................35GENERELLE INFORMATIONEN........................................................................................36FEHLERSUCHE............................................................................................................ 37-38SPEZIFIKATIONEN.............................................................................................................39GARANTIE..................................................................................................................... 78-792
DEUTSCHSICHERHEITSHINWEISE1. Dieses Gerät ist nur für den Betrieb an einem Bordnetz mit +12V (DC) und Minus gegenMasse geeignet.2. Montieren und bedienen Sie das Gerät nur so, wie es in der Bedienungsanleitungbeschrieben wird. Alles andere kann zum Erlöschen Ihres Garantieanspruches führen.3. Zerlegen oder modifizieren Sie das Gerät nicht. Dies kann zu einer Beschädigung desGerätes führen und Ihr Garantieanspruch erlischt dadurch. Versuchen Sie auch nichtdas Gerät selbst zu reparieren oder zu warten, sondern wenden Sie sich an einenautorisierten ZENEC-Fachhändler.4. Benutzen Sie nur das Originalzubehör, um das Gerät zu installieren und zu betreiben, daansonsten eine Beschädigung des Gerätes riskiert wird. Befestigen Sie das Gerät gemäßder Installationsanleitung, unter Verwendung des mitgelieferten Montagezubehörs. Diebei Unfällen auftretenden Beschleunigungskräfte sind teilweise enorm. Unsachgemäßmontierte Geräte stellen bei Unfällen ein großes Risiko für den Fahrer und die Insassendes Fahrzeuges dar.5. Schützen Sie das Gerät vor Wasser oder anderen Flüssigkeiten, die in das Innere desGerätes eindringen können. Ein Kurzschluss mit Brandfolge könnte daraus resultieren.6. Bevor Sie eine defekte Sicherung austauschen, sollten Sie erst überprüfen wasder Grund für den Kurzschluss war. Achten Sie dabei besonders auf die Kabelder Spannungsversorgung! Wenn der Kurzschluss nicht durch einen Fehler in derSpannungsversorgung verursacht wurde, müssen Sie die defekte Sicherung gegen einneues Exemplar mit identischen Werten austauschen. Sollte der Kurzschluss immer nochvorhanden sein, wenden Sie sich bitte an einen autorisierten ZENEC-Fachhändler.7. Achten Sie darauf, dass bei ausgeschaltetem Motor die Batterie des Fahrzeuges nichtentladen wird. Da es sich bei dem Gerät um einen Verbraucher handelt und die Batterienur bei laufendem Motor aufgeladen wird, kann es passieren, dass die Batterie tiefentladen wird und das Fahrzeug sich nicht mehr starten lässt.8. Gemäß den in den verschiedenen Ländern der EU geltenden Verkehrsvorschriften, darfein Monitor, der in Sichtweite des Fahrers montiert ist, während der Fahrt, ausser zuNavigationszwecken, nicht betrieben werden, da er den Fahrer vom Verkehrsgeschehenablenkt. Beachten Sie unbedingt die geltenden Vorschriften in Ihrem Land, da ansonstenbei einem Unfall Regressansprüche von der Kfz Versicherung geltend gemacht werdenkönnen. Achten Sie zusätzlich darauf, dass die Lautstärke in Ihrem Fahrzeug nur sohoch ist, dass Sie Außengeräusche, wie z.B. eine Polizeisirene, noch klar wahrnehmenkönnen.9. Setzen Sie das Gerät keinen harten Stößen aus. Eine mechanische und elektronischeBeschädigung des Gerätes könnte daraus resultieren.3
TASTEN DES FERNBEDIENUNGENFERNBEDIENUNG FÜR DEN VORDEREN WIEDERGABEBEREICH3459bnbrbsbtcmcncqcr21678blbmbobpbqbuclcocpcsct6
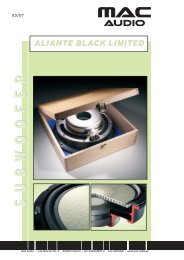
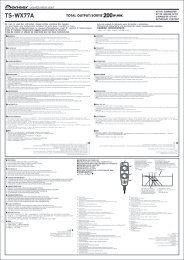
DEUTSCH1. POWER■ Drücken Sie die POWER-Taste, um dasGerät ein- oder auszuschalten.2. EJECT■ Drücken Sie die EJECT-Taste, um eineDisk einzuziehen oder auszuwerfen.3. MUTE■ Drücken Sie die MUTE-Taste, um dieTonwiedergabe manuell zu unterdrücken.4. SRC■ Drücken Sie die SRC-Taste, um zwischenden folgenden Wiedergabemodi zuwechseln:RADIO ➞ Disc ➞ NAVI ➞ AV IN ➞DVBT ➞ SD CARD ➞ iPod ➞ USB ➞CAMERADer gewählte Wiedergabemodus wird imDisplay angezeigt.5. NUMERISCHES ZIFFERNFELD■ Für direkten Zugriff auf Titel oder gespeicherteRadiostationen.6. VOL UP■ Erhöht die Lautstärke.7. VOL DOWN■ Verringert die Lautstärke.8. INFO■ Zeigt die momentan verfügbaren Informationeneiner Disk an.9. GOTO SUCHE■ Suchfunktion im DVD/CD-Modus.Drücken Sie die [-/--]-Taste, um eineKategorie zu wählen. Geben Sie dannüber das numerische Ziffernfeld die Zeitoder Titel/Kapitel ein.10. STOP/BAND■ Wählt das FM/AM Band im Radio-Modus.■ Stoppt die Wiedergabe in den anderenWiedergabemodi.11. SELECT■ Öffnet das Equalizer-Menü.12. Ohne Funktion13. HAUPTMENU■ Öffnet das Hauptmenü.14. Helligkeitseinstellungen15. REPEAT A-->B■ Drücken Sie die Taste, um den StartpunktA festzulegen. Drücken Sie die Tasteerneut, um den Endpunkt B der Repeat-Schleife zu setzen.16. OK■ Startet oder pausiert die Wiedergabe.■ Bestätigt die gewählten Einstellungen.17. RICHTUNGSTASTEN■ Drücken Sie die Richtungstasten, umin den Menüs zu navigieren oder Einstellungenzu ändern.18. TITLE■ Öffnet das Titelmenü der DVD.19. ROOT■ Öffnet das Hauptmenü der DVD.■ Schaltet PBC ein wenn eine VCD abgespieltwird.20. REPEAT■ Drücken Sie die REPEAT-Taste um Titel/Ordner/Kapitel/Disk zu wiederholen.21. NEXT■ Drücken Sie die NEXT-Taste, um zumnächsten Titel/Kapitel zu gelangen.■ Startet im Radio-Modus einen automatischenFrequenzsuchlauf zumnächsten Sender.22. PREVIOUS■ Drücken Sie die PREVIOUS-Taste, umzum vorherigen Titel/Kapitel zu gelangen.■ Startet im Radio-Modus einen automatischenFrequenzsuchlauf zum vorherigenSender.23. FAST REVERSE■ Erhöht den Rücklauf durch mehrmaligesDrücken in folgenden Schritten: "2X","4X", "8X", "16X".24. FAST FORWARD■ Erhöht den Vorlauf durch mehrmaligesDrücken in folgenden Schritten: "2X","4X", "8X", "16X".25. AUDIO■ Wenn verfügbar, wechselt die AUDIO-Taste die Tonspur während derDVD-Wiedergabe.26. ZOOM■ Vergrössert durch mehrmaliges Drückenden Bildausschnitt in folgendenSchritten: "+1", "+2", "+3", "OFF"27. ANGLE■ Wenn verfügbar, wechselt die ANGLE-Taste die Kameraperspektive währendder DVD-Wiedergabe.28. SUB-T■ Wenn verfügbar, wechselt die SUB-T-Tastedie Sprache des Untertitels während derDVD-Wiedergabe.7
FERNBEDIENUNG FÜR DEN HINTEREN WIEDERGABEBEREICH (M-ZONE)213457DTV MENUROOT689bnbmbqbpbtbuEPGTV/RADIOP Pblbobrbscmcl8
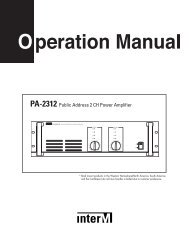
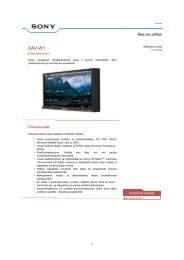
DEUTSCH1. R-SRC■ Nachdem die M-Zone im Hauptmenüaktiviert wurde, drücken Sie die R-SRC-Taste, um den Wiedergabemodus für denhinteren Wiedergabebereich zu wählen.2. Numerisches Tastenfeld■ Keine Funktion.3. MUTE■ Drücken Sie die MUTE-Taste, umdie Tonwiedergabe manuell zu unterdrücken.4. GOTO Suche■ Keine Funktion.5. TITLE■ Öffnet das Titelmenü des gewähltenModus.■ Spielt im CD-Modus die Titel für einigeSekunden an.6. ROOT■ Öffnet das Hauptmenü der Disk.■ Schaltet PBC ein, wenn eine VCD abgespieltwird.7. OK■ Startet oder pausiert die Wiedergabe.■ Bestätigt die gewählten Einstellungen.8. RICHTUNGSTASTEN■ Drücken Sie die Richtungstasten,um in den Menüs zu navigieren oderEinstellungen zu ändern.9. PREVIOUS■ Drücken Sie die PREVIOUS-Taste, umzum vorherigen Titel zu gelangen.10. NEXT■ Drücken Sie die NEXT-Taste, um zumnächsten Titel zu gelangen.11. STOP■ Stoppt die Wiedergabe des aktuellenWiedergabemodus.12. PLAY/PAUSE■ Startet oder pausiert die Wiedergabe.13. ZOOM■ Vergrössert durch mehrmaliges Drückenden Bildausschnitt in folgendenSchritten: "+1", "+2", "+3", "OFF".14. FAST REVERSE■ Erhöht den Vorlauf durch mehrmaligesDrücken in folgenden Schritten:"2X", "4X", "8X", "16X".15. FAST FORWARD■ Erhöht den Rücklauf durch mehrmaligesDrücken in folgenden Schritten:"2X", "4X", "8X", "16X".16. SLOWER PLAY■ Aktiviert die Zeitlupen Funktion.17. REPEAT■ Drücken Sie die REPEAT-Taste, um Titel/Ordner/Kapitel/Disk zu wiederholen.18. AUDIO■ Wenn verfügbar, wechselt die AUDIO-Taste die Tonspur während der DVD-Wiedergabe.19. SUB-T■ Wenn verfügbar, wechselt die SUB-T-Taste die Sprache des Untertitelswährend der DVD-Wiedergabe.20. ANGLE■ Wenn verfügbar, wechselt die ANGLE-Taste die Kameraperspektive währendder DVD-Wiedergabe.21. REPEAT A -> B■ Drücken Sie die Taste, um den StartpunktA festzulegen. Drücken Sie die Tasteerneut, um den Endpunkt B der Repeat-Schleife zu setzen.9
DEUTSCHSTUMMSCHALTUNG■ Manuell: Drücken Sie die Mute/Power-Taste an der Gerätefront, um den Ton zuunterbrechen. Drücken Sie die Taste erneut, um zur zuvor eingestellten Lautstärkezurückzukehren.■ Automatisch: Das Gerät wird gemutet, wenn ein Telefongespräch geführt wird.AUDIO CONTROL MENÜ■ Das Audio Control Menü erlaubt die Anpassung der Audiowiedergabe an die eigenenHörgewohnheiten und die Fahrzeuggegebenheiten. Der Menüpunkt "SW" ist nur vonBedeutung, wenn ein Subwoofer am entsprechenden Vorverstärkerausgang des Gerätesangeschlossen ist.■ Drücken Sie den PUSH/ENT-Drehregler, um in dasAudio Control Menü zu gelangen.■ Drücken Sie auf das Feld mit dem aktuellenWiedergabemodus in der oberen linken Ecke, umdas Menü zu verlassen.■ Drücken Sie den PUSH/ENT-Drehregler erneut, umdas Menü zu verlassen.■ Nach 15 Sekunden ohne Eingabe wird das Menüautomatisch geschlossen. HINWEIS:■ Bass und Höhen sind nur im "User"-Modus einstellbar.SPERRE DER VIDEOWIEDERGABE■ Die Video-Wiedergabe auf dem Display des Gerätes ist während der Fahrt aufgrund derVerkehrssicherheit mittels des CAN-Bus gesperrt. Für die Videowiedergabe muss dieHandbremse angezogen sein.■ Der Rückfahrkamera-Modus und die M-Zone bleiben von dieser Sperre unberührt.SYSTEM ZURÜCKSETZEN■ Sollte sich der Prozessor aufhängen oder sonstige Fehlfunktionen auftreten, drückenSie die RESET-Taste an der unteren rechten Gerätefront, um den Prozessor in denAuslieferungszustand zurückzusetzen.11
HAUPTMENÜ und EINSTELLUNGENHAUPTMENÜ■ Berühren Sie das []-Icon im Hauptmenü, um in das Setup-Menü zu gelangen.■ Berühren Sie den gewünschten Menüpunkt direkt am Display, um das Untermenü zuöffnen und den eingestellten Wert zu verändern.■ Die Icons [ ] und [ ] zeigen an, das Optionen auf einer weiteren Seite verfügbarsind.■ Berühren Sie das "SETUP"-Icon in der oberen linken Ecke, um das Setup-Menü zuverlassen.■ Das Setup-Menü schliesst sich automatisch nach 15 Sekunden ohne Eingabe.12
DEUTSCHGENERELLEinstellung Option FunktionUhr (HH:MM) Stellen Sie hier die Uhrzeit ein.AM/PMClock ModeRDS CTBeepCamera ImageBluetoothRadio FieldCAN BrightnessAMPM12Hr24HrOnOffOnOffNormalMirrorOnOffUSALATINEUROPEOnOffStellt die Uhrzeit auf AM oder PM ein. (Nur im12h Modus)Anzeige im 12h Modus mit AM und PM.Anzeige im 24h Modus.Aktiviert/deaktiviert die RDS CT Funktion.Aktiviert/deaktiviert die Tastentöne.Normale oder gespiegelte Ansicht des Bildesder Rückfahrkamera.Aktiviert/deaktiviert die Bluetooth Funktion.Auswahl der Region für optimale Radioempfangseigenschaft.Aktiviert/deaktiviert die vom Fahrzeuglichtabhängige Displayhelligkeit.CAN BacklightVersionDivX Registration-10 Einstellung der Display Helligkeit, wenn das+10 Fahrzeuglicht eingeschaltet ist.Anzeige der aktuellen Software Versionen.Anzeige des DivX Registrierungscode.13
VIDEOEinstellung Option FunktionTV ShapeAux INCinemaNormalAutoPALNTSCAnpassung des Seitenverhältnisses.Anpassung des Seitenverhältnisses.Schaltet automatisch zwischen PAL undNTSC um.Die Wiedergabe erfolgt im PAL Format.Die Wiedergabe erfolgt im NTSC Format.Brightness -10 to +10 Einstellen der Helligkeit des Displays.Monitor OffAusschalten des Bildschirms.ASP (AUDIOEINSTELLUNGEN)■ Im ASP Menü können Sie weitere Equalizer-Einstellungen vornehmen.Einstellung Option FunktionBass FreqTreble FreqSub FilterBass Q-Factor60Hz80Hz Wählt die Scheitelfrequenz des Bassreglers.100Hz Abhängig von der Wiedergabequelle.200Hz10 kHz12.5 kHz Wählt die Scheitelfrequenz des Höhenreglers.15 kHz Abhängig von der Wiedergabequelle.17.5 kHz80Hz120Hz Setzt einen Tiefpassfilter für den Subwoofer.160Hz1.0 Die eingestellte Sub-Filter Frequenz geteilt1.25 durch den Q-Faktor bestimmt die Weite der1.5 Bassanhebung. Somit ist eine breitbandige2.0 oder eine punktuelle Bassanhebung möglich.14
DEUTSCHEinstellung Option FunktionDown MixFront SpeakersCenter SpeakersSur SpeakersSub WooferCenter DelayDown SamplingSurr DelayDown Mix2-Kanal Stereo Audiowiedergabe.Full 6 CH 6-Kanal Audiowiedergabe (5.1).LargeSmallLargeSmallNoneLargeSmallNoneNonePresentNo Delay0.3 m0.6 m1.0 mOffOnNo Delay1 m2 m3 m4 m5.1 mEmpfohlen für LS ab 13 cm.Empfohlen für LS bis 13 cm.Empfohlen für LS ab 13 cm.Empfohlen für LS bis 13 cm.Nicht vorhanden.Empfohlen für LS ab 13 cm.Empfohlen für LS bis 13 cm.Nicht vorhanden.Nicht vorhanden.Vorhanden.Keine Laufzeitkorrektur.Laufzeitkorrektur in Relation zu den Frontlautsprechernbeträgt 0.3 m.Laufzeitkorrektur in Relation zu den Frontlautsprechernbeträgt 0.6 m.Laufzeitkorrektur in Relation zu den Frontlautsprechernbeträgt 1.0 m.Normale Audiowiedergabe.Audiowiedergabe in 48 kHz.Keine Laufzeitkorrektur.Laufzeitkorrektur in Relation zu den Frontlautsprechernbeträgt 1 m.Laufzeitkorrektur in Relation zu den Frontlautsprechernbeträgt 2 m.Laufzeitkorrektur in Relation zu den Frontlautsprechernbeträgt 3 m.Laufzeitkorrektur in Relation zu den Frontlautsprechernbeträgt 4 m.Laufzeitkorrektur in Relation zu den Frontlautsprechernbeträgt 5.1 m. HINWEIS:■ Wählen Sie "Groß" aus, wenn Sie die angeschlossenen Lautsprecher im Full Range Modusbetreiben wollen.■ Wählen Sie "Klein" aus, wenn Sie die angeschlossenen Lautsprecher über ein Hochpassfilterbetreiben wollen. Der Hochpassfilter wird automatisch aktiviert, wenn Sie "Klein" auswählen undist abhängig von der Einstellung des Tiefpassfilters (Subwoofer).15
SPRACHENAuswahlDVD MenuFunktionStellen Sie hier die gewünschte Menüsprache ein, die beimStart der DVD automatisch ausgewählt werden soll.SubtitleStellen Sie hier die gewünschte Sprache für den Untertitelein, die beim Start der DVD automatisch ausgewählt werdensoll.AudioOSDStellen Sie hier die gewünschte Tonspur ein, die beim Startder DVD automatisch ausgewählt werden soll.Stellen Sie hier die Sprache ein, in welcher das Bildschirmmenüdes Gerätes dargestellt werden soll.LAUTSTÄRKEEinstellung Option FunktionStart VolumeAdjustLastStellt beim Start des Gerätes automatisch diein diesem Menü ausgewählte Lautstärke ein.Wählt die vor dem letzten Ausschalten desGerätes gewählte Lautstärke aus.Start Vol Adjust 0 to 10Stellen Sie hier die gewünschte Lautstärkebeim Start des Gerätes ein.TA Volume 0 to 10Stellen Sie hier die Lautstärke desVerkehrsfunks ein.Volume BarOffOnAnzeigefeld der eingestellten Lautstärke aufdem Bildschirm.16
DEUTSCHVerschiedenesEinstellung Option FunktionNo Berühren Sie das "Yes"-Icon, um den TouchscreenTS Calibratezu kalibrieren. Folgen Sie den Anweisungen aufYes dem Bildschirm.Set Password LockedGeben Sie ein Passwort ein, um den Jugendschutzzu aktivieren.1. Kid Safe Kid safe: Der Inhalt ist für Kinder geeignet.2. GG: Der Inhalt ist für sämtliche Altersgruppengeeignet.3. PGPG: Der Inhalt ist für sämtliche Altersgruppen geeignet,jedoch wird elterliche Führung empfohlen.Parental control4. PG-13PG13: Der Inhalt ist für sämtliche Altersgruppengeeignet, jedoch wird elterliche Führung für Kinderunter 13 Jahren empfohlen.5. PG-R PG-R: siehe PG6. RR: Der Inhalt ist nur ab einer bestimmtenAltersgruppe geeignet. Meistens ab dem 17tenLebensjahr, es sei denn ein Erziehungsberechtigterbegleitet den Jugendlichen während des Films.7. NC-17NC-17: Es ist nicht gestattet den InhaltJugendlichen unter 17 Jahren zu zeigen.8. ADULT Adult: Der Inhalt ist nur für Erwachsene geeignet.Anti CODELockedEingabe des Codes für die Diebstahlschutzfunktion.Anti Theft SWOn Aktivieren/Deaktivieren der Diebstahlschutzfunktion.OffLoad FactoryNoYesWerkseinstellungen wiederherstellen.Software UpdateNo Berühren Sie das "Yes"-Icon, um ein Softwareupdatedurchzuführen.YesNavi UpdateNo Berühren Sie das "Yes"-Icon, um ein Update desYes Navigations Systems durchzuführen. HINWEIS:■ Das Gerät verfügt über eine integrierte Kinder- und Jugendschutzfunktion. Im Auslieferungszustandist diese Funktion deaktiviert. Der Menüpunkt ist erst verfügbar, wenn einPasswort eingegeben wurde.17
SICHERHEITSCODE■ Um das Gerät vor einem Diebstahl und der darauffolgenden Verwendung zu schützen,verfügt das Gerät über die Möglichkeit einen vierstelligen Sicherheitscode einzugeben.Wird das Gerät bei aktiviertem Sicherheitscode von der Spannungsquelle getrennt undanschliessend wieder angeschlossen, muss der Sicherheitscode eingegeben werden,um das Gerät wieder in Betrieb zu nehmen.Andernfalls kann das Gerät nicht mehr in Betrieb genommen werden.Im Auslieferungszustand ist die Eingabe des Sicherheitscodes deaktiviert, daherist es nicht nötig, den Sicherheitscode einzugeben, nachdem das Gerät von derSpannungsquelle getrennt wurde.1. Berühren Sie das Anti theft SW-Icon und aktivieren Sie die Eingabe des Sicherheitscodes.2. Berühren Sie das AntiCode-Icon und geben Sie mit dem auf dem Bildschirm erscheinendennumerischen Tastenfeld einen vierstelligen Sicherheitscode ein und bestätigen Siedie Eingabe durch eine wiederholte Eingabe. HINWEIS:■ Die Eingabe eines Sicherheitscodes, nachdem das Gerät von der Spannungsquelle getrenntwurde, ist im Auslieferungszustand deaktiviert und muss manuell aktiviert werden.■ Notieren Sie sich den Sicherheitscode und bewahren Sie ihn an einem sicheren Ort auf, sodass Sie ihn bei Bedarf wieder finden.Wird der Sicherheitscode dreimal falsch eingegeben, kann das Gerät nur noch mit einemSupercode freigeschaltet werden. Dazu muss es kostenpflichtig über einen ZENEC-Fachhändlereingeschickt werden.■ Um den Sicherheitscode zu ändern oder die Eingabe des Sicherheitscodes zu deaktivieren,müssen Sie zuerst den gültigen Sicherheitscode eingeben.18
DEUTSCHDURCHFÜHREN EINES SOFTWARE UPDATES HINWEIS:■ Auf www.zenec.com werden in unregelmäßigen Abständen Software Updates bereitgestellt.Befolgen Sie bitte die Anweisungen der dem jeweiligen Update beiliegendenInstallationsanleitung, um die Software zu installieren.19
RADIO-MODUS1 2 3 4 5 6bucmcl7 8 9 bl bm bn bo bp bqbr bs btcncocucp cq cr cs ct20
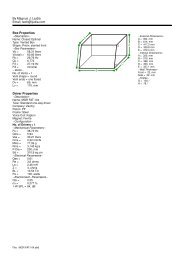
DEUTSCH1. Momentan gewählter Wiedergabemodus:Radio. Berühren, um das Hauptmenüzu öffnen.2. Anzeige der Signalstärke des ausgewähltenSenders.3. Die TP Anzeige leuchtet orange, wennder ausgewählte Sender Verkehrsfunknachrichtensendet.4. Die TA Anzeige leuchtet orange,wenn gerade eine Verkehrsdurchsageübertragen wird.5. Anzeige des Bluetooth Status.6. Uhrzeit.7. Automatischer Frequenzwechsel beimEmpfang von Regionalsendern. Wenn Sieim Randgebiet einer bestimmten Regioneinen Regionalsender empfangen unddiesen auch durchgehend hören möchten,können Sie durch die Aktivierung derREG-Funktion verhindern, das eventuellauf ein benachbartes Regionalprogrammumgeschaltet wird, auch wenn dessenEmpfangsqualität besser ist. BeachtenSie aber, das die eingestellte Frequenzvielleicht nicht mehr störungsfreiempfangen wird.8. Manuelles Suchen durch Verringern derFrequenz.9. Berühren, um AF-Funktion zu de- bzw.aktivieren. Bei aktivierter AF-Funktionwählt das Gerät automatisch die amBesten zu empfangende Frequenz desgehörten Radiosenders.10. Die Anspielfunktion des Gerätesspielt alle empfangbaren Sender desFrequenzbandes an. Wenn Sie einenpassenden Sender gefunden haben,berühren Sie irgendein Icon, um dieScan-Funktion zu deaktivieren.11. Berühren, um die TA Funktion zude- bzw. aktivieren. Bei aktivierter TAFunktion schaltet das Gerät automatischauf einen Radiosender um, welchergerade eine Verkehrsdurchsagesendet. Es spielt dabei keine Rolle,welchen Wiedergabemodus Sie geradeausgewählt haben.12. Manuelles Suchen durch Erhöhen derFrequenz.13. Berühren Sie das gewünschte PTYIcon. Das Gerät startet automatisch mitder Suche. Mit Hilfe der PTY-Funktionkann das Gerät gezielt nach Sendernmit bestimmten Programminhalten (z.B.Nachrichten, Rock etc.) suchen.14. Automatisches Suchen durch Erhöhender Frequenz.15. Wechsel zwischen den Untermenü-Seiten.16. Berühren, um zur vorhergehenden Seitezu gelangen.17. MUTE, schaltet die Audiowiedergabestumm.18. Berühren, um zur nächsten Seite zugelangen.19. Anzeige des momentan gewähltenFrequenzbandes, Sendernamen und derFrequenz.20. Automatisches Suchen durch Verringernder Frequenz.21. Radio Stationstasten 1 bis 6: Berühren,zum Aufrufen des jeweiligengespeicherten Senders. Berühren undhalten zum speichern des eingestelltenFrequenz.22. Anzeige, ob DX oder LOC aktiviert ist.23. Anzeige, ob die Wiedergabe im Monooder Stereo erfolgt. Das Gerät schaltetje nach Empfangsqualität automatischzwischen Mono und Stereo um.24. Wechsel zwischen den Untermenü-Seiten.25. Wählt zwischen den folgenen Frequenzbändern:FM-1, FM-2, FM-3, AM-1,AM-2.26. Berühren, um den automatischenSendersuchlauf zu starten. Es werdendie 6 stärksten Sender gespeichert.27. Die gespeicherten Sender werdennacheinander für ca. 10. Sekundenangespielt.28. Berühren, um DX oder LOC zuaktivieren.29. Anzeige des momentan gewähltenFrequenzbandes, Sendernamen und derFrequenz.21
HINWEIS:■ Das Gerät besitzt einen RDS Tuner, ein System, das zusätzlich zu den Radiofrequenzen auchDaten der Radiosender überträgt. Die Verfügbarkeit der RDS-Daten und deren Verwendunghängt vom jeweiligen Radiosender und dessen Empfangsqualität ab. Die RDS-Funktion stehtnicht im AM Frequenzband zur Verfügung.■ Um RDS nutzen zu können, muss die AF-Funktion aktiv sein. Im Auslieferungszustand ist dieAF-Funktion deaktiviert. Achten Sie bei der ersten Inbetriebnahme darauf, die AF-Funktion zuaktivieren. Die Einstellung bleibt anschließend gespeichert.22
DEUTSCHDVD/CD-MODUS3 4Area AArea FArea BArea CArea DArea E1256789■ Berühren Sie den unteren Bereich des Displays, um die Liste mit den Icons anzuzeigen.1. Berühren Sie das Icon, um den Startpunkt A festzulegen. Berühren Sie das Icon erneut,um den Endpunkt B der Schleife zu setzen. Nochmaliges Berühren beendet denSchleifen-Modus.2. Berühren Sie die REPEAT-Icon, um Titel/Ordner/Kapitel/Disk zu wiederholen.3. Wählt eine der verfügbaren Tonspuren aus.4. Wählt einen der verfügbaren Untertitel aus.5. Erhöht den Rücklauf durch mehrmaliges Berühren in folgenden Schritten:"2X", "4X", "8X", "16X".6. Startet oder pausiert die Wiedergabe.7. Erhöht den Vorlauf durch mehrmaliges Berühren in folgenden Schritten:"2X", "4X", "8X", "16X".8. Stoppt die Wiedergabe.9. Öffnet das DVD-Menü.■ Der Bildschirm des Gerätes ist in verschiedene Bereiche aufgeteilt, um die Bedienungper Touchscreen zu erleichtern.Bereich A: ■ Berühren Sie Bereich A, um das Hauptmenü des Gerätes aufzurufen.Bereich B: ■ Berühren Sie Bereich B, um die Wiedergabeinformationen einer DVD aufzurufen.Bereich C: ■ Berühren Sie Bereich C, um das vorherige Kapitel einer DVD auszuwählen.Bereich D: ■ Berühren Sie Bereich D, um das nächste Kapitel einer DVD auszuwählen.Bereich E: ■ Berühren Sie Bereich E, um die verschiedenen Wiedergabeoptionen anzuzeigen.Bereich F: ■ Berühren Sie Bereich F, um die GOTO Suchfunktion aufzurufen. HINWEIS:■ Wenn die Jugendschutzfunktion aktiviert ist, müssen Sie je nach DVD zuerst den erforderlichenJugendschutzcode eingeben.■ Die Handbremse muss angezogen sein, um die Videowiedergabe auf dem Gerät zu ermöglichen.Die Monitore für die M-Zone bleiben hiervon unberührt.23
CD/MP3/WMA-MODUS1 3bpbr2bq54 768 9 bl bsbmbnbo1. Momentan gewählter Wiedergabemodus: CD. Berühren, um das Hauptmenü zuöffnen.2. Anzeige von Titeln oder Ordnern bzw. deren Inhalte.3. Uhrzeit.4. Berühren Sie das REPEAT-Icon, um Titel/Ordner zu wiederholen.5. Öffnet ein nummerisches Tastenfeld und ermöglicht eine Direktanwahl der Titel.6. Zufallswiedergabe, spielt die Titel im aktuellen Ordner in zufälliger Reihenfolge ab.7. Berühren, um zum vorherigen Titel zu gelangen.8. Startet oder pausiert die Wiedergabe.9. Berühren, um zum nächsten Titel zu gelangen.10. Stoppt die Wiedergabe.11. Berühren, um zur vorhergehenden Seite zu gelangen.12. MUTE, schaltet das Gerät stumm.13. Berühren, um zur nächsten Seite zu gelangen.14. Name des Titels.15. Vergangene und gesamte Zeit des Titels.16. Berühren, um sich die darüberliegende Ordnerstruktur anzeigen zu lassen.17. Untermenü schließen.24
DEUTSCHSD-KARTEN-MODUS■ Legen Sie eine SD-Karte oder SDHC-Karte (max. 8 GB) in den SD-Kartenschacht einund wählen Sie den Wiedergabemodus SD-Karte. HINWEIS:■ Die Menüführung ist identisch zur Menüführung des CD/MP3/WMA Modus.■ Je nach Ordnerstruktur und Inhalt ist die Anzahl der verfügbaren Ordner begrenzt.■ Beachten Sie, dass die Geschwindigkeit der Bedienung von der Speicherkapazität der SD-Karte oder SDHC-Karte und der darauf befindlichen Datenmenge abhängt.USB-MODUS■ Stecken Sie einen USB-Stick in den USB-Port des Gerätes oder der Media-Link-Boxund wählen Sie den Wiedergabemodus USB. HINWEIS:■ Die Menüführung ist identisch zur Menüführung des CD/MP3/WMA Modus.■ Achten Sie darauf, dass die verwendeten USB-Speichermedien nicht mehr als 400 mA (max.zulässiger Strom) aufnehmen. Andernfalls können Sie nicht verwendet werden.■ Je nach Ordnerstruktur und Inhalt ist die Anzahl der verfügbaren Ordner begrenzt.■ Beachten Sie, dass die Geschwindigkeit der Bedienung von der Speicherkapazität des USB-Speichermediums und der darauf befindlichen Datenmenge abhängt.25
iPod-MODUS1 3bqbr5bt24bs68bu bn bo bp 7 9■ Schliessen Sie einen iPod mittels dem optionalem iPod-Kabel ZE-NC-IPS an den USB-Port an und wählen Sie iPod als Wiedergabemodus aus.1. Momentan gewählter Wiedergabemodus: iPod. Berühren, um das Hauptmenü zuöffnen.2. Anzeige der iPod Auswahlmenüs und deren Inhalte.3. Uhrzeit.4. Berühren Sie das REPEAT-Icon, um Titel/Ordner zu wiederholen.5. Öffnet ein nummerisches Tastenfeld und ermöglicht eine Direktanwahl der Titel.6. Scan-Funktion, spielt die Titel im aktuellen Ordner nacheinander für 10 Sekunden an.7. Berühren, um zum vorherigen Titel zu gelangen.8. Auswahl zwischen Video- und Musiktitel-Ordner. Nach der Auswahl des Videotitelserfolgt die Anzeige des Videos auf dem Display. Berühren Sie das Display, um in dasiPod-Menü zurückzukehren. Die Wiedergabe wird hierbei nicht pausiert.9. Startet oder pausiert die Wiedergabe.10. Berühren, um zum nächsten Titel zu gelangen.11. Stoppt die Wiedergabe.12. Berühren, um zur vorhergehenden Seite zu gelangen.13. MUTE, schaltet das Gerät stumm.14. Berühren, um zur nächsten Seite zu gelangen.15. Name des Titels.16. Vergangene und gesamte Zeit des Titels.17. Zufallswiedergabe, spielt die Titel im aktuellen Ordner in zufälliger Reihenfolge ab.18. Berühren, um in der Ordnerstruktur den vorherigen Ordner auszuwählen und dessenInhalt anzuzeigen.19. Untermenü schließen. HINWEIS:■ Bitte beachten Sie die aktuelle iPod-Kompatibilitätsliste und eventuelle Änderungen bezüglichder iPod Software auf www.zenec.com.26bl bm
DEUTSCHBLUETOOTH-MODUSBLUETOOTH BEDIENUNG1 9 bm bo 2bn 81. Momentan gewählter Wiedergabemodus: Bluetooth. Drücken, um das Hauptmenü zuöffnen.2. Bluetooth Icon.3. Aktivieren der Wählfunktion.4. Öffnen des Telefonbuchs.5. Öffnen der Anruflisten.6. Aktivieren der A2DP-Funktion.7. Aktivierung der Kopplungsfunktion.8. Übergabe des Telefongesprächs vom Gerät an das Mobiltelefon.9. Anzeige der Empfangssignalstärke des gekoppelten Mobiltelefons.10. Öffnen des Einstellungsmenü für Bluetooth.11. Annahme bzw. Beginnen eines Telefonanrufs.12. Beenden bzw. Ablehnen eines Telefonanrufs.13. Löschen einer eingegebenen Ziffer. HINWEIS:■ Die Lautstärke der Freisprecheinrichtung lässt sich mit dem PUSH/VOL-Regler während desGesprächs einstellen. Die eingestellte Lautstärke bleibt gespeichert.■ Die Bluetooth Systemlautstärke ist je nach Mobiltelefon abhängig von der Mobiltelefon-Systemlautstärke.DAS BLUETOOTH-ICON■ Wenn Sie Bluetooth im Setup aktiviert haben, erscheint am oberen Rand des Displaysdas Bluetooth-Icon [ ].■ Das Bluetooth-Icon ist grau, wenn Bluetooth aktiv ist, aber kein Mobiltelefon gekoppeltwurde.■ Das Bluetooth-Icon ist blau, wenn Bluetooth aktiv ist und ein Mobiltelefon gekoppeltwurde. HINWEIS:■ Sollte kein Bluetooth-Icon sichtbar sein, ist die Bluetooth Funktion im Setup deaktiviert.34567bl27
TELEFONBUCH■ Nachdem das Mobiltelefon mit dem Gerät gekoppelt wurde, startet automatisch dieSynchronisation des Telefonbuchs. Dabei werden die Einträge vom Mobiltelefonautomatisch an das Gerät übertragen, sobald Sie ins Fahrzeug einsteigen. Die Funktion„Automatisch verbinden" ist vorher am Telefon wie am Gerät zu aktivieren.SUCHFUNKTION FÜR TELEFONBUCHEINTRÄGE■ Berühren Sie das [ ]-Icon um die Tastatur aufzurufen. Mit der Eingabe eines Buchstabenskönnen Sie nach dem Anfangsbuchstaben des Nachnamens suchen. DieEinträge mit dem entsprechenden Anfangsbuchstaben werden direkt angezeigt. HINWEIS:■ Diese Funktion und die Sortierung der Einträge sind abhängig von dem verwendetenMobiltelefon.■ Eine Liste mit den kompatiblen Mobiltelefonen und den unterstützten Funktionen finden Sieunter www.zenec.com.28
DEUTSCHANRUFLISTEN■ Anzeigemöglichkeit der gewählten, empfangenen und verpassten Anrufe.A2DP FUNKTION■ Starten Sie die Wiedergabe am Gerät. Der Musikplayer des Mobiltelefons wird automatischaktiviert und kann über das Gerät ferngesteuert werden.PAIRING■ Sie haben zwei Möglichkeiten ein Mobiltelefon mit dem Gerät zu koppeln. Beachten Siehier, dass der Bluetooth-Modus des Gerätes aktiviert sein muss.1. Suchen nach einem Mobiltelefon in Ihrer Nähe.2. Suchen über Ihr Mobiltelefon.29
1. Suchen nach einem Mobiltelefon in Ihrer Nähe1. Aktivieren Sie den Bluetooth-Modus des Mobiltelefons und achten Sie darauf, dassdas Ermitteln des Mobiltelefons vorher zugelassen bzw. die entsprechende Funktionaktiviert wurde.2. Berühren Sie das Add-Icon um das Suchmenü aufzurufen und um den Suchlauf zustarten.3. Nachdem das Mobiltelefon vom Gerät gefunden und eine Bluetooth-Verbindungaufgebaut wurde, erscheint der Name des Mobiltelefons auf dem Gerät.4. Wählen Sie nun das Mobiltelefon auf dem Gerät aus, berühren Sie anschliessend dasConnect-Icon und geben Sie den alphanumerischen Kennschlüssel ein, welcher imAuslieferungszustand 1234 lautet.Je nach Mobiltelefon und Einstellung muss auch dort der alphanumerische Kennschlüsseleingegeben werden.5. Nachdem die Kopplung zwischen dem Gerät und dem Mobiltelefon abgeschlossen ist,werden Sie je nach Mobiltelefon noch einmal aufgefordert, die Kopplung zu bestätigen,um den Vorgang zu beenden.2. Suchen über Ihr Mobiltelefon1. Aktivieren Sie den Bluetooth-Modus des Mobiltelefons.2. Wählen Sie den Bluetooth-Modus des Gerätes aus.3. Starten Sie die Suche nach Bluetooth Geräten auf dem Mobiltelefon.4. Nachdem das Gerät vom Mobiltelefon gefunden und eine Bluetooth-Verbindungaufgebaut wurde, erscheint das Gerät mit der Bezeichnung ZE-NC2010 auf demMobiltelefon.5. Wählen Sie nun ZE-NC2010 auf dem Mobiltelefon aus und geben Sie den alphanumerischenKennschlüssel ein, welcher im Auslieferungszustand 1234 lautet.6. Nachdem die Kopplung zwischen dem Gerät und dem Mobiltelefon abgeschlossen ist,werden Sie je nach Mobiltelefon noch einmal aufgefordert, die Kopplung zu bestätigen,um den Vorgang zu beenden.30
DEUTSCHSETUPAUTO CONNECT■ Die Bluetooth Freisprecheinrichtung verbindet sich automatisch mit dem gekoppeltenMobiltelefon.PIN CODE■ Änderung des Pairing Codes (Auslieferungszustand 1234).UPDATE■ Aktualisierung der Bluetooth Software.MICROPHONE■ Wählen Sie, ob die Einstellung für das interne oder externe Mikrofon verwendet werdensoll.VERSION■ Anzeige der aktuellen Bluetooth Software Version des Gerätes. HINWEIS:■ Auf www.zenec.com werden in regelmässigen Abständen Software Updates für die BluetoothSoftware bereitgestellt. Befolgen Sie bitte die Anweisungen der dem jeweiligen Updatebeiliegenden Installationsanleitungen, um es zu installieren.31
EINGABE EINES SPRACHBEFEHLS■ Es besteht die Möglichkeit für 200 Telefonnummern einen Sprachbefehl aufzunehmen,so das der entsprechende Eintrag per Spracheingabe angerufen werden kann.1. Wählen Sie einen Eintrag aus dem Telefonbuch aus.2. Starten Sie die Aufnahme eines Sprachbefehls und befolgen Sie die Anweisungen, umden Vorgang zu beenden. Einträge mit bereits aufgenommenem Sprachbefehl sind miteinem [Add Voice Tag]-Icon gekennzeichnet. Nachdem ein Sprachbefehl aufgenommenwurde, besteht die Möglichkeit, die einzelnen Sprachbefehle wieder zu löschen. WählenSie dazu den entsprechenden Eintrag aus und löschen ihn.3. Um einen Eintrag mit zuvor aufgenommenen Sprachbefehl anzurufen, berühren Siezweimal hintereinander das [ ]-Icon und warten Sie mit der Spracheingabe, bis einSignalton ertönt. Stimmt die Spracheingabe mit dem aufgenommenen Sprachbefehlüberein, startet das Gerät automatisch den Wählvorgang.32
DEUTSCH HINWEIS:■ Achten Sie darauf, das der Abstand zwischen dem Gerät und dem Mobiltelefon nichtmehr als 8 Meter beträgt, da ansonsten keine einwandfreie Funktion gewährleistetwerden kann. Äussere Einflüsse können diese Distanz weiter verringern.■ Es kann nicht garantiert werden, dass jedes Mobiltelefon mit dem Gerät gekoppelt undverwendet werden kann.■ Die Bedienung des Mobiltelefons unterscheidet sich je mach Typ und Fabrikat. BeachtenSie daher die Bedienungsanleitung des Mobiltelefons, um genauere Informationendarüber zu erhalten.■ Je nach Mobiltelefon besteht die Möglichkeit, dass die Klingeltöne nicht über die imFahrzeug installierten Lautsprecher wiedergegeben werden.■ Diese Übertragung, die Sortierung und Anzeige der Telefonbucheinträge sind abhängigvon dem verwendeten Mobiltelefon. Sollte die Übertragung nicht oder fehlerhaftfunktionieren, sollte die Verbindung zwischen dem Gerät und dem Mobiltelefon getrenntund wieder hergestellt werden.■ Eine Liste mit den kompatiblen Mobiltelefonen und den unterstützten Funktionen findenSie unter www.zenec.com.■ Es ist möglich bis zu 5 Mobiltelefone mit dem Gerät zu koppeln.■ Es können bis zu 1000 Telefonbucheinträge synchronisiert werden.■ Achten Sie darauf, das die automatische Synchronisation des Telefonbuchs auf IhremMobiltelefon aktiviert ist. Beachten Sie die Bedienungsanleitung des Mobiltelefons, umdiese Funktion zu aktivieren bzw. um die manuelle Synchronisation zu aktivieren.■ Bitte beachten Sie bei der Auswahl des internen oder externen Mikrofons die imLieferumfang enthaltene Montageanleitung bezüglich der Verwendung der beidenMikrofonarten.■ Auf www.zenec.com werden in regelmässigen Abständen Software Updates für dieBluetooth Software bereitgestellt. Befolgen Sie bitte die Anweisungen der dem jeweiligenUpdate beiliegenden Installationsanleitung, um es zu installieren.33
NAVIGATIONS-MODUS■ Für die Bedienung der Navigation lesen Sie bitte die separate Bedienungsanleitung,welche im Lieferumfang enthalten ist.■ Während der Navigation können Sie einen anderen Wiedergabemodus wiedergeben. Indiesem Fall verringert die Navigation den Ton des aktuellen Wiedergabemodus für dieDauer der Navigationsdurchsage.■ Die Lautstärke der Navigationshinweise lässt mit dem PUSH/VOL Regler während derNavigationsdurchsage einstellen. Die eingestellte Lautstärke bleibt gespeichert.■ Das Gerät verfügt zusätzlich über einen Splitscreen-Modus, der in den folgendenWiedergabemodi verfügbar ist: Tuner, USB (Audio), iPod (Audio) und SD-Karte (Audio).121. Wenn Sie im Navigationsmodus eine Zielführung gestartet haben und in einen Wiedergabemoduswechseln, welcher den Splitscreenmodus unterstützt, können Sie durchBerühren des [ ]-Icons den Splitscreen-Modus aktivieren.2. Berühren Sie das Feld mit der Pfeilanzeige des Splitscreens, um ihn wieder auszublenden.ANSCHLUSSMÖGLICHKEITEN FÜR EXTERNE GERÄTEDVB-T MODUS1. Wenn Sie am DVB-T Anschluss ein geeignetes Gerät angeschlossen haben undverwenden möchten, berühren Sie im Hauptmenü das DVB-T Tuner-Icon.2. Für die Bedienung des DVB-T Tuners lesen Sie bitte dessen Bedienungsanleitung. HINWEIS:■ Wenn Sie einen geeigneten ZENEC DVB-T Tuner verwenden, können Sie ihn über denTouchscreen des ZE-NC2010 steuern. Nähere Informationen zu geeigneten DVB-T Tunernfinden Sie unter www.zenec.com.AUX-MODUS1. Wenn Sie am AUX-Anschluss ein geeignetes Gerät angeschlossen haben und verwendenmöchten, berühren Sie im Hauptmenü das AUX-Icon.2. Für die Bedienung des AUX-Gerätes lesen Sie bitte dessen Bedienungsanleitung.KAMERA-MODUS1. Wenn Sie am KAMERA-Anschluss ein geeignetes Gerät angeschlossen haben und verwendenmöchten, berühren Sie im Hauptmenü das CAMERA-Icon.34
DEUTSCHCAN-BUS■ CAN ist die Abkürzung von Controller Area Network. Es handelt sich hierbei um eininternationales Standard Bus-Protokoll der Automobilbranche. Dank dieses Protokollskönnen die Funktionen der Lenkradfernbedienung und anderer Funktionen desFahrzeuges vom ZE-NC2010 erkannt und verwendet werden. Verbinden Sie die CAN-BUS-Box mit dem ZE-NC2010. Beachten Sie bitte zuvor das Anschlussdiagramm.Aufgrund verschiedener Funktionen der Tasten der Lenkradfernbedienung von unterschiedlichenFahrzeugen, werden nicht immer alle Funktionen vom ZE-NC2010 unterstützt.Eine Auflistung der unterstützten Funktionen finden Sie auf www.zenec.com.35
GENERELLE INFORMATIONENHINWEISE ZU DIVXDivX ist ein komprimiertes digitales Videoformat, das vom DivX Videocodec der DivX, Inc.erzeugt wird. Dieses Gerät kann DivX Videodateien von CD-R/RW/-ROM und DVD-R/-RW/-ROM Discs wiedergeben. Zur Vereinheitlichung derselben Terminologie wie bei DVD Video,werden einzelne DivX Videodateien “Titel“ genannt. Beachten Sie bei der Benennung vonDateien/Titeln auf einer CD-R/-RW oder einer DVD-R/-RW Disc vor dem Brennvorgang,dass diese standardmässig in alphabetischer Reihenfolge wiedergegeben wird. OffiziellesDivX-zertifiziertes Produkt. Wiedergabe aller DivX-Videos (einschliesslich DivX6) sowieStandard-Wiedergabe von DivX Media-Dateien.®DivX, DivX Certified und entsprechende Logos sind Warenzeichen der DivX, Inc. undwerden unter der Lizenz verwendet.GRUNDWISSEN CD/DVD DATENTRÄGERRegional Code:Die Welt wurde von den Filmgesellschaften in verschiedene Regionen aufgeteilt. In jederdieser Regionen können nur DVD‘s wiedergegeben werden, die über den entsprechendenRegional Code verfügen.Region 1: USA, Kanada, Ostpazifische InselnRegion 2: Japan, Ost-Europa, Nord-Europa, Ägypten, Südafrika, Zentral-EuropaRegion 3: Taiwan , Hongkong, Süd-Korea, Indonesien, Südost-AsienRegion 4: Australien, Neuseeland, Zentral und Süd-Afrika, Thailand, Ocean IlandsRegion 5: Russland, Mongolei, Indien, Zentral-Asien, Ost-Europa, Nordkorea, Nord-Afrika,Nord- West-AsienRegion 6: Chinesisches FestlandBeim Gebrauch einer Disk ist zu beachten:1. Verwenden Sie keine Disk, deren Form nicht der Norm entspricht.2. Benutzen Sie ein trockenes und weiches Tuch, um eine Disk zu reinigen und wischenSie von Innen nach Aussen. Benutzen Sie dazu nur neutrale Reinigungsmittel.3. Eine neue Disk kann Innen und Aussen raue Kanten haben. Wenn das der Fall ist, kannes sein, dass die Disk gar nicht oder nur fehlerhaft wiedergegeben wird. Verwenden Sieeinen Kugelschreiber oder Bleistift, um die rauen Kanten zu entfernen. Drücken Sie dazuden Stift gegen die jeweilige Kante und fahren daran entlang.MP3 KOMPATIBILITÄTDie folgenden Formate sind kompatibel mit dem Gerät:■ ISO 9660 – File-Name: 12 Zeichen, File-Erweiterung: 3 Zeichen■ ISO 9660 – File-Name: 31 Zeichen, File-Erweiterung: 3 Zeichen■ Joliet – 64 ZeichenWenn das File oder der Ordner nicht mit dem ISO 9660 Standard übereinstimmt, kann espassieren, das die Musikdaten nicht richtig wiedergegeben bzw. angezeigt werden.This unit is manufactured under license from Dolby Laboratories. “Dolby” and the double-Dsymbol are trademarks of Dolby Laboratories.36
DEUTSCHFEHLERSUCHEProblem Ursache LösungALLGEMEINDas Gerät schaltetnicht ein.Radiosicherung defekt.Hauptsicherung im Sicherungskastendes Radios defekt.Falsche Bedienung.Die Audioausgänge wurden nichtrichtig verbunden.Die Lautstärke ist sehr leiseeingestellt.Durch eine Sicherung gleichen Typsersetzen.Durch eine Sicherung gleichen Typsersetzen.RESET drücken undBedienungsanleitung noch einmallesen.Verbinden Sie die Audioausgängegemäss dem Anschlussdiagramm.Erhöhen Sie die Lautstärke.Kein/sehr leiseAudiowiedergabe.SchlechteAudioqualität oderVerzerrungen.TFT MONITORKein Bild.Das Bild erscheintzu gross.Die Lautsprecher sind defekt.Es funktioniert nur ein Kanal.Die Lautsprecherkabel habeneine Verbindung zur Fahrzeugmasse.Die Audiowiedergabe(Mute) wurde am Gerätstummgeschaltet.Sie benutzen eine Raubkopie.Der Leistungsbedarf derLautsprecher paßt nicht zurAusgangsleistung des Gerätes.Die Lautsprecherkabel habeneine Verbindung zurFahrzeugmasse.Die Handbremse ist nichtangezogen.CAN-Bus Interface ist defekt.Der Bildschirm wurde am Gerätausgeschaltet.Falsches Bildformat gewählt.Überprüfen Sie die Lautsprecher.Überprüfen Sie die Balance derAudiokanäle.Isolieren Sie die blanke Stelleoder tauschen Sie das Lautsprecherkabel.Schalten Sie die Audiowiedergabeam Gerät wieder ein.Benutzen Sie keine Raubkopien.Verwenden Sie passende Lautsprecher.Isolieren Sie die blankeStelle oder tauschen Sie dasLautsprecherkabel.Ziehen Sie die Handbremse an.Lassen Sie das CAN-Bus Interfaceaustauschen.Schalten Sie den Bildschirm wiederein.Benutzen Sie das richtigeBildformat.37
TUNERSchlechterRadioempfang.DVD-PLAYERDie Disk kann nichteingelegt werden.Die Disk kann nichtabgespieltwerden.MP3Die ID3 Tagswerden falschangezeigt.Die Fahrzeugantenne ist nichtrichtig mit dem Gerät verbunden.Die REG-Funktion ist aktiviert.Die Phantomspeisung wurde nichtoder falsch angeschlossen.Die AF-Funktion wurde nichtaktiviert.Es befindet sich bereits eine Diskim Laufwerk.Die Disk ist zerkratzt.Die Disk ist zu verschmutzt oderfeucht.Die Disk ist nicht kompatibel.Die Jugendschutzfunktion ist zuhoch eingestellt.Der Regional Code ist falsch.Die Disk ist falsch herumeingelegt.Das Dateiformat stimmt nicht oderdie ID3 Tags auf der Disk sindfehlerhaft.Verbinden Sie die Antennegemäss dem Anschlussdiagramm.Deaktivieren Sie die REG-Funktion.Schließen Sie die Phantomspeisungrichtig an.Aktivieren Sie die AF-Funktion.Entfernen Sie zuerst die Disk imLaufwerk.Verwenden Sie eine andere Disk.Reinigen Sie die Disk.Verwenden Sie eine andere Disk.Ändern Sie die Einstellung derJugendschutzfunktion.Verwenden Sie eine Disk mit demrichtigen Regional Code.Legen Sie die Disk richtig herumein.Verwenden Sie eine Disk mitanderen MP3-Dateien.Error Ursache LösungNo Disc Siehe "Fehlersuche DVD-Player". Siehe "Fehlersuche DVD-Player".Bad Disc Siehe "Fehlersuche DVD-Player". Siehe "Fehlersuche DVD-Player".Unknown Disc Siehe "Fehlersuche DVD-Player". Siehe "Fehlersuche DVD-Player".Region Error Siehe "Fehlersuche DVD-Player". Siehe "Fehlersuche DVD-Player".ErrorLaufwerksfehler.Drücken Sie die Eject Taste amGerät 5 s lang, um ein Laufwerks-RESET durchzuführen.38
DEUTSCHSPEZIFIKATIONENInterner VerstärkerAusgangsleistung: 20 Watt x 4 @ 4 Ohm @ < 10% THD+NRauschabstand: 70dBAMaximale Ausgangsleistung: 50 x 4 Watt @ 4 OhmFrequenzgang: 20Hz to 20 kHz, -3dBReferenzspannung: 14.4V DCDVD-PlayerKompatible Formate: CD, CD-R/RW, MP3, WMA, DVD, DVD-R/RW, DVD+R/RW, DVD-MP3, Avi,MPEG4, DivX6, JPEG und Picture CDRauschabstand: 85dBADynamikbereich: >95dBFrequenzgang: 20Hz to 20 kHz, -3dBKanaltrennung: > 60dB @ 1kHzD/A Konverter: 6-Kanal High Performance 24-bit, 192 kHz, Multi-Bit Sigma Delta Modulation.DAC unterstützt Sample Rating von 8~192 kHz.Regional Code: 2UKW-TunerFrequenzbereich: 87.5MHz – 108MHzMono-Empfindlichkeit: (-30dB): 10dBuRauschabstand: @ 1kHz: 58dBSpiegelfrequenzunterdrückung: 60dBStereo-Empfindlichkeit: @ 1kHz: 30dBFrequenzgang: 30Hz – 15kHz, -3dBMW-TunerFrequenzbereich: 522kHz – 1629kHzEmpfindlichkeit: (-20dB): 20dBuRauschabstand: @ 1kHz: 50dBSpiegelfrequenzunterdrückung: 60dBFrequenzgang: 50Hz – 2kHz, -3dBDisplayBildschirmdiagonale: 6.5"Display: TFT Liquid Crystal Display (LCD) active matrixReaktionszeit: 30 msAuflösung, CD/Composite Video In: 336'960 PixelAuflösung: 1440 (B) X 234 (H)Betrachtungswinkel:Links/rechts: 45~60°Oben: 20~30°Unten: 40~60°GenerellEingangsimpedanz: 10 kSpannungsversorgung: 10.5 – 16V DC, minus an MasseSicherung: 10 A (Mini ATM)Abmessungen: 178 mm x 153 mm x100 mm HINWEIS: Änderungen am Gerät nach Druck dieses Handbuchs bleiben vorbehalten.39
ABOUT THIS <strong>INSTRUCTION</strong> <strong>MANUAL</strong>The instruction manual contains important information and warnings about the operation ofthe ZE-NC2010. Please add this instruction manual to the log book of your vehicle to haveaccess to it any time. NOTE:■ Text passages with this symbol indicate particular information, which are very important forcorrect operation.CONTENTSSAFETY <strong>INSTRUCTION</strong>S...................................................................................................41FRONT PANEL BUTTONS............................................................................................ 42-43REMOTE CONTROL BUTTONS.................................................................................. 44-47BASIC OPERATION...................................................................................................... 48-49MAIN MENU AND SETTINGS...................................................................................... 50-57RADIO MODE............................................................................................................... 58-60CD/DVD MODE...................................................................................................................61CD/MP3/WMA MODE........................................................................................................62SD/USB MODE...................................................................................................................63IPOD MODE........................................................................................................................64BLUETOOTH MODE..................................................................................................... 65-71NAVIGATION MODE...........................................................................................................72EXTERNAL PLAYING SOURCES.......................................................................................72CAN-BUS............................................................................................................................73GENERaL INFORMATION.................................................................................................74TROUBLESHOOTING................................................................................................... 75-76SPECIFICATIONS...............................................................................................................77WARRANTY.................................................................................................................. 78-7940
ENGLISHSAFETY <strong>INSTRUCTION</strong>S1. This unit is designed to be used in a vehicle with a 12V battery and negative ground.2. Do not operate the unit in any other way than described in this manual. Failure to followthe instructions within this manual will invalidate your warranty.3. Do not disassemble or alter the unit in any way, because it can cause a defect and yourwarranty claim will be rejected. Do not attempt to repair or to service the unit yourself,but contact an authorized ZENEC dealer instead.4. Use only original accessories which are designed and manufactured to install and to usethe unit, otherwise you will risk to damage it. Install the unit according to the mountingmanual and use only the supplied mounting accessories. The forces of acceleration foraccidents are sometimes huge. Incorrect mounted units are a big risk for the driver andthe passenger of the car, during an accident.5. Protect the unit from water and other liquids, which can intrude into the housing. A shortcircuit with fire could be the result.6. Before you replace a defect fuse, try to find the cause for the short circuit. Please payattention to the cables of the power supply! If the short circuit doesn't result from amistake of the power supply or wiring, you can replace the defect fuse against a new onewith the identical data. If the short-circuit is still existing, please contact an authorizedZENEC dealer.7. Be careful not to drain the car battery while using the unit when the car engine is turnedoff. Because the unit is an appliance and the battery will be charged only while theengine is running, it's possible that the battery will discharge to a point it's not longerpossible to start the engine.8. According to the law in different European countries, driving with monitors in use in theviewing range of the driver is not allowed, because the driver will be distracted from thetraffic. Please respect the traffic regulations of your country, or you might face penaltiesin case of an accident. Please pay attention to the volume inside your vehicle, becauseyou have to notice exterior sounds like police siren.9. Don't expose the unit to hard impacts. A mechanical or electrical damage of the unitcould be the result.41
FRONT PANEL BUTTONSMAIN UNITbq bs br bs bt123456789blbmbnbobp42
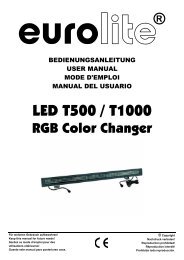
ENGLISH1. POWER/MUTE■ Press the POWER/MUTE-button to turnon the unit.■ Press and hold the POWER/MUTEbuttonto turn off the unit.■ Press the POWER/MUTE-button to mutethe audio output and press the buttonagain, to go back to the last volumelevel.2. FM/AM■ Press the FM/AM-button to enter theradio mode.■ Change in radio mode between thefollowing radio bands: FM-1, FM-2,FM-3, AM-1, AM-23. DVD■ Press the DVD-button to enter the DVD/CD mode.4. SRC■ Press and hold the SRC-button to enterthe main menu.■ Press the SRC-button to change betweenthe following playing modes:RADIO ➞ Disc ➞ NAVI ➞ AV IN ➞DVBT ➞ SD CARD ➞ iPod ➞ USB ➞CAMERAThe selected playing mode will bedisplayed on the screen.5. NAV■ Press the NAV-button to enter thenavigation mode. The audio output ofthe last playing mode will be playedback.■ Press the NAV-button in navigationmode to change between the navigationmode and the last playing mode.6. PUSH/VOL■ Turn the PUSH/VOL rotary knob tochange the volume.■ Press the PUSH/VOL rotary knob toenter the equalizer menu.7. EJECT■ Press the EJECT-button to insert or ejecta disc.8. PREVIOUS■ Press the PREVIOUS-button to choosethe previous track/chapter.■ Press the PREVIOUS-button in radiomode to auto search down.9. NEXT■ Press the NEXT-button to choose thenext track/chapter.■ Press the NEXT-button in radio mode toauto search up.10. WIDE PIC■ Press the WIDE PIC-button to enter thevideo setup.■ Press and hold the WIDE PIC-buttonto change the brightness of the paneldirectly.11. BT■ Press the BT-button to enter theBluetooth mode.■ Press the BT-button in Bluetooth modeto change between the Bluetooth modeand the last playing mode.12. RESET■ Press the RESET-button to make ahardware reset.13. PUSH/ENT■ Turn the PUSH/ENT rotary knob tochoose a preset station or a track etc.,which is stored on a media.■ Press the PUSH/ENT-button to confirmyour selection.14. SD-card slot15. Internal microphone for Bluetoothmode16. DVD/CD slot■ Insert a disc with the label on the topside into the DVD/CD slot until it will beinserted automatically.17. Disc indicator■ Disc inside: red.■ No disc inside: white.18. Receiver for IR-remote control43
REMOTE CONTROL BUTTONSFRONT REMOTE CONTROL3459bnbrbsbtcmcncqcr21678blbmbobpbqbuclcocpcsct44
ENGLISH1. POWER■ Press the POWER/MUTE-button to turnon the unit.2. EJECT■ Press the EJECT-button to insert or ejecta disc.3. MUTE■ Press the MUTE-button to mute theaudio output.4. SRC■ Press the SRC-button to change betweenthe following playing modes:RADIO ➞ Disc ➞ NAVI ➞ AV IN ➞DVBT ➞ SD CARD ➞ iPod ➞ USB ➞CAMERAThe selected playing mode will bedisplayed on the screen.5. Numeric keypad■ Directly access to track/chapter orpreset station.6. VOL up■ Increase the volume.7. VOL down■ Decrease the volume.8. INFO■ Display the available disc information.9. GOTO SEARCH■ Position search function for CD/DVDmode.10. STOP/BAND■ Change in radio mode between thefollowing radio bands: FM-1, FM-2,FM-3, AM-1, AM-2■ Stop playback in other playing modes.11. SELECT■ Enter the equalizer menu.12. No function13. Main menu■ Enter the main menu.14. Brightness adjustment15. REPEAT A-->B■ Set start point A and end point B torepeat continually.16. OK■ Start or pause the playback.■ Confirm the selected adjustment.17. Direction buttons■ Up/Down/Left/Right to select an item toadjust.18. TITLE■ Enter the title menu of the DVD.19. ROOT■ Enter the main menu of the DVD.■ Turn on PBC while playing VCD.20. REPEAT■ Press the REPEAT-button to repeat thetrack/folder/chapter/disc playback.21. NEXT■ Press the NEXT-button to choose thenext track/chapter.■ Press the NEXT-button in radio mode toauto search up.22. PREVIOUS■ Press the PREVIOUS-button to choosethe previous track/chapter.■ Press the PREVIOUS-button in radiomode to auto search down.23. FAST REVERSE■ Fast reverse the disc content (2X", "4X","8X", "16X).24. FAST FORWARD■ Fast forward the disc content (2X", "4X","8X", "16X).25. AUDIO■ Change the audio language for DVDplayback (if available).26. ZOOM■ Zooming in/out an image (+1", "+2","+3", "OFF)27. ANGLE■ Change between different angles for ascene (if available).28. SUB-T■ Language selection for DVD subtitle (ifavailable).45
REAR REMOTE CONTROL (M-ZONE)213457DTV MENUROOT689bnbmbqbpbtbuEPGTV/RADIOP Pblbobrbscmcl46
ENGLISH1. R-SRC■ After you have activated M-Zone in themain menu, press the R-SRC-button tochoose the playing mode for the rearzone.2. Numeric keypad■ No function.3. MUTE■ Press the MUTE-button to mute theaudio output.4. GOTO Search■ No function.5. TITLE■ Enter the title menu of the DVD.■ Scan function for CD mode. Each trackwill be played back for 10 seconds.6. ROOT■ Enter the main menu of the DVD.■ Turn on PBC while playing VCD.7. OK■ Start or pause the playback.■ Confirm the selected adjustment.8. Direction buttons■ Up/Down/Left/Right to select an item toadjust.9. PREVIOUS■ Press the PREVIOUS-button to choosethe previous track/chapter.10. NEXT■ Press the NEXT-button to choose thenext track/chapter.11. STOP■ Stop playback.12. PLAY/PAUSE■ Start or pause the playback.13. ZOOM■ Zooming in/out an image (+1", "+2","+3", "OFF).14. FAST REVERSE■ Fast reverse the disc content (2X", "4X","8X", "16X).15. FAST FORWARD■ Fast forward the disc content (2X", "4X","8X", "16X).16. SLOWER PLAY■ Activate the slow-motion function.17. REPEAT■ Press the REPEAT-button to repeat thetrack/folder/chapter/disc playback.18. AUDIO■ Change the audio language for DVDplayback (if available).19. SUB-T■ Language selection for DVD subtitle (ifavailable).20. ANGLE■ Change between different angles for ascene (if available).21. REPEAT A -> B■ Set start point A and end point B torepeat continually.47
BASIC OPERATIONPOWER ON/OFF■ Press the POWER/MUTE-button on the front panel to turn on the unit. Press and holdthe button for 2 seconds to turn off the unit.■ It's also possible to turn on and off the unit with the ignition, but this depends on thelast state, before the unit was turned off.SELECT A PLAYING SOURCE■ After you have turned on the unit, touch theicon with the current playing mode in theupper left corner of the screen to go back tothe main menu.■ After entering the main menu, you haveaccess to each playing mode and setting.■ Touch the arrow to choose between the twopages of the main menu.Current playing modeArrow NOTE:■ If a medium is not inserted or the external unit is not connected, the respective icon is greyedout.REAR VIEW CAMERA■ The rear view camera mode will be activated automatically, if a camera is connected tothe camera input of the unit and you go into reverse gear.M-ZONE■ If you have installed monitors for example to the headrests of your car and they areconnected to the M-Zone A/V outputs of the unit, the passenger can operate the unitwith the rear remote control. To choose a playing mode directly (only DVB-T and DVD)at the unit, touch the M-Zone icon in the main menu. The playing mode DVD is notavailable, if you have selected the playing mode SD card or USB for the front zone. Thevolume of the M-Zone components can only get changed with the volume adjustmentof an external unit (e.g. IR headphones).48
ENGLISHMUTE FUNCTION■ Manually: Press the Mute/Power-button on the front panel to mute the audio output.Press the button again to deactivate the mute function.■ Automatically: The audio output will be muted, if you make a phone call.AUDIO CONTROL MENU■ The audio control menu allows you to adjust your audio system to meet your requirementsand the acoustical characteristics of the vehicle. The menu item "SW" is only relevant, ifyou have connected a subwoofer to the respective sub pre-out of the unit.■ Press the PUSH/ENT rotary knob to enter theaudio control menu.■ Touch the icon with the current playing modein the upper left corner of the screen to leavethe menu.■ Press the PUSH/ENT rotary knob again toleave the menu.■ After 15 seconds without any operation,the audio menu exits back to current audiosource automatically. NOTE:■ Bass and treble settings are only adjustable in "User"-mode.VIDEO PLAYBACK DISABLED■ The video playback on the display of the unit is disabled when the car is driven due tosafety reasons. It's necessary to engage the handbrake to enable the video playback.■ The rear camera mode and the M-Zone remain unaffected.SYSTEM RESET■ If the unit does not work correctly, you should first try to reset the unit by pressing theRESET-button on the bottom-right corner of the front panel to reset the processor. Thelast adjustments will always be saved.49
SETUPSETUP MENU■ Touch the []-Icon in the main menu to enter the setup menu.■ Touch the desired menu item directly on the display to open the submenu and to changethe selected adjustment.■ The icons [ ] and [ ] indicate that there are more options available on the nextpage of the setup menu.■ Touch the "SETUP" icon in the right upper corner to exit the setup menu.■ After 15 seconds without any operation, the audio menu exits back to the current audiosource automatically.50
ENGLISHGENERALSettings Options FunctionClockAM/PMClock ModeRDS CTBeepCamera ImageBluetoothRadio FieldCAN BrightnessCAN BacklightVersionDivX Registration(HH:MM)Adjusts the clock appearing in the top right cornerof the TFT screen.AMPMChoose AM or PM mode (only for 12 Hr mode).12Hr Clock displays 12 hour time using AM and PM.24Hr Clock displays 24 hour time up to 23:59.On When ”CT” is activated, the unit adjusts the clock/Off time itself via RDS.On Select to activate/deactivate the beeperOff function.NormalMirrorOnOffUSALATINEUROPEOnOff-10+10The output of camera image is in normal mode.The output of camera image is in inverted mode.Select to activate/deactivate the Bluetoothfunction.Choose your country or region for best radioreception.Activate or deactivate the display brightness,coupled or decoupled from the car lights.Adjusts the brightness, when the car lights are on.Current software version.Displays the DivX registration code.51
VIDEOSettings Options FunctionTV ShapeAux INcinemanormalAutoPALWidescreen picture scaling.Normal picture scalingThe video output is switched automatically based onthe current disc.The video output is in the standard PAL format.NTSC The video output is in the standard NTSC format.Brightness -10 to +10 Adjusts the brightness of the screen.Monitor OffTurns the monitor off.ASP (AUDIO SIGNAL PROCESSING) SETUP MENU■ The ASP configuration menu allows you to make some finer audio adjustments.Settings Options FunctionBass FreqTreble FreqSub FilterBass Q-Factor60Hz80Hz100Hz200Hz10 kHz12.5 kHz15 kHz17.5 kHz80Hz120Hz160Hz1.01.251.52.0Select the bass center frequency to achieve the bestbass effect.Select the treble center frequency to achieve thebest treble effect.Selecting a crossover frequency sets a cut-offfrequency of the subwoofer’s LPF (low-pass filter)and the speakers’ HPF (high-pass filter).When the bass center frequency is selected,adjusting the bass Q-factor alters the perceived"weight" of the bass output.52
ENGLISHSettings Options FunctionDown MixDown MixFull 6 CH2-channel stereo mode.6-channel mode.Front SpeakersCenter SpeakersSur SpeakersSub WooferCenter DelayDown SamplingSurr DelayLarge Recommended for speakers > 5.25".Small Recommended for speakers < 5.25".Large Recommended for speakers > 5.25".SmallNoneRecommended for speakers < 5.25".No speaker present.Large Recommended for speakers > 5.25".Small Recommended for speakers < 5.25".None No speaker present.None No speaker present.Present Existing and connected.No Delay Deactivates time alignment.0.3 mDelay of the center speaker to the frontspeakers is 0.3 m.0.6 mDelay of the center speaker to the frontspeakers is 0.6 m.1.0 mDelay of the center speaker to the frontspeakers is 1 m.Off Normal audio playback.On Audio playback in 48 kHz.No Delay Deactivate time alignment.1 m2 m3 m4 m5.1 mDelay of the surround speaker to the frontspeakers is 1 m.Delay of the surround speaker to the frontspeakers is 2 m.Delay of the surround speaker to the frontspeakers is 3 m.Delay of the surround speaker to the frontspeakers is 4 m.Delay of the surround speaker to the frontspeakers is 5.1 m. NOTES:■ Choose "Large", if you want to use your speaker system in full range mode.■ Choose "Small", if you want to use your speaker system in high pass mode. The high passmode is activated automatically, if you select "Small". The high pass frequency is identicalwith the subwoofer's low pass frequency.53
LANGUAGESSettingsDVD MenuFunctionSelect the language for the DVD menu.SubtitleSelect the language for the subtitle.AudioSelect the language for the soundtrack.OSDSelect the language for the OSD menu.VOLUMESettings Options FunctionStart VolumeAdjustsLastThe unit starts with the volume, which wasadjusted with the menu item"start vol adjust".The unit starts with the volume, which wasadjusted before it was turned off.Start Vol Adjust 0 to 10Adjusts the start volume, when the startvolume is enabled.TA Volume 0 to 10Adjust the volume of the TA function (trafficannouncement).Volume BarOffOnDisplays the volume bar while adjusting thevolume.54
ENGLISHMISC SETUP MENUSettings Options FunctionTS CalibrateNo Touch "Yes" to enter the touch screen calibrateYes mode.Then follow instructions on the screen.Set Password Locked Enter your password to unlock the parental lock.1. Kid SafeKid safe: A movie rating that is appropriate forchildren.2. GG: A movie rating that allows admission to personsof all ages.3. PGPG: A movie rating that allows admission of personsof all ages but suggests parental guidance in thecase of children.Parental control4. PG-13PG-13: A movie rating that allows admission ofpersons of all ages but suggests parental guidancein the case of children under the age of 13.5. PG-R PG-R: PG-related.6. RR: Amovie rating that allows admission onlyto persons of a certain age, usually 17, unlessaccompanied by a parent or guardian.7. NC-17NC-17: A movie rating that allows admission to noone under the age of 17.8. ADULTAdult: A movie rating that is appropriate for adultsonly.Anti CODE Locked Enter the code for the anti-theft function.Anti Theft SWOnOffDeactivate or activate the anti-theft function.Load FactoryNoYesRestore the factory default settings.Software UpdateNo Touch "Yes" to update the operating software of theYes unit.Navi UpdateNo Touch "Yes" to update the navigation software ofYes the unit. NOTE:■ The DVD system has a built-in parental lock feature to prevent unauthorized persons fromviewing restricted disc content. By default, the parental control system is unlocked. Oncesetup, the parental lock is released only by entering the correct password. Once the passwordis entered, parental control is available.55
ANTI-THEFT CODE■ To secure the unit from a theft and later use, it’s possible to enter a four-digit anti-theftcode.If the anti-theft code is activated and the unit will be disconnected from the powersupply and reconnected again, it’s necessary to enter the anti-theft code to start up theunit. Otherwise it’s not possible to restart the unit.The delivery status for the input of the anti-theft code is deactivated, so it’s not necessaryto enter the anti-theft code, when the unit was disconnected from the power supply.1. Touch the Anti theft icon and activate the anti-theft function.2. Touch the AntiCode icon and use the keypad, which appears on the screen, to enter thefour-digit anti-theft code and confirm your input by entering the same code a secondtime. NOTE:■ The delivery status of the anti-theft code, with the unit new cut of the box is deactivated andyou must activate it manually.■ Please note down the anti-theft code and keep it in a safe place, so you can find it when youneed it. If the anti-theft code is entered wrong three times, it’s necessary to enter the supercode to unlock the unit again. To unlock the unit with the super code, it’s unavoidable to sendit back to an authorized ZENEC-dealer.■ If you want to change or deactivate the anti-theft code, you must enter a valid code first.56
ENGLISHINSTALLATION OF SOFTWARE UPDATES NOTE:■ There will be new software updates appearing for download at irregular intervals on www.zenec.com. Please follow the instruction notes of the software update, to install the updateproperly.57
RADIO MODE1 2 3 4 5 6bucmcl7 8 9 bl bm bn bo bp bqbr bs btcncocucp cq cr cs ct58
ENGLISH1. Current mode of unit. Touch to open themain menu.2. Displays the signal strength.3. The TP button lights up orange whenthe radio station provides trafficannouncements.4. The TA button lights up orange when atraffic announcement is transmitted.5. Bluetooth indicator.6. Current time indicator.7. When AF and Region are activated,auto tuning to those stations within theregion is assigned. When AF is activatedand region is deactivated, auto tuningattempts to find stations without anyregion boundary.8. Touch to tune backward one step.9. Touch to activate/deactivate the AFfunction. When AF is activated anda radio signal is too weak, the tunerautomatically switches to the bestavailable frequency.10. Touch on the screen to automaticallyscan all stations of the current band topreview stations. Press any button tostop scanning and listen to the selectedstation.11. Touch to activate/deactivate the AFfunction. When TA is activated, theunit will auto seek an available TP orTA station. When TA is activated and atraffic announcement is received, thecurrent playing source is overridden bythe traffic announcement automatically,if the tuner was last set to the FM bandbut not, if it was last set to the AM band.When traffic announcement is over, thecurrent playing source will be resumed.12. Touch to tune forward one step.13. Touch to enter the PTY menu, then touchto select a choice in the PTY menu. Theunit will auto seek the next available PTYby increasing tuning frequency until theprogram type matches the PTY, if nomatch is found, the tuner will return tooriginal radio and "None" is displayed.5914. Touch to seek forward.15. Touch to switch between the two submenus.16. Touch to turn to previous page.17. Touch to mute the volume.18. Touch to turn to next page.19. Current radio band, preset station playingback and radio frequency indicator.20. Touch to seek backward.21. Preset radio stations: Touch to recallpreset stations or touch and hold tostore a station, (total 6 stations for eachband).22. Displays whether LOC or DX mode isactive.23. Displays whether mono or stereo sound isplaying. The unit switches automaticallybetween mono and stereo, dependingon the reception quality of the radiostation.24. Touch to switch between the two submenus.25. Touch to change among the followingbands: FM-1, FM-2, FM-3, AM-1, AM-2.26. Touch to automatically scan and storethe best 6 stations of the current radioband.27. Scan the stations in the 6 preset channelsof the current band.28. Switch to choose between LOC and DXtuner searching mode.29. Current radio band, preset station playingback and radio frequency indicator.
NOTE:■ This product features a tuner with RDS function. RDS (Radio Data System) is a system thattransmits broadcast station information together with FM programs. RDS service is notavailable in AM broadcasting. RDS service availability depends on the FM broadcastingprovider.■ To use the RDS features, the AF function needs to be enabled. Please be sure to activate theAF function at the very first time.60
ENGLISHDVD MODE3 4Area AArea FArea BArea CArea DArea E1256789■ Touch the lower section of the screen to display these icons. If no operation has beenentered for 10 seconds, these icons will be automatically hidden.1. Touch to repeat from A to B. Select the repeat point A whenever you want to start andthe point B whenever you want to end, then, the DVD will be played back from A to Bcontinually.2. Touch to repeat playback of title/folder/chapter/disc.3. Touch to choose a language, if the disc is recorded in multiple languages.4. Touch to display subtitle.5. Touch to fast reverse. Keep touching and releasing the button to increase the rate from"2X" to "4X", "8X", and "16X".6. Touch to play/pause.7. Touch to fast forward. Keep touching and releasing the button to increase the rate from"2X" to "4X", "8X", and "16X".8. Touch to stop playback.9. Touch to return to DVD main menu.■ The touch key areas outlined below to run the unit in DVD, VCD, playback modeconveniently.Area A: ■ Touch to return to main menu.Area B: ■ Touch to display playing information.Area C: ■ Touch to select the previous chapter.Area D: ■ Touch to select the next chapter.Area E: ■ Touch to display the on-screen controls. Different mode displays different menu.Area F: ■ Touch to display the GOTO search menu on the screen directly. NOTES:■ If the parental lock is activated, you need to enter the code to play back the DVD disc.■ The DVD video cannot be displayed on the screen, unless the parking brake is applied.61
CD/MP3/WMA MODE1 3bpbr2bq54 768 9 bl bsbmbnbo1. Current mode indicator. Touch to open the main menu.2. Display of disc folders and titles.3. Current time indicator.4. Touch to repeat track/folder/disc.5. Touch to display the numeric keypad on the screen. Use the numeric keypad toaccess a track directly.6. Touch to activate/deactivate the random mode.7. Touch to play previous track.8. Touch to play/pause.9. Touch to play next track.10. Touch to stop disc playback.11. Touch to turn to the previous page.12. Touch to mute the volume.13. Touch to turn to the next page.14. Track title.15. Elapsed playing time and total time of the track.16. Touch to navigate through the directories/folders.17. Open/close submenu.62
ENGLISHSD-CARD MODE■ Insert the SD or SDHC card (up to 8 GB) into the SC-card slot and enter the SD cardmode. NOTE:■ The interface and the operation of the SD card mode is similar to the CD/MP3/WMA mode.■ Depending on the folder structure and the content, the number of the available folders islimited.■ Please pay attention that the operation is depending on the memory of the SD or SDHC cardand stored data volume.USB MODE■ Insert the USB stick into the USB slot and enter the USB mode. NOTE:■ The interface and the operation of the USB mode is similar to the CD/MP3/WMA mode.■ Depending on the folder structure and the content, the number of the available folders islimited.■ Please pay attention that the operation is depending on the memory of the USB device andstored data volume.■ The max. current supply for the connected USB device must be below 400 mA. Otherwise it'snot possible to use it with this unit.63
iPod MODE1 3bqbr5bt24bs68bu bn bo bp 7 9bl bm■ Connect the iPod with the optional iPod cable ZE-NC-IPS to the USB port and choosethe iPod playback mode.1. Current mode indicator. Touch to open the main menu.2. Display of iPod folders and title.3. Current time indicator.4. Touch to repeat track/folder.5. Touch to display the numeric keypad on the screen. Use the numeric keypad toaccess a track directly.6. Touch to scan each file in the current folder for 10 seconds.7. Touch to play previous track.8. Touch to show the available video folder of the iPod. Touch it again to show the musicfolder.9. Touch to play/pause.10. Touch to play next track.11. Touch to stop disc playback.12. Touch to turn to the previous page.13. Touch to mute the volume.14. Touch to turn to the next page.15. Track title.16. Elapsed playing time and total time of the track.17. Touch to activate/deactivate the random mode.18. Touch to navigate through the directories/folders.19. Open/close submenu. NOTE:■ Please visit www.zenec.com for the latest iPod software updates and compatibility lists.64
ENGLISHBLUETOOTH MODEBLUETOOTH OPERATION1 9 bm bo 2bn 81. Current playing source: Bluetooth. Touch to go back to the main menu.2. Bluetooth icon.3. Open the dialling function.4. Open the phone book.5. Open the call log.6. Open the A2DP mode.7. Open the pairing function.8. Voice transfer back from the unit to the mobile phone.9. Display the signal strengh of the paired mobile phone.10. Open the Bluetooth setup.11. Accept resp. start a phone call.12. Dismiss resp. stop a phone call.13. Delete your number input. NOTE:■ It's possible to set the volume of the Bluetooth mode with the PUSH/VOL rotary knob duringa call. The adjusted volume will be saved.34567blTHE BLUETOOTH ICON■ If Bluetooth is activated in the setup, there is a Bluetooth icon on the of the screen[ ].■ The Bluetooth icon is gray, if Bluetooth is activated, but no mobile phone is connected.■ The Bluetooth icon is blue, if Bluetooth is activated and a mobile phone is connected. NOTE:■ If no Bluetooth icon is visible, the Bluetooth function is deactivated in the setup menu.65
PHONE BOOK■ After the mobile phone is paired with the unit, the synchronisation of the phone bookwill start automatically. All entries get transferred from the mobile phone to the unit. Set”Auto Connect” at the unit and your mobile phone to ”On”.SEARCH FUNCTION FOR PHONE BOOK ENTRIES■ Touch the [ ]-icon to open the keypad. Enter a letter to search for the initial letter ofthe family name. The entries with the respective initial letter get displayed directly. NOTE:■ The function and the sorting of the entries are depending of the mobile phone.A listing of the compatible mobile phones and the supported function are available onwww.zenec.com.66
ENGLISHCALL LOG■ Display the dialled, received and missed calls.A2DP FUNCTION■ Start the playback on the unit. The music player of the mobile phone will be activatedautomatically and it's possible to operate and control the music player of your mobilephone with the unit.PAIRING■ You have two possibilities to pair a mobile phone with the unit. Please pay attention thatthe Bluetooth mode of the unit must be activated in the setup menu.1. Searching for nearby phones.2. Pairing of your mobile phone.67
1. Searching for nearby phones.1. Activate the Bluetooth mode on the mobile phone und check, if it allows to detect it fromother devices resp. if the function to search for Bluetooth devices is activated.2. Touch the Add icon to open the search menu and to start the search run.3. After the mobile phone was found from the unit and a Bluetooth connection wasestablished, the name of the mobile phone will appear on the screen of the unit.4. Choose the mobile phone on the unit, touch the Connect icon and enter the PIN code,which is in the delivery status 1234.Depending on the mobile phone and the settings, it's also required to enter the PIN codeon the mobile phone a second time.5. After the pairing between the unit and the mobile phone is finished, depending onthe mobile phone, it's necessary to confirm the pairing once more to complete thisprocess.2. Pairing from your mobile phone.1. Activate the Bluetooth mode on the mobile phone.2. Open the Bluetooth mode of the unit.3. Start the search for Bluetooth units on the mobile phone.4. After the unit is found by the mobile phone and a Bluetooth connection was established,the unit will appear with the description ZE-NC2010 on the mobile phone.5. Choose ZE-NC2010 on the mobile phone and enter the PIN code, which is in the deliverystatus 1234.6. After the pairing between the unit and the mobile phone is finished, depending on themobile phone, it's necessary to confirm the pairing again to complete the procedure.68
ENGLISHSETUPAUTO CONNECT■ Automatically connect to a paired mobile phone.PIN CODE■ Change the pairing code (default setting is 1234).UPDATE■ Update the Bluetooth software.MICROPHONE■ Choose between using the internal or external microphone.VERSION■ Display the current Bluetooth software version of the unit. NOTE:■ There will be new Bluetooth software updates at regular intervals available onwww.zenec.com. Please follow the instruction manual of the software update toinstall it.69
ENTER A VOICE TAG■ The user can record a voice tag for 200 phone numbers, i.e. it's possible to start a phonecall with a pre-recorded voice tag.1. Choose one entry form the phone book.2. Start to record a voice tag and follow the instructions to finish the procedure. Entrieswith a voice tag are indicated with a [voice tag]-icon. After a voice tag was recorded, it'salso possible to delete this voice tag. Choose the entry and delete the voice tag.3. Touch the [ ]-icon two times and wait with the speech input until an acoustic beepsignal is audible, to start a call of a phone book entry with voice tag. If the speech inputwas identical with the recorded voice tag, the unit starts to dial the phone number of theentry automatically.70
ENGLISH NOTES:■ The line-of-sight distance between the unit and the mobile phone must be 8 metresor less, otherwise a flawless function can't be guaranteed. The transmission distancemay become shorter than the estimated distance, depending on the environmentduring use.■ It cannot be guaranteed, that all mobile phones can be paired and all that functions willwork with the unit.■ The operation of the mobile phone is different according to the model and brand.Please pay attention to the manual of the mobile phone to get more information aboutits operation.■ Depending on the mobile phone brand and model, the speakers of the vehicle may notproduce a ring sound.■ The synchronisation, the transferring, the sorting and the display of the phone bookentries are depending on the mobile phone brand and model. If the synchronisationdoesn't work or if it's faulty, disconnect the phone and perform pairing again with theunit.■ A listening with compatible mobile phones and functions are available on www.zenec.com.■ It's possible to pair up to 5 mobile phones with the unit.■ It's possible to synchronise and handle up to 1000 phone book entries.■ Pls check if the automatic synchronisation of the phone book is activated on the mobilephone. Please read the manual of the mobile phone to activate the function resp. toactivate the manual synchronisation.■ Please read the mounting manual, which is included in the set content of the unit,to learn more about the placement, mounting and usage of the internal and externalmicrophones.■ There will be new software updates at irregular intervals available on www.zenec.com.Pls follow the instruction manual of the software update to install it.71
NAVIGATION MODE■ Please read the separate navigation software manual to learn more about the operationof the navigation system.■ In navigation mode, it's possible to play back an audio source. In this case, the audiooutput of the current playing mode will be lowered during a voice response.■ It's possible to adjust the volume of the navigation voice with the PUSH/VOL rotaryknob during a voice response. The adjusted volume will be saved.■ The unit has a splitscreen mode, which is available in the following playing modes:Tuner, USB (audio), iPod (audio) and SD card (audio).121. Once you have started a route guidance in the navigation mode you can change to anaudio source that is supported by the splitscreen mode, by touching the [ ]-icon toactivate it.2. Touch the field with the arrow display of the splitscreen to exit this mode.EXTERNAL PLAYING SOURCESDVB-T MODE1. If you have connected a DVB-T tuner to the unit and want to use it, touch the DVB-Ttuner icon in the main menu.2. Please read the manual of the DVB-T tuner to learn more about the operation of it. NOTE:■ If you are using a compatible ZENEC DVB-T tuner, it's possible to operate it with the touchscreenof the ZE-NC2010. Please visit www.zenec.com to find compatible DVB-T tunermodel(s).AUX MODE1. If you have connected an external device to the unit and want to use it, touch theAUX-IN icon in the main menu.2. Please read the manual of the external device to learn more about the operation of it.CAMERA MODE1. If you have connected a rear view camera to the unit and want to use it, touch theCAMERA icon in the main menu.2. Please read the manual of the rear view camera to learn more about the operation of it.72
ENGLISHCAN BUS■ CAN is the abbreviation for controller area network. It’s a international standard Busprotocol of the automotive industry. Because of this protocol, it's possible to use thesteering wheel buttons and other functions of the vehicle in which the ZE-NC2010 ismounted to. Connect the CAN Bus interface with the ZE-NC2010 and pay attention tothe connection diagram first.Because of the different functions of the steering wheel buttons in the different vehicles,the ZE-NC2010 doesn't support all functions. You will find a list of the supportedfunctions on www.zenec.com.73
GENEREL INFORMATIONABOUT DIVXABOUT DIVX VIDEO: DivX® is a digital video format created by DivX, Inc. This is an officialDivX Certified device that plays DivX video. Visit www.divx.com for more information andsoftware tools to convert your files into DivX video.ABOUT DIVX VIDEO-ON-DEMAND: This DivX Certified® device must be registered in orderto play DivX Video-on-Demand (VOD) content. To generate the registration code, locate theDivX VOD section in the device setup menu. Go to vod.divx.com with this code to completethe registration process and learn more about DivX VOD.BASIC KNOCKLEDGE OF DISCRegion Code:According to DVD sale region, the whole world is divided into six regions. A DVD disc canbe played back only when the DVD region number is the same with the DVD disc.Region 1: USA, Canada, East Pacific Ocean IslandsRegion 2: Japan, West Europe, North Europe, Egypt, South Africa, Middle EastRegion 3: Taiwan of China, Hong Kong of China, South Korea, Indonesia, South East AsiaRegion 4: Australia, New Zealand, Mid & South America, South Pacific Thailand, OceanIslands/OceaniaRegion 5: Russia, Mongolia, India, Middle Asia, East Europe, North Korea, North Africa,North West AsiaRegion 6: Chinese MainlandCaution of disc using:1. Do not use irregular shaped discs.2. Use a dry, soft cloth to wipe the disc from center to edge. Only neutral detergent can beused.3. New discs may have some rough spots around the inner and outer edges. If such a discis used, remove these rough spots with a pencil or ball-point pen.MP3 COMPATIBILITYAll the file naming format below are compatible■ ISO 9660 – Level file name: 12 characters, file extension: 3 characters■ ISO 9660 – Level file name: 31 characters, file extension: 3 characters■ Joliet – 64 charactersIf the file or folder name does not conform to ISO 9660 file system, it may not be displayedcorrectly or be normally played back.This unit is manufactured under license from Dolby Laboratories. “Dolby” and the double-Dsymbol are trademarks of Dolby Laboratories.74
ENGLISHTROUBLESHOOTINGProblem Cause SolutionGENERELUnit will not poweron.Radio fuse blown.Car battery fuse blown.Illegal operation.Improper audio outputconnection.Volume set too low.Install new fuse with correct rating.Install new fuse with correct rating.Press the RESET button.Check wiring and correct.Increase volume level.No/low audio output.Poor sound qualityor distortion.Speakers damaged.Only one channel is playing.Speaker wiring is in contact withmetal part of car.Mute is activated.Unauthorized disc is in use.Speaker power rating notcompatible with unit.Speaker is shorted.Replace speakers.Check the balance and faderadjustments.Insulate all speaker wiringconnections or replace thespeaker cable.Turn off the Mute function.Use original disc.Connect proper speakers.Check speaker connections.TFT MONITORNo image.Prolonged imageor improper height/width ratio.The parking brake is not engaged.CAN-Bus Interface is defect.The "Monitor off"-function isactivated.Improper aspect ratio setup.Stop vehicle in a safe place andapply parking brake.Replace the CAN-bus interface.Touch the monitor to activate thedisplay.Use correct aspect ratio setting.75
TUNERWeak stationsearching.DVD-PLAYERCannot insert disc.Disc does not playback.MP3The ID3 tags areshown incorrectlyAuto antenna not properlyconnected.REG function is activated.The antenna power cable is notconnected.The AF function is not activated.Disc already inside unit.Disc is warped or scratched.Disc is dirty or wet.Incompatible disc is used.Disc rating exceeds parental lockrating limit.Disc region code is notcompatible with unit.Disc is inserted upside down.Message is longer than LCDcan display or ID3 tag is notcompatible.Connect the auto antenna cableproperly.Turn REG function off.Connect the antenna power cableproperly.Activate the AF function.Eject current disc and insert newone.Use disc in good condition.Clean disc with soft cloth.Use compatible disc.Change parental lock settings tolower restriction.Use disc with proper region code.Insert disc with label side up.Use proper ID3 tag information.Problem Cause SolutionNo Disc. Refer to "Problem DVD". Refer to "Problem DVD".Bad Disc. Refer to "Problem DVD". Refer to "Problem DVD".Unknown Disc. Refer to "Problem DVD". Refer to "Problem DVD".Region Error. Refer to "Problem DVD". Refer to "Problem DVD".Error.Illegal mechanism operation.Press EJECT key for 5 seconds toreset loading mechanism.76
ENGLISHSPECIFICATIONSMain AmplifierPower Output: 20 watts X 4 channels into 4-ohms @ < 10% THD+NSignal to Noise Ratio: 70dBA below reference. (Reference: 1 watt, 4-ohms)MAX Power: 50 X 4 watts into 4-ohms, all channels drivenFrequency Response: 20Hz to 20 kHz, -3dB. Aux input used as source referenceReference Supply Voltage: 14.4VDCDVD PlayerCompatible formats: CD, CD-R/RW, MP3, WMA, DVD, DVD-R/RW, DVD+R/RW, DVD-MP3, Avi,MPEG4, DivX6, JPEG and Picture CDSignal to Noise Ratio: 85dBADynamic Range: >95dBFrequency Response: 20Hz to 20 kHz, -3dBChannel Separation: > 60dB @ 1kHzD/A Converter(s): 6-channel high performance 24-bit, 192 kHz, multi-bit Sigma Delta modulation.DAC supports sample rates from 8~192 kHz.Region code: 2FM Tuner SectionTuning Range: 87.5MHz - 108MHzMono Sensitivity (-30dB): 10dBuSignal to Noise Ratio @ 1kHz: 58dBImage Rejection: 60dBStereo Separation @ 1kHz: 30dBFrequency Response: 30Hz - 15kHz, -3dBAM Tuner SectionTuning Range: 522kHz - 1629kHzSensitivity (-20dB): 20dBuSignal to Noise Ratio @ 1kHz: 50dBImage Rejection: 60dBFrequency Response: 50Hz - 2kHz, -3dBMonitor SectionScreen Size: 6.5" (measured diagonally).Screen Type: TFT Liquid Crystal Display (LCD)Response Time: 30 msResolution, CD/Composite Video in: 336,960 sub pixels,1440 (W) X 234 (H)Viewing angle:•45~60 degrees left or right•20~30 degrees up•40~60 degrees downGeneralAuxiliary Input impedance: 10kPower Supply: 10.5 to 16V DC, negative groundFuse: 10-amp, mini ATM typeDIN chassis dimensions: 178mm x 153mm x100mm NOTE:Specifications and designs of this model are necessarily subject to changes without any notice.77
Warranty 2 YearsDear customerThank you for purchasing this ZENEC product. It is advisable to keep the original packing materialfor any future transporting of the product.Should your ZENEC product require warranty service, please return it to the retailer from whomit was purchased or the distributor in your country.This ZENEC product is warranted against defective materials or workmanship for a period ofTWO years from date of purchase at retail.Warranty LimitationsThis warranty does not cover any damage due to:1. Improper installation, incorrect audio or mains connection(s).2. Exposure to excessive humidity, fluids, heat sun rays or excessive dirt or dust.3. Accidents or abuse, unauthorized repair attempts and modifications not explicitlyauthorized by the manufacturer.This warranty is limited to the repair or the replacement of the defective product at themanufacturer’s option and does not include any other form of damage, whether incidental,consequential or otherwise. The warranty does not cover any transport costs or damagescaused by transport or shipment of the product. Warranty work will not be carried out unless thiswarranty certificate is presented fully completed with model, serial number, purchaser’s address,purchasing date and dealer stamp together with the original sales slip!2 Jahre GarantieSehr geehrter Kunde,Vielen Dank, dass Sie sich zum Kauf dieses Produktes von ZENEC entschlossen haben. Wirbitten Sie, die Originalverpackung aufzuheben, z.B. für den Transport bei einem Garantiefall.Wenn Sie Garantie-Leistungen für dieses ZENEC Produkt beanspruchen, wenden Sie sich bittedirekt an den Händler, bei dem das Gerät gekauft wurde.Dieses ZENEC Produkt ist durch eine Werksgarantie von 2 Jahren ab Kaufdatum im Fachhandelgegen Material- oder Herstellungsfehler geschützt.Garantie-EinschränkungenNicht unter Garantie fallen Schäden infolge von:1. unsachgemässem Einbau oder inkorrektem Audio- oder Stromanschluss.2. Einwirkung von übermässiger Feuchtigkeit, Flüssigkeit, Hitze, Sonneneinstrahlungoder starker Verschmutzung.3. mechanischer Beschädigung durch Unfall, Fall oder Stoss; Schäden durch nicht autorisierteReparaturversuche und/oder Modifikationen.Die Garantie dieses Produkts bleibt in jedem Fall auf die Reparatur bzw. den Ersatz (Entscheidungbeim Hersteller) des ZENEC Produktes beschränkt. Transportschäden und die Kosten desRücktransportes sind durch diese Garantie nicht abgedeckt. Jeder über diese Garantie-Erklärunghinausgehende Anspruch und Haftung für direkte / indirekte Folgeschäden werden ausdrücklichabgelehnt. Garantie-Ansprüche können nur mit einer korrekt und vollständig ausgefülltenGarantie-Karte und dem Original-Kaufbeleg geltend gemacht werden.78
WARRANTYZENEC Model: ZE-NC2010Serial number:...............................................................................................................................Date of purchase:..........................................................................................................................Your name:....................................................................................................................................Your address:................................................................................................................................City:...............................................................................................................................................State: ................................... ZIP or postal code .........................................................................Country: .......................................................................................................................................Dealer’s address & stamp■ If at any time in the future you should need to dispose this product please note that waste electricalproducts should not be disposed of with household waste. Please recycle where facilities exist.Check with your Local Authority or retailer for recycling advice. (Waste Electrical and ElectronicEquipment Directive)■ Sollten Sie dieses Gerät eines Tages entsorgen müssen, beachten Sie bitte dass elektrische Gerätenicht mit dem Haushaltsmüll entsorgt werden sollten. Führen Sie das Gerät wenn möglich demRecycling zu. Ihre lokalen Behörden oder Ihr Händler können Sie dementsprechend informieren(Richtlinie über die Entsorgung elektrischer und elektronischer Ausstattungen).79
MODEL NO:ZE-DVBT101 CH DVB-T TUNERZENEC · By ACR AG · Bohrturmweg 1 · Bad Zurzach · Switzerland