Erfolgreiche ePaper selbst erstellen
Machen Sie aus Ihren PDF Publikationen ein blätterbares Flipbook mit unserer einzigartigen Google optimierten e-Paper Software.
Sicherheitstelefon<br />
Security Phone<br />
Bedienungsanleitung<br />
Operating Instructions<br />
<strong>TEL</strong> <strong>48</strong> <strong>Extra</strong> <strong>Plus</strong>
2<br />
2<br />
<strong>TEL</strong> <strong>48</strong> <strong>Extra</strong> <strong>Plus</strong><br />
Bedienungsanleitung____3<br />
Operating Instructions__17
− INHALTSVERZEICHNIS−<br />
SICHERHEITSHINWEISE . . . . . . . . . . . . . . . . . . . . . . . . . . . . . . . . . . . . . . . . . . . . . . 4<br />
1 BEDIENELEMENTE . . . . . . . . . . . . . . . . . . . . . . . . . . . . . . . . . . . . . . . . . . . 5<br />
2 INSTALLATION . . . . . . . . . . . . . . . . . . . . . . . . . . . . . . . . . . . . . . . . . . . . . . . 6<br />
2.1 <strong>TEL</strong>EFONHÖRER ANSCHLIEßEN . . . . . . . . . . . . . . . . . . . . . . . . . . . . . . . . . . . . . . 6<br />
2.2 BATTERIE EINSETZEN . . . . . . . . . . . . . . . . . . . . . . . . . . . . . . . . . . . . . . . . . . . . . . . 6<br />
2.3 <strong>TEL</strong>EFON ANSCHLIEßEN . . . . . . . . . . . . . . . . . . . . . . . . . . . . . . . . . . . . . . . . . . . . . 6<br />
2.4 WANDMONTAGE . . . . . . . . . . . . . . . . . . . . . . . . . . . . . . . . . . . . . . . . . . . . . . . . . . . . . 7<br />
2.5 HÖRGERÄTE KOMPATIBEL . . . . . . . . . . . . . . . . . . . . . . . . . . . . . . . . . . . . . . . . . . . 7<br />
2.6 T−NET ANPASSUNG . . . . . . . . . . . . . . . . . . . . . . . . . . . . . . . . . . . . . . . . . . . . . . . . . . 7<br />
2.7 UHRZEIT EINS<strong>TEL</strong>LEN . . . . . . . . . . . . . . . . . . . . . . . . . . . . . . . . . . . . . . . . . . . . . . . 8<br />
3 BEDIENUNG . . . . . . . . . . . . . . . . . . . . . . . . . . . . . . . . . . . . . . . . . . . . . . . . . 9<br />
3.1 <strong>TEL</strong>EFONIEREN . . . . . . . . . . . . . . . . . . . . . . . . . . . . . . . . . . . . . . . . . . . . . . . . . . . . . 9<br />
3.2 ANRUFE ENTGEGENNEHMEN . . . . . . . . . . . . . . . . . . . . . . . . . . . . . . . . . . . . . . . . 9<br />
3.3 LAUTSTÄRKE DES HÖRERS EINS<strong>TEL</strong>LEN . . . . . . . . . . . . . . . . . . . . . . . . . . . . . 9<br />
3.4 WAHLWIEDERHOLUNG . . . . . . . . . . . . . . . . . . . . . . . . . . . . . . . . . . . . . . . . . . . . . . . 10<br />
3.5 ANZEIGE DER GESPRÄCHSDAUER . . . . . . . . . . . . . . . . . . . . . . . . . . . . . . . . . . . 10<br />
3.6 EINS<strong>TEL</strong>LBARER TONRUF . . . . . . . . . . . . . . . . . . . . . . . . . . . . . . . . . . . . . . . . . . . . 10<br />
3.7 KLANGREGELUNG . . . . . . . . . . . . . . . . . . . . . . . . . . . . . . . . . . . . . . . . . . . . . . . . . . . 10<br />
3.8 DIREKT− UND KURZWAHLTASTEN SPEICHERN . . . . . . . . . . . . . . . . . . . . . . . . . 11<br />
3.8.1 WÄHLEN MIT DEN DIREKTWAHLTASTEN . . . . . . . . . . . . . . . . . . . . . . . . . . . . . . . 11<br />
3.8.2 WÄHLEN MIT DEN KURZWAHLTASTEN . . . . . . . . . . . . . . . . . . . . . . . . . . . . . . . . 11<br />
4 DIE "R"−SIGNALTASTE . . . . . . . . . . . . . . . . . . . . . . . . . . . . . . . . . . . . . . . 12<br />
4.1 "R"−SIGNALTASTE AN NEBENS<strong>TEL</strong>LENANLAGEN . . . . . . . . . . . . . . . . . . . . . . . 12<br />
4.2 "R"−SIGNALTASTE UND DIE T−NET−FUNKTIONEN DER<br />
DEUTSCHEN <strong>TEL</strong>EKOM . . . . . . . . . . . . . . . . . . . . . . . . . . . . . . . . . . . . . . . . . . . . . . 12<br />
4.3 <strong>TEL</strong>EFONNUMMERN WÄHLEN UND SPEICHERN BEI DEM BETRIEB<br />
AN NEBENS<strong>TEL</strong>LENANLAGEN . . . . . . . . . . . . . . . . . . . . . . . . . . . . . . . . . . . . . . . . 13<br />
5 WICHTIGE HINWEISE . . . . . . . . . . . . . . . . . . . . . . . . . . . . . . . . . . . . . . . . . 14<br />
5.1 FEHLERSUCHE . . . . . . . . . . . . . . . . . . . . . . . . . . . . . . . . . . . . . . . . . . . . . . . . . . . . . . 14<br />
5.2 <strong>TEL</strong>EFONKABEL AUSTAUSCHEN . . . . . . . . . . . . . . . . . . . . . . . . . . . . . . . . . . . . . . 14<br />
5.3 GARANTIE . . . . . . . . . . . . . . . . . . . . . . . . . . . . . . . . . . . . . . . . . . . . . . . . . . . . . . . . . . 15<br />
5.4 KONFORMITÄTSERKLÄRUNG . . . . . . . . . . . . . . . . . . . . . . . . . . . . . . . . . . . . . . . . 16<br />
OPERATING INSTRUCTIONS . . . . . . . . . . . . . . . . . . . . . . . . . . . . . . . . . . . . . . . . . .<br />
17<br />
3
SICHERHEITSHINWEISE<br />
4<br />
− SICHERHEITSHINWEISE −<br />
Bedienungsanleitung: Bitte lesen Sie diese Bedienungsanleitung<br />
sorgfältig durch. Bei auftretenden Fragen wenden Sie sich bitte an unseren<br />
Service unter der Service−Hotline 0180 5 00 13 88 (Kosten Telekom bei<br />
Drucklegung: 12 ct/min). Öffnen Sie das Gerät in keinem Fall selbst und<br />
führen Sie keine eigenen Reparaturversuche durch. Bei<br />
Gewährleistungsansprüchen wenden Sie sich bitte an Ihren Fachhändler.<br />
Hinweise zur Entsorgung:<br />
Die Umsetzung europäischen Rechtes in nationale Gesetze und<br />
Verordnungen verpflichtet Sie zur sachgerechten Entsorgung von<br />
Gebrauchsgütern. Dies dient dem Schutz von Personen und Umwelt.<br />
Das nebenstehende Symbol bedeutet, dass elektrische und<br />
elektronische Altgeräte und Batterien getrennt vom Hausmüll<br />
zu entsorgen sind.<br />
Alte oder ausgediente Geräte entsorgen Sie bei einer Sammelstelle<br />
eines geeigneten Entsorgungsträgers.<br />
Batterien und Akkumulatoren entsorgen Sie beim batterievertreibenden<br />
Handel sowie zuständigen Sammelstellen, die<br />
entsprechende Behälter bereitstellen.<br />
Pflege: Die Gehäuseoberflächen können mit einem trockenen, weichen<br />
und fusselfreien Tuch gereinigt werden. Niemals Reinigungsmittel oder<br />
Lösungsmittel verwenden.<br />
Temperatur und Umgebungsbedingungen: Das Gerät ist für den Betrieb<br />
in geschützten Räumen mit einem Temperaturbereich von +5 °C bis +45 °C<br />
ausgelegt. Stellen Sie das Gerät nicht in Feuchträumen wie Bad oder<br />
Waschküche auf. Vermeiden Sie die Nähe zu Wärmequellen wie<br />
Heizkörpern und setzen Sie das Gerät keiner direkten Sonnenbestrahlung<br />
aus. Stellen Sie das Telefon nicht auf antike Möbel, Furniere oder<br />
empfindliche Oberflächen, da es Abdrücke hinterlassen kann.<br />
Anschlusshinweise: Schließen Sie das AUDIOLINE Telefon <strong>48</strong> <strong>Extra</strong> <strong>Plus</strong><br />
an einer TAE−Anschlussdose mit F Codierung an. Es kann gemeinsam mit<br />
anderen Geräten wie Fax, Anrufbeantworter oder Modem benutzt werden,<br />
wenn Sie über eine TAE−Anschlußdose mt F/N Codierung verfügen.<br />
Zulassung und CE−Zeichen: Das Gerät ist für den Einsatz im<br />
europäischen Telefonnetz freigegeben. Dieses Gerät erfüllt die<br />
Anforderungen der EU−Richtlinien. Die Konformität des Gerätes mit den<br />
Richtlinien wird durch das CE−Kennzeichen bestätigt.<br />
Die Konformitätserklärung finden Sie am Ende dieser Anleitung.
1 BEDIENELEMENTE<br />
14<br />
13<br />
15<br />
16<br />
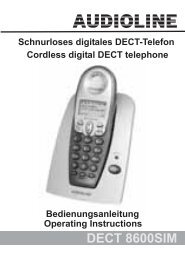
− BEDIENELEMENTE −<br />
12<br />
1<br />
2 3<br />
1. Kurzwahltaste 9. Schieberegler �Flash"<br />
2. Display 10. Schieberegler �Klangregelung"<br />
3. Telefonanschluss (hinten) 11. Zahlenfeld, 1−9, 0, * und #<br />
4. Einstellen der Uhrzeit (+/−) 12. Optische Rufanzeige<br />
5. Einstellen der Uhrzeit (SET) 13. Wahlwiederholung<br />
6. Zurücksetzen oder starten der<br />
Gesprächsdauer<br />
14. Hörerlautstärke<br />
7. Direktwahltasten M1, M2, M3 15. �R"−Signaltaste<br />
8. Schieberegler �Klingel" 16. Speichertaste<br />
11<br />
10<br />
4<br />
9<br />
5<br />
8<br />
6<br />
7<br />
5
2 INSTALLATION<br />
6<br />
− INSTALLATION −<br />
2.1 <strong>TEL</strong>EFONHÖRER ANSCHLIEßEN<br />
Packen Sie Ihr Telefon aus. Verbinden Sie den Hörer mit dem Grundgerät.<br />
Die Anschlüsse an dem dazu benötigten Spiralkabel sind gleich. Nehmen<br />
Sie das eine Ende des Spiralkabels und stecken Sie es in die Buchse am<br />
unteren Ende des Hörers. Das andere Ende stecken Sie in die Buchse auf<br />
der linken Seite des Grundgerätes.<br />
2.2 BATTERIE EINSETZEN<br />
Setzen Sie die mitgelieferte Batterie ein, bevor Sie Ihr neues Telefon mit<br />
dem Telefonnetz verbinden. Verwenden Sie den Typ AAA 1,5 V Alkaline.<br />
Die Batterie wird für die Displayanzeige und für weitere Funktionen des<br />
Telefons benötigt. Achten Sie immer darauf, dass das Telefon nicht mit dem<br />
Telefonnetz verbunden ist, wenn Sie die Batterie einbauen oder wechseln.<br />
Das Batteriefach befindet sich auf der Unterseite Ihres Telefons.<br />
1. Öffnen Sie das Batteriefach mit einem kleinen Schraubenzieher oder<br />
einem spitzen Gegenstand.<br />
2. Legen Sie die Batterie ein und achten Sie dabei auf die richtige Polung.<br />
Schieben Sie den "−" Pol auf die kleine Feder und drücken Sie dann den<br />
"+" Pol nach unten.<br />
3. Schließen Sie das Batteriefach.<br />
Tauschen Sie die Batterie aus, wenn die Displayanzeige zu schwach ist<br />
oder erloschen ist.<br />
2.3 <strong>TEL</strong>EFON ANSCHLIEßEN<br />
Verbinden Sie das beiliegende Telefonkabel mit der Telefonsteckdose und<br />
der Telefonbuchse auf der Rückseite des Telefons. Das AUDIOLINE<br />
Telefon <strong>48</strong> <strong>Extra</strong> <strong>Plus</strong> arbeitet mit dem MFV−Wählverfahren (Tonwahl).
− INSTALLATION −<br />
2.4 WANDMONTAGE<br />
Ihr AUDIOLINE Telefon <strong>48</strong> <strong>Extra</strong> <strong>Plus</strong> ist auch zur Wandmontage geeignet.<br />
Benutzen Sie zur Befestigung zwei Schrauben, bohren Sie zwei Löcher im<br />
vertikalen Abstand von 83 mm und lassen Sie die Schrauben 5 mm aus der<br />
Wand herausstehen. Stecken Sie nun das Telefon auf die Schrauben und<br />
schieben Sie es etwas nach unten.<br />
Hinweis: Unter den zu bohrenden Löchern dürfen sich keine Leitungen<br />
befinden.<br />
Wenn Sie das Telefon auf einem Tisch benutzen, muss sich der<br />
Einhängehaken des Hörers in der versenkten Position befinden, wie es in<br />
der Abbildung A dargestellt ist (Werkseinstellung). Bei einer Wandmontage<br />
wird der Einhängehaken des Telefonhörers herausgezogen und umgedreht.<br />
Siehe dazu die Abbildung B.<br />
2.5 HÖRGERÄTE KOMPATIBEL<br />
Das Telefon ist mit den meisten am Markt befindlichen Hörgeräten<br />
kompatibel. Durch die Vielzahl der angebotenen Modelle kann keine<br />
einwandfreie Funktion mit jedem Hörgerät garantiert werden.<br />
2.6 T−NET ANPASSUNG<br />
Ihr AUDIOLINE Telefon <strong>48</strong> <strong>Extra</strong> <strong>Plus</strong> unterstützt die wichtigsten<br />
Mehrwertdienste der DEUTSCHEN <strong>TEL</strong>EKOM (z. B.: Makeln, Anklopfen,<br />
Dreier−Konferenz, u. a.). Dazu benötigen Sie die Einstellung "FLASH" an<br />
Ihrem Telefon. Weitere Informationen erhalten Sie unter Punkt 4. Zur<br />
Freischaltung Ihrer Leitung für diese Funktionen (die z. T. gebührenpflichtig<br />
sind) wenden Sie sich bitte an die DEUTSCHE <strong>TEL</strong>EKOM.<br />
7
8<br />
− INSTALLATION −<br />
2.7 UHRZEIT EINS<strong>TEL</strong>LEN<br />
Im Display wird die aktuelle Uhrzeit angezeigt. Um die Uhr zu stellen, gehen<br />
Sie bitte wie folgt vor:<br />
1. Drücken Sie einmal die Taste SET unter dem Display. Die<br />
Stundenanzeige im Display beginnt zu blinken.<br />
2. Nun können Sie mit der Taste +/− die aktuelle Stunde eingeben. Drücken<br />
Sie dazu die Taste +/− so oft, bis Sie die aktuelle Stunde im Display<br />
sehen.<br />
3. Drücken Sie nun erneut die Taste SET und die Minutenanzeige im<br />
Display beginnt zu blinken.<br />
4. Nun können Sie durch mehrmaliges Drücken der Taste +/− die aktuelle<br />
Minutenzahl eingeben.<br />
5. Drücken Sie die Taste SET. Die Uhrzeit ist eingestellt.
3 BEDIENUNG<br />
− BEDIENUNG −<br />
3.1 <strong>TEL</strong>EFONIEREN<br />
Das AUDIOLINE Telefon <strong>48</strong> <strong>Extra</strong> <strong>Plus</strong> kann wie jedes konventionelle<br />
Telefon benutzt werden.<br />
BITTE DEN ANWEISUNGEN FOLGEN:<br />
Nehmen Sie den Telefonhörer ab und warten Sie auf das<br />
Freizeichen.<br />
Wählen Sie nun die gewünschte Telefonnummer. Die gewählte<br />
Rufnummer wird im Display angezeigt. Das Display zeigt maximal<br />
16 Zahlen an. Ist die gewählte Telefonnummer länger, werden nur<br />
die letzten 16 Zahlen angezeigt.<br />
Um das Gespräch zu beenden, legen Sie den Hörer wieder auf.<br />
3.2 ANRUFE ENTGEGENNEHMEN<br />
Heben Sie den Hörer ab und führen Sie das Gespräch.<br />
Um das Gespräch zu beenden, legen Sie den Hörer wieder auf.<br />
3.3 LAUTSTÄRKE DES HÖRERS EINS<strong>TEL</strong>LEN<br />
Sollte die Stimme des Gesprächspartners einmal zu leise oder zu laut sein,<br />
können Sie die Lautstärke des Hörers vergrößern oder verringern.<br />
Drehen Sie während eines Gesprächs den Knopf � (unter dem Hörer).<br />
Warnung: Wenn die größtmögliche Lautstärke eingestellt ist, kann<br />
dies Ihr Gehör schädigen. Stellen Sie daher nach jedem Gespräch die<br />
Lautstärke wieder auf �0" ein.<br />
9
10<br />
− BEDIENUNG −<br />
3.4 WAHLWIEDERHOLUNG<br />
Ist ein Anschluss, den Sie gewählt haben, besetzt oder konnten Sie<br />
niemanden erreichen, legen Sie den Telefonhörer wieder auf. Die zuletzt<br />
gewählte Rufnummer bleibt automatisch im Telefon gespeichert.<br />
Um die Wahlwiederholung zu nutzen, gehen Sie wie folgt vor:<br />
Heben Sie den Hörer ab und drücken Sie die Wahlwiederholungstaste �.<br />
Die gespeicherte Rufnummer wird erneut gewählt.<br />
3.5 ANZEIGE DER GESPRÄCHSDAUER<br />
Nach dem Wählen der Rufnummer wird im Display nach einigen Sekunden<br />
die aktuelle Gesprächsdauer in Minuten und Sekunden angezeigt.<br />
Die interne Uhr können Sie auch als Stoppuhr verwenden. Drücken Sie<br />
dazu während eines Gesprächs oder auch bei aufgelegtem Hörer die<br />
Taste �. Mit der gleichen Taste � wird die Zeitmessung wieder gestoppt.<br />
Die gemessene Zeit wird noch für einige Sekunden im Display angezeigt.<br />
Danach springt das Display zur aktuellen Uhrzeit zurück.<br />
3.6 EINS<strong>TEL</strong>LBARER TONRUF<br />
Mit dem Schiebeschalter "KLINGEL" an der rechten Gehäuseseite können<br />
Sie die Stellungen "LEISE" (�) oder "LAUT" auswählen, um die Lautstärke<br />
des Tonrufes Ihren Bedürfnissen anzupassen. Möchten Sie einmal nicht<br />
gestört werden, benutzen Sie die Stellung "AUS".<br />
3.7 KLANGREGELUNG<br />
Mit dem Schiebeschalter � an der rechten Gehäuseseite können Sie<br />
den Klang im Hörer Ihres Telefons verändern.<br />
Hinweis: Die Klangregelung funktioniert nicht, wenn die Hörerlautstärke auf<br />
Minimum eingestellt ist.
− BEDIENUNG −<br />
3.8 DIREKT− UND KURZWAHLTASTEN SPEICHERN<br />
Mit Ihrem AUDIOLINE Telefon <strong>48</strong> <strong>Extra</strong> <strong>Plus</strong> können Sie auf den Tasten<br />
M1, M2 und M3 jeweils eine Rufnummer zur Direktwahl speichern. Die<br />
Direktwahltaste M3 ist rot gekennzeichnet und somit als Notruftaste<br />
geeignet. Zehn weitere Rufnummern können zur Kurzwahl gespeichert<br />
werden.<br />
BITTE DEN ANWEISUNGEN FOLGEN:<br />
Heben Sie den Telefonhörer ab.<br />
Drücken Sie die Speichertaste �.<br />
Geben Sie nun die gewünschte Rufnummer über das Zahlenfeld<br />
ein. Die maximale Länge beträgt 16 Zahlen.<br />
Drücken Sie erneut die Speichertaste �.<br />
Drücken Sie nun die gewünschte Direktwahltaste M1, M2 oder M3<br />
oder eine Taste auf dem Zahlenfeld zwischen 1 bis 9 oder 0, um<br />
die Rufnummer als Kurzwahlnummer zu speichern.<br />
Legen Sie den Telefonhörer auf.<br />
Schon belegte Speicherplätze werden automatisch überschrieben, wenn<br />
Sie eine neue Rufnummer auf diesem Speicherplatz speichern.<br />
Die gespeicherten Rufnummern können auf dem Index unter dem<br />
Telefonhörer notiert werden. Schieben Sie mit festem Fingerdruck die<br />
Abdeckung nach unten und entnehmen Sie den Notizzettel. Notieren Sie<br />
die Rufnummern. Setzen Sie Notizzettel und Abdeckung wieder ein.<br />
3.8.1 WÄHLEN MIT DEN DIREKTWAHLTASTEN<br />
BITTE DEN ANWEISUNGEN FOLGEN:<br />
Heben Sie den Telefonhörer ab und drücken Sie die gewünschte<br />
Direktwahltaste M1, M2 oder M3.<br />
3.8.2 WÄHLEN MIT DEN KURZWAHLTASTEN<br />
BITTE DEN ANWEISUNGEN FOLGEN:<br />
Heben Sie den Telefonhörer ab und drücken Sie die Kurzwahltaste<br />
� und den gewünschten Speicherplatz von 1 bis 9 oder 0.<br />
11
4 DIE "R"−SIGNALTASTE<br />
12<br />
− DIE �R"−SIGNALTASTE −<br />
Die "R"−Signaltaste Ihres Telefons können Sie an Nebenstellenanlagen und<br />
bei der Verwendung der T−NET Funktionen der DEUTSCHEN <strong>TEL</strong>EKOM<br />
nutzen.<br />
4.1 "R"−SIGNALTASTE AN NEBENS<strong>TEL</strong>LENANLAGEN<br />
Haben Sie Ihr Telefon mit einer Nebenstellenanlage verbunden, können Sie<br />
alle Möglichkeiten, wie z. B. Anrufe weiterleiten, automatischen Rückruf<br />
usw. nutzen. Die "R"−Signaltaste verschafft Ihnen den Zugang zu diesen<br />
Möglichkeiten. An einer Nebenstellenanlage wird die FLASH−Zeit "100ms"<br />
benötigt.<br />
Stellen Sie dazu den Schalter "FLASH" (auf der rechten Geräteseite) auf<br />
die Einstellung "100ms".<br />
Ob Ihr Telefon an Ihrer Nebenstellenanlage einwandfrei funktioniert und<br />
welche weiteren Möglichkeiten Sie dadurch erhalten, erfahren Sie bei dem<br />
Händler, bei dem die Anlage gekauft wurde.<br />
4.2 "R"−SIGNALTASTE UND DIE T−NET−FUNKTIONEN DER<br />
DEUTSCHEN <strong>TEL</strong>EKOM<br />
Ihr AUDIOLINE Telefon <strong>48</strong> <strong>Extra</strong> <strong>Plus</strong> unterstützt die wichtigsten<br />
Mehrwertdienste der DEUTSCHEN <strong>TEL</strong>EKOM (z. B.: Makeln, Anklopfen,<br />
Dreier−Konferenz u. a.). Das T−NET arbeitet mit der Einstellung "FLASH<br />
300ms".<br />
Stellen Sie dazu den Schalter "FLASH" (auf der rechten Geräteseite) auf<br />
die Einstellung "300ms".<br />
Zur Freischaltung der T−NET Funktionen (die z. T. gebührenpflichtig sind)<br />
wenden Sie sich bitte an die DEUTSCHE <strong>TEL</strong>EKOM.
− DIE �R"−SIGNALTASTE −<br />
4.3 <strong>TEL</strong>EFONNUMMERN WÄHLEN UND SPEICHERN BEI DEM<br />
BETRIEB AN NEBENS<strong>TEL</strong>LENANLAGEN<br />
Hinweis!<br />
Die in diesem Kapitel erklärte Pausenfunktion zwischen der Kennziffer für<br />
die Amtsholung (meistens 0 oder 9) ist nur bei älteren Nebenstellenanlagen<br />
erforderlich.<br />
Einige Nebenstellenanlagen benötigen eine kurze Pause zwischen der<br />
Amtskennziffer (meistens 0 oder 9) und dem Freizeichen. Beim manuellen<br />
Wählen und dem Wählen über die Direkt− und Kurzwahltasten kann<br />
diese Pause mit eingegeben werden, damit die weiteren Zahlen nicht zu<br />
schnell gewählt werden.<br />
Pause beim manuellen Wählen eingeben<br />
Drücken Sie zwischen der Kennziffer für die Amtsholung und der<br />
eigentlichen Telefonnummer einmal die Taste �. Im Display wird die Pause<br />
mit "P" angezeigt. Nach der Amtsholung wartet Ihr Telefon für drei<br />
Sekunden mit dem Wählen der eigentlichen Telefonnummer.<br />
Pause mitspeichern<br />
Drücken Sie während des Speicherns nach der Kennziffer für die<br />
Amtsholung und vor der eigentlichen Rufnummer die Taste �. Im Display<br />
wird die Pause mit "P" angezeigt. Beim Wählen über die Direkt− oder<br />
Kurzwahltasten wird dann nach der Kennziffer für die Amtsholung<br />
automatisch eine Pause von drei Sekunden eingefügt.<br />
13
5 WICHTIGE HINWEISE<br />
14<br />
− WICHTIGE HINWEISE −<br />
5.1 FEHLERSUCHE<br />
Sie können mit Ihrem Telefon nicht telefonieren:<br />
Entfernen Sie alle Geräte und verbinden Sie nur das Telefon direkt mit der<br />
Telefonbuchse.<br />
Der Fehler ist nicht behoben:<br />
Fehler kann an defektem Anschlusskabel oder Telefon liegen. Bitte<br />
austauschen.<br />
Der Fehler ist nicht behoben:<br />
Fehler liegt in der Zuleitung. Bitte rufen Sie die Störungsstelle Ihres<br />
Telefonnetzanbieters an.<br />
Bei technischen Problemen können Sie sich unter der Hotline − Rufnummer<br />
0180 5 00 13 88 (Kosten Telekom bei Drucklegung: 12ct/min) auch an<br />
unseren Service wenden.<br />
5.2 <strong>TEL</strong>EFONKABEL AUSTAUSCHEN<br />
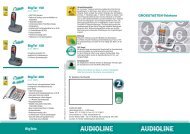
Müssen Sie Ihr Telefonkabel austauschen, finden Sie anhand der<br />
untenstehenden Zeichnung das passende Kabel bei Ihrem Händler.<br />
F−Codierung − IMPORT Standard<br />
TAE−F Rj11 6/x<br />
1<br />
1<br />
4 3 2<br />
2<br />
5 2<br />
3<br />
4<br />
3<br />
4 1<br />
2 34<br />
5 6<br />
6 1 5<br />
5<br />
6<br />
6
− WICHTIGE HINWEISE −<br />
5.3 GARANTIE<br />
AUDIOLINE − Geräte werden nach den modernsten Produktionsverfahren<br />
hergestellt und geprüft. Ausgesuchte Materialien und hoch entwickelte<br />
Technologien sorgen für einwandfreie Funktion und lange Lebensdauer. Ein<br />
Garantiefall liegt nicht vor, wenn die Ursache einer Fehlfunktion des<br />
Gerätes bei dem Telefonnetzbetreiber oder einer zwischengeschalteten<br />
Nebenstellenanlage liegt. Die Garantie gilt nicht für die in den Produkten<br />
verwendeten Batterien. Die Garantiezeit beträgt 24 Monate, gerechnet vom<br />
Tage des Kaufs.<br />
Innerhalb der Garantiezeit werden alle Mängel, die auf Material− oder<br />
Herstellungsfehler zurückzuführen sind, kostenlos beseitigt. Der<br />
Garantieanspruch erlischt bei Eingriffen durch den Käufer oder durch Dritte.<br />
Schäden, die durch unsachgemäße Behandlung oder Bedienung, durch<br />
falsches Aufstellen oder Aufbewahren, durch unsachgemäßen Anschluss<br />
oder Installation sowie durch höhere Gewalt oder sonstige äußere Einflüsse<br />
entstehen, fallen nicht unter die Garantieleistung. Wir behalten uns vor, bei<br />
Reklamationen die defekten Teile auszubessern oder zu ersetzen oder das<br />
Gerät auszutauschen. Ausgetauschte Teile oder ausgetauschte Geräte<br />
gehen in unser Eigentum über. Schadenersatzansprüche sind<br />
ausgeschlossen, soweit sie nicht auf Vorsatz oder grober Fahrlässigkeit des<br />
Herstellers beruhen.<br />
Sollte Ihr Gerät dennoch einen Defekt innerhalb der Garantiezeit<br />
aufweisen, wenden Sie sich bitte unter Vorlage Ihrer Kaufquittung<br />
ausschließlich an das Geschäft, in dem Sie Ihr AUDIOLINE − Gerät gekauft<br />
haben. Alle Gewährleistungsansprüche nach diesen Bestimmungen sind<br />
ausschließlich gegenüber Ihrem Fachhändler geltend zu machen. Nach<br />
Ablauf von zwei Jahren nach Kauf und Übergabe unserer Produkte können<br />
Gewährleistungsrechte nicht mehr geltend gemacht werden.<br />
15
16<br />
− WICHTIGE HINWEISE −<br />
5.4 KONFORMITÄTSERKLÄRUNG<br />
Dieses Gerät erfüllt die Anforderungen der EU−Richtlinie:<br />
1999/5/EG Richtlinie über Funkanlagen und<br />
Telekommunikationsendeinrichtungen und die gegenseitige Anerkennung<br />
ihrer Konformität. Die Konformität mit der o. a. Richtlinie wird durch das<br />
CE−Zeichen auf dem Gerät bestätigt.<br />
Für die komplette Konformitätserklärung nutzen Sie bitte den kostenlosen<br />
Download von unserer Website www.audioline.de.
− CONTENTS−<br />
SAFETY INFORMATION . . . . . . . . . . . . . . . . . . . . . . . . . . . . . . . . . . . . . . . . . . . . . . . 18<br />
1 OPERATIONAL ELEMENTS . . . . . . . . . . . . . . . . . . . . . . . . . . . . . . . . . . . 19<br />
2 INSTALLATION . . . . . . . . . . . . . . . . . . . . . . . . . . . . . . . . . . . . . . . . . . . . . . . 20<br />
2.1 CONNECTING THE RECEIVER . . . . . . . . . . . . . . . . . . . . . . . . . . . . . . . . . . . . . . . . 20<br />
2.2 INSERT BATTERY . . . . . . . . . . . . . . . . . . . . . . . . . . . . . . . . . . . . . . . . . . . . . . . . . . . . 20<br />
2.3 CONNECTING THE <strong>TEL</strong>EPHONE . . . . . . . . . . . . . . . . . . . . . . . . . . . . . . . . . . . . . . 20<br />
2.4 WALL MOUNTING . . . . . . . . . . . . . . . . . . . . . . . . . . . . . . . . . . . . . . . . . . . . . . . . . . . . 21<br />
2.5 HEARING AID COMPATIBLE . . . . . . . . . . . . . . . . . . . . . . . . . . . . . . . . . . . . . . . . . . . 21<br />
2.6 T−NET SET−UP . . . . . . . . . . . . . . . . . . . . . . . . . . . . . . . . . . . . . . . . . . . . . . . . . . . . . . . 21<br />
2.7 SETTING THE CLOCK . . . . . . . . . . . . . . . . . . . . . . . . . . . . . . . . . . . . . . . . . . . . . . . . 22<br />
3 OPERATION . . . . . . . . . . . . . . . . . . . . . . . . . . . . . . . . . . . . . . . . . . . . . . . . . 23<br />
3.1 USING THE <strong>TEL</strong>EPHONE . . . . . . . . . . . . . . . . . . . . . . . . . . . . . . . . . . . . . . . . . . . . . 23<br />
3.2 RECEIVING CALLS . . . . . . . . . . . . . . . . . . . . . . . . . . . . . . . . . . . . . . . . . . . . . . . . . . . 23<br />
3.3 ADJUSTING THE VOLUME OF THE RECEIVER . . . . . . . . . . . . . . . . . . . . . . . . . . 23<br />
3.4 REDIAL . . . . . . . . . . . . . . . . . . . . . . . . . . . . . . . . . . . . . . . . . . . . . . . . . . . . . . . . . . . . . 24<br />
3.5 CALL DURATION DISPLAY . . . . . . . . . . . . . . . . . . . . . . . . . . . . . . . . . . . . . . . . . . . . 24<br />
3.6 ADJUSTABLE RINGING TONE . . . . . . . . . . . . . . . . . . . . . . . . . . . . . . . . . . . . . . . . . 24<br />
3.7 TONE ADJUSTMENT . . . . . . . . . . . . . . . . . . . . . . . . . . . . . . . . . . . . . . . . . . . . . . . . . 24<br />
3.8 STORING DIRECT AND SPEED DIAL NUMBERS . . . . . . . . . . . . . . . . . . . . . . . . 25<br />
3.8.1 DIALLING USING THE DIRECT DIAL BUTTONS . . . . . . . . . . . . . . . . . . . . . . . . . . 25<br />
3.8.2 DIALLING USING THE SPEED DIAL BUTTONS . . . . . . . . . . . . . . . . . . . . . . . . . . 25<br />
4 THE "R" SIGNAL BUTTON . . . . . . . . . . . . . . . . . . . . . . . . . . . . . . . . . . . . 26<br />
4.1 "R"SIGNAL BUTTON ON PRIVATE EXCHANGES . . . . . . . . . . . . . . . . . . . . . . . . . 26<br />
4.2 "R" SIGNAL BUTTON AND THE DEUTSCHE <strong>TEL</strong>EKOM T−NET FUNCTIONS . 26<br />
4.3 DIALLING AND STORING <strong>TEL</strong>EPHONE NUMBERS WHEN USING ON<br />
PRIVATE EXCHANGES . . . . . . . . . . . . . . . . . . . . . . . . . . . . . . . . . . . . . . . . . . . . . . . 27<br />
5 IMPORTANT INFORMATION . . . . . . . . . . . . . . . . . . . . . . . . . . . . . . . . . . . 28<br />
5.1 FAULT FINDING . . . . . . . . . . . . . . . . . . . . . . . . . . . . . . . . . . . . . . . . . . . . . . . . . . . . . . 28<br />
5.2 REPLACING THE <strong>TEL</strong>EPHONE CABLE . . . . . . . . . . . . . . . . . . . . . . . . . . . . . . . . . 28<br />
5.3 GUARANTEE . . . . . . . . . . . . . . . . . . . . . . . . . . . . . . . . . . . . . . . . . . . . . . . . . . . . . . . . 29<br />
5.4 DECLARATION OF CONFORMITY . . . . . . . . . . . . . . . . . . . . . . . . . . . . . . . . . . . . . . 30<br />
6 IMPORTANT NOTES ON THE GUARANTEE . . . . . . . . . . . . . . . . . . . . .<br />
31<br />
17
SAFETY INFORMATION<br />
18<br />
− SAFETY INFORMATION −<br />
Operating Instructions: Please read this operating instruction manual<br />
thoroughly. In the case of any questions, please contact our Service Hotline<br />
0180 5 00 13 88 (cost via Telekom at time of going to print: 12 ct/min).<br />
Under no circumstances open the device or complete any repair work<br />
yourself. In the case of claims under the terms of guarantee, contact your<br />
sales outlet.<br />
Notes on disposal:<br />
The adjacent symbol indicates that old electrical and electronic<br />
devices and batteries must be disposed of separately from<br />
domestic waste.<br />
Equipment which is old or no longer in service must be<br />
disposed of at the collection point provided by the appropriate<br />
public waste disposal authority.<br />
Batteries and power packs must be disposed of at the sales<br />
outlet or the appropriate pubic waste authority collection point<br />
who provide the necessary container.<br />
Care: The surface of the case can be cleaned with a soft, dry, lint−free cloth.<br />
Never use cleaning agents or solvents.<br />
The implementation of European law in national laws and directives obliges<br />
you to dispose of consumer goods appropriately. This serves to protect<br />
persons and the environment.<br />
Temperature and Ambient Conditions: The unit is designed for use in<br />
protected rooms with a temperature range of +5 °C to 45 °C. The unit must<br />
not be installed in damp rooms such as a bathroom or laundry room. Avoid<br />
proximity to sources of heat such as radiators and do not expose the unit to<br />
direct sunlight. We therefore recommend that this product should not be<br />
used on antique furniture, veneers or other wooden surfaces.<br />
Connection Information: Connect the AUDIOLINE Telephone <strong>48</strong> <strong>Extra</strong><br />
<strong>Plus</strong> to a TAE connection socket with F coding. It can be connected<br />
together with other units, such as facsimile unit, answering machine or<br />
modem, if a TAE connection socket is available with F/N coding.<br />
Approval and CE Marking: The unit is approved for use on the European<br />
telephone network. This unit fulfils the requirements of the EU Directives.<br />
Conformity of the unit to the directives is confirmed by the CE mark. You will<br />
find the Declaration of Conformity at the end of this manual.
− OPERATIONAL ELEMENTS −<br />
1 OPERATIONAL ELEMENTS<br />
14<br />
13<br />
15<br />
16<br />
12<br />
1<br />
2 3<br />
1. Speed dial button 9. Slide control �Flash"<br />
2. Display 10. Slide control �tone control"<br />
3. Telephone socket (rear) 11. Number pad, 1−9, 0, * and #<br />
4. Set time (+/−) 12. Visual call indicator<br />
5. Set time (SET) 13. Redial<br />
6. Reset or start the call duration 14 Receiver volume<br />
7. Direct call buttons M1, M2, M3 15. �R" Signal button<br />
8. Slide control �Ringer� 16 Store button<br />
11<br />
10<br />
4<br />
9<br />
5<br />
8<br />
6<br />
7<br />
19
2 INSTALLATION<br />
20<br />
− INSTALLATION −<br />
2.1 CONNECTING THE RECEIVER<br />
After unpacking your telephone, you must first connect the telephone<br />
receiver to the base unit. The spiral cable needed for this has two identical<br />
connections. First take one end of the spiral cable and plug it into the<br />
socket at the bottom of the receiver. Now plug the other end into the socket<br />
on the left−hand side of the base unit.<br />
2.2 INSERT BATTERY<br />
Before connecting your new telephone to the telephone network, install the<br />
battery enclosed with the telephone. Please always use type AAA 1.5 V<br />
alkaline batteries. The batteries are required for the display and other<br />
features of the telephone. Make sure that the telephone is not connected to<br />
the telephone network, before installing or changing the batteries. The<br />
battery compartment is to be found on the underside of your telephone.<br />
1. Open the battery compartment with a small screwdriver or a pointed<br />
object.<br />
2. Insert the battery. Ensure that the polarity is correct. Push the "−" pole<br />
onto the small spring and then press the "+" pole downwards.<br />
3. Close the battery compartment<br />
Change the battery when the display is no longer visible.<br />
2.3 CONNECTING THE <strong>TEL</strong>EPHONE<br />
Connect the telephone cable provided to the telephone jack and the<br />
telephone socket on the rear of the telephone. The AUDIOLINE Telephone<br />
<strong>48</strong> <strong>Extra</strong> <strong>Plus</strong> works using the TTD system (Touch−Tone Dialling).
− INSTALLATION −<br />
2.4 WALL MOUNTING<br />
Your AUDIOLINE Telephone <strong>48</strong> <strong>Extra</strong> <strong>Plus</strong> is also suitable for wall<br />
mounting. Use two screws for fixing it to the wall. Drill two holes with a<br />
vertical distance of 83 mm between them and leave the screws protruding 5<br />
mm from the wall. Now place the telephone over the screws and push down<br />
slightly.<br />
Note: There must be no lines or pipes under the area where the holes are<br />
to be drilled.<br />
When the telephone is used on a table, the receiver hanging hook must be<br />
in the flush position as shown in diagram A (factory setting). When<br />
mounting on the wall, the telephone receiver hanging hook is pulled out and<br />
rotated. See diagram B.<br />
2.5 HEARING AID COMPATIBLE<br />
The telephone is compatible with all the most common hearing aids on the<br />
market. However, due to the numerous models available, there is no<br />
guarantee that the telephone will operate perfectly with all hearing aids.<br />
2.6 T−NET SET−UP<br />
Your AUDIOLINE Telephone <strong>48</strong> <strong>Extra</strong> <strong>Plus</strong> supports the most important<br />
DEUTSCHE <strong>TEL</strong>EKOM added value functions (e.g. brokering, call waiting,<br />
three−way conference, etc.). For these, you will need the "FLASH" setting<br />
on your telephone. More information can be found in item 4. Please contact<br />
DEUTSCHE <strong>TEL</strong>EKOM to gain access to these functions (some of which<br />
are subject to charge).<br />
21
22<br />
− INSTALLATION −<br />
2.7 SETTING THE CLOCK<br />
The present time is shown in the display. To set the clock, please proceed<br />
as follows:<br />
1. Press the SET button beneath the display once. The hours figure in the<br />
display starts to flash.<br />
2. You can now enter the present time using the +/− button. To do this,<br />
press the +/− button until you see the present hour in the display.<br />
3. Now press the SET button again and the minutes figure in the display<br />
starts to flash.<br />
4. You can now enter the present number of minutes by repeatedly<br />
pressing the +/− button.<br />
5. Press the SET button. The time is set.
3 OPERATION<br />
− OPERATION −<br />
3.1 USING THE <strong>TEL</strong>EPHONE<br />
The AUDIOLINE Telephone <strong>48</strong> <strong>Extra</strong> <strong>Plus</strong> can be used like any<br />
conventional telephone.<br />
PLEASE FOLLOW THE INSTRUCTIONS:<br />
Lift the receiver and wait until you hear the dialling tone.<br />
Now dial the required telephone number. The number dialled will<br />
be shown in the display. The display shows a telephone number<br />
with a maximum of 16 digits. If the number dialled is longer, only<br />
the last 16 digits will be displayed.<br />
To end the call simply replace the receiver.<br />
3.2 RECEIVING CALLS<br />
Lift the receiver and carry out the conversation.<br />
Replace the receiver to end the call.<br />
3.3 ADJUSTING THE VOLUME OF THE RECEIVER<br />
If the caller’s voice should ever be too quiet or too loud, you can increase or<br />
reduce the volume of the receiver.<br />
Turn the � knob (beneath receiver) during the call.<br />
Warning: Setting the volume to its loudest volume may cause ear damage.<br />
Therefore, reset the volume to �0" after each call.<br />
23
24<br />
− OPERATION −<br />
3.4 REDIAL<br />
If a connection that you have dialled is engaged or you were unable to get<br />
through to anybody, replace the receiver. The last number dialled remains<br />
stored in the telephone automatically.<br />
To use the redial facility, proceed as follows:<br />
Lift the receiver and press the redial button �. The stored redial number<br />
will be dialled again.<br />
3.5 CALL DURATION DISPLAY<br />
After dialling the telephone number, the current call duration in minutes and<br />
seconds will be shown in the display after a few seconds.<br />
You can also use the internal clock as a stopwatch. To do this, press the �<br />
button during a call or even with the receiver on the hook. The time<br />
measurement can be stopped using the same button �. The measured<br />
time will still be shown in the display for a few seconds. The display then<br />
jumps back to showing the present time.<br />
3.6 ADJUSTABLE RINGING TONE<br />
By means of the "KLINGEL" slide switch on the right−hand side of your<br />
telephone you can choose the settings "LEISE" (�), or "LAUT" to match the<br />
volume of the ringing tone to your requirements. If at any time you do not<br />
want to be disturbed, use the "AUS" setting.<br />
3.7 TONE ADJUSTMENT<br />
Use the sliding switch � on the right−hand side of the telephone to adjust<br />
the tone.<br />
Note: The tone adjustment function will not be affective when the reveiver<br />
volume has been set to minimum level.
− OPERATION −<br />
3.8 STORING DIRECT AND SPEED DIAL NUMBERS<br />
You can store a telephone number for direct dialling on each of the buttons<br />
M1, M2 and M3 with your AUDIOLINE Telephone <strong>48</strong> <strong>Extra</strong> <strong>Plus</strong>. The direct<br />
dial button M3 is coloured red and is thus suitable for use as an emergency<br />
call button. An additional ten numbers can be stored as speed dial<br />
numbers.<br />
PLEASE FOLLOW THE INSTRUCTIONS:<br />
Lift the receiver.<br />
Press the store button �.<br />
Now enter the required telephone number using the number pad.<br />
The maximum length is 16 digits.<br />
Press the store button � again.<br />
Now press the required direct dial button M1, M2 or M3 or a button<br />
on the number pad between 1 to 9 or 0 to save the telephone<br />
number as a speed dial number.<br />
Replace the receiver.<br />
Storage locations already used are automatically overwritten when you<br />
store a new telephone number in this location.<br />
The numbers stored can be recorded on the index underneath the receiver.<br />
Press down firmly on the cover, slide it downwards and remove the note.<br />
Write down the phone number. Replace the note and cover.<br />
3.8.1 DIALLING USING THE DIRECT DIAL BUTTONS<br />
PLEASE FOLLOW THE INSTRUCTIONS:<br />
Lift the receiver and press the required direct dial button M1, M2 or<br />
M3.<br />
3.8.2 DIALLING USING THE SPEED DIAL BUTTONS<br />
PLEASE FOLLOW THE INSTRUCTIONS:<br />
Lift the receiver and press the speed dial button � and the required<br />
storage location from 1 to 9 or 0.<br />
25
26<br />
− THE �R" SIGNAL BUTTON −<br />
4 THE "R" SIGNAL BUTTON<br />
You can use the "R" signal button on your telephone on private exchanges<br />
and when using DEUTSCHE <strong>TEL</strong>EKOM’s T−Net functions.<br />
4.1 "R" SIGNAL BUTTON ON PRIVATE EXCHANGES<br />
If you have connected your telephone to a private exchange, you can use<br />
all the facilities such as call transfer, automatic recall, etc. The "R" signal<br />
button gives you access to these facilities. The FLASH time "100ms" will be<br />
required on a private exchange.<br />
For this purpose, set the "FLASH" switch, located on the right side of the<br />
telephone, to the "100ms" setting.<br />
You can find out from the dealer from whom the equipment was purchased<br />
whether your telephone will work on your private exchange without any<br />
problems and what further facilities you will receive from this.<br />
4.2 "R" SIGNAL BUTTON AND THE DEUTSCHE <strong>TEL</strong>EKOM T−NET<br />
FUNCTIONS<br />
Your AUDIOLINE Telephone <strong>48</strong> <strong>Extra</strong> <strong>Plus</strong> supports the most important<br />
DEUTSCHE <strong>TEL</strong>EKOM added value functions (e.g. brokering, call waiting,<br />
three−way conference, etc.). The T−NET works using the "FLASH 300ms"<br />
setting.<br />
For this purpose, set the "FLASH" switch, located on the right side of the<br />
telephone, to the "300ms" setting.<br />
Please contact DEUTSCHE <strong>TEL</strong>EKOM to gain access to the T−NET<br />
functions (some of which are subject to charge).
− THE �R" SIGNAL BUTTON −<br />
4.3 DIALLING AND STORING <strong>TEL</strong>EPHONE NUMBERS WHEN<br />
USING ON PRIVATE EXCHANGES<br />
Note!<br />
The pause function after an outside line code (usually 0 or 9) described in<br />
this chapter is only required on older private exchanges.<br />
Some private exchanges use a short pause between the code for the<br />
outside line (usually 0 or 9) and the dialling tone. When dialling manually<br />
and when dialling using the direct dial and speed dial buttons, this pause<br />
can be entered along with the number so that the following digits are not<br />
dialled too quickly.<br />
Entering the pause when dialling manually<br />
Press the � button once between the number for the outside line and the<br />
actual telephone number. The pause will be shown by a "P" in the display.<br />
After connecting to an outside line your telephone will wait for three<br />
seconds before dialling the actual telephone number.<br />
Storing the pause<br />
When storing a number, press the � button after the number for the<br />
outside line and before the actual telephone number. The pause will be<br />
shown by a "P" in the display. When dialling using the direct dial or speed<br />
dial buttons a pause of three seconds will automatically be inserted after the<br />
number for the outside line.<br />
27
28<br />
− IMPORTANT INFORMATION −<br />
5 IMPORTANT INFORMATION<br />
5.1 FAULT FINDING<br />
You cannot make calls with your phone:<br />
Remove all devices and connect only the telephone directly to the<br />
telephone socket.<br />
The fault has not been cleared:<br />
The fault may be due to a defect connection cable or telephone. Please<br />
replace.<br />
The fault has not been cleared:<br />
The fault lies in the power supply cable. Please call telephone network<br />
provider’s service department.<br />
In the case of technical problems you can also contact our Service<br />
Department on the Hotline number 0180 5 00 13 88 (cost via Telekom at<br />
time of going to print: 12 ct/min)..<br />
5.2 REPLACING THE <strong>TEL</strong>EPHONE CABLE<br />
If you have to replace your telephone cable, you can locate the appropriate<br />
cable at your dealer’s with the help of the diagram below.<br />
F−Codierung − IMPORT Standard<br />
TAE−F Rj11 6/x<br />
1<br />
1<br />
4 3 2<br />
2<br />
5 2<br />
3<br />
4<br />
3<br />
4 1<br />
2 34<br />
5 6<br />
6 1 5<br />
5<br />
6<br />
6
− GUARANTEE −<br />
5.3 GUARANTEE<br />
AUDIOLINE equipment is produced and tested according to the latest<br />
production methods. The implementation of carefully chosen materials and<br />
highly developed technologies ensure trouble−free functioning and a long<br />
service life. The terms of guarantee do not apply where the cause of<br />
equipment malfunction is the fault of the telephone network operator or any<br />
interposed private branch extension system. The terms of guarantee do not<br />
apply to the batteries used in the products. The period of guarantee is 24<br />
months from the date of purchase.<br />
All deficiencies resulting from material or production faults which occur<br />
during the period of guarantee will be eliminated free of charge. Rights to<br />
claims under the terms of guarantee are annulled following intervention by<br />
the purchaser or third parties. Damage caused as a result of improper<br />
handling or operation, incorrect positioning or storing, improper connection<br />
or installation, Acts of God or other external influence are not covered by<br />
the terms of guarantee. In the case of complaints, we reserve the right to<br />
repair or replace defect parts or provide a replacement device.<br />
Replacement parts or devices become our property. Rights to compensation<br />
in the case of damage are excluded where there is no evidence of intent or<br />
gross negligence by the manufacturer.<br />
If your device shows signs of defect during the period of guarantee, please<br />
return it to the sales outlet in which you purchased the AUDIOLINE device<br />
together with the purchase receipt. All rights to claims under the terms of<br />
guarantee in accordance with this agreement must be asserted exclusively<br />
with regard to your sales outlet. Two years after the purchase and transfer<br />
of our products, claims under the terms of guarantee can no longer be<br />
asserted.<br />
29
30<br />
− GUARANTEE −<br />
5.4 DECLARATION OF CONFORMITY<br />
This device fulfils the requirements stipulated in the EU directive:<br />
1999/5/EU directive on radio equipment and telecommunications terminal<br />
equipment and the mutual recognition of their conformity. Conformity with<br />
the above mentioned directive is confirmed by the CE symbol on the<br />
device.<br />
To view the complete Declaration of Conformity, please refer to the free<br />
download available on our web site www.audioline.de.
− GUARANTEE −<br />
6 IMPORTANT NOTES ON THE GUARANTEE<br />
The period of guarantee for the AUDIOLINE product begins on the date of<br />
purchase. Rights to claims under the terms of guarantee relate to<br />
deficiencies resulting from material or production faults. Rights to claims<br />
under the terms of guarantee are annulled following intervention by the<br />
purchaser or third parties. Damage caused as a result of improper handling<br />
or operation, normal wear and tear, incorrect positioning or storing,<br />
improper connection or installation, Acts of God or other external influence<br />
are not covered by the terms of guarantee.<br />
CLAIMS UNDER THE TERMS OF GUARANTEE MAY ONLY BE<br />
ASSERTED TO THE RETAILER WHERE THE EQUIPMENT WAS<br />
PURCHASED, WHEREBY THE PURCHASE RECEIPT MUST ALSO BE<br />
SUBMITTED.<br />
TO PREVENT UNNECESSARY LONG DELAYS, PLEASE DO NOT<br />
SEND EQUIPMENT UNDER COMPLAINT TO OUR OFFICE ADDRESS.<br />
IN THE CASE OF QUESTIONS CONCERNING OPERATION OR THE<br />
TERMS OF GUARANTEE, PLEASE REFER TO THE OPERATING<br />
MANUAL OR CONTACT OUR HOTLINE:<br />
0180 500 13 88 (Telekom cost at time of going to print: 12 ct/min)<br />
AUDIOLINE GmbH<br />
Neuss<br />
Service Hotline 0180 500 13 88<br />
(Telekom cost at time of going to print: 12 ct/min)<br />
Internet: www.audioline.de − E−mail: info@audioline.de<br />
31
− WICHTIGE GARANTIEHINWEISE −<br />
Die Garantiezeit für Ihr AUDIOLINE − Produkt beginnt mit dem Kaufdatum.<br />
Ein Garantieanspruch besteht bei Mängeln, die auf Material− oder<br />
Herstellungsfehler zurückzuführen sind. Der Garantieanspruch erlischt bei<br />
Eingriffen durch den Käufer oder durch Dritte. Schäden, die durch<br />
unsachgemäße Behandlung oder Bedienung, natürliche Abnutzung, durch<br />
falsches Aufstellen oder Aufbewahren, durch unsachgemäßen Anschluss<br />
oder Installation sowie durch höhere Gewalt oder sonstige äußere Einflüsse<br />
entstehen, fallen nicht unter die Garantieleistung.<br />
BITTE WENDEN SIE SICH IM GARANTIEFALL AUSSCHLIESSLICH AN DEN<br />
HÄNDLER, BEI DEM SIE DAS GERÄT GEKAUFT HABEN UND VERGESSEN SIE<br />
NICHT, DEN KAUFBELEG VORZULEGEN.<br />
UM UNNÖTIG LANGE WARTEZEITEN ZU VERMEIDEN, SENDEN SIE<br />
REKLAMATIONSGERÄTE BITTE NICHT AN UNSERE BÜROADRESSE.<br />
BEI FRAGEN ZUR BEDIENUNG UND GARANTIELEISTUNG LESEN SIE BITTE DIE<br />
BEDIENUNGSANLEITUNG ODER WENDEN SIE SICH AN UNSERE HOTLINE:<br />
0180 500 13 88 (Kosten Telekom bei Drucklegung: 12ct/min)<br />
AUDIOLINE GmbH<br />
Neuss<br />
Service Hotline 0180 500 13 88<br />
(Kosten Telekom bei Drucklegung: 12ct/min)<br />
Internet: www.audioline.de − E−mail: info@audioline.de<br />
Version 1.4 − 10.10.2005