
Create successful ePaper yourself
Turn your PDF publications into a flip-book with our unique Google optimized e-Paper software.
Contents<br />
1 Introduction..................................................................................................................................................................... 4<br />
2 Scope of delivery ............................................................................................................................................................ 5<br />
3 Machine specifications <strong>COBRA</strong> CLASSIC ................................................................................................................... 6<br />
3.1 Important components ...................................................................................................................................................... 6<br />
3.2 Technical data .................................................................................................................................................................. 7<br />
3.3 Safety and machine protection facilities............................................................................................................................ 7<br />
4 Proper use ....................................................................................................................................................................... 7<br />
5 Assembly of the machine............................................................................................................................................... 8<br />
5.1 Installing the guide tube ................................................................................................................................................... 8<br />
5.2 Installing the motor ........................................................................................................................................................... 8<br />
6 Disassembling for transport ......................................................................................................................................... 9<br />
6.1 Removing the guide tube ................................................................................................................................................ 9<br />
6.2 Removing the motor.......................................................................................................................................................... 10<br />
7<br />
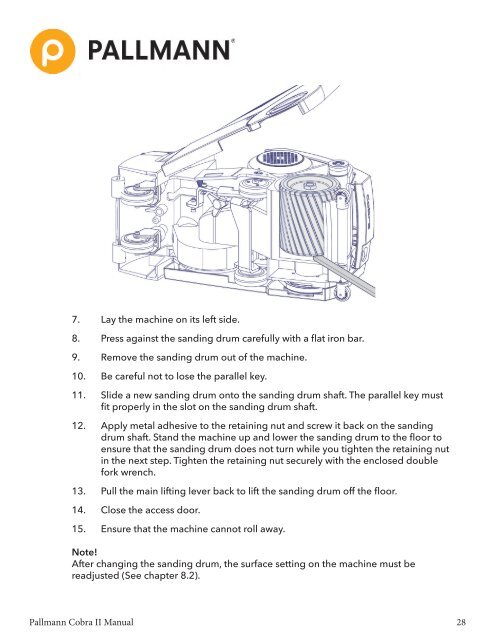
7. Lay the machine on its left side.<br />
Operating the <strong>COBRA</strong> CLASSIC .................................................................................................................................. 11<br />
7.1 Protective 8. clothing Press and equipment against .................................................................................................................................. the sanding drum carefully with a flat iron bar.<br />
11<br />
7.2 Fitting the dust bag ........................................................................................................................................................ 11<br />
7.3 Safety 9. instructions Remove regarding dust the .................................................................................................................................... sanding drum out of the machine.<br />
12<br />
7.4 Disposing of sanding dust ............................................................................................................................................... 12<br />
7.5 Replacing 10. the sanding Be careful belt .............................................................................................................................................. not to lose the parallel key.<br />
13<br />
7.6 Adjusting the sanding pressure ....................................................................................................................................... 14<br />
7.7 Safety 11. instructions Slide for electric a new cable sanding connectors drum ...................................................................................................... onto the sanding drum shaft. The parallel key 14 must<br />
7.8 Connecting the <strong>COBRA</strong> fit properly CLASSIC in to the mains slot power on the .................................................................................................. sanding drum shaft.<br />
15<br />
7.9 Remarks about sanding parquet and plank floors .......................................................................................................... 16<br />
7.10 <strong>Sanding</strong> 12. with the Apply <strong>COBRA</strong> CLASSIC metal adhesive ............................................................................................................................... to the retaining nut and screw it back on the sanding 19<br />
drum shaft. Stand the machine up and lower the sanding drum to the floor to<br />
8 Maintenance ................................................................................................................................................................... 24<br />
ensure that the sanding drum does not turn while you tighten the retaining nut<br />
8.1 Changing the sanding<br />
in the<br />
drum<br />
next<br />
............................................................................................................................................<br />
step. Tighten the retaining nut securely with the enclosed double<br />
24<br />
8.2 Adjusting the running wheels .......................................................................................................................................... 26<br />
8.3 Adjusting the castor<br />
fork<br />
wheels<br />
wrench.<br />
............................................................................................................................................ 27<br />
8.4 Adjusting the tension roller ............................................................................................................................................... 28<br />
13. Pull the main lifting lever back to lift the sanding drum off the floor.<br />
8.5 Changing the belt.............................................................................................................................................................. 29<br />
8.6 Checking dust extraction ................................................................................................................................................. 30<br />
14. Close the access door.<br />
8.7 Switching off and storing the machine ............................................................................................................................ 30<br />
9<br />
15. Ensure that the machine cannot roll away.<br />
Declaration of conformity .............................................................................................................................................. 31<br />
Note!<br />
10 Warranty........................................................................................................................................................................... After changing the sanding drum, the surface setting on the machine must be 32<br />
readjusted (See chapter 8.2).<br />
Pallmann Cobra <strong>II</strong> <strong>Manual</strong> 28