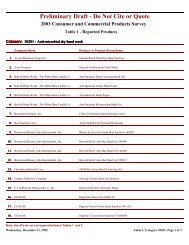
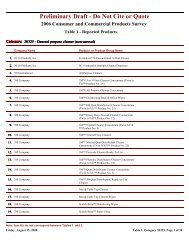
- Page 1 and 2: ARB Approved Installation, Operatio
- Page 3 and 4: To confirm Veeder-Root TLS or ISD t
- Page 5 and 6: About VST VST EVR Total Balance Sys
- Page 7: VST Contractor Requirements VST EVR
- Page 11 and 12: VST EVR Total Balance System Soluti
- Page 13 and 14: VST EVR Total Balance System Soluti
- Page 15 and 16: Figure 2: Model VST‐EVR‐NB Nozz
- Page 17 and 18: Daily Inspections Component Procedu
- Page 19 and 20: VR‐203 Daily Inspection and Testi
- Page 21 and 22: Preventative Maintenance Checklist
- Page 23 and 24: ISD Alarm Troubleshooting Summary V
- Page 25 and 26: Drivve‐Offs s and OOther Custoome
- Page 27 and 28: Function Testing Description VST EV
- Page 29 and 30: VST Installation Procedure for Phas
- Page 31 and 32: VST Installation Procedure for Phas
- Page 33 and 34: 6. Check the nozzle shut-off action
- Page 35 and 36: VST Installation Procedure for Phas
- Page 37 and 38: Table of Contents VST EVR Total Bal
- Page 39 and 40: Table of Figures VST EVR Total Bala
- Page 41 and 42: About VST VST EVR Total Balance Sys
- Page 43 and 44: Warranty Cards Figure 1: VST Regist
- Page 45 and 46: VST Contractor Requirements VST EVR
- Page 47 and 48: Safetty Icons ELECTRIC CITY A poten
- Page 49 and 50: 1 ECS Membrane Processor Overview 1
- Page 51 and 52: 1.3 Processor Dimensions and Weight
- Page 53 and 54: Figure 3: HHow the Processo or fits
- Page 55 and 56: Figure 5: ECCS Vent Riser Co onfigu
- Page 57 and 58: Figure 7: Prrocessor Isomet tric Dr
- Page 59 and 60:
3 Sitte Requirements Be sure e to r
- Page 61 and 62:
Snapshot of Site Requirements, cont
- Page 63 and 64:
4.3 Ground‐Mount Location VST EVR
- Page 65 and 66:
4.4 Setting the Concrete Pad VST EV
- Page 67 and 68:
Figuure 9: Concrete Mounting Pad DD
- Page 69 and 70:
5 RooofTop Installaation 5.1 Rooo
- Page 71 and 72:
6 Canopy Top T Insttallationn 6.1 C
- Page 73 and 74:
7 Vaapor Pip ping 7.1 Vaapor Piping
- Page 75 and 76:
7.4 Underground Vapor Piping Instru
- Page 77 and 78:
Figure 12: PProcessor Conne ections
- Page 79 and 80:
Figure 14: TTypical GDF Vapor Pipin
- Page 81 and 82:
8 Air Outlet Connection VST EVR Tot
- Page 83 and 84:
Figure 16: EECS Vent Riser Configur
- Page 85 and 86:
8.1 Underground Piping Connection V
- Page 87 and 88:
VST EVR Total Balance System Soluti
- Page 89 and 90:
9.4 Reference Information for Proce
- Page 91 and 92:
9.8 Power for the Motor Starter Rel
- Page 93 and 94:
10.3 Wiring the Processor • Size
- Page 95 and 96:
Figure 18: SSingle‐Phase Wi iring
- Page 97 and 98:
Figure 20: VVacuum Pump: Single‐P
- Page 99 and 100:
Figure 22: PProcessor Three e‐Pha
- Page 101 and 102:
Figure 24: VVacuum Pump: Three‐Ph
- Page 103 and 104:
10.4 Auxiliary Output Relay • Run
- Page 105 and 106:
Figure 27: PProcessor Single e‐Ph
- Page 107 and 108:
10.5 HC Sensor / HC Sentry • Usin
- Page 109 and 110:
Figure 31: HHC Sensor and HC H Sent
- Page 111 and 112:
Figure 33: HHC Sentry RS‐48 85 Ca
- Page 113 and 114:
11 PostInstallation Checklist ASC
- Page 115 and 116:
Section #15 Operation, Maintenance,
- Page 117 and 118:
VST EVR Total Balance System Soluti
- Page 119 and 120:
About VST VST EVR Total Balance Sys
- Page 121 and 122:
Warranty Cards Figure 1: VST Regist
- Page 123 and 124:
VST Contractor Requirements VST EVR
- Page 125 and 126:
Safetty Icons ELECTRIC CITY A poten
- Page 127 and 128:
1 ECS Membrane Processor Overview 1
- Page 129 and 130:
1.3 Processor Dimensions and Weight
- Page 131 and 132:
1.5 Processor Auxiliary Components
- Page 133 and 134:
Figure 4: ECCS Process Contr rol Di
- Page 135 and 136:
Figure 6: Prrocessor Isomet tric Dr
- Page 137 and 138:
2 Processor Operation VST EVR Total
- Page 139 and 140:
2.3 Manual Control of the Processor
- Page 141 and 142:
VST EVR Total Balance System Soluti
- Page 143 and 144:
2.5.1 TLS‐350 (ISD): Alarm Troubl
- Page 145 and 146:
Figure 10: EECS Piping Confi figura
- Page 147 and 148:
3.3 Electrical Connection Test •
- Page 149 and 150:
3.4.2 Processor Leak Test Steps •
- Page 151 and 152:
Figure 13: VVacuum Pump: Single‐P
- Page 153 and 154:
Figure 15: Blower: Single‐Phase M
- Page 155 and 156:
3.6 Heat‐Trace Temperature Test V
- Page 157 and 158:
3.8 Preparing th he Processor for F
- Page 159 and 160:
ECS PROCESSOR COMPONENTS Passed Fai
- Page 161 and 162:
4.1 Prrocessor Sh hut‐Down • Th
- Page 163 and 164:
Annual System Compliance Testing St
- Page 165 and 166:
Preventative Maintenance Checklist
- Page 167 and 168:
CCompoonent Replace R ement 6 Blowe
- Page 169 and 170:
7 Vacuuum Pum mp Replaacementt 77.1
- Page 171 and 172:
Figure 21: Vacuum pump outlet tubin
- Page 173 and 174:
8 Membbrane Replacemment 88.1 Safet
- Page 175 and 176:
8.3 Installing the New Membrane 1.
- Page 177 and 178:
4. Un‐bolt the vacuum pump ffrom
- Page 179 and 180:
10.3 Overview for Installing the Ne
- Page 181 and 182:
10.4.1 End Seal Kit Installation In
- Page 183 and 184:
Figure 38: Prepare the new heat tra
- Page 185 and 186:
Figure 40: Electrical junction box
- Page 187 and 188:
Figure 42: Electrical junction box
- Page 189 and 190:
Figure 44: Installed Electrical Jun
- Page 191 and 192:
VST EVR Total Balance System Soluti
- Page 193 and 194:
VST EVR Total Balance System Soluti
- Page 195 and 196:
12 Forms • The following pages co
- Page 197 and 198:
12.2 Preventative Maintenance Check
- Page 199 and 200:
Notice Veeder-Root makes no warrant
- Page 201 and 202:
Figures iv Table of Contents 5 Oper
- Page 203 and 204:
1 Introduction In-Station Diagnosti
- Page 205 and 206:
1 Introduction Safety Precautions S
- Page 207 and 208:
2 Installation This section discuss
- Page 209 and 210:
OFF 2 Installation Smart Sensor Int
- Page 211 and 212:
3 Setup Introduction This section d
- Page 213 and 214:
3 Setup EVR/ISD Setup EVR/ISD Setup
- Page 215 and 216:
3 Setup EVR/ISD Setup Figure 16-8 d
- Page 217 and 218:
M 3 Setup Output Relay Setup - VST
- Page 219 and 220:
3 Setup Alarm Setup Alarm Setup INT
- Page 221 and 222:
3 Setup Alarm Setup Figure 16-15 sh
- Page 223 and 224:
3 Setup Alarm Setup Figure 16-17 sh
- Page 225 and 226:
4 ISD Operability Test Procedure Va
- Page 227 and 228:
4 ISD Operability Test Procedure Va
- Page 229 and 230:
4 ISD Operability Test Procedure Va
- Page 231 and 232:
4 ISD Operability Test Procedure Va
- Page 233 and 234:
4 ISD Operability Test Procedure Va
- Page 235 and 236:
Alarms 5 Operation OVERVIEW OF TLS
- Page 237 and 238:
5 Operation Alarms MMM DD, YYYY HH:
- Page 239 and 240:
5 Operation Alarms Displayed Messag
- Page 241 and 242:
5 Operation Reports Reports There a
- Page 243 and 244:
5 Operation Reports Figure 16-29 sh
- Page 245 and 246:
5 Operation Reports Figure 16-31 sh
- Page 247 and 248:
5 Operation Viewing ISD Reports via
- Page 249 and 250:
5 Operation Viewing ISD Reports via
- Page 251 and 252:
5 Operation Viewing ISD Reports via
- Page 253 and 254:
5 Operation Viewing ISD Reports via
- Page 255 and 256:
6 Maintenance TLS Console The TLS c
- Page 257 and 258:
7 Diagnostic Menus ISD Diagnostic M
- Page 259 and 260:
M 7 Diagnostic Menus VST ECS Membra
- Page 261 and 262:
Appendix A: Site EVR/ISD Equipment
- Page 263 and 264:
Appendix A: Site EVR/ISD Equipment
- Page 265 and 266:
Appendix A: Site EVR/ISD Equipment
- Page 267 and 268:
Appendix A: Site EVR/ISD Equipment
- Page 269 and 270:
Form 2 Data Form for Vapor Pressure
- Page 271 and 272:
Site Shutdown Test Data Form DATE O
- Page 273 and 274:
Pressure Sensor Installation Guide
- Page 275 and 276:
Figures Tables iii Table of Content
- Page 277 and 278:
Pressure Sensor Installation Before
- Page 279 and 280:
OFF Pressure Sensor Installation In
- Page 281 and 282:
Pressure Sensor Installation Instal
- Page 283 and 284:
Pressure Sensor Installation Instal
- Page 285 and 286:
Installation Guide ISD Balance Vapo
- Page 287 and 288:
Table of Contents ISD Vapor Flow Me
- Page 289 and 290:
ISD Vapor Flow Meter Installation S
- Page 291 and 292:
OFF ISD Vapor Flow Meter Installati
- Page 293 and 294:
OFF ISD Vapor Flow Meter Installati
- Page 295 and 296:
ISD Vapor Flow Meter Installation I
- Page 297 and 298:
ISD Vapor Flow Meter Installation S