Puritan Bennett™ 840 Ventilator User's Pocket Guide - Covidien
Puritan Bennett™ 840 Ventilator User's Pocket Guide - Covidien
Puritan Bennett™ 840 Ventilator User's Pocket Guide - Covidien

You also want an ePaper? Increase the reach of your titles
YUMPU automatically turns print PDFs into web optimized ePapers that Google loves.
<strong>Puritan</strong> Bennett <br />
<strong>840</strong> <strong>Ventilator</strong><br />
User’s <strong>Pocket</strong> <strong>Guide</strong><br />
<strong>Puritan</strong> Bennett <strong>840</strong> <strong>Ventilator</strong> <strong>Pocket</strong> <strong>Guide</strong><br />
i
The <strong>Puritan</strong> Bennett <strong>840</strong> <strong>Ventilator</strong> System is manufactured in accordance<br />
with <strong>Covidien</strong> proprietary information, covered by one or more of the following<br />
U.S. Patents and foreign equivalents: 4,954,799; 5,161,525; 5,271,389; 5,301,921;<br />
5,319,540; 5,339,807; 5,368,019; and 5,390,666. <strong>840</strong>, Flow-by, DualView, SandBox,<br />
SmartAlert and Bi-Level are trademarks of <strong>Covidien</strong> <strong>Puritan</strong> Bennett.<br />
The information contained in this manual is the sole property of <strong>Covidien</strong> and<br />
may not be duplicated without permission. This manual may be revised or<br />
replaced by <strong>Covidien</strong> at any time and without notice. While the information set<br />
forth herein is believed to be accurate, it is not a substitute for the exercise of<br />
professional judgment.<br />
The ventilator should be operated and serviced only by trained professionals.<br />
<strong>Covidien</strong> acknowledges sole responsibility with respect to the ventilator, and its use,<br />
as stated in the limited warranty provided.<br />
Nothing in this publication shall limit or restrict in any way <strong>Covidien</strong> the<br />
right to revise or otherwise change or modify the equipment (including its<br />
software) described herein, without notice. In the absence of an express, written<br />
agreement to the contrary, <strong>Covidien</strong> has no obligation to furnish any such<br />
revisions, changes or modifications to the owner or user of the equipment<br />
(including its software) described herein.<br />
ii<br />
<strong>Puritan</strong> Bennett <strong>840</strong> <strong>Ventilator</strong> <strong>Pocket</strong> <strong>Guide</strong>
TaBle of conTenTs<br />
Introduction .................................................1<br />
The <strong>Puritan</strong> Bennett <strong>840</strong> <strong>Ventilator</strong> ............................2<br />
Connections .................................................4<br />
Power ....................................................4<br />
Air and oxygen supplies .......................................6<br />
Patient circuit ................................................8<br />
Patient setup ................................................12<br />
New patient setup .........................................13<br />
Apnea settings ............................................14<br />
Calibrating the oxygen sensor ...............................14<br />
Once patient setup is complete ..............................14<br />
Inspiratory pause ..........................................15<br />
Expiratory pause ..........................................15<br />
Alarm settings ...............................................21<br />
Main setting changes .........................................22<br />
Mode, breath type and batch (multiple) changes .................23<br />
Previous setup ............................................23<br />
Humidification type, humidifier volume, O 2 sensor<br />
enable/disable, and disconnect sensitivity (D SENS ) ...........24<br />
Constant during rate change ................................25<br />
Alarm handling .............................................26<br />
Alarm silence .............................................27<br />
Alarm reset ...............................................27<br />
Alarm log ................................................28<br />
Alarm messages ...........................................29<br />
Graphics. . . . . . . . . . . . . . . . . . . . . . . . . . . . . . . . . . . . . . . . . . . . . . . . . . . .37<br />
Display ..................................................37<br />
Color ....................................................37<br />
Freezing .................................................39<br />
Plot setup ................................................39<br />
Once graphics are displayed ................................40<br />
The ? key ...................................................41<br />
Bi-Level ....................................................42<br />
Patient setup. . . . . . . . . . . . . . . . . . . . . . . . . . . . . . . . . . . . . . . . . . . . . .42<br />
Constant during rate change ................................43<br />
Using pressure support with Bi-Level ........................44<br />
Manual inspiration in Bi-Level mode ........................45<br />
Tube compensation ..........................................46<br />
Patient setup. . . . . . . . . . . . . . . . . . . . . . . . . . . . . . . . . . . . . . . . . . . . . .46<br />
<strong>Ventilator</strong> self-tests ..........................................48<br />
Running SST .............................................48<br />
Safety modes ................................................53<br />
Preventive maintenance ......................................55<br />
<strong>Puritan</strong> Bennett <strong>840</strong> <strong>Ventilator</strong> <strong>Pocket</strong> <strong>Guide</strong><br />
iii
fiGUres<br />
Figure 1. <strong>Puritan</strong> Bennett <strong>840</strong> <strong>Ventilator</strong> components .........3<br />
Figure 2. Connecting the ventilator power cord ................4<br />
Figure 3. Connecting the air and oxygen supplies ..............6<br />
Figure 4. Connecting the patient circuit ......................8<br />
Figure 5. Installing the expiratory filter and<br />
collector vial ......................................9<br />
Figure 6. Using the collector vial with or without<br />
drain bag ........................................10<br />
Figure 7. <strong>Ventilator</strong> startup screen ..........................12<br />
Figure 8. <strong>Puritan</strong> Bennett <strong>840</strong> <strong>Ventilator</strong><br />
graphic user interface (GUI) .......................20<br />
Figure 9. Alarm setup . . . . . . . . . . . . . . . . . . . . . . . . . . . . . . . . . . . . .21<br />
Figure 10. Constant during rate change<br />
(inspiratory time selected) .........................25<br />
Figure 11. Alarm indicators .................................26<br />
Figure 12. Alarm log .......................................29<br />
Figure 13. Alarm message format ............................30<br />
Figure 14. Pressure-volume loop .............................38<br />
Figure 15. Bi-Level breath timing bar .........................43<br />
Figure 16. Bi-Level with pressure support .....................45<br />
TaBles<br />
Table 1. Inspiratory pause maneuver displays ................16<br />
Table 2. Alarm messages ..................................31<br />
Table 3. Ideal body weight (IBW) and tube I.D. ..............47<br />
Table 4. Individual test results in SST .......................50<br />
Table 5. Overall SST results ...............................51<br />
Table 6. Maintenance summary. . . . . . . . . . . . . . . . . . . . . . . . . . . .55<br />
iv<br />
<strong>Puritan</strong> Bennett <strong>840</strong> <strong>Ventilator</strong> <strong>Pocket</strong> <strong>Guide</strong>
inTrodUcTion<br />
This pocket guide gives you a quick overview of how to set<br />
up and use the <strong>Puritan</strong> Bennett <strong>840</strong> <strong>Ventilator</strong> System.<br />
As you read through this pocket guide, this symbol:<br />
➪ asks you to take an action<br />
This pocket guide is intended to supplement (not replace)<br />
the <strong>Puritan</strong> Bennett <strong>840</strong> <strong>Ventilator</strong> Operator’s and<br />
Technical Reference Manual, which should always be<br />
available while using the ventilator.<br />
Different versions of the <strong>Puritan</strong> Bennett <strong>840</strong> <strong>Ventilator</strong><br />
can have minor variations in labeling (e.g., keyboard overlays<br />
and off-screen alarm status indicators).<br />
For more detailed information on any of the topics covered<br />
in this pocket guide, please see the <strong>Puritan</strong> Bennett <strong>840</strong><br />
<strong>Ventilator</strong> Operator’s and Technical Reference Manual.<br />
(Also please see the <strong>Puritan</strong> Bennett <strong>840</strong> <strong>Ventilator</strong><br />
Service Manual.)<br />
<strong>Puritan</strong> Bennett <strong>840</strong> <strong>Ventilator</strong> <strong>Pocket</strong> <strong>Guide</strong><br />
1
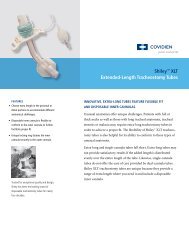
The PUriTan BenneTT <strong>840</strong> VenTilaTor<br />
The <strong>Puritan</strong> Bennett <strong>840</strong> <strong>Ventilator</strong> includes a breath delivery<br />
unit (BDU) that controls ventilation, and a graphic<br />
user interface (GUI) that monitors and displays ventilator<br />
and monitored data (see Figure 1). The ventilator supplies<br />
mandatory (pressure or volume controlled) or spontaneous<br />
breaths (inspiratory flows of up to 200 L/min, with or without<br />
pressure support) with a preset oxygen concentration. Breaths<br />
can be pressure- or flow-triggered (using Flow-by).<br />
Touch screens display monitored data separately from ventilator<br />
settings for easy assessment of your patient’s condition.<br />
This allows you to preview settings before applying them<br />
to your patient, and the Alarm System helps you to quickly<br />
determine the urgency and root cause of alarm conditions.<br />
The optional 806 Compressor provides compressed air to the<br />
BDU, and can be used in place of wall or cylinder air. The<br />
standard 802 Backup Power Source (BPS) provides DC power<br />
to the BDU and GUI in the event that AC power is lost.<br />
<strong>Puritan</strong> Bennett <strong>840</strong> <strong>Ventilator</strong> mounting options include a<br />
cart, pole mount or wall mount.<br />
2<br />
<strong>Puritan</strong> Bennett <strong>840</strong> <strong>Ventilator</strong> <strong>Pocket</strong> <strong>Guide</strong>
Graphic User<br />
Interface (GUI)<br />
Compressor<br />
Cart<br />
Breath Delivery<br />
Unit (BDU)<br />
802 Backup Power<br />
Source (BPS)<br />
fiGUre 1.<br />
<strong>Puritan</strong> Bennett <strong>840</strong> <strong>Ventilator</strong> components<br />
<strong>Puritan</strong> Bennett <strong>840</strong> <strong>Ventilator</strong> <strong>Pocket</strong> <strong>Guide</strong><br />
3
4<br />
connecTions<br />
This section tells you how to connect the <strong>Puritan</strong> Bennett<br />
<strong>840</strong> <strong>Ventilator</strong> to AC power, air and oxygen supplies and<br />
the patient circuit.<br />
Power<br />
➪ Plug the ventilator power cord to AC power<br />
(see Figure 2). The power cord retainer protects against<br />
accidental disconnection, and must always be in place<br />
during operation.<br />
WarninG<br />
To avoid electrical shock hazard, connect the ventilator<br />
power cord into a grounded AC power outlet.<br />
Power cord<br />
To AC power<br />
fiGUre 2.<br />
Connecting the ventilator power cord<br />
Power cord retainer<br />
<strong>Puritan</strong> Bennett <strong>840</strong> <strong>Ventilator</strong> <strong>Pocket</strong> <strong>Guide</strong>
Normally, the <strong>Puritan</strong> Bennett <strong>840</strong> <strong>Ventilator</strong> System is<br />
mains-powered. The mandatory 802 Backup Power Source<br />
(BPS) operates the ventilator when AC power drops below a<br />
minimum level. The ventilator recharges the BPS during AC<br />
power operation.<br />
noTe:<br />
The BPS is designed for short-term use only, and is not<br />
intended as a primary alternative power source. The BPS<br />
is intended to power the BDU and GUI only. In case of<br />
AC power loss, no power is available for the compressor<br />
or humidifier.<br />
If you turn on the ventilator after it has been unplugged for<br />
an extended period, the LOW BATTERY alarm may become<br />
active. If so, recharge the BPS by leaving it connected to<br />
an operating ventilator for up to eight hours. If the LOW<br />
BATTERY alarm is still active or if the INOPERATIVE<br />
BATTERY alarm is active, the BPS battery must be replaced<br />
by a qualified service technician.<br />
<strong>Puritan</strong> Bennett <strong>840</strong> <strong>Ventilator</strong> <strong>Pocket</strong> <strong>Guide</strong><br />
5
6<br />
air and oxyGen sUPPlies<br />
➪ Connect air and oxygen supplies to the ventilator (see<br />
Figure 3). The ventilator can use air and oxygen from<br />
cylinder or wall supplies. Supply pressures must be 35 to<br />
100 psi (241 to 690 kPa).<br />
Air inlet<br />
connector<br />
Oxygen inlet<br />
conncer<br />
Air hose<br />
(from air<br />
supply)<br />
Oxygen hose<br />
(from oxygen<br />
supply)<br />
fiGUre 3.<br />
Connecting the air and oxygen supplies<br />
WarninG<br />
Air inlet<br />
filter bowl<br />
Connect only air to the air inlet, and only oxygen to the<br />
oxygen inlet. Do not attempt to switch air and oxygen<br />
or connect any other gas.<br />
<strong>Puritan</strong> Bennett <strong>840</strong> <strong>Ventilator</strong> <strong>Pocket</strong> <strong>Guide</strong>
WarninG<br />
To ensure that a constant gas supply is available to the<br />
patient, always connect at least two gas sources to the<br />
ventilator. (There are three gas source connections: the<br />
compressor, air inlet and oxygen inlet.)<br />
caUTion<br />
To prevent damage to the ventilator, ensure that<br />
the connections to the air and oxygen supplies are clean<br />
and unlubricated, and that there is no water in the air or<br />
oxygen supply gas. If you suspect water in the air supply<br />
gas, use an external wall air water trap to prevent water<br />
damage to the ventilator and its components.<br />
<strong>Puritan</strong> Bennett <strong>840</strong> <strong>Ventilator</strong> <strong>Pocket</strong> <strong>Guide</strong><br />
7
8<br />
PaTienT circUiT<br />
➪ Connect the patient circuit to the ventilator (see Figure 4).<br />
(From patient)<br />
(To patient)<br />
Expiratory filter<br />
Inspiratory limb<br />
of patient circuit<br />
Collector vial<br />
fiGUre 4.<br />
Connecting the patient circuit<br />
Inspiratory filter<br />
Tubing<br />
Humidifier<br />
<strong>Puritan</strong> Bennett <strong>840</strong> <strong>Ventilator</strong> <strong>Pocket</strong> <strong>Guide</strong>
➪ Figure 5 shows you how to install the expiratory filter<br />
and collector vial to the ventilator. Attach the expiratory<br />
limb of the patient circuit to the filter’s expiratory limb<br />
connection.<br />
Pull latch<br />
up to install<br />
filter, pull<br />
down to<br />
hold filter<br />
and collector<br />
vial in place<br />
Expiratory<br />
limb connection<br />
<strong>Puritan</strong> Bennett <strong>840</strong> <strong>Ventilator</strong> <strong>Pocket</strong> <strong>Guide</strong><br />
Filter<br />
housing<br />
area<br />
fiGUre 5.<br />
Installing the expiratory filter and collector vial<br />
Slide filter rim<br />
onto these tracks<br />
9
➪ Cap the collector vial drain port if you are not using the<br />
drain bag (see Figure 6).<br />
➪ If you are using the drain bag, install clamp on tubing.<br />
Uncap collector vial drain port and install tubing to<br />
collector vial drain port. Connect other end of tubing<br />
to drain bag. If the ventilator is mounted on the cart,<br />
place the drain bag in the cart drawer (see Figure 6).<br />
The drain bag is designed to lie flat, and is not designed<br />
to be suspended.<br />
10<br />
Tubing<br />
Place drain<br />
bag in cart<br />
drawer<br />
fiGUre 6.<br />
Using the collector vial with or without drain bag<br />
<strong>Puritan</strong> Bennett <strong>840</strong> <strong>Ventilator</strong> <strong>Pocket</strong> <strong>Guide</strong>
WarninG<br />
<strong>Covidien</strong> recommends that you use one of the identified<br />
patient circuits (see the <strong>Puritan</strong> Bennett <strong>840</strong> <strong>Ventilator</strong><br />
Operator’s and Technical Reference Manual for patient<br />
circuit testing specifications). Using a circuit with a<br />
higher resistance does not prevent ventilation, but can<br />
cause an SST fault or compromise the patient’s ability to<br />
breathe through the circuit.<br />
noTe:<br />
To ensure optimum compliance compensation, <strong>Covidien</strong><br />
recommends that you use low-compliance patient circuits.<br />
(For pediatric patients, the compliance compensation<br />
volume limit is four times the set tidal volume, in addition<br />
to the set tidal volume.)<br />
noTe:<br />
To ensure optimum ventilation, use pediatric circuits for<br />
patients whose ideal body weight (IBW) is 24 kg (53 lbs)<br />
or less, and adult circuits for patients whose IBW is more<br />
than 24 kg.<br />
<strong>Puritan</strong> Bennett <strong>840</strong> <strong>Ventilator</strong> <strong>Pocket</strong> <strong>Guide</strong><br />
11
12<br />
PaTienT seTUP<br />
Once you turn on the ventilator or run SST, the ventilator<br />
runs POST, then displays the <strong>Ventilator</strong> Startup screen<br />
(see Figure 7) on the lower screen.<br />
noTe:<br />
If TC was used on the previous patient setup, a note<br />
emphasizing tube type and tube I.D. appears below the<br />
SAME PATIENT button explanation.<br />
fiGUre 7.<br />
<strong>Ventilator</strong> startup screen<br />
➪ Touch SAME PATIENT, then press ACCEPT to<br />
continue ventilating with the most recent settings.<br />
Ventilation does not begin until a patient is connected.<br />
➪ Touch NEW PATIENT to begin ventilating with<br />
new settings.<br />
<strong>Puritan</strong> Bennett <strong>840</strong> <strong>Ventilator</strong> <strong>Pocket</strong> <strong>Guide</strong>
noTe:<br />
If you are unsure of the meaning of any symbol for<br />
ventilator settings, alarms or monitored data, touch the<br />
symbol on the screen; its definition will appear at the left<br />
bottom corner of the lower screen. (Figure 8 shows where<br />
symbol definitions appear on the GUI.)<br />
new patient setup<br />
➪ Touch the IBW button, then turn the knob to adjust<br />
the IBW. (Many initial settings and setting limits are<br />
automatically determined based on the IBW.) The<br />
proposed value is shown in red.<br />
➪ Touch CONTINUE (this button does not appear until<br />
you touch IBW), or touch RESTART to return to the<br />
<strong>Ventilator</strong> Startup screen.<br />
➪ At the New Patient Setup screen, settings for mode,<br />
mandatory type (for manual inspirations, if the selected<br />
mode is SPONT), spontaneous type (if applicable)<br />
and trigger type appear. For any setting you want to<br />
change, touch its button, then turn the knob to select<br />
the value. When you are finished changing settings,<br />
touch CONTINUE.<br />
➪ At the New Patient Settings screen, more settings appear.<br />
Touch each setting you want to change, then turn the<br />
knob to select its value. (To cancel a highlighted change,<br />
press CLEAR.)<br />
➪ Press ACCEPT to put all settings into effect. Normal<br />
ventilation begins once a patient is connected. (Any time<br />
before you press ACCEPT, you can touch RESTART to<br />
restart setting changes.)<br />
<strong>Puritan</strong> Bennett <strong>840</strong> <strong>Ventilator</strong> <strong>Pocket</strong> <strong>Guide</strong><br />
13
14<br />
apnea settings<br />
Although you aren’t required to change or confirm apnea<br />
settings, you should verify that they are appropriate for<br />
the patient. Apnea settings are automatically determined<br />
based on IBW, but can be changed.<br />
➪ If you selected NEW PATIENT, the Current Apnea<br />
Settings screen appears at the end of patient setup.<br />
➪ If you selected SAME PATIENT, touch the APNEA<br />
button at the bottom of the lower screen to view<br />
apnea settings.<br />
➪ If you change any apnea settings, press ACCEPT to put<br />
new settings into effect.<br />
calibrating the oxygen sensor<br />
Press the 100% O /CAL 2 MIN key. This causes the<br />
2<br />
ventilator to deliver 100% oxygen (if available) for two<br />
minutes and calibrates the oxygen sensor.<br />
The ventilator’s oxygen monitoring feature is always<br />
active unless you disable the oxygen sensor (see the More<br />
Settings screen). The oxygen sensor is always enabled when<br />
you power up the ventilator.<br />
once patient setup is complete<br />
Once the settings are accepted, you can attach a patient to<br />
the ventilator. Ventilation only begins when the ventilator<br />
senses that a patient is attached. (If you attach a patient<br />
before completing setup, the ventilator begins safety<br />
ventilation and declares a PROCEDURE ERROR alarm<br />
that resets once patient setup is complete.)<br />
<strong>Puritan</strong> Bennett <strong>840</strong> <strong>Ventilator</strong> <strong>Pocket</strong> <strong>Guide</strong>
inspiratory pause<br />
Pressing the INSP PAUSE key causes the ventilator to schedule<br />
an automatic pause maneuver as follows (see Table 1).<br />
• At the next scheduled inspiration, the inspiratory and<br />
expiratory valves close to allow pressure to equilibrate<br />
between the patient and the circuit.<br />
• The inspiratory pause continues until a stable pressure is<br />
reached or until two seconds elapse, whichever comes first.<br />
• The graphics screen will automatically be displayed (if it<br />
is not already active). The trace freezes and the values for<br />
compliance and resistance are displayed.<br />
• You can extend the pause beyond two seconds to a<br />
maximum of seven seconds by holding down the INSP<br />
PAUSE key.<br />
expiratory pause<br />
Pressing the EXP PAUSE key causes the ventilator to<br />
schedule an automatic expiratory pause maneuver as<br />
follows:<br />
• Press EXP PAUSE key to schedule automatic expiratory<br />
pause maneuver.<br />
• During the next exhalation, the inspiratory and expiratory<br />
valves close to allow pressure to equilibrate between the<br />
circuit and the patient.<br />
• The expiratory pause continues until a stable pressure is<br />
reached or two seconds elapse, whichever comes first.<br />
• The graphics screen will automatically be displayed (if it<br />
is not already active). The trace freezes and the values for<br />
intrinsic (auto) PEEP and total PEEP are displayed.<br />
• You can extend the pause beyond two seconds to a<br />
maximum of 20 seconds by holding down the EXP PAUSE<br />
key.<br />
<strong>Puritan</strong> Bennett <strong>840</strong> <strong>Ventilator</strong> <strong>Pocket</strong> <strong>Guide</strong><br />
15
TaBle 1. Inspiratory pause maneuver displays<br />
16<br />
it means: do this:<br />
or resistance (r)<br />
(if displayed):<br />
When you see<br />
compliance (c):<br />
Check the breathing waveforms and<br />
monitored patient data for clues<br />
about these questionable inputs.<br />
C < 0.1 mL/cm H O or patient flow < 0.1 L/<br />
2<br />
min. This points to questionable inputs to<br />
the C equation, which would in turn render<br />
R questionable. The low patient flow is below<br />
the threshold of reliable measurement.<br />
R (******)<br />
C (******)<br />
Check the breathing waveforms and<br />
monitored patient data for clues<br />
about these questionable inputs.<br />
The difference in pressure between end plateau<br />
and end exhalation < 0.1 cm H O. This<br />
2<br />
is below the limits of reliable resolution. The<br />
R and C values are therefore questionable.<br />
R (******)<br />
C (******)<br />
Check the patient-ventilator interaction,<br />
the breathing waveforms, and<br />
the patient circuit for underlying<br />
causes.<br />
C ≤ 0 mL/cm H O or C < 500 mL/cm H O.<br />
2 2<br />
These measurements are outside of<br />
physiological limits.<br />
R ( )<br />
Message as<br />
dictated by other<br />
tests<br />
C ( 0 )<br />
or<br />
C (500)<br />
<strong>Puritan</strong> Bennett <strong>840</strong> <strong>Ventilator</strong> <strong>Pocket</strong> <strong>Guide</strong>
TaBle 1. Inspiratory pause maneuver displays (continued)<br />
it means: do this:<br />
or resistance (r)<br />
(if displayed):<br />
When you see<br />
compliance (c):<br />
Check the patient-ventilator<br />
interaction, the breathing<br />
waveforms, and the patient<br />
circuit for underlying causes.<br />
R ≤ 0 cm H O/L/s or R < 500 cm H O/L/s.<br />
2 2<br />
These measurements are outside of physiological<br />
limits.<br />
R ( 0 )<br />
or<br />
R (500)<br />
C ( )<br />
Message as<br />
dictated by<br />
other tests<br />
If the patient’s IBW ≤ 24 kg, consider<br />
installing a pediatric patient circuit.<br />
Sub-threshold input value(s) C < 1/3 of ventilator<br />
breathing system compliance (derived<br />
from SST). Both C and R are questionable.<br />
R (yyy)<br />
C (xxx)<br />
<strong>Puritan</strong> Bennett <strong>840</strong> <strong>Ventilator</strong> <strong>Pocket</strong> <strong>Guide</strong><br />
Check for an insufficient expiratory<br />
interval. If possible, shorten<br />
inspiration time and reduce<br />
respiratory rate.<br />
Exhalation was not complete. This renders<br />
end-expiratory pressure and total exhaled<br />
flow values questionable.<br />
R (yyy)<br />
Incomplete<br />
exhalation<br />
C (xxx)<br />
Incomplete<br />
exhalation<br />
17
TaBle 1. Inspiratory pause maneuver displays (continued)<br />
18<br />
it means: do this:<br />
or resistance (r)<br />
(if displayed):<br />
When you see<br />
compliance (c):<br />
If plateau continues to decline, check<br />
for a leak in the breathing circuit,<br />
possibly around the cuff. If plateau<br />
is unstable, check for moisture<br />
condensing in a “lazy” loop or a<br />
breathing circuit being jiggled.<br />
Plateau is not “flat” (lung and circuit<br />
pressures did not equilibrate) or pause<br />
pressure was excessively noisy. These<br />
problems render R and C questionable.<br />
R (yyy)<br />
No plateau<br />
Check the breathing waveforms and<br />
monitored patient data for clues<br />
about these questionable inputs.<br />
C < 1.0 mL/cm H O. This results from<br />
2<br />
questionable input data. This out-of-range<br />
value also renders R questionable.<br />
R (yyy)<br />
Questionable<br />
measurement<br />
Check the breathing waveforms and<br />
monitored patient data for clues<br />
about these questionable inputs.<br />
R > 150 cm H O/L/s. This results from<br />
2<br />
questionable input data, possibly C.<br />
R (yyy)<br />
Out of range<br />
<strong>Puritan</strong> Bennett <strong>840</strong> <strong>Ventilator</strong> <strong>Pocket</strong> <strong>Guide</strong>
TaBle 1. Inspiratory pause maneuver displays (continued)<br />
it means: do this:<br />
or resistance (r)<br />
(if displayed):<br />
When you see<br />
compliance (c):<br />
Check the pressure-time waveform<br />
to see whether the patient delayed<br />
inspiration until the end of gas<br />
delivery.<br />
The pressure rose slowly at the end of the<br />
square flow waveform. This suggests that<br />
the pressures, volumes and flows involved<br />
are minimal and questionable. This is not<br />
expected during normal ventilation.<br />
R (yyy)<br />
Questionable<br />
measurement<br />
Check for a highly compliant lung<br />
inflated slightly. If the tidal volume<br />
can be safely increased, try that.<br />
The difference between the circuit pressure<br />
at the end of the plateau and the pressure<br />
at the end of exhalation < 0.5 cm H O. This<br />
2<br />
results in a questionable R value.<br />
R (yyy)<br />
Questionable<br />
measurement<br />
<strong>Puritan</strong> Bennett <strong>840</strong> <strong>Ventilator</strong> <strong>Pocket</strong> <strong>Guide</strong><br />
19
The top of the upper screen shows monitored data (data<br />
outside the normal range flashes). Once normal ventilation<br />
is in progress, ventilator settings are displayed across the<br />
top of the lower screen. (Figure 8 shows how information is<br />
displayed on the GUI.)<br />
Upper screen:<br />
monitored<br />
information<br />
(alarms,<br />
patient data)<br />
Lower<br />
screen:<br />
ventilator<br />
settings<br />
20<br />
Off-screen keys Knob<br />
fiGUre 8.<br />
<strong>Puritan</strong> Bennett <strong>840</strong> <strong>Ventilator</strong> graphic user interface (GUI)<br />
<strong>Puritan</strong> Bennett <strong>840</strong> <strong>Ventilator</strong> <strong>Pocket</strong> <strong>Guide</strong>
alarm seTTinGs<br />
Most alarm settings are initially set based on the patient’s<br />
IBW. You should review all alarm settings.<br />
➪ Touch the ALARM SETUP button (lower screen) to view<br />
the current alarm setup (see Figure 9).<br />
➪ Touch the alarm you want to change.<br />
➪ Turn the knob to set the value you want. Proposed values<br />
are shown in red. You can change several alarm settings<br />
in a batch change. To cancel a highlighted change,<br />
press CLEAR.<br />
➪ Review all settings.<br />
➪ Press ACCEPT to apply the new alarm settings.<br />
Press the ALARM SETUP button to cancel all<br />
alarm changes.<br />
You can touch the ALARM SETUP button at any<br />
time during ventilation to show the current limits and<br />
monitored value for each alarm. If an alarm annunciates,<br />
the alarm slider on the Alarm Setup screen will turn a<br />
color indicating the urgency of the alarm state: red for<br />
high urgency, yellow for medium and low urgency.<br />
fiGUre 9.<br />
Alarm setup<br />
<strong>Puritan</strong> Bennett <strong>840</strong> <strong>Ventilator</strong> <strong>Pocket</strong> <strong>Guide</strong><br />
21
noTe:<br />
The upper limits for the spontaneous exhaled tidal volume<br />
and mandatory exhaled tidal volume alarms are always the<br />
same. Changing the upper limit of one alarm automatically<br />
changes the upper limit of the other.<br />
22<br />
main seTTinG chanGes<br />
Main settings are the buttons displayed at the top of the<br />
lower screen, and you can only change them individually.<br />
Follow these steps to change main settings:<br />
➪ Touch the setting you want to change<br />
➪ Turn the knob to the set value<br />
➪ Press ACCEPT to apply the new setting<br />
Remember: touch, turn, ACCEPT!<br />
<strong>Puritan</strong> Bennett <strong>840</strong> <strong>Ventilator</strong> <strong>Pocket</strong> <strong>Guide</strong>
mode, BreaTh TyPe and BaTch<br />
(mUlTiPle) chanGes<br />
➪ Touch the SETUP button on the lower screen.<br />
The Current Vent Setup screen appears.<br />
➪ To change ventilation setup (mode, mandatory breath<br />
type, spontaneous type or trigger type), touch its button,<br />
then turn the knob to set the value. Proposed changes are<br />
shown in red. (Press CLEAR to cancel a change you’ve<br />
just made.)<br />
➪ Once you’ve made all the changes you want (you don’t<br />
have to make any changes at all), touch CONTINUE.<br />
Appropriate settings for the ventilation setup you’ve<br />
selected appear on the lower screen.<br />
➪ For each of the current ventilator settings you want to<br />
change, touch its button, then turn the knob to set its<br />
value. (Press CLEAR to cancel a change you’ve just made.)<br />
➪ Once you’ve made any changes you want, review the<br />
settings, then press ACCEPT to apply all the new settings<br />
at the same time. (Touch SETUP to cancel all changes.)<br />
Previous setup<br />
Once ventilator settings are in effect, the PREVIOUS<br />
SETUP button appears at the bottom of the lower screen<br />
when you press SETUP, and allows you to restore the<br />
entire previous setup (including alarm and apnea settings)<br />
that was in effect immediately before you made setting<br />
changes using the <strong>Ventilator</strong> Setup screen.<br />
➪ To restore the previous setup, touch PREVIOUS SETUP,<br />
then press ACCEPT.<br />
<strong>Puritan</strong> Bennett <strong>840</strong> <strong>Ventilator</strong> <strong>Pocket</strong> <strong>Guide</strong><br />
23
24<br />
humidification type, humidifier volume, o 2 sensor<br />
enable/disable and disconnect sensitivity (dsens)<br />
To view or change:<br />
➪ Touch the OTHER SCREENS button, then touch the<br />
MORE SETTINGS button.<br />
➪ Touch each setting you want to change (you can change<br />
multiple settings), then turn the knob to set its value. To<br />
leave settings unchanged, touch the OTHER SCREENS<br />
button again.<br />
➪ Press ACCEPT to apply the new settings.<br />
<strong>Puritan</strong> Bennett <strong>840</strong> <strong>Ventilator</strong> <strong>Pocket</strong> <strong>Guide</strong>
constant during rate change<br />
If you selected pressure control (PC), you can select one<br />
of three timing variables (inspiratory time, I:E ratio, or<br />
expiratory time) to be held constant when the respiratory<br />
rate setting changes.<br />
➪ Touch SETUP.<br />
➪ Touch CONTINUE. The breath timing bar appears in the<br />
lower screen (see Figure 10).<br />
➪ Touch one of the lock icons to select T I , I:E, or T E as<br />
the setting that remains constant when the rate setting<br />
changes.<br />
➪ Review settings and change if necessary, then press<br />
ACCEPT. The value displayed is the one held constant<br />
during rate changes, and becomes the only setting you can<br />
adjust directly.<br />
fiGUre 10.<br />
Constant during rate change (inspiratory time selected)<br />
noTe:<br />
You can change the value of the constant setting at any<br />
time, but the value does not change as a result of changing<br />
the rate setting.<br />
<strong>Puritan</strong> Bennett <strong>840</strong> <strong>Ventilator</strong> <strong>Pocket</strong> <strong>Guide</strong><br />
25
alarm handlinG<br />
The SmartAlert Alarm System offers prioritized alarm<br />
annunciation that distinguishes primary alarms from<br />
secondary, dependent alarms (that is, alarms that arise due<br />
to the initial alarm condition) and indicates the urgency<br />
level of each alarm. An alarm log keeps a time-and-datestamped<br />
record of alarms, alarm silences, and resets in<br />
order of occurrence.<br />
Alarms on the <strong>Puritan</strong> Bennett <strong>840</strong> <strong>Ventilator</strong> are classified<br />
as high-, medium- or low-urgency (see Figure 11).<br />
fiGUre 11.<br />
Alarm indicators<br />
noTe:<br />
You can always change an alarm setting even when alarms<br />
are active. You do not need to press ALARM RESET or wait<br />
for the alarm to autoreset.<br />
26<br />
Medium-urgency<br />
alarm indicator<br />
(yellow): Prompt<br />
attention required.<br />
High-urgency alarm indicator<br />
(red): Immediate attention<br />
required to ensure patient safety.<br />
Low-urgency alarm<br />
indicator (yellow):<br />
Indicates a change in the<br />
patient-ventilator system.<br />
<strong>Puritan</strong> Bennett <strong>840</strong> <strong>Ventilator</strong> <strong>Pocket</strong> <strong>Guide</strong>
alarm silence<br />
Pressing ALARM SILENCE mutes the alarm sound for two<br />
minutes. The key’s LED lights during the silence period, and<br />
turns off if the alarm is reset. Every time you press ALARM<br />
SILENCE, the two-minute silence period restarts. An on-screen<br />
alarm silence notification appears on the display when alarm<br />
silence is active.<br />
WarninG<br />
Never leave patient unattended when ALARM SILENCE<br />
is activated. ALARM RESET will cancel silence.<br />
alarm reset<br />
Pressing the off-screen ALARM RESET key resets the<br />
detection algorithms of all active alarms, except for these:<br />
AC POWER LOSS<br />
COMPRESSOR INOPERATIVE<br />
DEVICE ALERT<br />
O SENSOR<br />
2<br />
INOPERATIVE BATTERY<br />
LOW AC POWER<br />
LOW BATTERY<br />
NO AIR SUPPLY<br />
NO O SUPPLY<br />
2<br />
PROCEDURE ERROR<br />
Pressing ALARM RESET has no effect on patient data.<br />
If an alarm condition persists, the alarm becomes active<br />
again, according to the detection algorithm for that alarm.<br />
For example, if the APNEA alarm is active, ALARM RESET<br />
resets the apnea detection algorithm to its initial state and<br />
returns the ventilator to normal ventilation.<br />
<strong>Puritan</strong> Bennett <strong>840</strong> <strong>Ventilator</strong> <strong>Pocket</strong> <strong>Guide</strong><br />
27
Pressing ALARM RESET cancels alarm silence if active (this<br />
avoids silencing an alarm condition that arises shortly after<br />
pressing ALARM RESET). Pressing ALARM RESET clears<br />
any high-urgency alarm that has autoreset (and the steadily<br />
lit high-urgency alarm indicator turns off).<br />
ALARM RESET gives you a way to return the ventilator to<br />
normal operation if an alarm condition has been resolved,<br />
without waiting for alarm detection algorithms to reset<br />
the alarm.<br />
alarm log<br />
To view the alarm log, touch the ALARM LOG button on the<br />
upper screen. The alarm log shows alarm events (including<br />
time-and-date-stamped alarms, silences and resets) in order<br />
of occurrence, with the most recent event at the top of the list<br />
(see Figure 12). The alarm log can store up to 80 of the most<br />
recent entries. Completing a new patient setup clears the<br />
alarm log.<br />
A question mark in a triangle appears on the ALARM LOG<br />
button if the log includes an event that hasn’t been viewed<br />
yet. The question mark in a triangle disappears after you’ve<br />
viewed the event.<br />
To scroll through the alarm log, move the scroll box up or<br />
down and turn the knob to page through the alarm log.<br />
An icon shows your relative position in the log.<br />
28<br />
<strong>Puritan</strong> Bennett <strong>840</strong> <strong>Ventilator</strong> <strong>Pocket</strong> <strong>Guide</strong>
fiGUre 12.<br />
Alarm log<br />
Alarm log<br />
button<br />
Indicates that<br />
log includes<br />
unread entries<br />
Touch symbols<br />
to see definition<br />
at bottom of<br />
screen<br />
alarm messages<br />
The upper screen displays the two highest-urgency active<br />
alarms. Alarms are color coded, both on the Alarm Setup<br />
screen and in the alarm status section on the upper screen.<br />
Red for high urgency; yellow for medium and low urgency.<br />
An alarm icon flashes on the MORE ALARMS button if<br />
there are other active alarms. Pressing the icon displays a full<br />
screen of up to eight active alarms.<br />
Each alarm message consists of a base message, an analysis<br />
message (supplementary information that includes any<br />
associated alarm conditions) and a remedy message that<br />
suggests corrective actions (see Figure 13).<br />
<strong>Puritan</strong> Bennett <strong>840</strong> <strong>Ventilator</strong> <strong>Pocket</strong> <strong>Guide</strong><br />
Touch scroll box<br />
and turn rotary<br />
encoder to scroll<br />
through log<br />
29
The base message<br />
identifies the alarm.<br />
Touch alarm symbol<br />
to view definition<br />
on lower screen.<br />
Table 2 lists possible alarm messages.<br />
30<br />
WarninG<br />
The analysis message<br />
gives the root cause<br />
of the alarm. May also<br />
include dependent<br />
alarms that have arisen<br />
due to the initial alarm.<br />
Touch flashing MORE ALARMS button<br />
to view messages for up to six<br />
additional active alarms.<br />
fiGUre 13.<br />
Alarm message format<br />
The two highest-priority<br />
active alarm messages<br />
are displayed here.<br />
The remedy<br />
message<br />
suggests how<br />
to resolve<br />
the alarm<br />
condition.<br />
When more than one alarm is active and the alarm<br />
messages vary in their degree of seriousness, you should<br />
assume that the most serious message is applicable.<br />
<strong>Puritan</strong> Bennett <strong>840</strong> <strong>Ventilator</strong> <strong>Pocket</strong> <strong>Guide</strong>
TaBle 2. Alarm messages<br />
When you see It means: Do this:<br />
this message:<br />
AC<br />
POWER LOSS<br />
APNEA<br />
CIRCUIT<br />
DISCONNECT<br />
COMPRESSOR<br />
INOPERATIVE<br />
DEVICE ALERT<br />
The power switch<br />
is ON, AC power is<br />
not available, and the<br />
ventilator is being<br />
powered by the backup<br />
power source (BPS).<br />
The set apnea interval<br />
has elapsed without the<br />
ventilator, patient or<br />
operator triggering a<br />
breath.<br />
There is a<br />
disconnection in the<br />
patient circuit before<br />
the patient wye or<br />
patient disconnect<br />
is detected following<br />
power restoration from<br />
an unintentional power<br />
loss with the power<br />
switch ON.<br />
Compressor cannot<br />
maintain sufficient<br />
supply pressure.<br />
A background test<br />
or power on self-test<br />
(POST) has detected a<br />
problem.<br />
<strong>Puritan</strong> Bennett <strong>840</strong> <strong>Ventilator</strong> <strong>Pocket</strong> <strong>Guide</strong><br />
Prepare for power<br />
loss. Obtain alternate<br />
ventilation. Check<br />
integrity of<br />
AC power source.<br />
Contact service if<br />
necessary.<br />
Check patient<br />
and settings.<br />
Check patient.<br />
Reconnect patient<br />
circuit. Press<br />
ALARM RESET.<br />
Check patient.<br />
Obtain alternate<br />
ventilation. Remove<br />
ventilator from use<br />
and contact service.<br />
Check patient.<br />
If prompted to do so,<br />
obtain alternate<br />
ventilation or<br />
contact service.<br />
31
TaBle 2. Alarm messages (continued)<br />
When you see it means: do this:<br />
this message:<br />
32<br />
O 2 SENSOR<br />
P CIRC<br />
(High circuit<br />
pressure)<br />
O 2 %<br />
(High delivered<br />
O 2 %)<br />
V TE<br />
(High exhaled<br />
tidal volume)<br />
V .<br />
E TOT<br />
(High exhaled<br />
total minute<br />
volume)<br />
Background checks<br />
have detected a<br />
problem with the O 2<br />
sensor.<br />
The measured airway<br />
pressure is equal to or<br />
greater than the set<br />
limit. Reduced tidal<br />
volume likely.<br />
The O 2 % measured<br />
during any phase of a<br />
breath cycle is 7% (12%<br />
during the first hour<br />
of operation) or more<br />
above the O 2 % setting<br />
for at least 30 seconds.<br />
(These percentages<br />
increase by 5% for four<br />
minutes following a<br />
decrease in the O 2 %<br />
setting.)<br />
The patient’s exhaled<br />
tidal volume for any<br />
breath is equal to or<br />
greater than the set<br />
limit.<br />
The patient’s expiratory<br />
minute volume is equal<br />
to or greater than the<br />
set limit.<br />
O 2 sensor is out of<br />
calibration or has<br />
failed. Press 100%<br />
O 2 CAL; replace or<br />
disable the sensor.<br />
Check patient,<br />
patient circuit and<br />
endotracheal tube.<br />
Check patient, air<br />
and oxygen supplies,<br />
oxygen analyzer<br />
and ventilator.<br />
Check patient and<br />
settings. Consider<br />
whether the patient’s<br />
compliance or<br />
resistance has<br />
changed.<br />
Check patient<br />
and settings.<br />
<strong>Puritan</strong> Bennett <strong>840</strong> <strong>Ventilator</strong> <strong>Pocket</strong> <strong>Guide</strong>
TaBle 2. Alarm messages (continued)<br />
When you see it means: do this:<br />
this message:<br />
V .<br />
ti<br />
SPONT Alarm<br />
f TOT<br />
(High respiratory<br />
rate)<br />
P VENT<br />
(High internal<br />
ventilator<br />
pressure)<br />
P COMP<br />
INOPERATIVE<br />
BATTERY<br />
INSPIRATION<br />
TOO LONG<br />
The delivered volume of<br />
any tube compensated<br />
(TC) breath is equal to or<br />
greater than the inspired<br />
tidal volume limit.<br />
<strong>Ventilator</strong> transitions to<br />
exhalation.<br />
The breath rate from all<br />
breaths is greater than or<br />
equal to the set limit.<br />
The inspiratory pressure<br />
transducer has measured<br />
a pressure of at least 100<br />
cm H 2 O. Active only<br />
during volume-controlled<br />
breaths. <strong>Ventilator</strong><br />
transitions to exhalation.<br />
Reduced tidal volume<br />
likely.<br />
The target pressure of a<br />
tube compensated (TC)<br />
breath equals the P CIRC<br />
limit. This limit is equal<br />
to the setting of P PEAk .<br />
Inspiration pressure is<br />
limited during this alarm.<br />
BPS is installed but not<br />
functioning.<br />
IBW-based inspiratory<br />
time for a spontaneous<br />
breath exceeds ventilatorset<br />
limit.<br />
<strong>Puritan</strong> Bennett <strong>840</strong> <strong>Ventilator</strong> <strong>Pocket</strong> <strong>Guide</strong><br />
Check patient.<br />
Check for leaks,<br />
tube type/I.D.<br />
setting.<br />
Check patient<br />
and settings.<br />
Check patient.<br />
Obtain alternate<br />
ventilation.<br />
Remove ventilator<br />
from use and<br />
contact service.<br />
Check patient.<br />
Check for leaks,<br />
tube type/I.D.<br />
setting.<br />
Contact service.<br />
Check patient.<br />
Check for leaks.<br />
33
TaBle 2. Alarm messages (continued)<br />
When you see it means: do this:<br />
this message:<br />
LOSS OF<br />
POWER<br />
LOW AC<br />
POWER<br />
LOW<br />
BATTERY<br />
34<br />
The ventilator power<br />
switch is on and there is<br />
insufficient power from<br />
the AC supply and the<br />
BPS. There may not<br />
be a visual indicator<br />
for this alarm, but an<br />
independent audio<br />
alarm sounds for at<br />
least 120 seconds.<br />
Mains AC power has<br />
dropped below 80%<br />
of nominal voltage for<br />
at least one second.<br />
Warns that AC<br />
power has dropped<br />
significantly, and that<br />
a more severe power<br />
drop may be imminent.<br />
The ventilator turns<br />
off the compressor<br />
(if installed), and<br />
otherwise operates<br />
normally.<br />
The BPS has less than<br />
approximately two<br />
minutes of operational<br />
time remaining.<br />
Check integrity of<br />
AC power and BPS<br />
connections.<br />
Obtain alternate<br />
ventilation.<br />
Check integrity<br />
of connection to AC<br />
power. Check AC<br />
power supply.<br />
Replace BPS or allow<br />
it to recharge during<br />
normal ventilator<br />
operation.<br />
<strong>Puritan</strong> Bennett <strong>840</strong> <strong>Ventilator</strong> <strong>Pocket</strong> <strong>Guide</strong>
TaBle 2. Alarm messages (continued)<br />
When you see it means: do this:<br />
this message:<br />
↓O 2 %<br />
(Low<br />
delivered<br />
O 2 %)<br />
↓V TE MAND<br />
(Low exhaled<br />
mandatory<br />
tidal volume)<br />
↓VTE SPONT<br />
(Low exhaled<br />
spontaneous<br />
tidal volume)<br />
↓V .<br />
E TOT<br />
(Low exhaled<br />
total minute<br />
volume)<br />
NO AIR<br />
SUPPLY<br />
The O 2 % measured<br />
during any phase of a<br />
breath cycle is 7% (12%<br />
during the first hour of<br />
operation) or more below<br />
the O 2 % setting for at<br />
least 30 seconds, or below<br />
18%. (These percentages<br />
increase by 5% for four<br />
minutes following<br />
an increase in the<br />
O 2 % setting.)<br />
The patient’s exhaled<br />
mandatory tidal volume<br />
is less than or equal to the<br />
set limit.<br />
The patient’s exhaled<br />
spontaneous tidal volume<br />
is less than or equal to the<br />
set limit.<br />
The minute volume for<br />
all breaths is less than or<br />
equal to the set limit.<br />
Air supply pressure is<br />
less than the minimum<br />
required pressure<br />
for correct ventilator<br />
operation throughout its<br />
range of flows. Accurate<br />
O 2 % delivery may be<br />
compromised. You<br />
cannot set or disable the<br />
NO AIR<br />
SUPPLY alarm.<br />
<strong>Puritan</strong> Bennett <strong>840</strong> <strong>Ventilator</strong> <strong>Pocket</strong> <strong>Guide</strong><br />
Check patient, air<br />
and oxygen supplies,<br />
oxygen analyzer and<br />
ventilator. Calibrate<br />
oxygen sensor (press<br />
100% O 2/CAL 2<br />
min key).<br />
Check patient.<br />
Check for leaks<br />
or changes in the<br />
patient’s resistance or<br />
compliance.<br />
Check patient and<br />
settings.<br />
Check patient and<br />
settings.<br />
Check patient<br />
and air source.<br />
Obtain alternate<br />
ventilation.<br />
35
TaBle 2. Alarm messages (continued)<br />
When you see it means: do this:<br />
this message:<br />
NO O 2<br />
supply<br />
PROCEDURE<br />
ERROR<br />
SEVERE<br />
OCCLUSION<br />
36<br />
Oxygen supply<br />
pressure is less than<br />
the minimum required<br />
pressure for correct<br />
ventilator operation<br />
throughout its range<br />
of flows. Accurate<br />
O 2 % delivery may be<br />
compromised. You<br />
cannot set or disable<br />
the NO O 2 SUPPLY<br />
alarm.<br />
Patient attached before<br />
ventilator startup<br />
is complete. Safety<br />
ventilation is active.<br />
Patient circuit is<br />
severely occluded.<br />
Check patient<br />
and oxygen source.<br />
Obtain alternate<br />
ventilation.<br />
Provide alternate<br />
ventilation.<br />
Complete ventilator<br />
startup procedure.<br />
Check patient.<br />
Obtain alternate<br />
ventilation if<br />
necessary. Check<br />
patient circuit for<br />
crimps, blocked<br />
filter. If problem<br />
persists, remove<br />
ventilator from use<br />
and contact service.<br />
<strong>Puritan</strong> Bennett <strong>840</strong> <strong>Ventilator</strong> <strong>Pocket</strong> <strong>Guide</strong>
GraPhics<br />
The graphics function displays real-time patient<br />
data, including:<br />
• Pressure-time curve<br />
• Flow-time curve<br />
• Volume-time curve<br />
• Pressure-volume loop<br />
display<br />
➪ To display the most recently selected graphics, press the<br />
GRAPHICS button at the bottom of the upper screen.<br />
• If the pressure-volume loop is selected, the loop<br />
for the next full breath is displayed, then updated every<br />
other breath. The inspiratory area is calculated based on<br />
the area inside the loop to the left of the baseline (see<br />
Figure 14).<br />
• Curves (pressure-time, flow-time and volume-time) are<br />
drawn on the screen at the start of a breath, beginning<br />
with the last 0.5 second of the previous breath.<br />
color<br />
Curves and loops are enhanced by color:<br />
• Inspiration is green<br />
• Expiration is yellow<br />
• Spontaneous breaths are orange<br />
<strong>Puritan</strong> Bennett <strong>840</strong> <strong>Ventilator</strong> <strong>Pocket</strong> <strong>Guide</strong><br />
37
38<br />
Inspiratory area<br />
fiGUre 14.<br />
Pressure-volume loop<br />
Graphics are automatically displayed when you press the<br />
EXP PAUSE or INSP PAUSE key. The measured values<br />
for intrinsic and total PEEP are displayed at the end of<br />
the expiratory pause. The measured values for compliance<br />
and resistance (for VC with a square flow pattern) are<br />
displayed at the end of an inspiratory pause. During both the<br />
expiratory pause and inspiratory pause, the most recently<br />
selected graphics are displayed and frozen.<br />
Graphics won’t be displayed when:<br />
• The ventilator begins apnea ventilation or safety ventilation.<br />
(However, you can choose to redisplay graphics by pressing<br />
the graphics button.)<br />
• You touch the MORE PATIENT DATA, ALARM LOG,<br />
MORE ALARMS or OTHER SCREENS button.<br />
<strong>Puritan</strong> Bennett <strong>840</strong> <strong>Ventilator</strong> <strong>Pocket</strong> <strong>Guide</strong>
freezing<br />
Follow these steps to freeze graphics on the screen:<br />
➪ Touch FREEZE. The screen flashes the message<br />
“FREEZING,” the UNFREEZE button appears, and the<br />
scaling buttons disappear. Plotting continues until the<br />
screen is full.<br />
➪ Once the screen is filled and frozen, the other onscreen<br />
scaling buttons reappear. You can now redo the plot setup<br />
and adjust the scales for the last 48 seconds of frozen data.<br />
(The pressure-volume display shows the most recent full<br />
breath within the 48-second freeze period.)<br />
➪ Press UNFREEZE at any time to resume real-time<br />
graphics display.<br />
Graphics remain frozen even if you switch to another<br />
screen (for example, MORE ALARMS).<br />
Plot setup<br />
You can choose to display one or two time curves at a<br />
time. (The pressure-volume loop uses the entire screen, so<br />
no other waveform can be displayed at the same time.)<br />
➪ Touch the graphics button at the lower left of the upper<br />
screen. Graphics appear.<br />
➪ Touch PLOT SETUP at the upper left of the screen.<br />
Touch Plot 1, then turn the knob to select any one of the<br />
waveforms. (If you select pressure-volume, which uses the<br />
entire screen, Plot 2 disappears.)<br />
➪ Touch Plot 2, if applicable. Turn the knob to select either of<br />
the two remaining waveforms or none. If you select none,<br />
only one enlarged plot (with higher resolution) appears.<br />
➪ Touch CONTINUE to display the graphics you’ve<br />
selected. (You don’t have to press ACCEPT.)<br />
<strong>Puritan</strong> Bennett <strong>840</strong> <strong>Ventilator</strong> <strong>Pocket</strong> <strong>Guide</strong><br />
39
40<br />
once graphics are displayed<br />
Setting baseline pressure:<br />
➪ To move the baseline on a<br />
pressure-volume loop, touch the<br />
baseline pressure button, then<br />
use the knob to position the<br />
baseline.<br />
The default position of the baseline is the PEEP setting. If<br />
the PEEP setting changes, the baseline resets to PEEP.<br />
Adjusting scales:<br />
➪ To adjust vertical and horizontal scales,<br />
touch the arrow buttons, then turn the<br />
knob to select.<br />
<strong>Puritan</strong> Bennett <strong>840</strong> <strong>Ventilator</strong> <strong>Pocket</strong> <strong>Guide</strong>
The ? key<br />
The ? key on the GUI displays basic operating information<br />
about the <strong>Puritan</strong> Bennett <strong>840</strong> <strong>Ventilator</strong>, including:<br />
• A few basics — information about screens, sounds, keys<br />
and symbols.<br />
• <strong>Ventilator</strong>, alarm and apnea settings.<br />
• New patient setup — how to configure the ventilator for a<br />
new patient.<br />
• How to view patient data, including graphics.<br />
• Graphics — setting up, viewing and freezing<br />
waveforms and loops.<br />
• Alarm handling — what to do in case of alarm.<br />
• Short self-test (SST).<br />
• Service, including O 2 sensor calibration, cleaning, periodic<br />
maintenance and when to call for help.<br />
<strong>Puritan</strong> Bennett <strong>840</strong> <strong>Ventilator</strong> <strong>Pocket</strong> <strong>Guide</strong><br />
41
42<br />
Bi-leVel<br />
Bi-Level is a breath mode in which the patient has the<br />
ability to breathe spontaneously at two levels of PEEP.<br />
Its pressure waveform resembles pressure controlled<br />
ventilation but differs in its ability to allow unrestricted<br />
spontaneous breathing at both the upper and lower<br />
pressure levels. Therefore, only a minimally necessary<br />
degree of ventilatory augmentation needs to be applied.<br />
Patient setup<br />
To select Bi-Level ventilation:<br />
➪ Touch the SETUP button on the lower screen.<br />
➪ Touch the Mode button, then turn the knob to select<br />
Bi-Level.<br />
noTe:<br />
Once you have selected Bi-Level, the PC mandatory breath<br />
type is selected and cannot be changed.<br />
➪ Select PS or none as the spontaneous type (or TC if this<br />
option is active), select P -TRIG or V -TRIG as your trigger type,<br />
then press CONTINUE.<br />
➪ Settings for Bi-Level are displayed. For each setting you<br />
want to change, touch its button and turn the knob to set<br />
its value.<br />
noTe:<br />
PEEP H must always be set at least 5 cm H 2 O greater than<br />
PEEP L . Otherwise, the settings for PEEP H and PEEP L do not<br />
affect each other. When you have finished changing settings,<br />
press ACCEPT to put all settings into effect.<br />
noTe:<br />
Rise time % determines the rise time to reach the pressure<br />
target in pressure support (P SUPP ) or transitions from PEEP L<br />
to PEEP H .<br />
<strong>Puritan</strong> Bennett <strong>840</strong> <strong>Ventilator</strong> <strong>Pocket</strong> <strong>Guide</strong>
noTe:<br />
Expiratory sensitivity (E SENS ) applies to all spontaneous<br />
breaths.<br />
constant during rate change<br />
In Bi-Level ventilation as in pressure control, you can<br />
select one of three timing variables: inspiratory time (T ), H<br />
I:E ratio (T :T ratio), and expiratory time (T ) to be held<br />
H L L<br />
constant when the frequency setting changes.<br />
➪ Touch SETUP.<br />
➪ Touch CONTINUE. The breath timing bar appears in the<br />
lower screen (see Figure 15).<br />
➪ Touch one of the lock icons to select T H , T H :T L , or T L as<br />
the setting that remains constant when the respiratory rate<br />
changes, and to determine which timing variable will be<br />
present on the timing button.<br />
➪ Review settings and change if necessary, then press<br />
ACCEPT. The value displayed is the one held constant<br />
during rate changes and becomes the only setting you can<br />
adjust directly.<br />
fiGUre 15.<br />
Bi-Level breath timing bar<br />
<strong>Puritan</strong> Bennett <strong>840</strong> <strong>Ventilator</strong> <strong>Pocket</strong> <strong>Guide</strong><br />
43
noTe:<br />
You can change the value of the constant setting at any time,<br />
but the value does not change as a result of changing the<br />
respiratory rate setting.<br />
44<br />
Using pressure support with Bi-Level<br />
Spontaneous breaths in Bi-Level mode can be augmented<br />
with pressure support according to these rules:<br />
• Pressure support can assist spontaneous breaths at PEEP L<br />
and PEEP H , and is always relative to PEEP L .<br />
• If P SUPP + PEEP L is less than PEEP H , all spontaneous breaths<br />
at PEEP L are augmented by the P SUPP setting,<br />
and all spontaneous breaths at PEEP H are augmented<br />
by 1.5 cmH 2 O.<br />
• If P SUPP + PEEP L is greater than PEEP H , all spontaneous<br />
breaths at PEEP L are augmented by the P SUPP setting, and all<br />
spontaneous breaths at PEEP H are augmented by (P SUPP +<br />
PEEP L – PEEP H ).<br />
For example, if PEEP L = 5 cm H 2 O, and PEEP H =<br />
15 cmH 2 O, and P SUPP = 15 cm H 2 0:<br />
• All spontaneous breaths at PEEP L are augmented by<br />
15 cmH 2 O of pressure support (P SUPP + PEEP L ) for a total<br />
pressure of 20 cm H 2 O.<br />
• All spontaneous breaths at PEEP H are augmented by<br />
5 cm H 2 O of pressure support (P SUPP + PEEP L – PEEP H )<br />
for a total pressure of 20 cm H 2 O (see Figure 16).<br />
<strong>Puritan</strong> Bennett <strong>840</strong> <strong>Ventilator</strong> <strong>Pocket</strong> <strong>Guide</strong>
PS = 5 cm H 2 O<br />
PEEPL = 5 cm H 2 O<br />
fiGUre 16.<br />
Bi-Level with pressure support<br />
PEEPH = 15 cm H 2 O<br />
manual inspiration in Bi-Level mode<br />
Pressing the MANUAL INSP key during Bi-Level mode<br />
causes the ventilator to:<br />
• Switch from PEEP H to PEEP L if pressed during a<br />
PEEP H phase.<br />
• Switch from PEEP L to PEEP H if pressed during a<br />
PEEP L phase.<br />
<strong>Puritan</strong> Bennett <strong>840</strong> <strong>Ventilator</strong> <strong>Pocket</strong> <strong>Guide</strong><br />
Actual Peak PS Pressure = 20 cm H 2 O<br />
45
TUBe comPensaTion<br />
Tube Compensation (TC) assists a patient’s spontaneous<br />
breath by delivering positive pressure proportional to the<br />
inspired flow, which overcomes the estimated resistance of<br />
an artificial airway. TC supports all spontaneous breaths<br />
for patients with an ideal body weight ≥ 7.0 kg (15.4 lb),<br />
and for endotracheal/tracheostomy tubes with an inside<br />
diameter (I.D.) of ≥ 4.5 mm. TC can be used within SPONT,<br />
BI-LEVEL or SIMV. With the Bi-Level option selected, TC<br />
supports spontaneous breaths at both PEEP levels.<br />
Patient setup<br />
To select TC option:<br />
1. Touch the VENT SETUP button on the lower screen.<br />
2. Touch the MODE button and turn the knob to select<br />
either SPONT, BI-LEVEL or SIMV, all of which allow for<br />
TC to be selected as the spontaneous type.<br />
3. Touch the SPONTANEOUS TYPE button and turn the<br />
knob to select TC.<br />
4. Touch the CONTINUE button. The settings applicable to<br />
the selected mode, and for TC, appear on the lower screen.<br />
5. Touch the on-screen button for each setting you wish to<br />
change, and then turn the knob to set the desired value<br />
(see Table 3 for tube I.D. and IBW). Proposed changes<br />
are highlighted. Press the CLEAR key above the knob to<br />
cancel any changes you’ve just made. Flashing arrows<br />
indicate TC settings.<br />
noTe:<br />
If you select an I.D. that does not match the IBW, you<br />
must touch the Ok button to continue. The tube type and<br />
tube I.D. indicators flash if TC is a new selection.<br />
6. When you have made the settings you want, press the<br />
ACCEPT key above the knob to apply the new settings,<br />
or the CLEAR key to cancel the last change.<br />
46<br />
<strong>Puritan</strong> Bennett <strong>840</strong> <strong>Ventilator</strong> <strong>Pocket</strong> <strong>Guide</strong>
TaBle 3. Ideal body weight (IBW) and tube I.D.<br />
iBW (kg) iBW (lb) eT/Trach i.d. eT/Trach i.d.<br />
(mm) (low) (mm) (high)<br />
7-10 15-22 4.5 4.5<br />
11-13 23-29 4.5 5.0<br />
14-16 30-35 4.5 5.5<br />
17-18 36-40 4.5 6.0<br />
19-22 41-49 5.0 6.0<br />
23-24 50-53 5.0 6.0<br />
25-27 54-60 5.5 6.5<br />
28-31 61-68 5.5 7.0<br />
32-35 69-77 6.0 7.0<br />
36 78-79 6.0 7.5<br />
37-42 80-93 6.5 7.5<br />
43-49 94-108 6.5 8.0<br />
50-53 109-117 7.0 8.0<br />
54-59 118-130 7.0 8.5<br />
60 131-132 7.0 9.0<br />
61-69 133-152 7.5 9.0<br />
70 153-154 7.5 9.5<br />
71-79 155-174 8.0 9.5<br />
80-100 175-220 8.0 10.0<br />
101-130 221-287 8.5 10.0<br />
131-150 288-330 9.0 10.0<br />
<strong>Puritan</strong> Bennett <strong>840</strong> <strong>Ventilator</strong> <strong>Pocket</strong> <strong>Guide</strong><br />
47
48<br />
VenTilaTor self-TesTs<br />
The <strong>Puritan</strong> Bennett <strong>840</strong> <strong>Ventilator</strong> has three self tests to<br />
verify microprocessor, pneumatic and circuit integrity. The<br />
tests include:<br />
• Power on self-test (POST): A several-second test that<br />
automatically checks microprocessor function when you<br />
power up the ventilator.<br />
• Short self-test (SST): A short and simple sequence of tests<br />
that verify proper ventilator operation. SST checks the<br />
patient circuit for leaks and measures circuit compliance.<br />
• Extended self-test (EST): A more exhaustive test of<br />
ventilator integrity, designed to be run by a qualified<br />
service technician.<br />
running ssT<br />
Use SST to check the patient circuit for leaks and to<br />
calculate circuit compliance and resistance. Always<br />
rerun SST whenever you change the circuit type or the<br />
humidification type, or when you install a new or<br />
sterilized exhalation filter.<br />
WarninG<br />
Incorrectly specifying the patient circuit type or<br />
humidification type (or changing either type after<br />
you’ve run SST) can affect the accuracy of compliance<br />
calculation and measured exhaled tidal volume. (You<br />
must rerun SST to change the circuit type. You can<br />
change the humidification type during ventilation by<br />
touching the OTHER SCREENS, then the MORE SETTINGS<br />
buttons.) Humidifier Volume allows you to mimimize<br />
inaccuracies due to a change in humidifier type.<br />
<strong>Puritan</strong> Bennett <strong>840</strong> <strong>Ventilator</strong> <strong>Pocket</strong> <strong>Guide</strong>
➪ Ensure that the patient is not connected to the<br />
circuit and that the patient wye is unblocked.<br />
WarninG<br />
Disconnect the ventilator from the patient before<br />
running SST. Running SST while the ventilator is<br />
connected to the patient can injure the patient.<br />
➪ Turn the power switch (at the front of the ventilator) to<br />
the ON position. You can only run SST immediately after<br />
you turn on the ventilator.<br />
➪ At the <strong>Ventilator</strong> Startup screen, touch SST, then press<br />
the TEST button (on the side of the ventilator) within five<br />
seconds. (Waiting longer than five seconds cancels SST.)<br />
➪ At the Current SST Setup screen, select the patient circuit<br />
and humidification type (and humidifier volume, if<br />
applicable), then press ACCEPT.<br />
➪ The ventilator automatically starts the test sequence.<br />
Some tests (SST flow sensor, Expiratory filter and Circuit<br />
resistance) require your intervention and will wait<br />
indefinitely for your response. Otherwise, you don’t need<br />
to do anything until a test result is ALERT or FAILURE,<br />
or SST is complete.<br />
➪ As each test is performed, the SST Status screen shows test<br />
results (see Table 4).<br />
WarninG<br />
To ensure reliable SST results, do not repeat an<br />
individual test with a different patient circuit if the test<br />
result is FAILURE or ALERT. If you suspect a defective<br />
patient circuit, restart SST from the beginning with a<br />
different patient circuit.<br />
<strong>Puritan</strong> Bennett <strong>840</strong> <strong>Ventilator</strong> <strong>Pocket</strong> <strong>Guide</strong><br />
49
TaBle 4. Individual test results in SST<br />
if the test it means: do this:<br />
result is:<br />
➪ You can touch EXIT SST during SST to halt testing.<br />
You can touch EXIT SST again to resume testing, or press<br />
ACCEPT to restart the ventilator (if SST has not detected<br />
an ALERT or FAILURE).<br />
50<br />
Passed<br />
ALERT<br />
FAILURE<br />
WarninG<br />
No problems<br />
found.<br />
Test results not<br />
ideal, but not<br />
critical. SST<br />
halts.<br />
A critical<br />
problem has been<br />
detected, and SST<br />
cannot complete<br />
until the<br />
ventilator passes<br />
the failed test.<br />
Nothing, unless prompted by<br />
the ventilator.<br />
Touch one of these buttons,<br />
then press ACCEPT:<br />
RESTART SST<br />
Repeat SST<br />
from the beginning.<br />
REPEAT<br />
Repeat the test.<br />
NEXT<br />
Skip to the next test.<br />
Touch one of these buttons,<br />
then press ACCEPT:<br />
RESTART SST<br />
Repeat SST<br />
from the beginning.<br />
REPEAT<br />
Repeat the test.<br />
To ensure ventilation that correctly compensates for circuit<br />
resistance and compliance, do not exit SST and begin<br />
normal ventilation until the entire SST has been successfully<br />
completed with the circuit to be used attached.<br />
<strong>Puritan</strong> Bennett <strong>840</strong> <strong>Ventilator</strong> <strong>Pocket</strong> <strong>Guide</strong>
When all of the tests in SST are complete, the SST Status<br />
screen displays all individual test results and SST outcome.<br />
Table 5 summarizes overall SST outcomes and how to<br />
proceed in each case.<br />
➪ To begin normal ventilation (if SST has not detected<br />
an ALERT or FAILURE), touch EXIT SST, then press<br />
ACCEPT. The ventilator reruns POST.<br />
➪ The ventilator displays the <strong>Ventilator</strong> Startup screen.<br />
Confirm or change the last valid settings.<br />
TaBle 5. Overall SST results<br />
if the test it means: do this:<br />
result is:<br />
Passed<br />
ALERT<br />
All tests passed.<br />
One or more<br />
noncritical<br />
problems were<br />
detected. Follow<br />
your institution’s<br />
protocol for<br />
overriding<br />
an ALERT.<br />
Immediate service<br />
not required.<br />
<strong>Puritan</strong> Bennett <strong>840</strong> <strong>Ventilator</strong> <strong>Pocket</strong> <strong>Guide</strong><br />
Touch one of these buttons,<br />
then press ACCEPT:<br />
EXIT SST<br />
To exit SST and begin<br />
normal ventilation.<br />
RESTART SST<br />
To repeat SST from the<br />
beginning.<br />
Touch one of these buttons,<br />
then press ACCEPT:<br />
RESTART SST<br />
To repeat SST from the<br />
beginning.<br />
OVERRIDE<br />
To override the alert, as<br />
allowed by your institution’s<br />
protocol, touch EXIT SST.<br />
Then press ACCEPT to<br />
begin normal ventilation.<br />
51
TaBle 5. Overall SST results (continued)<br />
if the test it means: do this:<br />
result is:<br />
52<br />
FAILURE One or more<br />
critical problems<br />
were detected.<br />
The ventilator<br />
enters a ventilator<br />
inoperative state<br />
and cannot be<br />
used for normal<br />
ventilation until<br />
it passes SST.<br />
Service required.<br />
Restart SST with a different<br />
patient circuit.<br />
Touch<br />
RESTART SST<br />
then press ACCEPT<br />
to repeat SST from the<br />
beginning.<br />
If the failure persists, contact a<br />
qualified service technician.<br />
<strong>Puritan</strong> Bennett <strong>840</strong> <strong>Ventilator</strong> <strong>Pocket</strong> <strong>Guide</strong>
safeTy modes<br />
The <strong>Puritan</strong> Bennett <strong>840</strong> <strong>Ventilator</strong> offers these safety<br />
modes:<br />
Safety ventilation: If you attach a patient before<br />
completing setup, the ventilator alarms and begins safety<br />
ventilation. Safety ventilation delivers pressure control<br />
(PC) mandatory breaths with predetermined settings and<br />
a high pressure limit of 20 cm H 2 O until the setup<br />
is complete.<br />
Apnea ventilation: The ventilator monitors the time<br />
from the start of one breath to the start of the next.<br />
If that time exceeds the operator-set apnea interval,<br />
the ventilator begins apnea ventilation according to<br />
operator-determined settings. Apnea ventilation continues<br />
until the patient initiates two consecutive breaths and<br />
the exhaled volume is equal to or greater than 50% of the<br />
delivered volume (autoreset). May also be manually reset<br />
by the operator.<br />
Occlusion status cycling (OSC): The ventilator checks the<br />
patient circuit for severe occlusions during all modes of<br />
breathing to protect the patient from excessive airway<br />
pressures. If the ventilator detects a severe occlusion,<br />
it opens the safety valve and enters OSC. In OSC, the<br />
ventilator periodically attempts to deliver a pressure-based<br />
breath while monitoring for a severe occlusion. Normal<br />
ventilation resumes once the occlusion is corrected.<br />
Idle mode (disconnect detection): Once the ventilator detects<br />
a patient circuit disconnect, it enters idle mode, in which<br />
the exhalation valve opens, idle flow (5 L/min flow at<br />
100% O 2 , if available) begins, and breath triggering is<br />
disabled. The ventilator displays the length of time that<br />
the patient has been without ventilatory support. Once the<br />
ventilator confirms that the disconnect has been corrected,<br />
normal ventilation resumes.<br />
<strong>Puritan</strong> Bennett <strong>840</strong> <strong>Ventilator</strong> <strong>Pocket</strong> <strong>Guide</strong><br />
53
The <strong>Puritan</strong> Bennett <strong>840</strong> <strong>Ventilator</strong> is also designed to<br />
enter emergency states (ventilator inoperative and safety<br />
valve open, SVO) under some circumstances. A ventilator<br />
inoperative condition always includes the SVO state, but<br />
an SVO state does not necessarily indicate a ventilator<br />
inoperative condition.<br />
<strong>Ventilator</strong> inoperative: The ventilator declares a ventilator<br />
inoperative condition if a hardware failure or critical<br />
software error that could compromise safe ventilation<br />
occurs. In case of a ventilator inoperative condition, the<br />
ventilator enters the SVO state. To correct a ventilator<br />
inoperative condition, the ventilator must be turned off,<br />
then powered on again; at power on, a qualified service<br />
technician must run EST. The ventilator must pass EST<br />
before normal ventilation can resume.<br />
SVO: The safety valve allows the patient to breathe room air<br />
unassisted when the ventilator is in the SVO state. The<br />
ventilator remains in the SVO state until the condition<br />
that caused the SVO state is corrected or, if the ventilator<br />
declared a ventilator inoperative condition, POST verifies<br />
that power levels to the ventilator are acceptable and that<br />
the major electronics systems are functioning correctly.<br />
The ventilator enters the SVO state if a hardware or software<br />
failure occurs that could compromise safe ventilation, both<br />
air and oxygen supplies are lost or an occlusion is detected.<br />
In case of a malfunction that prevents software from opening<br />
the safety valve, there is also an analog circuit that opens the<br />
safety valve if system pressure exceeds 100 to 120 cm H 2 O.<br />
54<br />
<strong>Puritan</strong> Bennett <strong>840</strong> <strong>Ventilator</strong> <strong>Pocket</strong> <strong>Guide</strong>
PreVenTiVe mainTenance<br />
Table 6 summarizes maintenance intervals and procedures.<br />
TaBle 6. Maintenance summary<br />
Procedure<br />
Check patient circuit for water buildup; empty<br />
and clean as necessary.<br />
Inspect and check the resistance across<br />
inspiratory and expiratory filters before<br />
every use, after 15 days of continuous use in<br />
the exhalation limb or if you suspect excess<br />
resistance. (SST checks the resistance of the<br />
expiratory filter.)<br />
Collector vial, water traps and drain bag: check<br />
and empty as needed.<br />
Air inlet filter bowl: if cracked, replace bowl. If<br />
any sign of moisture is visible, remove ventilator<br />
from use and contact service or maintenance.<br />
Clean compressor inlet filter.<br />
Replace reusable inspiratory and expiratory<br />
bacteria filters. Sterilize between patients<br />
and circuit changes, or according to<br />
your institution’s policy. Sterilize before<br />
nondestructive disposal.<br />
Replace oxygen sensor and BPS internal battery<br />
pack. (Must be replaced by a qualified service<br />
technician according to instructions in the<br />
<strong>Puritan</strong> Bennett <strong>840</strong> <strong>Ventilator</strong> Service Manual.)<br />
Use appropriate preventive maintenance kit<br />
(preventive maintenance must be performed<br />
by a qualified service technician according to<br />
instructions in the <strong>Puritan</strong> Bennett <strong>840</strong> <strong>Ventilator</strong><br />
Service Manual).<br />
<strong>Puritan</strong> Bennett <strong>840</strong> <strong>Ventilator</strong> <strong>Pocket</strong> <strong>Guide</strong><br />
interval<br />
Several times<br />
a day or as<br />
required<br />
by your<br />
institution’s<br />
policy<br />
250 hours<br />
(or more often,<br />
if required)<br />
Annually<br />
or after 100<br />
autoclave<br />
cycles<br />
Every two<br />
years or as<br />
necessary<br />
Every 10,000<br />
hours<br />
55
6135 Gunbarrel Avenue<br />
Boulder, CO<br />
80301<br />
COVIDIEN, COVIDIEN with logo, <strong>Covidien</strong><br />
logo and positive results for life are U.S.<br />
and internationally registered trademarks of<br />
<strong>Covidien</strong> AG. Other brands are trademarks of a<br />
<strong>Covidien</strong> company. ©2008, 2011 <strong>Covidien</strong>.<br />
All rights reserved<br />
11-VE-0259 VE07000<br />
800-635-5267 www.covidien.com