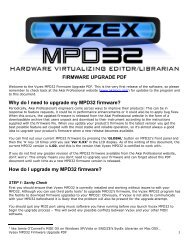
Setting up the MPK49 and MPD32 with Ableton Live - Akai
Setting up the MPK49 and MPD32 with Ableton Live - Akai
Setting up the MPK49 and MPD32 with Ableton Live - Akai

You also want an ePaper? Increase the reach of your titles
YUMPU automatically turns print PDFs into web optimized ePapers that Google loves.
<strong>Akai</strong> MPD <strong>and</strong> MPK Series – Set<strong>up</strong> With <strong>Ableton</strong> <strong>Live</strong><br />
Contents<br />
Configuring as a Control Surface ...................................................................... 2<br />
Input Output Options ......................................................................................... 4<br />
Custom Assigning Controls ............................................................................... 8<br />
Value Scaling vs. Pick Up Mode...................................................................... 10<br />
Using Note Repeat /Arp <strong>with</strong> <strong>the</strong> MPD or MPK’s Internal MIDI Clock ............. 11<br />
Using Note Repeat /Arp <strong>with</strong> <strong>Ableton</strong> as Master ............................................. 12<br />
Using a Virtual Instrument in <strong>Ableton</strong> .............................................................. 13<br />
Technical S<strong>up</strong>port <strong>and</strong> Warranty Service ........................................................ 16<br />
1
Note: These screenshots were taken on <strong>Ableton</strong> <strong>Live</strong> 7.0.15, while <strong>the</strong>re are new<br />
features in 8 <strong>the</strong> selections that pertain to this set<strong>up</strong> should remain <strong>the</strong> same.<br />
Also note <strong>the</strong>y were taken using <strong>the</strong> MPK on a Mac. All of <strong>the</strong> options are <strong>the</strong><br />
same for <strong>the</strong> MPD short of <strong>the</strong> Arp option. So if you own an MPD follow <strong>the</strong>se<br />
same steps. The only difference is you will see MPD instead of MPK. PC users<br />
will see USB Device ra<strong>the</strong>r than MPD or MPK.<br />
Configuring as a Control Surface<br />
1. First open <strong>the</strong> software <strong>and</strong> go to <strong>the</strong> <strong>Live</strong> Menu (File Menu on a PC) <strong>and</strong><br />
choose Preferences.<br />
2. In <strong>the</strong> Preferences screen choose <strong>the</strong> MIDI Sync tab, <strong>and</strong> <strong>the</strong>n drop down<br />
<strong>the</strong> Control Surface menu. In here you should see MPD or MPK.<br />
If you do not see <strong>the</strong>se options in <strong>the</strong> Control Surface menu please <strong>up</strong>grade<br />
to <strong>the</strong> latest version of <strong>Ableton</strong> 6. <strong>Ableton</strong> 7 <strong>and</strong> 8 should have <strong>the</strong>se options<br />
already.<br />
2
3. After choosing <strong>the</strong> appropriate Control Surface, turn your attention to <strong>the</strong><br />
Input <strong>and</strong> Output drop-down menus.<br />
On <strong>the</strong> Input drop-down choose <strong>the</strong> 1 st midi input. (Note: on PC’s you may<br />
see USB Audio Device not MPD or MPK)<br />
4. After choosing <strong>the</strong> first input drop down <strong>the</strong> Output menu.<br />
On <strong>the</strong> Output drop-down menu choose <strong>the</strong> 1 st midi output.<br />
3
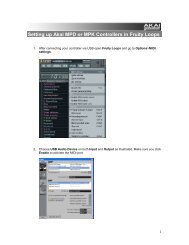
Input Output Options<br />
The MPD or MPK should now be selected as <strong>the</strong> control surface.<br />
Now turn your attention to <strong>the</strong> MIDI Ports section below. You will see 3 inputs<br />
<strong>and</strong> 2 outputs. You will also notice <strong>the</strong> Track, Sync, <strong>and</strong> Remote options.<br />
* Please ask download our MIDI IO Details Guide from any MPD or MPK<br />
controller’s product page for an explanation on <strong>the</strong> differences between <strong>the</strong> 3<br />
inputs <strong>and</strong> 2 outputs.<br />
1. The Track option will control any midi notes being sent by <strong>the</strong> MPD or MPK<br />
or being sent back out to <strong>the</strong> MPD or MPK. (i.e., <strong>the</strong> keys <strong>and</strong> <strong>the</strong> pads for<br />
playing instruments).<br />
When using <strong>the</strong> MPD or MPK to trigger virtual instruments in <strong>Ableton</strong>,<br />
you will want to turn Track On for <strong>the</strong> 1 st input.<br />
If you need to route midi notes from output B on <strong>the</strong> MPD or MPK <strong>the</strong>n<br />
choose Track On for input 2.<br />
If you would like to use <strong>the</strong> physical midi in to route midi from ano<strong>the</strong>r<br />
controller <strong>the</strong>n choose Track On for input 3.<br />
You will see you can do <strong>the</strong> same on both outputs. Generally you will<br />
not need to turn Track On here. However if you need to route midi<br />
notes back out to an external device, you can do so by turning Track<br />
On for output 2.<br />
4
2. The Sync option is specifically for routing Midi Clock between devices. This<br />
will come into play <strong>with</strong> Note Repeat <strong>and</strong> <strong>the</strong> Arp option.<br />
When using <strong>the</strong> MPK you may want to use <strong>the</strong> Note Repeat function on<br />
<strong>the</strong> pads or <strong>the</strong> Arp <strong>with</strong> <strong>the</strong> keys. The MPD will also allow Note Repeat<br />
<strong>with</strong> <strong>the</strong> pads. Both of <strong>the</strong>se options repeat notes at a specific time<br />
division following a specific tempo.<br />
The MPD or MPK has an internal MIDI Clock <strong>and</strong> <strong>the</strong> ability to use an<br />
external clock source. This means <strong>the</strong> tempo of your project, <strong>and</strong><br />
inevitably <strong>the</strong> tempo of Note Repeat <strong>and</strong> <strong>the</strong> Arp, can be chosen by<br />
tapping <strong>the</strong> Tap Tempo button on <strong>the</strong> MPD or MPK or by having <strong>the</strong> MPD<br />
or MPK listen to <strong>Ableton</strong>’s tempo. This is purely based off personal<br />
preference.<br />
5
3. The Remote option is used to send/receive Control Surface comm<strong>and</strong>s. i.e,<br />
<strong>the</strong> transport controls, <strong>the</strong> knobs, <strong>and</strong> <strong>the</strong> faders. (see Custom Assigning<br />
Controls for more on this)<br />
To use <strong>the</strong> knobs, faders, <strong>and</strong> transport to control <strong>Ableton</strong> turn Remote<br />
On for <strong>the</strong> 1st input. This will route <strong>the</strong>se messages into <strong>the</strong> software<br />
enabling you to use <strong>the</strong> knobs, faders, <strong>and</strong> transport to control different<br />
functions in <strong>the</strong> software.<br />
By default <strong>the</strong>y are assigned to <strong>the</strong>ir best controls already. If you have <strong>the</strong><br />
knobs or faders assigned to midi port B on your MPD or MPK <strong>the</strong>n you<br />
would turn Remote On for input 2.<br />
If you would like to use ano<strong>the</strong>r controller via <strong>the</strong> MPD or MPK’s MIDI in<br />
port <strong>the</strong>n turn Remote On for input 3. To route Control Change messages<br />
through <strong>the</strong> MIDI out port on <strong>the</strong> MPD or MPK, turn Remote On for output<br />
2.<br />
7
Custom Assigning Controls<br />
1. It is also very easy to customize <strong>Ableton</strong> to respond in any way you’d like.<br />
On a Mac hit CMD + M to bring <strong>up</strong> <strong>the</strong> midi assignment options. On a<br />
PC press CTRL+M. You’ll see it puts a blue sheen over all assignable<br />
options. Any option you see highlighted can learn any knob, fader, or<br />
s-button on <strong>the</strong> MPD or MPK.<br />
2. First click an assignable option on screen. In <strong>the</strong> example below I chose<br />
Send A on Track 3. You’ll see it puts brackets around <strong>the</strong> option chosen.<br />
8
3. After selecting <strong>the</strong> assignable option (Send A in this example), simply move<br />
<strong>the</strong> knob or fader you would like to assign to it on <strong>the</strong> MPD or MPK.<br />
As you can see in <strong>the</strong> screen shot below it will show a number for <strong>the</strong><br />
assignment it learned. This is <strong>the</strong> CC (Control Change) number<br />
assigned to <strong>the</strong> particular knob or fader you moved.<br />
4. Once you see this on screen press CMD+M on <strong>the</strong> Mac (Ctrl+M on <strong>the</strong> PC)<br />
again to take <strong>the</strong> midi learn assignments off screen. Move <strong>the</strong> knob or fader<br />
you assigned <strong>and</strong> you will see it now moves <strong>the</strong> assignment you chose on<br />
screen. You can do this for virtually anything in <strong>Ableton</strong>. Feel free to set <strong>up</strong><br />
your controller any way you’d like.<br />
9
Value Scaling vs. Pick Up Mode<br />
There is one more thing to be aware of on <strong>the</strong> MIDI Sync tab in your<br />
Preferences menu. You will see a Takeover Mode drop-down menu. Your two<br />
options are Pick Up <strong>and</strong> Value Scaling.<br />
1. When set to Pick Up <strong>the</strong> knobs <strong>and</strong> faders will only start moving <strong>the</strong>re<br />
counterpart on screen when that particular knob or fader moves past <strong>the</strong><br />
location of <strong>the</strong> on screen knob or fader.<br />
i.e., Fader 1 on <strong>the</strong> MPD or MPK is all <strong>the</strong> way down. You open<br />
<strong>Ableton</strong> <strong>and</strong> Fader 1 in <strong>the</strong> software is halfway <strong>up</strong>. When set to<br />
Pick Up <strong>the</strong> fader on screen will not move until <strong>the</strong> fader on <strong>the</strong><br />
MPD or MPK goes past <strong>the</strong> halfway <strong>up</strong> point. It will “Pick Up” from<br />
this point <strong>and</strong> move along <strong>with</strong> <strong>the</strong> fader on screen.<br />
2. When set to Value Scaling it will do <strong>the</strong> opposite.<br />
i.e., Fader 1 on <strong>the</strong> <strong>MPK49</strong> is all <strong>the</strong> way down. You open <strong>Ableton</strong><br />
<strong>and</strong> Fader 1 in <strong>the</strong> software is halfway <strong>up</strong>. When set to Value<br />
Scaling <strong>the</strong> fader on screen will move as soon as you move <strong>the</strong><br />
fader on <strong>the</strong> <strong>MPK49</strong> <strong>with</strong>out waiting for <strong>the</strong> fader to be halfway <strong>up</strong>.<br />
So ra<strong>the</strong>r than waiting for <strong>the</strong> fader on <strong>the</strong> <strong>MPK49</strong> to pass <strong>the</strong> point<br />
where <strong>the</strong> on screen fader is set, it will move immediately from its<br />
original location by <strong>the</strong> amount <strong>the</strong> fader on <strong>the</strong> <strong>MPK49</strong> was<br />
moved.<br />
10
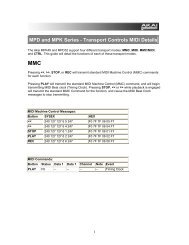
Using Note Repeat /Arp <strong>with</strong> <strong>the</strong> MPD or MPK’s Internal<br />
MIDI Clock<br />
1. First turn Sync On for <strong>the</strong> first input. You will see Sync Type. Drop down<br />
this menu <strong>and</strong> choose MIDI Clock.<br />
This is telling <strong>Ableton</strong> to listen to <strong>the</strong> tempo from your MPD or MPK.<br />
You choose this tempo by ei<strong>the</strong>r tapping <strong>the</strong> Tap Tempo button or by<br />
pressing Edit <strong>and</strong> <strong>the</strong>n Tap Tempo to manually scroll to <strong>the</strong> desired<br />
BPM. The Tap Tempo light will blink at <strong>the</strong> chosen tempo.<br />
If you have an external device that sends MIDI clock that you would<br />
ra<strong>the</strong>r use as your source for midi clock, connect it to <strong>the</strong> MPD or<br />
MPK’s MIDI in port <strong>and</strong> choose Sync On for <strong>the</strong> 3 rd input.<br />
When you do this you will notice <strong>Ableton</strong> will switch to Ext where you<br />
normally would see Tap. This confirms it is listening to <strong>the</strong> external<br />
MIDI clock.<br />
11
Using Note Repeat /Arp <strong>with</strong> <strong>Ableton</strong> as Master<br />
1. To set <strong>the</strong> MPD or MPK to listen to External clock press <strong>the</strong> Global<br />
button <strong>and</strong> <strong>the</strong>n page right until you see MIDI/CLK. Set this option to<br />
External. Make sure you are on <strong>the</strong> latest firmware to be able to save this<br />
change.<br />
The Tap Tempo light will stop blinking which confirms it is no longer using<br />
Internal Clock.<br />
2. Back on <strong>the</strong> MIDI Sync tab under <strong>the</strong> MIDI Ports section turn your<br />
attention to output 1. Turn Sync On for <strong>the</strong> 1 st output in order to route<br />
<strong>Ableton</strong>’s MIDI clock to <strong>the</strong> MPD or MPK.<br />
If you would like to send <strong>the</strong> midi clock to an external device via <strong>the</strong> MPD<br />
or MPK MIDI out port <strong>the</strong>n choose Sync On for port 2.<br />
12
Using a Virtual Instrument in <strong>Ableton</strong><br />
1. To set <strong>up</strong> a Virtual Instrument in <strong>Ableton</strong> <strong>the</strong> first thing we need to do is<br />
choose one from <strong>the</strong> <strong>Ableton</strong> Device List. (You can also use 3 rd party<br />
VST’s, consult <strong>Ableton</strong>’s documentation)<br />
2. Choose <strong>the</strong> option highlighted in <strong>the</strong> screenshot below to bring <strong>up</strong> a list of<br />
your <strong>Live</strong> Devices. In this example I chose Billy <strong>the</strong> Kid under <strong>the</strong><br />
Instrument Rack. To add this to <strong>the</strong> project simply drag it from here <strong>and</strong><br />
drop it to <strong>the</strong> right where it says “Drop Files <strong>and</strong> Audio Devices Here”.<br />
13
3. You will see <strong>the</strong> track appear on <strong>the</strong> right. Notice at <strong>the</strong> bottom <strong>the</strong>re is a<br />
red button. This is Record Enable, this must be activated to hear what<br />
you are playing.<br />
14
4. Below you will see <strong>the</strong> drop down menu for <strong>the</strong> midi input. It will be labeled<br />
MIDI From. Generally you can leave this set to All Ins, however if need<br />
be choose <strong>the</strong> specific input for <strong>the</strong> <strong>MPK49</strong>/<strong>MPD32</strong> from <strong>the</strong> drop down<br />
menu.<br />
5. If you have something set to a specific midi channel that you would like<br />
only this instrument to respond to you can choose <strong>the</strong> channel by dropping<br />
down <strong>the</strong> menu below. Generally this will stay on All Channels.<br />
15
Now if you play <strong>the</strong> MPD or MPK you should hear <strong>the</strong> audio from this Virtual<br />
Instrument track. There is plenty to learn <strong>with</strong> <strong>Ableton</strong> as it is an advanced<br />
DAW(Digital Audio Workstation), so we still suggest reading <strong>the</strong> manual <strong>and</strong><br />
going through <strong>the</strong> tutorial videos. You’re MPD or MPK should be configured <strong>and</strong><br />
ready to use!<br />
Technical S<strong>up</strong>port <strong>and</strong> Warranty Service<br />
Whe<strong>the</strong>r you are a customer or dealer, if you already own a <strong>Akai</strong> Pro product, or if you just have<br />
pre-sales questions, our experienced technical s<strong>up</strong>port team is here to help!<br />
Visit us online: Each product we make has a dedicated s<strong>up</strong>port page on our<br />
website where you can find manuals, specifications, software<br />
<strong>up</strong>dates, drivers <strong>and</strong> troubleshooting guides.<br />
Contact us by Phone: 401-658-4032<br />
http://www.akaipro.com/mpk25<br />
http://www.akaipro.com/mpk49<br />
http://www.akaipro.com/mpk61<br />
http://www.akaipro.com/mpk488<br />
http://www.akaipro.com/mpd26<br />
http://www.akaipro.com/mpd32<br />
Hours of Operation: We are available to help you 8:30 AM - 6:30 PM EST Monday<br />
through Friday (except holidays).<br />
Contact us by email: http://www.akaipro.com/contact<br />
16