
Create successful ePaper yourself
Turn your PDF publications into a flip-book with our unique Google optimized e-Paper software.
User’s <strong>Manual</strong><br />
For<br />
PV-TV304P+<br />
PV-TV304PL+<br />
DOC NO : 54-TV304-03 Rev.A<br />
03/08/22
FCC Requirement<br />
This device has been certified to comply with the limits for a Class B computing device pursuant to Subpart J of Part 15 of<br />
the FCC Rules. See instructions if interference to radio reception is suspected.<br />
WARNING: This equipment generates and uses radio frequency energy and, if not installed or used properly,<br />
that is, in strict accordance with the manufacturer's instructions, may cause interference to radio or<br />
television reception.<br />
It has been tested and found to comply with the limits for a Class B compliant device in accordance with the specifications<br />
in Subpart J of Part 15 of FCC Rules, which are designed to provide reasonable protection against such interference in a<br />
residential installation.<br />
However, there is no guarantee that interference-will not occur in a particular installation.<br />
If this equipment does cause interference to radio or television reception, which can be determined by turning the<br />
equipment off and on, the user is encouraged to try to correct the interference by one or more of the following measures:<br />
˙ Reorient the receiving antenna<br />
˙ Relocate the computer away from the receiver<br />
˙ Move the computer away from the receiver<br />
˙ Plug the computer into a different outlet so that the computer and the receiver are on different branch<br />
circuits<br />
˙ Ensure that the card's mounting screws, attachment connector screws, and ground wires are tightly<br />
secured<br />
˙ Ensure that slot covers are installed in all unused slots<br />
If necessary, consult your dealer, service representative, or an experienced radio/television Technician for additional<br />
suggestions.<br />
The manufacturer is not responsible for any radio or TV interference caused by unauthorized modifications to this<br />
equipment. It is the responsibility of the user to correct such interference.<br />
The user may find the following booklet prepared by the Federal Communications Commission helpful:<br />
How to Identify and Resolve Radio-TV Interference Problems.<br />
This booklet is available from the Government Printing Office, Washington, D.C. 20402, Stock No. 004-000-00345-4.<br />
NOTE: You must use shielded interface cables with a ferrite bead in order to maintain compliance<br />
with the limits for a Class B device.<br />
CAUTION: CHANGES OR MODIFICATIONS NOT EXPRESSLY APPROVED BY THE PARTY<br />
RESPONSIBLE FOR COMPLIANCE COULD VOID THE USER'S AUTHORITY TO OPERATE<br />
THE EQUIPMENT<br />
I
Notice<br />
The information in this document is subject to change in order to improve reliability, design, or function<br />
without prior notice and does not represent a commitment on the part of this company.<br />
In no event will we be liable for direct, indirect, special, incidental, or consequential damages arising out<br />
of the use or the inability to use the product or documentation, even if advised of the possibility of such<br />
damages.<br />
No part of this reference manual may be reproduced or transmitted in any form or by any means without<br />
the prior written permission of this company.<br />
©2003<br />
Trademark Acknowledgements<br />
Limited Warranty<br />
All brand names and trademarks are the property of their owners.<br />
Our company warrants this product against defects in materials and workmanship for a period of one (1)<br />
year from the date of purchase. During the warranty period, a product determined by us to be defective in<br />
form or function will be repaired or at our option, to be replaced at no charge. This warranty does not<br />
apply if the product has been damaged by accident, abuse, misuse, or as a result of service or<br />
modification other than by us.<br />
This warranty is in lieu of any other warranty expressed or implied. In no event shall we be held liable for<br />
incidental or consequential damages, such as lost revenue or lost business opportunities arising from the<br />
purchase of a this product.<br />
Macrovision Corporation Product Notice<br />
This product incorporates copyright protection technology that is protected by method claims of certain<br />
U.S. patents and other intellectual property rights owned by Macrovision Corporation, and other rights<br />
owners. Use of this copyright protection technlolgy must be authorized by Macrovision Corporation, and<br />
is intended for home and other limited viewing uses only unless otherwise authorized by Macrovision<br />
Corporation, Reverse engineering or disassembly is prohibited.<br />
II
TABLE OF CONTENTS<br />
1. FEATURE.............................................................................................................. 1<br />
2. SYSTEM REQUIREMENTS................................................................................ 1<br />
3. SPECIFICATIONS................................................................................................ 2<br />
4. HARDWARE INSTALLATION ........................................................................... 4<br />
4.1 Connecting to other AV devices..................................................................... 5<br />
5. SOFTWARE INSTALLATION............................................................................. 6<br />
5.1 Windows ME Driver and Application Installation......................................... 6<br />
5.2 Windows XP Driver and Application Installation.......................................... 8<br />
5.3 TV Country and Input source selection ....................................................... 10<br />
5.4 Sound Settings ............................................................................................. 10<br />
5.5 DMA Settings .............................................................................................. 12<br />
5.6 DirectX Installation...................................................................................... 13<br />
6. CAPTURE APPLICATION................................................................................. 14<br />
6.1 Capture Application Instruction................................................................... 14<br />
6.2 System requirements.................................................................................... 14<br />
6.3 Video Display Windows .............................................................................. 14<br />
6.4 Capture to Clipboard and AVI files.............................................................. 15<br />
6.5 Video Settings.............................................................................................. 16<br />
6.6 TV Control / Capture Applications .............................................................. 19<br />
6.7 FM Control Application............................................................................... 30<br />
6.8 TV Scheduler ............................................................................................... 32<br />
7. REMOTE CONTROL......................................................................................... 33<br />
7.1 TV Function Keys........................................................................................ 34<br />
7.2 FM Function Keys ....................................................................................... 35<br />
8. FAQ ..................................................................................................................... 36<br />
III
1. Feature<br />
□ Fully PCI Rev 2.1 compliant.<br />
□ Supports Windows 98SE/ME/2000/XP.<br />
□ Supports NTSC, PAL or SECAM video formats.<br />
□ Full TV frequency range for CATV/VHF/UHF.<br />
□ FM band coverage from 87.5 to 108MHz (Option).<br />
□ Combined S-Video & Composite Video and Audio Inputs.<br />
□ Supports planner YUV data format.<br />
□ VBI data capture for closed captioning data decoding.<br />
□ Support NICAM/MTS Audio decoding.<br />
2. System Requirements<br />
□ Intel Pentium II 233MHz or higher and compatible computer.<br />
□ Main board with Intel 440FX chipset or higher.<br />
□ PCI local bus PnP 2.1 compliant.<br />
□ SVGA support higher than 640x480/Hi-color.<br />
□ Sound Card support for audio mix functions.<br />
□ Cable/VHF/UHF antenna.<br />
□ Windows 98SE/ME/2000/XP.<br />
□ DirectX Version 8.1a or higher.<br />
□ Minimum Hard Drive free space of 100MB.<br />
1
3. Specifications<br />
This model supports two types of video inputs: Composite and S-Video. This<br />
TV Tuner card allows you to watch TV, and capture video.<br />
FM radio antenna<br />
CATV/VHF/UHF antenna<br />
Remote control<br />
S-video input<br />
Audio output<br />
Composite input<br />
Audio input<br />
FM radio antenna<br />
CATV/VHF/UHF antenna<br />
Remote control<br />
S-video input<br />
Audio output<br />
Composite input<br />
Audio input<br />
PV-TV304P+(w/FM,MTS,RC)<br />
PV-TV304P+(w/FM,NI,RC)<br />
2
Remote control<br />
FM antenna<br />
CATV/VHF/UHF antenna<br />
S-video & Composite input<br />
Audio input<br />
Remote control<br />
FM antenna<br />
CATV/VHF/UHF antenna<br />
S-video & Composite input<br />
Audio input<br />
PV-TV304PL+(w/FM,MTS,RC)<br />
PV-TV304PL+(w/FM,NI,RC)<br />
3
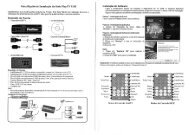
4. Hardware Installation<br />
1. Turn off your computer FIRST. Remove the case and insert this TV tuner/<br />
Capture card into your computer’s PCI slot. Make sure the adapter card is well<br />
seated in the slot, and then fasten it with screws. Then Replace case.<br />
2. Connect the CATV/VHF/UHF antenna and FM radio antenna to the tuner-input<br />
port of adapter.<br />
3. PV-TV304P+<br />
Plug one end of audio cable into “AUDIO<br />
OUT” input and the other end plugs into<br />
the “LINE IN” of the sound card.<br />
PV-TV304PL+<br />
Plug one end of audio cable into “AUDIO<br />
OUT” input and the other end plugs into<br />
the “AUX IN” of the motherboard.<br />
Audio output<br />
Remote control<br />
4. Plug in Remote Receiver into “Remote”.<br />
Caution:When you plug-in or remove the connector of the receiver every<br />
time, please make sure your computer is power off.<br />
5. After completing the above, you may begin to install the software.<br />
4<br />
Remote control<br />
Audio output
4.1 Connecting to other AV devices<br />
This TV tuner/Capture card provides two-types of Video Input. One is Composite<br />
Video input, the other one is S-Video input, and there is another connector for audio<br />
line in.<br />
S-Video input<br />
Composite video<br />
Audio input<br />
S-Video & Composite input<br />
Audio input<br />
5<br />
PV-TV304P+<br />
PV-TV304PL+
5. Software Installation<br />
5.1 Windows ME Driver and Application Installation<br />
Notice<br />
After hardware installation, power on your computer and then system will<br />
detect a new hardware. Please set the new hardware to “Unknown Device”.<br />
Then follow the installation procedure.<br />
1. After turning on your computer, the<br />
Windows ME will detect the new<br />
hardware and will show the following<br />
message on your monitor.<br />
Select the “Automatic search for a<br />
better driver (Recommended)” and<br />
click “Next” on this message box.<br />
2. The operating system will automatically detect the TV card as a new device and<br />
display the “Add New Hardware Wizard” dialog box.<br />
3. Click “Finish” to set the new hardware to<br />
“Unknown Device” on this message box.<br />
4. Insert the AutoRun CD-ROM driver (wait a few seconds). You will<br />
see ”AutoRun” window that will be shown on the screen. If it does not display,<br />
please explore CD and double click “AutoRun.exe”.<br />
6
5. Please follow the procedure to install the Driver and Application.<br />
i.<br />
ii.<br />
iii.<br />
Click TV Card Series Click PlayTV Pro Ultra Click Install Driver<br />
9. Click “Next” to install Driver and<br />
Application on this message box.<br />
10. Setup Complete. Choose “Yes, I want to<br />
restart my computer now” and click<br />
“Finish” to restart Windows.<br />
11. After windows restart, it will install the entire device. Please jump to<br />
“5.3 TV Country and Input source selection”<br />
7
5.2 Windows XP Driver and Application Installation<br />
Notice<br />
After hardware installation, power on your computer and then system will<br />
detect a new hardware. Please set the new hardware to “Unknown Device”.<br />
Then follow the installation procedure.<br />
1. After turn on your computer, the<br />
Windows XP will detect the newly added<br />
hardware and will show the following<br />
message on your monitor.<br />
Click “Cancel” to set the new hardware<br />
to “Unknown Device” on this message<br />
box.<br />
2. Insert the AutoRun CD-ROM driver (wait a few seconds). You will see<br />
“AutoRun” window that will be shown on the screen. If it does not display,<br />
please explore CD and double click “AutoRun.exe”.<br />
3. Please follow the procedure to install the Driver and Application.<br />
i.<br />
ii.<br />
iii.<br />
Click TV Card Series Click PlayTV Pro Ultra Click Install Driver<br />
8
4. If you see any “Hardware Installation”<br />
this message box please clicks “Continue<br />
Anyway”.<br />
5. Click “Next” to install the application on<br />
this message box.<br />
6. Setup Complete. Choose “Yes, I want to<br />
restart my computer now” and click<br />
“Finish” to restart Windows.<br />
9
5.3 TV Country and Input source selection<br />
1. After rebooting, the dialog box “TV<br />
Card Model Configuration” will show,<br />
please click “Next” to continue.<br />
2. In the dialog box “TV Country Code<br />
Configuration”, please select your<br />
location, your TV signal (the default is<br />
“Cable CATV”), your language, the<br />
video source (please select the item<br />
“Tuner”), and the audio source (please<br />
select the item “Aux”).<br />
5.4 Sound Settings<br />
1. Double-click the icon “Volume” on the<br />
taskbar.<br />
2. Click the menu “Options”.<br />
10
3. Check the “Aux” of “Playback” and<br />
click “OK”.<br />
4. Un-check the “Mute” of “Aux”.<br />
5. Click the menu “Options” again and<br />
Check the “Aux” of “Recording” and<br />
click “OK”.<br />
6. And then check the “Select” of “Aux”.<br />
11
5.5 DMA Settings<br />
After installed software application, be sure to<br />
check the hard disc DMA mode. (If your O.S<br />
is Windows 98SE/ME)<br />
In Control Panel:<br />
i. Double click “System”.<br />
ii. Click “Device Manager”.<br />
iii. Double click “Disk drives” and choose<br />
your hard disc and click “Properties”.<br />
iv. Click “Settings” and enable “DMA”.<br />
v. Click “OK”.<br />
vi. Windows restart.<br />
In Control Panel:<br />
i. Double click “System”.<br />
ii. Click “Device Manager”.<br />
iii. Double click “System devices”.<br />
iv. Double click “Direct memory access<br />
controller”.<br />
v. Click “Settings”.<br />
vi. Enable “Reserve DMA buffer” and type<br />
“64” in Textbox.<br />
vii. Click “OK” and the system will reboot.<br />
12
5.6 DirectX Installation<br />
1. There is no need to reinstall DirectX if it is already in your system and its version<br />
is 8.1a or later. You can install DirectX 9.0 from the installation CD, please<br />
click-on “DirectX”.<br />
2. Insert the AutoRun CD-ROM driver (wait<br />
a few seconds). You will see “AutoRun”<br />
window on the screen and click DirectX.<br />
If it does not display, please browse CD<br />
and double click “AutoRun.exe”.<br />
3. Select “I accept the agreement” and<br />
click “Next” on this message box.<br />
4. Click “Next” to install DirectX.<br />
5. Click “Finish” to finish and your<br />
computer will restart automatically.<br />
13
6. Capture Application<br />
6.1 Capture Application Instruction<br />
The application is a 3 in 1 station which includes TV, Capture, and FM radio<br />
functions. The user interface of the station is designed to resemble a consumer Car<br />
Stereo. Thereby, allowing you to access and enjoy these three applications on your PC<br />
system rather easily.<br />
6.2 System requirements<br />
The application has been carefully and successfully designed to work well<br />
with this adapter card. Without this specific TV Tuner card, this software may<br />
not work properly.<br />
6.3 Video Display Windows<br />
The video display window is shown initially in a 640 x 480 scalable and moveable<br />
window format.<br />
1. Full screen display<br />
By double clicking-on the video display window, you can change it to a full<br />
screen, and double clicking again, Restores the original video window size.<br />
It may not function for some incompatible VGA cards with resolution other than<br />
640 x 480. Please update the VGA driver or try another more compatible one.<br />
2. Drag and drop<br />
To move the video display window, just click the left mouse button and move the<br />
TV window anywhere on the screen and release the left mouse.<br />
3. Dynamic sizing<br />
To resize the video display window, just move the mouse to the corner of the<br />
display window and resize, as general windows program and the video display<br />
window will be dynamic resized.<br />
14
4. OSD interface (On Screen Display)<br />
You can fine tune the channel frequency<br />
or change the Brightness, Contrast,<br />
Saturation or Hue through the keyboard<br />
or through the optional Remote Control.<br />
or Click to Change the mode you want to adjust.<br />
or Click to Reset the Default values.<br />
or Click to Fine tune a Previous adjustment.<br />
or Click to Fine tune a Next adjustment.<br />
6.4 Capture to Clipboard and AVI files<br />
With the Video Capture functions, you can grab sensational PC still images or AVI<br />
movies from any TV, VCR or camera. It is just as simple to view and playback<br />
captured video.<br />
1. Video Capture Function keys<br />
Click-on the Control Panel to invoke the capture functions<br />
A.<br />
or Click to Copy the image to the clipboard.<br />
B. or Click to Save the image as .BMP or .JPEG file.<br />
C. or Click to capture AVI files.<br />
D. or Click to Play captured AVI files.<br />
2. Setting Capture Parameters<br />
Press To set capture parameters<br />
such as Frame Rate, Capture Time<br />
Limit, Capture Audio or not, Key or<br />
Mouse to Abort…<br />
15
6.5 Video Settings<br />
1. Source<br />
To choose a video source from this<br />
pull-down menu.<br />
2. Capture Audio<br />
Click-on to capture audio of recording.<br />
3. Enable Capture Time Limit<br />
Click-on enable and set the time limit<br />
(HH:MM:SS) for recording.<br />
4. Scheduler<br />
This function is disabled presently.<br />
16
5. AVI filename<br />
Click-on to set and save the name of the<br />
captured video file. The file name will be<br />
shown in the dialog box; and the default<br />
is: KS2000.AVI.<br />
6. AVI Auto Increment<br />
Click-on to increse number automatically<br />
for the files. If this parameter is disabled,<br />
the captured file will overwrite the<br />
previous one.<br />
7. BMP filename<br />
Click-on to save the file as a still image.<br />
The file name will be shown in the dialog<br />
box. The default file is KS001.BMP.<br />
8. BMP Auto Increment<br />
Click-on to increse number automatically<br />
for the files. If this parameter is disabled,<br />
the captured file will overwrite the<br />
previous one.<br />
9. Save as JPEG<br />
Click-on to convert a .BMP file to<br />
a .JPEG file automatically as a .BMP file<br />
is being captured. The .BMP file will then<br />
be erased to save space on the hard drive.<br />
10. Video Capture Device<br />
Show the video capture devices that are<br />
installed in your system. Please use the<br />
drop down menu to select another device<br />
if more than one video capture cards are<br />
installed in the system. It will take one or<br />
two seconds to connect the capture<br />
device.<br />
17
11. Slide Show Function<br />
Slide shows consists of 160 x 120 video<br />
images at 15 frames per second in a full<br />
screen display. 16 windows are shown in<br />
a screen of 640 x 480 resolution, and up<br />
to 25 windows shown in a screen of 1600<br />
x 1200 resolution.<br />
There are three types of Slide Shows:<br />
12. Other Function<br />
Be viewed in sequencial frames.<br />
Be viewed in a 160 x 120 video image display window.<br />
Be similar to the type “Frames”, except with a enlarged center<br />
display window.<br />
Check to put the control panel and the video screen on<br />
the top of the others.<br />
Check to put the video window in ratio 4:3 mode,<br />
default is enabled.<br />
Check to enable OSD function to shown in video<br />
display window. The TV channel number, name and<br />
configuration parameter are displayed in the video<br />
display window.<br />
Check to get more fluent image and enable OSD.<br />
Check to set de-interlace scan mode. If the function is<br />
checked, it must re-execute the TV application.<br />
18
6.6 TV Control / Capture Applications<br />
The TV Control and Video Capture applications are used with the capture cards<br />
that have a TV tuner module. Please refer to the following section.<br />
6.6.1 Input Source Select and Video Mode<br />
Click to Exit the TV<br />
application.<br />
Click to Recording the Video<br />
files.<br />
Click to Pause the Video files<br />
or Freeze image.<br />
19<br />
Click to switch to the FM<br />
application.<br />
Click to Playback the<br />
Video files.<br />
Click to Forward or<br />
Backward the Video<br />
files.<br />
Click to Minimize the Control Panel. Click to enable Online Help.<br />
1. Video Source<br />
To choose a Video Source Input click-on the corresponding button, from the<br />
Source menu.<br />
A. The Cable Input. The hotkey is<br />
B. The Antenna Input. The hotkey is<br />
C. The Composite Input. The hotkey is<br />
D. The S-VHS Input. The hotkey is<br />
2. The Information on LCD (Liquid Crystal Display)<br />
Shows the current TV channel number<br />
and TV station. Also, indicates if the<br />
reception is in MTS mode.
6.6.2 Sound (MTS) Mode<br />
If the current channel support MTS mode, you can click the button to switch<br />
sound (MTS) mode. The current sound mode will be shown on the LCD window.<br />
The sound mode is Stereo.<br />
The sound mode is Mono.<br />
The sound mode is SAP.<br />
The Keyboard hotkey is to switch<br />
MTS sound mode.<br />
If the Green dot appears, the current channel would be with Stereo.<br />
If the Red dot appears, the current channel would be with SAP.<br />
6.6.3 TV Channel functions<br />
1. Two-digit Chancnel Number Selecting<br />
For Channel selecting, please use the fast channel selector.<br />
Which are the Numbered buttons to the left of the LCD. They<br />
allow the user to select two-digit channels. For example:<br />
To select channel 38, click on then .<br />
To select channel 7, click on then or click on then<br />
or click on and wait for 3 seconds, the application will<br />
select it automatically<br />
2. Channel Select<br />
A. Click-on to return Previous channel.<br />
B. Click-on to +100 or to accept the channel input.<br />
C. Click-on to Channel Up.<br />
D. Click-on to Channel Down.<br />
3. Audio Mixer<br />
A. Click-on to Increase the volume.<br />
B. Click-on to Decrease the volume.<br />
4. Favorite Channel<br />
A. Memory Favorite channels<br />
Click-on to memorize the current channel and then click …<br />
(anyone you want) to make a Memorized channel.<br />
B. Recall Favorite channels<br />
Click and select the saved channel number … , which you want.<br />
20
6.6.4 TV Channel information<br />
1. TV Settings<br />
The TV Settings menu is include all the<br />
advanced functions that allow you to<br />
pre-program the various TV tuner settings<br />
for your viewing pleasure.<br />
2. TV Channel Block<br />
To Block a channel from being viewed,<br />
Please scroll through the list of TV<br />
channels. To select a channel Click-on the<br />
left mouse button. The channel name will<br />
then be copied to the Edit text box.<br />
Click-on the to update the channel<br />
name.<br />
To Enable or Disable a TV channel: Please Highlight a chosen TV Channel, and<br />
then double click the left mouse button. An asterisk (*) will appear, if the channel<br />
is Enabled. A Disabled channel will be skipped when the Channel<br />
3. Channel Function<br />
or arrows are used.<br />
21
A. Channel Scan<br />
Channel Scan is for a system with a newly installed capture card. Please<br />
Scan when a capture card is newly installed. The Scanned channels will be<br />
shown with an asterisk (*).<br />
B. Channel up<br />
Click to reach a Previous channel. The selected bar and channel information<br />
will be updated synchronously.<br />
C. Channel down<br />
Click to reach the Next channel. The selected bar and channel information<br />
will be updated synchronously.<br />
D. Add Channel<br />
Click to Add to the current displayed channels.<br />
E. Delete Channel<br />
Click to Erase current displayed channels.<br />
F. Channel Preview<br />
Channel Preview allows the user to view and chose some favorite channels<br />
and displays them on a full screen display. Click the right mouse button on<br />
any portion of the display window, and the channel selector will be prompted<br />
to select the channel. The channel selected will then be shown on the top left<br />
corner with white background. The channel will be shown in next scanning<br />
cycle.<br />
22
4. TV channel frequency Fine Tune<br />
This function is used to adjust the<br />
receiver frequency for better video<br />
quality. The range is from -128 to +127.<br />
Click on the ‘Save as Default’ button to<br />
save your current changes to the default<br />
channel table. Slide the scroll bar to the<br />
left or to the right to Increase or<br />
Decrease the channel frequency.<br />
The tracked value will be shown in the<br />
value box. Be sure to<br />
Click-on and Save the value for the next<br />
time.<br />
5. TV Input source select<br />
Click-on Cable for CATV (Cable TV) or<br />
on Antenna for standard non-cable<br />
channels.<br />
The selected channel number and the fine<br />
tune number will also be shown.<br />
6. Audio Mixer<br />
To adjust the Volume, Treble and Bass<br />
of the Audio output, please drag the scroll<br />
bars of the equalizer Up or Down.<br />
Also switch the MTS Sound mode:<br />
Mono, Stereo and SAP.<br />
7. OSD interface (On Screen Display)<br />
Click-on to Enable or Disable the On<br />
Screen Display functions.<br />
The TV Channel Number, Name and<br />
Configuration parameters can be<br />
displayed in the video display window.<br />
Please refer to Video Display Window<br />
for further description.<br />
8. Remote Controller<br />
Click-on to Enable/Disable the external<br />
Remote Controller.<br />
23
9. 16-Channel Preview<br />
Click-on to enable the 16-channel<br />
preview feature. If the item is unchecked,<br />
it will be only previewed 4 channels in<br />
the 640 x 480 mode or 9 channels in the<br />
1024 x 768 mode.<br />
10. Free Scan<br />
Click to enable the free scan mode. You<br />
can scan all signalized channels from low<br />
frequency to high frequency. It will cost<br />
you few minutes. This function works<br />
well must with .<br />
If the item is disabled, you can scan all<br />
channels in accordance with standard<br />
frequency table.<br />
24
6.6.5 Advanced functions<br />
1.<br />
2.<br />
Click-on to set the TV parameters. Please refer to TV Channel Information.<br />
Click-on to set the Video parameters. Please refer to Capture Settings.<br />
3. Video Capture Function keys<br />
Click-on the Control Panel to invoke the capture functions<br />
A.<br />
or Click to Copy the image to clipboard.<br />
B.<br />
or Click to Save the still images as a Windows .BMP or .JPEG file.<br />
C.<br />
or Click to Save a Sequence of images as the Microsoft .AVI file.<br />
D.<br />
or Click to Play captured .AVI files, or the choose Default .AVI<br />
files.<br />
4. TV Channel Preview keys<br />
or By Clicking-on 16CH, the viewer is allowed to Preview 16 TV<br />
Channels at a time, to select some of their TV favorite channels and display them<br />
in on a full screen. Click the right mouse button on any of the 16 display windows,<br />
and the channel selector will be prompted to select that channel. The selected<br />
channel will be then shown on the top left corner with white background.<br />
25
5. Slide Show Function keys<br />
or Click-on to view a slide show. Slide shows are displayed in either<br />
a 160 x 120 video image format at 15 frames per second on a full screen display.<br />
Or shown in 16 windows from a 640 x 480 resolution screen. The last option is<br />
up to a 25window display on a 1600 x 1280 resolution screen.<br />
To Exit, double click the left mouse button. The full screen is saved to the<br />
CLIPBOARD when you exit. The captured images are then ready for other DDE<br />
available applications.<br />
There are three types of Slide Shows:<br />
Are shows viewed in sequencial frames.<br />
Are shows viewed in a 160 x 120 video<br />
image display window.<br />
Are shows similar to the FRAMES show,<br />
except with a Enlarged Center display<br />
window.<br />
PS:This format function is only for<br />
screen area 640 by 480 pixels use.<br />
26
6. Video Format<br />
Click the right mouse button on user interface controller to select video format<br />
that you want. Ex: NTSC, PAL, SECAM<br />
Example: When you can see some channel that the image looks like black and<br />
white or deviation from green or other colors or other abnormal image. Maybe<br />
the video format of the channel is wrong. You can try to select everyone of the<br />
video format to get correct video format of this channel(Only for the channel).<br />
The TV application can memorize the video format(Last choice)at this channel<br />
exactly.<br />
PS. Please ask the local TV station to get the detailed description of TV<br />
system.<br />
7. Desktop Play<br />
Click the right mouse button on user interface controller to show the Video image<br />
on desktop.<br />
PS. The function works well must with function. (Please<br />
refer to Capture Settings)<br />
27
6.6.6 Hot-Keys<br />
HOT KEYS are Short Cuts to various applications using either the Mouse, by<br />
pressing on the Function Keys, or by using a Remote Control to activate the various<br />
applications.<br />
See listing below:<br />
1. Hot-Keys <strong>User's</strong> guide<br />
A. To Enable Online Help.<br />
2. Video Display Mode<br />
A. To change video to the Overlay mode.<br />
B. To change video to the Preview mode.<br />
C. To put a video image at the Top of the list.<br />
D. To Freeze the video display.<br />
3. Capture Settings Function Keys<br />
Click-on or PRESS the following Hot-Keys to activate them<br />
A. To Copy the images to the clipboard for other DDE applications.<br />
B. To Save Still images as a Windows .BMP file.<br />
C. To Save Sequential Images as a Microsoft .AVI file.<br />
D. To Play Captured .AVI files.<br />
E. or To Select a Video source.<br />
F. To Choose a Image display Size and format.<br />
G. To Set the Capture parameters.<br />
H. To switch the video source to AIR antenna.<br />
I. To switch the video source to Cable CATV.<br />
J. To switch the video source to S-VHS.<br />
K. To switch the video source to RCA Composite.<br />
4. OSD interface (On Screen Display)<br />
Click-on or PRESS the following Hot-Keys to activate them<br />
A. To Change to another mode<br />
B. To Reset the Default value<br />
C. To Fine tune Backward<br />
D. To Fine tune Forward<br />
28
5. TV Channel Function Keys<br />
Click-on or PRESS the following Hot-Keys to activate them<br />
A. To Scan the TV channels<br />
B. To Channel Up<br />
C. To Channel Down<br />
D. To Return to previous channel.<br />
E. To Insert a current displayed channel<br />
F. To Erase current displayed channel<br />
6. Audio Mode<br />
A. To Mute and Enable Audio<br />
B. To Increase the volume<br />
C. To Decrease the volume<br />
D. To Switch the MTS Sound mode. (Stereo/SAP/Mono)<br />
7. Other functions<br />
A. To Preview your favorite channels<br />
B. To Start the video slide show<br />
C. To pop-up Video Settings.<br />
D. To pop-up TV Settings.<br />
E. To exit control application.<br />
F. To zoom the video display window to full screen or not.<br />
G. To Switch the TV / FM application.<br />
Number Keys: Used for selecting<br />
two-digit TV channels, and Increasing or<br />
Decreasing the volume.<br />
29
6.7 FM Control Application<br />
FM Control Application is used with the capture cards that have a TV/FM tuner<br />
module. Please refer to the following section. If you turn on the FM application then<br />
the TV application will turn off automatically<br />
1. FM Control Panel<br />
Click to Exit the FM<br />
application.<br />
Click to Recording the<br />
Audio files.<br />
30<br />
Click to switch to the TV<br />
application.<br />
Click to Playback the<br />
Audio files.<br />
Click to Minimize the Control Panel. Click to enable Online Help.<br />
A. Click to toggle the FM STEREO / MONO status. If the signal is not<br />
clear, please use the mono status.<br />
B. Click on to Increase the volume.<br />
C. Click on to Decrease the volume.<br />
D. Click to seek for previous signalized channel automatically.<br />
D. Click to seek for next signalized channel automatically.<br />
E. Click to fine-tune frequency 0.05MHz forward.<br />
G. Click to fine-tune frequency 0.05MHz backward.
2. FM Frequency bandwidth<br />
Press or to toggle FM bandwidth between 70 ~ 108MHz and 88 ~<br />
108MHz.<br />
88~108 MHZ 70~108MHZ<br />
3. FM Frequency slider<br />
Please drag the frequency slider anywhere<br />
by the left mouse button and fine tune by<br />
clicking the frequency find tune buttons.<br />
4. Memorize Favorite Channels<br />
Click to memorize the current channel and click<br />
channel that you want to save.<br />
… (anyone)<br />
5. Recall Favorite Channels<br />
... Select the memorize channel number which you want.<br />
6. Assign Favorite Channels? Name<br />
To edit the name of the FM station, move<br />
the mouse to the memorized key and click<br />
on the right mouse button and a small<br />
window created. Keyin the name of the<br />
station and press to save. The<br />
name will be shown on the hint LCD if<br />
the mouse is moved to the memorized<br />
key.<br />
31
6.8 TV Scheduler<br />
6.8.1 Function Instruction<br />
32<br />
This is an advanced function, which<br />
can make a schedule to play TV, FM,<br />
and close application, even shutdown<br />
the windows by it.<br />
Please click right mouse button on<br />
the TVSCHL icon at<br />
toolbar and then click “scheduler” To<br />
control the TV Scheduler.<br />
(A) Start to play DATE (B) End to play DATE<br />
(C) Start to play TIME (D) End to play TIME<br />
(E) Time limit<br />
(F) Input source<br />
(G) Channel select<br />
(H) Image display window size<br />
Example: 2002-4-12, 21:00 start to play Air channel 12 over 60 minutes.<br />
(A) Without choose “Date Time” you can set Daily or every Monday,<br />
Tuesday…to play. Then you must set what time you want to play.<br />
(B) Choose to set playing date and time.<br />
(C) Choose to execute TV or FM application.<br />
(D) Choose to close application when finished playing.<br />
(E) Choose to Shutdown windows when finished playing. (This function works<br />
must with “Close”)<br />
(F) Click to add a new task on scheduler.<br />
(G) Click to modify the current task.<br />
(H) Click to delete the highlight task.<br />
(I) Click to remove the entire task on scheduler.<br />
(J) Click to exit the TV Scheduler.
7. Remote Control<br />
If you bought our Remote Control, you’ll<br />
now be able to control your new<br />
application remotely. The Remote Control<br />
package contains the Remote Control and<br />
its Receiver. The receiver must be<br />
connected to the adapter for it to function<br />
properly. PLEASE install the application,<br />
FIRST, before trying out the Remote<br />
Control.<br />
33
7.1 TV Function Keys<br />
SCAN channels<br />
Switch to TV or FM<br />
Numbered keys<br />
Select Video SOURCE<br />
FUNCTION Adjustment<br />
34<br />
Screen ZOOM<br />
Program OFF<br />
VOLUME Up/Down<br />
CHANNEL Up/Down<br />
Audio MUTE<br />
+100 Click to accept the channel<br />
Loop Click to return<br />
previous channel
7.2 FM Function Keys<br />
SCAN channels<br />
Switch to TV or FM<br />
Channel keys<br />
Quick search<br />
35<br />
Program OFF<br />
VOLUME Up/Down<br />
CHANNEL Up/Down<br />
Audio MUTE<br />
Frequency Adjustment
8. FAQ<br />
Q: What VGA card could be used to run the TV card?<br />
A: The VGA card spec requested is as following:<br />
1. Linear frame buffer<br />
2. Hardware cursor<br />
3. Graphics mode support 640x480/hi-color<br />
Q: When in the 1280x1024 graphics mode, the Video Screen does not<br />
display a Full-Screen.<br />
A: The TV card needs more graphics memory at a higher resolution. The best<br />
graphics mode is 800 x 600/Hi-Color or 800 x 600/True-Color when watching<br />
TV.<br />
Q: Why the video picture motion is slowly when I capture or see at<br />
preview mode?<br />
A: That is normal, because the signal is via CPU and memory to display.<br />
Q: How to enable audio function.<br />
A: Please see the section “5.4 Sound Settings”.<br />
Q: Why does it have no audio when I watch TV?<br />
A: 1. Please confirm IRQ is works properly.<br />
2. Please reference the User’s <strong>Manual</strong> page 3 (4.Hardware Installation) check<br />
your hardware installation.<br />
Q: The system will hang up when I launch application program on my<br />
motherboard (all in one motherboard).<br />
A: Please change the slot of capture card far away CPU slot. It caused by resource of<br />
motherboard. As we know, the resource of slot that near CPU is the same with<br />
other device that on board of motherboard. (Sound card, modem, VGA...)<br />
Q: Does it have any compatibility issue with VGA card or motherboard?<br />
A: It has some compatibility issue with Trident 9750/9850/9685 and S3 Savage 4<br />
VGA cards and SiS620 motherboard. Because they can't support TV Overlay<br />
mode. So you can't see video in Overlay mode.<br />
36
Q: When I finish installing the driver to Windows ME/XP and run TV<br />
application program, but there is no picture and audio?<br />
A: It maybe has IRQ conflict. Check your ‘Device Manager’ whether has IRQ<br />
conflict with another devices, like SCSI card, net card or sound card. If yes,<br />
please change the TV card to another PCI slot to try again or adjust your IRQ<br />
address manually.<br />
Q: If my location have two kinds TV system,,,,One is NTSC mode,,,,another<br />
is PAL mode,,,,Can I save the two kinds mode????<br />
A: Yes, you can select the TV channel then push mouse right key in the control<br />
panel. The screen will show a setting form. Please select Format item in your<br />
setting form. After setting completely, the channels you want watch will auto<br />
select the system with last setting.<br />
Q: Why have I no audio after finish installing driver and software on<br />
Windows ME?<br />
A: Because Windows ME does not include DirectX8.1a. So, you must install<br />
DirectX8.1a or later version.<br />
Q: Why have I no picture when I open application software again on<br />
Windows ME?<br />
A: Because Windows ME may be lost the hardware driver sometimes. Please install<br />
driver again.<br />
37