SUMMIT® GAS GRILL - Help - Weber
SUMMIT® GAS GRILL - Help - Weber
SUMMIT® GAS GRILL - Help - Weber

Create successful ePaper yourself
Turn your PDF publications into a flip-book with our unique Google optimized e-Paper software.
6<br />
INSTALL <strong>GAS</strong> SUPPLY<br />
General Specifi cations for Piping<br />
Note - Contact your local municipality for building codes regulating<br />
outdoor gas barbecue installations. In absence of Local Codes, you<br />
must confi rm to the latest edition of the National Fuel Gas Code: ANSI Z<br />
223.1/NFPA 54, or CAN/CGA-B149.1, Natural Gas and Propane Installation<br />
Code. WE RECOMMEND THAT THIS INSTALLATION BE DONE BY A<br />
PROFESSIONAL.<br />
Some of the following are general requirements taken from the latest<br />
edition of the National Fuel Gas Code: ANSI Z 223.1/NFPA 54, or CAN/<br />
CGA-B149.1, Natural Gas and Propane Installation Code for complete<br />
specifi cations.<br />
• This barbecue is designed to operate at 4.5 inches of water column<br />
pressure (.16241 psi).<br />
A manual shut-off valve must be installed outdoors, immediately ahead<br />
of the quick disconnect.<br />
• An additional manual shut-off valve indoors should be installed in the<br />
branch fuel line in an accessible location near the supply line<br />
• The quick disconnect connects to a 3/8 inch NPT thread from the gas<br />
source. The quick disconnect fi tting is a hand-operated device that<br />
automatically shuts OFF the fl ow of gas from the source when the<br />
barbecue is disconnected<br />
• The quick disconnect fi tting can be installed horizontally, or pointing<br />
downward. Installing the fi tting with the open end pointing upward can<br />
result in collecting water and debris.<br />
• The dust covers (supplied plastic plugs) help keep the open ends of the<br />
quick disconnect fi tting clean while disconnected.<br />
• Pipe compound should be used which is resistant to the action of natural<br />
gas when connections are made.<br />
• The outdoor connector must be fi rmly attached to rigid, permanent<br />
construction.<br />
WARNING: Do not route the 10 foot hose under a<br />
deck. The hose must be visible.<br />
Gas Line Piping<br />
• If the length of the line required does not exceed 50 feet, use a 5/8" O.D.<br />
tube. One size larger should be used for lengths greater than 50 feet.<br />
• Gas piping may be copper tubing, type K or L; polyethylene plastic tube,<br />
with a minimum wall thickness of .062 inch; or standard weight (schedule<br />
40) steel or wrought iron pipe.<br />
• Copper tubing must be tin-lined if the gas contains more than 0.3 grams<br />
of hydrogen sulfi de per 100 cubic feet of gas.<br />
• Plastic tubing is suitable only for outdoor, underground use.<br />
• Gas piping in contact with earth, or any other material which may corrode<br />
the piping, must be protected against corrosion in an approved manner.<br />
• Underground piping must have a minimum of 18" cover<br />
Test Connections<br />
All connections and joints must be thoroughly tested for leaks in accordance<br />
with local codes and all listed procedures in the latest edition of the National<br />
Fuel Gas Code: ANSI Z 223.1/NFPA 54, or CAN/CGA-B149.1<br />
DANGER<br />
Do not use an open fl ame to check for gas leaks. Be<br />
sure there are no sparks or open fl ames in the area<br />
while you check for gas leaks. This will result in a fi re<br />
or explosion which can cause serious bodily injury or<br />
death and damage to property.<br />
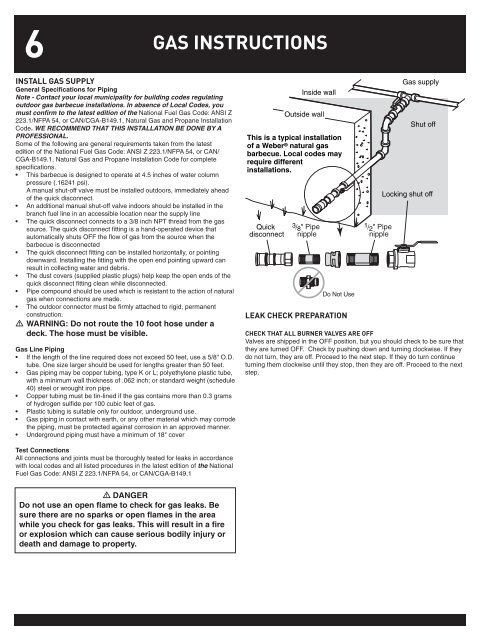
<strong>GAS</strong> INSTRUCTIONS<br />
Inside wall<br />
Outside wall<br />
This is a typical installation<br />
of a <strong>Weber</strong> ® natural gas<br />
barbecue. Local codes may<br />
require different<br />
installations.<br />
Quick<br />
disconnect<br />
3 /8" Pipe<br />
nipple<br />
Do Not Use<br />
LEAK CHECK PREPARATION<br />
1 /2" Pipe<br />
nipple<br />
Gas supply<br />
Shut off<br />
Locking shut off<br />
CHECK THAT ALL BURNER VALVES ARE OFF<br />
Valves are shipped in the OFF position, but you should check to be sure that<br />
they are turned OFF. Check by pushing down and turning clockwise. If they<br />
do not turn, they are off. Proceed to the next step. If they do turn continue<br />
turning them clockwise until they stop, then they are off. Proceed to the next<br />
step.