

2 piece mold Swim Whiz.pub - Make Your Own Lures
2 piece mold Swim Whiz.pub - Make Your Own Lures
2 piece mold Swim Whiz.pub - Make Your Own Lures

Create successful ePaper yourself
Turn your PDF publications into a flip-book with our unique Google optimized e-Paper software.
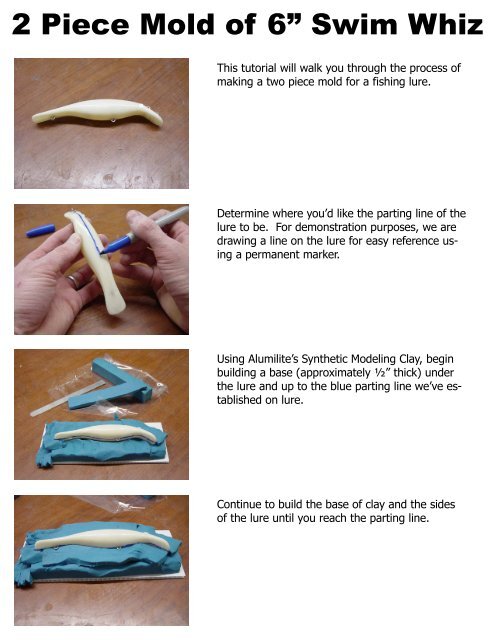
2 Piece Mold of 6” <strong>Swim</strong> <strong>Whiz</strong><br />
This tutorial will walk you through the process of<br />
making a two <strong>piece</strong> <strong>mold</strong> for a fishing lure.<br />
Determine where you’d like the parting line of the<br />
lure to be. For demonstration purposes, we are<br />
drawing a line on the lure for easy reference using<br />
a permanent marker.<br />
Using Alumilite’s Synthetic Modeling Clay, begin<br />
building a base (approximately ½” thick) under<br />
the lure and up to the blue parting line we’ve established<br />
on lure.<br />
Continue to build the base of clay and the sides<br />
of the lure until you reach the parting line.
2 Piece Mold of 6” <strong>Swim</strong> <strong>Whiz</strong><br />
How To: <strong>Swim</strong> <strong>Whiz</strong><br />
Once you’ve built the clay up to the parting line,<br />
smooth the edges using one of Alumilite’s clay<br />
tools to make a clean parting line on the lure<br />
where the two halves of the <strong>mold</strong> will split.<br />
Continue to smooth the remaining clay out which<br />
will make a smooth seam line and create very little<br />
flash.<br />
Use a popsicle stick or any other similar shaped<br />
item to create your pour and vent holes. This will<br />
create the area in which you will pour the resin<br />
into the <strong>mold</strong> and the vents which will allow the<br />
air to escape the <strong>mold</strong> to prevent air bubbles<br />
from being trapped in your finished casting.<br />
Note: You can choose to cut your pour and vent<br />
holes after you pour both halves of your <strong>mold</strong> if<br />
you prefer. You can also cut in locators into the<br />
<strong>mold</strong> after you pour the first half of the <strong>mold</strong><br />
prior to pouring the second half. This is completely<br />
a preference of the <strong>mold</strong> maker. For demonstration<br />
we are adding them in prior to pouring<br />
the first half of the <strong>mold</strong>.<br />
At this point you can add locators to the clay.<br />
Here we are using some clear marbles that are<br />
pressed halfway down into the clay. These will<br />
create negative craters in half of the <strong>mold</strong> which<br />
will help align the two halves of the <strong>mold</strong>.
2 Piece Mold of 6” <strong>Swim</strong> <strong>Whiz</strong><br />
How To: <strong>Swim</strong> <strong>Whiz</strong><br />
The more locators you add to the flange, the better<br />
the two halves of the <strong>mold</strong> will seat into one<br />
another and locate properly.<br />
You are now ready to make a <strong>mold</strong> box around<br />
the clayed up lure to contain the silicone rubber.<br />
Using Alumilite’s 3” Corrugated Strips, size up and<br />
cut through one layer of the plastic to quickly and<br />
easily make a perfect custom fit <strong>mold</strong> box.<br />
Continue constructing the <strong>mold</strong> box by cutting off<br />
the excess strip and making sure it is a tight fit to<br />
the clay.
2 Piece Mold of 6” <strong>Swim</strong> <strong>Whiz</strong><br />
How To: <strong>Swim</strong> <strong>Whiz</strong><br />
Glue the edges of the corrugated box together to<br />
prevent the rubber from leaking.<br />
Now the <strong>mold</strong> box is constructed and sealed, we<br />
are ready to pour the first half of our silicone rubber<br />
<strong>mold</strong>.<br />
Measure the proper amounts of base and catalyst<br />
of High Strength 2 silicone <strong>mold</strong> making rubber.<br />
If you need help figuring out how much silicone is<br />
required for your <strong>piece</strong>, use the Calculating Volumes<br />
page on this site (found on the tool bar<br />
above). If you have the ability to degas the silicone<br />
it is recommended but by no means required.<br />
If you do not have vacuum, simply brush on the<br />
first coat of silicone rubber over the lure and then<br />
continue to pour the <strong>mold</strong> box full starting in one<br />
corner and allowing the rubber to flow naturally<br />
to fill the box. Brushing the silicone on will<br />
squeegee the air off of the surface and paint on a<br />
skin coat of silicone that will not allow air to hold<br />
onto the surface of the lure. Bubbles that can no<br />
longer hold on to the lure will float to the top<br />
away from the <strong>mold</strong> surface giving you a great<br />
<strong>mold</strong> of the lure.
2 Piece Mold of 6” <strong>Swim</strong> <strong>Whiz</strong><br />
How To: <strong>Swim</strong> <strong>Whiz</strong><br />
Continue to pour the rubber into the <strong>mold</strong> box<br />
from the same spot in which you started pouring.<br />
Allow the silicone to flow naturally over the <strong>piece</strong><br />
to reduce the chance of trapping or creating air in<br />
your <strong>mold</strong>.<br />
Continue to pour the High Strength 2 until the<br />
complete lure is covered up by approximately<br />
3/8”-1/2” of silicone. Allow the silicone to cure<br />
overnight.<br />
When the rubber has cured (hardened to a flexible<br />
rubber), you are ready to flip it over and begin<br />
removing the clay.<br />
Begin by flipping the <strong>mold</strong> box over and removing<br />
the <strong>mold</strong> base.
2 Piece Mold of 6” <strong>Swim</strong> <strong>Whiz</strong><br />
How To: <strong>Swim</strong> <strong>Whiz</strong><br />
Carefully remove the clay but be sure NOT to remove<br />
the lure from the first half of the silicone<br />
rubber <strong>mold</strong>. It is very important to not even<br />
break the seal between the lure and the first pour<br />
of silicone rubber. This seal prevents the second<br />
pour of silicone from leaking between the lure<br />
and the first half of the <strong>mold</strong> which will mess up<br />
your parting line.<br />
Carefully remove the clay making sure not to remove<br />
the original lure.<br />
Continue removing the clay as well as the marble<br />
locators.<br />
Spend the time necessary to clean up all clay<br />
residue around the lure and the seam line. Paper<br />
towel and a little rubbing alcohol may help the<br />
cleaning process. Do NOT use rubbing alcohol on<br />
a painted lure as it may smear or remove the<br />
paint messing up your original.<br />
Once the clay has been completely removed, you<br />
are ready to apply release and pour the second<br />
half of your <strong>mold</strong>.
2 Piece Mold of 6” <strong>Swim</strong> <strong>Whiz</strong><br />
How To: <strong>Swim</strong> <strong>Whiz</strong><br />
Using either Alumilite’s UMR release or Rubber to<br />
Rubber Mold Release, apply release to prevent<br />
the second pour of Alumilite’s High Strength 2<br />
silicone rubber from bonding to the first.<br />
Note: Release is not required unless you are<br />
pouring onto another silicone that you do not<br />
wish to bond it to. Silicone only sticks (or bonds)<br />
to another silicone. This is why we did not need<br />
any <strong>mold</strong> release on the first half of the lure that<br />
was laid up in clay.<br />
If you do not have either of Alumilite’s release<br />
agents, use a very thin layer of Vaseline to prevent<br />
the silicone from bonding to itself.<br />
You are now ready to mix up your second batch<br />
of silicone rubber, degas it or brush on the initial<br />
layer, and pour the remaining silicone over the<br />
second half of the lure to complete your two<br />
<strong>piece</strong> <strong>mold</strong>.<br />
Continue to pour from one corner and allow the<br />
rubber to flow naturally, as you did with the first<br />
half, to prevent unnecessary air entrapment.<br />
Continue to pour the rubber until it is covered by<br />
3/8”-1/2” thick of silicone and allow it to cure<br />
overnight.
2 Piece Mold of 6” <strong>Swim</strong> <strong>Whiz</strong><br />
How To: <strong>Swim</strong> <strong>Whiz</strong><br />
Once the rubber is cured, remove your <strong>mold</strong> box<br />
and prepare to separate the two halves of the<br />
<strong>mold</strong>.<br />
Begin to separate the <strong>mold</strong> on the seam line.<br />
Follow the seam line down and continue to separate<br />
the two halves of the <strong>mold</strong>.<br />
Once apart, remove the original from the <strong>mold</strong> as<br />
well as the vents and pour hole <strong>piece</strong>s. Now you<br />
have an exact <strong>mold</strong> of your original bait.
2 Piece Mold of 6” <strong>Swim</strong> <strong>Whiz</strong><br />
How To: <strong>Swim</strong> <strong>Whiz</strong><br />
Using an Alumilite Excel Knife, cut small reservoirs<br />
in the <strong>mold</strong> at the top of the vents and pour<br />
hole to open them up. These openings should<br />
only go half way down the vents and pour hold<br />
and should not be close to the actual lure. Then<br />
simply put the <strong>mold</strong> together and use tape to<br />
hold it in place. Do NOT over tighten the <strong>mold</strong><br />
and this will distort your lure. The locators will<br />
line up the two halves of the <strong>mold</strong> and will simply<br />
need to be held in place.<br />
Mix equal amounts of Alumilite White thoroughly<br />
and slowly pour the mixed resin into the <strong>mold</strong><br />
through the pour hole. Alumilite White is extremely<br />
thin and flows very well into the <strong>mold</strong><br />
which will pick up the exact detail of your original<br />
lure. Microballoons or Tungsten can also be<br />
added to the resin to increase or decrease the<br />
density.<br />
The resin will begin to turn to an opaque white<br />
color as it begins to harden (at the 3 minute<br />
point). De<strong>mold</strong> time for the Alumilite White is approximately<br />
5-10 minutes. The de<strong>mold</strong> time can<br />
be shortened by preheating the <strong>mold</strong> to 120 F<br />
prior to pouring the resin.<br />
Once the resin is cured and you are ready to de<strong>mold</strong><br />
your cast lure, remove the tape.
2 Piece Mold of 6” <strong>Swim</strong> <strong>Whiz</strong><br />
How To: <strong>Swim</strong> <strong>Whiz</strong><br />
Begin separating the two halves of the <strong>mold</strong> as<br />
you did when making the <strong>mold</strong>.<br />
Open the two halves of the <strong>mold</strong> to see your<br />
<strong>piece</strong> and remove it.<br />
Here you can see what the actual lure will look<br />
like when you first remove it from the <strong>mold</strong>.<br />
It is highly recommended to deflash the lure with<br />
a razor blade shortly after de<strong>mold</strong>ing as the resin<br />
will be slightly soft while it is still hardening making<br />
the task much easier than when it fully hardens.
2 Piece Mold of 6” <strong>Swim</strong> <strong>Whiz</strong><br />
How To: <strong>Swim</strong> <strong>Whiz</strong><br />
Here is the bait after the flash has been removed<br />
along with the original. Screw eyes can be added<br />
before pouring by simply laying them in the <strong>mold</strong><br />
prior to pouring or can be screwed in after the<br />
lure has been cast.<br />
If you have questions regarding this or any of our how to’s please<br />
call us toll free Monday through Friday 8am-5pm EST or type<br />
your question into Larry’s forum found on this page at:<br />
http://www.purpledesert.net/asklarry/