Douglas in full lengths - Dinesen
Douglas in full lengths - Dinesen
Douglas in full lengths - Dinesen

Create successful ePaper yourself
Turn your PDF publications into a flip-book with our unique Google optimized e-Paper software.
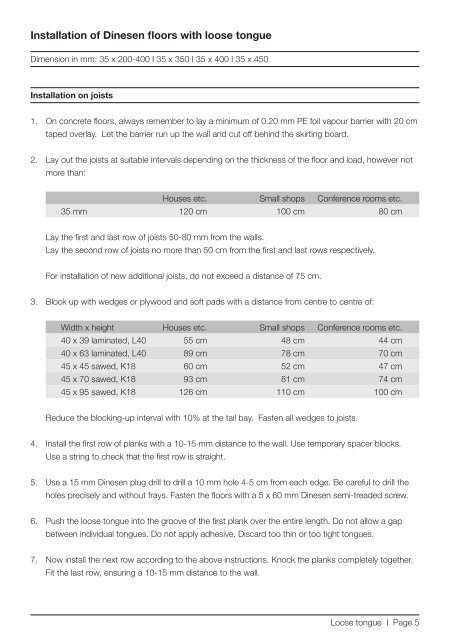
Installation of D<strong>in</strong>esen floors with loose tongue<br />
Dimension <strong>in</strong> mm: 35 x 200-400 I 35 x 350 I 35 x 400 I 35 x 450<br />
Installation on joists<br />
1. On concrete floors, always remember to lay a m<strong>in</strong>imum of 0.20 mm PE foil vapour barrier with 20 cm<br />
taped overlay. Let the barrier run up the wall and cut off beh<strong>in</strong>d the skirt<strong>in</strong>g board.<br />
2. Lay out the joists at suitable <strong>in</strong>tervals depend<strong>in</strong>g on the thickness of the floor and load, however not<br />
more than:<br />
Houses etc. Small shops Conference rooms etc.<br />
35 mm 120 cm 100 cm 80 cm<br />
Lay the first and last row of joists 50-80 mm from the walls.<br />
Lay the second row of joists no more than 50 cm from the first and last rows respectively.<br />
For <strong>in</strong>stallation of new additional joists, do not exceed a distance of 75 cm.<br />
3. Block up with wedges or plywood and soft pads with a distance from centre to centre of:<br />
Width x height Houses etc. Small shops Conference rooms etc.<br />
40 x 39 lam<strong>in</strong>ated, L40 55 cm 48 cm 44 cm<br />
40 x 63 lam<strong>in</strong>ated, L40 89 cm 78 cm 70 cm<br />
45 x 45 sawed, K18 60 cm 52 cm 47 cm<br />
45 x 70 sawed, K18 93 cm 81 cm 74 cm<br />
45 x 95 sawed, K18 126 cm 110 cm 100 cm<br />
Reduce the block<strong>in</strong>g-up <strong>in</strong>terval with 10% at the tail bay. Fasten all wedges to joists.<br />
4. Install the first row of planks with a 10-15 mm distance to the wall. Use temporary spacer blocks.<br />
Use a str<strong>in</strong>g to check that the first row is straight.<br />
5. Use a 15 mm D<strong>in</strong>esen plug drill to drill a 10 mm hole 4-5 cm from each edge. Be careful to drill the<br />
holes precisely and without frays. Fasten the floors with a 5 x 60 mm D<strong>in</strong>esen semi-treaded screw.<br />
6. Push the loose tongue <strong>in</strong>to the groove of the first plank over the entire length. Do not allow a gap<br />
between <strong>in</strong>dividual tongues. Do not apply adhesive. Discard too th<strong>in</strong> or too tight tongues.<br />
7. Now <strong>in</strong>stall the next row accord<strong>in</strong>g to the above <strong>in</strong>structions. Knock the planks completely together.<br />
Fit the last row, ensur<strong>in</strong>g a 10-15 mm distance to the wall.<br />
Loose tongue I Page 5