DUR-A-QUARTZ “BM” EPOXY FLOORING ... - Dur-A-Flex
DUR-A-QUARTZ “BM” EPOXY FLOORING ... - Dur-A-Flex
DUR-A-QUARTZ “BM” EPOXY FLOORING ... - Dur-A-Flex
You also want an ePaper? Increase the reach of your titles
YUMPU automatically turns print PDFs into web optimized ePapers that Google loves.
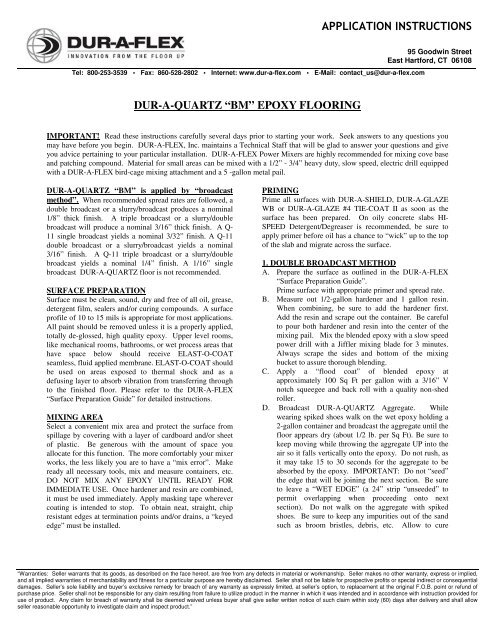
<strong>DUR</strong>-A-<strong>QUARTZ</strong> <strong>“BM”</strong> <strong>EPOXY</strong> <strong>FLOORING</strong><br />
IMPORTANT! Read these instructions carefully several days prior to starting your work. Seek answers to any questions you<br />
may have before you begin. <strong>DUR</strong>-A-FLEX, Inc. maintains a Technical Staff that will be glad to answer your questions and give<br />
you advice pertaining to your particular installation. <strong>DUR</strong>-A-FLEX Power Mixers are highly recommended for mixing cove base<br />
and patching compound. Material for small areas can be mixed with a 1/2” - 3/4” heavy duty, slow speed, electric drill equipped<br />
with a <strong>DUR</strong>-A-FLEX bird-cage mixing attachment and a 5 -gallon metal pail.<br />
<strong>DUR</strong>-A-<strong>QUARTZ</strong> <strong>“BM”</strong> is applied by “broadcast<br />
method”. When recommended spread rates are followed, a<br />
double broadcast or a slurry/broadcast produces a nominal<br />
1/8” thick finish. A triple broadcast or a slurry/double<br />
broadcast will produce a nominal 3/16” thick finish. A Q-<br />
11 single broadcast yields a nominal 3/32” finish. A Q-11<br />
double broadcast or a slurry/broadcast yields a nominal<br />
3/16” finish. A Q-11 triple broadcast or a slurry/double<br />
broadcast yields a nominal 1/4” finish. A 1/16” single<br />
broadcast <strong>DUR</strong>-A-<strong>QUARTZ</strong> floor is not recommended.<br />
SURFACE PREPARATION<br />
Surface must be clean, sound, dry and free of all oil, grease,<br />
detergent film, sealers and/or curing compounds. A surface<br />
profile of 10 to 15 mils is appropriate for most applications.<br />
All paint should be removed unless it is a properly applied,<br />
totally de-glossed, high quality epoxy. Upper level rooms,<br />
like mechanical rooms, bathrooms, or wet process areas that<br />
have space below should receive ELAST-O-COAT<br />
seamless, fluid applied membrane. ELAST-O-COAT should<br />
be used on areas exposed to thermal shock and as a<br />
defusing layer to absorb vibration from transferring through<br />
to the finished floor. Please refer to the <strong>DUR</strong>-A-FLEX<br />
“Surface Preparation Guide” for detailed instructions.<br />
MIXING AREA<br />
Select a convenient mix area and protect the surface from<br />
spillage by covering with a layer of cardboard and/or sheet<br />
of plastic. Be generous with the amount of space you<br />
allocate for this function. The more comfortably your mixer<br />
works, the less likely you are to have a “mix error”. Make<br />
ready all necessary tools, mix and measure containers, etc.<br />
DO NOT MIX ANY <strong>EPOXY</strong> UNTIL READY FOR<br />
IMMEDIATE USE. Once hardener and resin are combined,<br />
it must be used immediately. Apply masking tape wherever<br />
coating is intended to stop. To obtain neat, straight, chip<br />
resistant edges at termination points and/or drains, a “keyed<br />
edge” must be installed.<br />
APPLICATION INSTRUCTIONS<br />
Tel: 800-253-3539 • Fax: 860-528-2802 • Internet: www.dur-a-flex.com • E-Mail: contact_us@dur-a-flex.com<br />
95 Goodwin Street<br />
East Hartford, CT 06108<br />
PRIMING<br />
Prime all surfaces with <strong>DUR</strong>-A-SHIELD, <strong>DUR</strong>-A-GLAZE<br />
WB or <strong>DUR</strong>-A-GLAZE #4 TIE-COAT II as soon as the<br />
surface has been prepared. On oily concrete slabs HI-<br />
SPEED Detergent/Degreaser is recommended, be sure to<br />
apply primer before oil has a chance to “wick” up to the top<br />
of the slab and migrate across the surface.<br />
1. DOUBLE BROADCAST METHOD<br />
A. Prepare the surface as outlined in the <strong>DUR</strong>-A-FLEX<br />
“Surface Preparation Guide”.<br />
Prime surface with appropriate primer and spread rate.<br />
B. Measure out 1/2-gallon hardener and 1 gallon resin.<br />
When combining, be sure to add the hardener first.<br />
Add the resin and scrape out the container. Be careful<br />
to pour both hardener and resin into the center of the<br />
mixing pail. Mix the blended epoxy with a slow speed<br />
power drill with a Jiffler mixing blade for 3 minutes.<br />
Always scrape the sides and bottom of the mixing<br />
bucket to assure thorough blending.<br />
C. Apply a “flood coat” of blended epoxy at<br />
approximately 100 Sq Ft per gallon with a 3/16” V<br />
notch squeegee and back roll with a quality non-shed<br />
roller.<br />
D. Broadcast <strong>DUR</strong>-A-<strong>QUARTZ</strong> Aggregate. While<br />
wearing spiked shoes walk on the wet epoxy holding a<br />
2-gallon container and broadcast the aggregate until the<br />
floor appears dry (about 1/2 lb. per Sq Ft). Be sure to<br />
keep moving while throwing the aggregate UP into the<br />
air so it falls vertically onto the epoxy. Do not rush, as<br />
it may take 15 to 30 seconds for the aggregate to be<br />
absorbed by the epoxy. IMPORTANT: Do not “seed”<br />
the edge that will be joining the next section. Be sure<br />
to leave a “WET EDGE” (a 24” strip “unseeded” to<br />
permit overlapping when proceeding onto next<br />
section). Do not walk on the aggregate with spiked<br />
shoes. Be sure to keep any impurities out of the sand<br />
such as broom bristles, debris, etc. Allow to cure<br />
“Warranties: Seller warrants that its goods, as described on the face hereof, are free from any defects in material or workmanship. Seller makes no other warranty, express or implied,<br />
and all implied warranties of merchantability and fitness for a particular purpose are hereby disclaimed. Seller shall not be liable for prospective profits or special indirect or consequential<br />
damages. Seller’s sole liability and buyer’s exclusive remedy for breach of any warranty as expressly limited, at seller’s option, to replacement at the original F.O.B. point or refund of<br />
purchase price. Seller shall not be responsible for any claim resulting from failure to utilize product in the manner in which it was intended and in accordance with instruction provided for<br />
use of product. Any claim for breach of warranty shall be deemed waived unless buyer shall give seller written notice of such claim within sixty (60) days after delivery and shall allow<br />
seller reasonable opportunity to investigate claim and inspect product.”
E. Sweep off the excess aggregate using a stiff, clean, dry<br />
broom with synthetic bristles. Save the sweep off and<br />
use it for the next broadcast.<br />
F. Apply the next coat with a 12” flat squeegee. Move<br />
squeegee in a continuous semi-circular motion from<br />
left to right to left, etc. Back roll with a quality short<br />
nap, non-shed roller.<br />
G. Sweep off the excess aggregate again. Scrape the floor<br />
with a trowel. Sweep or vacuum the floor again.<br />
H. See TOPCOAT INSTRUCTIONS below.<br />
2. SLURRY BROADCAST METHOD<br />
A. Prepare the surface as outlined in the <strong>DUR</strong>-A-FLEX<br />
Surface Preparation Guide on our website.<br />
B. Prime surface with appropriate primer and spread rate.<br />
C. Measure out 1/2-gallon hardener and 1 gallon resin.<br />
When combining, be sure to add the hardener first.<br />
Add the resin and scrape out the container. Be careful<br />
to pour both hardener and resin into the center of the<br />
mixing pail. Mix the blended epoxy with a slow speed<br />
power drill with a Jiffler mixing blade for 3 minutes.<br />
Always scrape the sides and bottom of the mixing<br />
bucket to assure thorough blending.<br />
D. Add 1/2 gallon of #1/2 Jersey Sand, 1/2 gallon of<br />
<strong>DUR</strong>-A-<strong>QUARTZ</strong> aggregate and 1/2 gallon of #290<br />
flour. Blend thoroughly with drill and Jiffler mixer.<br />
Be sure to stir the slurry mix each time immediately<br />
before you pour it on the floor, as the sand will settle in<br />
the bucket.<br />
E. Pour out about 1/3 of the slurry and spread with a<br />
cement finish trowel. Do not tilt the trowel more than<br />
a 45° angle. Use the jersey sand as a guide and let the<br />
trowel slide over it. (A loop roller may also be used to<br />
help make the slurry more uniform). Allow 5 to 10<br />
minutes for the slurry to level before proceeding to the<br />
next step.<br />
F. Broadcast <strong>DUR</strong>-A-<strong>QUARTZ</strong> Aggregate. Wearing<br />
spiked shoes walk on the wet epoxy holding a 2-gallon<br />
container and broadcast the aggregate until the floor<br />
appears dry (about 3/4 lb. per Sq Ft). Be sure to keep<br />
moving while throwing the aggregate UP into the air so<br />
it falls vertically onto the epoxy. Do not rush, as it may<br />
take 15 to 30 seconds for the aggregate to be absorbed<br />
by the epoxy. IMPORTANT: Do not “seed” the edge<br />
that will be joining the next section. Be sure to leave<br />
this “WET EDGE” (a 24” strip “unseeded” to permit<br />
overlapping when proceeding onto next section). Do<br />
not walk on the aggregate with spiked shoes. Be sure<br />
to keep any impurities out of the sand such as broom<br />
bristles, debris, etc. Allow to cure.<br />
G. Sweep off the excess aggregate with a stiff broom.<br />
Sand the floor with a floor buffing machine and<br />
sanding attachment. Use 3½” open grit sandpaper.<br />
Sweep or vacuum the floor again.<br />
H. See TOPCOAT INSTRUCTIONS below.<br />
TOPCOAT INSTRUCTIONS (Q28 Only)<br />
(1 coat for standard, 2 for orange peel, 3 for smooth)<br />
<strong>DUR</strong>-A-GLAZE #4 “Water Clear” should be used for<br />
topcoats to lessen the effects of ambering from UV<br />
exposure.<br />
A. Measure out 1/2-gallon hardener and 1 gallon resin.<br />
Follow the same pouring and mixing procedures as<br />
described in the broadcast coat. Apply the topcoat with<br />
a 12” flat squeegee. Move squeegee in a continuous<br />
semi-circular motion from left to right to left, etc.<br />
Steady pressure on squeegee is necessary to obtain a<br />
uniform appearance. Do not advance squeegee too<br />
rapidly, each semi-circular swing should advance<br />
approximately 4 inches. It takes practice to reverse<br />
direction of the squeegee movement at the end of each<br />
left to right to left stroke. Remove all puddles and<br />
ridges before they are out of reach. Start movement of<br />
squeegee in a dry area, move onto wet GLAZE and<br />
continue to move squeegee until it reaches a dry edge.<br />
B. Back roll with a quality short nap, non-shed roller.<br />
C. For multiple topcoats, sand the floor in between<br />
topcoats with a floor buffing machine and sanding<br />
attachment. Use 3½” closed coat sandpaper.<br />
D. Sweep or vacuum the floor again and repeat for each<br />
topcoat. Apply Armor Top per Product Data Sheet<br />
instructions.<br />
IMPORTANT: Be sure to pour the hardener into the<br />
mixing bucket first, then the “resin”. Always scrape the<br />
sides and bottom of mixing container to assure thorough<br />
blending. USE SIGNS AND BARRIERS to keep traffic<br />
out of the area. Do not allow any water on coated surface<br />
for 24-48 hours. Chemical spillage must be prevented for<br />
approximately 5 days. NOTE: Use <strong>DUR</strong>-A-SOLVE or a<br />
lacquer thinner for clean up.<br />
CAUTION<br />
Follow the Hazardous Materials Identification System<br />
labeling guide for proper personal protective equipment<br />
to use when handling this product. Use only as directed.<br />
KEEP OUT OF REACH OF CHILDREN.<br />
JOINT GUIDELINES<br />
Refer to the Joint Guidelines for complete details on our<br />
website.<br />
Before using any <strong>DUR</strong>-A-FLEX, Inc. product, be sure the Material Safety Data Sheet is read and understood.<br />
12/20/2011027. <strong>Dur</strong>-A-Quartz BM Application instructions


