Do it yourself worm farming - City of Onkaparinga.
Do it yourself worm farming - City of Onkaparinga.
Do it yourself worm farming - City of Onkaparinga.

You also want an ePaper? Increase the reach of your titles
YUMPU automatically turns print PDFs into web optimized ePapers that Google loves.
<strong>Do</strong> <strong>it</strong> <strong>yourself</strong> <strong>worm</strong> <strong>farming</strong><br />
Worm farms are simple structures that<br />
you can easily and affordably do <strong>yourself</strong>.<br />
They consist <strong>of</strong> 3-4 stackable layers made<br />
up <strong>of</strong> plastic, wood or any other<br />
lightweight material. (Polystyrene boxes<br />
are perfect and can be obtained from<br />
your local fru<strong>it</strong> and vegetable shop).<br />
The <strong>worm</strong>s live in the layers and simply<br />
wriggle up from the lower level to the one<br />
above feeding on the food and veggie<br />
scraps that might have otherwise gone to<br />
waste.<br />
The base layer should have a solid floor to<br />
catch the liquid fertilizer that percolates<br />
down from the living and feeding layers.<br />
Ideally <strong>it</strong> is great to have a tap, although<br />
a hole that you can plug will certainly<br />
make do. Simply tilt the stack to allow the<br />
liquid to run through and collect.<br />
The upper layers will need to be<br />
perforated to allow the <strong>worm</strong>s to move<br />
through to reach the food supplies on the<br />
next level. These layers need to lock into<br />
each other and need to be deep enough to<br />
leave enough room w<strong>it</strong>hout being<br />
squashed.<br />
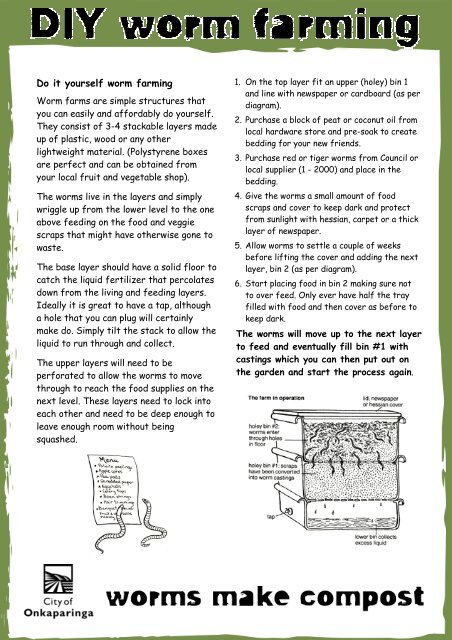
1. On the top layer f<strong>it</strong> an upper (holey) bin 1<br />
and line w<strong>it</strong>h newspaper or cardboard (as per<br />
diagram).<br />
2. Purchase a block <strong>of</strong> peat or coconut oil from<br />
local hardware store and pre-soak to create<br />
bedding for your new friends.<br />
3. Purchase red or tiger <strong>worm</strong>s from Council or<br />
local supplier (1 - 2000) and place in the<br />
bedding.<br />
4. Give the <strong>worm</strong>s a small amount <strong>of</strong> food<br />
scraps and cover to keep dark and protect<br />
from sunlight w<strong>it</strong>h hessian, carpet or a thick<br />
layer <strong>of</strong> newspaper.<br />
5. Allow <strong>worm</strong>s to settle a couple <strong>of</strong> weeks<br />
before lifting the cover and adding the next<br />
layer, bin 2 (as per diagram).<br />
6. Start placing food in bin 2 making sure not<br />
to over feed. Only ever have half the tray<br />
filled w<strong>it</strong>h food and then cover as before to<br />
keep dark.<br />
The <strong>worm</strong>s will move up to the next layer<br />
to feed and eventually fill bin #1 w<strong>it</strong>h<br />
castings which you can then put out on<br />
the garden and start the process again.
<strong>Do</strong> <strong>it</strong> <strong>yourself</strong> mulch<br />
Mulch is a terrific water and garden saver,<br />
helps to reduce weeds and most importantly<br />
improves the qual<strong>it</strong>y <strong>of</strong> sandy and clay like<br />
soils by improving the amount <strong>of</strong> organic<br />
matter and encouraging earth <strong>worm</strong>s. You<br />
can recycle your would be waste at home to<br />
save money and benef<strong>it</strong> both your garden<br />
and the environment.<br />
Mulching materials found at home<br />
• Grass and leaves can be used for mulch,<br />
but <strong>it</strong>s best if they are dried first or<br />
mixed w<strong>it</strong>h coarse materials like twigs to<br />
prevent them from forming a waterpro<strong>of</strong><br />
layer when they are tightly packed<br />
together. Lawn clippings are actually best<br />
left on the lawn (but that is dependant on<br />
how you like the appearance <strong>of</strong> your lawn<br />
to be). Fallen leaves are also useful. If you<br />
have problems w<strong>it</strong>h them decomposing too<br />
slowly, run the lawnmower over the top<br />
and mix w<strong>it</strong>h cut grass or twigs.<br />
• Compost and manure are some <strong>of</strong> the best<br />
materials that you can use. These will<br />
decay quickly and provide lots <strong>of</strong> nutrients<br />
for the soil. Mix manure w<strong>it</strong>h other<br />
mulches especially when fresh.<br />
• Newspaper makes a perfect weed mat<br />
when soaked and layered in the garden,<br />
newspaper works best when combined w<strong>it</strong>h<br />
another mulch that is heavier to go on top<br />
and prevent the newspaper from flying<br />
away. Woodchips, pine-bark and even peastraw<br />
are ideal to do this.<br />
How to go about <strong>it</strong><br />
Clear away any weeds from around your<br />
plants, break up the soil crust, and water<br />
the area. Spread the mulch evenly around<br />
the plants until <strong>it</strong> is approximately 7cm deep.<br />
Always remember to leave a space around<br />
the plant stem to prevent stem rot. Top up<br />
every season, as most mulches will break<br />
down quickly to become part <strong>of</strong> the soil.<br />
When to apply mulch<br />
The time <strong>of</strong> application depends on what you<br />
hope to achieve by mulching. Mulches, by<br />
providing an insulating barrier between the<br />
soil and the air, moderate the soil<br />
temperature. This means that a mulched soil<br />
in the summer will be cooler than an<br />
adjacent unmulched soil. However, since<br />
mulch acts as an insulating layer, mulched<br />
soils tend to warm up more slowly in the<br />
spring and cool down more slowly in autumn<br />
than unmulched soils.<br />
Please contact Tess Sapia, Waste and<br />
recycling Education Officer on 8384 0128<br />
for further information.