Engine Cranks but Will Not Start Probable Causes ... - JustAnswer
Engine Cranks but Will Not Start Probable Causes ... - JustAnswer
Engine Cranks but Will Not Start Probable Causes ... - JustAnswer

Create successful ePaper yourself
Turn your PDF publications into a flip-book with our unique Google optimized e-Paper software.
Troubleshooting<br />
C4.4 and C6.6 Industrial <strong>Engine</strong>s and <strong>Engine</strong>s for Caterpillar Built Machines<br />
Media Number -SENR9969-05 Publication Date -01/10/2009 Date Updated -07/10/2009<br />
<strong>Engine</strong> <strong>Cranks</strong> <strong>but</strong> <strong>Will</strong> <strong>Not</strong> <strong>Start</strong><br />
<strong>Probable</strong> <strong>Causes</strong><br />
•<br />
•<br />
•<br />
•<br />
•<br />
•<br />
•<br />
•<br />
•<br />
•<br />
Diagnostic codes<br />
Visible faults<br />
Air intake and exhaust system<br />
Primary speed/timing sensor<br />
Low pressure fuel system<br />
Secondary speed/timing sensor<br />
High pressure fuel system<br />
Glow plugs<br />
Valve lash<br />
Low compression (cylinder pressure)<br />
Recommended Actions<br />
NOTICE<br />
Page 1 of 8
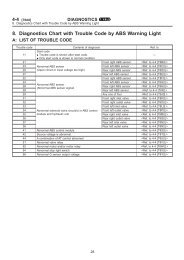
Diagnostic Codes<br />
Do not crank the engine continuously for more than 30 seconds. Allow<br />
the starting motor to cool for two minutes before cranking the engine<br />
again.<br />
Use one of the following methods to check for active diagnostic codes:<br />
•<br />
•<br />
•<br />
Flash Codes<br />
The display on the control panel<br />
The electronic service tool<br />
Flash Codes<br />
<strong>Not</strong>e: The following procedure is only applicable if the machine is equipped with the appropriate<br />
warning lamps.<br />
1.<br />
2.<br />
Check the warning lamps on the control panel for flash codes. Flash codes are explained in<br />
Troubleshooting, "Flash Codes".<br />
If any flash codes are displayed, troubleshoot the codes before continuing with this procedure.<br />
Refer to Troubleshooting, "Troubleshooting with a Diagnostic Code".<br />
Attempt to start the engine. If the engine will not start, proceed to "Visible 3. Faults".<br />
Display on the Control Panel<br />
<strong>Not</strong>e: The following procedure is only applicable if the application is equipped with a display on the<br />
control panel.<br />
1.<br />
2.<br />
Check the display on the control panel for active diagnostic codes.<br />
Troubleshoot any active codes before continuing with this procedure. Refer to Troubleshooting,<br />
"Troubleshooting with a Diagnostic Code".<br />
Attempt to start the engine. If the engine will not start, proceed to "Visible 3. Faults".<br />
Electronic Service Tool<br />
1.<br />
2.<br />
3.<br />
Connect the electronic service tool to the diagnostic connector.<br />
Check for active diagnostic codes on the electronic service tool.<br />
Investigate any active codes before continuing with this procedure. Refer to Troubleshooting,<br />
"Troubleshooting with a Diagnostic Code".<br />
Attempt to start the engine. If the engine will not start, proceed to "Visible 4. Faults".<br />
Page 2 of 8
Visible Faults<br />
1.<br />
2.<br />
3.<br />
4.<br />
Visually inspect the engine for the following faults:<br />
◦<br />
◦<br />
◦<br />
◦<br />
◦<br />
Missing components<br />
Damaged components<br />
Damaged electrical cables or loose electrical cables<br />
Oil leaks<br />
Fuel leaks<br />
Check the following items:<br />
◦<br />
◦<br />
◦<br />
◦<br />
◦<br />
◦<br />
◦<br />
◦<br />
Check for smoke from the exhaust when the engine is cranking. If smoke is seen during<br />
cranking, there may be a mechanical fault in the engine. Refer to "Low Compression<br />
(Cylinder Pressure)".<br />
Check for the proper level of fuel, oil and coolant.<br />
Ensure that the fuel supply valve (if equipped) is in the full OPEN position.<br />
If the ambient temperature is below 0 °C (32 °F), make sure that the correct specification<br />
of engine oil and oil for the machine is used.<br />
Check that the battery voltage is correct.<br />
Use the electronic service tool to check the average cranking speed of the engine. If the<br />
cranking speed is less than 150 rpm, investigate the cause of the low cranking speed.<br />
Make sure that all fuel filters are correctly installed.<br />
Drain any water from the primary fuel filter/water separator.<br />
Rectify any faults that are found during the visual checks.<br />
Attempt to start the engine. If the engine will not start, proceed to "Air Intake and Exhaust<br />
System".<br />
Air Intake and Exhaust System<br />
1.<br />
2.<br />
3.<br />
Check the air filter restriction indicator, if equipped.<br />
Ensure that the air filter is clean and serviceable.<br />
Check the air intake and exhaust systems for the following defects:<br />
◦<br />
◦<br />
Blockages<br />
Restrictions<br />
Page 3 of 8
4.<br />
5.<br />
◦ Damage to lines or hoses<br />
Repair any defects before attempting to restart the engine.<br />
Attempt to start the engine. If the engine will not start, proceed to "Primary Speed/timing<br />
Sensor".<br />
Primary Speed/timing Sensor<br />
1.<br />
2.<br />
3.<br />
5.<br />
Disconnect connector P401 from the primary speed/timing sensor.<br />
Attempt to start the engine.<br />
If the engine starts, check for a fault in the circuit for the primary speed/timing sensor. Refer to<br />
Troubleshooting, "<strong>Engine</strong> Speed/Timing Sensor Circuit - Test".<br />
If the engine does not start, inspect the timing ring on the crankshaft for4. misalignment.<br />
If necessary, repair the timing ring. Refer to Disassembly and Assembly, "<strong>Cranks</strong>haft Timing<br />
Ring - Remove and Install".<br />
Attempt to start the engine. If the engine will not start, proceed to "Low6. Pressure Fuel System".<br />
Low Pressure Fuel System<br />
2.<br />
3.<br />
4.<br />
5.<br />
6.<br />
8.<br />
10.<br />
If the temperature is below 0 °C (32 °F), check for solidified fuel (wax).1.<br />
Check for fuel supply lines that are restricted.<br />
Check that the low pressure fuel lines are correctly installed.<br />
Check the diesel fuel for contamination. Refer to Systems Operation, Testing and Adjusting,<br />
"Fuel Quality - Test".<br />
Check for air in the fuel system. Refer to Systems Operation, Testing and Adjusting, "Air in<br />
Fuel - Test".<br />
Ensure that the fuel system has been primed. Refer to Systems Operation, Testing and<br />
Adjusting, "Fuel System - Prime".<br />
Attempt to start the engine. If the engine will not start, continue with this 7. procedure.<br />
Replace the primary fuel filter and the secondary fuel filter. Refer to the Operation and<br />
Maintenance Manual, "Fuel System Primary Filter (Water Separator) Element - Replace".<br />
Attempt to start the engine. If the engine will not start, continue with this 9. procedure.<br />
Page 4 of 8<br />
Check the flow of fuel through the transfer pump. If the flow of fuel through the transfer pump<br />
is less than 250 mL per minute at 150 rpm, replace the transfer pump. Refer to Disassembly and<br />
Assembly, "Fuel Transfer Pump - Remove" and Disassembly and Assembly, "Fuel Transfer<br />
Pump - Install".
11.<br />
Attempt to start the engine. If the engine will not start, proceed to "Secondary Speed/timing<br />
Sensor".<br />
Secondary Speed/timing Sensor<br />
1.<br />
2.<br />
Connect the electronic service tool to the diagnostic connector.<br />
Check that the desired fuel rail pressure is at least 25 MPa (3625 psi) when the engine is<br />
cranking.<br />
If the desired fuel rail pressure is less than 25 MPa (3625 psi), perform the 3. following procedure:<br />
a.<br />
b.<br />
c.<br />
d.<br />
Use the electronic service tool to check the signal from the secondary speed/timing<br />
sensor while the engine is cranking.<br />
If the signal from the secondary speed/timing sensor is 0 rpm, investigate the secondary<br />
speed/timing sensor. Refer to Troubleshooting, "<strong>Engine</strong> Speed/Timing Sensor Circuit -<br />
Test".<br />
If a fault is identified in the circuit for the secondary speed/timing sensor, repair the fault<br />
and then attempt to start the engine. If the engine will not start, proceed to "High Pressure<br />
Fuel System".<br />
If the signal from the secondary speed/timing sensor is greater than 0 rpm and the engine<br />
will not start, proceed to "High Pressure Fuel System".<br />
High Pressure Fuel System<br />
1.<br />
2.<br />
Use the electronic service tool to check the absolute fuel rail pressure while the engine is<br />
cranking at a minimum speed of 150 rpm.<br />
If the absolute fuel rail pressure is less than 25 MPa (3625 psi), perform the following<br />
procedure:<br />
a.<br />
b.<br />
c.<br />
d.<br />
e.<br />
Page 5 of 8<br />
Check that the inlet pressure at the fuel rail pump is greater than 50 kPa (7.25 psi). If the<br />
inlet pressure is less than 50 kPa (7.25 psi), repeat the diagnostic process from "Low<br />
Pressure Fuel System".<br />
Check for fuel leaks in the high pressure fuel system. Rectify any fuel leaks and then<br />
recheck the pressure in the fuel rail. If the fuel rail pressure is greater than 25 MPa (3625<br />
psi), proceed to test step 3.<br />
Use the electronic service tool to perform a solenoid test on the fuel rail pump. Refer to<br />
Troubleshooting, "Fuel Rail Pump Solenoid - Test".<br />
If any service has been performed as a result of Step 2.c, attempt to start the engine. If the<br />
engine will not start, repeat the diagnostic process from "Diagnostic Codes".<br />
Check the pressure relief valve in the fuel rail for leakage. If the pressure relief valve is<br />
leaking, replace the valve and recheck the pressure in the fuel rail.
3.<br />
f.<br />
g.<br />
h.<br />
i.<br />
If the pressure relief valve in the fuel rail is not leaking, check for fuel in the engine oil<br />
system. If fuel is suspected in the oil system, take an engine oil sample for analysis. Refer<br />
to the Operation and Maintenance Manual, "<strong>Engine</strong> Oil Sample - Obtain". If the analysis<br />
confirms that there is fuel in the engine oil system, investigate the cause.<br />
If fuel is not found in the oil system, check the electronic unit injectors for excessive fuel<br />
leak off. Refer to Special Instruction KENR6938, "High Leakoff of the Electronic Unit<br />
Injector".<br />
If the leak off is greater than 38 mL (1.3 oz) in 30 seconds for a 6 cylinder engine or the<br />
leak off is greater than 25 mL (0.85 oz) in 30 seconds for a 4 cylinder engine, replace the<br />
electronic unit injectors.<br />
<strong>Not</strong>e: The fault is not in the fuel rail pump. Do not replace the pump.<br />
If the leak off is less than 38 mL (1.3 oz) in 30 seconds for a 6 cylinder engine or the leak<br />
off is less than 25 mL (0.85 oz) in 30 seconds for a 4 cylinder engine, proceed to Test<br />
Step 3.d.<br />
If the absolute fuel rail pressure is greater than 25 MPa (3625 psi), perform the following<br />
procedure:<br />
a.<br />
b.<br />
c.<br />
d.<br />
e.<br />
f.<br />
g.<br />
h.<br />
i.<br />
j.<br />
Use the electronic service tool to make sure that the status of the electronic unit injectors<br />
is not "Disabled". If the injectors are disabled <strong>but</strong> the injectors were not intentionally<br />
disabled with the electronic service tool, proceed to test step 3.d.<br />
If the electronic unit injectors are not disabled, use the electronic service tool to perform<br />
an injector solenoid test. Refer to Troubleshooting, "Injector Solenoid Circuit - Test".<br />
If any service has been performed as a result of Step 3.b, attempt to start the engine. If the<br />
engine will not start, proceed to "Glow Plugs".<br />
Make sure that the latest flash file for the application is installed in the ECM. Refer to<br />
Troubleshooting, "Flash Programming".<br />
Contact the technical communicator at the Caterpillar dealer.<br />
<strong>Not</strong>e: This consultation can greatly reduce the repair time.<br />
If the technical communicator recommends the use of a test ECM, install a test ECM.<br />
Refer to Troubleshooting, "Replacing the ECM".<br />
Page 6 of 8<br />
Attempt to start the engine. If the engine will not start, install the original ECM and then<br />
proceed to Test Step 3.l.<br />
If the engine starts normally, stop the engine and then attempt to start the engine again. If<br />
the engine will not start at the second attempt, proceed to Test Step 3.k.<br />
If the engine starts normally, reconnect the suspect ECM and then verify that the fault<br />
returns when the suspect ECM is installed.<br />
If the engine will not start with the suspect ECM, replace the ECM. Check that the engine<br />
starts normally. If the engine starts normally, no further testing is required.
k.<br />
l.<br />
m.<br />
n.<br />
Glow Plugs<br />
Replace the ECM again and then replace the fuel rail pump. Verify that the fault has been<br />
eliminated. If the engine will not start, proceed to "Glow Plugs".<br />
Check the timing of the fuel rail pump. Refer to Systems Operation, Testing and<br />
Adjusting, "Fuel Injection Timing - Check".<br />
If the timing of the fuel rail pump required adjustment and the engine will not start,<br />
proceed to "Glow Plugs".<br />
If the timing of the fuel rail pump was correct, replace the fuel rail pump. If the engine<br />
will not start, proceed to "Glow Plugs".<br />
<strong>Not</strong>e: Faulty glow plugs will only affect engine starting when the ambient temperature is below 10 °C<br />
(50 °F).<br />
1.<br />
2.<br />
Check the operation of the glow plugs. Refer to Systems Operation, Testing and Adjusting,<br />
"Glow Plugs - Test".<br />
If necessary, replace faulty glow plugs. Refer to Disassembly and Assembly, "Glow Plug -<br />
Remove and Install".<br />
Attempt to start the engine. If the engine will not start, proceed to "Valve 3. Lash".<br />
Valve Lash<br />
1.<br />
2.<br />
Check the valve lash. Refer to Systems Operation, Testing and Adjusting, "<strong>Engine</strong> Valve Lash -<br />
Inspect/Adjust".<br />
Attempt to start the engine. If the engine will not start, proceed to "Low Compression (Cylinder<br />
Pressure)".<br />
Low Compression (Cylinder Pressure)<br />
1.<br />
Perform a compression test. Refer to Systems Operation, Testing and Adjusting, "Compression<br />
- Test ".<br />
If low compression is noted on any cylinders, investigate the cause and rectify 2. the cause.<br />
Possible causes of low compression are shown in the following list:<br />
◦<br />
◦<br />
◦<br />
◦<br />
◦<br />
Loose glow plugs<br />
Faulty piston<br />
Faulty piston rings<br />
Worn cylinder bores<br />
Worn valves<br />
Page 7 of 8
3.<br />
4.<br />
◦ Faulty cylinder head gasket<br />
◦<br />
Damaged cylinder head<br />
Perform all necessary repairs.<br />
Ensure that the repairs have eliminated the fault.<br />
Page 8 of 8