Updating the BIOS with the Q-Flash Utility - Gigabyte
Updating the BIOS with the Q-Flash Utility - Gigabyte
Updating the BIOS with the Q-Flash Utility - Gigabyte
You also want an ePaper? Increase the reach of your titles
YUMPU automatically turns print PDFs into web optimized ePapers that Google loves.
What is Q-<strong>Flash</strong> TM ?<br />
With Q-<strong>Flash</strong> you can update <strong>the</strong> system <strong>BIOS</strong> <strong>with</strong>out having to enter<br />
operating systems like MS-DOS or Window first. Embedded in <strong>the</strong> <strong>BIOS</strong>, <strong>the</strong><br />
Q-<strong>Flash</strong> tool frees you from <strong>the</strong> hassles of going through complicated <strong>BIOS</strong> flashing process.<br />
<strong>Updating</strong> <strong>the</strong> <strong>BIOS</strong> <strong>with</strong> <strong>the</strong> Q-<strong>Flash</strong> <strong>Utility</strong><br />
A. Before You Begin:<br />
1. From GIGABYTE's website, download <strong>the</strong> latest compressed <strong>BIOS</strong> update file that matches your<br />
mo<strong>the</strong>rboard model.<br />
2. Extract <strong>the</strong> file and save <strong>the</strong> new <strong>BIOS</strong> file (e.g. EP45DS5.F1) to your floppy disk, USB flash drive,<br />
or hard drive. Note: The USB flash drive or hard drive must use FAT32/16/12 file system.<br />
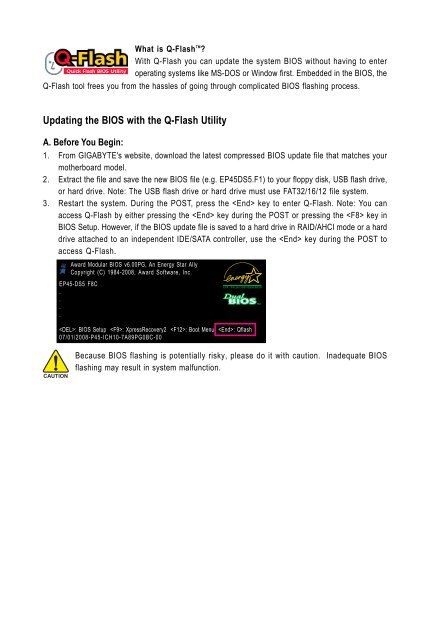
3. Restart <strong>the</strong> system. During <strong>the</strong> POST, press <strong>the</strong> key to enter Q-<strong>Flash</strong>. Note: You can<br />
access Q-<strong>Flash</strong> by ei<strong>the</strong>r pressing <strong>the</strong> key during <strong>the</strong> POST or pressing <strong>the</strong> key in<br />
<strong>BIOS</strong> Setup. However, if <strong>the</strong> <strong>BIOS</strong> update file is saved to a hard drive in RAID/AHCI mode or a hard<br />
drive attached to an independent IDE/SATA controller, use <strong>the</strong> key during <strong>the</strong> POST to<br />
access Q-<strong>Flash</strong>.<br />
Award Modular <strong>BIOS</strong> v6.00PG, An Energy Star Ally<br />
Copyright (C) 1984-2008, Award Software, Inc.<br />
EP45-DS5 F8C<br />
.<br />
.<br />
.<br />
.<br />
: <strong>BIOS</strong> Setup : XpressRecovery2 : Boot Menu : Qflash<br />
07/01/2008-P45-ICH10-7A89PG0BC-00<br />
Because <strong>BIOS</strong> flashing is potentially risky, please do it <strong>with</strong> caution. Inadequate <strong>BIOS</strong><br />
flashing may result in system malfunction.
B. <strong>Updating</strong> <strong>the</strong> <strong>BIOS</strong><br />
When updating <strong>the</strong> <strong>BIOS</strong>, choose <strong>the</strong> location where <strong>the</strong> <strong>BIOS</strong> file is saved. The follow procedure<br />
assumes that you save <strong>the</strong> <strong>BIOS</strong> file to a floppy disk.<br />
Step 1:<br />
1. Insert <strong>the</strong> floppy disk containing <strong>the</strong> <strong>BIOS</strong> file into <strong>the</strong> floppy disk drive. In <strong>the</strong> main menu of<br />
Q-<strong>Flash</strong>, use <strong>the</strong> up or down arrow key to select Update <strong>BIOS</strong> from Drive and press .<br />
• The Save Main <strong>BIOS</strong> to Drive option allows you to save <strong>the</strong> current <strong>BIOS</strong> file.<br />
• Q-<strong>Flash</strong> only supports USB flash drive or hard drives using FAT32/16/12 file system.<br />
• If <strong>the</strong> <strong>BIOS</strong> update file is saved to a hard drive in RAID/AHCI mode or a hard drive<br />
attached to an independent IDE/SATA controller, use <strong>the</strong> key during <strong>the</strong> POST to<br />
access Q-<strong>Flash</strong>.<br />
2. Select Floppy A and press .<br />
Q-<strong>Flash</strong> <strong>Utility</strong> v2.05<br />
<strong>Flash</strong> Type/Size.................................ESMT F25L008A 1M<br />
Keep DMI Data Enable<br />
Update <strong>BIOS</strong> from Drive<br />
Save 0 file(s) <strong>BIOS</strong> found to Drive<br />
Enter Floppy : Run A :Move ESC:Reset F10:Power Off<br />
HDD 0-0 <br />
Total size : 0 Free size : 0<br />
3. Select <strong>the</strong> <strong>BIOS</strong> update file and press .<br />
Make sure <strong>the</strong> <strong>BIOS</strong> update file matches your mo<strong>the</strong>rboard model.<br />
Step 2:<br />
The process of <strong>the</strong> system reading <strong>the</strong> <strong>BIOS</strong> file from <strong>the</strong> floppy disk is displayed on <strong>the</strong> screen. When<br />
<strong>the</strong> message "Are you sure to update <strong>BIOS</strong>?" appears, press to begin <strong>the</strong> <strong>BIOS</strong> update. The<br />
monitor will display <strong>the</strong> update process.<br />
• Do not turn off or restart <strong>the</strong> system when <strong>the</strong> system is reading/updating <strong>the</strong> <strong>BIOS</strong>.<br />
• Do not remove <strong>the</strong> floppy disk, USB flash drive, or hard drive when <strong>the</strong> system is<br />
updating <strong>the</strong> <strong>BIOS</strong>.<br />
Step 3:<br />
When <strong>the</strong> update process is complete, press any key to return to <strong>the</strong> main menu.<br />
Q-<strong>Flash</strong> <strong>Utility</strong> v2.05<br />
<strong>Flash</strong> Type/Size.................................ESMT F25L008A 1M<br />
Keep DMI Data Enable<br />
!! Copy Update <strong>BIOS</strong> <strong>BIOS</strong> completed from Drive - Pass !!<br />
Save <strong>BIOS</strong> to Drive<br />
Enter : Run Please :Move press any key ESC:Reset to continue<br />
F10:Power Off
Step 4:<br />
Press and <strong>the</strong>n to exit Q-<strong>Flash</strong> and reboot <strong>the</strong> system. As <strong>the</strong> system boots, you should<br />
see <strong>the</strong> new <strong>BIOS</strong> version is present on <strong>the</strong> POST screen.<br />
Step 5:<br />
During <strong>the</strong> POST, press to enter <strong>BIOS</strong> Setup. Select Load Optimized Defaults and press<br />
to load <strong>BIOS</strong> defaults. System will re-detect all peripherals devices after a <strong>BIOS</strong> update, so we<br />
recommend that you reload <strong>BIOS</strong> defaults.<br />
CMOS Setup <strong>Utility</strong>-Copyright (C) 1984-2008 Award Software<br />
MB Intelligent Tweaker(M.I.T.)<br />
Load Fail-Safe Defaults<br />
Standard CMOS Features<br />
Load Optimized Defaults<br />
Advanced <strong>BIOS</strong> Features<br />
Set Supervisor Password<br />
Integrated Peripherals<br />
Set User Password<br />
Power Management Setup Load Optimized Defaults (Y/N)? Save Y&<br />
Exit Setup<br />
PnP/PCI Configurations<br />
Exit Without Saving<br />
PC Health Status<br />
Security Chip Configuration<br />
ESC: Quit : Select Item F11: Save CMOS to <strong>BIOS</strong><br />
F8: Q-<strong>Flash</strong> F10: Save & Exit Setup F12: Load CMOS from <strong>BIOS</strong><br />
Load Optimized Defaults<br />
Press to load <strong>BIOS</strong> defaults<br />
Step 6:<br />
Select Save & Exit Setup and <strong>the</strong>n press to save settings to CMOS and exit <strong>BIOS</strong> Setup. The<br />
procedure is complete after <strong>the</strong> system restarts.


