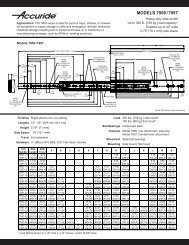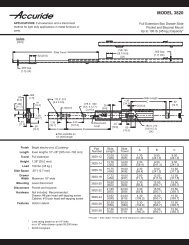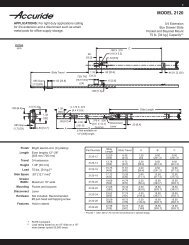
MODEL 3640-A 3640-A QUICK REFERENCE - Accuride
MODEL 3640-A 3640-A QUICK REFERENCE - Accuride
MODEL 3640-A 3640-A QUICK REFERENCE - Accuride

Create successful ePaper yourself
Turn your PDF publications into a flip-book with our unique Google optimized e-Paper software.
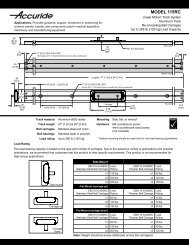
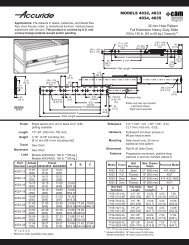
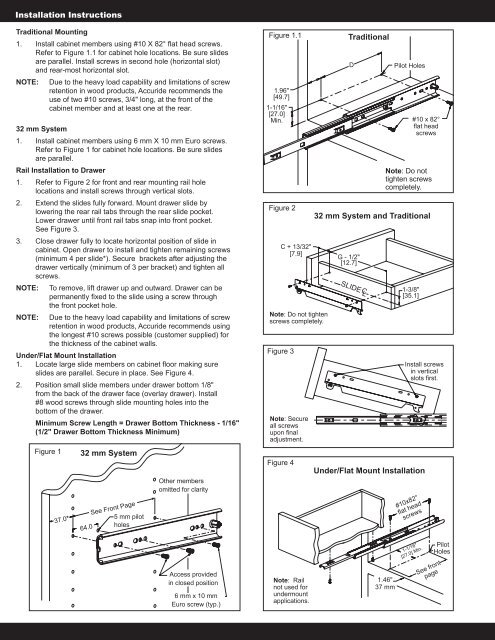
Installation Instructions<br />
Traditional Mounting<br />
1. Install cabinet members using #10 X 82° flat head screws.<br />
Refer to Figure 1.1 for cabinet hole locations. Be sure slides<br />
are parallel. Install screws in second hole (horizontal slot)<br />
and rear-most horizontal slot.<br />
NOTE: Due to the heavy load capability and limitations of screw<br />
retention in wood products, <strong>Accuride</strong> recommends the<br />
use of two #10 screws, 3/4" long, at the front of the<br />
cabinet member and at least one at the rear.<br />
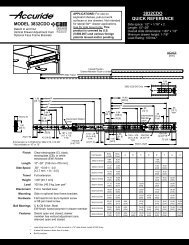
32 mm System<br />
1. Install cabinet members using 6 mm X 10 mm Euro screws.<br />
Refer to Figure 1 for cabinet hole locations. Be sure slides<br />
are parallel.<br />
Rail Installation to Drawer<br />
1. Refer to Figure 2 for front and rear mounting rail hole<br />
locations and install screws through vertical slots.<br />
2. Extend the slides fully forward. Mount drawer slide by<br />
lowering the rear rail tabs through the rear slide pocket.<br />
Lower drawer until front rail tabs snap into front pocket.<br />
See Figure 3.<br />
3. Close drawer fully to locate horizontal position of slide in<br />
cabinet. Open drawer to install and tighten remaining screws<br />
(minimum 4 per slide*). Secure brackets after adjusting the<br />
drawer vertically (minimum of 3 per bracket) and tighten all<br />
screws.<br />
NOTE: To remove, lift drawer up and outward. Drawer can be<br />
permanently fixed to the slide using a screw through<br />
the front pocket hole.<br />
NOTE: Due to the heavy load capability and limitations of screw<br />
retention in wood products, <strong>Accuride</strong> recommends using<br />
the longest #10 screws possible (customer supplied) for<br />
the thickness of the cabinet walls.<br />
Under/Flat Mount Installation<br />
1. Locate large slide members on cabinet floor making sure<br />
slides are parallel. Secure in place. See Figure 4.<br />
2. Position small slide members under drawer bottom 1/8"<br />
from the back of the drawer face (overlay drawer). Install<br />
#8 wood screws through slide mounting holes into the<br />
bottom of the drawer.<br />
Minimum Screw Length = Drawer Bottom Thickness - 1/16"<br />
(1/2" Drawer Bottom Thickness Minimum)<br />
Figure 1<br />
37.0*<br />
32 mm System<br />
64.0<br />
See Front Page<br />
5 mm pilot<br />
holes<br />
Other members<br />
omitted for clarity<br />
Access provided<br />
in closed position<br />
6 mm x 10 mm<br />
Euro screw (typ.)<br />
Figure 1.1<br />
1.96"<br />
[49.7]<br />
1-1/16"<br />
[27.0]<br />
Min.<br />
Figure 2<br />
Note: Do not tighten<br />
screws completely.<br />
Figure 3<br />
Note: Secure<br />
all screws<br />
upon final<br />
adjustment.<br />
Figure 4<br />
C + 13/32"<br />
[7.9]<br />
Note: Rail<br />
not used for<br />
undermount<br />
applications.<br />
Traditional<br />
D<br />
32 mm System and Traditional<br />
G - 1/2"<br />
[12.7]<br />
SLIDE C L<br />
1.46"<br />
37 mm<br />
Pilot Holes<br />
Note: Do not<br />
tighten screws<br />
completely.<br />
1-3/8"<br />
[35.1]<br />
Install screws<br />
in vertical<br />
slots first.<br />
Under/Flat Mount Installation<br />
#10 x 82°<br />
flat head<br />
screws<br />
#10x82°<br />
flat head<br />
screws<br />
1-1/16"<br />
[27.0] Min.<br />
Pilot<br />
Holes<br />
See front<br />
page