Crosscut Sleds - Fine Woodworking
Crosscut Sleds - Fine Woodworking
Crosscut Sleds - Fine Woodworking

Create successful ePaper yourself
Turn your PDF publications into a flip-book with our unique Google optimized e-Paper software.
Make a test cut. Right away, make a crosscut in wide<br />
stock to test whether the rear fence is square.<br />
you will be able to crosscut at exactly 90° for years to<br />
come. Here’s how you do it.<br />
Get everything ready. Rip a piece of MDF about<br />
12 in. wide and 3 ft. long with straight, parallel edges.<br />
This will be used to test the accuracy of the rear fence.<br />
Now drill from the bottom for a screw on one end of<br />
the sled base, and be ready to shoot a single 18-ga.<br />
nail from the bottom on the opposite end. Apply the<br />
glue, set the fence on the line carefully, then drive<br />
the screw and nail. Now crosscut the MDF test piece.<br />
Pull the sled back and slide the two freshly cut edges<br />
together, keeping them snug against the fence. If the<br />
rear fence is straight, the edges should meet tightly,<br />
with no gap. Now, flip over one of the test pieces,<br />
keeping the same just-cut edges together, and put the<br />
two halves together against the rear fence. If there<br />
still is no gap, the cut is perfectly square. If there is<br />
a gap, this gap is double the amount the fence is out<br />
of square. With a steel hammer, tap the nailed end of<br />
the fence to correct, and test cut again, using the same<br />
procedure. Assuming that you’ve screwed down the<br />
left side of the fence and nailed the right, if the gap is<br />
at the fence, tap the right-hand end of the fence back.<br />
If the gap is away from the fence, tap the right side<br />
forward. With ordinary yellow woodworking glue, you<br />
should have about 3 to 5 minutes of open time to test<br />
and adjust, so work quickly.<br />
When you have it dialed in just right, put clamps<br />
on to secure the rear fence to the sled base until the<br />
glue dries. Then go back and install screws from the<br />
bottom to be sure. You now have a sled that will cut<br />
dead square, every time, for many years to come. ☐<br />
Alan Turner is an attorney, woodworker, and owner of<br />
Philadelphia Furniture Workshop, a woodworking school.<br />
www.finewoodworking.com<br />
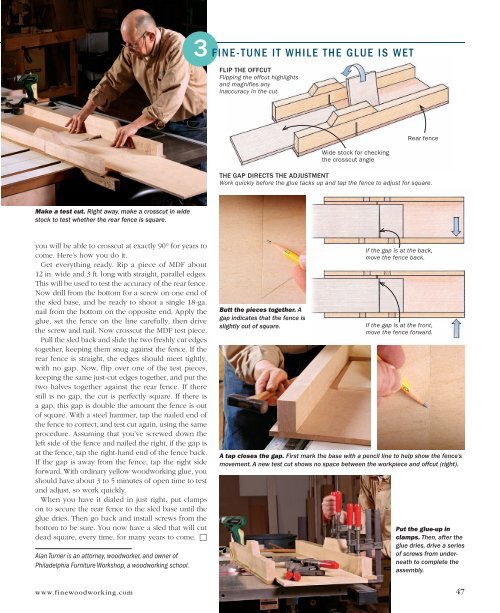
3 FINE-TUNE IT WHILE THE GLUE IS WET<br />
FLIP THE OFFCUT<br />
Flipping the offcut highlights<br />
and magnifies any<br />
inaccuracy in the cut.<br />
THE GAP DIRECTS THE ADJUSTMENT<br />
Work quickly before the glue tacks up and tap the fence to adjust for square.<br />
Butt the pieces together. A<br />
gap indicates that the fence is<br />
slightly out of square.<br />
Wide stock for checking<br />
the crosscut angle<br />
Rear fence<br />
If the gap is at the back,<br />
move the fence back.<br />
If the gap is at the front,<br />
move the fence forward.<br />
A tap closes the gap. First mark the base with a pencil line to help show the fence’s<br />
movement. A new test cut shows no space between the workpiece and offcut (right).<br />
Put the glue-up in<br />
clamps. Then, after the<br />
glue dries, drive a series<br />
of screws from underneath<br />
to complete the<br />
assembly.<br />
47