
Create successful ePaper yourself
Turn your PDF publications into a flip-book with our unique Google optimized e-Paper software.
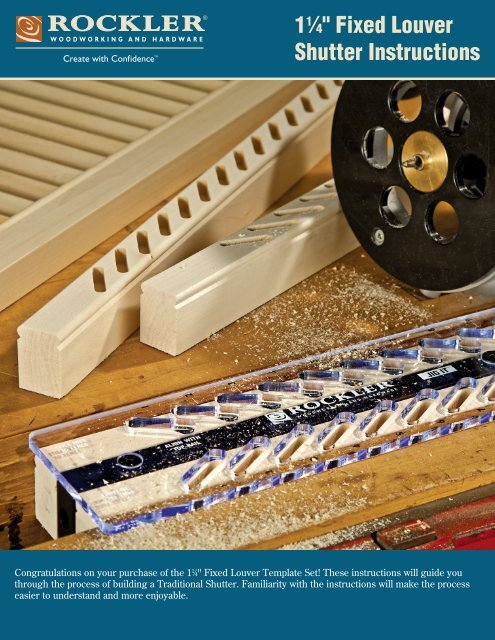
1 1 ⁄4" Fixed Louver<br />
<strong>Shutter</strong> <strong>Instructions</strong><br />
Congratulations on your purchase of the 1 1 ⁄4" Fixed Louver Template Set! These instructions will guide you<br />
through the process of building a Traditional <strong>Shutter</strong>. Familiarity with the instructions will make the process<br />
easier to understand and more enjoyable.
1<br />
Inside mount no frame<br />
• Window opening should<br />
be nearly square<br />
• Solid wood jamb needed<br />
• Butt hinge application<br />
Fig. 1<br />
Fig. 2<br />
Fig. 3<br />
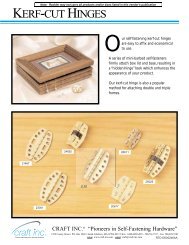
Mounting<br />
Considerations<br />
Inside mount<br />
hang strip<br />
Wall with or without trim<br />
• Mounting for window openings<br />
that are not square<br />
• Hang strip may need to be<br />
mounted towards the room<br />
• Wrap around hinge application<br />
Outside mount<br />
hang strip<br />
• Re<strong>com</strong>mended for<br />
drywall openings<br />
• Mounted flush<br />
with hang strip<br />
• Butt hinge<br />
application<br />
Wall with or without trim<br />
1 3 ⁄16"<br />
1 1 ⁄16"<br />
13 ⁄16" Min. Depth<br />
Requirement<br />
Hang<br />
strip<br />
11 ⁄16" Min. Depth<br />
Requirement<br />
1 1 ⁄16"<br />
Hang strip<br />
1 3 ⁄16"<br />
1 1 ⁄16"<br />
1 1 ⁄16"<br />
2 3 ⁄16"<br />
2 1 ⁄8"<br />
Stile<br />
Stile<br />
2 3 ⁄16"<br />
Stile<br />
1 1 ⁄16"<br />
Window<br />
Window<br />
Window<br />
Rail<br />
Rail<br />
Rail
Use caution when<br />
clamping softwoods<br />
1 1 ⁄2" Stile<br />
Bottom Rail<br />
2" min.<br />
5" max<br />
<strong>Shutter</strong> Mounting and Measuring<br />
1. Determine mounting applications and prepare<br />
windows. Fig 1, 2 and 3.<br />
2. Once window prep has been <strong>com</strong>pleted,<br />
determine the number of shutters desired<br />
per window.<br />
3. Measure for panel height. For inside mount panel<br />
height measure the total window opening and<br />
subtract 1/4". For outside window mount,<br />
measure the total window opening and add the<br />
desired top and bottom overlap.<br />
4. Measure for panel width by dividing the total<br />
window opening by the number of shutter panels<br />
and then subtract the appropriate gaps.<br />
Note: Leave 1/16" gaps where hinges are<br />
mounted and 1/8" gaps between panels.<br />
5. Take these measurements and plug them into<br />
the <strong>Shutter</strong> Design Wizard at rockler.<strong>com</strong> to<br />
Top Rail<br />
2" min.<br />
5" max<br />
1" between<br />
louvers<br />
1 1 ⁄2" Stile<br />
create your Bill of Materials and Dimensioned<br />
Plans specific to your shutters.<br />
<strong>Shutter</strong> Design Options<br />
1. A Middle Rail is re<strong>com</strong>mended<br />
for shutters over 48" in height.<br />
Remove 2 or 3 Louvers from the<br />
shutter and replace with a 2" or<br />
3" wide rail with 3/16" rabbets<br />
on both sides.<br />
Stile Stile<br />
1 1 ⁄2"<br />
1 1 ⁄2"<br />
Mid<br />
Rail<br />
2. Consider rabbeted stiles between<br />
panels to block light transmission. Add 3/8"<br />
width to one stile to create the overlap.<br />
2
3<br />
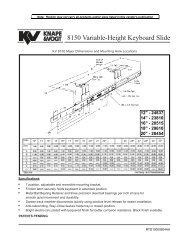
PARTS LIST - 1 1 ⁄4" FIxed LOUVeR TeMPLATe SeT<br />
1<br />
Quantity<br />
1 Stile <strong>Jig</strong> 1<br />
2 Router Guide Bushing 1<br />
2
Left<br />
Stile<br />
Right<br />
Stile<br />
Fig. 4 Fig. 5<br />
Routing Stiles<br />
1. Place shutter frame <strong>com</strong>ponents face side<br />
down on work surface.<br />
2. Label back side of stiles and rails.<br />
3. Measure the width of the top rail and transfer<br />
that measurement to the top end of each stile.<br />
Measure the width of the bottom rail and<br />
transfer that measurement to the bottom<br />
end of each stile.<br />
4. Clamp stiles to Stile <strong>Jig</strong> (1), aligning the top<br />
rail mark with the etched line that says “Align<br />
with Top Rail” on jig template.<br />
Note: Be sure that the stile faces are towards<br />
the <strong>Jig</strong> fence back sides out. Fig. 4.<br />
5. Install the 3/8" Router Guide Bushing (2) and<br />
a 1/4" mortising bit into your router. Set depth<br />
to 5/8". Fig. 5.<br />
6. Rout your stiles. Move stiles along jig to<br />
<strong>com</strong>plete desired series of holes. Fig. 6.<br />
Fig. 6<br />
4
3<br />
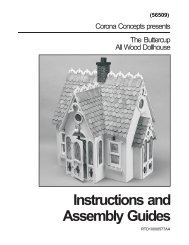
<strong>Shutter</strong> Assembly<br />
1. Depending on selected finish (paint, stain<br />
and/or clearcoat), prefinish <strong>com</strong>ponents<br />
before assembly<br />
2. Stand the right side stile on the work<br />
bench, mortises up.<br />
3. Insert all of the louvers vertically into the<br />
stile. Do not apply glue to the louvers. Fig. 7.<br />
4. Apply glue to the dowels and insert the top<br />
and bottom rail into the stile.<br />
5. Apply glue to the exposed dowels in the top<br />
and bottom rails. Do not apply glue to<br />
the louvers.<br />
6. Working from top to bottom of the shutter<br />
align the louvers into the appropriate mortise.<br />
Move down the stile until all louvers are<br />
seated. Fig. 8.<br />
7. When all parts are together, clamp the<br />
frame tight and check for square.<br />
Fig. 8<br />
Fig. 7<br />
Mortised<br />
Slot<br />
Louver<br />
Stile<br />
Attention <strong>Rockler</strong> Plan User<br />
Before starting, please read the plan <strong>com</strong>pletely. Check<br />
<strong>Rockler</strong>.<strong>com</strong> for updates that may not be included on this copy.<br />
If you have further questions, please contact our Technical<br />
Support Department, 1-800-260-9663 or support@rockler.<strong>com</strong>
Notes<br />
4
49470<br />
Rev 03/12<br />
Distributed by <strong>Rockler</strong> Companies, Inc.<br />
©2012 <strong>Rockler</strong> Woodworking and Hardware