

IMPORTANT SAFETY INSTRUCTIONS SAVE THESE ... - Janome
IMPORTANT SAFETY INSTRUCTIONS SAVE THESE ... - Janome
IMPORTANT SAFETY INSTRUCTIONS SAVE THESE ... - Janome

You also want an ePaper? Increase the reach of your titles
YUMPU automatically turns print PDFs into web optimized ePapers that Google loves.
1<br />
Completed<br />
Emerald Green 250<br />
1<br />
Stitch Counter<br />
00001<br />
ST:126x110mm 2<br />
Jog/ST X<br />
START<br />
STOP<br />
Auto<br />
13 min 6 Colors<br />
7,052 ST 70x78mm<br />
A Z<br />
2 1 3 4<br />
2.6<br />
+<br />
-<br />
ST:126x110mm 2<br />
Default<br />
X<br />
OK<br />
13 min 6 Colors<br />
Auto<br />
3 4<br />
7,052 ST 70x78mm<br />
2<br />
A Z<br />
70<br />
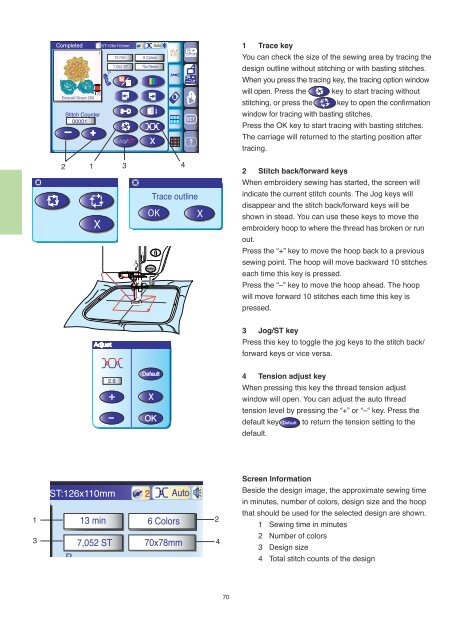
1 Trace key<br />
You can check the size of the sewing area by tracing the<br />
design outline without stitching or with basting stitches.<br />
When you press the tracing key, the tracing option window<br />
will open. Press the key to start tracing without<br />
stitching, or press the key to open the confirmation<br />
window for tracing with basting stitches.<br />
Press the OK key to start tracing with basting stitches.<br />
The carriage will returned to the starting position after<br />
tracing.<br />
2 Stitch back/forward keys<br />
When embroidery sewing has started, the screen will<br />
indicate the current stitch counts. The Jog keys will<br />
disappear and the stitch back/forward keys will be<br />
shown in stead. You can use these keys to move the<br />
embroidery hoop to where the thread has broken or run<br />
out.<br />
Press the “+” key to move the hoop back to a previous<br />
sewing point. The hoop will move backward 10 stitches<br />
each time this key is pressed.<br />
Press the “–” key to move the hoop ahead. The hoop<br />
will move forward 10 stitches each time this key is<br />
pressed.<br />
3 Jog/ST key<br />
Press this key to toggle the jog keys to the stitch back/<br />
forward keys or vice versa.<br />
4 Tension adjust key<br />
When pressing this key the thread tension adjust<br />
window will open. You can adjust the auto thread<br />
tension level by pressing the “+” or “–“ key. Press the<br />
default key <br />
to return the tension setting to the<br />
default.<br />
Screen Information<br />
Beside the design image, the approximate sewing time<br />
in minutes, number of colors, design size and the hoop<br />
that should be used for the selected design are shown.<br />
1 Sewing time in minutes<br />
2 Number of colors<br />
3 Design size<br />
4 Total stitch counts of the design


