WT-548 - Tempo (Aust)
WT-548 - Tempo (Aust)
WT-548 - Tempo (Aust)

Create successful ePaper yourself
Turn your PDF publications into a flip-book with our unique Google optimized e-Paper software.
N13275<br />
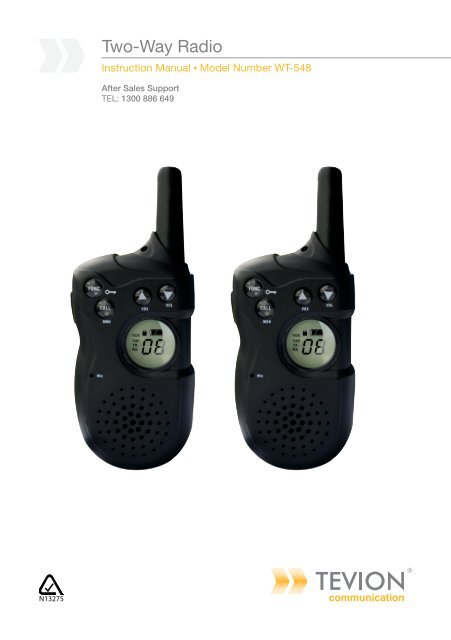
Two-Way Radio<br />
Instruction Manual • Model Number <strong>WT</strong>-<strong>548</strong><br />
After Sales Support<br />
TEL: 1300 886 649
1<br />
Two-Way Radio<br />
What your 1 year warranty means<br />
Congratulations on choosing to buy a TEVION ® product.<br />
All products brought to you by TEVION ® are manufactured to the highest standards<br />
of performance and safety and, as part of our philosophy of customer service and<br />
satisfaction, are backed by our comprehensive 1 year warranty. We hope you will<br />
enjoy using your purchase for many years to come.<br />
After Sales Support TEL: 1300 886 649
Contents<br />
What your 1 year warranty means 1<br />
Important safety instructions 3<br />
Buttons and controls 4<br />
Operating instructions Main screen<br />
Battery installation<br />
Quick start guide A. Start operation 6<br />
Power on / off<br />
Key lock / unlock<br />
B. Two-way radio operations 6<br />
Selecting a channel<br />
Selecting a sub-code<br />
Making a call<br />
Transmitting a message<br />
Receiving a call<br />
Using earphones<br />
Function set-up Selecting a channel<br />
Selecting a sub-code<br />
Automatic channel scan<br />
Auto squelch (SQ)<br />
VOX function<br />
Monitor function<br />
Volume level adjustment<br />
Other functions “Roger beep”<br />
Repeater function<br />
Screen backlight<br />
Low battery alert<br />
Charging<br />
Setting memory<br />
Technical specifications 9<br />
Transmit - receive frequencies (MHz)<br />
Interference eliminator code chart<br />
FAQs 11<br />
After Sales Support TEL: 1300 886 649<br />
2<br />
5<br />
5<br />
6<br />
6<br />
6<br />
6<br />
6<br />
6<br />
6<br />
6<br />
7<br />
7<br />
7<br />
7<br />
7<br />
7<br />
8<br />
8<br />
8<br />
8<br />
9<br />
9<br />
9<br />
10<br />
10
3<br />
Important safety instructions<br />
When using your two-way radio equipment, the following basic safety precautions should always be<br />
followed to reduce the risk of fire, electric shock and injury to persons.<br />
• Make sure to read, understand and follow all instructions and warnings.<br />
• Take care not to drop the two-way radio as a fall may damage the product.<br />
• Never spill liquid of any kind on or into the product.<br />
• Avoid using this unit and switch it off during an electrical storm.<br />
• Do not attempt to open the product yourself and do not have it serviced by unauthorised personnel.<br />
In case of a defect, contact after sales support line for advice.<br />
Caution:<br />
• Avoid using the unit with non-rechargeable batteries as the charging operation can only be<br />
performed with suitable rechargeable batteries.<br />
• To reduce the risk of electric shock, do not expose this appliance to rain or moisture.<br />
• Do not hold the antenna while the radio is in use, or transmission quality will be affected.<br />
• Your two-way radio set has been fully adjusted prior to shipment from the factory.<br />
• Never open your two-way radio or adjust the settings inside the device.<br />
• Never change or replace anything in your two-way radio set except the battery.<br />
• To clean your two-way radio set, use a soft cloth dampened with water. Do not use liquid or aerosol<br />
cleaners or corrosive solvents, which may damage the radio housing and leak inside, causing<br />
permanent damage.<br />
After Sales Support TEL: 1300 886 649
Buttons and controls<br />
NECK<br />
STRAP HOLE<br />
FUNCTION/LOCK KEY<br />
CALL/MON KEY<br />
PTT KEY (Push-To-Talk)<br />
MIC<br />
MIC<br />
EARPHONE JACK<br />
(connections not supplied)<br />
FUNC<br />
NECK<br />
STRAP HOLE<br />
SOFT ANTENNA<br />
DOWN/VOLUME<br />
CONTROL KEY<br />
UP/VOX KEY<br />
SCREEN DISPLAY<br />
SPEAKER<br />
PTT<br />
CHARGING JACK<br />
(connections not supplied)<br />
After Sales Support TEL: 1300 886 649<br />
4
5<br />
Operating instructions<br />
Main screen<br />
See Fig. 1 for an illustration of the main screen.<br />
1 VOX indicator<br />
2 Call mode (Call)<br />
3 Transmitting mode (TX)<br />
4 Receiving mode (RX)<br />
5 Channel number: displays current channel (1-40)<br />
6 Battery level indicator<br />
-- Full<br />
-- Reminder to change the batteries.<br />
-- Blinking: batteries must be changed.<br />
7. Key lock indicator<br />
Battery installation<br />
1. Ensure the unit is off. Press the button on the belt clip and rotate<br />
clockwise or counter-clockwise 90°.<br />
2. Open the battery compartment door.<br />
3. Install 3 AAA batteries according to the + / - signs in the battery<br />
compartment.<br />
4. Close the battery compartment door. Press and rotate the belt clip to<br />
its normal position.<br />
After Sales Support TEL: 1300 886 649<br />
1<br />
2<br />
3<br />
4<br />
7 6<br />
5<br />
Fig.1
Quick start guide<br />
A. Start operation<br />
Power on / off<br />
1. Press and hold the FUNCTION key for three seconds, a “tic” sound indicates the radio is ready (Fig. 2).<br />
2. Repeat the same to turn off the radio.<br />
Key lock / unlock<br />
1. To lock the keys, press and hold the FUNCTION key, then press the PTT key. A lock will<br />
appear on the screen display (Fig. 3).<br />
2. To unlock the keys, repeat the same as above (Fig. 2).<br />
NOTE: Under key lock mode, all keys will be locked except PTT and CALL.<br />
B. 2-way radio operations<br />
Selecting a channel<br />
1. Press the / key to select the channel, e.g. Channel 40 (Fig. 2).<br />
2. Set both units into the same channel for communication, e.g. both screens will show 40. Fig.3<br />
3. <strong>Aust</strong>ralian regulations prohibit use of Channels 22 and 23 for speech telephony (data only).<br />
Selecting a sub-code<br />
1. Press the FUNCTION key twice within one second to enter the CTCSS sub-code setting (this will<br />
reduce the incidence of other users sharing the two-way radio communications channel). The<br />
screen will display as illustrated in Fig. 4. One second later, it will be blinking and show the current<br />
sub-code (Fig. 5).<br />
2. Press the / key to select sub-code 00/01-38.<br />
3. Press the FUNCTION key again one more time to confirm and return to the main screen.<br />
4. If the sub-code is not confirmed after two seconds, the setting will be confirmed<br />
automatically and return to the main screen.<br />
5. Set both units into the same sub-code, e.g. both units will show 38 as the sub-<br />
code.<br />
Making a call<br />
1. Press the CALL/MON key once to transmit to the other unit (Fig. 6).<br />
(Brief audio signals indicate the start and end of a call tone transmission.)<br />
2. <strong>Aust</strong>ralia regulations prohibit use of Channels 5 and 35 for calling function<br />
(emergency only).<br />
NOTE: A call tone (of not more than three seconds) can be transmitted once only within a<br />
minute in the same channel. To make a call tone immediately, switch to another channel.<br />
Transmitting a message<br />
Press and hold the PTT key to speak into the microphone, keeping it about 2.5–5cm from<br />
the mouth (Fig. 7). The screen displays TX, indicating the unit is in transmission mode.<br />
NOTE: Maximum continuous transmission, while holding the PTT key, is three minutes.<br />
Fig.7<br />
Receiving a call<br />
7<br />
At the end of the call, release the PTT key to receive the signal from the other device (Fig. 8).<br />
“RX” will display on the screen, indicating the radio is in receiving mode. You can hear the call ring<br />
tone or the voice from the other user.<br />
Using earphones (not supplied)<br />
Plug your earphone into the earphone socket, speak into the microphone and press the PTT<br />
key of the earphone.<br />
Fig.4<br />
After Sales Support TEL: 1300 886 649<br />
Fig.5<br />
Fig.6 6<br />
Fig.8 8<br />
6
7<br />
Function set-up<br />
Selecting a channel<br />
1. Press the / key to select the channel (1-40).<br />
2. When switching to the desired channel number, press the FUNCTION key to confirm.<br />
NOTE: The last channel number can be recalled.<br />
Selecting a sub-code<br />
1. Press the FUNCTION key twice within one second to enter the CTCSS sub-code setting (this will reduce<br />
the incidence of other users sharing the two-way radio communications channel). The screen will<br />
display as illustrated in Fig. 4, page 4. One second later, it will be blinking and show the current subcode<br />
(Fig. 5, page 4).<br />
2. Press the / key to select sub-code 00/01-38.<br />
3. Press the FUNCTION key again one more time to confirm and return to the main screen.<br />
4. If the sub-code is not confirmed after two seconds, the setting will be confirmed automatically and<br />
will return to main the screen.<br />
5. There is no sub-code in Channels 5 and 35 under <strong>Aust</strong>ralian regulations.<br />
NOTE: • No sub-code is shown on the main screen.<br />
• Channel and sub-code are independently memorised. The last channel and sub-code<br />
will be memorised if the unit is switched off accurately.<br />
• If the channel and sub-code are occupied, a busy indicator “ b ” will be shown on the<br />
screen (Fig. 9). Press any key to return to show the channel. When it is not busy, it will<br />
revert to the normal two-way radio main screen (Fig. 2).<br />
Automatic channel scan<br />
1. Press the / key for two seconds to start the channel scan. The channel number will change, it will<br />
stop scanning when it finds a channel where transmission is taking place.<br />
2. Press the / key again to stop the channel scan.<br />
Auto squelch (SQ)<br />
Auto squelch control eliminates unwanted interference during communication; you do not need to<br />
activate it.<br />
VOX function<br />
VOX is the voice activating transmission function. You can talk and communicate with the<br />
other user without holding the PTT button down.<br />
1. Press and hold the FUNCTION key, then press the / VOX key to activate the VOX function,<br />
the VOX icon shows on the screen (Fig. 10).<br />
2. Repeat the same to exit from VOX mode and close the VOX function.<br />
Monitor function<br />
Activate the monitor function during weak transmission to receive all signals in the same channel.<br />
1. Press and hold the FUNCTION key, then press the CALL/MON key to activate the monitor (MON)<br />
function.<br />
2. Press the same again to exit MON mode.<br />
After Sales Support TEL: 1300 886 649<br />
Fig.9 9<br />
Fig.10
Volume level adjustment<br />
1. Press and hold the FUNCTION key, then press the / VOL key to alter the volume level from<br />
“1” to “4” (Fig. 11 shows the volume level).<br />
2. The volume level changes once when the / VOL key is pressed once.<br />
3. Release the / VOL and FUNCTION key to return to normal mode.<br />
Other functions<br />
“Roger beep”<br />
This is the short beep sound you hear at the end of each transmission. You can turn it on or off.<br />
1. Turn off the unit.<br />
2. Press the CALL and FUNCTION key for three seconds to turn on the unit: “ ” or “ ”<br />
shows on the screen (Fig. 12 and Fig. 13).<br />
3. Press the / key to select “Roger Beep” on ( ) or “Roger Beep” off ( ).<br />
4. Press the FUNCTION key for three seconds to confirm the setting and return to normal mode.<br />
Repeater function<br />
Under this function, you can transmit the message to the message transmission station, the signal<br />
will then be retransmitted to the other partner in the same channel and/or sub-code within the<br />
communication range of the repeater station. It enables signal transmission over longer distances.<br />
1. Press and hold the PTT key, then press the key within one second to select the repeater function.<br />
2. or Indicates the current status of the repeater function (on or off, see Fig. 14 and Fig. 15).<br />
Enables the repeater function, the current channel will reset to Channel 1.<br />
Indicates the radio is in repeater mode.<br />
Disables the repeater function.<br />
3. Release the PTT and key to confirm and return to normal mode.<br />
4. The channel number displays “ - , - ” on the screen with the repeater function on,<br />
or it displays “ - ”. (There are eight repeater channels: channels 1 to 8.)<br />
Screen backlight<br />
The screen backlight will stay on for five seconds if any key is pressed.<br />
After Sales Support TEL: 1300 886 649<br />
8<br />
Fig.11<br />
Fig.12<br />
Fig.13
9<br />
Low battery alert<br />
This symbol displayed on the screen indicates the battery level is low.<br />
This symbol displayed on the screen, together with a beeping sound, indicates the battery level is<br />
low: you must change the battery.<br />
NOTE: The unit will automatically turn off when out of battery.<br />
Charging<br />
The battery icon flashes while charging. It stops flashing when the batteries are fully charged. If the unit<br />
is on while charging, the screen shows the current channel and the unit can receive signals only. The<br />
CALL and PTT key is not available for use.<br />
1. Please charge any rechargeable batteries (not supplied) before first use.<br />
2. Use an AC charger (not supplied) to recharge any rechargeable batteries (not supplied).<br />
3. Supply power: 7.5V / 300mA.<br />
4. To fully charge the battery takes 1-8 hours, depending on how much charge is left in the battery.<br />
Setting memory<br />
The unit will memorise the last setting selected before you turn the radio off and will automatically<br />
resume to it when you turn the radio on again. However, the setting will not be memorised if you turn<br />
off the unit and take out the batteries.<br />
Technical specifications<br />
Description Specifications<br />
Power output 500mW<br />
Operating frequency 476.425 --- 477.400MHz<br />
Channels 40<br />
CTCSS sub-codes 38<br />
Modulation FM<br />
Communication range Unobstructed conditions: up to 3km<br />
Power source 3 x AAA alkaline batteries or Ni-MH AAA 600mAh 1.2V rechargeable<br />
batteries<br />
(Do not mix alkaline and rechargeable batteries in the same unit.)<br />
Battery life 10 hours for AAA batteries (5% transmission, 5% reception, 90% stand-by)<br />
Screen Backlit<br />
After Sales Support TEL: 1300 886 649
Transmit - receive frequencies (MHz)<br />
CHANNEL FREQUENCY CHANNEL FREQUENCY CHANNEL FREQUENCY<br />
1* 476.425 15 476.775 29 477.125<br />
2* 476.450 16 476.800 30 477.150<br />
3* 476.475 17 476.825 31* 477.175<br />
4* 476.500 18 476.850 32* 477.200<br />
5** 476.525 19 476.875 33* 477.225<br />
6* 476.550 20 476.900 34* 477.250<br />
7* 476.575 21 476.925 35** 477.275<br />
8* 476.600 22• 476.950 36* 477.300<br />
9 476.625 23• 476.975 37* 477.325<br />
10 476.650 24 477.000 38* 477.350<br />
11 476.675 25 477.025 39 477.375<br />
12 476.700 26 477.050 40 477.400<br />
13 476.725 27 477.075<br />
14 476.750 28 477.100<br />
* These channels are repeater access channels.<br />
** Designated emergency channel<br />
• Speech telephony is not permitted on these channels.<br />
Interference eliminator code chart<br />
CODE FREQUENCY<br />
(Hz)<br />
CODE FREQUENCY<br />
(Hz)<br />
CODE FREQUENCY<br />
(Hz)<br />
1 67.0 14 107.2 27 167.9<br />
2 71.9 15 110.9 28 173.8<br />
3 74.4 16 114.8 29 179.9<br />
4 77.0 17 118.8 30 186.2<br />
5 79.7 18 123.0 31 192.8<br />
6 82.5 19 127.3 32 203.5<br />
7 85.4 20 131.8 33 210.7<br />
8 88.5 21 136.5 34 218.1<br />
9 91.5 22 141.3 35 225.7<br />
10 94.8 23 146.2 36 233.6<br />
11 97.4 24 151.4 37 241.8<br />
12 100 25 156.7 38 250.3<br />
13 103.5 26 162.2<br />
After Sales Support TEL: 1300 886 649<br />
10
FAQs<br />
Problem Solution<br />
No power - Reposition or replace the batteries.<br />
Message not transmitted<br />
- Make sure the Push-to-Talk (PTT) button is<br />
completely pressed as you transmit.<br />
- Reposition or replace the batteries.<br />
Message not received - Confirm radios have the same channel settings.<br />
- Make sure PTT is not inadvertently being pressed.<br />
- Obstructions operating indoors or in vehicles may<br />
interfere with communication.<br />
- Change your location.<br />
- Check to make sure the volume is loud enough to<br />
be heard.<br />
- Reposition or replace the batteries.<br />
Hearing other conversation or noise on - Shared channel may be in use, try another.<br />
a channel<br />
Limited talk range - Are there any steel/concrete structures between<br />
each other?<br />
- Heavy foliage will decrease the communication<br />
range, check for a clear line of sight.<br />
Transmission - Wearing the radio close to the body such as in a<br />
pocket or on a belt will decrease the talk range,<br />
change the location of the radio.<br />
Heavy static or interference - Radios are too close to each other. Increase your<br />
distance so the radios are at least 5m apart.<br />
- Radios are too far apart. Obstacles interfere with<br />
transmission. The talk range is up to 3.2km in clear,<br />
unobstructed conditions.<br />
After Sales Support TEL: 1300 886 649<br />
11