User Guide PDF - Nik Software
User Guide PDF - Nik Software
User Guide PDF - Nik Software

Create successful ePaper yourself
Turn your PDF publications into a flip-book with our unique Google optimized e-Paper software.
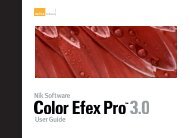
nik Sharpener!
Welcome to nik Sharpener!<br />
In this booklet, we will explain to you how to install and use nik Sharpener!<br />
This software is a typical “one-time-read” software booklet, since<br />
once you understand how to use its features, the booklet can be put right<br />
back into the CD case. If you have already installed the software and do<br />
not want to read any more information, we recommend one thing: Read<br />
and remember the “Golden Rules of Using nik Sharpener!”. Following these<br />
rules will decrease the likelihood of errors and bring you closer to that<br />
“perfect” image.<br />
The Idea Behind nik Sharpener!<br />
Photo prints should be sharpened appropriately to optimize their<br />
appearance. Since the development of computer image enhancement,<br />
photographers and graphic artists have searched for a program which will<br />
sharpen an image while maintaining the qualities that make each photo<br />
unique.<br />
In the past, programs such as Photoshop relied on an “Unsharp Mask”<br />
algorithm to create the illusion of a sharper, crisper image, a principle that<br />
comes from a traditional darkroom technique. In traditional photography,<br />
to sharpen an image in going from negative to print, the photographer<br />
masks the original image with a blurred copy of the same image.<br />
Herzlich Willkommen zu nik Sharpener!<br />
Diese gedruckte Anleitung enthält ausschließlich englischen Text.<br />
Eine Anleitung mit deutschem Text finden Sie im Adobe ® Acrobat ® -<br />
Format (*.<strong>PDF</strong>) auf der CD.<br />
Viel Spaß und Erfolg mit dieser <strong>Software</strong>!<br />
–2–
Numerous attempts over the years have been made to invent an effective<br />
alternative to this algorithm and process. However, none of these alternatives<br />
provided a more effective algorithm or overall approach, and none of<br />
them simplified the inputs and parameters. nik Sharpener, though, now<br />
provides true, simplified image sharpening,<br />
using an “auto-optimizing” version of<br />
the Unsharp Mask algorithm that actually<br />
analyzes the parameters and sharpens<br />
the image.<br />
Optimally Sharpened Images<br />
In studying images in even some of the best magazines, you will notice<br />
varying degrees of sharpness, only a few being sharpened optimally. Many<br />
of these variations in sharpness result from discrepancies between the<br />
appearance of the image on the screen and the final print. The optimal<br />
degree of sharpening depends significantly on the final printer type, so no<br />
matter how sharp the image appears on the screen or in a test print, the<br />
degree of sharpness of the final printed image cannot be accurately predicted.<br />
However, once you set the desired image size and the printer type, nik<br />
Sharpener eliminates the guesswork and optimizes final image, adjusting<br />
its degree of sharpness.<br />
–3–
Installing nik Sharpener!<br />
1 Installing nik Sharpener is simple. Place the nik Sharpener CD in your<br />
CD-ROM drive and find the folder named “Filters”.<br />
2 You will want to install nik Sharpener<br />
in the “Filters” folder (generally<br />
located in the Plug-ins folder) for the<br />
version of Photoshop that you are<br />
using. If you are installing nik<br />
Sharpener for use in another Adobe<br />
compatible program, please check the<br />
documentation of that program for<br />
instructions on properly installing<br />
Adobe compatible filters or check our web site at www.tech-nik.com for updated<br />
compatibility information and instructions. (Note: While we cannot<br />
provide support for host programs with which nik Sharpener operates, we<br />
do our best to evaluate and provide updated information on compatibility.)<br />
If you are not sure where your filters are installed within Photoshop:<br />
a) Open Photoshop and from the file menu, select<br />
Preferences “Plug-Ins & Scratch Disks…” The location of<br />
your plug-ins will appear.<br />
b) Next, click the Choose button/option to locate the filters<br />
folder and scroll through the folders checking for your folder<br />
named “Filters”.<br />
–4–
c) After determining the location of your filters folder, make a notation of<br />
this location and close the preferences dialog box by selecting “Cancel”.<br />
d) Close Photoshop before proceeding with installing nik Sharpener!<br />
e) Copy the folder “Filters” from the nik Sharpener CD-ROM with one<br />
mouse drag into the “Filters” folder you determined in step 3.<br />
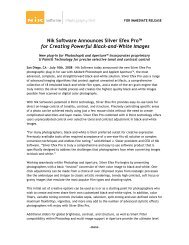
f) Launch Photoshop and select the Filter menu (in Photoshop). Click on<br />
it and locate “nik Sharpener” as shown and you are ready to Sharpen your<br />
image.<br />
If nik Sharpener does not appear in the Filters menu, you may have<br />
copied the filter folder from the CD to the wrong location on your hard<br />
drive. If this happens, check to see if you have<br />
more than one copy of Photoshop installed or<br />
if you selected a different folder location when<br />
installing Photoshop. Return to step 3 and<br />
check the “Filters” folder location again and<br />
ensure that nik Sharpener is installed in this<br />
folder. You may also want to check to be sure that you have not installed<br />
nik Sharpener in the “Extensions” folder, often located one folder up from<br />
the “Filters” folder.<br />
–5–
Run no other sharpening options or sharpening programs in<br />
conjunction with nik Sharpener! nik Sharpener is the only<br />
sharpening tool that you will need. Turn off any other automatic<br />
sharpening options that may be included with scanning programs,<br />
and do not use any Unsharp Mask filters included with<br />
Photoshop or any other image alteration software. Running<br />
other sharpening options or programs with nik Sharpener will<br />
result in incorrectly sharpened images.<br />
Enter the CORRECT parameters. If you have a low quality<br />
image, for example, it will be sharpened best if you set the<br />
Overall Image Quality parameter to “below average” or “bad”.<br />
Selecting a higher setting will lead to non-optimized sharpening.<br />
In short, be honest about the variables you enter, not optimistic,<br />
and do NOT play around with the parameters until the<br />
image “appears” to be sharpened optimally. Doing so is completely<br />
contrary to how nik Sharpener is designed to work.<br />
–6–
Do not doubt what you see. Making sharpening adjustments<br />
on the screen can and often will result in an inaccurately<br />
sharpened image. While some images may not appear sharpened<br />
optimally when viewed on the screen, they are nevertheless,<br />
adjusted precisely using the parameters entered.<br />
If a photo will be utilized in two different sizes, sharpen<br />
each separately and keep two separate sharpened copies of<br />
the photo on your computer. Because each photo is optimized<br />
for printing using its size as a major variable, you will need to<br />
sharpen the same image separately when the image will be<br />
printed in different sizes.<br />
When in doubt, see rules 2 & 3.<br />
–7–
Using nik Sharpener<br />
Once you have installed nik Sharpener successfully,<br />
open the image you want to sharpen<br />
using Photoshop or any other 100% Adobe<br />
plug-in compatible program. Then open nik<br />
Sharpener from the “Filter” menu in Photoshop. (In some applications,<br />
this menu may be called “Effects”. Check the software manufacturer’s<br />
documentation for the appropriate<br />
filter menu location.)<br />
In the filter dialog that appears,<br />
begin by setting up all the parameters<br />
of the image and of the<br />
printing process that will be used.<br />
The two most important variables<br />
are image “Width” and image<br />
“Height”. Set these parameters<br />
and then proceed by making the<br />
other parameter adjustments<br />
appropriately, remembering to set the parameters as they correspond to<br />
your image and the devices you are using. All of the nik Sharpener parameters<br />
are explained on the following pages.<br />
If you have not decided on the exact size of your printed image,<br />
you may want to create the layout first and sharpen the images<br />
afterwards.<br />
–8–
The Image “Width” and Image “Height” Sliders<br />
The two sliders “Width” and “Height” define the dimensions of the<br />
image. These two sliders behave as one slider, i. e., they maintain the<br />
image’s aspect ratio. As you move one slider, the other one will move proportionally,<br />
depending on the width and height of the image. Setting these<br />
two sliders correctly is critical. Errors in defining the dimensions of the<br />
image will result in problems later. To sharpen the image optimally in the<br />
final print, the sharpening dimensions need to be within 15% of the final<br />
print size. This range allows you to make minor adjustments when preparing<br />
an image for layout or when scaling an image slightly down or up in<br />
layout applications such as QuarkXPress, Adobe InDesign or PageMaker.<br />
And remember to keep a copy of your image in a folder on your hard drive<br />
for each size you want to sharpen.<br />
–9–
The “Image Source” Slider<br />
APS Film<br />
Small Format Slide<br />
Medium Format Transparency<br />
Large Format Transparency<br />
Digital Camera (low-end)<br />
The slider “Image Source” defines the format of the original image. The<br />
first four settings identify traditional film size: “APS”, “Small Format<br />
Slide”, “Medium Format Transparency” and “Large Format<br />
Transparency”. These first four settings can be used when scanning either<br />
slides or negatives. The next three settings identify photos that come from<br />
a digital camera: “Digital Camera (low-end)” for cameras whose resolution<br />
is below one million pixels, “Digital Camera (mid-range)”, for cameras<br />
with a resolution between one and two million pixels, and “high-end”<br />
for cameras beyond that. Professionals: If you have a camera with 4.2 million<br />
pixels or above, you might want to choose the equivalent film format<br />
(Medium or Large Transparency) providing a similar source quality setting.<br />
–10–<br />
Digital Camera (mid-range)<br />
Digital Camera (high-end)<br />
Scan (low-end)<br />
Scan (mid-range)<br />
Scan (high-end)
The last three source settings represent images that were scanned with a<br />
flatbed scanner. Determining the optimal setting for scanned images can<br />
be difficult since the quality of the scanned image depends on so many<br />
factors, including scanner quality and age, paper type, quality of the source<br />
image, size of the source image, etc.. Considering this, we recommend<br />
using only top quality or “high-end” photo source images when scanning<br />
on a flatbed scanner. However, if you must use a photo or image that is not<br />
seen as a “high-end” image, two settings have been included to compensate<br />
slightly for this, allowing you to scan and sharpen the image to the<br />
greatest degree possible. Mid-range source images may not look entirely<br />
crisp and clean, while “low-end” source images may contain even less definition.<br />
Keep in mind, a source image can be sharpened, but it will result<br />
in an optimally sharpened low quality image. We highly recommend using<br />
“high-end” source images.<br />
Avoid sharpening an image that was scanned from an offset<br />
print (e.g. a brochure, magazine, poster, catalogue, etc.). Special<br />
adjustments prior to sharpening are needed to obtain optimal<br />
results.<br />
–11–
The “Printer” Slider<br />
300x300 inkjet<br />
360x360 inkjet<br />
720x360 inkjet<br />
720x720 inkjet<br />
The slider “Printer” defines the type of printer you are using. The first<br />
six settings identify various resolutions of inkjet printers. If your inkjet<br />
printer’s resolution is not represented here, select a setting which is closest<br />
to your printer’s resolution.<br />
The “Color Laser” setting suits all Color Laser printers from 300 to 400<br />
dpi. Photo printers include all printers that are designed to print typical<br />
photos in standard photo sizes approximately 4"x5" or 9x13cm. The setting<br />
“Standard Offset” will adjust the sharpening for general offset printing.<br />
However, if you seek more offset adjustments, a more advanced sharpening<br />
process, and want to sharpen directly in CMYK mode, the professional<br />
version of nik Sharpener (nik Sharpener Pro) provides these<br />
advanced features. nik Sharpener Pro allows you to define the lpi resolution<br />
and a number of other parameters, providing an optimized sharpening<br />
process for professional offset printing.<br />
–12–<br />
1440x720 inkjet<br />
1440x1440 inkjet<br />
Color Laser<br />
Photo Printer<br />
Standard Offset
The “Overall Image Quality” Slider<br />
bad<br />
below average<br />
The Overall Image Quality slider defines the overall source image quality,<br />
allowing you to use source images that may not have been taken with<br />
optimal settings. This slider setting is designed to compensate for lower<br />
quality image sources. As always, however, we recommend that you use the<br />
highest quality image source possible. If you choose to use a bad or below<br />
average quality image, use the setting “below average” or “bad” to provide<br />
a compensating factor within the sharpening process for the images you<br />
want to salvage. Photos that were taken with a “throw-away” camera, for<br />
example, or images scanned from old photos are appropriate with these<br />
settings. If, on the other hand, you have purchased photos from a professional<br />
image source such as The Image Bank, Photo Disc, etc., you will<br />
probably want to choose “above average” or “very good” as the Overall<br />
Image Quality.<br />
average<br />
When in doubt, the setting “average” for most images is appropriate<br />
and will leave this variable within the sharpening process<br />
unaffected.<br />
–13–<br />
above average<br />
very good
The “Overall Printer Quality” Slider<br />
bad<br />
below average<br />
The slider “Overall Printer Quality” is similar to the slider for the image<br />
quality, providing an additional compensating factor. You will want to use<br />
the setting “bad” or “below average” for draft prints or older printers. If, on<br />
the other hand you are using a newer printer with high gloss, coated photo<br />
print paper, you will want to use the “above average” or “very good” setting.<br />
Remember, when in doubt the setting “average” for most images is<br />
appropriate and will leave this variable within the sharpening process<br />
unaffected.<br />
average<br />
You can NOT increase the overall image quality just by setting<br />
the last two sliders both to “very good”.<br />
–14–<br />
above average<br />
very good
A Closer Look at Sharpening with nik Sharpener!<br />
With regard to sharpening images, very little has changed over the years.<br />
Additionally, not much is written about what is behind the technology<br />
that you buy (such as nik Sharpener). As a result, we decided to include<br />
information in this booklet that tells you, the user, a little more about what<br />
is behind the design of nik Sharpener to “open the door” and hopefully<br />
help you understand the technology and why it does what it does.<br />
Leading the development team for nik multimedia is head programmer<br />
and founder of nik multimedia, Nils Kokemohr. Nils is not just a computer<br />
programmer, but also a recognized Photoshop expert and graphic<br />
designer. In designing tools such as nik Sharpener, he and his team take<br />
great care in designing efficient tools for graphic artists, designers and<br />
photographers, while focussing on improving overall design capabilities.<br />
–15–
From the Developer Nils Kokemohr<br />
In designing nik Sharpener, we set out to take a new look at sharpening<br />
and optimizing images. More specifically, we began by taking a close look<br />
at where improvements to a final image can be made while automating<br />
this optimization process. This approach not only involved sharpening,<br />
but also took into account the overall process of optimizing images. The<br />
result brought about a few issues and key changes with regard to sharpening<br />
and the development of nik Sharpener!<br />
–16–
Good-bye “Pixels”!<br />
Eliminating the “pixels” variable was at the top of our list. The radius<br />
with which an image is to be sharpened depends on the printer type, not<br />
on its resolution. To sharpen an image that has 400 dpi, for example, you<br />
need to sharpen it with twice the radius as if it had 200 dpi. This is a simple<br />
fact. However, to sharpen an image correctly it means that you must<br />
perform various calculations each time you would want to sharpen an<br />
image. Even knowing how to do the calculations and make the adjustments,<br />
few graphic artists and<br />
designers look forward to doing<br />
this. So, we started by removing<br />
the pixels variable from sharpening<br />
and incorporated this internally<br />
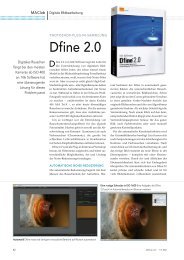
within nik Sharpener. Errors<br />
that typically occur in traditional<br />
sharpening are shown in the two<br />
images on this page; errors that nik<br />
Sharpener will help you avoid.<br />
The images shown are the same size, but different resolutions<br />
in pixels. Although the right image’s pixels are twice<br />
as large, the image must NOT be sharpened twice as much.<br />
–17–
Sharp? Sharper? Too Sharp!<br />
When most people sharpen an image, they focus on making the image<br />
as sharp as possible. However, the objective in sharpening is not to optimize<br />
the sharpness of<br />
an image – but rather<br />
to optimize the image!<br />
Like a bad face-lift,<br />
over-sharpened images<br />
create an effect that<br />
something just doesn’t<br />
look right. To remedy<br />
this we incorporated<br />
internal calculations for<br />
sharpening images that<br />
prevent over-sharpening.<br />
The image on the left is sharpened correctly while the photo on the right<br />
is over-sharpened.<br />
Sharpening Depends on the Printer Type!<br />
High resolution printers need sharpening with a small radius while low<br />
resolution printers require stronger sharpening. nik Sharpener considers<br />
this variable within its calculations and adjusts the image for optimal<br />
results.<br />
–18–
Sharpening Depends on the Image Source!<br />
Higher resolution images require different parameters than those with<br />
lower resolution when sharpening an image. A 2,000x2,000 pixel image,<br />
for example needs to be sharpened with a high radius when scanned from<br />
APS film. However, an image of the same size must be scanned with a<br />
lower radius when scanned from a large format negative. This is another<br />
adjustment we made in nik Sharpener. We take the source of the image<br />
into account as a variable within the sharpening process.<br />
Sharpening ALL Images to the Same Degree!<br />
Looking at the overall process of image optimization, graphic artists and<br />
designers seek predictability and consistency in the tools they use.<br />
Simplicity and consistency is the basis on which we designed nik<br />
Sharpener.<br />
nik Sharpener takes true sharpening parameters and uses them to sharpen<br />
each image to the optimal degree – never more or less. The images in<br />
any layout should be sharpened optimally and to the same degree in order<br />
to optimize the appearance of the overall effect of the page.<br />
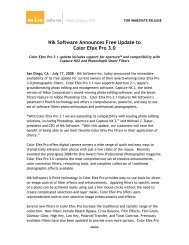
There always seems to be a temptation to try to sharpen blurry<br />
or fuzzy images. I cannot emphasize this enough: DO NOT<br />
sharpen blurry images! Sharpening cannot fix a fuzzy or blurry<br />
image.<br />
–19–
You may be able to bring out some of the structure of the image, making<br />
it appear more crisp. However, a bad or blurry photo is still a bad or<br />
blurry photo. Remember, painting glitter on a duck will not make it a<br />
swan!<br />
Have Fun!<br />
Nils Kokemohr<br />
nik multimedia<br />
–20–<br />
While the image on the right is a<br />
sharpened version of the image on the<br />
left, sharpening a blurry image can<br />
merely add some contrast and not<br />
“fix” a blurry image.
Additional features of “nik Sharpener Pro”<br />
While nik Sharpener focuses on inkjet and color laser printers<br />
for home and occasional professional uses, nik Sharpener<br />
Pro serves the needs of professionals who regularly do layout<br />
design and need to have more precise control of image sharpening<br />
and incorporate individual offset lpi resolutions.<br />
nik Sharpener Pro!<br />
• Supports Grayscale and CMYK image modes.<br />
• Includes “Save” and “Load” features, enabling settings to be stored.<br />
• Allows batch processing of images so that you can sharpen entire folders of<br />
images – very helpful for catalog production.<br />
• Enables users to enter parameters using the keyboard.<br />
• Incorporates additional parameters and multiple lpi settings for optimizing<br />
images for offset printing.<br />
• Utilizes a new antialiasing algorithm that avoids aliasing during sharpening.<br />
• Provides various “eye distance” settings, enabling images to be optimized for<br />
normal reading distance, product display distance, large sign and display distance,<br />
larger format distance and much more.<br />
• Incorporates a new and advanced color space, different from the Photoshop<br />
color mode, maintaining higher color integrity.<br />
For the most recent list of features for nik Sharpener Pro, contact TECHnik<br />
using the information on page 22 or visit our web site at www.tech-nik.com.<br />
–21–
TECHnik USA TECHnik Europe<br />
The TECHnik Group<br />
6549 Mission Gorge Rd. #220<br />
San Diego, CA 92120<br />
U. S. A.<br />
Phone: (619) 562 - 4456<br />
Fax: (619) 562 - 5583<br />
E-mail: infous@tech-nik.com<br />
HIGH PERFORMANCE GmbH<br />
Wendenstraße 130<br />
D-20537 Hamburg<br />
Germany<br />
Phone: + 49 - 40 - 25 40 48 - 0<br />
Fax: + 49 - 40 - 25 40 48 - 40<br />
E-Mail: infoeu@tech-nik.com<br />
nik multimedia software is<br />
produced and distributed exclusively by<br />
The TECHnik Group.<br />
© Copyright 1999 by The TECHnik Group. All rights reserved.<br />
–22–
Interested in adding more creative power to Photoshop? Check out other nik<br />
software, including nik Efex, nik Type Efex, nik Color Efex and nik<br />
Radioactive Backgrounds - all giving you creative power and additional<br />
functionality with Adobe Photoshop and all other Adobe-compatible products.<br />
Find more information on these products on this CD or go to our Web Site.<br />
Möchten Sie Photoshop mit noch mehr kreativen Effekten erweitern?<br />
<strong>Software</strong> wie nik Efex, nik Type Efex, nik Color Efex and nik Radioactive<br />
Backgrounds erweitert Adobe Photoshop und Adobe-kompatible<br />
Produkte. Informationen finden Sie auf dieser CD oder im Internet.<br />
http://www.tech-nik.com<br />
–23–
certificate of authenticity<br />
Authentic and original versions of this software are accompanied<br />
by a certificate of authenticity and a numbered registration<br />
card. Versions not accompanied by this certificate and registration<br />
card are considered invalid. If your version does not<br />
include this three-part-document or if you question the authenticity<br />
of your software, please contact your software dealer<br />
immediately, and/or contact TECHnik at http://www.technik.com/registration,<br />
or e-mail us at regalert@tech-nik.com .<br />
registration card, page 1 registration card, page 2<br />
Sharpener_Booklet D/US 1.0