6) The Scroller Module (Cassette) - Pani Projection and Lighting
6) The Scroller Module (Cassette) - Pani Projection and Lighting
6) The Scroller Module (Cassette) - Pani Projection and Lighting

You also want an ePaper? Increase the reach of your titles
YUMPU automatically turns print PDFs into web optimized ePapers that Google loves.
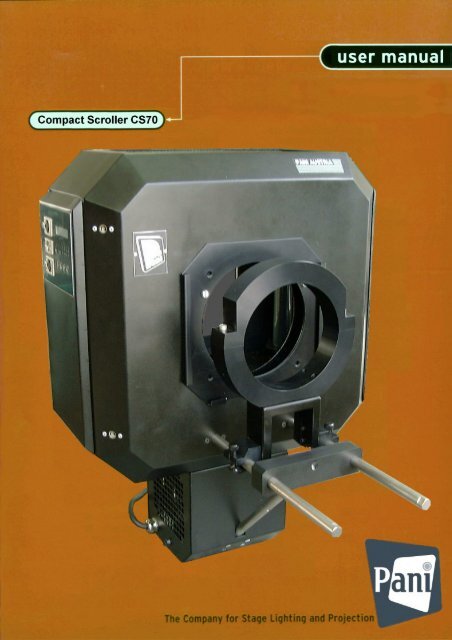
Compact <strong>Scroller</strong> CS 70<br />
Version March 2009<br />
<strong>Pani</strong> <strong>Projection</strong> <strong>and</strong> <strong>Lighting</strong> Vertriebs GmbH<br />
CONTENTS<br />
1) Dimension Drawing..............................................................2<br />
2) Position Drawing <strong>and</strong> Legend..............................................2<br />
3) Mounting the <strong>Scroller</strong> on a PANI-Projector........................3<br />
3.1) Mounting on 2,5 kW Projectors<br />
of the "Compact" <strong>and</strong> "CT“-Series.................................3<br />
3.2) Mounting on 4 kW Projectors<br />
of the "Compact" <strong>and</strong> "CT“-Series.................................3<br />
3.3) Mounting on the 6 kW Projectors<br />
BP 6 Gold II <strong>and</strong> BP 6 GT..............................................4<br />
3.4) Adapter System of <strong>Projection</strong> Lenses............................4<br />
3.5) Mounting the optional Dimming Shutter / PCS..............5<br />
3.6) Important notes before starting projection...............5<br />
4) Controlling the <strong>Scroller</strong>........................................................5<br />
4.1) Preparing the Film for st<strong>and</strong>ard working <strong>and</strong> for<br />
working with frames........................................................5<br />
4.2) Communication Area...............................................6,7,8<br />
4.3) DMX-512 St<strong>and</strong>ard Protocol.......................................8,9<br />
4.4) <strong>The</strong> PC Mode <strong>and</strong> Automatic.........................................9<br />
4.5) <strong>The</strong> <strong>Pani</strong> Scene Mode...................................................9<br />
5) Using Frames<br />
5.1) General Information about Frames..............................10<br />
5.2) Controlling Frames.......................................................10<br />
5.3) Marks on the Film.........................................................11<br />
5.4) Frames in Use .............................................................11<br />
6) <strong>The</strong> <strong>Scroller</strong> <strong>Module</strong> (<strong>Cassette</strong>) ........................................11<br />
7) Basic Unit as Delivered .....................................................12<br />
8) Accessories ........................................................................12<br />
6) Technical Data ...................................................................13<br />
2<br />
Page
Compact <strong>Scroller</strong> CS 70<br />
Legend<br />
(1) Housing<br />
(2) Communication Area<br />
(3) Main Switch<br />
(4) Connection Sockets<br />
(1x 0-10V,<br />
2x numerical output)<br />
(5) Supporting Rod<br />
(6) Accessory Bearing Rods<br />
(7) Objective Mounting Ring<br />
(8) Ventilation Grids<br />
(9) Removable <strong>Scroller</strong> Unit<br />
(10) Lock Nut<br />
(11) Electrical Supporting Plug<br />
<strong>Pani</strong> <strong>Projection</strong> <strong>and</strong> <strong>Lighting</strong> Vertriebs GmbH<br />
1) Dimension Drawing<br />
2) Position Drawing<br />
3
Compact <strong>Scroller</strong> CS 70<br />
<strong>Pani</strong> <strong>Projection</strong> <strong>and</strong> <strong>Lighting</strong> Vertriebs GmbH<br />
3) Mounting the <strong>Scroller</strong> on a PANI-Projector<br />
provided for BP2,5Compact, BP2,5CT, BP4Compact, BP4CT, BP6GoldII <strong>and</strong> BP6GT<br />
Preparing the Projector for mounting:<br />
For mounting the <strong>Scroller</strong> on a projector, you first have to dismount the following parts<br />
of the projector<br />
1) <strong>The</strong> Ventilator for Slide Cooling<br />
2) <strong>The</strong> Guide Roller for the Slide Carrier<br />
3) Slide Carrier Locking Pin<br />
Preparing the <strong>Scroller</strong> for mounting:<br />
1) Put out the Removable <strong>Scroller</strong> unit (9) after opening the Lock Nut (10)<br />
2) Dismount the St<strong>and</strong>ard mounting plate by unlocking the four wing nuts<br />
inside the scroller housing.<br />
Note: <strong>The</strong> loading of the film into the <strong>Scroller</strong> Unit you’ll find in the<br />
delivered “Quick reference for loading the film into a CS 70 scroller unit“<br />
3.1) Mounting on 2,5 kW Projectors of the<br />
"Compact" <strong>and</strong> "CT“-Series<br />
1) Dismount the Objective Support Bolts (Turning the front plate of the projector<br />
enables dismounting the hexagonal socket head screws)<br />
2) Mount the st<strong>and</strong>ard mounting plate by using the delivered countersunk<br />
hexagonal socket head screws (DIN 7991M8x25).<br />
3) Mount the housing of the scroller (1) by using the four wing nuts<br />
4) Insert the the Removable <strong>Scroller</strong> unit (9), lock the nut <strong>and</strong> connect the<br />
Electrical Supporting Plug (11) with the socket of the <strong>Scroller</strong> unit.<br />
5) Plug in the delivered dummy plug for using the projector without st<strong>and</strong>ard<br />
cooling fan<br />
3.2) Mounting on 4 kW Projectors of the<br />
"Compact" <strong>and</strong> "CT“-Series<br />
1) Dismount the Objective Support Bolts (Turning the front plate of the projector<br />
enables dismounting the hexagonal socket head screws)<br />
2) Disconnect the projector from the electrical source, open the lid of the<br />
housing. Replace the Adjustable Clamp Lever for Front Plate by the<br />
delivered hexagonal screw (DIN 933 M8x30)<br />
3) Mount the st<strong>and</strong>ard mounting plate by using the delivered countersunk<br />
hexagonal socket head screws (DIN 7991M8x25).<br />
4) Mount the housing of the scroller (1) by using the four wing nuts<br />
5) Insert the Removable <strong>Scroller</strong> unit (9), lock the nut <strong>and</strong> connect the Electrical<br />
Supporting Plug (11) with the socket of the <strong>Scroller</strong> unit.<br />
6) Plug in the delivered dummy plug for using the projector without st<strong>and</strong>ard<br />
cooling fan (otherwise ignition would not be possible).<br />
4
Compact <strong>Scroller</strong> CS 70<br />
3.3) Mounting on BP 6 Gold II or BP 6 GT<br />
1) Dismount the four Objective Support Brackets.<br />
2) Mount the delivered <strong>Scroller</strong> Support Brackets like<br />
shown in the adjoining picture, but fasten only the<br />
two at the button<br />
3) Mount the housing of the scroller (1) by using the<br />
four wing nuts <strong>and</strong> then fasten the screws of the<br />
brackets on top (to correct tolerances)<br />
4) Insert the Removable <strong>Scroller</strong> unit (9), lock the<br />
nut <strong>and</strong> connect the Electrical Supporting Plug (11)<br />
with the socket of the <strong>Scroller</strong> unit.<br />
3.4) Adapter System of <strong>Projection</strong> Lenses<br />
Using projection<br />
lenses of focal<br />
lengths over 27cm,<br />
may produce a<br />
scattered light, which<br />
may be unwanted in<br />
some cases.<br />
<strong>The</strong>refore a special<br />
modular bellows<br />
system is provided to<br />
combine the<br />
projection lens with<br />
the scroller housing.<br />
In the case of<br />
necessity, please<br />
contact our staff of<br />
Service <strong>and</strong> Support.<br />
Note:<br />
For using the motor<br />
driven focus unit<br />
(O.C. 12045) special<br />
mounting rings<br />
instead of R1 <strong>and</strong> R2<br />
are used!<br />
<strong>Pani</strong> <strong>Projection</strong> <strong>and</strong> <strong>Lighting</strong> Vertriebs GmbH<br />
Table of projection<br />
lenses <strong>and</strong> adapters:<br />
Lens 11cm 13,5cm 18cm 22cm 27cm 33cm 40cm 50cm 60cm<br />
Adapter R1+C0 R1+C0 R2+C1 R2+C1 R2+C1 R2+C2<br />
+C4<br />
5<br />
R2+C2 R2+C3 R1+C0
Compact <strong>Scroller</strong> CS 70<br />
3.5) Mounting the optional Dimming Shutter / PCS<br />
<strong>Pani</strong> <strong>Projection</strong> <strong>and</strong> <strong>Lighting</strong> Vertriebs GmbH<br />
<strong>The</strong> mounting <strong>and</strong> driving of the Dimming Shutter / PCS (G 405/ PCS, Order<br />
Code 22702) is very simple:<br />
1) Dismount the st<strong>and</strong>ard mounting brackets of the<br />
dimming shutter<br />
2) Mount the delivered adapter unit, which is shown in<br />
the adjoining figure with the delivered screws <strong>and</strong><br />
mount the unit to the two Accessory Bearing Rods (6)<br />
3) Connect (0-10V) the scroller (3pin-XLR connection socket (4)) with the<br />
control box of the shutter by using the delivered cable<br />
<strong>The</strong> dimming shutter uses DMX-channel 6 (see more in the documentation of<br />
controlling the scroller)<br />
4) Connect dimming shutter <strong>and</strong> the control box as normal.<br />
3.6) Important Notes before starting projection:<br />
Before Starting projection with the Compact <strong>Scroller</strong> CS 70 it is necessary to<br />
recognise the following Information:<br />
<strong>The</strong> fan of the <strong>Scroller</strong> is independently working, so<br />
• connect the plug to the 230V - source <strong>and</strong> switch on the <strong>Scroller</strong> first<br />
(before you start the projector) <strong>The</strong>n start the projector.<br />
• After ignition,<br />
switch on the scroller electronic. If you do it before<br />
ignition, the electronic may be disturbed by the ignition process.<br />
• After operation (when the projector is switched off) keep the scroller fan<br />
running for at least 3 minutes to save the film against heat tailback.<br />
4) Controlling the <strong>Scroller</strong><br />
4.1) Preparing the Film for st<strong>and</strong>ard working <strong>and</strong> for<br />
working with frames (more precise)<br />
<strong>The</strong> clear film parts at the beginning <strong>and</strong> the end of the scroller film are marked<br />
with a very thin high reflective tape. <strong>The</strong>y are delivered premounted in the<br />
scroller unit. <strong>The</strong>re is one cut, where you can split the clear film <strong>and</strong> mount the<br />
projection film between (take care of the right orientation, it´s the same as in<br />
st<strong>and</strong>ard slide projection!) For loading the film, see the delivered quick<br />
reference. As the film guiding has a free area of 18cm the cut film has to be<br />
with a width of only 17,5-17,8cm to guarantee optimal function.<br />
For very accurate driving (up to 0,05mm repeatable precision) it is good to<br />
divide the film into frames by mounting special stickers on the film (Ask the<br />
PANI - support staff for details). Each sticker marks the beginning of a new<br />
frame <strong>and</strong> the scroller control calculates <strong>and</strong> divides the area between two<br />
marks into 65536 steps. So the narrow the marks the higher the precision.<br />
If you use no frames, the scroller takes the whole length of the film (max. 13m)<br />
for calculation. This results in a repeatable precision of positioning of at least.<br />
0.19mm, which should be enough for st<strong>and</strong>ard uses. (see more about frames in<br />
chapter 5 on page 10)<br />
6
Compact <strong>Scroller</strong> CS 70<br />
4.2) Communication Area<br />
Here you find all<br />
information of the<br />
scroller status<br />
(LCD-display <strong>and</strong><br />
LED-controls), the<br />
keys for basic<br />
settings <strong>and</strong><br />
manual drive as<br />
well as the<br />
sockets of the<br />
main connections<br />
for st<strong>and</strong>ard uses.<br />
<strong>The</strong> Menu Buttons <strong>and</strong> their functions:<br />
<strong>Pani</strong> <strong>Projection</strong> <strong>and</strong> <strong>Lighting</strong> Vertriebs GmbH<br />
Use SET to : enter or validate<br />
← to : leave or cancel<br />
↑ to : change up or increase the value<br />
↓ to : change down or decrease the value<br />
IF YOU PUSH THE 4 KEYS AT THE SAME TIME, YOU RESET THE UNIT !<br />
<strong>The</strong> 7 LED indicate the status of the power supply units <strong>and</strong> the data flow of the<br />
control unit of the scroller. <strong>The</strong>se informations are mainly used for service purposes.<br />
<strong>The</strong> st<strong>and</strong>ard 5-pin XLR sockets DATA IN <strong>and</strong> DATA OUT are for connecting the<br />
scroller with the DMX-console <strong>and</strong> for cascading scroller units for DMX-operation <strong>and</strong><br />
st<strong>and</strong>alone working (up to 4 units). You can use the st<strong>and</strong>ard male/female 5-pin XLR<br />
cables to connect. <strong>The</strong> DATA IN socket is also used for the connection of the scroller<br />
with the PC-interface, which is delivered with the optional deliverable PC-software.<br />
This software enables programming the built in EEPROM for st<strong>and</strong>alone working <strong>and</strong><br />
MIDI – synchronisation.<br />
<strong>The</strong> 6-pin XLR socket MICRO CONSOLE is provided for special service operations<br />
only.<br />
<strong>The</strong> LCD-display:<br />
After switching on the scroller it first runs a reset <strong>and</strong> self checking procedure, which is<br />
good to prevent an undefined status <strong>and</strong> unwanted reactions.<br />
After finishing this check with a good result, the display automatically shows the main<br />
menu. This <strong>and</strong> a lot of submenus are shown in the logical diagram on pages 7 to 9.<br />
7
Compact <strong>Scroller</strong> CS 70<br />
<strong>Pani</strong> <strong>Projection</strong> <strong>and</strong> <strong>Lighting</strong> Vertriebs GmbH<br />
At main : press Set to go into the menu<br />
Press � to leave the menu<br />
Press ↓ to toggle display<br />
value on/off<br />
Address Menu<br />
With these setting options, you can define the<br />
No of the scroller <strong>and</strong> the corresponding DMX<br />
address<br />
In <strong>Pani</strong> Scene Mode you can select the full<br />
DMX address 1 - 512<br />
Mode Menu<br />
Here you define the actual working mode:<br />
� DMX-Mode: <strong>The</strong> scroller is ready to<br />
be controlled by at most 11 DMX<br />
channels (see also 4.3)<br />
PC-Mode: not supported anymore<br />
Scene Mode: not supported anymore<br />
Master Mode: not supported anymore<br />
Display Menu<br />
Here you can monitor the incoming data from<br />
DMX in real time.<br />
You choose the parameter <strong>and</strong> press REC <strong>and</strong><br />
after go back to main<br />
When you don’t want display, you go to the<br />
« display menu » <strong>and</strong> choose » Not »<br />
Reset <strong>and</strong> others<br />
In this menu, you can reset the scroller to leave<br />
an undefined driver status<br />
Run the « teach me » process to read all film<br />
data (length, frame positions) into the flash<br />
memory of the scroller. This function is<br />
necessary when you change the film.<br />
You can also check the DMX signal to know<br />
how many packages by second you receive.<br />
8
Compact <strong>Scroller</strong> CS 70<br />
Manual test.<br />
<strong>Pani</strong> <strong>Projection</strong> <strong>and</strong> <strong>Lighting</strong> Vertriebs GmbH<br />
This function works duly when you unplug DMX!<br />
Choose the parameter, which you want to test <strong>and</strong><br />
press SET (=REG)<br />
After that you can use 0/Full key (=min / max)<br />
Or use � to change the key step to<br />
0FL<br />
+16 / -16<br />
+1 / -1<br />
With the keys ↑ <strong>and</strong> ↓ you step through the values.<br />
<strong>The</strong> scroller is following the new settings after<br />
confirming with SET.<br />
4.3) DMX-512 st<strong>and</strong>ard protocol<br />
<strong>The</strong> Compact <strong>Scroller</strong> CS-70 is normally provided for DMX-use. Some<br />
parameters are predefined, so you find here the tables to get the facility of<br />
programming:<br />
Table of used DMX-Channels<br />
Channel Sign Notation Description<br />
1 D1 define position low res. (=coarse)<br />
2 D2 define position high res. (=fine)<br />
3 F frame<br />
4 S driving speed<br />
5 T driving time<br />
6 Dim dimming shutter 1<br />
7 Ign projector ignition (reserved)<br />
8 Foc Focus<br />
9 reserved for future functions<br />
10 reserved for future functions<br />
11 reserved for future functions<br />
User Tip: Always set channel 4 at min. 2% to avoid malfunctions!<br />
9
Compact <strong>Scroller</strong> CS 70<br />
<strong>Pani</strong> <strong>Projection</strong> <strong>and</strong> <strong>Lighting</strong> Vertriebs GmbH<br />
Mapping to define working area of DMX-channels for a greater number of scrollers:<br />
Num. DMX Num. DMX Num. DMX Num. DMX Num. DMX<br />
1 1 8 78 15 155 22 232 29 309<br />
2 12 9 89 16 166 23 243 30 320<br />
3 23 10 100 17 177 24 254 31 331<br />
4 34 11 111 18 188 25 265 32 342<br />
5 45 12 122 19 199 26 276 - -<br />
6 56 13 133 20 210 27 287 - -<br />
7 67 14 144 21 221 28 298<br />
4.4) <strong>The</strong> PC Mode <strong>and</strong> Automatic<br />
This Mode is not supported by PANI anymore.<br />
Please use other solutions for DMX-st<strong>and</strong>alone driving.<br />
4.5) <strong>The</strong> PANI Scene Mode<br />
This Mode is not supported by PANI anymore.<br />
Please use other solutions for DMX-st<strong>and</strong>alone driving.<br />
10
Compact <strong>Scroller</strong> CS 70<br />
5) Using Frames<br />
<strong>Pani</strong> <strong>Projection</strong> <strong>and</strong> <strong>Lighting</strong> Vertriebs GmbH<br />
5.1) General Information about Frames<br />
<strong>The</strong> frame system allows you to divide a film into different zones with the<br />
advantage to reach more precision of film positioning (possibility for frames up<br />
to the number of 32)<br />
5.2) Controlling Frames<br />
DMX-channel 3 (F) controls the frames:<br />
Value 0 to 7 .... frame zero:<br />
controls the whole film even if you have set some marks<br />
Value 8 to 15 ... frame one:<br />
controls the film between mark 1 <strong>and</strong> mark 2<br />
other values see the following table:<br />
DMX-settings for using frames:<br />
Table for frame position values (binary <strong>and</strong> %)<br />
Bin<br />
Frame<br />
Num.<br />
% Bin<br />
Frame<br />
Num. % Bin<br />
Frame<br />
Num. %<br />
0 to 7 0 0 88 to 95 11 36 176 to 183 22 70<br />
8 to 15 1 4 96 to 103 12 39 184 to 191 23 74<br />
16 to 23 2 8 104 to 111 13 42 192 to 199 24 77<br />
24 to 31 3 11 112 to 119 14 45 200 to 207 25 80<br />
32 to 39 4 14 120 to 127 15 48 208 to 215 26 83<br />
40 to 47 5 17 128 to 135 16 52 216 to 223 27 86<br />
48 to 55 6 20 136 to 143 17 55 224 to 231 28 89<br />
56 to 63 7 23 144 to 151 18 58 132 to 239 29 92<br />
64 to 71 8 27 152 to 159 19 61 240 to 247 30 96<br />
72 to 79 9 30 160 to 167 20 64 248 to 255 31 99<br />
80 to 87 10 33 168 to 175 21 67<br />
User Tips: 1) Always use one single comm<strong>and</strong> for frames select (do not combine e.g. with position)<br />
2) Always use a step comm<strong>and</strong> for frames select (no fading)<br />
3) Always use the frames in increasing order to avoid malfunction <strong>and</strong> keep accuracy<br />
11
Compact <strong>Scroller</strong> CS 70<br />
<strong>Pani</strong> <strong>Projection</strong> <strong>and</strong> <strong>Lighting</strong> Vertriebs GmbH<br />
12
Compact <strong>Scroller</strong> CS 70<br />
<strong>Pani</strong> <strong>Projection</strong> <strong>and</strong> <strong>Lighting</strong> Vertriebs GmbH<br />
5.3) Marks on the Film<br />
Marks on the film are made of a piece of very thin high reflective adhesive tape,<br />
with a special shape print on it (5 samples are delivered with the scroller).<br />
Each mark indicates the beginning of the following frame, which ends at the<br />
next mark.<br />
For positioning the distance between the two marks is divided into 65536 steps.<br />
So the accuracy of positioning depends on the distance of the marks.<br />
But the best precision is 0,05 mm max. because of the limits of the optical<br />
sensor.<br />
Note: 1) For keeping junction tapes invisible: Do not position marks less than<br />
1 cm before or 10 cm after a tape or optionally position it on the tape.<br />
2) Position the mark at that side of the film, which is inside the scroller<br />
unit to read it with the optical sensor.<br />
<strong>The</strong> positions of the frames are learned by the scroller during the function<br />
“teach me” (see chapters 4.2 page 7 <strong>and</strong> 5.4 on this page)<br />
5.4) Frames in Use<br />
<strong>The</strong> positioning of a film with frames is depending on the three DMX-channels<br />
1,2 <strong>and</strong> 3. So if you change only the frame parameter, the film runs to the set<br />
position of the new frame.<br />
Please note the User Tips on pages 8 <strong>and</strong> 10 !<br />
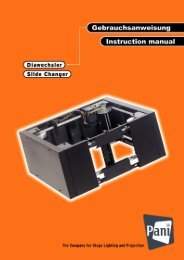
6) <strong>The</strong> <strong>Scroller</strong> <strong>Module</strong> (<strong>Cassette</strong>)<br />
On top of the <strong>Scroller</strong> cassette you find the LED – bank <strong>and</strong> 4 keys.<br />
LED: 2 red <strong>Scroller</strong> encoder: blinks during the moving of the film<br />
2 yellow electric source ±15V must light up permanently<br />
2 green frame sensor, lights up, when frame indicator is present in the<br />
sensor-position<br />
2 yellow 1 of them is light up, when the scroller cassette gets data from<br />
the electronic control unit.<br />
2 red Not in use<br />
Keys: Num. 1 to drive the film manually left,<br />
press key Num. 2 additionally for forcing the driving speed<br />
Num. 2 to drive the film manually right,<br />
press key Num. 1 additionally for forcing the driving speed<br />
Num. 3 <strong>and</strong> 4 pressing together says “teach me”<br />
Pressing all 4 keys together results in a reset run.<br />
For loading the film into the <strong>Cassette</strong>, see delivered QUICK REFERENCE !<br />
13
Compact <strong>Scroller</strong> CS 70<br />
<strong>Pani</strong> <strong>Projection</strong> <strong>and</strong> <strong>Lighting</strong> Vertriebs GmbH<br />
7) Basic Unit as Delivered<br />
1 CS-70 housing unit with built in universal fan, electronic drive equipment <strong>and</strong> added mask holder<br />
1 CS-70 cassette unit with built in electronic drive equipment <strong>and</strong> loaded st<strong>and</strong>ard film ends<br />
(mounted <strong>and</strong> fixed in the housing unit)<br />
1 supporting rod <strong>and</strong> a connection block<br />
4 set of accessory bearing rods (supporting all focal lengths up to 60cm)<br />
1 st<strong>and</strong>ard lens mounting set<br />
1 lens mounting ring for 11 <strong>and</strong> 13,5 cm lenses<br />
2 lens adapter tube<br />
3 lens adapter rings<br />
4 adapter brackets for BP 6<br />
1 adapter plate for BP 2,5 <strong>and</strong> 4 (mounted with 4 wing nuts on the housing unit)<br />
1 PCS-adapter unit<br />
1 XLR 3-pin connecting cable 2m (for dimmer)<br />
1 bag with: 4 screws for mounting the adapter plate on BP 2,5 or 4<br />
1 screw with spring washer <strong>and</strong> hexagonal nut ( see 3.2) 2) )<br />
1 dummy plug for BP 2,5 <strong>and</strong> 4<br />
5 pcs. of PANI - frame marks<br />
1 instruction manual<br />
1 quick reference for loading the film<br />
8) Accessories<br />
Description Type: Order Code:<br />
CS-70 cassette unit for simple changing the scroller repertoire 12521<br />
CS-70 film cutting & gluing device for exact preparing the film 12813<br />
CS-70 motor driven focus unit for DMX- or programme- driven focusing 12045<br />
PANI - frame marks for CS-70 4423<br />
This list will be continued<br />
For actual information please see our homepage or contact us:<br />
http://www.pani.com e-mail: light@pani.com<br />
14
Compact <strong>Scroller</strong> CS 70<br />
<strong>Pani</strong> <strong>Projection</strong> <strong>and</strong> <strong>Lighting</strong> Vertriebs GmbH<br />
9) Technical Data<br />
Mechanical Data<br />
Size of Housing (L x W x H) 554 x 515 x 700 mm<br />
Size of <strong>Cassette</strong> (L x W x H) 170 x 480 x 385 mm<br />
Weight Housing 17 kg<br />
Weight <strong>Cassette</strong> 13 kg<br />
Film Data<br />
Slide Format (= free masking frame format): 180 x 155mm<br />
Film dimensions: max. 13 m x max. 180 mm<br />
Best film width for good function: 175-178mm<br />
Max. Number of Single Slides (180x155) 72<br />
Driving Speeds:<br />
maximum: 0,28 cm/s = 16 m/min at the beginning of the film<br />
0,42 cm/s = 25 m/min near the end of a 13m long film<br />
minimum: 0,11 mm/s = 6,6 mm/min = 0,39 m/hour<br />
Accuracy:<br />
minimum without frames with a film length of 13m: 0,19mm<br />
maximum with frames up to 3,3m length 0,05mm<br />
Electrical Data<br />
Supply Data 220/240V – 50 Hz, 2A(nom.), 3A (fuse)<br />
Protection Class: IP 20<br />
Fan Capability: 430 m³/hour<br />
Cable: 2 m with Schuko connector<br />
Application Fields<br />
PANI-Compatibility BP2500Halogen <strong>and</strong> BP3000Halogen<br />
BP 2,5 Compact <strong>and</strong> BP 2,5 CT<br />
BP 4 Compact <strong>and</strong> BP 4 CT<br />
BP 6 Gold II (with new universal filter)<br />
BP 6 GT<br />
others on request<br />
Rotation on Projector (around optical axis) ± 90° possible<br />
Ambient Operating Temperature: max. 30°<br />
<strong>Pani</strong><br />
<strong>Projection</strong> <strong>and</strong> <strong>Lighting</strong> Vertriebs GmbH<br />
AUSTRIA – EUROPE<br />
A-1070 VIENNA, KANDLGASSE 23<br />
TEL. + 43 1 521 08-0* FAX + 43 1 526 42 87<br />
http://www.pani.com e-mail: light@pani.com<br />
15