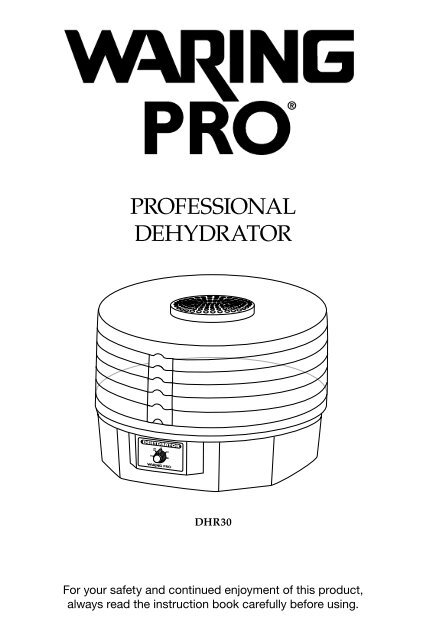
DHR30 Professional Food Dehydrator Instruction Booklet - Waring Pro
DHR30 Professional Food Dehydrator Instruction Booklet - Waring Pro
DHR30 Professional Food Dehydrator Instruction Booklet - Waring Pro

You also want an ePaper? Increase the reach of your titles
YUMPU automatically turns print PDFs into web optimized ePapers that Google loves.
PROFESSIONAL<br />
DEHYDRATOR<br />
<strong>DHR30</strong><br />
For your safety and continued enjoyment of this product,<br />
always read the instruction book carefully before using.
TABLE OF CONTENTS<br />
Important Safeguards . . . . . . . . . . . . . . . . . . . . . . . . . . . . 1<br />
Special Cord Set <strong>Instruction</strong>s . . . . . . . . . . . . . . . . . . . . . . 2<br />
Introduction . . . . . . . . . . . . . . . . . . . . . . . . . . . . . . . . . . . . 3<br />
Operating <strong>Instruction</strong>s . . . . . . . . . . . . . . . . . . . . . . . . . . . . 3<br />
Before Using . . . . . . . . . . . . . . . . . . . . . . . . . . . . . . . . . . . . 4<br />
Usage . . . . . . . . . . . . . . . . . . . . . . . . . . . . . . . . . . . . . . . . . 4<br />
Cleaning, Care and Maintenance . . . . . . . . . . . . . . . . . . . 5<br />
<strong>Food</strong> Selection . . . . . . . . . . . . . . . . . . . . . . . . . . . . . . . . . . 5<br />
Vegetable Preparation and Treatment . . . . . . . . . . . . . .6-8<br />
Fruit Preparation and Treatment . . . . . . . . . . . . . . . . . .8-11<br />
Nuts, Herbs and Flowers . . . . . . . . . . . . . . . . . . . . . . .10-11<br />
Useful Tips . . . . . . . . . . . . . . . . . . . . . . . . . . . . . . . . . . . . 12<br />
<strong>Food</strong> Storage . . . . . . . . . . . . . . . . . . . . . . . . . . . . . . . . . . 13<br />
Recipes . . . . . . . . . . . . . . . . . . . . . . . . . . . . . . . . . . . . .14-18<br />
IMPORTANT SAFEGUARDS<br />
When operating electric appliances, basic safety precautions<br />
should always be followed, including the following:<br />
1. READ ALL INSTRUCTIONS BEFORE OPERATION.<br />
2. Always unplug appliance from outlet when not in<br />
use or before cleaning. Allow plenty of time to cool<br />
before adding or removing parts.<br />
3. Never touch hot surfaces. Use handles or knobs.<br />
4. Avoid using the appliance in the presence<br />
of children. Close supervision is necessary when<br />
appliance is used by or near children.<br />
5. To avoid electrical shock, never immerse plugs,<br />
cord, or the base assembly in any liquid.<br />
6. Never operate any appliance with a damaged cord or<br />
plug, or one that has malfunctioned or been damaged<br />
in any way. Immediately return the appliance to the<br />
nearest authorized service facility for analysis.<br />
1
7. Using accessory attachments not recommended or<br />
sold by the appliance manufacturer may cause electric<br />
shock, injury, or fire.<br />
8. Never use outdoors.<br />
9. Never let the cord hang over the edge of a table or<br />
counter or touch hot surfaces.<br />
10. Never place on or near a hot gas or electric burner or in<br />
a heated oven.<br />
11. Never use this appliance for any other use than that for<br />
which it is intended.<br />
12. To disconnect, first turn control knob to OFF, then<br />
unplug from electrical wall outlet.<br />
13. Never pour liquids into the appliance.<br />
14. Never operate near combustible or pressurized<br />
spray cans.<br />
SAVE THESE INSTRUCTIONS<br />
FOR HOUSEHOLD USE ONLY<br />
SPECIAL CORD INSTRUCTIONS<br />
A shot power-supply cord is provided to reduce the risks<br />
resulting from becoming entangled in or tripping over a<br />
longer cord. Longer extension cords are available and may<br />
be used if care is exercised in their use.<br />
If a long extension cord is used, the marked electrical<br />
rating of the extension cord should be at least as great<br />
as the electrical rating of the appliance, and the longer<br />
cord should be arranged so that it will not drape over the<br />
countertop or tabletop, where it can be pulled on by children<br />
or tripped over.<br />
NOTICE: This appliance has a polarized plug (one blade is<br />
wider than the other). To reduce the risk of electrical shock,<br />
this plug is intended to fit into a polarized outlet only one<br />
way. If the plug does not fit fully into the outlet, reverse the<br />
plug. If it still does not fit, contact a qualified electrician. Do<br />
not attempt to modify the plug in any way.<br />
2
INTRODUCTION<br />
The dehydration of fruits and vegetables is one of the<br />
earliest methods of food preservation. Since their discovery<br />
and cultivation, plums and grapes have been sun-dried into<br />
prunes and raisins. These dried fruits and vegetables make<br />
great snacks or desserts, and it’s easy to dehydrate<br />
different meats to make jerky. Dehydration is a healthy way<br />
of preserving food because bacteria growth is inhibited by<br />
the removal of moisture. You can even use your food<br />
dehydrator to dry flowers and make potpourri! Before<br />
using your food dehydrator, be sure to take time to read<br />
the “Important Safeguards” and all other instructions in<br />
this manual.<br />
OPERATING INSTRUCTIONS<br />
This appliance is meant for household use only. First,<br />
place it on a level surface, and then insert the plug into a<br />
120V rated electrical outlet. Do not use any other rated type<br />
outlet. This food dehydrator has a polarized plug (one blade<br />
is wider than the other). To reduce risk of electric shock, this<br />
plug is intended to fit into a polarized outlet only one way. If<br />
the plug does not fit fully into the outlet, reverse the plug and<br />
try again. If it still does not fit, contact a qualified electrician.<br />
Do not attempt to modify the plug in any way. Attempting<br />
to defeat this safety feature may result in damage to the<br />
plug or the outlet.<br />
The food dehydrator is equipped with a short power-supply<br />
cord, reducing the risk of tangling or tripping over a longer<br />
cord. Extension cords can be used with the proper attention<br />
paid to safety concerns. When using a longer, detachable<br />
power-supply cord or extension cord, the marked electrical<br />
rating of the extension cord should be the same or greater<br />
as the electrical rating of the appliance, and the longer cord<br />
should not drape over the countertop or table where children<br />
could pull it or it could be tripped over unintentionally.<br />
3
BEFORE USING<br />
1. Unpack the food dehydrator with care.<br />
2. Wash all of the dehydrator trays and lid in warm,<br />
soapy water. Rinse well and dry completely.<br />
3. Wipe the dehydrator base with a clean and dry soft<br />
cloth or sponge. Never immerse base, plug or cord in<br />
water or any other liquid.<br />
USAGE<br />
1. First, ensure the unit is turned to the OFF position and<br />
unplugged before preparing to use.<br />
2. Wash the trays and lid before each use to prevent<br />
food contamination.<br />
3. Place the base on a flat, smooth countertop surface.<br />
4. Prepare food to be dehydrated as instructed, depending<br />
on the type of food; never overlap food or overload<br />
trays.<br />
5. Arrange food on trays, stack up the trays, and set<br />
them aside.<br />
6. Trays can accommodate a variety of food sizes with<br />
small adjustments.<br />
7. Plug unit into electrical wall outlet. Set control knob to<br />
desired setting.<br />
8. Place stacked trays on base and cover the top tray with<br />
the lid. Then allow the food to dry for the recommended<br />
length of time (drying time depends on the food type).<br />
9. Top lid vent holes must be kept clear of any objects.<br />
10. Monitor the food while it is dehydrating and check it<br />
for desired doneness. It may be necessary to rotate<br />
the racks during drying as bottom racks will dehydrate<br />
faster than top racks. Once cooled, remove individual<br />
pieces and store in food-safe containers or plastic<br />
bags, preferably airtight. Leave the pieces that are not<br />
yet done in the dehydrator and monitor them until done.<br />
11. Store the pieces that are not going to be eaten in the<br />
next few days in the refrigerator. When storing food in<br />
4
the freezer, use containers or bags designed specifically<br />
for freezer storage.<br />
12. Switch the unit to OFF and unplug after using.<br />
13. Wash the dehydrator trays and lid after each use. Wipe<br />
the base with a soft, slightly damp cloth or sponge;<br />
never let water or any other liquid get into the base. Be<br />
sure the trays and lid are completely dry before storing<br />
them back on the base.<br />
NOTE: Any other servicing should be performed by an<br />
authorized service representative.<br />
HOW TO USE THE FRUIT ROLL-UP SHEET<br />
Your unit comes with one fruit roll-up sheet.<br />
To prepare fruit roll-up sheet, lightly<br />
spray a paper towel with cooking<br />
spray and rub over the fruit roll-up<br />
sheet. Follow preheating preparation<br />
instructions which can be found in<br />
the recipe section of the instruction<br />
book for Yogurt Roll-Ups, Spiced<br />
Apple Trail Mix Leather and<br />
Strawberry Banana Leather. Once<br />
your fruit roll-up sheet is ready, place<br />
on top rack of unit as shown in Fig. 1.<br />
5<br />
Fig. 1<br />
CLEANING, CARE AND MAINTENANCE<br />
<strong>Dehydrator</strong> racks, top cover and fruit roll-up sheet are all<br />
dishwasher safe.<br />
To clean unit base, unplug from outlet and wipe clean using<br />
a damp cloth. Wipe dry with a clean cloth.<br />
NOTE: Any other servicing should be performed by an<br />
authorized service representative.
FOOD SELECTION<br />
Select foods for dehydration that are in good condition.<br />
Fruits should have just become ripe since they contain the<br />
highest natural form of sugar and provide the best results.<br />
Vegetables should be fresh and crisp. Avoid fruits that are<br />
not ripe; they yield unpredictable results and often have a<br />
flat, bitter taste. Overripe fruits and vegetables with spoiled<br />
portions should also be avoided. Cut off any bruised or<br />
marred portions of the fruits and vegetables before<br />
dehydration. Meat, poultry and fish should be fresh and<br />
lean. Preparation, dehydration time and their storage<br />
method will also influence their quality and taste. Follow<br />
preparation, dehydration and storage instructions in this<br />
manual to ensure the best-tasting, highest quality dried<br />
foods.<br />
IMPORTANT<br />
If you suspect food contamination, do not attempt to use the<br />
dehydrator. Discard the food.<br />
VEGETABLE PREPARATION AND TREATMENT<br />
Vegetables are low in acid and have less sugar than fruits,<br />
so they require a little more effort. Some vegetables are<br />
better frozen than dried, so remember to be selective in the<br />
vegetables you choose.<br />
PREPARATION<br />
Only the highest quality vegetables should be selected for<br />
drying. Wash them carefully just before dehydrating to<br />
remove dirt and bacteria. Most vegetables should be peeled,<br />
trimmed, cut or shredded prior to drying.<br />
PRETREATMENT<br />
Blanching vegetables prior to drying is recommended.<br />
This destroys the enzymes that can produce “off” flavors<br />
when stored and lead to poor texture and poor rehydration.<br />
Steam blanching is a better method than water blanching<br />
because more flavor and vitamins are retained. Vegetables<br />
can also be microwaved.<br />
6
STEAM BLANCHING<br />
Layer prepared vegetables in the top portion of a steamer or<br />
a steamer insert and steam until the vegetables are heated<br />
through but are not cooked enough to eat (usually 2 to 3<br />
minutes). Stir to ensure all vegetables are evenly blanched.<br />
Quickly transfer steamed vegetables directly to drying trays.<br />
MICROWAVE BLANCHING<br />
Microwave ovens can easily be used to blanch fresh<br />
vegetables. Prepare vegetables the same way as for steam<br />
blanching. Place vegetables in a covered casserole dish<br />
with small amount of water (refer to your microwave oven<br />
cooking chart). Cook for ¼ to ¹/3 the time listed in the chart,<br />
stirring after half of the blanching time. Vegetables blanched<br />
in a microwave will be more brightly colored than those that<br />
are steam blanched. Quickly transfer blanched vegetables<br />
directly to drying tray.<br />
VEGETABLE PREP<br />
Asparagus Divide tips from stems by snapping in half.<br />
Tips are best for drying, but dried stems can<br />
be crushed and used for seasoning.<br />
Beans Snip off ends and cut as desired. Blanch,<br />
(green) then place in the freezer for 30 to 45 minutes.<br />
Beets Trim, leaving about an inch of the top and<br />
root. Blanch, allow to cool, then cut off the<br />
top and root. Slice.<br />
Broccoli Trim and cut into pieces. Steam for about<br />
4 to 5 minutes.<br />
Carrots Wash, peel, and cut into ½-inch long pieces.<br />
Steam for about 4 to 5 minutes.<br />
Corn Remove husk, wash and steam blanch the<br />
whole piece of corn. Allow to cool, then<br />
shear the corn from the cob.<br />
7
Celery Break leaves off their stems. Place leaves<br />
separate from stalks in tray(s).<br />
Chives Wash, dry, and mince.<br />
Cucumber Wash, trim and slice about ¼-inch thick.<br />
Garlic Separate and peel cloves. Cut cloves into<br />
halves or slices.<br />
Mushrooms Remove any soil and remove stem. Dry the<br />
mushroom whole, cut in halves or sliced.<br />
Onions Trim off the ends and peel. Cut into rings<br />
or dice.<br />
Peppers Wash and remove core. Cut into halves,<br />
(pimentos) quarters, rings or strips.<br />
Peppers Wash and dry whole.<br />
(jalapeños)<br />
Potatoes Wash, peel, and cut or slice as desired;<br />
steam blanch. Rinse under cold water<br />
and pat dry before placing on tray(s).<br />
Note: If you wish to leave the skin on, you<br />
must wash and scrub the potato and remove<br />
all the eyes and scars with the tip of a potato<br />
peeler or paring knife.<br />
Tomatoes Wash and remove stems. Using a ladle or<br />
tongs, dip into boiling water and then into an<br />
ice water bath. You will be able to remove the<br />
skin easily. Cut into halves, quarters or thick<br />
slices.<br />
8
FRUIT & NUTS<br />
PREPARATION AND TREATMENT<br />
FRUIT<br />
Nearly all fruits can be dried at home, but some will require<br />
more drying time than others; the guidelines offered here will<br />
help get you started. It is recommended that you select the<br />
fruits that are in season and experiment with those first.<br />
Preparation<br />
Wash and inspect fruits and remove any bruised or overripe<br />
parts. Peel if desired. Cut larger fruits in half. If the pieces<br />
vary too much in size, slice them to ³/8" to ½" thick for even<br />
drying. Smaller fruits such as grapes and cherries may be<br />
dried whole. Remove pits or stones from fruits such as<br />
plums, cherries, apricots, etc. Always peel fruits that have<br />
been artificially waxed. Peeling is optional with other fruits –<br />
for instance, dried pear skins tend to be grainy, and peach<br />
skin peels are a little fuzzy.<br />
Most fruits like pineapples, grapes, strawberries, and plums<br />
can be placed directly on the drying trays as they are<br />
prepared. However, some fruits will turn brown when<br />
exposed to air (apples, apricots, peaches, and pears).<br />
Following the guidelines set below, you can pretreat these<br />
fruits to slow this browning and to prevent loss of vitamins A<br />
and C. To pretreat them, the cut pieces should be kept in a<br />
holding solution until you have sufficient fruit to dry.<br />
Pretreatment<br />
Below are several optional methods of pretreatment. You<br />
don’t always need to pretreat food in order to dry it; however,<br />
pretreatment can make food look better, increase the<br />
shelf life and even enhance the nutritional value. Experiment<br />
with both treated and untreated food to see which will work<br />
best. Remember, proper storage is critical to the quality of<br />
the final product, whether treated or untreated.<br />
*Jell-O is a ® trademark of Kraft <strong>Food</strong>s.<br />
9
Sodium Bisulfite<br />
Use food-safe (USP) grade only. Dissolve 1 teaspoon of<br />
sodium bisulfite in one quart of water. Dip small amounts of<br />
fruit in the solution for 2 minutes. This helps prevent loss of<br />
vitamin C and maintains a bright color. Sodium bisulfite is<br />
available in most pharmacies/drug stores.<br />
Natural Pre-dips<br />
With their high vitamin C content, pineapple and lemon juice<br />
are natural alternatives to other pretreatments to reduce<br />
browning. Slice fruit directly into juice. Remove after about<br />
2 minutes and place on trays. Fruits may also be dipped<br />
in honey, lime or orange juice, Jell-O ® * powders or<br />
sprinkled with coconut to give them an exotic flavor.<br />
Use your imagination!<br />
When drying fruit halves, especially apricots, it has been<br />
suggested that popping the back (“inside out”) will speed<br />
drying time. This is true, but it also results in the loss of the<br />
nutritional juices to the bottom of the dehydrator. Instead,<br />
cut each half in half again to give the end product more<br />
nutritional value, a brighter color, and faster reconstitution<br />
capabilities.<br />
Apples Wash thoroughly and peel if you wish.<br />
Cut in half and core, then slice into<br />
smaller pieces. Pretreat with lemon juice<br />
to prevent browning.<br />
Apricots Wash, cut open and remove pit. If desired,<br />
cut into quarters.<br />
Bananas Peel and slice. Pretreat with lemon juice to<br />
prevent browning.<br />
Cherries Wash and remove pits.<br />
Coconut Drain the milk, open shell and remove<br />
coconut meat. Dry and cut into small<br />
chunks.<br />
10
Figs Wash, remove stems and cut into halves or<br />
quarters. Place dry skin side up.<br />
Grapes Remove stems and wash.<br />
Papaya Wash, peel and cut into chunks.<br />
Peaches Wash, slice in half and remove pit. If desired,<br />
cut into quarters.<br />
Pears Wash, peel, slice in half to remove core.<br />
Cut into chunks or slices. Pretreat with lemon<br />
juice to prevent browning.<br />
Pineapple Remove spiny skin, core and cut into chunks<br />
or wedges.<br />
Prunes Wash, cut in half and remove pit. If desired,<br />
cut into quarters.<br />
Strawberries Wash and slice or leave whole, as desired.<br />
NUTS<br />
To dry nuts, first shell and rinse them with warm water.<br />
Pat dry and spread out on trays. Most nuts will take<br />
approximately 20 to 30 hours to dehydrate and they should<br />
be allowed to dehydrate until brittle.<br />
Allow them to cool after rehydrating. Any nuts that will not<br />
be consumed within a few days should be frozen to ensure<br />
freshness. Allow them to defrost before eating.<br />
HERBS AND FLOWERS<br />
To dry herbs and flowers, first rinse and pat dry. Remove<br />
any dead, mushy or discolored portions, leaving the stem<br />
intact. Spread herbs or flowers on tray and allow to dehydrate<br />
for about 2 to 7 hours, depending on their type and<br />
size. Remove from tray and allow to cool when drying is<br />
complete. Remove the leaves or buds from stem and break<br />
them apart. Crush if desired.<br />
For best results, pick flowers after the rising sun evaporates<br />
the morning dew and before the cool evening mist settles on<br />
11
the petals. Be aware of flowers that have been sprayed with<br />
insecticides or other harmful chemicals; do not use these.<br />
If you are dehydrating flowers at the same time as herbs,<br />
place flowers on the bottom trays and herbs on the top<br />
trays; this prevents any debris from the flowers falling on<br />
the herbs.<br />
USEFUL TIPS<br />
• Wash and clean the dehydrator before using if it has<br />
been stored for a long time.<br />
• Fresh vegetables and fruits are best for dehydrating;<br />
canned goods do not dehydrate well.<br />
• All vegetables and fruits should be cleaned before<br />
preparation and pretreatment.<br />
• Prepare and pretreat fruits and vegetables as outlined in<br />
this manual for best results.<br />
• It is usually not dangerous to leave the dehydrator on for<br />
a long time period when required, but make sure that it<br />
is in a safe location. Read the “Important Safeguards” on<br />
page 1 of this manual, and exercise caution when using<br />
the dehydrator.<br />
• Exact dehydrating time can vary greatly, depending on<br />
the type of food used, its size and quality, the quantity<br />
placed on trays and your personal preferences. Keeping<br />
your own notes on the type of food, weight before and<br />
after drying, total drying time, and final results will enable<br />
you to achieve the desired outcome, every time!<br />
• Most recipes will work well with dried foods. By experimenting<br />
with the recipes offered in this manual you’ll<br />
soon discover your own unique ways of using dried<br />
foods. You’ll also be able to find books on the topic in<br />
bookstores, both locally and online.<br />
• For best results, it is recommended to rotate the trays<br />
midway through the dehydration process. For example,<br />
move the bottom tray to the top, as items in the bottom<br />
rack will dehydrate faster than those on top.<br />
12
FOOD STORAGE<br />
PACkAGING<br />
In order to keep well, dried foods must be carefully<br />
packaged. Pack dried foods in plastic freezer bags, squeezing<br />
out as much air as possible. (You can also use heat-sealable<br />
bags.) Store plastic bags inside airtight metal, plastic or<br />
glass containers. When you store foods in rigid containers<br />
without putting them into freezer bags first, you expose the<br />
dried foods to air, which will negatively impact them. Vacuum<br />
packaging will greatly extend the shelf life of your dried<br />
foods – equipment for home use can be found in<br />
some stores.<br />
STORAGE CONDITIONS<br />
Store appropriately packaged dried foods in a cool, dark<br />
place. The colder the food is kept, the longer the quality will<br />
be maintained. For every 18˚F drop in temperature, the shelf<br />
life increases 2 to 3 times, so if you have room in a refrigerator<br />
or freezer, keep your dried foods there. If not, find the<br />
coolest place in your home to store dried foods. Light also<br />
causes the quality and nutritive value to deteriorate, so<br />
keep dried foods in opaque or dark colored containers.<br />
SHELF LIFE<br />
Because fruits have a naturally high sugar and acid<br />
content, they dry well and store for longer periods of time<br />
than vegetables. When properly packaged and stored at<br />
room temperature or below (70˚F or less), most fruits will<br />
maintain a high quality and nutritional value up to a year.<br />
Most vegetables are best when eaten within six months.<br />
FRUITS AND VEGETABLES kEPT BEYOND THE<br />
RECOMMENDED TIME MAY NOT BE AS NUTRITIOUS<br />
OR TASTE AS GOOD, BUT WILL NOT SPOIL UNLESS<br />
THE PACkAGING IN NO LONGER INTACT.<br />
13
RECIPES<br />
Beef Jerky<br />
8 servings<br />
1½ pounds flank steak<br />
1 ⁄3 cup Worcestershire sauce<br />
2 tablespoons Liquid Smoke<br />
¼ cup light soy sauce<br />
2 tablespoons light brown sugar<br />
2 cloves fresh garlic<br />
¼ teaspoon fresh ground black pepper<br />
Place meat on a plate and freeze for 1 hour. This will make it easier to slice the meat<br />
into thin strips. Slice meat into ¼-inch wide strips, cutting against the grain. Combine<br />
remaining ingredients. Marinate beef strips for a minimum of 30 minutes in the<br />
refrigerator. Place strips on the racks. Do not overcrowd; leave enough space so that<br />
pieces are not touching. Cover and dehydrate on medium for 8 hours, or until desired<br />
doneness, flipping strips once about halfway through. Depending on the uniformity of<br />
the strips, the racks may require rotating throughout the dehydrating process, as<br />
bottom racks will dehydrate faster than top racks. Store beef jerky in an airtight<br />
container in the refrigerator or freezer.<br />
Nutritional information per serving:<br />
Calories 165 • carb. 6g • pro. 18g • fat 7g • sat. fat 3g<br />
• chol. 34mg • sod. 423mg • calc. 39.9mg • fiber 0g<br />
Tuna Jerky<br />
6 servings<br />
1 pound fresh tuna steak<br />
1 tablespoon fresh, grated ginger<br />
2 teaspoons crushed fresh garlic<br />
¼ cup light soy sauce<br />
¼ cup orange juice<br />
2 tablespoons rice wine vinegar<br />
1 teaspoon light brown sugar<br />
Place the tuna steak flat on a cutting board and cut in half. Place the tuna on a plate<br />
and freeze for 1 hour. This will make it easier to cut the tuna into thin strips. Stand tuna<br />
up with flat, cut edge on the board. Slice into ¼-inch pieces, then cut into about 1-inch<br />
wide strips. Combine ginger, garlic, soy sauce, orange juice, rice wine vinegar and<br />
brown sugar. Marinate tuna for a minimum of 30 minutes in the refrigerator. Place strips<br />
on racks. Do not overcrowd; leave enough space so that pieces are not touching. Cover<br />
and dehydrate on medium for 6 hours, or until desired doneness, flipping strips once<br />
about halfway through. It may be necessary to rotate the racks during drying, as<br />
bottom racks will dehydrate faster than top racks. Store tuna jerky in an airtight<br />
container in the refrigerator or freezer.<br />
Nutritional information per serving:<br />
Calories 124 • carb. 3g • pro. 18g • fat 4g • sat. fat 1g<br />
• chol. 28mg • sod. 384mg • calc. 11.6mg • fiber 0g<br />
14
Spicy Beef Sticks<br />
About 15 servings, 2 sticks each<br />
3 pounds ground beef<br />
1 tablespoon paprika<br />
1½ teaspoons cayenne pepper<br />
1½ teaspoons crushed red pepper<br />
1 tablespoon garlic powder<br />
4 tablespoons Worcestershire sauce<br />
2 teaspoons curing salt<br />
In a large bowl, combine all ingredients until just incorporated. To make the sticks,<br />
form a small piece of the meat mixture into a ball and then roll into 5-inch by ½-inch<br />
sticks. Place the sticks on a sheet pan. Refrigerate overnight, uncovered. Place the<br />
sticks on the dehydrating racks. Do not overcrowd; leave enough space so that pieces<br />
are not touching. Cover and dehydrate on medium for 6 hours or until desired<br />
doneness. It may be necessary to rotate the racks during drying, as bottom racks<br />
will dehydrate faster than top racks. Store beef sticks in an airtight container in the<br />
refrigerator or freezer.<br />
Nutritional information per serving:<br />
Calories 201 • carb. 2g • pro. 17g • fat 14g • sat. fat 5g<br />
• chol. 61mg • sod. 182mg • calc. 20mg • fiber 0g<br />
Teriyaki Chicken Jerky<br />
8 servings<br />
2½ pounds boneless, skinless chicken breasts<br />
½ cup teriyaki sauce, your favorite brand<br />
¾ cup pineapple juice<br />
1½ tablespoons Liquid Smoke<br />
¾ teaspoon crushed red pepper<br />
Trim the chicken breast of any fat. Place trimmed breasts on a sheet pan and freeze for<br />
1 hour. This will make it easier to slice the chicken into thin strips. Slice the chicken into<br />
¼-inch strips. Combine teriyaki sauce, pineapple juice, Liquid Smoke, and crushed red<br />
pepper. Marinate chicken strips for a minimum of 1 hour in the refrigerator. Place strips<br />
on racks. Do not overcrowd; leave enough space so that pieces are not touching. Cover<br />
and dehydrate on medium for 6 hours, or until desired doneness, flipping strips once<br />
about halfway through. It may be necessary to rotate the racks during drying, as<br />
bottom racks will dehydrate faster than top racks. Store chicken jerky in an airtight<br />
container in the refrigerator or freezer.<br />
Nutritional information per serving:<br />
Calories 179 • carb. 5g • pro. 33g • fat 2g • sat. fat 0g<br />
• chol. 81mg • sod. 340mg • calc. 22mg • fiber 0g<br />
15
“Sun”-Dried Tomato Basil Spread<br />
10 servings, ¼ cup each<br />
10 Roma tomatoes, all close in size<br />
8 ounces ¹/3-less-fat cream cheese<br />
½ cup light mayonnaise<br />
¾ cup light sour cream<br />
1 fresh garlic clove, crushed<br />
¼ cup fresh grated Parmesan cheese<br />
2 tablespoons chopped fresh basil<br />
2 scallions, light to dark green, chopped<br />
salt and pepper, to taste<br />
Quarter the tomatoes and place on racks, cut side up. Cover and dehydrate on medium<br />
for 15 hours or until dry and leathery. It may be necessary to rotate the racks during<br />
drying. Chop the dehydrated tomatoes into smaller pieces. Combine tomatoes, cream<br />
cheese, and mayonnaise in a food processor until the tomatoes are incorporated and it<br />
becomes a consistent mixture. Move the tomato mixture to a large bowl. Stir in sour<br />
cream, garlic, Parmesan, basil, scallions, and salt and pepper. Serve with your favorite<br />
bread or crackers.<br />
Nutritional information per serving:<br />
Calories 124 • carb. 6g • pro. 4g • fat 10g • sat. fat 4g<br />
• chol. 18mg • sod. 320mg • calc. 83mg • fiber 1g<br />
Yogurt Roll-Ups<br />
Makes 2 roll-ups<br />
1 8-ounce cup vanilla yogurt, your favorite brand<br />
2 tablespoons jam, your favorite flavor<br />
Combine yogurt and jam. Using a rubber spatula, spread the yogurt in an even, thin<br />
layer on the fruit roll-up sheet. Place the sheet on a rack. Cover and dehydrate on high<br />
for 5 hours, or until the yogurt is no longer gooey throughout. Peel leather from sheet<br />
and cut in half. The leather may be rolled up in plastic wrap and stored at room<br />
temperature for later use.<br />
*Fruited yogurt can be substituted for vanilla, but fruit chunks are not easily spread<br />
evenly.<br />
Nutritional information per half sheet roll-up:<br />
Calories 152 • carb. 29g • pro. 6g • fat 1g • sat. fat 1g<br />
• chol. 6mg • sod. 81mg • calc. 198mg • fiber 0g<br />
16
Spiced Apple Trail Mix Leather<br />
Makes 2 fruit leathers<br />
²/3 cup unsweetened applesauce<br />
pinch ground cinnamon<br />
pinch ground nutmeg<br />
½ teaspoon honey<br />
¼ teaspoon fresh lemon juice<br />
1 tablespoon dried cranberries, chopped fine<br />
1 tablespoon walnuts, chopped fine<br />
In a medium bowl, combine the applesauce, cinnamon, nutmeg, honey, and lemon<br />
juice. Using a rubber spatula, spread the applesauce in a thin even layer on the fruit<br />
roll-up sheet. Sprinkle evenly with dried cranberries and walnuts. Lightly press the<br />
cranberries and walnuts into the applesauce. Cover and dehydrate on medium for 4<br />
hours, or until the applesauce is no longer wet throughout. Peel leather from sheet and<br />
cut in half. The leather may be rolled up in plastic wrap and stored at room temperature<br />
for later use.<br />
Nutritional information per half sheet fruit leather:<br />
Calories 94 • carb. 15g • pro. 0g • fat 3g • sat. fat 0g<br />
• chol. 0mg • sod. 2mg • calc. 8mg • fiber 1g<br />
Tropical Granola<br />
7 servings, ½ cup each<br />
3 cups old-fashioned oats<br />
¾ cup coconut, shredded and dried<br />
½ cup wheat germ<br />
1<br />
⁄3 cup brown sugar<br />
½ cup dried cranberries<br />
½ cup dried pineapple, small chunks<br />
½ cup banana chips, small pieces<br />
1 cup pecans, chopped<br />
1 tablespoon orange zest<br />
¼ cup butter, melted<br />
2 tablespoons agave nectar, or honey<br />
1 tablespoon vanilla extract<br />
1<br />
⁄3 cup maple syrup<br />
¼ teaspoon salt<br />
In a large bowl, combine the dry ingredients and vanilla. In a small bowl combine the<br />
syrup, salt, honey and butter. Pour the syrup mixture over the oat mixture. Stir to<br />
combine. Divide the granola mixture among three dehydrating trays, using parchment<br />
paper to line the trays. Clump the mixture in your hand as you divide it to form clusters.<br />
Cover and dehydrate on high for 3 hours, or until the granola is no longer wet. Rotate<br />
the clusters half way through the dehydrating process. It may be necessary to rotate<br />
the racks during drying, as bottom racks will dehydrate faster than top racks. Store the<br />
granola in an airtight container at room temperature.<br />
Nutritional information per serving:<br />
Calories 318 • carb. 44g • pro. 8g • fat 13g • sat. fat 5g<br />
• chol. 9mg • sod. 59mg • calc. 45.8mg • fiber 6g<br />
17
Strawberry Banana Leather<br />
Makes 2 fruit leathers<br />
¾ cup fresh strawberries, chopped<br />
½ fresh banana, sliced<br />
½ tablespoon honey<br />
½ teaspoon fresh lemon juice<br />
cooking spray<br />
Combine all ingredients except cooking spray in a blender and purée until smooth.<br />
Lightly spray a paper towel with cooking spray and rub over the fruit roll-up sheet. Pour<br />
the strawberry mixture evenly on the sheet. Cover and dehydrate on high for 4 hours, or<br />
until the purée is no longer wet throughout. Peel leather from sheet and cut in half. The<br />
leather may be rolled up in plastic wrap and stored at room temperature for later use.<br />
Nutritional information per half sheet fruit leather:<br />
Calories 63 • carb. 16g • pro. 1g • fat 0g • sat. fat 0g<br />
• chol. 0mg • sod. 1mg • calc. 12mg • fiber 2g<br />
Salt and Vinegar Potato Crisps<br />
4 servings<br />
3 medium-size russet potatoes, skin removed if desired<br />
1 cup apple cider vinegar<br />
2 tablespoons olive oil<br />
coarse salt to taste<br />
Cut the potatoes into thin slices about ¹/8-inch thick, creating round chips. Soak the<br />
potatoes in the vinegar for 8 to 12 hours. This step is necessary so the potatoes do<br />
not taste chalky. Drain the potato slices well, transfer to a bowl, and toss with olive oil.<br />
Lay the potatoes in a single layer on parchment paper-lined racks. Sprinkle with salt.<br />
Cover and dehydrate on high for 8 to 12 hours or until desired crispiness. It may be<br />
necessary to rotate the racks during drying, as bottom racks will dehydrate faster than<br />
top racks. Store the crisps in an airtight container at room temperature.<br />
Nutritional information per serving:<br />
Calories 198 • carb. 29g • pro. 3g • fat 7g • sat. fat 1g<br />
• chol. 0mg • sod. 302mg • calc. 25mg • fiber 2g<br />
18
Any trademarks or service marks of third<br />
parties referred to herein are the trademarks or<br />
service marks of their respective owners .<br />
©2011 <strong>Waring</strong> Consumer <strong>Pro</strong>ducts<br />
150 Milford Road<br />
East Windsor, NJ 08520<br />
www .waringpro .com<br />
Printed in China<br />
<strong>DHR30</strong> IB<br />
11WR122794<br />
IB-10586