AIRMASTER™ REAR AIRfOIL 1384 - Kuryakyn
AIRMASTER™ REAR AIRfOIL 1384 - Kuryakyn
AIRMASTER™ REAR AIRfOIL 1384 - Kuryakyn

You also want an ePaper? Increase the reach of your titles
YUMPU automatically turns print PDFs into web optimized ePapers that Google loves.
AIRMASTER <strong>REAR</strong> <strong>AIRfOIL</strong> <strong>1384</strong><br />
fITS: ALL ’01-UP GL 1800<br />
PARTS INCLUDED<br />
1 Rear Airfoil<br />
1 Hardware Kit Including:<br />
2 Well Nuts<br />
2 1/4-20 x 1” Pan Head Screws<br />
2 1/4” Flat Washers<br />
1 Adhesive Backed Foam Stripping<br />
1 Installation Instructions<br />
Please read and understand entire instructions before starting installation.<br />
ThANk YOU fOR ChOOSING küRYAkYN!<br />
IN ORDER TO PROTECT YOU AND OThERS fROM POSSIBLE INjURY<br />
AND/OR PROPERTY DAMAGE OR LOSS, PLEASE PAY CLOSE ATTENTION<br />
TO ALL INSTRUCTIONS, WARNINGS, CAUTIONS AND ATTENTION NOTES<br />
REGARDING ThE USE AND CARE Of ThIS PRODUCT.<br />
WARNING! THIS INDICATION ALERTS YOU TO THE FACT THAT IGNORING THE<br />
CONTENTS DESCRIBED HEREIN CAN RESULT IN POTENTIAL DEATH OR<br />
SERIOUS INJURY.<br />
ATTENTION! This indication alerts you to the fact that ignoring the contents described<br />
herein may negatively affect product performance and functionality.<br />
TOOLS SUGGESTED<br />
Phillips screwdriver, glass cleaner, 15/32” drill bit, power drill, center punch.<br />
STRICTLY OBSERVE ThE fOLLOWING GUIDELINES IN ORDER TO USE ThE<br />
PRODUCT PROPERLY AND AVOID POTENTIALLY DANGEROUS ACCIDENTS.<br />
PROCEDURE<br />
STEP 1 Read and understand all steps in the instructions before starting the<br />
installation. Park the motorcycle on a hard, level surface and turn off the ignition.<br />
ATTENTION! Do not remove the protective film from<br />
the airfoil until the end of the installation<br />
or the airfoil may be scratched during<br />
the installation process.<br />
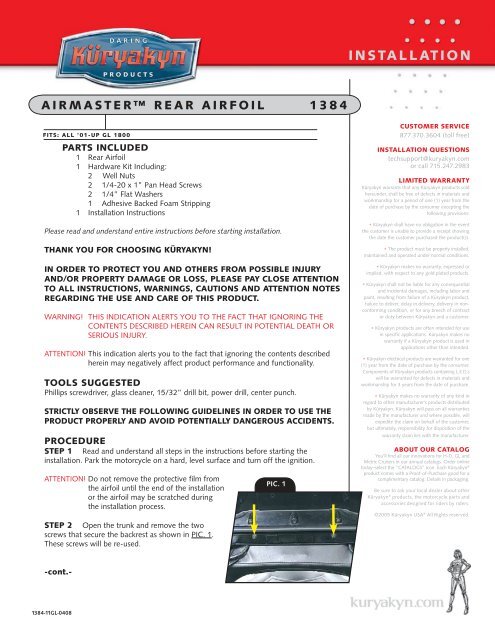
STEP 2 Open the trunk and remove the two<br />
screws that secure the backrest as shown in PIC. 1.<br />
These screws will be re-used.<br />
-cont.-<br />
<strong>1384</strong>-11GL-0408<br />
PIC. 1<br />
INSTALLATION<br />
CUSTOMER SERVICE<br />
877.370.3604 (toll free)<br />
INSTALLATION QUESTIONS<br />
techsupport@kuryakyn.com<br />
or call 715.247.2983<br />
LIMITED WARRANTY<br />
Küryakyn warrants that any Küryakyn products sold<br />
hereunder, shall be free of defects in materials and<br />
workmanship for a period of one (1) year from the<br />
date of purchase by the consumer excepting the<br />
following provisions:<br />
• Küryakyn shall have no obligation in the event<br />
the customer is unable to provide a receipt showing<br />
the date the customer purchased the product(s).<br />
• The product must be properly installed,<br />
maintained and operated under normal conditions.<br />
• Küryakyn makes no warranty, expressed or<br />
implied, with respect to any gold plated products.<br />
• Küryakyn shall not be liable for any consequential<br />
and incidental damages, including labor and<br />
paint, resulting from failure of a Küryakyn product,<br />
failure to deliver, delay in delivery, delivery in nonconforming<br />
condition, or for any breech of contract<br />
or duty between Küryakyn and a customer.<br />
• Küryakyn products are often intended for use<br />
in specific applications. Küryakyn makes no<br />
warranty if a Küryakyn product is used in<br />
applications other than intended.<br />
• Küryakyn electrical products are warranted for one<br />
(1) year from the date of purchase by the consumer.<br />
Components of Küryakyn products containing L.E.D.s<br />
will be warranted for defects in materials and<br />
workmanship for 3 years from the date of purchase.<br />
• Küryakyn makes no warranty of any kind in<br />
regard to other manufacturer’s products distributed<br />
by Küryakyn. Küryakyn will pass on all warranties<br />
made by the manufacturer and where possible, will<br />
expedite the claim on behalf of the customer,<br />
but ultimately, responsibility for disposition of the<br />
warranty claim lies with the manufacturer.<br />
ABOUT OUR CATALOG<br />
You’ll find all our innovations for H-D, GL and<br />
Metric Cruisers in our annual catalogs. Order online<br />
today–select the ”CATALOGS” icon. Each Küryakyn ®<br />
product comes with a Proof-of-Purchase good for a<br />
complimentary catalog. Details in packaging.<br />
Be sure to ask your local dealer about other<br />
Küryakyn ® products, the motorcycle parts and<br />
accessories designed for riders by riders.<br />
©2005 Küryakyn USA ® All Rights reserved.
STEP 3 Pull up on the backrest to remove it from the motorcycle.<br />
NOTE: On Models with seat heaters, it will be necessary to unplug the harness before<br />
removing the backrest.<br />
PIC. 2<br />
STEP 4 Clean the area shown in PIC. 2 with window cleaner and<br />
make sure that any wax build up is removed; allow the area to dry.<br />
STEP 5 Test fit the foam along the upper portion of the trunk and<br />
bend it to follow the contours of the as shown in PIC. 2.<br />
NOTE: The edge of the foam should be about a 1/8” below the top<br />
edge of the trunk as shown in PIC. 3.<br />
ATTENTION! Ensure the area of installation is free of grease, oil, dirt<br />
or other debris to ensure proper adhesion. Küryakyn<br />
WILL NOT warranty any parts lost due to improper installation.<br />
ATTENTION! The adhesive will not bond correctly if applied at temperatures less than 50° F.<br />
Do not attempt this installation in temperatures less than 50° F.<br />
STEP 6 Remove the adhesive backing from the foam and install the foam<br />
on the trunk.<br />
STEP 7 Hold the airfoil in place, so that the holes in the airfoil will be in the center<br />
of the flat spots shown in PIC. 4, and the edges of the of the airfoil are centered on the<br />
backrest as shown in PIC. 5.<br />
STEP 8 Mark the center of the holes of the airfoil on the trunk with a center punch.<br />
STEP 9 Remove the windscreen, and check behind the area where the holes will be<br />
drilled to ensure that no wires will be damaged when drilling.<br />
STEP 10 Drill a pilot hole using a 1/4” drill bit where the mark was made in STEP 8.<br />
STEP 11 Re-check to make sure that no wires will be damaged and drill a larger hole<br />
using a 15/32” drill bit.<br />
STEP 12 Push the well nuts in the holes.<br />
STEP 13 Remove the plastic protective film from the airfoil and install, secure using<br />
the screws and washers from the hardware kit.<br />
STEP 14 Reinstall the backrest (be sure to plug in the harness for the heated seats on<br />
equipped Models) and secure using the two screws that were removed in STEP 2.<br />
ATTENTION! It is the installer’s responsibility to ensure that all of the fasteners (including<br />
pre-assembled) are tightened before operation of the motorcycle. Küryakyn will not<br />
warranty components lost due to improper installation. Periodic maintenance<br />
may be required.<br />
NOTE: This airfoil is designed to be quick release by removing the screws that secure the backrest and<br />
the screws securing the airfoil.<br />
WARNING! DO NOT CLEAN IN HOT SUN OR HIGH TEMPERATURE. POWDERED, ABRASIvE<br />
OR ALKALINE CLEANSER WILL DAMAGE THE WINDSHIELD. NEvER SCRAPE THE<br />
WINDSHIELD WITH A RAzOR BLADE OR OTHER SHARP INSTRUMENT.<br />
-cont.-<br />
CLeAN ThIS<br />
AreA wITh<br />
wINdOw CLeANer<br />
(STeP 4)<br />
PAGe<br />
2<br />
AIrmASTer reAr AIrfOIL<br />
PIC. 3<br />
PIC. 4<br />
hOLeS ShOuLd be<br />
IN The CeNTer Of<br />
The fLAT AreAS<br />
fOAm ShOuLd be<br />
AbOuT 1/8” beLOw<br />
The TOP edGe<br />
INSTALLATION
WARNING! DO NOT USE BENzENE, PAINT THINNER, GASOLINE OR ANY OTHER TYPE OF<br />
HARSH CLEANER ON THE WINDSHIELD. DO NOT USE AMMONIA BASED<br />
SOLvENTS OR PETROLEUM DISTILLATES. DOING SO WILL DAMAGE THE<br />
WINDSHIELD SURFACE.<br />
WARNING! DO NOT USE HARSH CHEMICALS INCLUDING<br />
RAIN SHEETING PRODUCTS ON MOTORCYCLE<br />
WINDSHIELDS. THEY CAN CAUSE A DULLING OR<br />
HAzING. TO OBTAIN A PROPER HIGH-END<br />
POLISH, PLEASE USE A qUALITY PROTECTOR<br />
AND POLISH SUCH AS PLExUS® OR NOvUS®<br />
BRAND CLEANERS.<br />
NOTE: Sunlight reflections off the inside curvature of the<br />
windshield can, at certain times of the day, cause extreme heat<br />
build-up on motorcycle instruments. Exercise care in parking. Park<br />
facing the sun, place an opaque object over the instruments, or<br />
adjust the windshield to avoid reflections.<br />
Ride On!<br />
PIC. 2<br />
CeNTer edGeS Of AIrfOIL Are<br />
The SAme dISTANCe frOm The<br />
edGeS Of The bACkreST AreA<br />
edGeS Of AIrfOIL<br />
Are SAme dISTANCe<br />
frOm ArmreSTS<br />
PAGe<br />
3<br />
AIrmASTer reAr AIrfOIL<br />
INSTALLATION