Serial Flash Programmer Version 4.0 for FR Devices User's Guide
Serial Flash Programmer Version 4.0 for FR Devices User's Guide
Serial Flash Programmer Version 4.0 for FR Devices User's Guide

Create successful ePaper yourself
Turn your PDF publications into a flip-book with our unique Google optimized e-Paper software.
<strong>Serial</strong> <strong>Flash</strong> <strong>Programmer</strong> <strong>Version</strong> <strong>4.0</strong><br />
<strong>for</strong> <strong>FR</strong> <strong>Devices</strong><br />
User’s <strong>Guide</strong><br />
Fujitsu Mikroelektronik GmbH<br />
01.03.07 Vers. <strong>4.0</strong><br />
This manual shows how to program MB91F36x/MB91F46x-derivatives (e.g.<br />
MB91F46D) using the Software “FME <strong>FR</strong> <strong>Flash</strong> <strong>Programmer</strong>”.<br />
- 1 -
Table of Contensts<br />
1 PREPARATIONS ............................................................................................................3<br />
1.1 Software installation ...............................................................................................................................................3<br />
1.2 Hardware Setup : ....................................................................................................................................................4<br />
2 USING THE SOFTWARE................................................................................................5<br />
2.1 Getting started.........................................................................................................................................................5<br />
2.2 Using the “Automatic mode” .................................................................................................................................6<br />
2.3 Sub-Menu “External <strong>Flash</strong>”...................................................................................................................................7<br />
2.4 Sub-Menu “Boot-ROM Functions”.......................................................................................................................8<br />
2.5 Sub-Menu “<strong>Flash</strong> Functions”.................................................................................................................................9<br />
2.6 Sub-Menu “Options” ............................................................................................................................................11<br />
2.7 Sub-Menu “Signals”..............................................................................................................................................12<br />
3 APPENDIX ....................................................................................................................13<br />
3.1 In<strong>for</strong>mation on Files to be programmed (MHX-Format)..................................................................................13<br />
3.2 Required Linker-Settings .....................................................................................................................................13<br />
3.3 Using “K-line” .......................................................................................................................................................13<br />
3.4 Command line options ..........................................................................................................................................14<br />
4 NOTE ON EXTERNAL FLASH PROGRAMMING ........................................................18<br />
5 DISCLAIMER ................................................................................................................19<br />
- 2 -
What you’ll need<br />
MB9146x Starterkit (or similar hardware) with MB91F46x MCU<br />
Host (PC with Win95 and free COM port)<br />
Software FLASHPRG.EXE (MB91360, MB91460 <strong>Flash</strong> <strong>Programmer</strong>)<br />
RS232 <strong>Serial</strong> cable (“extension type” 1:1)<br />
Power supply (9-12V DC ; + on shield) <strong>for</strong> Starterkit<br />
1 Preparations<br />
1.1 Software installation<br />
Extract the provided “FME_<strong>FR</strong>_<strong>Flash</strong>programmer_v4_xx.zip” to to C:\<strong>Flash</strong>prg (or any other<br />
directory). The following files will be installed :<br />
FLASHPRG.EXE : Stand-alone <strong>Flash</strong>-programmer software (details see below)<br />
BRLxxxxxx.BIN : Binary files <strong>for</strong> programming specific devices<br />
README.TXT : Usage and version In<strong>for</strong>mation<br />
FLASHPRG.PDF : <strong>Flash</strong>programmer documentation (this file)<br />
FLASHBAT.BAT : Example batch-file <strong>for</strong> automated flash programming<br />
- 3 -
1.2 Hardware Setup :<br />
Set jumper settings of your starter kit to asynchronous flash programming (please refer to<br />
the User <strong>Guide</strong> of your starter kit <strong>for</strong> further in<strong>for</strong>mation).<br />
Connetct a PC-COM-port via a RS232-cable to the UART which is used <strong>for</strong> flash<br />
programming (see User <strong>Guide</strong>) of your board.<br />
Be<strong>for</strong>e the Flasjprogrammer can connect to the device a reset is necessary. If you don’t<br />
want to reset your device manually see your User <strong>Guide</strong> <strong>for</strong> DTR-reset jumper settings.<br />
If you use your own hardware, make sure you have external access to the UART. In<br />
addition, you should be able to initiate a power-on reset.<br />
- 4 -
2 Using the Software<br />
2.1 Getting started<br />
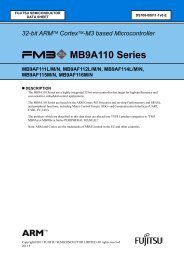
Run the installed Software-tool “FME-<strong>FR</strong> <strong>Programmer</strong>”. The following main screen will<br />
appear :<br />
Start connection (to<br />
MB91F36x device)<br />
Sub-<br />
Menus<br />
Start<br />
automatic<br />
programming<br />
Log-window:<br />
Shows<br />
status and<br />
results<br />
COM-port<br />
number (1-x)<br />
Fig. 1 : Main Menu<br />
Enter the correct COM-port number (1-x) and your device from the selections menu. Then<br />
press the connect button and - shortly afterwards - switch on the Starterkit (or hit “Reset”).<br />
See 2.7 Sub-Menu “Signals” how to make an automatic reset.<br />
If a connection could be established to the internal Boot-RO, the message “Connection<br />
OK” and the Chip ID will be shown in the log-window.<br />
If you fail to get a connection, the message “there was no reply” will appear in the logwindow<br />
after a certain amount of time. Double-check the COM-port number on your PC<br />
and the hardware-settings. Be sure the starterkit is ready and you are using the correct<br />
RS232-cable.<br />
- 5 -<br />
Number of re-trys<br />
until abort<br />
Programming<br />
Baudrate<br />
Target<br />
device<br />
selection<br />
Hex-file (to be<br />
programmed)<br />
selection<br />
Status<br />
in<strong>for</strong>mation<br />
<strong>for</strong> automode<br />
Optional startaddress<br />
(after<br />
programming)<br />
Abort (current<br />
operation)<br />
and Quit<br />
buttons
To increase the time until “no reply”, change the value in “no. of attempts”. This value is the<br />
total number of attempts to receive the acknoledge-character from the device after sending<br />
a start-code.<br />
2.2 Using the “Automatic mode”<br />
A very convenient way of programming your application to flash-ROM is using the<br />
automatic mode. All you have to do is select the appropriate file to program and press the<br />
“Automatic”-button. The entire programming procedure should work on it’s own.<br />
Specify the file to be programmed to flash-ROM in the “file to program”-field (use the<br />
browse-button to select). This file must be a converted linker output file from Softune in the<br />
Motorola -Format “*.MHX” . (See Appendix <strong>for</strong> more in<strong>for</strong>mation).<br />
Then press the automatic button and switch on the starterkit (or press Monior Reset). The<br />
following sequence will be processed :<br />
Establishes a serial connection to the device<br />
The loader will be written to RAM using the Boot-ROM protocol<br />
The baudrate will be set and the flashloader will be executed<br />
The controller will be initialized <strong>for</strong> flash-programming<br />
The flash-ROM is checked <strong>for</strong> programmed words<br />
If the flash-ROM is not blank, it will be erased now<br />
The file will be programmed to flash-ROM and verified<br />
As an option, the application will be started automatically<br />
If the automatic sequence was successfully terminated, the message “Automode<br />
finished” will be shown in the log-window.<br />
If any of the above operations will fail, the sequence stops with an error-message and<br />
has to be started again. If errors occur always during flash-operations, try to reduce the<br />
baudrate be<strong>for</strong>e starting again.<br />
Note that some operations may take longer – esp. erasing the flash. This depends on the<br />
number of previous write/erase-cycles.<br />
If you wish to adjust the programming baudrate (only <strong>for</strong> the flash-programming itself, not<br />
<strong>for</strong> any operations using the Boot-ROM protocol !), use the “programming baudrate”<br />
selection. Supported baudrates are 9600…115200 Baud. High-speed baudrates such as<br />
115200 require low-noise transmission-lines and must be supported by your PC.<br />
- 6 -
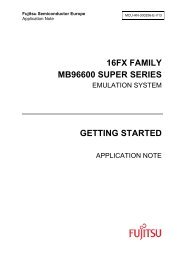
2.3 Sub-Menu “External <strong>Flash</strong>”<br />
The external <strong>Flash</strong> functions are only supported by the MB91460 series MCU’s and this<br />
sub-menu is only visible if on of this MCU’s is selected as Device Type.<br />
Enable external<br />
<strong>Flash</strong><br />
Register settings<br />
Fig. 2. : External <strong>Flash</strong> Options<br />
This new feature potentiates the programming of memory devices connect to the external<br />
bus of the MCU. If this feature is selected, all memory addresses within your MHX project<br />
file, that fit into the configured external memory area, are programmed into the external<br />
<strong>Flash</strong>!<br />
The following configuration settings are avalibale:<br />
Enable ext. <strong>Flash</strong>: Enables the support of the <strong>Flash</strong>loader to program external memory.<br />
CSx: Selects the hardware connection of the external <strong>Flash</strong> device.<br />
Please select the corresponding Chip Select to which you <strong>Flash</strong><br />
memory is connected.<br />
Chip Erase: If this checkbox is enabled, the chip erase command also executes a<br />
chip erase on the external <strong>Flash</strong> memory.<br />
ASRx: Area Select Register -> select the base memory mapping address<br />
of the external memory. For more details please refer to the MB91460<br />
series Hardware Manual.<br />
- 7 -
ACRx: Area Configuration Register -> Configuration of the selected memory<br />
I/F. For more details please refer to the MB91460 series Hardware<br />
Manual.<br />
AWCRx: Area WaitConfiguration Register -> Wait setting configuration of the<br />
selected memory I/F. For more details please refer to the MB91460<br />
series Hardware Manual.<br />
2.4 Sub-Menu “Boot-ROM Functions”<br />
All available functions in sub-menus are individual operations which will be used by<br />
“automatic mode” in a defined sequence. Use these functions if customized operation is<br />
required or to find errors. Background knowledge of the Boot-ROM and flash operation is<br />
highly recommended in order to prevent misoperation, damage or permanent loss of<br />
program code.<br />
The following functions represent the basic operations of the built-in Boot-ROM :<br />
Write File : Dumps a binary file into the internal RAM (FastRAM) beginning at the<br />
specified address. The transmission will be verified by a checksum.<br />
Write Byte : Writes one single byte to the given location (RAM)<br />
Call : Calls the program or function at the given address. If there is a “RET”statement<br />
at the end, the operation will continue (return value is displayed) .<br />
Read : Reads out a number of bytes from a given address and creates a binary file.<br />
Checksum : Displays the checksum from the last operation.<br />
Note : Further details about the Boot-ROM functions and the protocol are included in the<br />
hardware manual of the device.<br />
- 8 -
2.5 Sub-Menu “<strong>Flash</strong> Functions”<br />
The flash functions work together with the various flashloaders (the “brloadxx.bin”-files),<br />
that have to be downloaded to FastRAM first. Without any of the provided flashloaders<br />
operating from FastRAM, these functions cannot be used.<br />
Initialize : Checks wheather the flashloader which was dumped to FastRAM is available,<br />
initialized at the correct baudrate and ready to operate. This function checks<br />
<strong>for</strong> a prompt character (“>”) and displays the flashloader version. If this<br />
operation fails (e.g. no flashloader present), none of the following functions<br />
will be enabled.<br />
Blank Check : Reads out every byte of each flash-sector<br />
to check <strong>for</strong> non-blank ( “FF”) cells. The<br />
result is displayed in the flash-diagram<br />
shown (red = not blank sectors;<br />
green=blank sectors). If any of the sectors<br />
is not blank, the message “<strong>Flash</strong> NOT<br />
blank” will appear.<br />
Note : The flash configuration depends on<br />
the device and total flash-size.<br />
This operation is per<strong>for</strong>med automaticly<br />
after each programming/erasing operation.<br />
All not blank sectors are also listed in the Sector Erase-field.<br />
Sector Erase :Erases the sectors indicated by the numbers in the Sector Erase field<br />
(sepperated by “,” eg: “1,2,3” will erase sectors 1,2,3). The result is displayed<br />
in the log-window.<br />
ChipErase : Erases the entire flash-ROM (all sectors). The result is displayed in the logwindow.<br />
ProgWord : Programs one word to flash at the specified address. The result is displayed<br />
in the log-window. Note that “word” can mean different sizes (e.g. MB91F361<br />
can only program 16-bit words).<br />
If the external memory feature is selected, programming of external memory<br />
addresses is possible too.<br />
ProgFile : Handles the transfer of the specified MHX-file to the flashloader. Each line will<br />
be processed (programmed) sequencially. If any error occurs, the function will<br />
be aborted with an error-message (e.g. “Loading Error”). During programming,<br />
a progress- bar is displayed.<br />
BlockTransfer:This option enables the block transfer of the MHX-file (instead of transmitting<br />
only single lines they are compressed to bigger chuncks). This option will<br />
increase the programming speed and also enables the option to uses an<br />
offset <strong>for</strong> the target address.<br />
Read : Reads out a number of bytes beginning at the specified address and displays<br />
the results in hexadecimal <strong>for</strong>mat on the log-window. This function can be<br />
used to verify certain areas (e.g. security-vector).<br />
- 9 -
If the external memory feature is selected, reading of external memory<br />
addresses is possible too.<br />
Call : This function will divert operation of the device to the specified location. This<br />
terminates the flashloader.<br />
Read to File : This function will read and save the complete flash memory to a binary file.<br />
This function can be used to verify the flash.<br />
- 10 -
2.6 Sub-Menu “Options”<br />
This page contains other settings :<br />
Create Trace-File: If this box is checked, a file “flashprg.trc” will be created which contains<br />
all in- and out-going characters from this application. This file can be<br />
used to check <strong>for</strong> errors (knowledge of the protocol is required).<br />
Note : this file will be available after FLASHPRG has terminated.<br />
Working Directory : Whenever this program is started, the actual location of the<br />
FLASHPRG.EXE will be treated as “Working Directory” where all<br />
necessary files (e.g. brloadxx.bin) must be placed. You may change<br />
this setting manually if binary files are placed in a different directory.<br />
User Directory : The user directory is the location <strong>for</strong> the files to be programmed (mhxfiles).<br />
This directory can be chosen indepentently from the working<br />
directory and can also be specified as command parameter (instead of<br />
programming file).<br />
- 11 -
2.7 Sub-Menu “Signals”<br />
This page contains all settings <strong>for</strong> the RS232-Signals:<br />
Online: Defines if either DTR or RTS should be active when a device is connected. It<br />
is also selectable if the signal should be high or low active.<br />
Reset: Defines if DTR or RTS is used to trigger a reset on the target board during<br />
startup (normally a DTR high-level is used).<br />
Reset <strong>for</strong>: This option defines how long the reset signal should be active (values below<br />
100ms are inaccurate).<br />
If you want to reset your device automaticly be<strong>for</strong>e each connection attempt you’ll have to<br />
jumper your board <strong>for</strong> DTR-reset and select DTR high-level as reset-signal. If you are using<br />
an USB-to-serial converter you might have to increase the time the reset-signal is<br />
generated.<br />
- 12 -
3 Appendix<br />
3.1 In<strong>for</strong>mation on Files to be programmed (MHX-Format)<br />
The hex-file to be programmed to flash-ROM must be specified in the “file to program”-field<br />
(use the browse-button to select). This file must be a converted linker output file from<br />
Softune Workbench in the Motorola -Format (.MHX). If you can’t find this file in your<br />
project directory, you probably haven’t included the converter in your tool-chain. To do so,<br />
select “Project – Setup – Make/Build” from the Softune main menu and tick “Absolute<br />
module converter is started”. Be sure you have selected “Motorola S-Format” in your<br />
Converter settings (tool options). After a successful “Make” or “Build”, you should be able to<br />
find the “.MHX”-file in the ABS-directory.<br />
3.2 Required Linker-Settings<br />
When linking your project, you should make sure that code and constant areas are located<br />
inside the flash area (MB91F361 = 180000hex..1FFFFFhex). Also make sure that your<br />
application starts at 1F4000hex !<br />
3.3 Using “K-line”<br />
This software as well as the Boot-ROM are capable of using a “K-line”-type connection.<br />
This is a special 1-wire communication standard which multiplexes serial input and output to<br />
one line. K-line is mainly used in automotive applications <strong>for</strong> diagnostic purposes and<br />
there<strong>for</strong>e ideal <strong>for</strong> re-programming a microcontroller inside a control unit.<br />
If you are using a “K-line”-connection in your application you can use the <strong>Flash</strong> <strong>Programmer</strong><br />
as described in this manual without any further actions. The software will automatically<br />
detect the presence of a K-line connection because of the transmission echos. If such a<br />
connection was detected, a message “K-line detected !” is displayed in the log-window and<br />
on the status bar.<br />
Note that some K-line adapters use transistors instead of integrated circuits <strong>for</strong> multiplexing<br />
the signals. This can lead to a limited maximum baudrate. If you experience problems while<br />
flash-programming using a K-line connection, try to reduce the baud-rate.<br />
- 13 -
3.4 Command line options<br />
The <strong>Flash</strong> <strong>Programmer</strong> can process various command line parameters during start. This<br />
method allows to set certain parameters and start the automode :<br />
FLASHPRG com [-Ddev] [-Bbaud] [-Cadr] [-Q] [-Elogfile] file<br />
(1 st ) com : COM-Port : 1-x<br />
-Dx device selection : D0 = MCM<br />
D1 = MB91F361<br />
D2 = MB91F365<br />
D3 = MB91F362 (default)<br />
D4 = MB91F365,6,7,8,9Gx<br />
D5, D6, D7= ext. <strong>Flash</strong><br />
(Cremson Starterkit)<br />
D8 = MB91F364<br />
D9 = MB91F376G<br />
D10 = MB91302<br />
D11 = <strong>Flash</strong>16MB_CS2456<br />
D12 = ADA_91V460_91F467D<br />
D13 = MB91F467D<br />
D14 = MB91F464A<br />
D15 = MB91F465K<br />
D16 = MB91F469G<br />
D17 = EMA91V460<br />
D18 = MB91F463N<br />
D19 = MB91F467B<br />
D20 = MB91F465X<br />
D21 = MB91F467R<br />
-C(address) call-address after writing the file<br />
-Q quit FLASHPRG after successful programming<br />
-B(Baudrate) selects programming baudrate<br />
(9600,19200,38400,57600,115200)<br />
-S5 ignore S5 record<br />
-E(errorlogfile) creates an error-log file <strong>for</strong> batch-processing (see below)<br />
Errorcodes : 0 = success<br />
1 = wrong command shell parameters<br />
2 = flash erase error<br />
3 = download error<br />
4 = user abort<br />
5 = file open error<br />
6 = no connect<br />
7 = command error<br />
8 = wrong echo (protocol) received<br />
-ONLINE=[NONE/RTS/DTR] select signal <strong>for</strong> online state<br />
-RESET=[NONE/RTS/DTR] select signal <strong>for</strong> reset insertion<br />
-ICE chip erase will not be executed in automatic session<br />
-ATP=n (n)umber of attemps<br />
- 14 -
Examples :<br />
-PSV security verctors are programmed (MB91F46xx)<br />
-XEN enable external flash feature<br />
-XCS(chipselect) enable chip select CHIPSELECT <strong>for</strong> ext. flash<br />
ChipSelect : 1 = CS1<br />
2 = CS2<br />
3 = CS3<br />
4 = CS4<br />
5 = CS5<br />
6 = CS6<br />
-XCER execute chip erase on external flash<br />
-XAWR=[WaitRegister] wait register setting <strong>for</strong> external bus chip select area<br />
WaitRegister : 3378 (default)<br />
-XASR=[AreaSelect] base memory address <strong>for</strong> chip select<br />
AreaSelect: 0100<br />
-XACR=[Configuration] configuration <strong>for</strong> external bus chip select area chip select<br />
Configuration: 8822 (default: MB91F467D)<br />
-RT=[t] Reset time t (in ms): defines how long the reset signal is<br />
send.<br />
-ASE=[sectors] Will erase the given sectors in automatic mode instead of<br />
a chip erase (only if they are not blank), eg: -ASE=0,5,6<br />
-TB transfers mhx-file as block (if supported by the<br />
flashloader)<br />
-TBDB creates a new mhx-file (same name as the old +'_n')<br />
containing the compressed S-Record strings used by the<br />
block-transfer function.<br />
-OFFSET=[offset] defines an offset <strong>for</strong> the flash-programming (only if using -<br />
TB)<br />
-TRACE enables trace mode<br />
-UCLK=[freq] selects the frequency of the used oscillator (default 4<br />
[MHz])<br />
file1[,file2,..] hexfiles (must include full path+name+.mhx)<br />
or path sets path <strong>for</strong> user directory only (last) file:<br />
FLASHPRG 2 c:\flashprg\Demo360.mhx<br />
Opens COM2 and automatically programs the "Demo360"-example to the<br />
connected device at default baudrate (38400).<br />
- 15 -
FLASHPRG 1 -B115200 -Q -Ec:\temp\error.log c:\flashprg\LEDdemo1.mhx<br />
Opens COM1 and automatically programs the "LEDdemo1"-example<br />
to the connected device using 115200 baud.<br />
FLASHPRG will quit (wheather successful or not) and create the file "error.log"<br />
which indicated the result "code=.." as explained above.<br />
See the provided examples FLASHBAT.BAT and FLASHBAT_NT.BAT as examples <strong>for</strong><br />
flash programming using batch files. Use these batch files to create your own automated<br />
flash programming environment.<br />
Important : Please note that Fujitsu does not allow to use the flashprogrammer as a tool<br />
<strong>for</strong> mass production ! See the disclaimer on page 13 <strong>for</strong> more details.<br />
- 16 -
Examples <strong>for</strong> use in Softune Workbench :<br />
FLASHPRG 2 -D1 %D%A.mhx (<strong>for</strong> use in Softune Workbench)<br />
Opens COM2 and automatically programs the acutal Softune project<br />
(converted file) into the flashROM of an MB91F361 device.<br />
FLASHPRG 1 -D0 -C1F4000 %D%A.mhx (<strong>for</strong> use in Softune Workbench)<br />
Opens COM1 and automatically programs the acutal Softune project<br />
into the flashROM of an MCM and executes from 1F4000.<br />
FLASHPRG 2 -C1F4000 C:\Softune\Sample\Test\Abs\Test.Mhx<br />
This would be an example <strong>for</strong> programming and starting a fixed<br />
mhx-file through COM2 (Device is MB91F361 by default).<br />
NOTE :<br />
Be sure to enable the option "Absolute Load Module Converter is started" in the "Project<br />
Setup" -Menu. This creates the MHX-file.<br />
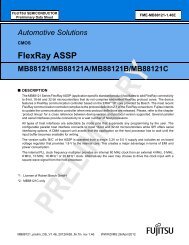
To register the flashprogrammer as a “tool” in Softune, use the “setup-tool” dialog :<br />
Fig. 3. : Registering the flash programmer in Softune Workbench<br />
- 17 -
4 Note on external flash programming<br />
The selection “external flash” is used <strong>for</strong> the “Cremson Starterkit” in order to program any<br />
mhx-file to the 1MB, 8MB or 16MB external flash devices connected to the MB91F36x. This<br />
mode can be used <strong>for</strong> any external flash connection which has similar characteristics :<br />
1MB external flash (2 devices MBM29LV400T) must be connected to external bus on CS2<br />
in memory area : 0030:0000 ... 003F:FFFF. See the “Cremson Starterkit” documentation <strong>for</strong><br />
schematics and further details.<br />
- 18 -
5 Disclaimer<br />
Warranty and Disclaimer<br />
To the maximum extent permitted by applicable law, Fujitsu Mikroelektronik GmbH restricts its warranties and<br />
its liability <strong>for</strong> all products delivered free of charge (eg. software include or header files, application<br />
examples, target boards, evaluation boards, engineering samples of IC’s etc.), its per<strong>for</strong>mance and any<br />
consequential damages, on the use of the Product in accordance with (i) the terms of the License Agreement<br />
and the Sale and Purchase Agreement under which agreements the Product has been delivered, (ii) the<br />
technical descriptions and (iii) all accompanying written materials. In addition, to the maximum extent<br />
permitted by applicable law, Fujitsu Mikroelektronik GmbH disclaims all warranties and liabilities <strong>for</strong> the<br />
per<strong>for</strong>mance of the Product and any consequential damages in cases of unauthorised decompiling and/or<br />
reverse engineering and/or disassembling. Note, all these products are intended and must only be used<br />
in an evaluation laboratory environment.<br />
1. Fujitsu Mikroelektronik GmbH warrants that the Product will per<strong>for</strong>m substantially in accordance with<br />
the accompanying written materials <strong>for</strong> a period of 90 days <strong>for</strong>m the date of receipt by the customer.<br />
Concerning the hardware components of the Product, Fujitsu Mikroelektronik GmbH warrants that the<br />
Product will be free from defects in material and workmanship under use and service as specified in<br />
the accompanying written materials <strong>for</strong> a duration of 1 year from the date of receipt by the customer.<br />
2. Should a Product turn out to be defect, Fujitsu Mikroelektronik GmbH´s entire liability and the<br />
customer´s exclusive remedy shall be, at Fujitsu Mikroelektronik GmbH´s sole discretion, either return<br />
of the purchase price and the license fee, or replacement of the Product or parts thereof, if the<br />
Product is returned to Fujitsu Mikroelektronik GmbH in original packing and without further defects<br />
resulting from the customer´s use or the transport. However, this warranty is excluded if the defect<br />
has resulted from an accident not attributable to Fujitsu Mikroelektronik GmbH, or abuse or<br />
misapplication attributable to the customer or any other third party not relating to Fujitsu<br />
Mikroelektronik GmbH.<br />
3. To the maximum extent permitted by applicable law Fujitsu Mikroelektronik GmbH disclaims all other<br />
warranties, whether expressed or implied, in particular, but not limited to, warranties of<br />
merchantability and fitness <strong>for</strong> a particular purpose <strong>for</strong> which the Product is not designated.<br />
4. To the maximum extent permitted by applicable law, Fujitsu Mikroelektronik GmbH´s and its<br />
suppliers´ liability is restricted to intention and gross negligence.<br />
NO LIABILITY FOR CONSEQUENTIAL DAMAGES<br />
To the maximum extent permitted by applicable law, in no event shall Fujitsu Mikroelektronik<br />
GmbH and its suppliers be liable <strong>for</strong> any damages whatsoever (including but without<br />
limitation, consequential and/or indirect damages <strong>for</strong> personal injury, assets of substantial<br />
value, loss of profits, interruption of business operation, loss of in<strong>for</strong>mation, or any other<br />
monetary or pecuniary loss) arising from the use of the Product.<br />
Should one of the above stipulations be or become invalid and/or unen<strong>for</strong>ceable, the remaining stipulations<br />
shall stay in full effect.<br />
- 19 -