Create successful ePaper yourself
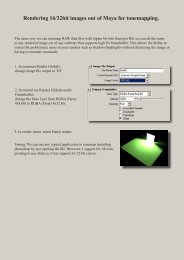
Turn your PDF publications into a flip-book with our unique Google optimized e-Paper software.
Why layered textures?<br />
<strong>Layered</strong> textures are diferent from layered shaders in that one shader is used with several texture<br />
layers instead of several shaders layered together into one shader. <strong>Layered</strong> textures take less time to<br />
render and also adapt to global ilumination, final gather, and other mental ray lighting techniques.<br />
Step One: Setup<br />
Open a new scene in Maya and create a new model or import a<br />
previously made model. I used a simple polygon sphere. Open<br />
up the hypershade (Window > Rendering Editors > Hypershade)<br />
and make sure it is set to show the top and botom tabs.<br />
Create a new material (I used a lambert). From the Create<br />
menu, select <strong>Layered</strong> Texture. Drag the layered texture onto<br />
the lambert shader with the middle mouse buton.<br />
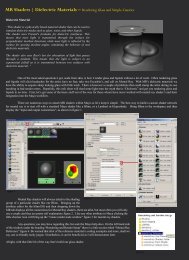
Step Two: Editing the Atributes<br />
Click on the layered texture and open its atribute editor. Click in the red box to add additional layers (I<br />
used two layers for this exercise). The layer to the farthest left is the top layer, and the layer to the farthest<br />
right is the botom layer. Click on the botom layer and name it. Map the color atribute with your<br />
texture file and change your blend mode to none (this texture is on the botom, therefore has nothing to<br />
blend with). Click the next layer (this would be my top layer) and map the color atribute like the previous<br />
layer. I used a simple fractal noise for this layer. Experiment with blending modes to find the one you<br />
would like to use. For this exercise, I used the blending mode multiply.<br />
NOTE: Make sure you have the box “Layer is Visible” checked, otherwise you won’t see your layer!<br />
Page One<br />
<strong>Layered</strong> <strong>Textures</strong> in Maya
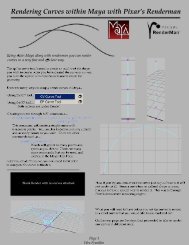
Step Three: Edit the Shader and Render<br />
In the Hypershade, double-click on the shader to open its<br />
atribute editor (this should be the shader that is connected<br />
to the layered texture). Change the hardware texturing<br />
seting to “highest” and then atach the shader to<br />
your geometry. Changing this option wil alow you to manipulate<br />
your shader beter in your scene. Edit your render<br />
globals and render out your scene. This would also be a<br />
good time to SAVE. Below is a shot of the hypershade work<br />
space and the connections between al of the elements.<br />
Page Two<br />
<strong>Layered</strong> <strong>Textures</strong> in Maya