Toshiba 40RV525R PDF Manual - static.highspeedb...
Toshiba 40RV525R PDF Manual - static.highspeedb...
Toshiba 40RV525R PDF Manual - static.highspeedb...

Create successful ePaper yourself
Turn your PDF publications into a flip-book with our unique Google optimized e-Paper software.
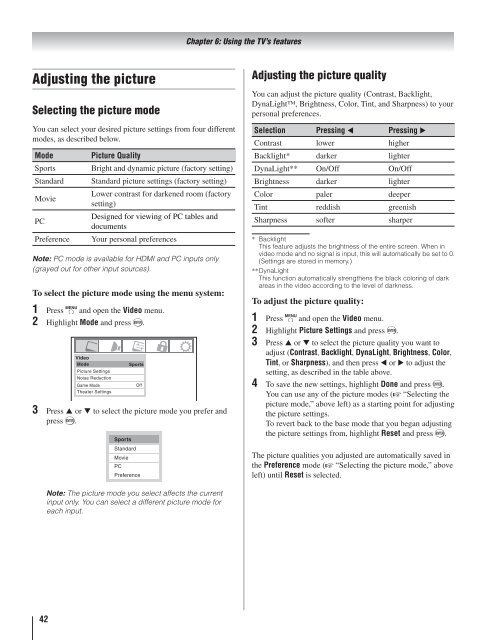
Adjusting the picture<br />
Selecting the picture mode<br />
You can select your desired picture settings from four different<br />
modes, as described below.<br />
Mode Picture Quality<br />
Sports Bright and dynamic picture (factory setting)<br />
Standard Standard picture settings (factory setting)<br />
Movie<br />
Lower contrast for darkened room (factory<br />
setting)<br />
PC<br />
Designed for viewing of PC tables and<br />
documents<br />
Preference Your personal preferences<br />
Note: PC mode is available for HDMI and PC inputs only<br />
(grayed out for other input sources).<br />
To select the picture mode using the menu system:<br />
1<br />
2<br />
3<br />
42<br />
Press and open the Video menu.<br />
Highlight Mode and press .<br />
Video<br />
Mode<br />
Picture Settings<br />
Noise Reduction<br />
Game Mode<br />
Theater Settings<br />
Sports<br />
Press or to select the picture mode you prefer and<br />
press .<br />
Note: The picture mode you select affects the current<br />
input only. You can select a different picture mode for<br />
each input.<br />
Off<br />
Chapter 6: Using the TV’s features<br />
Adjusting the picture quality<br />
You can adjust the picture quality (Contrast, Backlight,<br />
DynaLight, Brightness, Color, Tint, and Sharpness) to your<br />
personal preferences.<br />
Selection Pressing Pressing <br />
Contrast lower higher<br />
Backlight* darker lighter<br />
DynaLight** On/Off On/Off<br />
Brightness darker lighter<br />
Color paler deeper<br />
Tint reddish greenish<br />
Sharpness softer sharper<br />
* Backlight<br />
This feature adjusts the brightness of the entire screen. When in<br />
video mode and no signal is input, this will automatically be set to 0.<br />
(Settings are stored in memory.)<br />
** DynaLight<br />
This function automatically strengthens the black coloring of dark<br />
areas in the video according to the level of darkness.<br />
To adjust the picture quality:<br />
1<br />
2<br />
3<br />
4<br />
Press and open the Video menu.<br />
Highlight Picture Settings and press .<br />
Press or to select the picture quality you want to<br />
adjust (Contrast, Backlight, DynaLight, Brightness, Color,<br />
Tint, or Sharpness), and then press or to adjust the<br />
setting, as described in the table above.<br />
To save the new settings, highlight Done and press .<br />
You can use any of the picture modes ( “Selecting the<br />
picture mode,” above left) as a starting point for adjusting<br />
the picture settings.<br />
To revert back to the base mode that you began adjusting<br />
the picture settings from, highlight Reset and press .<br />
The picture qualities you adjusted are automatically saved in<br />
the Preference mode ( “Selecting the picture mode,” above<br />
left) until Reset is selected.