Installing ezRemote Manager
Installing ezRemote Manager
Installing ezRemote Manager

You also want an ePaper? Increase the reach of your titles
YUMPU automatically turns print PDFs into web optimized ePapers that Google loves.
ii<br />
© 2003 by Neoware Systems, Inc.<br />
400 Feheley Drive<br />
King of Prussia, PA 19406 USA<br />
+1.610.277.8300<br />
E-mail:info@neoware.com<br />
Web: http://www.neoware.com<br />
This manual is copyrighted by Neoware Systems, Inc. All rights are reserved. This document may<br />
not, in whole or in part, be copied, photocopied, reproduced, translated, or reduced to any electronic<br />
medium or machine-readable form without prior consent, in writing, from Neoware Systems, Inc.<br />
Neoware, Eon, Capio, ThinSTAR, and <strong>ezRemote</strong> <strong>Manager</strong> are trademarks or registered trademarks<br />
of Neoware Systems, Inc. Microsoft and Windows are registered trademarks of Microsoft Corporation.<br />
MetaFrame, WinFrame, and ICA are registered trademarks of Citrix Systems, Inc. Other trademarks<br />
used in this manual are the property of their respective owners.<br />
Disclaimer: The information provided in this manual is intended for instructional purposes only and<br />
is subject to change without notice. Neoware Systems, Inc., accepts no responsibility or liability for<br />
errors, omissions, or misleading information that may be contained in this manual.<br />
Production note: This manual was entirely designed, written, edited, and illustrated on Neoware thin<br />
client appliances.<br />
MN-USER-EZRM-3.0 12.10.2003
Table of Contents<br />
Table of Contents iii<br />
CHAPTER 1 Introduction 7<br />
Overview 7<br />
Complete remote management of Neoware<br />
thin client appliances 7<br />
<strong>ezRemote</strong> <strong>Manager</strong> distribution 8<br />
Getting More Information 9<br />
The Internet 9<br />
Technical support 9<br />
CHAPTER 2 <strong>Installing</strong> <strong>ezRemote</strong><br />
<strong>Manager</strong> 11<br />
<strong>Installing</strong> <strong>ezRemote</strong> <strong>Manager</strong> 11<br />
<strong>Installing</strong> <strong>ezRemote</strong> <strong>Manager</strong> 11<br />
Uninstalling <strong>ezRemote</strong> <strong>Manager</strong> 12<br />
CHAPTER 3 Asset <strong>Manager</strong> 13<br />
Asset <strong>Manager</strong> functions not available in Support<br />
Mode 13<br />
Building an asset database 13<br />
<strong>ezRemote</strong> <strong>Manager</strong> User Manual<br />
Locating thin client appliances 13<br />
List view 16<br />
List view thin client appliance<br />
information 16<br />
Sorting the list view 17<br />
Renaming thin client appliances 17<br />
Adding one or more thin client appliances to the<br />
list view 19<br />
Adding a single thin client appliance 20<br />
Adding multiple thin client appliances using a<br />
range of IP addresses 20<br />
Adding thin client appliances using a list of IP<br />
addresses 21<br />
Grouping in asset lists 22<br />
Creating a new group 22<br />
Printing list views 23<br />
Switching to the task view 23<br />
Adjusting the list view 23<br />
Saving and automatically retrieving asset<br />
lists 24<br />
Apply Database Access password<br />
Exporting asset list data to other<br />
24<br />
applications 25<br />
iii
Table of Contents <strong>ezRemote</strong> <strong>Manager</strong> User Manual<br />
File | Export Database 25<br />
Data exported 26<br />
CHAPTER 4 Database Access<br />
Modes 27<br />
Administrator and Support modes 27<br />
Administrator mode functions 27<br />
Support mode functions 28<br />
Two database access passwords 28<br />
Administrator mode access password 28<br />
Enable Support Mode Access 29<br />
Support Mode password 29<br />
Retrieving <strong>ezRemote</strong> <strong>Manager</strong> asset list<br />
databases 30<br />
Retrieving an asset list database<br />
Using the proper database access<br />
30<br />
password 31<br />
Access mode indicators 31<br />
Administrator access mode indicators 31<br />
Support access mode indicators 32<br />
CHAPTER 5 Updating Appliance<br />
Software 33<br />
Software updates 33<br />
Getting software updates 33<br />
Accessing the Software Update <strong>Manager</strong> 33<br />
XPe/NTe software cloning 35<br />
Preparing the template or source<br />
appliance 36<br />
Preparing the target appliances 36<br />
Start the cloning process 36<br />
Copying the cloned image to other XPe / NTe<br />
appliances 38<br />
iv Table of Contents<br />
CHAPTER 6 Connection<br />
<strong>Manager</strong> 39<br />
Connection <strong>Manager</strong> not available in Support<br />
Mode 39<br />
Connections in thin client appliances 39<br />
What are “connections”? 39<br />
Connection cloning supported models 40<br />
Cloned connection settings 41<br />
What about other configuration settings? 41<br />
Why clone connections? 41<br />
Save time configuring thin client<br />
appliances 41<br />
Create “standard desktops” using ezUpdate<br />
server configuration files 42<br />
Setting up the template appliance 42<br />
Creating connections 42<br />
Cloning connections to other appliances 43<br />
“Cloning” or copying connections from one<br />
thin client appliance directly to others 43<br />
Loading connection configurations from a<br />
file 45<br />
Saving connection configurations to file 46<br />
CHAPTER 7 Properties<br />
<strong>Manager</strong> 49<br />
Properties <strong>Manager</strong> not available in Support<br />
Mode 49<br />
Device properties in thin client appliances 49<br />
What are “properties”? 49<br />
Which thin client appliances support property<br />
cloning? 50<br />
Which appliance configuration items are not<br />
cloned using Properties <strong>Manager</strong>? 51
<strong>ezRemote</strong> <strong>Manager</strong> User Manual Table of Contents<br />
Which appliance configuration items are<br />
cloned using Properties <strong>Manager</strong>? 51<br />
Why clone properties? 52<br />
Save time configuring thin client<br />
appliances 52<br />
Save standard configurations as backups<br />
Create ezUpdate server configuration<br />
52<br />
files 52<br />
Setting appliance properties using<br />
ezAnywhere shadowing 53<br />
Loading property settings from a file 55<br />
Saving properties configurations to file 57<br />
CHAPTER 8 Snap-In <strong>Manager</strong> 59<br />
What is a Snap-In? 59<br />
ezSnap Technology 59<br />
Snap-In <strong>Manager</strong> 60<br />
Apply snap-ins and more 60<br />
Using the Snap-In <strong>Manager</strong> 60<br />
CHAPTER 9 ezAnywhere<br />
Shadowing 63<br />
What is shadowing? 63<br />
Remote viewing and control 63<br />
Underlying protocol 63<br />
What is required to shadow a remote<br />
appliance 64<br />
Client configuration 64<br />
ezAnywhere shadowing and passwords 65<br />
Initiating an ezAnywhere shadowing session 65<br />
Error messages during ezAnywhere session<br />
initiation 66<br />
CHAPTER 10Sessions 69<br />
Setting Session Parameters 69<br />
Using the Set Session Parameters Dialog 70<br />
Task view 72<br />
Task view actions 73<br />
Switching to the list view 74<br />
Adjusting the task view 74<br />
CHAPTER 11 Wake on LAN<br />
Operations 75<br />
Wake on LAN and <strong>ezRemote</strong> <strong>Manager</strong> 75<br />
What is Wake on LAN? 75<br />
What does Wake on LAN do in <strong>ezRemote</strong><br />
<strong>Manager</strong>? 75<br />
Wake on LAN on demand 76<br />
Automatic Wake on LAN (Auto Wake on<br />
LAN) 76<br />
<strong>ezRemote</strong> <strong>Manager</strong> tasks that work with by<br />
Auto Wake on LAN 77<br />
Configuring automatic Wake on LAN (Auto<br />
WOL) 77<br />
Appendix A: Broadcast SNMP and<br />
Router Configuration 79<br />
<strong>ezRemote</strong> <strong>Manager</strong> access to separate subnets<br />
through Cisco routers 79<br />
Adding a route to your server 80<br />
Configuring Router 80<br />
Relevant Cisco Router Commands 82<br />
Appendix B: ezUpdate for Windows<br />
CE Appliances 83<br />
Windows CE ezUpdate 83<br />
Requirements 83<br />
Table of Contents v
Table of Contents <strong>ezRemote</strong> <strong>Manager</strong> User Manual<br />
Overview of procedure 84<br />
FTP Server 84<br />
DHCP Tag 137 84<br />
Static IP Address 85<br />
ezUpdate Server Configuration 86<br />
Basic FTP server setup 86<br />
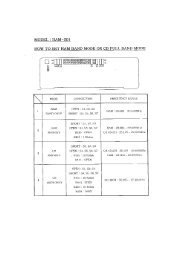
Choosing the right instruction set 87<br />
1Instruction Set A 87<br />
Instruction Set B 88<br />
Instruction Set C 89<br />
Creating ezUpdate files 90<br />
properties.rgy 90<br />
connections.rgy 90<br />
config.txt 91<br />
Appendix C: ezUpdate for NeoLinux<br />
Appliances 93<br />
ezUpdate and NeoLinux 93<br />
Requirements 94<br />
NeoLinux ezUpdate server package<br />
installation 94<br />
Configuring ezUpdate via DHCP 95<br />
Manually configuring ezUpdate on the<br />
client 95<br />
Using ezUpdate to distribute NeoLinux software<br />
update packages 97<br />
Using ezUpdate to distribute NeoLinux<br />
configurations 97<br />
Updating connections and properties 97<br />
install.nl 98<br />
Version file 98<br />
Configuration files 98<br />
properties.rgy 98<br />
vi Table of Contents<br />
connections.rgy 99<br />
Setting the appliances for ezUpdate 100<br />
ezUpdate Advanced Topics 102<br />
Snap-ins 102<br />
Appendix D: ezUpdate for Windows<br />
XPe Appliances 103<br />
ezUpdate and Windows XPe 103<br />
Suggested implementations 103<br />
Requirements 104<br />
Options 104<br />
DHCP tag 137 104<br />
FTP server setup 105<br />
XPe ezUpdate server package 105<br />
How XPe ezUpdate functions 109<br />
Boot time check for updated software<br />
Starting ezUpdate after the initial boot-<br />
109<br />
up 110<br />
Simple XPe ezUpdate example 110<br />
Step 1. Install the XPe ezUpdate<br />
package 110<br />
Step 2. Set up a “standard” XPe<br />
configuration 111<br />
Step 3. Save the “standard” image to the<br />
ezUpdate server 111<br />
Step 4. Update the Update Version File<br />
name 112<br />
Step 5. Apply the initial update 112<br />
XPe ezUpdate Advanced Topics 112<br />
Profiles for XPe ezUpdate 112<br />
Snap-ins for XPe ezUpdate 113<br />
Index 115
Overview<br />
Complete remote<br />
management of<br />
Neoware thin client<br />
appliances<br />
CHAPTER 1 Introduction<br />
<strong>ezRemote</strong> <strong>Manager</strong> User Manual<br />
Introduction to Neoware’s <strong>ezRemote</strong> <strong>Manager</strong> software.<br />
<strong>ezRemote</strong> <strong>Manager</strong> is a server-based application that provides<br />
sophisticated centralized administration capabilities for Neoware<br />
thin client appliances and for other thin client appliances running<br />
Neoware software. With <strong>ezRemote</strong> <strong>Manager</strong>, you can:<br />
• Locate thin client appliances running Neoware software on your<br />
network,<br />
View current configuration information about thin client appliances<br />
running Neoware software on your network,<br />
Select, group, and print lists of Neoware thin client appliances<br />
for easy management,<br />
Export <strong>ezRemote</strong> <strong>Manager</strong> data to other database applications,<br />
Import lists of IP addresses to build lists,<br />
Centrally manage security on Neoware thin client appliances<br />
anywhere on your network,<br />
Selectively push system software updates to Neoware thin client<br />
appliances running Microsoft ® Windows ® CE, Windows ®<br />
NTe, Windows ® XPe, or NeoLinux ,<br />
7<br />
Connections Introduction
Introduction<br />
<strong>ezRemote</strong> <strong>Manager</strong><br />
distribution<br />
8 Overview<br />
Remotely create and modify server connections on Neoware thin<br />
client appliances running Windows CE, Windows NTe, Windows<br />
XPe or NeoLinux,<br />
Copy or “clone” the connections, appliance properties, and security<br />
settings from one appliance to other appliances, as well as<br />
save them to disk,<br />
Configure pull-based ezUpdate automatic updates of software,<br />
properties, and connections for Neoware thin client appliances<br />
running Windows CE, Windows XPe, or NeoLinux,<br />
Remotely configure any Neoware thin client appliance located<br />
anywhere on your network, or shadow users for instructions or<br />
helpdesk functions,<br />
View the progress of updates as they occur,<br />
Choose to allow a restricted “Tech Support Mode” access to<br />
remote device configuration information and to remote device<br />
shadowing without the ability to reconfigure thin client appliances,<br />
Perform tasks immediately or schedule tasks for more convenient<br />
or less disruptive times, and<br />
Add new software components, and remotely control appliance<br />
processes through the use of snap-ins, scripting, and commands.<br />
Because Neoware's <strong>ezRemote</strong> <strong>Manager</strong> is an enterprise-class tool,<br />
able to manage thousands of appliances, it is critical that you test<br />
configurations carefully before “cloning” them to other appliances.<br />
Neoware recommends first configuring connections and properties<br />
at one appliance, and testing them carefully from that appliance —<br />
before cloning them to other appliances. To ensure that customers<br />
have carefully tested their configuration, we also recommend setting<br />
these properties directly at the appliance, not from within <strong>ezRemote</strong><br />
<strong>Manager</strong>.<br />
<strong>ezRemote</strong> <strong>Manager</strong> is distributed as a download from the Neoware<br />
Web site, www.neoware.com.
Getting More Information<br />
Introduction<br />
Important! Installation and use of <strong>ezRemote</strong> <strong>Manager</strong> -- Enterprise<br />
Edition requires a software license key from Neoware. If you don’t<br />
have a software license key, you can get one by calling 800-636-<br />
9273 in the U.S. or +1-610-277-8300 elsewhere.<br />
Neoware also provides a Limited Edition of <strong>ezRemote</strong> <strong>Manager</strong>,<br />
which does not require a license key. It contains all of the features of<br />
the Enterprise Edition, but is limited to managing any five (5) appliances<br />
simultaneously.<br />
The Internet You can find current and archival information about Neoware products,<br />
including the latest software updates, at:<br />
http://www.neoware.com<br />
In addition, this user manual and other Neoware documentation are<br />
available on the Neoware web site for reading or downloading.<br />
Technical support For technical support, call Neoware at +1.610.277.8300, or initiate a<br />
Technical Support Request at<br />
http://www.neoware.com/support/support_request.html<br />
Getting More Information 9<br />
Connections Introduction
Introduction<br />
10 Getting More Information
<strong>Installing</strong> <strong>ezRemote</strong> <strong>Manager</strong><br />
<strong>Installing</strong> <strong>ezRemote</strong><br />
<strong>Manager</strong><br />
<strong>ezRemote</strong> <strong>Manager</strong> User Manual<br />
CHAPTER 2 <strong>Installing</strong><br />
<strong>ezRemote</strong> <strong>Manager</strong><br />
This chapter explains how to install Neoware <strong>ezRemote</strong> <strong>Manager</strong><br />
on a server.<br />
<strong>ezRemote</strong> <strong>Manager</strong> must be installed on a Windows-based server,<br />
running either Windows NT Server 4.0, Windows 2000 Server, or<br />
Windows Server 2003. These servers can also be running Microsoft<br />
Terminal Services, Citrix MetaFrame, or WinFrame.<br />
<strong>ezRemote</strong> <strong>Manager</strong> includes these key files: ezRM.exe (the application),<br />
snmp.dll (the SNMP directory), mib.txt (which contains the<br />
SNMP database), and brapi.dll (for use with connection updates).<br />
PutNTEImage and GetNTEImage directories used for Windows<br />
NTe and Windows XPe cloning are also installed. Additionally<br />
installed are directories used for the ezUpdate of Windows CE software.<br />
A setup wizard guides you through the installation process.<br />
1 Start the Installation and Setup Wizard, using the installation<br />
distribution file you have downloaded (see “<strong>ezRemote</strong> <strong>Manager</strong><br />
distribution” on page 8).<br />
Note: You must be logged in as an administrator to properly<br />
install <strong>ezRemote</strong> <strong>Manager</strong>. If you are using an application<br />
server, use the Add/Remove Programs applet in Control Panel to<br />
install the program from the downloaded file.<br />
2 At the Setup wizard Welcome screen, click Next.<br />
11<br />
<strong>Installing</strong> <strong>ezRemote</strong> <strong>Manager</strong><br />
<strong>Installing</strong> <strong>ezRemote</strong> <strong>Manager</strong> <strong>Installing</strong> <strong>ezRemote</strong> <strong>Manager</strong>
<strong>Installing</strong> <strong>ezRemote</strong> <strong>Manager</strong><br />
Uninstalling<br />
<strong>ezRemote</strong> <strong>Manager</strong><br />
12 <strong>Installing</strong> <strong>ezRemote</strong> <strong>Manager</strong><br />
3 When prompted, type in the software license key for <strong>ezRemote</strong><br />
<strong>Manager</strong>, and then click Next.<br />
Note: The license key must be typed exactly as provided. The Limited<br />
Edition of <strong>ezRemote</strong> <strong>Manager</strong> does not require a license key for<br />
installation.<br />
4 In the Software License Agreement window, click Yes to agree to<br />
the license agreement and continue with the installation. Otherwise,<br />
click No and you will exit the setup utility.<br />
5 Type your name and company, and then click Next.<br />
6 Select the installation location, and then click Next.<br />
Note: The default installation folder is C:/Program Files/Neoware/<br />
ezRM.<br />
7 Click Next again to start copying files.<br />
8 When done, click Finish.<br />
Important: After the installation is completed, restrict access to<br />
the installation directory to only those people who need to run<br />
<strong>ezRemote</strong> <strong>Manager</strong>. If you installed <strong>ezRemote</strong> <strong>Manager</strong> on a<br />
Windows application server, make sure the shortcuts on the Start<br />
menu are only installed for those users who need to run <strong>ezRemote</strong><br />
<strong>Manager</strong>.<br />
When you decide to uninstall <strong>ezRemote</strong> <strong>Manager</strong>, you can do<br />
so by using the Add/Remove Programs applet located in<br />
Windows Control Panel (Start | Settings | Control Panel).<br />
Scroll down in the installed software menu and highlight<br />
<strong>ezRemote</strong> <strong>Manager</strong>. Then click on the Add/Remove button and<br />
follow the directions in the dialog.
CHAPTER 3 Asset <strong>Manager</strong><br />
<strong>ezRemote</strong> <strong>Manager</strong> User Manual<br />
This chapter explains how to use <strong>ezRemote</strong> <strong>Manager</strong> for locating,<br />
adding, viewing, and grouping lists of thin client appliances.<br />
Asset <strong>Manager</strong> functions not available in Support Mode<br />
Building an asset database<br />
Locating thin client<br />
appliances<br />
Not available in<br />
Support Mode<br />
Locating thin client appliances<br />
is a function that is<br />
available only when<br />
<strong>ezRemote</strong> <strong>Manager</strong> is<br />
accessing a database<br />
with Administrator Access<br />
mode. This function is not<br />
available when in Support<br />
Mode.<br />
When <strong>ezRemote</strong> <strong>Manager</strong> is in Support Mode, Connection <strong>Manager</strong><br />
is not an available option. For more information about how to<br />
tell which mode you are using, see “Access mode indicators” on<br />
page 31.<br />
A note about the screen shots in this document: <strong>ezRemote</strong> <strong>Manager</strong><br />
Rel. 3.0 has been built with an updated user interface designed<br />
for use on high color displays. If you run <strong>ezRemote</strong> <strong>Manager</strong> in<br />
256-color displays, a low-color version of the interface will be used<br />
that looks different from the images in this manual. To see the user<br />
interface that is documented here, run <strong>ezRemote</strong> <strong>Manager</strong> in displays<br />
at high color (16-bit) or true color (24-bit) or higher.<br />
Once <strong>ezRemote</strong> <strong>Manager</strong> is installed on a server, use it to locate<br />
and view information about your Neoware thin client appliances.<br />
1 Launch <strong>ezRemote</strong> <strong>Manager</strong> by selecting Neoware | <strong>ezRemote</strong><br />
<strong>Manager</strong> in the Windows Start | Programs menu.<br />
2 In the <strong>ezRemote</strong> <strong>Manager</strong> toolbar, click Assets. You can also<br />
13<br />
Asset <strong>Manager</strong><br />
Asset <strong>Manager</strong> Asset <strong>Manager</strong>
Asset <strong>Manager</strong><br />
Asset <strong>Manager</strong><br />
(Locate thin client<br />
appliances)<br />
Left-click<br />
to select or<br />
deselect an<br />
address<br />
Additional<br />
addresses<br />
Select the<br />
number of<br />
and delay<br />
between SNMP<br />
broadcasts.<br />
Filter your broadcast<br />
using the appliance<br />
operating system.<br />
FYI<br />
In order to locate clients<br />
on subnets through a<br />
router or switch, you may<br />
need to make changes in<br />
the router/switch configuration:<br />
SNMP broadcasts<br />
must be passed to<br />
the subnet. For more<br />
information, see “Appendix<br />
A: Broadcast SNMP<br />
and Router Configuration”<br />
on page 79.<br />
14 Building an asset database<br />
select Assets from the Actions dropdown menu.<br />
3 Select a broadcast IP address.<br />
Right-click<br />
to change<br />
Click Password<br />
to use a thin client<br />
access<br />
password with<br />
appliances discovered<br />
during<br />
this asset location<br />
operation.<br />
<strong>ezRemote</strong> <strong>Manager</strong> locates Neoware thin client appliances on your<br />
network by sending a Simple Network Management Protocol<br />
(SNMP) broadcast request from the server. You need to select a<br />
broadcast IP address (click on the select / deselect indicator to the<br />
left of the address).<br />
Note: The default broadcast address for each network interface<br />
card (NIC) (as determined from your server’s registry) is already<br />
selected when the dialog first appears.
Asset <strong>Manager</strong><br />
4 To change a broadcast IP address, right-click and type a new one.<br />
Add additional broadcast IP addresses by entering them one at a<br />
time in the provided field. clicking Add after each entry. For<br />
example, you might choose to add addresses for subnet routers.<br />
5 Specify the number and delay between SNMP broadcasts.<br />
Change the default settings only if network traffic interferes with<br />
the discovery of remote thin client appliances.<br />
6 The discovery can be filtered by thin client operating system in<br />
OS Select, limiting the units listed to those appliances running<br />
that operating system.<br />
7 If your Neoware thin client appliances have been protected using<br />
an appliance access password, click on the Password button to<br />
enter the password. The password will be associated with appli-<br />
The Appliance<br />
Access Security<br />
password is<br />
the device configurationpassword. <br />
ances located during this discovery session, and saved with the<br />
asset list database file.<br />
Appliance Access Security dialog:<br />
Enter the Appliance Access Password that is required to access<br />
and change configurations of the remote thin client appliances<br />
that you intend to manage with <strong>ezRemote</strong> <strong>Manager</strong>. Click OK to<br />
return to the Broadcast Address dialog.<br />
8 In the Broadcast Address Dialog, Click OK to locate and list the<br />
Neoware thin client appliances on your network.<br />
Building an asset database 15<br />
Asset <strong>Manager</strong><br />
Asset <strong>Manager</strong> Asset <strong>Manager</strong>
Asset <strong>Manager</strong><br />
List view<br />
List view thin client<br />
appliance<br />
information<br />
16 List view<br />
List view is the listing of located and added Neoware thin client<br />
appliances. It uses a familiar Explorer-type tree/list view, providing<br />
important information about each thin client appliance:<br />
The thin client appliance information in the list view includes:<br />
Station Name - The thin client appliance’s defined network<br />
name (called various names in different operating systems, such<br />
as: Client name, appliance name, host name, and computer<br />
name). By default, all Neoware thin client appliances are named<br />
using a prefix of “NEO-” and the last six characters of the client’s<br />
MAC address.<br />
IP Address - The IP address currently in use by the thin client<br />
appliance.<br />
DHCP - If the IP address has been dynamically assigned by a<br />
DHCP (or BOOTP with NeoLinux clients) server, a “Yes” will<br />
appear in this column.<br />
MAC Address - The thin client appliance’s network interface<br />
hardware Media Access Control address.<br />
Mainboard - A coded reference to the thin client appliance’s<br />
main circuit board revision level.<br />
OS Version - A description of which thin client appliance software<br />
version and release is currently running.<br />
Boot Version - (primarily for legacy equipment) Information<br />
about which version/release bootprom image version is installed<br />
in the thin client appliance.
Asset <strong>Manager</strong><br />
Flash - (primarily for legacy equipment) If Neoware’s Flash local<br />
storage daughterboard is installed, this column shows the amount<br />
of memory installed on the daughterboard.<br />
Disk - If a Flash disk (a DiskOnChip or DiskOnModule internal<br />
Flash device) is installed in the thin client appliance (or PCMCIA<br />
or IDE hard disks in @workStations), this column displays the<br />
size of the local storage.<br />
PLCC - (for legacy equipment) If a PLCC EEPROM programmable<br />
storage for the bootprom image is installed in the thin client<br />
appliance (@workStations and NeoStations, only), the<br />
capacity is displayed in this column.<br />
Sorting the list view To sort the list view by a category such as thin client appliance name,<br />
IP address, etc., click the column label button for that category.<br />
Click on column<br />
label to sort by<br />
that column<br />
Not available in<br />
Support Mode<br />
Renaming thin client<br />
appliances is a function<br />
Renaming that is available only thin<br />
when <strong>ezRemote</strong> Man-<br />
client appliances<br />
ager is accessing a database<br />
with Administrator<br />
Access mode. This function<br />
is not available when<br />
in Support Mode.<br />
List View<br />
Click one or more<br />
appliances in the<br />
Station Name<br />
column to activate<br />
File and Action<br />
menu options<br />
Click on a column label a second time to reverse the sort order of the<br />
thin client appliance.<br />
In the list view, you can directly change any thin client appliance’s<br />
name.<br />
1 Right-click the name of an thin client appliance in the list view,<br />
and then select Rename from the pop-up menu.<br />
2 Type a new name for the appliance.<br />
List view 17<br />
Asset <strong>Manager</strong><br />
Asset <strong>Manager</strong> Asset <strong>Manager</strong>
Asset <strong>Manager</strong><br />
18 List view<br />
Press the Enter key to finish name entry.
Adding one or more thin client appliances to the list view<br />
Tip<br />
Adding an appliance<br />
using its IP address does<br />
not use only SNMP<br />
broadcast, so that even<br />
appliances located on<br />
remote subnets can be<br />
added to the list when<br />
SNMP broadcasts are<br />
blocked by routers.<br />
Asset <strong>Manager</strong><br />
To add thin client appliance IP addresses to the list view, right click<br />
anywhere in the right-hand pane, and then select Add | Station from<br />
the pop-up menu.<br />
Right click in<br />
the list view<br />
pane to add<br />
appliances by<br />
IP address<br />
Click to use an<br />
appliance<br />
access security<br />
password with<br />
appliances<br />
added during<br />
this operation.<br />
Note: Adding and deleting thin client appliances is not allowed<br />
when <strong>ezRemote</strong> <strong>Manager</strong> is accessing an asset list database in Support<br />
Mode.<br />
Adding one or more thin client appliances to the list view 19<br />
Asset <strong>Manager</strong><br />
Asset <strong>Manager</strong> Asset <strong>Manager</strong>
Asset <strong>Manager</strong><br />
Adding a single thin<br />
client appliance<br />
Adding multiple<br />
thin client<br />
appliances using a<br />
range of IP<br />
addresses<br />
1 To specify a single IP address, enter the address in the Start field<br />
and click the add button.<br />
2 If a thin client appliance access password needs to be associated<br />
with the appliance(s) that you are adding, click on the Password<br />
button to set Access Security Password. Follow the instruction for<br />
entering a password and then click OK to return to the Add Station<br />
dialog.<br />
3 When you have specified the desired IP address(es), click OK to<br />
add them to your list view.<br />
1To specify a range of<br />
IP addresses, enter the<br />
first IP address of the<br />
range in the Start field,<br />
and the last IP address<br />
of the range in the End<br />
field, and click Add.<br />
2To delete one or more<br />
addresses from the list,<br />
click to highlight and<br />
then click Delete.<br />
3 If a thin client appliance access password needs to be associated<br />
with the appliance(s) that you are adding, click on the Password<br />
button to set Access Security Password. Follow the instruction for<br />
entering a password and then click OK to return to the Add Station<br />
dialog<br />
20 Adding one or more thin client appliances to the list view
Adding thin client<br />
appliances using a<br />
list of IP addresses<br />
Asset <strong>Manager</strong><br />
4 When you have specified the desired IP address(es), click OK to<br />
add them to your list view.<br />
With <strong>ezRemote</strong> <strong>Manager</strong> 3.0, thin client appliances can be added to<br />
the asset list using a text file containing IP addresses. The text file<br />
should contain nothing except IP addresses separated by the following<br />
characters (delimiters): space, TAB, new line, or semicolon.<br />
1 Create a text file (.txt file) in Notepad containing the following IP<br />
addresses (for example):<br />
192.168.0.1<br />
192.168.0.25<br />
192.168.10.15<br />
2 In the Add Station dialog, click Import, and select the saved text<br />
file.<br />
3 The IP addresses from the text file will appear in the Add Stations<br />
dialog.<br />
Adding one or more thin client appliances to the list view 21<br />
Asset <strong>Manager</strong><br />
Asset <strong>Manager</strong> Asset <strong>Manager</strong>
Asset <strong>Manager</strong><br />
Grouping in asset lists<br />
Restricted in<br />
Support Mode<br />
Adding, changing, and<br />
deleting asset lists grouping<br />
is a function that is<br />
available only when<br />
<strong>ezRemote</strong> <strong>Manager</strong> is<br />
accessing a database<br />
with Administrator Access<br />
mode. This function is not<br />
available when in Support<br />
Mode.<br />
Creating a new<br />
group<br />
22 Grouping in asset lists<br />
To more easily manage Neoware thin client appliances, you may<br />
choose to organize them in logical groups. Group appliances based<br />
on any criteria you desire. Use the sorting mechanism in the list<br />
view, and then click-and-drag selected appliances into defined<br />
groups to quickly create an easy-to-manage structure. For example,<br />
in a large network, you may decide to group thin client appliances<br />
located on different subnets in different groups, or a separate group<br />
for each configuration of software.<br />
Note on saving lists: <strong>ezRemote</strong> <strong>Manager</strong> allows complex multilevel<br />
grouping to provide you with flexibility. It is important to<br />
save your list as you go. When you use the File Save function,<br />
the complete asset management database is saved to disk,<br />
including groupings, IP addresses, station names, and OS versions.<br />
<strong>ezRemote</strong> <strong>Manager</strong> also allows saving multiple database files.<br />
(For more information on using saved databases, see “Saving<br />
and automatically retrieving asset lists” on page 24.) Saving<br />
multiple database files allows you to create different groupings<br />
of the same list of appliances.<br />
1 Right-click anywhere in the list view,<br />
and then select Add | Group from the<br />
pop-up menu.<br />
2 Type a name for the new group folder.<br />
3 Select the thin client appliances that<br />
will belong to the new group.<br />
4 Drag the selected appliances into the<br />
new group folder.<br />
Note: It is also possible to drag and drop selected thin client<br />
appliances to a folder contained in the left-hand pane.
Printing list views<br />
Not Available in<br />
Support Mode<br />
Printing list views is a<br />
function that is available<br />
only when <strong>ezRemote</strong><br />
<strong>Manager</strong> is accessing a<br />
database with Administrator<br />
Access mode. This<br />
function is not available<br />
when in Support Mode.<br />
Switching to the task view<br />
Adjusting the list view<br />
Asset <strong>Manager</strong><br />
Using the <strong>ezRemote</strong> <strong>Manager</strong> menus, you can easily print a list<br />
view:<br />
Use the organizational tree in the left-hand pane to select the<br />
group level you wish to print.<br />
Click into the right-hand pane.<br />
Select Print from the File Menu.<br />
The list displayed in the right-hand pane will print on the selected<br />
printer.<br />
To print the contents of a different group, select another group in<br />
the left-hand pane.<br />
You can select printer settings using File | Print Setup.<br />
While in list view, you can switch to the Task View by selecting View<br />
| Task View from the menu bar. The task view will only be accessible<br />
if you have sessions in progress, waiting to begin, or completed sessions.<br />
To hide the <strong>ezRemote</strong> <strong>Manager</strong> toolbar or status bar, deselect<br />
them in the View menu.<br />
To change the width of the <strong>ezRemote</strong> <strong>Manager</strong> left window, drag<br />
the bar between it and the main window. Or select Split from the<br />
View menu, and then drag the bar.<br />
Printing list views 23<br />
Asset <strong>Manager</strong><br />
Asset <strong>Manager</strong> Asset <strong>Manager</strong>
Asset <strong>Manager</strong><br />
Saving and automatically retrieving asset lists<br />
Tip<br />
Save asset lists when you<br />
exit <strong>ezRemote</strong> <strong>Manager</strong><br />
to avoid having to rediscover<br />
and group your<br />
appliances again.<br />
Apply Database<br />
Access password<br />
Tip<br />
Always use database<br />
access passwords when<br />
creating and saving asset<br />
lists to prevent unauthorized<br />
changes to thin client<br />
configurations.<br />
The asset listing displayed in <strong>ezRemote</strong> <strong>Manager</strong> can be saved to a<br />
database file (by default named with the extension .rms) when you<br />
exit the program, or at any time when using <strong>ezRemote</strong> <strong>Manager</strong> by<br />
using the menu File | Save selection. The data that are saved to the<br />
database file include: groupings (group names and grouped appliances),<br />
IP addresses, station names, appliance access passwords, and<br />
operating system version information.<br />
By default, <strong>ezRemote</strong> <strong>Manager</strong> prompts you to save the asset database<br />
when you exit the program. By default, the last-saved file is<br />
automatically opened the next time you start <strong>ezRemote</strong> <strong>Manager</strong>.<br />
(This behavior can be changed by unchecking Autoload Database in<br />
the Settings menu.)<br />
You can save multiple versions of your asset database. By grouping<br />
your asset list in different ways, or even maintaining separate databases<br />
for different large groups of appliances, can make the task of<br />
managing the appliances much easier.<br />
Because thin<br />
client appliance<br />
access passwords<br />
are saved<br />
as part of the<br />
asset list database<br />
file, an<br />
Administrator<br />
Password<br />
should always be applied when saving the database file.<br />
The next chapter discusses in detail saving and retrieving <strong>ezRemote</strong><br />
<strong>Manager</strong> databases.<br />
Once an <strong>ezRemote</strong> <strong>Manager</strong> asset database has been saved with one<br />
or more database access passwords, it cannot be opened without one<br />
24 Saving and automatically retrieving asset lists
Asset <strong>Manager</strong><br />
of the passwords. The database files are encrypted with RC4 encryption.<br />
Note: Because of the differences between RC4 encryption/decryption<br />
utilities that are part of Windows 2000 and earlier operating systems<br />
and the RC4 utilities in Windows XP and later operating<br />
systems, <strong>ezRemote</strong> <strong>Manager</strong> database files created with one set of<br />
utilities cannot be read with the other. If you intend to share the<br />
<strong>ezRemote</strong> <strong>Manager</strong> asset database with other users, make sure that<br />
the file is created and saved on the same version of operating system<br />
as the one that will be used to access the database.<br />
Exporting asset list data to other applications<br />
File | Export<br />
Database<br />
<strong>ezRemote</strong> <strong>Manager</strong> 3.0 includes the ability to export asset list data<br />
for use by other applications. This can be useful for combining<br />
Neoware thin client appliance information with other asset management<br />
data.<br />
In order to export the <strong>ezRemote</strong> <strong>Manager</strong> information from the current<br />
asset list:<br />
1 Select menu item File | Export Database.<br />
2 Select the location to which the exported data will be saved.<br />
Exporting asset list data to other applications 25<br />
Asset <strong>Manager</strong><br />
Asset <strong>Manager</strong> Asset <strong>Manager</strong>
Asset <strong>Manager</strong><br />
3 Provide a file name.<br />
4 Click Save.<br />
Data exported <strong>ezRemote</strong> <strong>Manager</strong> 3.0 exports asset list data in a comma-delimited<br />
text file (.csv file) format. The asset list data that are exported<br />
include:<br />
Station Name<br />
Grouping structure<br />
IP address<br />
Whether the device is using DHCP<br />
MAC address<br />
Whether or not a password has been set<br />
Board type<br />
Neoware operating system version<br />
Flash disk size<br />
RAM size<br />
CPU reported type<br />
26 Exporting asset list data to other applications
Administrator and Support modes<br />
Administrator mode<br />
functions<br />
<strong>ezRemote</strong> <strong>Manager</strong> User Manual<br />
CHAPTER 4 Database Access<br />
Modes<br />
This chapter explains how to use password protection to restrict<br />
access to <strong>ezRemote</strong> <strong>Manager</strong> database files and functionality.<br />
<strong>ezRemote</strong> <strong>Manager</strong> provides two modes of saving and accessing an<br />
asset list database file (.rms file).<br />
In Administrator mode (the default), users of <strong>ezRemote</strong> <strong>Manager</strong><br />
have full access to Neoware thin client appliances, their appliance<br />
access passwords, and their configurations. Using Administrator<br />
mode, <strong>ezRemote</strong> <strong>Manager</strong> can perform remotely any software configuration<br />
task, including changing configurations and rebooting<br />
the desktop appliances.<br />
While in Administrator mode, <strong>ezRemote</strong> <strong>Manager</strong> can locate new<br />
appliances, update software, update connections and properties<br />
configurations, apply snap-ins, and ezAnywhere shadow remote<br />
Neoware thin client appliances. While in Administrator mode, the<br />
asset list database can be saved and renamed, creating a Support<br />
mode access password if desired.<br />
<strong>ezRemote</strong> <strong>Manager</strong> uses Administrator mode except when using an<br />
asset list database file (.rms file) that has been opened using a Support<br />
mode password.<br />
27<br />
Database Access Modes<br />
Database Access Modes Database Access Modes
Database Access Modes<br />
Support mode<br />
functions<br />
Two database access passwords<br />
Administrator<br />
mode access<br />
password<br />
Neoware<br />
recommends<br />
always using an<br />
Administrator<br />
database access<br />
password<br />
28 Two database access passwords<br />
<strong>ezRemote</strong> <strong>Manager</strong> uses the restricted-access Support mode when:<br />
Opening an asset list database file that has been saved with Support<br />
mode enabled, and<br />
The Support mode password has been used to open the database.<br />
While in Support mode, <strong>ezRemote</strong> <strong>Manager</strong> performs two functions:<br />
View and sort the asset list in list view<br />
Initiate ezAnywhere shadowing sessions on a Neoware thin client<br />
appliance in the asset list that has an associated appliance access<br />
password.<br />
Support mode users:<br />
Cannot add to, modify, or save an asset list<br />
Cannot view or change thin client appliance access passwords<br />
Cannot change thin client appliance configurations<br />
Administrator and Support mode access in <strong>ezRemote</strong> <strong>Manager</strong> is controlled<br />
by two passwords.<br />
When an <strong>ezRemote</strong> <strong>Manager</strong> asset list database file is initially saved,<br />
or when a File | Save As action is selected, the Database Access Control<br />
dialog is displayed.
Tip<br />
Don’t forget the database<br />
access passwords you<br />
use to encrypt the asset<br />
list database. Neither the<br />
Administrator nor Support<br />
mode password<br />
may be recovered from<br />
the database file.<br />
Enable Support<br />
Mode Access<br />
Click Enable<br />
Support Mode<br />
access if desired<br />
Support Mode<br />
password<br />
Database Access Modes<br />
An Administrator mode password, once entered in the Database<br />
Access Control dialog, will be required thereafter in order to open<br />
that database file. Although the Administrator password field may be<br />
left empty (and an empty Administrator password field will open a<br />
database file that has been saved with an empty password field),<br />
Neoware recommends always applying a non-empty Administrator<br />
password.<br />
When the asset list database file is opened using the Administrator<br />
mode password, the <strong>ezRemote</strong> <strong>Manager</strong> user has full access to all<br />
<strong>ezRemote</strong> <strong>Manager</strong> functions.<br />
When saving a file, Support Mode access may be enabled by checking<br />
Enable Support Mode access. Once Support Mode is enabled for<br />
an asset list database file, <strong>ezRemote</strong> <strong>Manager</strong> will use both Administrator<br />
and Support Mode passwords to encrypt the database file.<br />
Use a Support<br />
Mode password<br />
different from the<br />
Administrator<br />
mode password.<br />
If Support Mode access is enabled, enter a Support Mode access<br />
password. Do not use the same password that was used as the<br />
Administrator password, or Support Mode will not be enabled.<br />
Two database access passwords 29<br />
Database Access Modes<br />
Database Access Modes Database Access Modes
Database Access Modes<br />
Retrieving <strong>ezRemote</strong> <strong>Manager</strong> asset list databases<br />
Retrieving an asset<br />
list database<br />
30 Retrieving <strong>ezRemote</strong> <strong>Manager</strong> asset list databases<br />
Recently saved database files are<br />
listed in the File menu. For a more<br />
complete list of database files, select<br />
File | Open.<br />
<strong>ezRemote</strong> <strong>Manager</strong><br />
asset list databases<br />
use the file<br />
suffix: .rms<br />
Note: <strong>ezRemote</strong><br />
<strong>Manager</strong> 3.0 can<br />
also open asset list<br />
database files that<br />
have been saved in<br />
a comma-delimited<br />
text file format,<br />
such as can<br />
be exported by <strong>ezRemote</strong> <strong>Manager</strong> for other programs (a .csv file).<br />
Also note that <strong>ezRemote</strong> <strong>Manager</strong> exported comma-delimited text<br />
files do not include individual thin client security access passwords,<br />
so that those passwords will have to be added before <strong>ezRemote</strong> <strong>Manager</strong><br />
can manage the appliances in the opened comma-delimited text<br />
file.
Using the proper<br />
database access<br />
password<br />
Name of the asset<br />
list database file<br />
that is being<br />
opened.<br />
Access mode indicators<br />
Administrator<br />
access mode<br />
indicators<br />
Database Access Modes<br />
The password entered in the Database Access Password dialog controls<br />
the access mode with which the database is opened.<br />
Administrator access mode, only -- If the asset list database<br />
being opened has been saved with the Administrator access mode<br />
only enabled (i.e., the Enable Support Mode access checkbox is<br />
not checked), then only the Administrator access password will<br />
open the file.<br />
Administrator and Support access modes -- If the asset list<br />
database being opened has been saved with Support access mode<br />
enabled, then:<br />
The password<br />
entered here<br />
controls the<br />
access mode.<br />
The Administrator Password will open the asset list database<br />
in Administrator access mode.<br />
The Support Mode password will open the asset list database<br />
in Support Mode.<br />
Note: Even if Support Mode Access has been enabled, but the same<br />
access password has been set in both the Administrator Password<br />
and Support Mode Password fields, then the file will be opened in<br />
Administrator Access mode.<br />
Administrator access mode is indicated by the following user interface<br />
features:<br />
Access mode indicators 31<br />
Database Access Modes<br />
Database Access Modes Database Access Modes
Database Access Modes<br />
Support access<br />
mode indicators<br />
32 Access mode indicators<br />
Title bar indicator<br />
When <strong>ezRemote</strong> <strong>Manager</strong> is operating in Administrator access<br />
mode, the window title bar includes “Administrator Mode” in the<br />
title name.<br />
All toolbar buttons enabled<br />
and accessible<br />
Administrator Access Mode Indicators<br />
“Administrator Mode” in<br />
window title bar.<br />
Toolbar indicator<br />
When <strong>ezRemote</strong> <strong>Manager</strong> is operating in Administrator access<br />
mode, the toolbar buttons are all active and accessible.<br />
Support access mode is indicated by the following user interface features:<br />
Title bar indicator<br />
When <strong>ezRemote</strong> <strong>Manager</strong> is operating in Support access mode, the<br />
window title bar includes “Support Mode” in the title name.<br />
Support Access Mode Indicators<br />
“Support Mode” in window<br />
title bar.<br />
Only ezAnywhere shadowing toolbar<br />
button is enabled.<br />
Toolbar indicator<br />
When <strong>ezRemote</strong> <strong>Manager</strong> is operating in Support access mode, the<br />
toolbar buttons are all active and accessible.
Software updates<br />
Getting software<br />
updates<br />
Accessing the<br />
Software Update<br />
<strong>Manager</strong><br />
<strong>ezRemote</strong> <strong>Manager</strong> User Manual<br />
CHAPTER 5 Updating<br />
Appliance Software<br />
This chapter explains how to update the system software in<br />
Neoware appliances.<br />
To properly use <strong>ezRemote</strong> <strong>Manager</strong> to update your computing<br />
appliance software, you must first install a Neoware software<br />
update package on the server that is running <strong>ezRemote</strong> <strong>Manager</strong>.<br />
These software update packages can be downloaded from the<br />
Neoware Web site at:<br />
http://www.neoware.com/downloads/<br />
Note: For instructions on installing software update packages after<br />
they have been downloaded, refer to the update package’s Release<br />
Notes file which can be found on the software update download<br />
Web page.<br />
1 Select one or more appliances from the List View.<br />
2 In the <strong>ezRemote</strong> <strong>Manager</strong> toolbar, click Software or select the<br />
33<br />
Updating Appliance Software Updating Appliance Software
Updating Appliance Software<br />
Software update<br />
manager toolbar<br />
button<br />
WARNING<br />
Do not attempt to create<br />
more than one simultaneous<br />
software update session<br />
on a single <strong>ezRemote</strong><br />
<strong>Manager</strong> server. Doing so<br />
can bypass the network<br />
services throttle built-in to<br />
<strong>ezRemote</strong> <strong>Manager</strong> and<br />
result in incomplete software<br />
updates and/or corrupted<br />
Flash disks.<br />
34 Software updates<br />
menu item Actions | Software.<br />
3 When the Update <strong>Manager</strong> opens, select either the NeoLinux,<br />
netOS, Windows CE, Windows XPe, or Windows NTe software<br />
update package to use to update your appliance(s). The update<br />
package will need to have been installed on the server on which<br />
you are running <strong>ezRemote</strong> <strong>Manager</strong>.
XPe/NTe software cloning<br />
Updating Appliance Software<br />
Note: If the selected group of appliances contains more than one<br />
type of software, you will be prompted to choose which software<br />
to update. Once you have chosen the software to update, <strong>ezRemote</strong><br />
<strong>Manager</strong> will display a list of the appliances running that<br />
software. and allow you to select the appropriate software update<br />
package for those appliances from the Available Versions list.<br />
Note: If no software update packages appear on the Available<br />
Versions list, then you need to download and install one of<br />
Neoware’s software update packages. The update packages can<br />
be accessed at http://www.neoware.com/downloads/.<br />
4 After selecting the appropriate software update package, click<br />
Update All.<br />
5 When the Confirm Session Start dialog appears, click the Properties<br />
button to set the session parameters (see “ Setting Session<br />
Parameters” on page 69), OK to begin the session immediately, or<br />
Cancel.<br />
Note: If you choose to delay the session in the Set Session<br />
Parameters dialog, clicking the OK button will add the delayed<br />
session to the Task View and delay the session, rather than beginning<br />
the session immediately.<br />
<strong>ezRemote</strong> <strong>Manager</strong> clones the full Flash disk image of Neoware thin<br />
client appliances based on Windows XPe and Windows NTe. You<br />
can copy the cloned image to other same-OS appliances running on<br />
your network, or store that image for backup. This image includes<br />
the operating system software, its configuration, all installed software<br />
applications (including custom software installations), and the<br />
configuration of that software.<br />
Note: When you use a cloned image to update other Neoware Windows<br />
XPe/NTe appliances running on your network, the cloned<br />
image will completely replace the contents of the appliances’ Flash<br />
disks. Only network settings and autologon settings are saved from<br />
the earlier version of the software.<br />
XPe/NTe software cloning 35<br />
Updating Appliance Software Updating Appliance Software
Updating Appliance Software<br />
Preparing the<br />
template or source<br />
appliance<br />
Preparing the<br />
target appliances<br />
Start the cloning<br />
process<br />
36 XPe/NTe software cloning<br />
Before using an XPe/NTe appliance as a template or source for cloning<br />
to other appliances (the target devices), it is critical that it be set<br />
up correctly:<br />
Make sure that all configuration changes are made in the unit<br />
which has been chosen to be cloned.<br />
Note that the pre-update autologon behavior of the target appliances<br />
is preserved after being updated with the new cloned<br />
images. If you change the template appliance’s account names, or<br />
account passwords as part of the cloning operation, each target<br />
appliance will continue to attempt to use the original, pre-cloning<br />
autologon name and password, which may no longer be correct.<br />
In that occurrence, you can reconfigure the target machine’s autologon<br />
status via the local GUI dialogs, or, you can use <strong>ezRemote</strong><br />
<strong>Manager</strong>’s ezAnywhere or Snap-in capabilities to modify the target<br />
machines.<br />
No special preparation is required for target XPe/NTe appliances,<br />
where you intend to copy the cloned template software.<br />
After the cloned template software update process is complete in the<br />
target appliances, those appliances’ original autologon information<br />
is restored. The target XPe/NTe appliances can then be updated<br />
whether or not they are configured for automatic logon.<br />
1 In the List View, select the preconfigured template XPe/NTe<br />
appliance to clone, and the target appliances to copy the image.<br />
2 In the <strong>ezRemote</strong> <strong>Manager</strong> toolbar, click Software, or select Software<br />
from the Actions dropdown menu.<br />
3 When the Update <strong>Manager</strong> opens, select the template Neoware
Select the<br />
Neoware<br />
Windows XPe/NTe<br />
appliance with<br />
the preconfigured<br />
software image.<br />
Click the Get<br />
Image button to<br />
initiate the clone<br />
operation.<br />
Enter the name for the<br />
cloned image as you<br />
would like it to appear<br />
in the Update <strong>Manager</strong><br />
Specify where you<br />
would like to store<br />
the cloned image.<br />
Updating Appliance Software<br />
XPe/NTe appliance in the left hand pane, and click Get Image.<br />
4 In the Version Name Image Name and Location dialog, type the<br />
name to be listed in the Update <strong>Manager</strong>. This name will represent<br />
the cloned storage image in the Enter new version name<br />
field. In the “Enter location and name of image that will be<br />
cloned” field, type the full path and the name for the cloned<br />
image file. If you want to browse the folders, click the Browse<br />
button and use the standard Windows Save As dialog to specify a<br />
location and name for the cloned image file.<br />
5 When finished, click OK.<br />
The full storage cloned image will now appear in the Update <strong>Manager</strong><br />
as a software update that you can apply to other Neoware Windows<br />
XPe appliances or Windows NTe appliances on your network.<br />
XPe/NTe software cloning 37<br />
Updating Appliance Software Updating Appliance Software
Updating Appliance Software<br />
Copying the cloned<br />
image to other XPe<br />
/ NTe appliances<br />
38 XPe/NTe software cloning<br />
Once the cloned image is saved on to the <strong>ezRemote</strong> <strong>Manager</strong> server,<br />
it will be available to copy to one or more other appliances. The<br />
name of the cloned image you provided in step 4 of this procedure,<br />
will appear in the software Update <strong>Manager</strong> window. (See “Accessing<br />
the Software Update <strong>Manager</strong>” on page 33.)<br />
Note: Images can be copied only to the same model appliance (with<br />
the identically-sized Flash disk) as the appliance from which the<br />
image was cloned.
CHAPTER 6 Connection<br />
<strong>Manager</strong><br />
<strong>ezRemote</strong> <strong>Manager</strong> User Manual<br />
This chapter explains how to use <strong>ezRemote</strong> <strong>Manager</strong> to manage<br />
server connections on your Neoware Appliances.<br />
Connection <strong>Manager</strong> not available in Support Mode<br />
Connections in thin client appliances<br />
What are<br />
“connections”?<br />
When <strong>ezRemote</strong> <strong>Manager</strong> is in Support Mode, Connection <strong>Manager</strong><br />
is not an available option. For more information about how to<br />
tell which mode you are using, see “Access mode indicators” on<br />
page 31.<br />
Neoware thin client appliances are designed to access servers or<br />
applications through pre-defined connections. For example: Windows<br />
CE thin client appliances are primarily used through the<br />
Neoware Connection <strong>Manager</strong> with its list of pre-defined ICA,<br />
RDP, terminal emulation, or Web browser connections.<br />
Among the operating systems supported by Neoware, Windows CE<br />
and NeoLinux use a connection manager to access network<br />
resources through pre-defined connections. Connection cloning is<br />
the mechanism by which <strong>ezRemote</strong> <strong>Manager</strong> can copy the predefined<br />
list of server connections from one thin client appliance to<br />
others (of the same model / software family).<br />
39<br />
Connections Connection <strong>Manager</strong> Connection <strong>Manager</strong>
Connection <strong>Manager</strong><br />
Connection cloning<br />
supported models<br />
40 Connections in thin client appliances<br />
This chapter focuses on cloning defined connections from and to the<br />
following thin client appliances running Neoware software:<br />
Capio I and II models running Neoware’s version of Windows CE<br />
software<br />
NetVista N2200 and N2800 models running NeoLinux or<br />
Neoware’s version of Windows CE software<br />
Model Series Operating System<br />
Capio 500<br />
Eon Proven 2100<br />
Associated Part<br />
Numbers<br />
Embedded Linux CP4A-AA<br />
CP4E-AA<br />
Eon Preferred 2000 Embedded Linux BA-EON2000E<br />
BA-EON2000X<br />
Capio 600<br />
Eon Proven 3100<br />
Eon 3000<br />
Eon Preferred 3000<br />
NeoStation 3000<br />
Eon Prestige Windows<br />
CE .NET<br />
Eon 4000<br />
Eon Preferred 4000<br />
Eon Professional 4300<br />
Eon Prestige<br />
NeoLinux<br />
Windows CE<br />
Windows CE .NET<br />
Windows CE<br />
Windows CE .NET<br />
CP4B-BA<br />
CP4F-AA<br />
CP4G-BA<br />
CP4H-BB<br />
CP4J-BA<br />
BA-EON3000X<br />
BA-EON3000I<br />
BA-N3000C<br />
Windows CE .NET BB-01-CB<br />
NeoLinux BA-EON4000I<br />
BA-EON4000S<br />
BA-EON4000T<br />
BA-EON4300S<br />
BA-EON4300T<br />
Linux BB-02-EC<br />
Neoware’s software (based on Windows XPe and Windows NTe) also<br />
may include customer-defined connections to servers and Web pages.<br />
Those connections (along with user configurations), are automatically<br />
duplicated when the thin client appliance software is cloned.<br />
The balance of this chapter does not apply to Windows XPe and Windows<br />
NTe thin client appliances. (For information about cloning Win-
Cloned connection<br />
settings<br />
What about other<br />
configuration<br />
settings?<br />
Why clone connections?<br />
Save time<br />
configuring thin<br />
client appliances<br />
Connection <strong>Manager</strong><br />
dows XPe/NTe appliances, see “XPe/NTe software cloning” on page<br />
35.)<br />
The following are examples of settings copied and cloned in Connection<br />
<strong>Manager</strong> (when the source or template appliance has any of<br />
these connections defined):<br />
ICA connections: all configuration settings for each defined connection<br />
RDP connections: all configuration settings for each defined connection<br />
TeemTalk terminal emulation connections (if installed on source<br />
or template appliance): all configuration settings for each defined<br />
connection<br />
Web browser connections: all configuration settings for each<br />
defined Web browser<br />
PPP connections: all configuration settings for each defined PPP<br />
connection<br />
Other appliance configuration settings, such as printer setup, screen<br />
resolution, and global ICA settings are cloned through Properties<br />
<strong>Manager</strong>.(See “CHAPTER 7 Properties <strong>Manager</strong>” on page 49.)<br />
Individual thin client appliances can be configured at the desktop<br />
when installed or whenever network resources change. This configuration<br />
usually includes initially defining to which servers, applications,<br />
and Web sites the thin client user may have access. While this<br />
configuration doesn’t take much time for an individual appliance,<br />
initially configuring or changing the connection configurations on<br />
more than a few thin client devices can consume a lot of administrator<br />
resources.<br />
Why clone connections? 41<br />
Connections Connection <strong>Manager</strong> Connection <strong>Manager</strong>
Connection <strong>Manager</strong><br />
Create “standard<br />
desktops” using<br />
ezUpdate server<br />
configuration files<br />
Setting up the template appliance<br />
Creating<br />
connections<br />
Caution<br />
Because Neoware's<br />
<strong>ezRemote</strong> <strong>Manager</strong> is an<br />
enterprise-class tool that<br />
can manage thousands<br />
of appliances, it is important<br />
that you test configurations<br />
carefully before<br />
"cloning" them to other<br />
appliances.<br />
42 Setting up the template appliance<br />
The alternative to individual client configuration is to configure a<br />
single appliance (the “template” appliance) with the server connections<br />
that will be used on other devices, and to then clone those connections<br />
and copy them to the other thin client appliances. <strong>ezRemote</strong><br />
<strong>Manager</strong> makes cloning and copying connections both quick and<br />
easy.<br />
The connection cloning mechanism used by <strong>ezRemote</strong> <strong>Manager</strong> to<br />
push new connections to target thin client appliances can also be<br />
used to create configuration files that can be pulled by same-model<br />
thin client appliances from ezUpdate servers. When properly configured,<br />
ezUpdate servers will provide complete configuration to newly<br />
installed thin client appliances. (For more information about setting<br />
up an ezUpdate server: see “Appendix B: ezUpdate for Windows CE<br />
Appliances” on page 83, or see “Appendix C: ezUpdate for<br />
NeoLinux Appliances” on page 93.)<br />
Using <strong>ezRemote</strong> <strong>Manager</strong> to manage the server connections on your<br />
Neoware computing appliance is easy. The process begins at the<br />
appliance itself.<br />
To be sure that each connection is properly configured, it is important<br />
to create and test connections (using the thin client appliance)<br />
on the network that will be used. Therefore, Neoware recommends<br />
that you create and test the connections for multiple appliances on a<br />
thin client connected to the same network environment that all copied<br />
appliances will use. This can be accomplished using the ezAnywhere<br />
shadowing feature of <strong>ezRemote</strong> <strong>Manager</strong> (see “ezAnywhere<br />
Shadowing” on page 63).<br />
By either using the actual thin client appliance as the template<br />
source device, or using ezAnywhere shadowing, create and test all of<br />
the connections you want to copy to other devices.
Cloning connections to other appliances<br />
“Cloning” or<br />
copying<br />
connections from<br />
one thin client<br />
appliance directly<br />
to others<br />
Connection<br />
manager toolbar<br />
button<br />
Connection <strong>Manager</strong><br />
The next step involves the use of <strong>ezRemote</strong> <strong>Manager</strong> to “clone” or<br />
copy the connections created on one appliance, to the rest of the<br />
appliances or groups of appliances on your network. This ensures<br />
that your connections are properly configured, and will work on any<br />
appliance on your network.<br />
1 In the List View, select both the appliance with the preconfigured<br />
connections, and all of the appliances to be cloned to those connections.<br />
2 In the toolbar, click Connections, or select Connections from the<br />
Actions menu bar item.<br />
Note: If the selected group of appliances are based on more than<br />
one kind of software you will be prompted to select which type of<br />
appliance to update by choosing the appropriate software platform.<br />
Once you have selected the software platform, <strong>ezRemote</strong><br />
<strong>Manager</strong> will single out the appliances running that software and<br />
allow you to continue cloning or editing your connections.<br />
3 When the Connection <strong>Manager</strong> appears, select the radio button<br />
Cloning connections to other appliances 43<br />
Connections Connection <strong>Manager</strong> Connection <strong>Manager</strong>
Connection <strong>Manager</strong><br />
Select the<br />
appliance<br />
with the<br />
preconfigured<br />
connections.<br />
Click the Get button to<br />
pull the connection<br />
information from the<br />
appliance.<br />
44 Cloning connections to other appliances<br />
entitled: Get connections from thin client appliance.<br />
4 Select the appliance with the preconfigured connections from the<br />
list of appliances on the left-hand side.<br />
Select “Get<br />
connections<br />
from thin client<br />
appliance”<br />
5 Click Get.<br />
When <strong>ezRemote</strong> <strong>Manager</strong> finishes uploading the preconfigured<br />
connections and lists them in the Connection <strong>Manager</strong> window,<br />
the Update All button will become active.<br />
6 To Copy or Clone the preconfigured connections to the other<br />
appliances listed on the left-hand side, click Update All.<br />
7 When the Confirm Session Start dialog appears, click Properties<br />
to set the session parameters (see “ Setting Session Parameters” on<br />
page 69), OK to begin the session immediately, or Cancel.<br />
Note: If you choose to make the session delayed in the Set Session<br />
Parameters dialog, the OK button will add the delayed session<br />
to the Task View instead of beginning the session<br />
immediately.
Loading connection<br />
configurations from<br />
a file<br />
Select “Get<br />
connections<br />
from file”<br />
Connection <strong>Manager</strong><br />
Connection configurations may be saved to a file for loading to one<br />
or more thin client appliances. This section describes loading a previously<br />
saved connection configuration file into <strong>ezRemote</strong> <strong>Manager</strong><br />
and how to push it to one or more appliances.<br />
Saving connection configuration: (For more information about<br />
how to save connection configurations to a file, see “Saving connection<br />
configurations to file” on page 46.)<br />
1 In the List View, select all of the appliances to be cloned to the<br />
saved connections.<br />
2 In the toolbar, click Connections, or select Connections from the<br />
Actions dropdown menu.<br />
Note: If the selected group of appliances are based on more than<br />
one kind of software, you will be prompted to select which type<br />
of appliance you would like to update by choosing the appropriate<br />
software platform. Once you have selected the software platform,<br />
<strong>ezRemote</strong> <strong>Manager</strong> will single out the appliances running<br />
that software and allow you to continue cloning or editing your<br />
connections.<br />
Select saved<br />
connection file<br />
and click OK<br />
3 When the Connection <strong>Manager</strong> appears, select the radio button<br />
entitled: Get connections from file.<br />
Cloning connections to other appliances 45<br />
Connections Connection <strong>Manager</strong> Connection <strong>Manager</strong>
Connection <strong>Manager</strong><br />
46 Saving connection configurations to file<br />
4 Click Get and select the file to copied from the previously saved<br />
connection configurations.<br />
When <strong>ezRemote</strong> <strong>Manager</strong> finishes uploading the preconfigured<br />
connections, and lists them in the Connection <strong>Manager</strong> window,<br />
the Update All button will become active.<br />
5 To Copy or Clone the preconfigured connections to all of the<br />
appliances listed on the left-hand side, click Update All.<br />
6 When the Confirm Session Start dialog appears, click Properties<br />
to set the session parameters (see “ Setting Session Parameters” on<br />
page 69), OK to begin the session immediately, or Cancel.<br />
Note: If you choose to make the session delayed in the Set Session<br />
Parameters dialog, clicking the OK button will add the<br />
delayed session to the Task View instead of beginning the session<br />
immediately.<br />
Saving connection configurations to file<br />
Using <strong>ezRemote</strong> <strong>Manager</strong> it is possible to save the appliance connection<br />
information as a file. This saved file (by default, Connections.rgy)<br />
may be used as follows:<br />
To load into <strong>ezRemote</strong> <strong>Manager</strong> for configuring appliances at a<br />
later date. See “Loading connection configurations from a file”<br />
on page 45.<br />
As a template for the automatic ezUpdate procedure (see the<br />
Appendices dealing with the ezUpdate process), or<br />
For support and debugging purposes.<br />
Once you have uploaded the connection information from your<br />
appliance by selecting an appliance and clicking the Get button, click<br />
Save As. The Save As dialog will appear, allowing you to specify the
When connections<br />
are finished<br />
uploading from<br />
the selected<br />
appliance,<br />
Save As is<br />
enabled.<br />
Connection <strong>Manager</strong><br />
directory and file name of the appliance connection file that you<br />
chose to save.<br />
Saving connection configurations to file 47<br />
Connections Connection <strong>Manager</strong> Connection <strong>Manager</strong>
Connection <strong>Manager</strong><br />
48 Saving connection configurations to file
<strong>ezRemote</strong> <strong>Manager</strong> User Manual<br />
CHAPTER 7 Properties <strong>Manager</strong><br />
This chapter explains how to use <strong>ezRemote</strong> <strong>Manager</strong> to duplicate<br />
device configurations.<br />
Properties <strong>Manager</strong> not available in Support Mode<br />
When <strong>ezRemote</strong> <strong>Manager</strong> is in Support Mode, Properties <strong>Manager</strong><br />
is not an available option. For more information about how to tell<br />
which mode you are using, see “Access mode indicators” on page<br />
31.<br />
Device properties in thin client appliances<br />
What are<br />
“properties”?<br />
Neoware computing appliances running Windows CE and<br />
NeoLinux operating systems use a registry-based configuration<br />
mechanism that is configured through the connection manager thin<br />
client interface. The previous chapter (“CHAPTER 6 Connection<br />
<strong>Manager</strong>” on page 39) discusses copying or cloning connection<br />
definitions from one appliance to one or more others.<br />
To provide a higher level of flexibility, without increasing complexity,<br />
Neoware separates the ability to clone connection configurations<br />
from the ability to clone or copy other appliance<br />
configuration items. Most of the appliance configuration parameters<br />
that are not copied or cloned using <strong>ezRemote</strong> <strong>Manager</strong> Con-<br />
49<br />
Properties <strong>Manager</strong><br />
Properties <strong>Manager</strong> Properties <strong>Manager</strong>
Properties <strong>Manager</strong><br />
Which thin client<br />
appliances support<br />
property cloning?<br />
50 Device properties in thin client appliances<br />
nection <strong>Manager</strong> are cloned using the Properties <strong>Manager</strong> interface.<br />
This chapter focuses on cloning configuration properties from and to<br />
the following thin client appliances running Neoware software:<br />
Capio I and II models running Neoware’s version of Windows CE<br />
software<br />
NetVista N2200 and N2800 models running NeoLinux or<br />
Neoware’s version of Windows CE software<br />
Model Series Operating System<br />
Capio 500<br />
Eon Proven 2100<br />
Associated Part<br />
Numbers<br />
Embedded Linux CP4A-AA<br />
CP4E-AA<br />
Eon Preferred 2000 Embedded Linux BA-EON2000E<br />
BA-EON2000X<br />
Capio 600<br />
Eon Proven 3100<br />
Eon 3000<br />
Eon Preferred 3000<br />
NeoStation 3000<br />
Eon Prestige Windows<br />
CE .NET<br />
Eon 4000<br />
Eon Preferred 4000<br />
Eon Professional 4300<br />
Eon Prestige<br />
NeoLinux<br />
Windows CE<br />
Windows CE .NET<br />
Windows CE<br />
Windows CE .NET<br />
CP4B-BA<br />
CP4F-AA<br />
CP4G-BA<br />
CP4H-BB<br />
CP4J-BA<br />
BA-EON3000X<br />
BA-EON3000I<br />
BA-N3000C<br />
Windows CE .NET BB-01-CB<br />
NeoLinux BA-EON4000I<br />
BA-EON4000S<br />
BA-EON4000T<br />
BA-EON4300S<br />
BA-EON4300T<br />
Linux BB-02-EC<br />
Neoware’s software based on Windows XPe and Windows NTe also<br />
includes configuration properties. Those properties are automatically<br />
duplicated, along with connection and user configuration,<br />
when the thin client appliance software is cloned. This chapter does<br />
not apply to Windows XPe and Windows NTe thin client appliances.
Which appliance<br />
configuration items<br />
are not cloned<br />
using Properties<br />
<strong>Manager</strong>?<br />
Which appliance<br />
configuration items<br />
are cloned using<br />
Properties<br />
<strong>Manager</strong>?<br />
Properties <strong>Manager</strong><br />
(For information about cloning Windows XPe/NTe appliances, see<br />
“XPe/NTe software cloning” on page 35.)<br />
The items not cloned using Properties <strong>Manager</strong> are:<br />
Connection definitions (these are cloned using the Connection<br />
<strong>Manager</strong> dialog)<br />
IP address<br />
Host name<br />
Configuration password (except NeoLinux-based appliances)<br />
The following are examples of configuration settings (properties)<br />
cloned by <strong>ezRemote</strong> <strong>Manager</strong>’s Properties <strong>Manager</strong> interface (not all<br />
settings are supported in both NeoLinux and Windows CE):<br />
Display resolution and refresh rate<br />
Screen saver settings<br />
Setting to get network configuration from DHCP<br />
RDP printer settings<br />
LPD printer settings<br />
TCP printer settings<br />
ThinPrint settings<br />
Touch screen settings<br />
Global ICA settings<br />
Global RDP settings<br />
Audio volume settings<br />
Date and time zone<br />
Web browser / Internet configuration settings (CE only)<br />
Connection <strong>Manager</strong> settings (security, appearance, automatic<br />
start-up settings)<br />
Security settings (but not password)<br />
ezAnywhere shadowing settings<br />
Mouse settings<br />
Keyboard settings (locale and Num Lock key behavior at startup)<br />
Device properties in thin client appliances 51<br />
Properties <strong>Manager</strong><br />
Properties <strong>Manager</strong> Properties <strong>Manager</strong>
Properties <strong>Manager</strong><br />
Why clone properties?<br />
Save time<br />
configuring thin<br />
client appliances<br />
Save standard<br />
configurations as<br />
backups<br />
Create ezUpdate<br />
server<br />
configuration files<br />
Setting up the template appliance<br />
52 Why clone properties?<br />
Individual thin client appliances can be configured at the desktop<br />
when installed or whenever network resources change. This configuration<br />
usually includes initially setting up monitor resolution, the<br />
network, defining printers, and deciding to which servers, applications,<br />
and Web sites the thin client user may have access. While this<br />
configuration doesn’t take much time for an individual appliance,<br />
initially configuring or changing the configurations on more than a<br />
few thin client devices can consume a lot of administrator resources.<br />
The alternative to individual client configuration is to configure a<br />
single appliance (the “template” appliance) with a standard configuration<br />
that other devices can use, and to then clone that configuration<br />
and copy it to the other thin client appliances. <strong>ezRemote</strong> <strong>Manager</strong><br />
makes cloning and copying thin client configurations easy and<br />
quick.<br />
Saving the template configuration to file provides a way to archive<br />
and back up your thin client appliance configurations. Multiple configuration<br />
files can be saved for later access and restoration using<br />
<strong>ezRemote</strong> <strong>Manager</strong>.<br />
The property cloning mechanism used by <strong>ezRemote</strong> <strong>Manager</strong> to<br />
push new or updated configurations to target thin client appliances<br />
can also be used to create configuration files that can be pulled by<br />
same-model thin client appliances from ezUpdate servers. (For more<br />
information about setting up an ezUpdate server: see “Appendix B:<br />
ezUpdate for Windows CE Appliances” on page 83, or see “Appendix<br />
C: ezUpdate for NeoLinux Appliances” on page 93.)<br />
Using <strong>ezRemote</strong> <strong>Manager</strong> to manage the appliance properties of<br />
your Neoware thin client devices is easy. The process begins at the<br />
appliance itself.
Caution<br />
Because Neoware's<br />
<strong>ezRemote</strong> <strong>Manager</strong> is an<br />
enterprise-class tool that<br />
can manage thousands<br />
of appliances, it is important<br />
that you test configurations<br />
carefully before<br />
"cloning" them to other<br />
appliances.<br />
Setting appliance<br />
properties using<br />
ezAnywhere<br />
shadowing<br />
Select a<br />
template<br />
appliance.<br />
Click the Shadow<br />
button to remotely<br />
shadow the appliance<br />
and customize<br />
its properties.<br />
Properties <strong>Manager</strong><br />
To be sure that the template appliance is correctly configured, it is<br />
important to set up and test the device configurations before copying<br />
them. Test configurations for multiple appliances on an appliance<br />
connected to the same network environment that all copied appliances<br />
will use. This can be accomplished using the ezAnywhere<br />
shadowing feature of <strong>ezRemote</strong> <strong>Manager</strong> (see “ezAnywhere Shadowing”<br />
on page 63). Testing may also be performed in front of a thin<br />
client appliance.<br />
By either using the actual thin client appliance as the template<br />
source device, or using ezAnywhere shadowing, make the configuration<br />
changes (or initial configuration) that you wish to copy to other<br />
devices.<br />
1 In List View, select the NeoLinux or Windows CE appliance(s) to<br />
manage using the Properties <strong>Manager</strong>.<br />
2 In the toolbar, click Properties, or select menu item Action | Properties.<br />
Select “Get properties<br />
from thin client<br />
appliance…”<br />
3 When the Properties <strong>Manager</strong> appears, select a “template” appliance<br />
from the list of appliances on the left-hand side.<br />
Why clone properties? 53<br />
Properties <strong>Manager</strong><br />
Properties <strong>Manager</strong> Properties <strong>Manager</strong>
Properties <strong>Manager</strong><br />
54 Why clone properties?<br />
Note: Later in this procedure, you will be able to customize this<br />
appliance for it to become a template from which you can clone its<br />
properties.<br />
4 Click Shadow.<br />
Depending upon the configuration settings on the appliance you<br />
are trying to shadow, you may have to wait for an approval of the<br />
appliance user before you can shadow their appliance. Also, you<br />
may have to wait for an approval time-out, which will occur if the<br />
user is not at their appliance when you attempt to shadow it. A<br />
window will appear containing the chosen appliance’s current<br />
desktop.<br />
5 If the Neoware connection manager does not appear on the screen<br />
which you are shadowing, use the Ctrl + Alt + End keyboard shortcut<br />
to make it appear. If the connection manager appears when<br />
the shadow window comes up, skip to the next step.<br />
Note: The Ctrl + Alt + End keyboard shortcut won’t work if you<br />
are running <strong>ezRemote</strong> <strong>Manager</strong> from a Neoware appliance that<br />
uses the Ctrl + Alt + End keyboard shortcut itself (NeoLinux and<br />
Windows CE-based thin client appliances).<br />
6 Using the ezConnect menus (in NeoLinux) or the Neoware<br />
Appliance Properties dialog (in Windows CE, accessed by pressing<br />
F2 from the connection manager screen), customize the appliances’<br />
properties (for more information on customizing your<br />
appliances’ properties see either the NeoLinux User Manual or<br />
the Windows CE User Manual). When finished close the ezAnywhere<br />
shadowing window.<br />
7 Select the template appliance from the list of appliances on the<br />
left-hand side.<br />
8 Click the Get button.<br />
<strong>ezRemote</strong> <strong>Manager</strong> will upload the appliance’s property information<br />
from the template appliance.<br />
9 To copy or clone the template appliance’s properties to other<br />
appliances in the left-pane list, click Update All.<br />
Note: You can also save the template appliance’s properties to a<br />
file by clicking the Save As button (See “Saving properties con-
Click the Get button<br />
to upload the properties<br />
information<br />
from the<br />
template appliance.<br />
Loading property<br />
settings from a file<br />
Properties <strong>Manager</strong><br />
figurations to file” below for more information concerning this<br />
feature).<br />
10 When the Confirm Session Start dialog appears, click Properties<br />
to set the session parameters (see “ Setting Session Parameters”<br />
on page 69), OK to begin the session immediately, or Cancel.<br />
Note: If you choose to make the session delayed in the Set Session<br />
Parameters dialog, clicking OK will add the delayed session<br />
to the Task View instead of beginning the session immediately.<br />
Properties settings may be saved to a file for loading to one or more<br />
thin client appliances. This section describes loading a previously<br />
saved property settings file into <strong>ezRemote</strong> <strong>Manager</strong>, and how to push<br />
the property settings updates to one or more appliances.<br />
Saving properties configuration: (For more information about how<br />
to save connection configurations to a file, See “Saving properties<br />
configurations to file” on page 57.)<br />
1 In the List View, select all of the appliances to be cloned to the<br />
saved properties.<br />
2 In the toolbar, click Properties, or select menu item Actions |<br />
Properties.<br />
Why clone properties? 55<br />
Properties <strong>Manager</strong><br />
Properties <strong>Manager</strong> Properties <strong>Manager</strong>
Properties <strong>Manager</strong><br />
Select “Get<br />
connections<br />
from file”<br />
56 Why clone properties?<br />
Note: If the selected group of appliances are based on more than<br />
one kind of software, you will be prompted to select which type<br />
of appliance to update by choosing the appropriate software platform.<br />
Once you have selected the software platform, <strong>ezRemote</strong><br />
<strong>Manager</strong> will single out the appliances running that software and<br />
allow you to continue cloning or editing your connections.<br />
3 When the Properties <strong>Manager</strong> appears, select the radio button<br />
entitled: Get connections from file.<br />
4 Click Get and select the file to copy from the list of previously<br />
saved connection configurations.<br />
Select saved<br />
connection file<br />
and click Open<br />
5 Click Get.<br />
When <strong>ezRemote</strong> <strong>Manager</strong> finishes uploading the preconfigured<br />
properties, the Update All button will become active.<br />
6 To Copy or Clone the preconfigured properties to all of the appliances<br />
listed on the left-hand side, click Update All.<br />
7 When the Confirm Session Start dialog appears, click Properties<br />
to set the session parameters (see “ Setting Session Parameters” on<br />
page 69), OK to begin the session immediately, or Cancel.
Saving properties configurations to file<br />
Properties <strong>Manager</strong><br />
Note: If you choose to make the session delayed in the Set Session<br />
Parameters dialog, clicking OK will add the delayed session<br />
to the Task View instead of beginning the session immediately.<br />
Using <strong>ezRemote</strong> <strong>Manager</strong> it is also possible to save the appliance<br />
property information as a file; to be used as a template for the ezUpdate<br />
automatic update procedure (see the Appendices dealing with<br />
the ezUpdate process); or for support and debugging purposes. Once<br />
you have pulled the appliance properties from your appliance by<br />
selecting an appliance and clicking the Get button, click the Save As<br />
button. The Save As dialog will appear allowing you to specify the<br />
directory and file name of the appliance property file that you would<br />
like to save.<br />
Using <strong>ezRemote</strong> <strong>Manager</strong>, it is possible to save the appliance properties<br />
information as a file. This saved file (by default, “Properties.rgy”)<br />
may be used as follows:<br />
Loaded into <strong>ezRemote</strong> <strong>Manager</strong> for configuring appliances at a<br />
later date (See “Loading property settings from a file” on page<br />
55.)<br />
As a template for the automatic ezUpdate procedure (see the<br />
Appendices dealing with the ezUpdate process), or<br />
For support and debugging purposes.<br />
Once you have uploaded the appliance properties information from<br />
your appliance by selecting an appliance and clicking the Get button,<br />
click the Save As button. The Save As dialog will appear allowing<br />
Saving properties configurations to file 57<br />
Properties <strong>Manager</strong><br />
Properties <strong>Manager</strong> Properties <strong>Manager</strong>
Properties <strong>Manager</strong><br />
When properties<br />
are finished<br />
uploading from<br />
the selected<br />
appliance,<br />
Save As is<br />
enabled.<br />
58 Saving properties configurations to file<br />
you to specify the directory and file name of the appliance connection<br />
file to be saved.
What is a Snap-In?<br />
<strong>ezRemote</strong> <strong>Manager</strong> User Manual<br />
CHAPTER 8 Snap-In <strong>Manager</strong><br />
This chapter explains how to remotely apply modular updates to<br />
Neoware appliance software and appliance configurations.<br />
All of Neoware’s thin client appliance operating systems utilize<br />
real filesystems in Flash disk memory instead of monolithic Flash<br />
images. They also use registry-based configuration mechanisms.<br />
The combination of real filesystems and registry-based configuration<br />
allows Neoware customers to add software, or to update software<br />
modules and device configuration, without having to move an<br />
entire Flash memory image into each appliance.<br />
Modular software additions and updates can be only as big as they<br />
have to be (and in some cases may be only a few kilobytes of information),<br />
and registry changes are similarly small. This speeds the<br />
update process, and helps alleviate bandwidth impact on busy networks<br />
and low-bandwidth connections.<br />
ezSnap Technology Neoware refers to this as our “ezSnap Technology.” Neoware<br />
makes snap-ins available to add capabilities to thin client appliances<br />
(such as adding Adobe Acrobat Reader plug-in to NeoLinux<br />
and Windows XPe thin client appliances). Neoware Tech Support<br />
provides snap-ins to help diagnose customer problems. Customers<br />
can develop and use their own snap-ins, since the technology is<br />
based on industry-standard protocols.<br />
59<br />
Snap-In <strong>Manager</strong><br />
Snap-In <strong>Manager</strong> Snap-In <strong>Manager</strong>
Snap-In <strong>Manager</strong><br />
Snap-In <strong>Manager</strong><br />
Apply snap-ins and<br />
more<br />
Using the Snap-In <strong>Manager</strong><br />
Snap-In manager<br />
toolbar button<br />
60 Snap-In <strong>Manager</strong><br />
<strong>ezRemote</strong> <strong>Manager</strong>’s Snap-In <strong>Manager</strong> provides the following functions:<br />
Snap-in software additions, software updates, or configuration<br />
changes simultaneously into one or more thin client appliances<br />
Remotely execute file-based scripts in one or more thin client<br />
appliances<br />
Remotely execute a command in one or more thin client appliances<br />
Snap-ins can be downloaded from the Support section of the<br />
Neoware Website at:<br />
http://www.neoware.com/downloads/<br />
1 Select one or more appliances from the List View.<br />
2 In the <strong>ezRemote</strong> <strong>Manager</strong> toolbar, click Snap-In or select menu<br />
item Actions | Snap-In.
Select the radio button<br />
to specify the action<br />
you would like the<br />
Snap-in manager to<br />
perform.<br />
Specify the file or<br />
command associated<br />
with the Snap-in action.<br />
Snap-In <strong>Manager</strong><br />
Note: If the selected group of appliances include more than one<br />
operating system, you will be prompted to select which type of<br />
appliance to update by choosing the appropriate software platform.<br />
Once you have selected the software platform, <strong>ezRemote</strong><br />
<strong>Manager</strong> will single out the appliances running that software and<br />
allow you to continue using Snap-In <strong>Manager</strong>.<br />
3 When Snap-In <strong>Manager</strong> opens, select a radio button to specify<br />
either a snap-in, script, or command to add or execute on your<br />
appliance(s).<br />
Note: You cannot run scripts on Windows CE, Windows NTe, or<br />
Windows XPe thin client appliances.<br />
4 In the accompanying text field specify the snap-in, script, or command<br />
you would like to run.<br />
Snap-ins - Enter the full path and name of where the snap-in<br />
file is located on your server. Snap-in files have a .2do extension.<br />
Click Browse to locate the snap-in file you would like to<br />
apply to the selected appliance(s).<br />
Using the Snap-In <strong>Manager</strong> 61<br />
Snap-In <strong>Manager</strong><br />
Snap-In <strong>Manager</strong> Snap-In <strong>Manager</strong>
Snap-In <strong>Manager</strong><br />
62 Using the Snap-In <strong>Manager</strong><br />
Scripts - For appliances running NeoLinux, the administrator<br />
can custom configure the appliance using bash scripting. The<br />
administrator can also specify a specific input file to be<br />
used in conjunction with a bash script. Enter the script file or<br />
commands and the optional input file you would like to run on<br />
the selected appliance(s).<br />
Command - The administrator can custom configure the<br />
appliance using commands. Neolinux based appliances use<br />
shell commands, and Windows based appliances use command<br />
line. The administrator can also specify a specific<br />
input file to be used in conjunction with a command. Enter<br />
the command and the optional input file you would like to run<br />
on the selected appliance(s).<br />
5 After you have specified the snap-in, script, or command, click<br />
OK.<br />
6 When the Confirm Session Start dialog appears, click Properties<br />
to set the session parameters (see “ Setting Session Parameters”<br />
on page 69), OK to begin the session immediately, or Cancel.<br />
Note: If you choose to make the session delayed in the Set Session<br />
Parameters dialog, clicking OK will add the delayed session<br />
to the Task View instead of beginning the session immediately.
What is shadowing?<br />
Remote viewing and<br />
control<br />
CHAPTER 9 ezAnywhere<br />
Shadowing<br />
<strong>ezRemote</strong> <strong>Manager</strong> User Manual<br />
This chapter explains how to remotely access a Neoware thin client<br />
appliance using ezAnywhere shadowing.<br />
ezAnywhere shadowing allows an administrator to remotely view<br />
and/or take control of any Neoware thin client appliance. Because<br />
the administrator can either view or actively control the remote<br />
device, including being able to input keyboard and mouse actions,<br />
ezAnywhere shadowing can be used to remotely configure a thin<br />
client appliance, or to assist a remote user in typical help desk functions.<br />
ezAnywhere shadowing does not depend on having an active ICA<br />
or RDP session active on the remote appliance, allowing an administrator<br />
to remotely configure unattended appliances. Multiple<br />
shadowing sessions can be opened simultaneously on a single<br />
administrator desktop; each one appears in its own window.<br />
Underlying protocol ezAnywhere shadowing is based on industry-standard VNC protocols.<br />
ezAnywhere shadowing is independent of both ICA and RDP<br />
protocols so that unattended devices can be managed.<br />
In the standard default configuration of Neoware desktop operating<br />
systems, only VNC sessions initiated by <strong>ezRemote</strong> <strong>Manager</strong> will<br />
be accepted by the thin client appliance. The desktop operating sys-<br />
63<br />
ezAnywhere Shadowing<br />
ezAnywhere Shadowing ezAnywhere Shadowing
ezAnywhere Shadowing<br />
tems also have settings to disable ezAnywhere shadowing, although<br />
remote configuration of devices is not as convenient as when shadowing<br />
is enabled.<br />
What is required to shadow a remote appliance<br />
Client configuration The thin client appliance must be configured to accept ezAnywhere<br />
shadowing. The default configuration in all software versions is to<br />
enable ezAnywhere shadowing.<br />
In Windows CE appliances<br />
Open the ezAnywhere applet<br />
from the Appliance Properties<br />
Control Panel tab.<br />
64 What is required to shadow a remote appliance<br />
Allow <strong>ezRemote</strong> <strong>Manager</strong> to<br />
Shadow must be checked.
ezAnywhere<br />
shadowing and<br />
passwords<br />
In NeoLinux appliances<br />
ezAnywhere Shadowing<br />
Open the ezAnywhere control from ezConnect Connection <strong>Manager</strong><br />
menus: Settings | Appliance Properties | Desktop | Shadow tab.<br />
Allow <strong>ezRemote</strong> <strong>Manager</strong> to Shadow must be checked.<br />
If a thin client configuration password (appliance access security<br />
password) has been set on an appliance, that password must be associated<br />
with the thin client appliance in the <strong>ezRemote</strong> <strong>Manager</strong> asset<br />
list database in order to access a desktop with ezAnywhere shadowing.<br />
Initiating an ezAnywhere shadowing session<br />
1 Select an appliance from the List View.<br />
2 In the <strong>ezRemote</strong> <strong>Manager</strong> toolbar, click Shadow or select Shadow<br />
Initiating an ezAnywhere shadowing session 65<br />
ezAnywhere Shadowing<br />
ezAnywhere Shadowing ezAnywhere Shadowing
ezAnywhere Shadowing<br />
Error messages<br />
during ezAnywhere<br />
session initiation<br />
ezAnywhere<br />
shadowing<br />
manager toolbar<br />
button<br />
from the Actions menu.<br />
Depending upon the configuration settings on the appliance you are<br />
trying to shadow, you may have to wait for an approval from the<br />
remote device’s user before you can shadow. Also, you may have to<br />
wait for an approval time-out, which will occur if the user is not at<br />
their appliance when you attempt to shadow it. If shadowing is<br />
allowed, a window will appear containing the thin client appliance’s<br />
current desktop.<br />
Note: It is possible to establish multiple shadowing sessions (simultaneously<br />
connecting to different thin client appliances), however<br />
you must establish them one by one following the instructions<br />
above.<br />
The following messages may appear when you attempt to initiate an<br />
ezAnywhere shadowing session:<br />
Shadow session already running. Do you want to replace it<br />
with a new one?<br />
This message occurs if you attempt to connect to a thin client<br />
appliance when a shadowing session is already in progress. Click<br />
Yes to replace the running session with a new one.<br />
Shadow sessions have been disabled on this appliance!<br />
This message occurs if the target thin client appliance has been<br />
configured to disallow ezAnywhere shadowing sessions.<br />
66 Initiating an ezAnywhere shadowing session
ezAnywhere Shadowing<br />
Error creating shadow session<br />
This message occurs when attempting to connect to an appliance<br />
that does not support ezAnywhere shadowing, or from network or<br />
configuration errors.<br />
Initiating an ezAnywhere shadowing session 67<br />
ezAnywhere Shadowing<br />
ezAnywhere Shadowing ezAnywhere Shadowing
ezAnywhere Shadowing<br />
68 Initiating an ezAnywhere shadowing session
Setting Session Parameters<br />
WARNING<br />
Please do not attempt to<br />
create more than one simultaneous<br />
full-image software<br />
update session on a single<br />
<strong>ezRemote</strong> <strong>Manager</strong> server.<br />
Doing so can bypass the<br />
network services throttle<br />
built-in to <strong>ezRemote</strong> <strong>Manager</strong><br />
and result in incomplete<br />
software updates and<br />
corrupted Flash Disks.<br />
CHAPTER 10 Sessions<br />
<strong>ezRemote</strong> <strong>Manager</strong> User Manual<br />
This chapter explains how to set Session Parameters and use the task view<br />
of <strong>ezRemote</strong> <strong>Manager</strong> after you have created sessions to update your<br />
Neoware computing appliances.<br />
A session is any defined task that you set <strong>ezRemote</strong> <strong>Manager</strong> to<br />
perform. This includes such tasks as software updates, connection<br />
cloning, etc. Using <strong>ezRemote</strong> <strong>Manager</strong>, it is also possible to either<br />
define multiple sessions for scheduling future tasks to be performed,<br />
or to define a series of tasks to be performed in a specific<br />
order. When multiple sessions are defined, each session is represented<br />
as a separate tab in the task view (see “Task view” on page<br />
72).<br />
After specifying changes to one or more appliances using <strong>ezRemote</strong><br />
<strong>Manager</strong>, a Confirm Session Start dialog will appear.<br />
Instead of clicking OK to begin the session immediately, click Properties<br />
to bring up the Set Session Parameters dialog. In Set Session<br />
69<br />
Sessions<br />
Sessions Sessions
Sessions<br />
Using the Set<br />
Session Parameters<br />
Dialog<br />
70 Setting Session Parameters<br />
Parameters, you can give each session a name, a delayed start time, set<br />
logging options, and set the option to reboot the appliance after the<br />
session is complete.<br />
Using the Set Session Parameters dialog the user can specify the following<br />
parameters:<br />
Log File Name - In the accompanying field, type the name of the<br />
log file to either use or create for the update session you are performing.<br />
Log File Properties - Below the Log File Name parameter are two<br />
columns of radio buttons that set the properties of the Log file. The<br />
choices available in the first column specify the type of logging you<br />
choose <strong>ezRemote</strong> <strong>Manager</strong> to perform. These choices include No<br />
Logging, Full Logging, and Summary Log. The choices in the second<br />
column specify whether you choose to overwrite or append the<br />
log file specified in the Log File Name field.<br />
Enter Session Name - In the accompanying field, type a name for<br />
this session. The name will appear as the tab name in the Task<br />
View. If multiple sessions are defined, you may check each session’s<br />
progress by clicking on the appropriate tab.
Sessions<br />
Start Time - Select whether you want this session to begin<br />
immediately or be delayed. If you choose delay, select the time<br />
and date when you would like the session to occur.<br />
Note: The time is based on a 24-hour clock: If you want to start a<br />
session at 10:20 P.M., then you select 22 in the first field and 20<br />
in the second field.<br />
Reboot Station - If you want the station(s) to reboot after the<br />
update session is completed, then select this checkbox.<br />
Note: Neoware-provided updates that require a reboot in order to<br />
be applied properly will reboot the remote thin client appliance(s)<br />
irrespective of this setting.<br />
After you have finished setting the session parameters, click Finish.<br />
The Confirm Session Start dialog will reappear. Depending on the<br />
settings, OK will begin the session immediately or add a new tab in<br />
Task View for a delayed session.<br />
Setting Session Parameters 71<br />
Sessions<br />
Sessions Sessions
Sessions<br />
Task view<br />
72 Task view<br />
Once a session is begun or set as a delayed session, the task view<br />
will appear with each session displayed in its own tabbed dialog.<br />
Clicking on each tab (when more than one task has been defined)<br />
displays the session type, status, log file to be used or created, start<br />
time (or progress if the task is currently running), and details concerning<br />
the appliances to be modified.<br />
Task View<br />
(Session in Progress)
Sessions<br />
Task view actions To select a specific session, select the tab labelled with the session<br />
name. Once you select the tab you will be able to do the following:<br />
Task View<br />
(Delayed Sessions)<br />
Start Time - You can make any delayed sessions begin immediately<br />
by selecting the immediate radio button, and then clicking<br />
the Start button. You can also change the time and date that you<br />
set a delayed session to occur.<br />
Note: The time is based on a 24-hour clock: If you want to start a<br />
session at 10:20 P.M., then you select 22 in the first field and 20<br />
in the second field.<br />
Cancel - You can cancel any session by clicking the cancel button.<br />
Caution: Canceling a session while it is in progress could leave<br />
your appliance in a non-working state.<br />
View Log - Clicking the View Log button while a session is in<br />
progress, or after it has completed, displays the contents of the<br />
log file. The log file contains information about the action performed<br />
on the appliance during the update.<br />
Task view 73<br />
Sessions<br />
Sessions Sessions
Sessions<br />
Switching to the list<br />
view<br />
Adjusting the task<br />
view<br />
74 Task view<br />
Note: The information logged in the log file is controlled by the<br />
type of logging selected in the Set Session Parameters dialog.<br />
The default setting for the type of logging is Summary Log information.<br />
Close - After a session is completed, the Cancel button changes to<br />
Close. Click Close to return to the List View.<br />
While in Task View, you can switch to the List View by selecting<br />
View | List View from the menu bar.<br />
To hide the <strong>ezRemote</strong> <strong>Manager</strong> toolbar or status bar, deselect<br />
them in the View menu.<br />
To change the width of the <strong>ezRemote</strong> <strong>Manager</strong> left window, drag<br />
the bar between it and the main window. Or select Split from the<br />
View menu, and then drag the bar.
CHAPTER 11 Wake on LAN<br />
Operations<br />
Wake on LAN and <strong>ezRemote</strong> <strong>Manager</strong><br />
What is Wake on<br />
LAN?<br />
What does Wake on<br />
LAN do in <strong>ezRemote</strong><br />
<strong>Manager</strong>?<br />
<strong>ezRemote</strong> <strong>Manager</strong> User Manual<br />
This chapter explains how <strong>ezRemote</strong> <strong>Manager</strong> uses Wake on LAN<br />
to power on thin client appliances.<br />
“Wake on LAN” (WOL) is a network technology that enables you<br />
to remotely wake up, or power networked systems “on” for management<br />
tasks — even when they have been powered “off.” WOL<br />
uses a “magic packet” that is sent to the target device using the<br />
device’s MAC address.<br />
<strong>ezRemote</strong> <strong>Manager</strong> allows you to remotely wake powered-off Eon<br />
and Capio thin client appliances using WOL technology. To use<br />
WOL, you must first have displayed (in list view) an asset list that<br />
contains the device(s) you plan to awaken or manage. In most<br />
instances, that will be a saved asset list database you retrieve into<br />
<strong>ezRemote</strong> <strong>Manager</strong> (see “Saving and automatically retrieving asset<br />
lists” on page 24).<br />
<strong>ezRemote</strong> <strong>Manager</strong> incorporates two distinct mechanisms that use<br />
WOL to wake up appliances:<br />
Wake on LAN on demand. Wake up selected appliances, or all<br />
appliances in the current list view, when initiated by <strong>ezRemote</strong><br />
<strong>Manager</strong> user.<br />
Automatic Wake on LAN. Wake up appliances automatically<br />
when they fail to respond to <strong>ezRemote</strong> <strong>Manager</strong> during a task.<br />
75<br />
Wake on LAN Operations<br />
Wake on LAN Operations Wake on LAN Operations
Wake on LAN Operations<br />
Wake on LAN on demand<br />
76 Wake on LAN on demand<br />
You can wake up one or more appliance<br />
selected in the current list view<br />
(right-hand pane):<br />
1 Right-click on a thin client appliance<br />
(or a multiple-device selection)<br />
in the list view.<br />
2 Select Wake-on-LAN from the<br />
pop-up context menu.<br />
3 The unit(s) selected will receive a<br />
Wake on LAN packet from the<br />
<strong>ezRemote</strong> <strong>Manager</strong> server.<br />
Automatic Wake on LAN (Auto Wake on LAN)<br />
You can configure the software to automatically awaken thin client<br />
appliances when they do not respond to <strong>ezRemote</strong> <strong>Manager</strong>. The Auto<br />
WOL setting controls the <strong>ezRemote</strong> <strong>Manager</strong> behavior during all configuration<br />
or software-related tasks. When Auto Wake on LAN is<br />
enabled, and <strong>ezRemote</strong> <strong>Manager</strong> attempts to communicate with an<br />
appliance not responding, the software automatically sends a Wake on<br />
LAN packet to the appliance and waits for it to reboot. Then the software<br />
will attempt to communicate with the appliance again. This cycle<br />
is repeated seven times, then <strong>ezRemote</strong> <strong>Manager</strong> issues a time-out<br />
error and continues with the next appliance in the list (if any).<br />
For example: If a scheduled software update is to take place on a<br />
group of appliances during a period when no user activity is expected,<br />
one or more of the appliances may be powered off. With Auto Wake on<br />
LAN enabled, if any remote appliance does not respond to <strong>ezRemote</strong><br />
<strong>Manager</strong>, the software will: a) send a WOL packet to the appliance, b)<br />
wait for the appliance to reboot, and then c) try to reach the appliance
<strong>ezRemote</strong> <strong>Manager</strong><br />
tasks that work<br />
with by Auto Wake<br />
on LAN<br />
Configuring<br />
automatic Wake on<br />
LAN (Auto WOL)<br />
Wake on LAN Operations<br />
again. If there is still no response, <strong>ezRemote</strong> <strong>Manager</strong> will repeat the<br />
cycle until the remote appliance wakes and responds. If the appliance<br />
doesn’t respond after seven attempts, <strong>ezRemote</strong> <strong>Manager</strong><br />
shows a time-out error in the log, and moves on to the next appliance<br />
in the list to update.<br />
These are the tasks that are affected by the Auto WOL setting:<br />
All Software <strong>Manager</strong> functions (See “CHAPTER 5, Updating<br />
Appliance Software” on page 33)<br />
All Connection <strong>Manager</strong> functions (See “CHAPTER 6, Connection<br />
<strong>Manager</strong>” on page 39)<br />
All Properties <strong>Manager</strong> functions (See “CHAPTER 7, Properties<br />
<strong>Manager</strong>” on page 49)<br />
All Snap-Ins <strong>Manager</strong> functions (See “CHAPTER 8, Snap-In<br />
<strong>Manager</strong>” on page 59)<br />
All ezAnywhere shadowing functions (See “CHAPTER 9, ezAnywhere<br />
Shadowing” on page 63)<br />
Configure Automatic Wake on<br />
LAN (Auto WOL) through the<br />
Auto Wake on LAN dialog:<br />
1 Select Auto Wake-on-LAN from<br />
the Settings menu.<br />
2 In the Auto Wake on LAN dialog,<br />
click Enable to turn on Automatic<br />
Wake on LAN. Click<br />
Ignore to turn off Automatic<br />
Wake on LAN.<br />
3 Click OK to save the setting.<br />
Automatic Wake on LAN (Auto Wake on LAN) 77<br />
Wake on LAN Operations<br />
Wake on LAN Operations Wake on LAN Operations
Wake on LAN Operations<br />
78 Automatic Wake on LAN (Auto Wake on LAN)
<strong>ezRemote</strong> <strong>Manager</strong> User Manual<br />
Appendix A: Broadcast SNMP<br />
and Router Configuration<br />
This appendix discusses router/switch configuration issues with<br />
respect to automatically locating Neoware appliances across subnetted<br />
networks.<br />
<strong>ezRemote</strong> <strong>Manager</strong> access to separate subnets through Cisco routers<br />
<strong>ezRemote</strong> <strong>Manager</strong> uses SNMP (Simple Network Management<br />
Protocol) broadcasts to automatically locate Neoware appliances<br />
on your network (when you click on the Locate button or use the<br />
Actions | Locate menu item). Customers with large, segmented networks<br />
may need to make configuration adjustments (in their routers)<br />
to use the automatic location function for appliances, located<br />
on subnets different from the one on which the <strong>ezRemote</strong> <strong>Manager</strong><br />
server is located.<br />
For <strong>ezRemote</strong> <strong>Manager</strong> to locate and display information about<br />
Neoware appliances (that are running on a subnet different from the<br />
one on which the <strong>ezRemote</strong> <strong>Manager</strong> server is running), two conditions<br />
must be met:<br />
A route must be defined from the server that will be hosting<br />
<strong>ezRemote</strong> <strong>Manager</strong> to the relevant router.<br />
The router must be configured to allow SNMP directed broadcasts<br />
through to the subnet.<br />
For the following examples:<br />
IP Address of <strong>ezRemote</strong> <strong>Manager</strong> server: 10.30.3.16<br />
IP Address of Cisco router: 10.30.1.l<br />
Class A subnet where appliances are located: 100.0.0.0<br />
79<br />
List View
Adding a route to<br />
your server<br />
Subnet mask 255.0.0.0<br />
If your server is not already configured to locate the subnet on which<br />
you are trying to locate Neoware appliances, you can add a route as<br />
follows:<br />
1 Open a Command Prompt window on the <strong>ezRemote</strong> <strong>Manager</strong> server.<br />
2 At the command prompt, type:<br />
route add 100.0.0.0 mask 255.0.0.0 10.30.1.1<br />
which tells the server that any communication with 100.*.*.*<br />
addresses will be forwarded to 10.30.1.1 that is the IP address of<br />
the Cisco router. The router controls access to the 100.*.*.* subnet.<br />
Configuring Router The following example shows a running configuration file for a<br />
Cisco Series 2500 Router (running Version 12.0). It is intended only<br />
as an example, and should be modified with the appropriate network<br />
addressing scheme for your network.<br />
This particular example is set up to only allow SNMP Directed<br />
Broadcasts from the server where <strong>ezRemote</strong> <strong>Manager</strong> is being executed<br />
(10.30.3.16) using a router in our networking laboratory.<br />
NOTE: You should not modify your router configurations without<br />
first consulting your router administrator and/or router documentation.<br />
!<br />
version 12.0<br />
service timestamps debug uptime<br />
service timestamps log uptime<br />
no service password-encryption<br />
!<br />
hostname TRouter<br />
!<br />
enable secret 5 $1$1/Dx$BwQpvgkEIyL0OrT549NA9.<br />
enable password ******<br />
!<br />
80 <strong>ezRemote</strong> <strong>Manager</strong> access to separate subnets through Cisco routers
ip subnet-zero<br />
ip domain-name neoware.com<br />
ip name-server 10.10.10.13<br />
!<br />
!<br />
!<br />
interface Ethernet0<br />
description connected to CorporateNetwork<br />
ip address 10.30.1.1 255.0.0.0<br />
ip directed-broadcast<br />
!<br />
interface Ethernet1<br />
description connected to Test EthernetLAN<br />
ip address 100.30.1.1 255.0.0.0<br />
ip access-group 102 in<br />
ip access-group 152 out<br />
ip directed-broadcast 176<br />
!<br />
interface Serial0<br />
no ip address<br />
no ip directed-broadcast<br />
no ip mroute-cache<br />
shutdown<br />
!<br />
interface Serial1<br />
no ip address<br />
no ip directed-broadcast<br />
shutdown<br />
!<br />
ip classless<br />
!<br />
access-list 102 permit ip any any<br />
access-list 152 permit ip any any<br />
access-list 176 permit udp host 10.30.3.16 any eq 161<br />
access-list 176 deny ip any any<br />
snmp-server community pub RW<br />
<strong>ezRemote</strong> <strong>Manager</strong> access to separate subnets through Cisco routers 81<br />
List View
Relevant Cisco<br />
Router Commands<br />
!<br />
line con 0<br />
transport input none<br />
line aux 0<br />
line vty 0 4<br />
password *******<br />
login<br />
!<br />
end<br />
NOTE: Consult your router manuals and/or Cisco for specific<br />
instructions on how to modify running configurations for a particular<br />
router.<br />
ip directed-broadcast<br />
ip forward-protocol<br />
Extended IP Access List<br />
82 <strong>ezRemote</strong> <strong>Manager</strong> access to separate subnets through Cisco routers
Windows CE ezUpdate<br />
Appendix B: ezUpdate for<br />
Windows CE Appliances<br />
<strong>ezRemote</strong> <strong>Manager</strong> User Manual<br />
This appendix discusses how to use <strong>ezRemote</strong> <strong>Manager</strong> to create the configuration<br />
files needed to automatically update your Windows CE- based<br />
Neoware appliances’ software, properties, and connections.<br />
Both <strong>ezRemote</strong> <strong>Manager</strong> (2.2 or later) and Neoware software,<br />
(incorporating Windows CE (5.2 or later)) contain enhancements<br />
that allow for the automatic server update of appliance software,<br />
appliance configuration properties, and appliance server connections.<br />
These enhancements are collectively called “ezUpdate.”<br />
The use of this feature enables all Neoware Windows CE-based<br />
appliances to pull their configuration and/or software from a server<br />
when they are powered on for the first time. Additionally, each time<br />
the appliance is booted, it will check with the server to see if it<br />
needs to update its configuration and/or software.<br />
Requirements The following is a list of requirements to enable ezUpdate:<br />
One Neoware Windows CE-based appliance configured as a<br />
template.<br />
Access to an FTP server, where configuration and software<br />
update packages can be installed, and to a DHCP server that can<br />
be configured to notify Neoware appliances where to look for<br />
updated configuration information and/or software. The FTP<br />
and DHCP servers can be resident on the same server or on separate<br />
servers.<br />
83<br />
List View
Overview of<br />
procedure<br />
84 Windows CE ezUpdate<br />
All Neoware Windows CE thin client appliances must be the<br />
same model, or have exactly the same hardware/software configuration.<br />
For example: ezUpdate will not work properly in an<br />
environment where some appliances are configured with ICA,<br />
RDP, and TeemTalk, while others are configured with ICA, RDP,<br />
and Internet Explorer.<br />
Using <strong>ezRemote</strong> <strong>Manager</strong>, create property and/or connection<br />
template files from where your appliances update themselves (to<br />
be placed into FTP server file structure).<br />
Using <strong>ezRemote</strong> <strong>Manager</strong>, create a config.txt file to direct your<br />
appliances to the appropriate software and configuration template<br />
files.<br />
If you intend to use the ezUpdate automatic software update<br />
mechanism, then you must download and install a Neoware Software<br />
Windows CE update package.<br />
FTP Server On a FTP server, create a folder to store all of the ezUpdate automatic<br />
update files. These files are:<br />
properties.rgy - automatically updates appliance properties.<br />
connections.rgy - automatically updates appliance connections.<br />
config.txt - This file automatically updates an appliance.<br />
Neoware Windows CE release - These files automatically update<br />
appliance software, and must be stored in a subdirectory named<br />
3000.<br />
DHCP Tag 137 DHCP tag 137 is used to specify the FTP location (URL) of the configuration<br />
and/or software update files. Neoware Windows CE-based<br />
appliances use this tag when they are powered on (if it is provided).<br />
The URL address will depend on the type and setup of the FTP<br />
server format you are running:
For password-protected FTP, the URL should use the following<br />
format:<br />
ftp://username:password@host/path_to_update_file_directory<br />
For anonymous FTP, then the URL should be in the following<br />
format:<br />
ftp://host/path_to_update_file_directory<br />
When using anonymous FTP (and your FTP server resides on the<br />
same machine as your DHCP server), then the URL should be in<br />
the following format:<br />
ftp://@DHCPSERVER/path_to_update_file_directory<br />
Note: FTP filenames and paths should not contain spaces. If the<br />
DHCP server responds with a zero-length value, the automatic configuration<br />
update will be disabled.<br />
Static IP Address To set a Neoware CE thin client appliance to use ezUpdate on a network<br />
where DHCP is not used, the registry settings<br />
[HKLM\Software\Neoware\Netconfig] “BasePath”= “ftp:///neoware”<br />
[HKLM\Software\Neoware\Netconfig] “DefaultBasePath”= “ftp:///neoware”<br />
must be set, where is the IP address of the ezUpdate<br />
server.<br />
Creating a Snap-In:<br />
A snap-in can be created based on the following example to set the<br />
registries in one or more Neoware Windows CE thin client appliances<br />
using <strong>ezRemote</strong> <strong>Manager</strong>:<br />
----- (begin snapin text install.2do) -----<br />
# install.2do for supporting ezUpdate on static IP units<br />
# replace the “” symbol with the IP address of the ezUpdate server.<br />
CMD regmgr -s [HKLM\Software\Neoware\Netconfig] “BasePath” = “ftp:///neoware”<br />
CMD regmgr -s [HKLM\Software\Neoware\Netconfig] “DefaultBasePath”= “ftp:///<br />
neoware/”<br />
CMD reboot<br />
---- (end snapin text install.2do) ----<br />
Windows CE ezUpdate 85<br />
List View
ezUpdate Server Configuration<br />
Basic FTP server<br />
setup<br />
86 ezUpdate Server Configuration<br />
Neoware Windows CE devices can access configuration updates,<br />
properties updates, and software updates from any standard FTP<br />
server. The underlying operating system doesn’t matter. Note: The<br />
following instructions are for setting up ezUpdate on a Windows<br />
2000 server, but can be adjusted for use with other Microsoft Windows<br />
server versions.<br />
The path structure instructions may also be used on Unix/Linux FTP<br />
servers. However, ezUpdate files should not be edited using a Unix<br />
or Linux text editor, because most of those editors remove the \r<br />
(carriage return) character. The removal of the carriage return character<br />
will cause the ezUpdate interpreter in Windows CE to fail.<br />
Make sure the FTP service (daemon) is running. In the<br />
“\Inetpub\Ftproot” directory, create a folder named: “Neoware.”<br />
In the Neoware folder, place the file install.exe that came bundled<br />
with your Neoware CE software. If you are operating with Neoware<br />
6.0.3 software, also place these files: celock.dll, celockwrap.exe,<br />
safenetcopy.exe, regmerge.exe, regretrieve.dll, inputs.txt,<br />
mkregdir.dll and uninsp.dll into that directory. Also, place the newer<br />
install.exe into the directory and overwrite the old one. The Neoware<br />
CE 6.0.3 ezUpdate files are backwards compatible with older versions<br />
of ezUpdate. They provide a more stable update process for all<br />
versions of Neoware’s Windows CE thin client appliances.<br />
Note: Ensure that the Neoware folder -- including all files and folders<br />
contained in that folder -- have permissions set appropriately.<br />
Most ezUpdate setups use anonymous FTP logon with all files and<br />
folders available with read-only access.<br />
Obtain any registry files for connections or properties cloning. The<br />
simplest method is to use <strong>ezRemote</strong> <strong>Manager</strong> to retrieve the properties.rgy<br />
file and connections.rgy files. See “Creating ezUpdate files”<br />
on page 90.
Choosing the right<br />
instruction set<br />
Following this paragraph are three sets of instructions: A, B, and C.<br />
Use the set(s) of instructions indicated according to your Neoware<br />
CE environment:<br />
If you have Windows CE<br />
thin client appliances<br />
running the following<br />
Neoware software release<br />
versions: Complete the instruction set(s)<br />
5.2, 5.3, 5.3.1, or 5.3.2 Instruction Set A (below),<br />
only<br />
5.2, 5.3, 5.3.1, or 5.3.2 and<br />
also units with 6.0, 6.0.1,<br />
6.0.2, or 6.0.3<br />
5.2, 5.3, 5.3.1, or 5.3.2 and<br />
you have units with 6.0, 6.0.1,<br />
or 6.0.2<br />
Instruction Set A (below) and<br />
Instruction Set C (page 89)<br />
Instruction Set B (page 88)<br />
and<br />
Instruction Set C (page 89)<br />
6.0.3 Instruction Set C (page 89),<br />
only.<br />
1Instruction Set A 1 Locate the software update directory for the software you wish<br />
your 5.2, 5.3, 5.3.1, or 5.3.2 units to have installed. This is usually<br />
located in either a subdirectory under a “NeowareSoftware-<br />
Updates” directory or else a subdirectory under your <strong>ezRemote</strong><br />
<strong>Manager</strong> installation. For example:<br />
D:\NeowareSoftwareUpdates\WinCE\WinCE-v532-4-112002\3000<br />
or<br />
F:\Program Files\Neoware\WinCE\software\WinCE-v531-062102-3\3000<br />
2 Copy the 3000 subdirectory into your “(ftproot)/Neoware” directory.<br />
In the 3000 directory, open the system.rev file with Notepad<br />
and copy the contents.<br />
3 In the “(ftproot)/Neoware” directory, create a config.txt file. The<br />
first line of the file should have the format:<br />
SYSTEM “X” LOAD_AND_RUN /REBOOT install.exe 3000<br />
ezUpdate Server Configuration 87<br />
List View
88 ezUpdate Server Configuration<br />
Where X is the contents of the system.rev file.<br />
4 If you have any registry files, most commonly the properties.rgy<br />
and connections.rgy created by <strong>ezRemote</strong> <strong>Manager</strong>, these will be<br />
added to the config.txt file next. For example:<br />
PROPERTIES “November 20, 2002" UPDATE_REGISTRY Properties.rgy<br />
CONNECTIONS “November 20, 2002" UPDATE_REGISTRY /REBOOT<br />
Connections.rgy<br />
There can be many additional registry files, and the date format is<br />
unimportant. However, prior to Neoware Rel. 6.0.3 there is a size<br />
limit of 64 KB per registry file. If the connections.rgy file, for<br />
instance, is 80K, it is possible to manually separate it into a 40K<br />
file connections1.rgy and a 40K connections2.rgy and modify the<br />
config.txt:<br />
PROPERTIES “November 20, 2002" UPDATE_REGISTRY Properties.rgy<br />
CONNECTIONS1 “November 20, 2002" UPDATE_REGISTRY /<br />
REBOOT Connections1.rgy<br />
CONNECTIONS2 “November 20, 2002" UPDATE_REGISTRY /<br />
REBOOT Connections2.rgy<br />
Instruction Set B To synchronize ezUpdate’s behavior for Neoware Releases 6.0,<br />
6.0.1, 6.02, and 6.0.3, an extra update process is necessary.<br />
1 In the “(ftproot)/Neoware” folder on the ezUpdate server, create a<br />
folder with the name “3000.”<br />
2 In the “(ftproot)/Neoware” directory also place a config.txt file<br />
with the text:<br />
SYSTEM “X” LOAD_AND_RUN /REBOOT install.exe 3000<br />
Where the value of “X” will be explained in step 3.<br />
Note: If you have a mixed environment with 5.3, 5.3.1, or 5.3.2<br />
units, this extra update MUST contain a full update of that software.
For example: If you possess units that are running 5.3.2 software,<br />
the update must be a correctly configured update of that software<br />
and X should be the contents of the 5.3.2 software system.rev file.<br />
The 3000 directory must contain the correct update files, as<br />
detailed under Instruction Set A.<br />
If you do not possess any units running 5.3, 5.3.1, or 5.3.2 software,<br />
the “X” value in the config.txt can have any value you want<br />
(e.g. “test”) and the 3000 subdirectory may remain empty.<br />
Instruction Set C 1 Create a subdirectory in the “(ftproot)/Neoware” directory named<br />
“CeNet.”<br />
2 Follow steps 1 through 5 under the Instruction Set A with two<br />
changes:<br />
A. Place all of the files and folders generated into the CeNet subdirectory.<br />
Instead of neoware/3000, neoware/config.txt, neoware/<br />
connections.rgy, and neoware/properties.rgy, the set up will<br />
involve neoware/cenet/3000, neoware/cenet/config.txt”, neoware/<br />
cenet/connections.rgy, and neoware/cenet/properties.rgy.<br />
B. Change the references in the config.txt file accordingly to<br />
reflect the new directory structure. Instead of a config.txt in the<br />
format:<br />
SYSTEM “6.0.3 (Built on Feb 20 2002 at 21:06:07)” LOAD_AND_RUN /<br />
REBOOT install.exe 3000<br />
PROPERTIES “November 20, 2002" UPDATE_REGISTRY /REBOOT<br />
Properties.rgy<br />
CONNECTIONS “November 22, 2002" UPDATE_REGISTRY Connections.rgy<br />
The new config.txt would have the format:<br />
SYSTEM “6.0.3 (Built on Feb 20 2002 at 21:06:07)” LOAD_AND_RUN /<br />
REBOOT install.exe CeNet/3000<br />
PROPERTIES “November 20, 2002" UPDATE_REGISTRY /REBOOT<br />
CeNet/Properties.rgy<br />
CONNECTIONS “November 22, 2002" UPDATE_REGISTRY CeNet/<br />
Connections.rgy<br />
ezUpdate Server Configuration 89<br />
List View
Creating ezUpdate files<br />
properties.rgy This plain-text file contains a full description of the Neoware appliance<br />
properties that you would like to be automatically set. This<br />
includes settings such as display, keyboard, screen saver, overall<br />
security, etc. To create the properties.rgy file:<br />
90 Creating ezUpdate files<br />
1 Using <strong>ezRemote</strong> <strong>Manager</strong>, locate the appliance with the properties<br />
that you would like to use as a template.<br />
2 Select the template appliance in the List View and click the Properties<br />
button in the <strong>ezRemote</strong> <strong>Manager</strong> toolbar, or select Properties<br />
from the Actions menu bar item.<br />
3 When the Neoware Appliance Properties tabbed dialog appears,<br />
select the template appliance from the list of appliances on the<br />
left-hand side.<br />
4 Click the Get button.<br />
When <strong>ezRemote</strong> <strong>Manager</strong> finishes uploading the appliance’s<br />
properties, the Save As button will become active.<br />
5 Click the Save As button.<br />
The Save As dialog will open.<br />
6 Browse to either the FTP directory or a temporary directory and<br />
click the Save button.<br />
In order for ezUpdate to function properly, this file must be placed in<br />
the FTP directory to which the DHCP tag 137 specifies.<br />
connections.rgy This plain-text file contains a full description of the Neoware appliance<br />
server connection to be automatically set. To create the connections.rgy<br />
file:<br />
1 Using <strong>ezRemote</strong> <strong>Manager</strong>, locate the appliance with the connections<br />
to be used as a template.<br />
2 Select the template appliance in the List View and click the Con-
nections button in the <strong>ezRemote</strong> <strong>Manager</strong> toolbar, or select Connections<br />
from the Actions menu bar item.<br />
3 When the Neoware Appliance Connection <strong>Manager</strong> appears,<br />
select the template appliance from the list of appliances on the<br />
left-hand side.<br />
4 Click the Get button.<br />
When <strong>ezRemote</strong> <strong>Manager</strong> finishes uploading the appliance’s connections,<br />
the Save As button will become active.<br />
5 Click the Save As button.<br />
The Save As dialog will open.<br />
6 Browse to either the FTP directory or a temporary directory and<br />
click the Save button.<br />
For ezUpdate to function properly, this file must be placed in the<br />
FTP directory the DHCP tag 137 specifies.<br />
config.txt This file describes the software, connection, and property configuration<br />
versions available on the FTP server for appliances to download.<br />
To create the config.txt file:<br />
1 Select Auto Update from the Actions menu.<br />
The Create Auto Update Configuration dialog will open.<br />
2 In the Enter Auto Update Directory field, specify the FTP directory<br />
to which DHCP tag 137 points (the URL path as it appears in<br />
the DHCP tag).<br />
This entry must include the full path on the FTP server specified.<br />
3 In the Software Version field, specify the name of the folder containing<br />
the Neoware Windows CE software. “3000” is the default<br />
name for this folder.<br />
4 In the Properties Registry File field specify both the name of the<br />
properties.rgy file located in the FTP directory (by default, “properties.rgy”),<br />
and the version in the accompanying Version field.<br />
Creating ezUpdate files 91<br />
List View
92 Creating ezUpdate files<br />
If a Properties Registry File is specified, <strong>ezRemote</strong> <strong>Manager</strong> will<br />
verify that this file exists in the Auto Update FTP directory, and<br />
that the associated version field is filled in when the OK button is<br />
clicked. The specified version is used to determine whether the<br />
thin client’s properties should be updated. By default, the current<br />
date is filled in.<br />
5 In the Connections Registry File dialog, specify both the name of<br />
the connections.rgy file located in the FTP directory (by default,<br />
“connections.rgy”), and the version in the accompanying Version<br />
field.<br />
If a Connections Registry File is specified, <strong>ezRemote</strong> <strong>Manager</strong><br />
will verify that this file exists in the Auto Update FTP directory<br />
and that the associated version field is filled in when the OK button<br />
is clicked. The specified version is used to determine whether<br />
the thin client’s connections should be updated. By default, the<br />
current date is filled in.<br />
6 Click the OK button to create the config.txt file.
ezUpdate and NeoLinux<br />
<strong>ezRemote</strong> <strong>Manager</strong> User Manual<br />
Appendix C: ezUpdate for<br />
NeoLinux Appliances<br />
This appendix explains how to set up ezUpdate for automatic updates to<br />
your NeoLinux based Neoware thin client appliances’ software, properties,<br />
and connections.<br />
Both <strong>ezRemote</strong> <strong>Manager</strong> (2.3 and later) and Neoware NeoLinux<br />
Software (2.2 and later) contain enhancements that allow the automatic<br />
server update of thin client appliance software, appliance<br />
configuration properties, and appliance server connections. These<br />
enhancements are collectively called “ezUpdate.”<br />
The use of this feature enables all NeoLinux-based appliances to<br />
automatically download configurations and/or software from a<br />
server (the “ezUpdate server”) when they are powered on for the<br />
first time, or when powered on for the first time in a new location.<br />
Each time the appliance boots thereafter, it checks with the server<br />
to see if there is a newer configuration or a software package download.<br />
ezUpdate for NeoLinux can be used with the following models:<br />
Capio 500 Series<br />
Eon Preferred 2000 Series<br />
Eon Preferred 4000 Series<br />
Eon Professional 4300 Series<br />
Eon Prestige NeoLinux Series<br />
93<br />
List View
Requirements The requirements to enable ezUpdate.<br />
NeoLinux ezUpdate<br />
server package<br />
installation<br />
94 ezUpdate and NeoLinux<br />
Either an FTP or an NFS server<br />
The NeoLinux ezUpdate Server Package from the Neoware Web<br />
site. The NeoLinux ezUpdate Server Package can be found at:<br />
http://www.neoware.com/downloads/<br />
One or more NeoLinux software update packages downloaded<br />
from http://www.neoware.com/downloads/ if full-image software<br />
updates are to be distributed with ezUpdate.<br />
Property and/or connection template files created with <strong>ezRemote</strong><br />
<strong>Manager</strong> if properties or connections settings are to be distributed<br />
with ezUpdate<br />
One or more NeoLinux software snap-in packages downloaded<br />
from http://www.neoware.com/downloads/ or created by the customer<br />
if modular software snap-in updates are to be distributed<br />
with ezUpdate.<br />
The NeoLinux ezUpdate server package contains a file tree with a<br />
specific structure and scripts that the ezUpdate client in NeoLinux<br />
appliances needs to use for automatic updates. Download the ezUpdate<br />
server package (a zip file) from Neoware’s Web site and extract<br />
the files.<br />
The file tree must be placed within the directory on the FTP or NFS<br />
server to which ezUpdate will be pointed. This directory will be<br />
referred-to here as the “ezUpdate directory.”<br />
NeoLinux ezUpdate Server Package<br />
Installed on Windows FTP Server
Configuring<br />
ezUpdate via DHCP<br />
Manually<br />
configuring<br />
ezUpdate on the<br />
client<br />
A Dynamic Host Configuration Protocol (DHCP) server may be<br />
configured to provide Neoware thin client appliances with the location<br />
(URL) of the ezUpdate server and files (the ezUpdate directory).<br />
Although ezUpdate can be configured to use any DHCP tag<br />
number, by default ezUpdate is configured to use DHCP tag 137.<br />
The ezUpdate DHCP tag (by default, tag 137) may be set on your<br />
DHCP server to specify the FTP or NFS location (URL) of configuration<br />
and/or software update files. If provided by DHCP, NeoLinux<br />
thin client appliances will use the URL to check for updated configuration<br />
files or updated software files at every bootup.<br />
The syntax of the URL address provided in the ezUpdate DHCP tag<br />
depends on the type and setup of the ezUpdate server you are using.<br />
For password-protected FTP, the URL should be in the following<br />
format:<br />
ftp://username:password@host/path_to_ezupdate_directory<br />
For anonymous FTP, the URL should be in the following format:<br />
ftp://host/path_to_ezupdate_directory<br />
If you are using anonymous FTP, and your FTP server resides on the<br />
same machine as your DHCP server, the URL should be in the following<br />
format:<br />
ftp://@DHCPSERVER/path_to_ezupdate_directory<br />
For an NFS server, the URL should be in the following format:<br />
nfs://host/path_to_ezupdate_directory<br />
On an NFS server, the ezUpdate directory should be shared for all<br />
users, read-only access.<br />
If DHCP is not used to provide the path information to the ezUpdate<br />
directory, that information may be entered in the NeoLinux client<br />
setup interface. Even if DHCP is used, the NeoLinux client ezUpdate<br />
configuration may be set to ignore the DHCP setting.<br />
To manually configure ezUpdate on the NeoLinux thin client appliance:<br />
ezUpdate and NeoLinux 95<br />
List View
96 ezUpdate and NeoLinux<br />
From the ezConnect Connection <strong>Manager</strong> screen, press F2 or<br />
from the Settings menu select Appliance properties | Network.<br />
On the Network Settings dialog, click ezUpdate Settings. The<br />
ezUpdate Settings dialog will appear.<br />
To enable ezUpdate, click checkbox: Enable automatic configuration<br />
and software updates (enabled by default).<br />
To enable manual configuration of ezUpdate, uncheck Override<br />
manual settings with DHCP tag and check Specify manual settings.<br />
The protocol (NFS or FTP), server address, and ezUpdate directory<br />
may be specified in the fields provided. If a username and<br />
password are required to access the server, they may be provided,<br />
also.<br />
Click OK and OK again on the Network Settings dialog to restart<br />
the thin client appliance’s networking with the new settings.
Using ezUpdate to distribute NeoLinux software update packages<br />
Software update packages are provided by Neoware as downloads<br />
from the Web site. The download packages that are pushed to the<br />
thin client appliances using <strong>ezRemote</strong> <strong>Manager</strong> may also be distributed<br />
from ezUpdate server(s). The following steps should be followed<br />
to enable ezUpdate distribution of software update packages:<br />
1 Download the appropriate NeoLinux software update package<br />
from http://www.neoware.com/downloads/.<br />
2 Using the license key provided by Neoware, install the software<br />
update package on the <strong>ezRemote</strong> <strong>Manager</strong> server. By default,<br />
NeoLinux software update packages install to<br />
3 Copy all of the software update package files from the installation<br />
directory to the appropriate (see the table below) ezUpdate<br />
directory on your FTP or NFS server.<br />
You are now set to have your appliances automatically update their<br />
embedded NeoLinux software.<br />
Using ezUpdate to distribute NeoLinux configurations<br />
Updating<br />
connections and<br />
properties<br />
NeoLinux Software Update<br />
Package (Flash Disk Size)<br />
ezUpdate Directory (Path)<br />
8 MB nl/software/NL-1<br />
16 MB nl/software/NL-2<br />
32, 48, 64 MB nl/software/NL-3<br />
To automatically update appliances’ connection and/or properties<br />
you need to begin by creating a profile. This is accomplished by adding<br />
a new profile folder directory to the NeoLinux ezUpdate directory<br />
(nl/profile/). This folder will contain the<br />
necessary files for automatically updating your appliance connec-<br />
Using ezUpdate to distribute NeoLinux software update packages 97<br />
List View
tions and properties. These files include: install.nl, version.profile,<br />
connections.rgy, and properties.rgy.<br />
install.nl To include install.nl in your profile directory, simply copy the<br />
install_profile_image.template file (found in the NeoLinux ezUpdate<br />
directory in the templates folder) into your profile directory and<br />
rename it install.nl.<br />
Version file The ezUpdate process uses the version file to determine if a<br />
NeoLinux appliance needs to be updated. The version file is a plaintext<br />
file that can contain any value.<br />
When an administrator makes a change to the profile configuration<br />
files, changing the value contained within the version file will notify<br />
NeoLinux appliances that an update is required at bootup. The version<br />
file must be named: “version.profile.”<br />
Configuration files To create the necessary configuration files, first set up a template or<br />
source appliance with the connections and/or properties that you<br />
want to copy to your other appliances.<br />
This can be done at the appliance itself, or can be done by shadowing<br />
the appliance using <strong>ezRemote</strong> <strong>Manager</strong> (see “ezAnywhere Shadowing”<br />
on page 63). Once you have set up the template appliance,<br />
you need to create the ezUpdate connections.rgy and properties.rgy<br />
files.<br />
Note: Unless you use the default “factory” profile, be sure to set the<br />
“Appliance Profile” in the thin client appliance’s ezUpdate dialog.<br />
The Appliance Profile name must exactly match the profile directory<br />
name. For more information on setting the Appliance Profile name,<br />
see “Manually configuring ezUpdate on the client” on page 95.<br />
properties.rgy This plain-text file contains the configuration settings (appliance<br />
properties -- such as time zone, monitor resolution, printer defini-<br />
98 Using ezUpdate to distribute NeoLinux configurations
tions, etc.) that you would like to be automatically copy to other<br />
appliances.<br />
1 Using <strong>ezRemote</strong> <strong>Manager</strong>, locate the template appliance (the one<br />
you have configured with the properties to be copied to other<br />
appliances).<br />
2 Select the template source appliance in the list view, and click the<br />
Properties button in the <strong>ezRemote</strong> <strong>Manager</strong> toolbar, or select<br />
Properties from the Actions menu bar item.<br />
3 When the <strong>ezRemote</strong> <strong>Manager</strong> Properties <strong>Manager</strong> interface<br />
appears, select the template appliance from the list of appliances<br />
on the left-hand side.<br />
4 Click the Get button.<br />
When <strong>ezRemote</strong> <strong>Manager</strong> finishes uploading the appliance’s<br />
properties, the Save As button will become active.<br />
5 Click the Save As button.<br />
The Save As dialog will open.<br />
6 Browse to either the FTP or NFS directory or a temporary directory<br />
and click the Save button.<br />
The properties.rgy file created by this process must reside within a<br />
profile directory of the ezUpdate directory.<br />
connections.rgy This plain-text file contains the configuration settings for each server<br />
connection (entry in the ezConnect Connection <strong>Manager</strong>) that is to<br />
be copied automatically to other appliances.<br />
1 Using <strong>ezRemote</strong> <strong>Manager</strong> locate the template appliance with the<br />
connections that are to be copied to other appliances.<br />
2 Select the template appliance in the list view, and click the Connections<br />
button in the <strong>ezRemote</strong> <strong>Manager</strong> toolbar, or select Connections<br />
from the Actions menu bar item.<br />
3 When the <strong>ezRemote</strong> <strong>Manager</strong> Connection <strong>Manager</strong> appears,<br />
select the template appliance from the list of appliances on the<br />
left-hand side.<br />
Using ezUpdate to distribute NeoLinux configurations 99<br />
List View
Setting the<br />
appliances for<br />
ezUpdate<br />
4 Click the Get button.<br />
When <strong>ezRemote</strong> <strong>Manager</strong> finishes uploading the appliance’s connections,<br />
the Save As button will become active.<br />
5 Click the Save As button.<br />
The Save As dialog will open.<br />
6 Browse to either the FTP or NFS profile directory or a temporary<br />
directory and click the Save button.<br />
The connections.rgy file that is created by this process must reside<br />
within the profile directory of the ezUpdate directory on the FTP or<br />
NFS server.<br />
Automatically applying an ezUpdate profile to your network appliances<br />
requires the appliances to be set to look for the appropriate<br />
profile.<br />
1 Using <strong>ezRemote</strong> <strong>Manager</strong>, locate all of the appliances that you<br />
wish to use the ezUpdate profile.<br />
2 Select these appliances in the list view, and click the Snap-Ins<br />
button in the <strong>ezRemote</strong> <strong>Manager</strong> toolbar, or select Snap-Ins from<br />
the Actions menu bar item.<br />
3 When the Snap-In <strong>Manager</strong> appears, click the Command radio<br />
button to activate the Command field.<br />
4 In the Command field, type<br />
sh -s “”<br />
The quotation marks are required whenever the profile name contains<br />
a space. Replace with the name given to<br />
the specific NeoLinux ezUpdate profile.<br />
Note: The of this NeoLinux ezUpdate profile<br />
must have the same name as the profile folder added to the<br />
NeoLinux ezUpdate directory on the NFS or FTP server (see<br />
“Updating connections and properties” on page 97).<br />
5 Click the Browse button next to the Optional Input field, locate<br />
the file named install_profile.sh and click Open.<br />
100 Using ezUpdate to distribute NeoLinux configurations
Type the command<br />
to set the profile<br />
name.<br />
Specify the full<br />
path of the<br />
install_profile.sh<br />
file.<br />
Note: The install_profile.sh shell script file is located in the<br />
directory to which <strong>ezRemote</strong> <strong>Manager</strong> was installed. By default,<br />
this file is located in C:/Program Files/Neoware/ezRM/<br />
install_profile.sh.<br />
6 Click the OK button to set the appliances to request the automatic<br />
profile ezUpdate.<br />
7 When the Confirm Session Start dialog appears, click Properties<br />
to set the session parameters (see “Setting Session Parameters” on<br />
page 69), OK to begin the session immediately, or Cancel.<br />
Note: If you choose to make the session delayed in the Set Session<br />
Parameters dialog, clicking the OK button will add the<br />
delayed session to the Task View instead of beginning the session<br />
immediately.<br />
You are now set to have your appliances automatically update their<br />
connections and/or properties.<br />
Using ezUpdate to distribute NeoLinux configurations 101<br />
List View
ezUpdate Advanced Topics<br />
Snap-ins ezUpdate also can be used to install snap-ins. The snap-in can be set up as<br />
part of an automatic software update, or as part of an automatic profile<br />
update. It can also be installed separately by either method.<br />
Snap-ins generally come with an install.nl script that is used to direct the<br />
thin client appliance’s installation of the snap-in files. However, the script<br />
that governs the ezUpdate process does not contain a way to identify and<br />
use the snap-in install.nl. To add snap-ins using ezUpdate, you must customize<br />
one of the ezUpdate scripts (a server file with .nl extension). Adding<br />
the line<br />
netconfig -p <br />
directs ezUpdate to jump into the directory and continue installing<br />
files that are located there.<br />
For example, suppose you have defined a profile named “web_kiosk” and<br />
you want to install the “French Netscape” snap-in as part of this profile.<br />
After making sure the files are on the server, you must edit the profile's<br />
install.nl file to direct it to also install the “French Netscape.” If this snap-in<br />
is stored in a sub-directory named “fr-ns” then you must add the following<br />
line to the profile's install.nl:<br />
102 ezUpdate Advanced Topics<br />
netconfig -p fr-ns
ezUpdate and Windows XPe<br />
Suggested<br />
implementations<br />
<strong>ezRemote</strong> <strong>Manager</strong> User Manual<br />
Appendix D: ezUpdate for<br />
Windows XPe Appliances<br />
This appendix explains how to set up ezUpdate for automatic updates to<br />
your Windows XPe-based Neoware appliance software.<br />
<strong>ezRemote</strong> <strong>Manager</strong> Rel. 2.4.2 (and later) and Neoware’s implementation<br />
of Microsoft Windows XP Embedded (XPe) Rel. 1.2<br />
(and later) contain enhancements that allow for the automatic<br />
server update of appliance software images and appliance software<br />
snap-ins. These enhancements collectively are called “ezUpdate.”<br />
Once enabled, ezUpdate can work with your XPe-based thin client<br />
appliances to automatically download software from a server (the<br />
“ezUpdate server”) when they are initially installed and powered<br />
on for the first time. In addition, each time the appliance boots, it<br />
checks with the server to see if there is a newer version of software<br />
that should be downloaded.<br />
Easy configuration of brand-new Windows XPe thin client<br />
appliances (plug-and-work installation) -- by configuring DHCP<br />
to provide ezUpdate information to new XPe thin clients, installation<br />
can be as simple as plugging in all of the connections.<br />
Set and use multiple profiles for XPe thin client appliances used<br />
in different roles<br />
Easy roll-out of snap-ins to in-place XPe thin client appliances<br />
103<br />
List View
104 ezUpdate and Windows XPe<br />
Easy roll-out of software updates to in-place XPe thin client<br />
appliances<br />
Combine with Enhanced Write Filter for ultimate lock-down<br />
security of the desktop operating system<br />
Requirements Following is a list of requirements to enable ezUpdate for Windows<br />
XPe:<br />
An FTP server<br />
The Windows XPe ezUpdate FTP Server Package (download<br />
from the Neoware Web site:<br />
http://www.neoware.com/downloads/)<br />
For image updates: Either download and install a Neoware XPe<br />
software update package, or use <strong>ezRemote</strong> <strong>Manager</strong> to create one<br />
or more master software images that will be used to update<br />
devices<br />
For snap-ins: Either download and install a Neoware XPe software<br />
snap-in package, or create one or more software snap-ins<br />
that will be used to update devices<br />
Options A DHCP server can provide XPe thin client appliances with the<br />
information about where to look for an ezUpdate server<br />
Profiles for different XPe thin client appliance configurations can<br />
be created and managed on the FTP server<br />
DHCP tag 137 DHCP tag 137 can be set on your DHCP server to specify the FTP<br />
location (URL) of the ezUpdate files. The URL address will depend<br />
on the type and setup of the ezUpdate server you are using.<br />
For password protected FTP, the URL should be in the following<br />
format:<br />
ftp://username:password@hostname_or_ip_address<br />
For anonymous FTP, the URL should be in the following format:<br />
ftp://hostname_or_ip_address
FTP server setup<br />
XPe ezUpdate<br />
server package<br />
Note: Do not include any trailing slash (“/”) or path information<br />
after the hostname or IP address in the URL. ezUpdate will add path<br />
information to the URL text when attempting to contact the server.<br />
The XPe ezUpdate server package contains scripts and a specific<br />
directory structure required for automatically updating XPe appliances.<br />
The package is a self-extracting Windows executable file that<br />
requires a license key for installation.<br />
Although this structure may be unpacked using any Windows operating<br />
system, the target for the packaged directory tree is the root<br />
directory of the FTP server to which the DHCP tag 137 points (or to<br />
which the XPe thin client appliance is manually directed).<br />
Note: The package must be installed at the root of the FTP server’s<br />
file system in order to function properly. For example, on a default<br />
FTP server setup 105<br />
List View
106 FTP server setup<br />
Windows server installation, the package would be installed to<br />
C:\Inetpub\ftproot\.<br />
A folder is provided<br />
for each<br />
supported<br />
Flash disk size<br />
on Neoware<br />
XPe thin client<br />
appliances<br />
The “factory”<br />
profile is the<br />
default for each<br />
Flash disk size.<br />
Other profiles<br />
can be added<br />
for different<br />
configurations.<br />
The package contains the following directories and files:<br />
Folder / File Description<br />
\neoware Folder: Top level of Neoware ezUpdate<br />
file structure: This folder should<br />
be located in the FTP server’s root<br />
directory.<br />
\xpe Folder: Contains ezUpdate folders<br />
associated with Windows XPe thin<br />
client appliances. Other Neowaresupported<br />
operating system ezUpdate<br />
file systems can be installed at<br />
this level.
Folder / File Description<br />
\[size] Folder: Four folders are located at<br />
this level, each one named for the<br />
size in megabytes of the Flash disk<br />
associated with the ezUpdate-managed<br />
XPe thin client appliance for<br />
which it is intended. “[size]” is<br />
replaced by:<br />
128 For 128 MB Flash disk<br />
devices<br />
192 For 192 MB Flash disk<br />
devices<br />
192FP For 192 MB Eon Prestige<br />
XPe flat-panel integrated<br />
devices<br />
256 For 256 MB Flash disk<br />
devices<br />
\factory Profile Folder: This folder is the<br />
factory-default profile container. By<br />
default, XPe thin client appliances<br />
will access the configuration files<br />
located in this folder. Additional<br />
profile folders can be added at the<br />
same level for use by appliances that<br />
are specifically configured to use a<br />
different profile.<br />
\1 File: The version file: Only the name<br />
of the file is important. It can be a<br />
zero KB (empty) file.<br />
Tip: Do not use “0” (zero) as the<br />
version file name, since the client<br />
software utilizes “0” to force an<br />
image update.<br />
FTP server setup 107<br />
List View
108 FTP server setup<br />
Folder / File Description<br />
\snapins.txt File: This file contains the name for<br />
each snap-in you wish to maintain as<br />
part of the profile. If no snap-ins are<br />
to be part of the profile, this file<br />
should be empty.<br />
Each snap-in name must occupy a<br />
single line in the snapins.txt file. An<br />
entry: “Citrix ICA Client<br />
v6.31.1051” (without the quotes) in<br />
snapins.txt requires that the snap-in<br />
folder \neoware\xpe\shared\snapins\Citrix<br />
ICA Client v6.31.1051<br />
exist on your FTP server.<br />
\image.dd File: This is the image file that will<br />
be used for the profile when a full<br />
image update is requested. The<br />
image file can be a standard update<br />
file downloaded from Neoware’s<br />
Web site, or a customer-created configuration<br />
created with <strong>ezRemote</strong><br />
<strong>Manager</strong>.<br />
Note: The ezUpdate Update Version<br />
in the image.dd MUST MATCH the<br />
version file name or else the XPe<br />
appliances will reboot and perform<br />
the ezUpdate image update continuously.<br />
\shared Folder: This folder contains shared<br />
resources used by all XPe ezUpdates.<br />
\d_drive Folder: This folder contains the<br />
scripts used when performing full<br />
image updates.<br />
\snapins Folder: This folder is provided for<br />
snap-ins, each in its own directory.
How XPe ezUpdate functions<br />
Boot time check for<br />
updated software<br />
When an ezUpdate-enabled XPe thin client appliance boots up<br />
(whether a soft reboot or a power cycle), an ezUpdate service runs in<br />
the appliance. ezUpdate is enabled as the default.<br />
The ezUpdate service runs even if no user is logged in.<br />
If DHCP has provided the XPe appliance with an ezUpdate FTP<br />
server name in tag 137 (see “DHCP tag 137” on page 104), then<br />
the ezUpdate service uses that server name.<br />
If the XPe appliance has been configured to ignore tag 137 and<br />
has been configured with a server name using the ezUpdate Control<br />
Panel applet, then the ezUpdate uses that server name.<br />
If no server name is provided, the ezUpdate service exits.<br />
For more information about the ezUpdate Control Panel applet,<br />
see “ezUpdate Control Panel” on page 33 of the User Manual for<br />
Thin Client Appliances with Microsoft Windows XP Embedded<br />
Operating System, Rel. 1.2.<br />
The ezUpdate service uses the following to create a query to the<br />
ezUpdate server:<br />
The ezUpdate server name (or IP address)<br />
The Flash disk size (in megabytes)<br />
The profile name (by default, “factory”)<br />
For example, for a 256 MB Flash disk device accessing the<br />
ezUpdate server named “EZSERVER” with default ezUpdate<br />
settings in the thin client appliance, the service attempts to<br />
access ftp://EZSERVER/neoware/xpe/256/factory/image.dd<br />
If an image.dd file is found, then the ezUpdate service attempts to<br />
access a version file matching its Update Version setting. For the<br />
Update Version setting of “1” (the default), the service attempts<br />
to access ftp://EZSERVER/neoware/xpe/256/factory/1. If the matching<br />
version file name is not found, then ezUpdate initiates a software<br />
update using the image.dd file located in the folder.<br />
How XPe ezUpdate functions 109<br />
List View
Starting ezUpdate<br />
after the initial<br />
boot-up<br />
Simple XPe ezUpdate example<br />
Step 1. Install the<br />
XPe ezUpdate<br />
package<br />
110 Simple XPe ezUpdate example<br />
If an image.dd file is not found, or if the matching version file<br />
name is found, then the ezUpdate service accesses the snapins.txt<br />
file located in the directory. For example, continuing the example<br />
above, the service downloads ftp://EZSERVER/neoware/xpe/256/<br />
factory/snapins.txt<br />
The ezUpdate service next compares the snap-in names contained<br />
in snapins.txt with names located in the XPe appliance’s registry<br />
Uninstall information. If no new or updated snap-ins are found to<br />
be installed, the ezUpdate service exits.<br />
If snap-ins are named in the snapins.txt file that are not found in<br />
the registry, then the ezUpdate service installs the snap-in(s).<br />
When the ezUpdate service determines that the image and snapins<br />
are up-to-date, the service turns itself off to conserve<br />
resources.<br />
The ezUpdate service can be restarted manually in the XPe thin client<br />
appliance (in the ezUpdate control panel applet) or the unit can<br />
be rebooted.<br />
The following example assumes that XPe thin client appliances will<br />
be managed by the ezUpdate server on a single subnet. All of the<br />
XPe appliances are 192 MB Eon Professional thin client appliances.<br />
In this example, DHCP will not be used. The FTP server has an IP<br />
address of 10.10.80.10 and has a Windows share named c_drive.<br />
Download the XPe ezUpdate FTP Server Package to a Windows<br />
PC or server.<br />
In Windows Explorer, double-click on the server package.<br />
Using the license key provided by e-mail after the download,<br />
install the update package to the FTP server. In this case, install<br />
the package to: \\10.10.80.10\c_drive\Inetpub\ftproot
Step 2. Set up a<br />
“standard” XPe<br />
configuration<br />
Step 3. Save the<br />
“standard” image<br />
to the ezUpdate<br />
server<br />
After the package is installed, there will be a new folder named<br />
\\10.10.80.10\c_drive\Inetpub\ftproot\neoware<br />
Configure one of the XPe thin client appliances exactly as you<br />
wish all others to be configured.<br />
Open the ezUpdate control panel applet (as Administrator) and:<br />
Deselect checkbox: Get Server Path URL from DCHP tag …<br />
Select checkbox: Enable automatic configuration and software<br />
updates<br />
Enter in FTP Server: ftp://10.10.80.10<br />
Change the Update Version to: 2<br />
Click Save<br />
Click Cancel to exit<br />
Log out of the XPe thin client appliance.<br />
Use <strong>ezRemote</strong> <strong>Manager</strong> to copy the “standard” XPe image from<br />
the appliance configured in Step 2, above (see “XPe/NTe software<br />
cloning” on page 35).<br />
Simple XPe ezUpdate example 111<br />
List View
Step 4. Update the<br />
Update Version File<br />
name<br />
Step 5. Apply the<br />
initial update<br />
XPe ezUpdate Advanced Topics<br />
Profiles for XPe<br />
ezUpdate<br />
112 XPe ezUpdate Advanced Topics<br />
Copy the cloned image to the FTP server and rename the image:<br />
“image.dd” (\\10.10.80.10\c_drive\Inetpub\ftproot\neoware\xpe\192\factory\image.dd)<br />
Rename the version file name to: “2”<br />
Note: This is to match the Update Version set in Step 2, above. If<br />
the version file name does not match the Update Version setting<br />
that is contained in image.dd, then the XPe appliances will reboot<br />
and run ezUpdate image update continuously. The default Update<br />
Version setting in software update packages distributed by<br />
Neoware is “1.”<br />
Reboot the thin client appliances<br />
Profiles are a mechanism for maintaining separate configurations for<br />
otherwise identical Neoware XPe thin client appliances. You can add<br />
as many profiles as you like, but should always leave the \factory<br />
profile intact. Once configured to use a specific profile, at boot-up<br />
the XPe appliance looks to the profile folder for a new image file,<br />
and for new or updated snap-ins.<br />
To create a new profile, add a folder at the same level as the appropriate<br />
\factory folder and name the new folder the name of the profile.<br />
For example: A profile for call-center XPe thin client appliances<br />
(256 MB Flash disk models) might be “callcenter.” The full pathname<br />
to the folder would thus be: ftp://servername/neoware/xpe/<br />
256/callcenter<br />
The \callcenter folder should contain these files: 1 (or other update<br />
version file name), snapins.txt, and optionally image.dd. The version<br />
file should be named the same as the Update Version setting in the
Snap-ins for XPe<br />
ezUpdate<br />
image file, otherwise each XPe thin client with the “callcenter” profile<br />
name will load new software on every reboot.<br />
The snapins.txt file is a plain text file (empty by default) that is used<br />
to describe the list of snap-ins that are to be installed on each ezUpdate-managed<br />
XPe thin client appliance. If a snap-in is listed in<br />
snapins.txt but not installed in the ezUpdate-enabled appliance, at<br />
boot-up the ezUpdate service attempts to perform the snap-in installation<br />
from \neoware\xpe\shared\snapins, in a folder with the name<br />
of the not-installed snap-in.<br />
snapins.txt: Snap-in names should appear one per line, exactly the<br />
same as the folder name in the \neoware\xpe\shared\snapins directory.<br />
Commas are illegal characters in the ezUpdate snap-in names.<br />
Function of snap-ins for XPe ezUpdate<br />
When checking to see if any snap-ins need to be installed/<br />
updated, the ezUpdate server’s snapins.txt file is compared to the<br />
XPe thin client appliance’s registry containing Uninstall information:<br />
the DisplayName key.<br />
If snapins.txt contains new or updated items, ezUpdate will<br />
install the required snap-ins(s).<br />
If any of the snap-ins requires a reboot, the ezUpdate service will<br />
wait until all required snap-ins are installed before rebooting.<br />
If Enhanced Write Filter is enabled on the thin client appliance(s),<br />
the changes will be committed prior to rebooting.<br />
For example, if the snapins.txt file contains a single line of<br />
“RDP52,” and “RDP52” is not found in the XPe appliance’s Uninstall<br />
registry keys, then the ezUpdate service will attempt to access<br />
ftp://servername/neoware/xpe/shared/snapins/RDP52 and execute the<br />
snap-in script file install.2do.<br />
XPe ezUpdate Advanced Topics 113<br />
List View
114 XPe ezUpdate Advanced Topics
Index<br />
Symbols<br />
.csv file 26, 30<br />
.rms file 24<br />
A<br />
access mode indicators<br />
administrator mode 31<br />
support mode 32<br />
add<br />
broadcast IP address 15<br />
administrator mode access<br />
indicators 31<br />
Administrator mode, database access 27<br />
Appliance Access Security dialog 15<br />
asset database<br />
open or retrieve saved 30<br />
asset list database<br />
comma-delimited text file<br />
opening 30<br />
fields exported 26<br />
saving the file 24<br />
Auto Wake-on-LAN 76<br />
Autoload Database 24<br />
B<br />
Boot Version column in list view 16<br />
broadcast address 14<br />
<strong>ezRemote</strong> <strong>Manager</strong> User Manual<br />
C<br />
Cisco router 79<br />
cloning<br />
advantages of cloning properties 51<br />
connections 43, 45<br />
command<br />
field name in Snap-In <strong>Manager</strong> 62<br />
Confirm Session Start dialog 69<br />
connections<br />
cloning or copying 43, 45<br />
creating 42<br />
supported operating systems 39<br />
copying<br />
connections 43, 45<br />
D<br />
Database Access Password dialog 31<br />
DHCP column in list view 16<br />
DHCP tag 104<br />
Disk column in list view 17<br />
E<br />
Enable Support Mode Access 29<br />
Export Database 25<br />
ezAnywhere shadowing<br />
CE client configuration 64<br />
NeoLinux client configuration 65<br />
overview 63<br />
<strong>ezRemote</strong> <strong>Manager</strong><br />
115
Index <strong>ezRemote</strong> <strong>Manager</strong> User Manual<br />
installation 11<br />
license key 12<br />
uninstall 12<br />
ezSnap technology 59<br />
ezUpdate<br />
creating properties files for distribution 52<br />
NeoLinux 93<br />
Configuring via DHCP 95<br />
connections.rgy 99<br />
properties.rgy 98<br />
requirements 94<br />
saving connection configuration files 46, 57<br />
Windows CE 83<br />
config.txt 91<br />
connections.rgy 90<br />
FTP Server setup 84<br />
properties.rgy 90<br />
requirements 83<br />
XPe<br />
options 104<br />
requirements 104<br />
F<br />
Flash column in list view 17<br />
G<br />
group appliances in list view 22<br />
I<br />
installing <strong>ezRemote</strong> <strong>Manager</strong> 11<br />
IP Address column in list view 16<br />
L<br />
license key 12<br />
list view<br />
adding a range of IP addresses 20<br />
adding from a list 21<br />
adding one appliance 20<br />
boot version 16<br />
DHCP 16<br />
disk 17<br />
flash 17<br />
grouping appliances 22<br />
116 Index<br />
IP address 16<br />
MAC address 16<br />
mainboard 16<br />
OS version 16<br />
PLCC 17<br />
renaming appliances 23<br />
sorting appliances in 17<br />
station name 16<br />
switch to task view 23<br />
log file<br />
name 70<br />
properties 70<br />
M<br />
MAC address column in list view 16<br />
Mainboard column in list view 16<br />
master appliance 52<br />
N<br />
NeoLinux ezUpdate 93<br />
files<br />
connections.rgy 99<br />
properties.rgy 98<br />
requirements 94<br />
Neoware<br />
technical support 9<br />
NTe<br />
Software Cloning 35<br />
O<br />
OS Select, filtering discovery requests by<br />
operating system 15<br />
OS Version column in list view 16<br />
P<br />
password<br />
appliance access 15, 20<br />
PLCC column in list view 17<br />
properties<br />
cloning 54<br />
excluded from cloning 51<br />
included during cloning 51<br />
operating systems supported 49<br />
setting remotely 53
<strong>ezRemote</strong> <strong>Manager</strong> User Manual Index<br />
shadowing remote appliances 54<br />
thin client appliances supporting cloning of 50<br />
R<br />
RC4 encryption/decryption 25<br />
reboot station 71<br />
rename appliances 23<br />
retrieve asset database 30<br />
S<br />
scripts<br />
field name in Snap-In <strong>Manager</strong> 62<br />
session name 70<br />
Sessions<br />
Confirm Session Start dialog 69<br />
Set Session Parameters dialog 70<br />
shadowing<br />
how is it used with Neoware software 63<br />
starting an ezAnywhere shadowing session 65<br />
Simple Network Management Protocol 14, 79<br />
snap-in<br />
uses of 59<br />
Snap-In <strong>Manager</strong> 60<br />
snap-ins<br />
field entry in Snap-In <strong>Manager</strong> 61<br />
SNMP 14, 79<br />
broadcast address 14<br />
Software Updates<br />
XPe/NTe Cloning 35<br />
software updates<br />
getting 33<br />
selecting update package 34<br />
start time 71<br />
start time, delayed sessions 73<br />
Station Name column in list view 16<br />
subnets, separate 79<br />
support mode access<br />
indicators 32<br />
Support mode, database access 28<br />
T<br />
task view 72<br />
actions 73<br />
cancel 73<br />
close 74<br />
start time 73<br />
view log 73<br />
adjusting 74<br />
switch to list view 74<br />
technical support 9<br />
template 52<br />
U<br />
uninstall 12<br />
V<br />
VNC 63<br />
W<br />
Wake on LAN 75<br />
Web site, Neoware, URL 8<br />
Windows CE ezUpdate 83<br />
DHCP tag 137 84, 104<br />
files<br />
config.txt 91<br />
connections.rgy 90<br />
properties.rgy 90<br />
FTP Server setup 84<br />
requirements 83<br />
WOL 75<br />
X<br />
XPe<br />
Software Cloning 35<br />
XPe ezUpdate<br />
options 104<br />
requirements 104<br />
Index 117
Index <strong>ezRemote</strong> <strong>Manager</strong> User Manual<br />
118 Index