Blu-ray Disc™ / DVD Player - Amazon S3
Blu-ray Disc™ / DVD Player - Amazon S3
Blu-ray Disc™ / DVD Player - Amazon S3

Create successful ePaper yourself
Turn your PDF publications into a flip-book with our unique Google optimized e-Paper software.
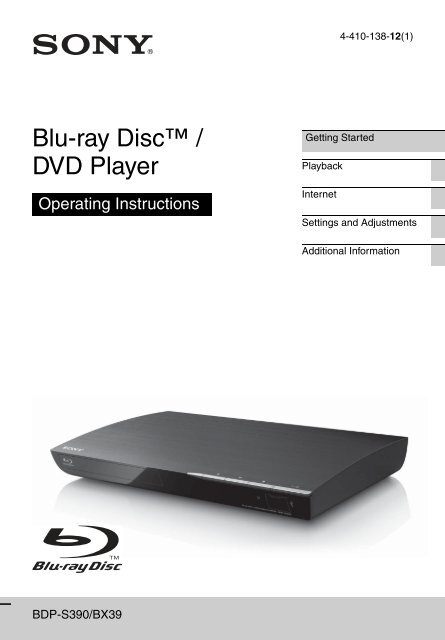
<strong>Blu</strong>-<strong>ray</strong> Disc /<br />
<strong>DVD</strong> <strong>Player</strong><br />
Operating Instructions<br />
BDP-<strong>S3</strong>90/BX39<br />
Getting Started<br />
Playback<br />
Internet<br />
4-410-138-12(1)<br />
Settings and Adjustments<br />
Additional Information
2<br />
WARNING<br />
To reduce the risk of fire or electric shock, do not<br />
expose this apparatus to rain or moisture.<br />
To avoid electrical shock, do not open the cabinet.<br />
Refer servicing to qualified personnel only.<br />
The AC power cord must be changed only at a<br />
qualified service shop.<br />
Batteries or batteries installed apparatus shall not<br />
be exposed to excessive heat such as sunshine,<br />
fire or the like.<br />
CAUTION<br />
The use of optical instruments with this product<br />
will increase eye hazard. As the laser beam used<br />
in this <strong>Blu</strong>-<strong>ray</strong> Disc/<strong>DVD</strong> player is harmful to<br />
eyes, do not attempt to disassemble the cabinet.<br />
Refer servicing to qualified personnel only.<br />
This label is located on the laser protective<br />
housing inside the enclosure.<br />
This symbol is intended to alert the<br />
user to the presence of uninsulated<br />
“dangerous voltage” within the<br />
product’s enclosure that may be of<br />
sufficient magnitude to constitute a<br />
risk of electric shock to persons.<br />
This symbol is intended to alert the<br />
user to the presence of important<br />
operating and maintenance<br />
(servicing) instructions in the<br />
literature accompanying the<br />
appliance.<br />
Precautions<br />
To prevent fire or shock hazard, do not place<br />
objects filled with liquids, such as vases, on the<br />
apparatus.<br />
Install this unit so that the AC power cord can<br />
be unplugged from the wall socket immediately<br />
in the event of trouble.<br />
Operation is subject to the following two<br />
conditions;<br />
(1) this device may not cause interference, and<br />
(2) this device must accept any interference<br />
received,<br />
including interference that may cause undesired<br />
operation of the device.<br />
FCC WARNING<br />
You are cautioned that any changes or<br />
modifications not expressly approved in this<br />
manual could void your authority to operate<br />
this equipment.<br />
This transmitter must not be co-located or<br />
operating in conjunction with any other<br />
antenna or transmitter.<br />
The shielded Interface cable (LAN cable)<br />
must be used with the equipment in order to<br />
comply with the limits for a digital device<br />
pursuant to Subpart B of Part 15 of FCC<br />
Rules.<br />
b<br />
This equipment has been tested and found to<br />
comply with the limits for a Class B digital<br />
device, pursuant to Part 15 of the FCC Rules.<br />
These limits are designed to provide<br />
reasonable protection against harmful<br />
interference in a residential installation. This<br />
equipment generates, uses, and can radiate<br />
radio frequency energy and, if not installed<br />
and used in accordance with the instructions,<br />
may cause harmful interference to radio<br />
communications. However, there is no<br />
guarantee that interference will not occur in a<br />
particular installation. If this equipment does<br />
cause harmful interference to radio or
television reception, which can be determined<br />
by turning the equipment off and on, the user<br />
is encouraged to try to correct the interference<br />
by one or more of the following measures:<br />
– Reorient or relocate the receiving antenna.<br />
– Increase the separation between the<br />
equipment and receiver.<br />
– Connect the equipment into an outlet on a<br />
circuit different from that to which the<br />
receiver is connected.<br />
– Consult the dealer or an experienced radio/<br />
TV technician for help.<br />
FCC Radiation Exposure Statement:<br />
This equipment complies with FCC radiation<br />
exposure limits set forth for an uncontrolled<br />
environment and meets the FCC radio<br />
frequency (RF) Exposure Guidelines in<br />
Supplement C to OET65. This equipment<br />
should be installed and operated keeping the<br />
radiator at least 20cm or more away from<br />
person’s body (excluding extremities: hands,<br />
wrists, feet and ankles).<br />
IC Radiation Exposure Statement:<br />
This equipment complies with IC radiation<br />
exposure limits set forth for an uncontrolled<br />
environment and meets RSS-102 of the IC<br />
radio frequency (RF) Exposure rules. This<br />
equipment should be installed and operated<br />
keeping the radiator at least 20cm or more<br />
away from person’s body (excluding<br />
extremities: hands, wrists, feet and ankles).<br />
Contains FCC ID : EW4DWMW069<br />
Contains IC : 4250A-DWMW069<br />
This class B digital apparatus complies with<br />
Canadian ICES-003.<br />
Important Safety Instructions<br />
1) Read these instructions.<br />
2) Keep these instructions.<br />
3) Heed all warnings.<br />
4) Follow all instructions.<br />
5) Do not use this apparatus near water.<br />
6) Clean only with dry cloth.<br />
7) Do not block any ventilation openings. Install<br />
in accordance with the manufacturer’s<br />
instructions.<br />
8) Do not install near any heat sources such as<br />
radiators, heat registers, stoves, or other<br />
apparatus (including amplifiers) that produce<br />
heat.<br />
9) Do not defeat the safety purpose of the<br />
polarized or grounding-type plug. A polarized<br />
plug has two blades with one wider than the<br />
other. A grounding type plug has two blades<br />
and a third grounding prong. The wide blade<br />
or the third prong are provided for your safety.<br />
If the provided plug does not fit into your<br />
outlet, consult an electrician for replacement<br />
of the obsolete outlet.<br />
10)Protect the power cord from being walked on<br />
or pinched particularly at plugs, convenience<br />
receptacles, and the point where they exit<br />
from the apparatus.<br />
11)Only use attachments/accessories specified by<br />
the manufacturer.<br />
12)Use only with the cart, stand, tripod, bracket,<br />
or table specified by the manufacturer, or sold<br />
with the apparatus. When a cart is used, use<br />
caution when moving the cart/apparatus<br />
combination to avoid injury from tip-over.<br />
13)Unplug this apparatus during lightning storms<br />
or when unused for long periods of time.<br />
14)Refer all servicing to qualified service<br />
personnel. Servicing is required when the<br />
apparatus has been damaged in any way, such<br />
as power-supply cord or plug is damaged,<br />
liquid has been spilled or objects have fallen<br />
into the apparatus, the apparatus has been<br />
exposed to rain or moisture, does not operate<br />
normally, or has been dropped.<br />
Owner’s Record<br />
The model and serial numbers are located at the<br />
rear of the unit. Record the serial number in the<br />
space provided below. Refer to them whenever<br />
you call upon your Sony dealer regarding this<br />
product.<br />
Model No.______________<br />
Serial No.______________<br />
For customers in the USA<br />
If this product is not working properly, please call<br />
1-866-909-7669.<br />
3
4<br />
For Customers in Canada<br />
If this product is not working properly, please<br />
contact our Customer Information Service<br />
Center at 1-877-899-7669 or write to us at:<br />
Customer Information Service 115 Gordon Baker<br />
Road, Toronto, Ontario, M2H 3R6<br />
Precautions<br />
This equipment has been tested and found to<br />
comply with the limits set out in the EMC<br />
Directive using a connection cable shorter<br />
than 3 metres.<br />
On placement<br />
Place the player in a location with adequate<br />
ventilation to prevent heat build-up in the<br />
player.<br />
Do not place the player on a soft surface<br />
such as a rug that might block the ventilation<br />
holes.<br />
Do not install this player in a confined space,<br />
such as a bookshelf or similar unit.<br />
Do not place the player in a location near<br />
heat sources, or in a place subject to direct<br />
sunlight, excessive dust, or mechanical<br />
shock.<br />
Do not place the player outdoors, in<br />
vehicles, on ships, or on other vessels.<br />
If the player is brought directly from a cold<br />
to a warm location, or is placed in a very<br />
damp room, moisture may condense on the<br />
lenses inside the player. Should this occur,<br />
the player may not operate properly. In this<br />
case, remove the disc and leave the player<br />
turned on for about half an hour until the<br />
moisture evaporates.<br />
Do not install the player in an inclined<br />
position. It is designed to be operated in a<br />
horizontal position only.<br />
Do not place metal objects in front of the<br />
front panel. It may limit reception of radio<br />
waves.<br />
Do not place the player in a place where<br />
medical equipment is in use. It may cause a<br />
malfunction of medical instruments.<br />
If you use a pacemaker or other medical<br />
device, consult your physician or the<br />
manufacturer of your medical device before<br />
using the wireless LAN function.<br />
Do not place heavy or unstable objects on<br />
the player.<br />
Do not place any objects other than discs on<br />
the disc t<strong>ray</strong>. Doing so may cause damage to<br />
the player or the object.<br />
Take out any discs from the t<strong>ray</strong> when you<br />
move the player. If you don’t, the disc may<br />
be damaged.<br />
Disconnect the AC power cord and all other<br />
cables from the player when you move the<br />
player.<br />
On power sources<br />
The player is not disconnected from the AC<br />
power source as long as it is connected to the<br />
wall outlet, even if the player itself has been<br />
turned off.<br />
Disconnect the player from the wall outlet if<br />
you are not going to use the player for a long<br />
time. To disconnect the AC power cord,<br />
grasp the plug itself; never pull the cord.<br />
Observe following points to prevent the AC<br />
power cord being damaged. Do not use the<br />
AC power cord if it is damaged, as doing so<br />
may result in an electric shock or fire.<br />
– Do not pinch the AC power cord between<br />
the player and wall, shelf, etc.<br />
– Do not put anything heavy on the AC<br />
power cord or pull on the AC power cord<br />
itself.<br />
On adjusting volume<br />
Do not turn up the volume while listening to a<br />
section with very low level inputs or no audio<br />
signals. Your ears and the speakers may be<br />
damaged when the sound level reaches the<br />
peak.<br />
On cleaning<br />
Clean the cabinet, panel, and controls with a<br />
soft cloth. Do not use any type of abrasive pad,<br />
scouring powder or solvent such as alcohol or<br />
benzine.<br />
On cleaning discs, disc/lens cleaners<br />
Do not use cleaning discs or disc/lens cleaners<br />
(including wet or sp<strong>ray</strong> types). These may<br />
cause the apparatus to malfunction.
On replacement of parts<br />
In the events that this player is repaired,<br />
repaired parts may be collected for reuse or<br />
recycling purposes.<br />
On connecting to the HDMI OUT jack<br />
Observe the following as improper handling<br />
may damage the HDMI OUT jack and the<br />
connector.<br />
Carefully align the HDMI OUT jack on the<br />
rear of the player and the HDMI connector<br />
by checking their shapes. Make sure the<br />
connector is not upside down or tilted.<br />
Be sure to disconnect the HDMI cable when<br />
moving the player.<br />
Hold the HDMI connector straight when<br />
connecting or disconnecting the HDMI<br />
cable. Do not twist or force the HDMI<br />
connector into the HDMI OUT jack.<br />
IMPORTANT NOTICE<br />
Caution: This player is capable of holding<br />
a still video image or on-screen display<br />
image on your television screen<br />
indefinitely. If you leave the still video<br />
image or on-screen display image<br />
displayed on your TV for an extended<br />
period of time you risk permanent damage<br />
to your television screen. Plasma display<br />
panel televisions and projection<br />
televisions are susceptible to this.<br />
If you have any questions or problems<br />
concerning your player, please consult your<br />
nearest Sony dealer.<br />
Copy Protection<br />
Please be advised of the advanced content<br />
protection systems used in both <strong>Blu</strong>-<strong>ray</strong><br />
Disc and <strong>DVD</strong> media. These systems,<br />
called AACS (Advanced Access Content<br />
System) and CSS (Content Scramble System),<br />
may contain some restrictions on playback,<br />
analog output, and other similar features. The<br />
operation of this product and the restrictions<br />
placed may vary depending on the date of<br />
purchase, as the governing board of the AACS<br />
may adopt or change its restriction rules after<br />
the time of purchase.<br />
Cinavia Notice<br />
This product uses Cinavia technology to limit<br />
the use of unauthorized copies of some<br />
commercially-produced film and videos and<br />
their soundtracks. When a prohibited use of an<br />
unauthorized copy is detected, a message will<br />
be displayed and playback or copying will be<br />
interrupted.<br />
More information about Cinavia technology is<br />
provided at the Cinavia Online Consumer<br />
Information Center at http://www.cinavia.com.<br />
To request additional information about<br />
Cinavia by mail, send a postcard with your<br />
mailing address to: Cinavia Consumer<br />
Information Center, P.O. Box 86851, San<br />
Diego, CA, 92138, USA.<br />
Copyrights and Trademarks<br />
“AVCHD” and the “AVCHD” logo are<br />
trademarks of Panasonic Corporation and<br />
Sony Corporation.<br />
Java is a trademark of Oracle and/or its<br />
affiliates.<br />
, “XMB,” and “xross media bar” are<br />
trademarks of Sony Corporation and Sony<br />
Computer Entertainment Inc.<br />
This product incorporates High-Definition<br />
Multimedia Interface (HDMI ® ) technology.<br />
HDMI, the HDMI logo and High-Definition<br />
Multimedia Interface are trademarks or<br />
registered trademarks of HDMI Licensing<br />
LLC in the United States and other<br />
countries.<br />
5
6<br />
<strong>Blu</strong>-<strong>ray</strong> Disc, <strong>Blu</strong>-Ray, BD-Live,<br />
BONUSVIEW, and the logos are<br />
trademarks of the <strong>Blu</strong>-<strong>ray</strong> Disc Association.<br />
“<strong>DVD</strong>+RW,” “<strong>DVD</strong>-RW,” “<strong>DVD</strong>+R,”<br />
“<strong>DVD</strong>-R,” “<strong>DVD</strong> VIDEO,” and “CD” logos<br />
are trademarks.<br />
“x.v.Color” and “x.v.Color” logo are<br />
trademarks of Sony Corporation.<br />
“BRAVIA” is a trademark of Sony<br />
Corporation.<br />
“PhotoTV HD” and the “PhotoTV HD” logo<br />
are trademarks of Sony Corporation.<br />
MPEG Layer-3 audio coding technology<br />
and patents licensed from Fraunhofer IIS<br />
and Thomson.<br />
This product incorporates proprietary<br />
technology under license from Verance<br />
Corporation and is protected by U.S. Patent<br />
7,369,677 and other U.S. and worldwide<br />
patents issued and pending as well as<br />
copyright and trade secret protection for<br />
certain aspects of such technology. Cinavia<br />
is a trademark of Verance Corporation.<br />
Copyright 2004-2010 Verance Corporation.<br />
All rights reserved by Verance. Reverse<br />
engineering or disassembly is prohibited.<br />
Windows Media is either a registered<br />
trademark or trademark of Microsoft<br />
Corporation in the United States and/or<br />
other countries.<br />
This product contains technology subject to<br />
certain intellectual property rights of<br />
Microsoft. Use or distribution of this<br />
technology outside of this product is<br />
prohibited without the appropriate license(s)<br />
from Microsoft.<br />
Content owners use Microsoft PlayReady<br />
content access technology to protect their<br />
intellectual property, including copyrighted<br />
content. This device uses PlayReady<br />
technology to access PlayReady-protected<br />
content and/or WMDRM-protected content.<br />
If the device fails to properly enforce<br />
restrictions on content usage, content<br />
owners may require Microsoft to revoke the<br />
device’s ability to consume PlayReadyprotected<br />
content. Revocation should not<br />
affect unprotected content or content<br />
protected by other content access<br />
technologies. Content owners may require<br />
you to upgrade PlayReady to access their<br />
content. If you decline an upgrade, you will<br />
not be able to access content that requires<br />
the upgrade.<br />
This product meets ENERGY STAR ®<br />
guidelines for energy efficiency.<br />
ENERGY STAR and the ENERGY STAR<br />
mark are registered U.S. marks. ENERGY<br />
STAR is a registered mark owned by the<br />
U.S. government.<br />
Music and video recognition technology and<br />
related data are provided by Gracenote ® .<br />
Gracenote is the industry standard in music<br />
recognition technology and related content<br />
delivery. For more information, please visit<br />
www.gracenote.com.<br />
CD, <strong>DVD</strong>, <strong>Blu</strong>-<strong>ray</strong> Disc, and music and<br />
video-related data from Gracenote, Inc.,<br />
copyright © 2000-present Gracenote.<br />
Gracenote Software, copyright © 2000present<br />
Gracenote. One or more patents<br />
owned by Gracenote apply to this product<br />
and service. See the Gracenote website for a<br />
nonexhaustive list of applicable Gracenote<br />
patents. Gracenote, CDDB, MusicID,<br />
MediaVOCS, the Gracenote logo and<br />
logotype, and the “Powered by Gracenote”<br />
logo are either registered trademarks or<br />
trademarks of Gracenote in the United<br />
States and/or other countries.<br />
Wi-Fi ® , Wi-Fi Protected Access ® and<br />
Wi-Fi Alliance ® are registered marks of the<br />
Wi-Fi Alliance.<br />
Wi-Fi CERTIFIED, WPA, WPA2<br />
and Wi-Fi Protected Setup are marks of<br />
the Wi-Fi Alliance.<br />
The Wi-Fi CERTIFIED Logo is a<br />
certification mark of the Wi-Fi Alliance.<br />
The Wi-Fi Protected Setup Mark is a mark<br />
of the Wi-Fi Alliance.<br />
DLNA ® , the DLNA Logo and DLNA<br />
CERTIFIED are trademarks, service<br />
marks, or certification marks of the Digital<br />
Living Network Alliance.
Opera ® Browser from Opera Software<br />
ASA. Copyright 1995-2010 Opera Software<br />
ASA. All rights reserved.<br />
All other trademarks are trademarks of their<br />
respective owners.<br />
Other system and product names are<br />
generally trademarks or registered<br />
trademarks of the manufacturers. and ®<br />
marks are not indicated in this document.<br />
Gracenote ® End User License<br />
Agreement<br />
This application or device contains software<br />
from Gracenote, Inc. of Emeryville, California<br />
(“Gracenote”). The software from Gracenote<br />
(the “Gracenote Software”) enables this<br />
application to perform disc and/or file<br />
identification and obtain music-related<br />
information, including name, artist, track, and<br />
title information (“Gracenote Data”) from<br />
online servers or embedded databases<br />
(collectively, “Gracenote Servers”) and to<br />
perform other functions. You may use<br />
Gracenote Data only by means of the intended<br />
End-User functions of this application or<br />
device.<br />
You agree that you will use Gracenote Data,<br />
the Gracenote Software, and Gracenote<br />
Servers for your own personal noncommercial<br />
use only. You agree not to assign,<br />
copy, transfer or transmit the Gracenote<br />
Software or any Gracenote Data to any third<br />
party. YOU AGREE NOT TO USE OR<br />
EXPLOIT GRACENOTE DATA, THE<br />
GRACENOTE SOFTWARE, OR<br />
GRACENOTE SERVERS, EXCEPT AS<br />
EXPRESSLY PERMITTED HEREIN.<br />
You agree that your non-exclusive license to<br />
use the Gracenote Data, the Gracenote<br />
Software, and Gracenote Servers will<br />
terminate if you violate these restrictions. If<br />
your license terminates, you agree to cease<br />
any and all use of the Gracenote Data, the<br />
Gracenote Software, and Gracenote Servers.<br />
Gracenote reserves all rights in Gracenote<br />
Data, the Gracenote Software, and the<br />
Gracenote Servers, including all ownership<br />
rights. Under no circumstances will Gracenote<br />
become liable for any payment to you for any<br />
information that you provide. You agree that<br />
Gracenote, Inc. may enforce its rights under<br />
this Agreement against you directly in its own<br />
name.<br />
The Gracenote service uses a unique identifier<br />
to track queries for statistical purposes. The<br />
purpose of a randomly assigned numeric<br />
identifier is to allow the Gracenote service to<br />
count queries without knowing anything about<br />
who you are. For more information, see the<br />
web page for the Gracenote Privacy Policy for<br />
the Gracenote service.<br />
The Gracenote Software and each item of<br />
Gracenote Data are licensed to you “AS IS.”<br />
Gracenote makes no representations or<br />
warranties, express or implied, regarding the<br />
accuracy of any Gracenote Data from in the<br />
Gracenote Servers. Gracenote reserves the<br />
right to delete data from the Gracenote Servers<br />
or to change data categories for any cause that<br />
Gracenote deems sufficient. No warranty is<br />
made that the Gracenote Software or<br />
Gracenote Servers are error-free or that<br />
functioning of Gracenote Software or<br />
Gracenote Servers will be uninterrupted.<br />
Gracenote is not obligated to provide you with<br />
new enhanced or additional data types or<br />
categories that Gracenote may provide in the<br />
future and is free to discontinue its services at<br />
any time.<br />
7
8<br />
GRACENOTE DISCLAIMS ALL<br />
WARRANTIES EXPRESS OR IMPLIED,<br />
INCLUDING, BUT NOT LIMITED TO,<br />
IMPLIED WARRANTIES OF<br />
MERCHANTABILITY, FITNESS FOR A<br />
PARTICULAR PURPOSE, TITLE, AND<br />
NON-INFRINGEMENT. GRACENOTE<br />
DOES NOT WARRANT THE RESULTS<br />
THAT WILL BE OBTAINED BY YOUR<br />
USE OF THE GRACENOTE SOFTWARE<br />
OR ANY GRACENOTE SERVER. IN NO<br />
CASE WILL GRACENOTE BE LIABLE<br />
FOR ANY CONSEQUENTIAL OR<br />
INCIDENTAL DAMAGES OR FOR ANY<br />
LOST PROFITS OR LOST REVENUES.<br />
© Gracenote, Inc. 2009
Table of Contents<br />
WARNING . . . . . . . . . . . . . . . . . . . . . . . . . . . . . . . . . . . . . . . . . . . . . 2<br />
Precautions . . . . . . . . . . . . . . . . . . . . . . . . . . . . . . . . . . . . . . . . . . . . 4<br />
Getting Started<br />
Guide to Parts and Controls . . . . . . . . . . . . . . . . . . . . . . . . . . . . . . 10<br />
Step 1: Supplied Accessories . . . . . . . . . . . . . . . . . . . . . . . . . . . . . 13<br />
Step 2: Connecting the <strong>Player</strong> . . . . . . . . . . . . . . . . . . . . . . . . . . . . . 14<br />
Step 3: Preparing for Network Connection . . . . . . . . . . . . . . . . . . . 16<br />
Step 4: Easy Setup . . . . . . . . . . . . . . . . . . . . . . . . . . . . . . . . . . . . . 16<br />
Playback<br />
Playing a Disc . . . . . . . . . . . . . . . . . . . . . . . . . . . . . . . . . . . . . . . . . 18<br />
Playing from a USB Device . . . . . . . . . . . . . . . . . . . . . . . . . . . . . . . 19<br />
Playing via a Network . . . . . . . . . . . . . . . . . . . . . . . . . . . . . . . . . . . 19<br />
Available Options . . . . . . . . . . . . . . . . . . . . . . . . . . . . . . . . . . . . . . . 21<br />
Internet<br />
Browsing Websites . . . . . . . . . . . . . . . . . . . . . . . . . . . . . . . . . . . . . 23<br />
Settings and Adjustments<br />
Using the Settings Displays . . . . . . . . . . . . . . . . . . . . . . . . . . . . . . . 25<br />
[Network Update] . . . . . . . . . . . . . . . . . . . . . . . . . . . . . . . . . . . . . . . 25<br />
[Screen Settings] . . . . . . . . . . . . . . . . . . . . . . . . . . . . . . . . . . . . . . . 25<br />
[Audio Settings] . . . . . . . . . . . . . . . . . . . . . . . . . . . . . . . . . . . . . . . . 26<br />
[BD/<strong>DVD</strong> Viewing Settings] . . . . . . . . . . . . . . . . . . . . . . . . . . . . . . . 27<br />
[Parental Control Settings] . . . . . . . . . . . . . . . . . . . . . . . . . . . . . . . . 28<br />
[Music Settings] . . . . . . . . . . . . . . . . . . . . . . . . . . . . . . . . . . . . . . . . 28<br />
[System Settings] . . . . . . . . . . . . . . . . . . . . . . . . . . . . . . . . . . . . . . . 28<br />
[Network Settings] . . . . . . . . . . . . . . . . . . . . . . . . . . . . . . . . . . . . . . 29<br />
[Easy Setup] . . . . . . . . . . . . . . . . . . . . . . . . . . . . . . . . . . . . . . . . . . 30<br />
[Resetting] . . . . . . . . . . . . . . . . . . . . . . . . . . . . . . . . . . . . . . . . . . . . 30<br />
Additional Information<br />
Troubleshooting . . . . . . . . . . . . . . . . . . . . . . . . . . . . . . . . . . . . . . . . 31<br />
Specifications . . . . . . . . . . . . . . . . . . . . . . . . . . . . . . . . . . . . . . . . . . 34<br />
9
10<br />
Getting Started<br />
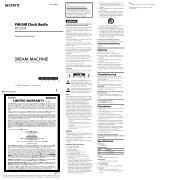
Guide to Parts and Controls<br />
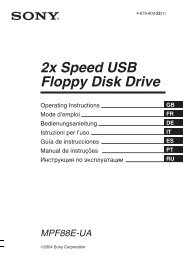
Front panel<br />
z<br />
The N button has a tactile dot. Use the tactile dot as a reference when operating the player.<br />
A Disc t<strong>ray</strong><br />
B Z (open/close)<br />
C N (play)<br />
D x (stop)<br />
E [/1 (on/standby) / Power<br />
indicator<br />
Turns on the player, or sets to<br />
standby mode.<br />
F (USB) jack<br />
Connect a USB device to this jack.<br />
G Remote sensor<br />
To lock the disc t<strong>ray</strong> (Child Lock)<br />
You can lock the disc t<strong>ray</strong> to avoid<br />
accidental opening of the t<strong>ray</strong>.<br />
While the player is turned on, hold down<br />
the N button on the player for more<br />
than 10 seconds to lock or unlock the<br />
t<strong>ray</strong>.
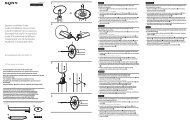
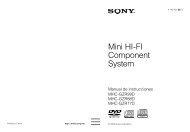
Rear panel<br />
VIDEO<br />
R AUDIO<br />
LINE OUT<br />
L<br />
DIGITAL OUT<br />
PCM/DTS/<br />
COAXIAL<br />
DOLBY DIGITAL<br />
HDMI OUT LAN(100)<br />
A LINE OUT (VIDEO) jack<br />
B DIGITAL OUT (COAXIAL) jack<br />
C LAN (100) terminal<br />
D HDMI OUT jack<br />
E LINE OUT (R-AUDIO-L) jacks<br />
11<br />
Getting Started
12<br />
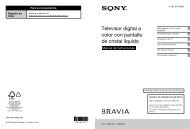
Remote<br />
The available functions of the remote are<br />
different depending on the disc or the<br />
situation.<br />
AUDIO SUBTITLE DISPLAY<br />
YELLOW BLUE RED GREEN<br />
PREV PAUSE NEXT<br />
PLAY<br />
STOP<br />
NETFLIX SEN<br />
z<br />
Number 5, AUDIO, VOL +, and N PLAY<br />
buttons have a tactile dot. Use the tactile dot as<br />
a reference when operating the player.<br />
The player automatically returns to<br />
standby mode<br />
If any button on the player or remote is<br />
not pressed for more than 30 minutes, the<br />
player automatically returns to standby<br />
mode.<br />
A Z OPEN/CLOSE<br />
Opens or closes the disc t<strong>ray</strong>.<br />
-TV- INPUT<br />
Switches between TV and other<br />
input sources.<br />
-TV- [/1 (on/standby)<br />
Turns on the TV, or sets to standby<br />
mode.<br />
[/1 (on/standby)<br />
Turns on the player, or sets to<br />
standby mode.<br />
B Number buttons (0 - 9)<br />
Enters the title/chapter numbers, etc.<br />
VOL +/–<br />
Adjusts the TV volume.<br />
AUDIO (page 27)<br />
Selects the language track when<br />
multi-lingual tracks are recorded on<br />
BD-ROMs/<strong>DVD</strong> VIDEOs.<br />
Selects the sound track on CDs.<br />
SUBTITLE (page 27)<br />
Selects the subtitle language when<br />
multi-lingual subtitles are recorded<br />
on BD-ROMs/<strong>DVD</strong> VIDEOs.<br />
DISPLAY (page 19)<br />
Displays the playback and web<br />
browsing information on the screen.<br />
C Color buttons (YELLOW/<br />
BLUE/RED/GREEN)<br />
Shortcut keys for interactive<br />
functions.<br />
D TOP MENU<br />
Opens or closes the BD’s or <strong>DVD</strong>’s<br />
Top Menu.<br />
POP UP/MENU<br />
Opens or closes the BD-ROM’s<br />
Pop-up Menu, or the <strong>DVD</strong>’s menu.
OPTIONS (page 21)<br />
Displays the available options on the<br />
screen.<br />
HOME<br />
Enters the player’s home menu.<br />
Displays the wall paper when<br />
pressed on the category icon of the<br />
home menu.<br />
RETURN<br />
Returns to the previous display.<br />
<br />
Skips to the previous/next chapter,<br />
track, or file.<br />
X PAUSE<br />
Pauses or re-starts playback.<br />
m/M (fast reverse/fast<br />
forward)<br />
Fast reverse/fast forward the disc<br />
when you press the button during<br />
playback. The search speed<br />
changes each time you press the<br />
button during video playback.<br />
Plays in slow motion, when<br />
pressed for more than one second<br />
in pause mode.<br />
Plays one frame at a time, when<br />
you press for a short time in pause<br />
mode.<br />
N PLAY<br />
Starts or re-starts playback.<br />
NETFLIX<br />
Enables access to the “NETFLIX”<br />
online service.<br />
x STOP<br />
Stops playback and remembers the<br />
stop point (resume point).<br />
The resume point for a title/track is<br />
the last point you played or the last<br />
photo for a photo folder.<br />
SEN (page 19)<br />
Accesses the “Sony Entertainment<br />
Network” online service.<br />
Home menu display<br />
The home menu appears when you press<br />
HOME. Select a category using
14<br />
Step 2: Connecting the <strong>Player</strong><br />
Do not connect the AC power cord until you have made all the connections.<br />
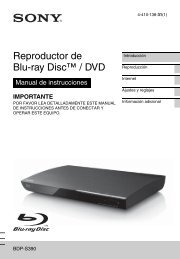
Connecting to your TV<br />
Select one of the following connection methods according to the input jacks on your<br />
TV.<br />
Match the color of the plug to that of the jack when connecting.<br />
VIDEO<br />
R AUDIO<br />
LINE OUT<br />
L<br />
DIGITAL OUT<br />
PCM/DTS/<br />
COAXIAL<br />
DOLBY DIGITAL<br />
HDMI OUT LAN(100)<br />
High Speed HDMI Cable *<br />
Audio/video cable (supplied)<br />
* See “Step 1: Supplied Accessories” (page 13).<br />
High quality<br />
Standard<br />
quality<br />
b<br />
Do not connect the player through a VCR. Video signals from VCRs can be affected by copyright<br />
protection systems that cause the picture on the TV to be distorted.
Connecting to your AV amplifier (receiver)<br />
Select one of the following connection methods according to the input jacks on your<br />
AV amplifier (receiver). When you select A or B, make the appropriate settings in<br />
the [Audio Settings] setup (page 26).<br />
VIDEO<br />
DIGITAL OUT<br />
PCM/DTS/<br />
COAXIAL<br />
DOLBY DIGITAL<br />
R AUDIO<br />
LINE OUT<br />
L<br />
DIGITAL OUT<br />
PCM/DTS/<br />
COAXIAL<br />
DOLBY DIGITAL<br />
HDMI OUT LAN(100)<br />
High Speed HDMI Cable *1<br />
Coaxial digital cable<br />
(not supplied)<br />
Audio/video cable (supplied)<br />
High Speed HDMI Cable<br />
(not supplied)<br />
t Set [BD Audio MIX Setting] (page 26).<br />
t Set [Dolby Digital *2 / DTS *3 ] (page 27).<br />
15<br />
Getting Started
16<br />
*1 See “Step 1: Supplied Accessories”<br />
(page 13).<br />
*2 Manufactured under license from Dolby<br />
Laboratories. Dolby, Pro Logic, and the<br />
double-D symbol are trademarks of Dolby<br />
Laboratories.<br />
*3 Manufactured under license under U.S.<br />
Patent Nos: 5,956,674; 5,974,380;<br />
6,226,616; 6,487,535; 7,212,872;<br />
7,333,929; 7,392,195; 7,272,567 & other<br />
U.S. and worldwide patents issued &<br />
pending. DTS-HD, the Symbol, & DTS-<br />
HD and the Symbol together are registered<br />
trademarks & DTS-HD Master Audio is a<br />
trademark of DTS, Inc. Product includes<br />
software. © DTS, Inc. All Rights Reserved.<br />
Step 3: Preparing for<br />
Network Connection<br />
If you are not going to connect the player<br />
to a network, proceed to “Step 4: Easy<br />
Setup” (page 16).<br />
Wired Setup<br />
Use a LAN cable to connect to the LAN<br />
(100) terminal on the player.<br />
Internet<br />
LAN cable<br />
(not supplied)<br />
ADSL modem/<br />
Cable modem<br />
Broadband<br />
router<br />
z<br />
Using a shielded interface cable (LAN cable),<br />
straight or crossing, is recommended.<br />
Wireless Setup<br />
Use the wireless LAN that is built into<br />
the player.<br />
Wireless LAN<br />
router<br />
LAN cable (not supplied)<br />
ADSL modem/<br />
Cable modem<br />
Step 4: Easy Setup<br />
Internet<br />
When turned on for the first time<br />
Wait for a short while before the<br />
player turns on and starts [Easy<br />
Initial Settings].<br />
1 Insert two Size AA (R6) batteries<br />
by matching the 3 and # ends on<br />
the batteries to the markings<br />
inside the battery compartment.
2 Plug the player into the AC outlet.<br />
VIDEO<br />
DIGITAL OUT<br />
PCM/DTS/<br />
COAXIAL<br />
DOLBY DIGITAL<br />
R AUDIO L<br />
LINE OUT HDMI OUT LAN(100)<br />
to AC outlet<br />
3 Press [/1 to turn on the player.<br />
4 Turn on the TV and set the input<br />
selector on your TV. This will<br />
show the signal from the player<br />
on your TV screen.<br />
5 Perform [Easy Initial Settings].<br />
Follow the on-screen instructions to<br />
make the basic settings using
18<br />
Playback<br />
Playing a Disc<br />
For playable discs, see page 35.<br />
1 Switch the input selector on your<br />
TV so that the signal from the<br />
player appears on your TV screen.<br />
2 Press Z OPEN/CLOSE, and place<br />
a disc on the disc t<strong>ray</strong>.<br />
Playing side facing down<br />
3 Press Z OPEN/CLOSE to close the<br />
disc t<strong>ray</strong>.<br />
Playback starts.<br />
If playback does not start<br />
automatically, select in the<br />
[Video], [Music], or [Photo]<br />
category, and press ENTER.<br />
Enjoying BONUSVIEW/<br />
BD-LIVE<br />
Some BD-ROMs with the “BD-LIVE”<br />
logo* have bonus contents and other<br />
data that can be downloaded for your<br />
enjoyment.<br />
*<br />
1 Connect a USB memory to the<br />
USB jack on the player (page 10).<br />
Use a 1 GB or larger USB memory<br />
as your local storage.<br />
2 Prepare for BD-LIVE (BD-LIVE<br />
only).<br />
Connect the player to a network<br />
(page 16).<br />
Set [BD Internet Connection] to<br />
[Allow] (page 27).<br />
3 Insert a BD-ROM with<br />
BONUSVIEW/BD-LIVE.<br />
The operation method differs<br />
depending on the disc. Refer to the<br />
instruction manual supplied with the<br />
disc.<br />
z<br />
To delete data in the USB memory, select<br />
[Erase BD Data] in the [Video], and press<br />
ENTER. All data stored in the buda folder will<br />
be erased.
Displaying the play<br />
information<br />
You can view the playback information,<br />
etc., by pressing DISPLAY.<br />
The displayed information differs<br />
depending on the disc type and player<br />
status.<br />
Example: when playing a BD-ROM<br />
A Output resolution/Video frequency<br />
B Title number or name<br />
C The currently selected angle<br />
D The currently selected audio setting<br />
E Available functions ( angle,<br />
audio, subtitle)<br />
F Playback information<br />
Displays the Play mode, Playing<br />
status bar, Disc type, Video codec,<br />
Bitrate, Repeat type, Elapsed time,<br />
and Total playing time.<br />
G Chapter number<br />
Playing from a USB<br />
Device<br />
For “Playable types of files”, see<br />
page 36.<br />
1 Connect the USB device to the<br />
USB jack on the player (page 10).<br />
Refer to the instruction manual<br />
supplied with the USB device before<br />
connecting.<br />
2 Select [Video], [Music],<br />
or [Photo] on the home menu<br />
using
20<br />
1 Connect the player to a network<br />
(page 16).<br />
2 Press SEN button on the remote.<br />
3 Select an Internet content and a<br />
variety of on-demand<br />
entertainment using
To play a file from a DLNA server via<br />
another product (Renderer)<br />
When you play files from a DLNA<br />
Server on this unit, you can use a DLNA<br />
Controller-compatible product (a phone,<br />
etc.), to control playback.<br />
Server<br />
Controller<br />
Control this unit using a DLNA<br />
controller. Refer to the instruction<br />
manual supplied with the DLNA<br />
controller.<br />
Renderer<br />
Playing the same music in<br />
different rooms (PARTY<br />
STREAMING)<br />
You can play music files on the player<br />
(PARTY host) in other rooms<br />
simultaneously through Sony products<br />
(PARTY guest) which are compatible<br />
with DLNA and the PARTY<br />
STREAMING function, or vice versa.<br />
1 Prepare for PARTY STREAMING.<br />
Connect the player to a network<br />
(page 16).<br />
Connect the products which are<br />
compatible with the PARTY<br />
STREAMING function to a<br />
network.<br />
To use the player as PARTY host<br />
Select a track in [Music], then select<br />
[Start PARTY] from the options menu to<br />
start a PARTY.<br />
To use the player as PARTY guest<br />
Select [PARTY] in [Music], then<br />
select the PARTY host product icon.<br />
b<br />
The sale and product lineup of products that<br />
are compatible with the PARTY<br />
STREAMING function differ depending on<br />
the area.<br />
Available Options<br />
Various settings and playback<br />
operations are available by pressing<br />
OPTIONS. The available items differ<br />
depending on the situation.<br />
Common options<br />
x [Repeat Setting]: Sets the repeat<br />
mode.<br />
x [Play]/[Stop]: Starts or stops the<br />
playback.<br />
x [Play from beginning]: Plays the<br />
item from the beginning.<br />
[Video] only<br />
x [A/V SYNC]: Adjusts the gap between<br />
picture and sound, by delaying the<br />
sound output in relation to the picture<br />
output (0 to 120 milliseconds).<br />
x [Video Settings]:<br />
– [Picture Quality Mode]: Selects the<br />
picture settings for different lighting<br />
environments.<br />
– [BNR]: Reduces the mosaic-like<br />
block noise in the picture.<br />
– [MNR]: Reduces minor noise<br />
around the picture outlines<br />
(mosquito noise).<br />
21<br />
Playback
22<br />
x [Pause]: Pauses the playback.<br />
x [Top Menu]: Displays the BD’s or<br />
<strong>DVD</strong>’s Top Menu.<br />
x [Menu]/[Popup Menu]: Displays the<br />
BD-ROM’s Pop-up Menu or <strong>DVD</strong>’s<br />
menu.<br />
x [Title Search]: Searches for a title on<br />
BD-ROMs/<strong>DVD</strong> VIDEOs and starts<br />
playback from the beginning.<br />
x [Chapter Search]: Searches for a<br />
chapter and starts playback from the<br />
beginning.<br />
x [Audio]: Switches the language track<br />
when multilingual tracks are recorded<br />
on BD-ROMs/<strong>DVD</strong> VIDEOs. Selects<br />
the sound track on CDs.<br />
x [Subtitle]: Switches the subtitle<br />
language when multilingual subtitles<br />
are recorded on BD-ROMs/<strong>DVD</strong><br />
VIDEOs.<br />
x [Angle]: Switches to other viewing<br />
angles when multi-angles are<br />
recorded on BD-ROMs/<strong>DVD</strong><br />
VIDEOs.<br />
x [IP Content Noise Reduction]:<br />
Adjusts the picture quality of Internet<br />
contents.<br />
x [Video Search]: Displays<br />
information on the BD-ROM/<strong>DVD</strong>-<br />
ROM based on Gracenote technology.<br />
Searches for related information using<br />
keywords from Gracenote when<br />
selecting [Cast] or [Related].<br />
Displays a list of titles when selecting<br />
[Playback History] or [Search<br />
History].<br />
[Music] only<br />
x [Add Slideshow BGM]: Registers<br />
music files in the USB memory as<br />
slideshow background music (BGM).<br />
x [Start PARTY]: Starts a PARTY with<br />
the selected source. This item may not<br />
appear depending on the source.<br />
x [Leave PARTY]: Leaves from a<br />
PARTY which the player is<br />
participating in. The PARTY<br />
STREAMING function continues<br />
among other participating products.<br />
x [Close PARTY]: Closes a PARTY<br />
which the player is participating in.<br />
The PARTY STREAMING function<br />
ends for all other participating<br />
products.<br />
x [Music Search]: Displays<br />
information on the audio CD (CD-<br />
DA) based on Gracenote technology.<br />
Searches for related information using<br />
keywords from Gracenote when<br />
selecting [Track], [Artist] or<br />
[Related].<br />
Displays a list of titles when selecting<br />
[Playback History] or [Search<br />
History].<br />
[Photo] only<br />
x [Slideshow Speed]: Changes the<br />
slideshow speed.<br />
x [Slideshow Effect]: Sets the effect<br />
for slideshows.<br />
x [Slideshow BGM]:<br />
– [Off]: Turns off the function.<br />
– [My Music from USB]: Sets the<br />
music files registered in [Add<br />
Slideshow BGM].<br />
– [Play from Music CD]: Sets the<br />
tracks in CD-DAs.<br />
x [Change Display]: Switches<br />
between [Grid View] and [List View].<br />
x [Slideshow]: Plays a slideshow.<br />
x [Rotate Left]: Rotates the photo<br />
counterclockwise by 90 degrees.<br />
x [Rotate Right]: Rotates the photo<br />
clockwise by 90 degrees.
Internet<br />
Browsing Websites<br />
You can connect to the Internet and<br />
enjoy websites.<br />
1 Prepare the Internet Browser.<br />
Connect the player to a network<br />
(page 16).<br />
2 Select [Network] on the home<br />
menu using
24<br />
Available options<br />
Various settings and operations are<br />
available by pressing OPTIONS.<br />
The available items differ depending on<br />
the situation.<br />
x [Browser Setup]: Displays the<br />
Internet Browser settings.<br />
– [Zoom]: Increases or decreases the<br />
size of the displayed contents.<br />
– [JavaScript Setup]: Enables or<br />
disables JavaScript.<br />
– [Cookie Setup]: Sets whether or not<br />
to accept cookies.<br />
– [SSL Alarm Display]: Enables or<br />
disables SSL.<br />
x [Input]: Displays the software<br />
keyboard to enter characters while<br />
browsing a website.<br />
x [Break]: Moves the cursor to the next<br />
line in the text input field.<br />
x [Delete]: Erases one character on the<br />
left side of the cursor during text<br />
input.<br />
x [Window List]: Displays a list of<br />
currently opened website windows.<br />
Allows you to return to a previously<br />
displayed website by selecting the<br />
window.<br />
x [Bookmark List]: Displays the<br />
bookmark list.<br />
x [URL entry]: Allows you to enter a<br />
URL when the software keyboard is<br />
displayed.<br />
x [Previous page]/[Next page]:<br />
Moves to the previous/next page.<br />
x [Cancel loading]: Stops loading a<br />
page.<br />
x [Reload]: Reloads the same page.<br />
x [Add to Bookmark]: Adds the<br />
currently displayed website to the<br />
bookmark list.<br />
x [Set as start page]: Sets the<br />
currently displayed website as the<br />
default start page.<br />
x [Open in new window]: Opens a link<br />
in a new window.<br />
x [Character encoding]: Sets the<br />
character code.<br />
x [Display certificate]: View server<br />
certificates sent from pages that<br />
support SSL.
Settings and Adjustments<br />
Using the Settings<br />
Displays<br />
Select [Setup] on the home menu<br />
when you need to change the settings of<br />
the player.<br />
The default settings are underlined.<br />
1 Select [Setup] on the home<br />
menu using
26<br />
x [Output Video Format]<br />
[HDMI]: Normally select [Auto]. Select<br />
[Original Resolution] to output the<br />
resolution recorded on the disc. When<br />
the resolution is lower than the SD<br />
resolution, it is scaled up to the SD<br />
resolution.<br />
[Video]: Automatically sets the lowest<br />
resolution.<br />
x [BD-ROM 24p Output]<br />
[Auto]: Outputs 1920 × 1080p/24 Hz<br />
video signals only when connecting a<br />
1080/24p-compatible TV using the<br />
HDMI OUT jack.<br />
[On]: Turns on the function.<br />
[Off]: Select this when your TV is not<br />
compatible with 1080/24p video signals.<br />
x [<strong>DVD</strong>-ROM 24p Output]<br />
[Auto]: Outputs 1920 × 1080p/24 Hz<br />
video signals only when connecting a<br />
1080/24p-compatible TV using the<br />
HDMI OUT jack.<br />
[Off]: Select this when your TV is not<br />
compatible with 1080/24p video signals.<br />
x [YCbCr/RGB (HDMI)]<br />
[Auto]: Automatically detects the<br />
connected TV type, and switches to the<br />
matching color setting.<br />
[YCbCr (4:2:2)]: Outputs YCbCr 4:2:2<br />
video signals.<br />
[YCbCr (4:4:4)]: Outputs YCbCr 4:4:4<br />
video signals.<br />
[RGB]: Outputs RGB video signals.<br />
x [HDMI Deep Color Output]<br />
[Auto]: Normally select this.<br />
[16bit]/[12bit]/[10bit]: Outputs 16bit/<br />
12bit/10bit video signals when the<br />
connected TV is compatible with Deep<br />
Color.<br />
[Off]: Select this when the picture is<br />
unstable or colors appear unnatural.<br />
x [Pause Mode]<br />
[Auto]: Normally select this. Dynamic<br />
moving pictures appear without blurring.<br />
[Frame]: Displays static pictures at high<br />
resolution.<br />
[Audio Settings]<br />
x [Audio (HDMI)]<br />
[Auto]: Normally select this. Outputs<br />
audio signals according to the status of<br />
the connected HDMI device.<br />
[PCM]: Outputs PCM signals from the<br />
HDMI OUT jack.<br />
x [DSD Output Mode]<br />
[On]: Outputs DSD signals from the<br />
HDMI OUT jack when playing a Super<br />
Audio CD. When [On] is selected, no<br />
signal is output from other jacks.<br />
[Off]: Outputs PCM signals from the<br />
HDMI OUT jack when playing a Super<br />
Audio CD.<br />
x [BD Audio MIX Setting]<br />
[On]: Outputs the audio obtained by<br />
mixing the interactive and secondary<br />
audio to the primary audio.<br />
[Off]: Outputs the primary audio only.<br />
Select this to output HD audio signals to<br />
an AV amplifier (receiver).
x [Dolby Digital / DTS]<br />
[Downmix PCM]: Converts to output<br />
Linear PCM signals. Select this when<br />
connecting an audio device without a<br />
built-in Dolby Digital or DTS decoder.<br />
[Bitstream]: Select this when connecting<br />
an audio device with a built-in Dolby<br />
Digital or DTS decoder.<br />
x [DTS Neo:6]<br />
[Cinema]/[Music]: Outputs the<br />
simulated multi-channel sound from 2<br />
channel sources via the HDMI OUT jack<br />
according to the capability of the<br />
connected device using DTS Neo:6<br />
Cinema or DTS Neo:6 Music mode.<br />
[Off]: Outputs the sound with its original<br />
number of channels via the HDMI OUT<br />
jack.<br />
x [Audio DRC]<br />
[Auto]: Performs playback at the<br />
dynamic range specified by the disc<br />
(BD-ROM only). Other discs are played<br />
back at the [On] level.<br />
[On]: Performs playback at a standard<br />
compression level.<br />
[Off]: No compression works. A more<br />
dynamic sound is produced.<br />
x [Downmix]<br />
[Surround]: Outputs audio signals with<br />
surround effects. Select this when<br />
connecting an audio device that supports<br />
Dolby Surround (Pro Logic) or DTS<br />
Neo:6.<br />
[Stereo]: Outputs audio signals without<br />
surround effects. Select this when<br />
connecting an audio device that does not<br />
support Dolby Surround (Pro Logic) or<br />
DTS Neo:6.<br />
[BD/<strong>DVD</strong> Viewing<br />
Settings]<br />
x [BD/<strong>DVD</strong> Menu Language]<br />
Selects the default menu language for<br />
BD-ROMs or <strong>DVD</strong> VIDEOs.<br />
Select [Select Language Code], and<br />
enter the code for your language,<br />
referring to “Language code list”<br />
(page 38).<br />
x [Audio Language]<br />
Selects the default track language for<br />
BD-ROMs or <strong>DVD</strong> VIDEOs.<br />
When you select [Original], the<br />
language given priority in the disc is<br />
selected.<br />
Select [Select Language Code], and<br />
enter the code for your language,<br />
referring to “Language code list”<br />
(page 38).<br />
x [Subtitle Language]<br />
Selects the default subtitle language for<br />
BD-ROMs or <strong>DVD</strong> VIDEOs.<br />
Select [Select Language Code], and<br />
enter the code for your language,<br />
referring to “Language code list”<br />
(page 38).<br />
x [BD Hybrid Disc Playback Layer]<br />
[BD]: Plays BD layer.<br />
[<strong>DVD</strong>/CD]: Plays <strong>DVD</strong> or CD layer.<br />
x [BD Internet Connection]<br />
[Allow]: Normally select this.<br />
[Do not allow]: Prohibits Internet<br />
connection.<br />
27<br />
Settings and Adjustments
28<br />
[Parental Control<br />
Settings]<br />
x [Password]<br />
Sets or changes the password for the<br />
Parental Control function. A password<br />
allows you to set a restriction on BD-<br />
ROM or <strong>DVD</strong> VIDEO, and Internet<br />
video playback. If necessary, you can<br />
differentiate the restriction levels for<br />
BD-ROMs, <strong>DVD</strong> VIDEOs, and Internet<br />
videos.<br />
x [Parental Control Area Code]<br />
Playback of some BD-ROMs, <strong>DVD</strong><br />
VIDEOs, or Internet videos can be<br />
limited according to the geographic area.<br />
Scenes may be blocked or replaced with<br />
different scenes. Follow the on-screen<br />
instructions and enter your four-digit<br />
password.<br />
x [BD Parental Control] /<br />
[<strong>DVD</strong> Parental Control] /<br />
[Internet Video Parental Control]<br />
By setting Parental Control, scenes can<br />
be blocked or replaced with different<br />
scenes. Follow the on-screen<br />
instructions and enter your four-digit<br />
password.<br />
x [Internet Video Unrated]<br />
[Allow]: Allows the playback of unrated<br />
Internet videos.<br />
[Block]: Blocks the playback of unrated<br />
Internet videos.<br />
[Music Settings]<br />
x [Super Audio CD Playback Layer]<br />
[Super Audio CD]: Plays the Super<br />
Audio CD layer.<br />
[CD]: Plays the CD layer.<br />
x [Super Audio CD Playback<br />
Channel]<br />
[DSD 2ch]: Plays the 2ch area.<br />
[DSD Multi]: Plays the multi-channel<br />
area.<br />
[System Settings]<br />
x [OSD Language]<br />
Selects on-screen display language for<br />
your player.<br />
x [Control for HDMI]<br />
[On]: The following BRAVIA Sync<br />
features are available:<br />
–One-Touch Play<br />
– System Power-Off<br />
– Language Follow<br />
[Off]: Turns off the function.<br />
z<br />
For details, refer to the instruction manual<br />
supplied with the TV or components.<br />
x [HDMI: Linked to TV-off]<br />
[On]: Automatically turns off the player<br />
and HDMI-compatible components<br />
when the connected TV enters standby<br />
mode (BRAVIA Sync).<br />
[Off]: Turns off the function.
x [Quick Start Mode]<br />
[On]: Shortens the startup time when<br />
turning on the player.<br />
[Off]: Reduces standby power<br />
consumption.<br />
x [Auto Display]<br />
[On]: Automatically displays<br />
information on the screen when<br />
changing the viewing titles, picture<br />
modes, audio signals, etc.<br />
[Off]: Displays information only when<br />
you press DISPLAY.<br />
x [Screen Saver]<br />
[On]: Turns on the screen saver function.<br />
The screen saver image appears when<br />
you do not use the player for more than<br />
10 minutes while an on-screen display is<br />
displayed.<br />
[Off]: Turns off the function.<br />
x [Software Update Notification]<br />
[On]: Sets the player to inform you of<br />
newer software version information<br />
(page 25).<br />
[Off]: Turns off the function.<br />
x [Gracenote Settings]<br />
[Auto]: Automatically downloads disc<br />
information when disc playback stops.<br />
Connect to the network for<br />
downloading.<br />
[Manual]: Downloads the disc<br />
information when [Video Search] or<br />
[Music Search] is selected.<br />
x [System Information]<br />
Displays the player’s software version<br />
information and the MAC address.<br />
x [Software License Information]<br />
Displays information about the Software<br />
License.<br />
[Network Settings]<br />
x [Internet Settings]<br />
Connect the player to the network<br />
beforehand. For details, see “Step 3:<br />
Preparing for Network Connection”<br />
(page 16).<br />
[Wired Setup]: Select this when you<br />
connect to a broadband router using a<br />
LAN cable.<br />
[Wireless Setup(built-in)]: Select this<br />
when you use the wireless LAN that is<br />
built into the player for wireless network<br />
connection.<br />
[View Network Status]: Displays the<br />
current network status.<br />
z<br />
For further details, visit the following website<br />
and check the FAQ contents:<br />
http://www.sony.com/blu<strong>ray</strong>support/<br />
x [Network Connection<br />
Diagnostics]<br />
Checks for the proper network<br />
connection by running the network<br />
diagnostics.<br />
x [Connection Server Settings]<br />
Sets whether or not to display the<br />
connected server.<br />
x [Renderer Options]<br />
[Auto Access Permission]: Sets whether<br />
or not to allow automatic access from<br />
newly detected DLNA controllercompatible<br />
product.<br />
29<br />
Settings and Adjustments
30<br />
[Renderer Name]: Displays the player’s<br />
name as it is listed on other DLNA<br />
products on the network.<br />
x [Renderer Access Control]<br />
Displays a list of DLNA controllercompatible<br />
products and sets whether or<br />
not each product is accessible via this<br />
player.<br />
x [PARTY Auto Start]<br />
[On]: Starts a PARTY or joins an<br />
existing PARTY at the request of a<br />
networked product compatible with the<br />
PARTY STREAMING function.<br />
[Off]: Turns off the function.<br />
x [Media Remote Device<br />
Registration]<br />
Registers your “Media Remote” device.<br />
x [Registered Media Remote<br />
Devices]<br />
Displays a list of your registered “Media<br />
Remote” devices.<br />
[Easy Setup]<br />
x [Easy Initial Settings]<br />
Select [Easy Initial Settings] to specify<br />
the basic settings. Follow the on-screen<br />
instructions.<br />
x [Easy Network Settings]<br />
Select [Easy Network Settings] to<br />
specify the network settings. Follow the<br />
on-screen instructions.<br />
[Resetting]<br />
x [Reset to Factory Default Settings]<br />
You can reset the player settings to the<br />
factory default by selecting the group of<br />
settings. All the settings within the group<br />
will be reset.<br />
x [Initialize Personal Information]<br />
You can erase your personal information<br />
stored in the player.
Additional Information<br />
Troubleshooting<br />
If you experience any of the following<br />
difficulties while using the player, use<br />
this troubleshooting guide to help<br />
remedy the problem before requesting<br />
repairs. Should any problem persist,<br />
consult your nearest Sony dealer.<br />
Picture Sound<br />
There is no picture or the picture is<br />
not output correctly.<br />
, Check that all the connecting cables<br />
are securely connected (page 14).<br />
, Switch the input selector on your TV<br />
to display the signal from the player.<br />
, Reset the video output resolution to the<br />
lowest resolution by pressing x on the<br />
player for more than 10 seconds.<br />
, For HDMI connections, try the<br />
following: 1Turn the player off and<br />
on again. 2Turn the connected<br />
equipment off and on again.<br />
3Disconnect and then reconnect the<br />
HDMI cable.<br />
, The HDMI OUT jack is connected to a<br />
DVI device that does not support<br />
copyright protection technology.<br />
, For HDMI connections, check the<br />
[Output Video Format] settings in the<br />
[Screen Settings] setup (page 26).<br />
, When the analog signals are also<br />
output, set [BD-ROM 24p Output] or<br />
[<strong>DVD</strong>-ROM 24p Output] to [Off] in<br />
the [Screen Settings] setup (page 26).<br />
, For BD-ROMs, check the [BD-ROM<br />
24p Output] or [<strong>DVD</strong>-ROM 24p<br />
Output] setting in the [Screen Settings]<br />
setup (page 26).<br />
The display language on the screen<br />
switches automatically when<br />
connected to the HDMI OUT jack.<br />
, When [Control for HDMI] is set to<br />
[On] (page 28), the display language<br />
on the screen automatically switches<br />
according to the language setting of the<br />
connected TV (if you change the<br />
setting on your TV, etc.).<br />
There is no sound or the sound is not<br />
output correctly.<br />
, Check that all the connecting cables<br />
are securely connected (page 14).<br />
, Switch the input selector on your AV<br />
amplifier (receiver) so that the audio<br />
signals of the player are output from<br />
your AV amplifier (receiver).<br />
, If the audio signal does not come<br />
through the DIGITAL OUT<br />
(COAXIAL)/HDMI OUT jack, check<br />
the audio settings (page 26).<br />
, For HDMI connections, try the<br />
following: 1Turn the player off and<br />
on again. 2Turn the connected<br />
equipment off and on again.<br />
3Disconnect and then reconnect the<br />
HDMI cable.<br />
, For HDMI connections, if the player is<br />
connected to a TV through an AV<br />
amplifier (receiver), try connecting the<br />
HDMI cable directly to the TV. Refer<br />
also to the instruction manual supplied<br />
with the AV amplifier (receiver).<br />
, The HDMI OUT jack is connected to a<br />
DVI device (DVI jacks do not accept<br />
audio signals).<br />
31<br />
Additional Information
32<br />
, The device connected to the HDMI<br />
OUT jack does not support the audio<br />
format of the player. Check the audio<br />
settings (page 26).<br />
The HD Audio (Dolby Digital Plus,<br />
Dolby TrueHD, DTS-HD High<br />
Resolution Audio, and DTS-HD<br />
Master Audio) is not output by<br />
bitstream.<br />
, Set [BD Audio MIX Setting] to [Off]<br />
in the [Audio Settings] setup<br />
(page 26).<br />
, Check that the connected AV amplifier<br />
(receiver) is compatible with each HD<br />
Audio format.<br />
The interactive audio is not output.<br />
, Set [BD Audio MIX Setting] to [On] in<br />
the [Audio Settings] setup (page 26).<br />
Disc<br />
The disc does not play.<br />
, The disc is dirty or skewed.<br />
, The disc is upside down. Insert the disc<br />
with the playback side facing down.<br />
, The disc has a format that cannot be<br />
played back by this player (page 35).<br />
, The player cannot play a recorded disc<br />
that is not correctly finalized.<br />
, The region code on the BD or <strong>DVD</strong><br />
does not match the player.<br />
USB device<br />
The player does not detect a USB<br />
device connected to the player.<br />
, Make sure that the USB device is<br />
securely connected to the USB jack.<br />
, Check if the USB device or a cable is<br />
damaged.<br />
, Check if the USB device is on.<br />
, If the USB device is connected via a<br />
USB hub, connect the USB device<br />
directly to the player.<br />
Sony Entertainment Network<br />
The picture/sound is poor/certain<br />
programs display a loss of detail,<br />
especially during fast-motion or dark<br />
scenes.<br />
, Picture/sound quality may be<br />
improved by changing the connection<br />
speed. Recommended connection<br />
speed is of at least 2.5 Mbps for<br />
standard definition video (10 Mbps for<br />
high definition video).<br />
The picture is small.<br />
, Press M to zoom in.<br />
Network connection<br />
The player cannot connect to the<br />
network.<br />
, Check the network connection<br />
(page 16) and the network settings<br />
(page 29).<br />
You cannot connect your PC to the<br />
Internet after [Wi-Fi Protected Setup<br />
(WPS)] is performed.<br />
, The wireless settings of the router may<br />
change automatically if you use the<br />
Wi-Fi Protected Setup function before<br />
adjusting the settings of the router. In<br />
this case, change the wireless settings<br />
of your PC accordingly.
You cannot connect the player to the<br />
wireless LAN router.<br />
, Check if the wireless LAN router is on.<br />
, Depending on the surrounding<br />
environment, such as the wall material,<br />
radio wave receiving condition, or<br />
obstacles between the player and the<br />
wireless LAN router, the<br />
communication distance may be<br />
shortened. Move the player and the<br />
wireless LAN router closer to each<br />
other.<br />
, Devices that use a 2.4 GHz frequency<br />
band, such as a microwave, <strong>Blu</strong>etooth,<br />
or digital cordless device, may<br />
interrupt the communication. Move<br />
the player away from such devices, or<br />
turn off such devices.<br />
The desired wireless router do not<br />
appear in the wireless network list.<br />
, Press RETURN to return to the<br />
previous screen, and try wireless setup<br />
again. If the desired wireless router is<br />
still not detected, press RETURN to<br />
select [Manual registration].<br />
The message [A new software version<br />
is available. Please go to the “Setup”<br />
section of the menu and select<br />
“Network update” to perform the<br />
update.] appears on the screen when<br />
turning the player on.<br />
, See [Network Update] (page 25) to<br />
update the player to a newer software<br />
version.<br />
You cannot start the PARTY<br />
STREAMING function.<br />
, Check that [PARTY Auto Start] is set<br />
to [On] in [Network Settings]<br />
(page 30).<br />
Control for HDMI (BRAVIA<br />
Sync)<br />
The [Control for HDMI] function does<br />
not work (BRAVIA Sync).<br />
, Check that [Control for HDMI] is set<br />
to [On] (page 28).<br />
, If you change the HDMI connection,<br />
turn the player off and on again.<br />
, If power failure occurs, set [Control<br />
for HDMI] to [Off], then set [Control<br />
for HDMI] to [On] (page 28).<br />
, Check the following and refer to the<br />
instruction manual supplied with the<br />
component.<br />
– the connected component is<br />
compatible with the [Control for<br />
HDMI] function.<br />
– the connected component’s setting<br />
for the [Control for HDMI] function<br />
is correct.<br />
, When you connect the player to a TV<br />
through an AV amplifier (receiver),<br />
– if the AV amplifier (receiver) is not<br />
compatible with the [Control for<br />
HDMI] function, you may be unable<br />
to control the TV from the player.<br />
– if you change the HDMI<br />
connection, disconnect and<br />
reconnect the AC power cord, or a<br />
power failure occurs, try the<br />
following: 1Switch the input<br />
selector of the AV amplifier<br />
(receiver) so that the picture from<br />
the player appears on the TV screen.<br />
2Set [Control for HDMI] to [Off],<br />
then set [Control for HDMI] to [On]<br />
(page 28). Refer to the instruction<br />
manual supplied with the AV<br />
amplifier (receiver).<br />
33<br />
Additional Information
34<br />
The System Power-Off function does<br />
not work (BRAVIA Sync).<br />
, Check that [Control for HDMI] and<br />
[HDMI: Linked to TV-off] are set to<br />
[On] (page 28).<br />
Others<br />
Playback does not start from the<br />
beginning of content.<br />
, Press OPTIONS, and select [Play from<br />
beginning].<br />
Playback does not start from the<br />
resume point where you last stopped<br />
playing.<br />
, The resume point may be cleared from<br />
memory depending on the disc when<br />
– you open the disc t<strong>ray</strong>.<br />
– you disconnect the USB device.<br />
– you play other content.<br />
– you turn off the player.<br />
The disc t<strong>ray</strong> does not open and you<br />
cannot remove the disc even after you<br />
press Z.<br />
, Try the following: 1Turn the player<br />
off, and disconnect the AC power cord.<br />
2Reconnect the AC power cord while<br />
pressing down Z on the player.<br />
3Keep pressing down Z on the player<br />
until the t<strong>ray</strong> opens. 4Remove the<br />
disc. 5Hold down [/1 on the player<br />
for more than 10 seconds until the<br />
player turns off.<br />
The player does not respond to any<br />
button.<br />
, Moisture has condensed inside the<br />
player (page 4).<br />
, Hold down [/1 on the player for more<br />
than 10 seconds until the player turns<br />
off.<br />
If the player still does not respond to<br />
any button, disconnect then reconnect<br />
the AC power cord.<br />
Specifications<br />
System<br />
Laser: Semiconductor laser<br />
Inputs and outputs<br />
(Jack name:<br />
Jack type/Output level/Load<br />
impedance)<br />
LINE OUT R-AUDIO-L:<br />
Phono jack/2 Vrms/10 kilohms<br />
DIGITAL OUT (COAXIAL):<br />
Phono jack/0.5 Vp-p/75 ohms<br />
HDMI OUT:<br />
HDMI 19-pin standard connector<br />
LINE OUT VIDEO:<br />
Phono jack/1.0 Vp-p/75 ohms<br />
LAN (100):<br />
100BASE-TX Terminal<br />
USB:<br />
USB jack Type A (For connecting a<br />
USB memory, memory card reader,<br />
digital still camera, and digital video<br />
camera)<br />
Wireless<br />
Wireless LAN standard:<br />
IEEE 802.11 b/g/n<br />
Frequency range:<br />
2.4 GHz band: Channels 1-11<br />
Modulation:<br />
DSSS and OFDM
General<br />
Power requirements:<br />
120 V AC, 60 Hz<br />
Power consumption: 11 W<br />
Dimensions (approx.):<br />
320 mm × 200 mm × 43 mm<br />
(12 5/8 in. × 7 7/8 in. × 1 3/4 in.)<br />
(width/depth/height)<br />
incl. projecting parts<br />
Mass (approx.): 1.2 kg (2 lb 10 oz)<br />
Operating temperature:<br />
5ºC to 35ºC (41°F to 95°F)<br />
Operating humidity:<br />
25 % to 80 %<br />
Supplied accessories<br />
See page 13.<br />
Specifications and design are subject to<br />
change without notice.<br />
Playable discs<br />
<strong>Blu</strong>-<strong>ray</strong><br />
Disc *1<br />
BD-ROM<br />
BD-R *2 /BD-RE *2<br />
<strong>DVD</strong> *3 <strong>DVD</strong>-ROM<br />
<strong>DVD</strong>-R/<strong>DVD</strong>-RW<br />
<strong>DVD</strong>+R/<strong>DVD</strong>+RW<br />
CD *3 CD-DA (Music CD)<br />
CD-ROM<br />
CD-R/CD-RW<br />
Super Audio CD<br />
*1 Since the <strong>Blu</strong>-<strong>ray</strong> Disc specifications are<br />
new and evolving, some discs may not be<br />
playable depending on the disc type and the<br />
version.<br />
The audio output differs depending on the<br />
source, connected output jack, and selected<br />
audio settings.<br />
*2 BD-RE: Ver.2.1<br />
BD-R: Ver.1.1, 1.2, 1.3 including organic<br />
pigment type BD-R (LTH type)<br />
The BD-Rs recorded on a PC cannot be<br />
played if postscripts are recordable.<br />
*3 A CD or <strong>DVD</strong> disc will not play if it has not<br />
been correctly finalized. For more<br />
information, refer to the instruction manual<br />
supplied with the recording device.<br />
Discs that cannot be played<br />
BDs with cartridge<br />
BDXLs<br />
<strong>DVD</strong>-RAMs<br />
HD <strong>DVD</strong>s<br />
<strong>DVD</strong> Audio discs<br />
PHOTO CDs<br />
Data part of CD-Extras<br />
Super VCDs<br />
Audio material side on DualDiscs<br />
A disc recorded in a color system other<br />
than NTSC, such as PAL (this player<br />
conforms to the NTSC color system).<br />
Note on Discs<br />
This product is designed to playback<br />
discs that conform to the Compact Disc<br />
(CD) standard. DualDiscs and some of<br />
the music discs encoded with copyright<br />
protection technologies do not conform<br />
to the Compact Disc (CD) standard,<br />
therefore, these discs may not be<br />
playable by this product.<br />
Note on playback operations of BDs/<br />
<strong>DVD</strong>s<br />
Some playback operations of BDs/<br />
<strong>DVD</strong>s may be intentionally set by<br />
software producers. Since this player<br />
plays BDs/<strong>DVD</strong>s according to the disc<br />
contents the software producers<br />
designed, some playback features may<br />
not be available.<br />
Note about double-layer BDs/<strong>DVD</strong>s<br />
The playback pictures and sound may be<br />
momentarily interrupted when the layers<br />
switch.<br />
35<br />
Additional Information
36<br />
Region code (BD-ROM/<strong>DVD</strong> VIDEO<br />
only)<br />
Your player has a region code printed on<br />
the rear of the unit and will only play<br />
BD-ROMs/<strong>DVD</strong> VIDEOs labeled with<br />
identical region codes or .<br />
Playable types of files<br />
Video<br />
File format Extensions<br />
MPEG-1 Video/<br />
PS *1*2<br />
MPEG-2 Video/PS,<br />
TS *1*3<br />
Music<br />
“.mpg,” “.mpeg,”<br />
“.m2ts,” “.mts”<br />
MPEG-4 AVC *1*2 “.mkv,” “.mp4,”<br />
“.m4v,” “.m2ts,”<br />
“.mts”<br />
WMV9 *1*2<br />
“.wmv,” “.asf”<br />
AVCHD *2*4 *5<br />
Xvid “.avi”<br />
File format Extensions<br />
MP3 (MPEG-1 Audio<br />
Layer III)<br />
“.mp3”<br />
AAC/HE-AAC *1*2*6 “.m4a”<br />
WMA9<br />
Standard *1*2*6<br />
ALL<br />
“.wma”<br />
LPCM “.wav”<br />
Region code<br />
Photo<br />
File format Extensions<br />
JPEG “.jpg,” “.jpeg”<br />
PNG “.png *7 ”<br />
GIF “.gif *7 ”<br />
*1 The player does not play coded files such as<br />
DRM.<br />
*2 The player may not play this file format on<br />
a DLNA server.<br />
*3 The player can only play standard<br />
definition video on a DLNA server.<br />
*4 This player can play AVCHD Ver.2.0<br />
format.<br />
*5 The player plays AVCHD format files that<br />
are recorded on a digital video camera, etc.<br />
The AVCHD format disc will not play if it<br />
has not been correctly finalized.<br />
*6 The player does not play coded files such as<br />
Lossless.<br />
*7 The player does not play animated PNG or<br />
animated GIF files.<br />
b Some files may not play depending on the<br />
file format, file encoding, recording<br />
condition, or DLNA server condition.<br />
Some files edited on a PC may not play.<br />
The player can recognize the following files<br />
or folders in BDs, <strong>DVD</strong>s, CDs and USB<br />
devices:<br />
– up to folders in the 9th layer, including the<br />
root folder<br />
– up to 500 files/folders in a single layer<br />
The player can recognize the following files<br />
or folders stored in the DLNA server:<br />
– up to folders in the 19th layer<br />
– up to 999 files/folders in a single layer<br />
Some USB devices may not work with this<br />
player.<br />
The player can recognize Mass Storage<br />
Class (MSC) devices (such as flash memory<br />
or an HDD), Still Image Capture Device<br />
(SICD) class devices and 101 keyboard.
To avoid data corruption or damage to the<br />
USB memory or devices, turn off the player<br />
when connecting or removing the USB<br />
memory or devices.<br />
The player may not play high bit rate video<br />
files on DATA CDs smoothly. You are<br />
recommended to play such files using<br />
DATA <strong>DVD</strong>s or DATA BDs.<br />
About wireless LAN security<br />
Since communication via the wireless<br />
LAN function is established by radio<br />
waves, the wireless signal may be<br />
susceptible to interception. To protect<br />
wireless communication, this player<br />
supports various security functions. Be<br />
sure to correctly configure the security<br />
settings in accordance with your network<br />
environment.<br />
No Security<br />
Although you can easily make settings,<br />
anyone can intercept wireless<br />
communication or intrude into your<br />
wireless network, even without any<br />
sophisticated tools. Keep in mind that<br />
there is a risk of unauthorized access or<br />
interception of data.<br />
WEP<br />
WEP applies security to<br />
communications to prevent outsiders<br />
from intercepting communications or<br />
intruding into your wireless network.<br />
WEP is a legacy security technology that<br />
enables older devices, which do not<br />
support TKIP/AES, to be connected.<br />
WPA-PSK (TKIP), WPA2-PSK (TKIP)<br />
TKIP is a security technology developed<br />
to correct the deficiencies of WEP. TKIP<br />
assures a higher security level than<br />
WEP.<br />
WPA-PSK (AES), WPA2-PSK (AES)<br />
AES is a security technology that uses an<br />
advanced security method that is distinct<br />
from WEP and TKIP.<br />
AES assures a higher security level than<br />
WEP or TKIP.<br />
Notes About the Discs<br />
To keep the disc<br />
clean, handle the<br />
disc by its edge. Do<br />
not touch the<br />
surface.<br />
Dust, fingerprints, or scratches on the<br />
disc may cause it to malfunction.<br />
Do not expose the disc to direct<br />
sunlight or heat sources such as hot air<br />
ducts, or leave it in a car parked in<br />
direct sunlight as the temperature may<br />
rise considerably inside the car.<br />
After playing, store the disc in its case.<br />
Clean the disc with a<br />
cleaning cloth. Wipe<br />
the disc from the<br />
center out.<br />
Do not use solvents<br />
such as benzine,<br />
thinner, commercially available disc/<br />
lens cleaners, or anti-static sp<strong>ray</strong><br />
intended for vinyl LPs.<br />
If you have printed the disc’s label, dry<br />
the label before playing.<br />
Do not use the following discs.<br />
– A lens cleaning disc.<br />
– A disc that has a non-standard shape<br />
(e.g., card, heart).<br />
– A disc with a label or sticker on it.<br />
– A disc that has cellophane tape or<br />
sticker adhesive on it.<br />
Do not resurface the playing side of a<br />
disc to remove surface scratches.<br />
37<br />
Additional Information
38<br />
Code numbers of controllable<br />
TVs<br />
While holding down -TV- [/1, enter the<br />
TV manufacturer’s code using the<br />
number buttons.<br />
If more than one code number is listed,<br />
try entering them one at a time until you<br />
find the one that works with your TV.<br />
Manufacturer Code number<br />
Sony 01 (default)<br />
Hitachi 02<br />
LG/Goldstar 04<br />
Mitsubishi/MGA 13<br />
NEC 04<br />
Panasonic 19<br />
Philips 21<br />
Pioneer 16<br />
RCA 10<br />
Samsung 20<br />
Sharp 18<br />
Toshiba 07<br />
Language code list<br />
For details, see [BD/<strong>DVD</strong> Viewing<br />
Settings] (page 27).<br />
The language spellings conform to the<br />
ISO 639: 1988 (E/F) standard.<br />
Code Language<br />
1027 Afar 1028 Abkhazian<br />
1032 Afrikaans 1039 Amharic<br />
1044 Arabic 1045 Assamese<br />
1051 Aymara 1052 Azerbaijani<br />
1053 Bashkir 1057 Byelorussian<br />
1059 Bulgarian 1060 Bihari<br />
1061 Bislama 1066 Bengali<br />
1067 Tibetan 1070 Breton<br />
1079 Catalan 1093 Corsican<br />
1097 Czech 1103 Welsh<br />
1105 Danish 1109 German<br />
1130 Bhutani;<br />
Dzongkha<br />
1142 Greek<br />
1144 English 1145 Esperanto<br />
1149 Spanish 1150 Estonian<br />
1151 Basque 1157 Persian<br />
1165 Finnish 1166 Fiji<br />
1171 Faroese 1174 French<br />
1181 Frisian 1183 Irish<br />
1186 Scots Gaelic 1194 Galician<br />
1196 Guarani 1203 Gujarati<br />
1209 Hausa 1217 Hindi<br />
1226 Croatian 1229 Hungarian<br />
1233 Armenian 1235 Interlingua<br />
1239 Interlingue 1245 Inupiak<br />
1248 Indonesian 1253 Icelandic<br />
1254 Italian 1257 Hebrew<br />
1261 Japanese 1269 Yiddish<br />
1283 Javanese 1287 Georgian<br />
1297 Kazakh 1298 Greenlandic;<br />
Kalaallisut<br />
1299 Cambodian;<br />
Khmer<br />
1300 Kannada<br />
1301 Korean 1305 Kashmiri<br />
1307 Kurdish 1311 Kirghiz<br />
1313 Latin 1326 Lingala<br />
1327 Laothian; Lao 1332 Lithuanian<br />
1334 Latvian 1345 Malagasy<br />
1347 Maori 1349 Macedonian<br />
1350 Malayalam 1352 Mongolian<br />
1353 Moldavian 1356 Marathi
Code Language<br />
1357 Malay 1358 Malese;<br />
Maltese<br />
1363 Burmese 1365 Nauru<br />
1369 Nepali 1376 Dutch<br />
1379 Norwegian 1393 Occitan<br />
1403 Oromo 1408 Oriya<br />
1417 Punjabi;<br />
Panjabi<br />
1428 Polish<br />
1435 Pashto;<br />
Pushto<br />
1436 Portuguese<br />
1463 Quechua 1481 Rhaeto-<br />
Romance<br />
1482 Kirundi; Rundi 1483 Romanian<br />
1489 Russian 1491 Kinyarwanda<br />
1495 Sanskrit 1498 Sindhi<br />
1501 Sangho; 1502 Serbo-<br />
Sango<br />
Croatian<br />
1503 Singhalese;<br />
Sinhalese<br />
1505 Slovak<br />
1506 Slovenian 1507 Samoan<br />
1508 Shona 1509 Somali<br />
1511 Albanian 1512 Serbian<br />
1513 Siswati; Swati 1514 Sesotho;<br />
Sotho<br />
southern<br />
1515 Sundanese 1516 Swedish<br />
1517 Swahili 1521 Tamil<br />
1525 Telugu 1527 Tajik<br />
1528 Thai 1529 Tigrinya<br />
1531 Turkmen 1532 Tagalog<br />
1534 Setswana; 1535 Tonga; Tonga<br />
Tswana<br />
islands<br />
1538 Turkish 1539 Tsonga<br />
1540 Tatar 1543 Twi<br />
1557 Ukrainian 1564 Urdu<br />
1572 Uzbek 1581 Vietnamese<br />
1587 Volapük 1613 Wolof<br />
1632 Xhosa 1665 Yoruba<br />
1684 Chinese 1697 Zulu<br />
1703 Not specified<br />
Parental control/area code<br />
For details, see [Parental Control Area<br />
Code] (page 28).<br />
Code Area<br />
2044 Argentina 2047 Australia<br />
2046 Austria 2057 Belgium<br />
2070 Brazil 2090 Chile<br />
2092 China 2093 Colombia<br />
2115 Denmark 2165 Finland<br />
2174 France 2109 Germany<br />
2200 Greece 2219 Hong Kong<br />
2248 India 2238 Indonesia<br />
2239 Ireland 2254 Italy<br />
2276 Japan 2304 Korea<br />
2333 Luxembourg 2363 Malaysia<br />
2362 Mexico 2376 Netherlands<br />
2390 New Zealand 2379 Norway<br />
2427 Pakistan 2424 Philippines<br />
2428 Poland 2436 Portugal<br />
2489 Russia 2501 Singapore<br />
2149 Spain 2499 Sweden<br />
2086 Switzerland 2543 Taiwan<br />
2528 Thailand 2184 United<br />
Kingdom<br />
39<br />
Additional Information
The software of this player may be updated in the future. For information about any<br />
available updates and the latest Operating Instructions, please visit the following<br />
website:<br />
http://www.sony.com/blu<strong>ray</strong>support/<br />
© 2012 Sony Corporation<br />
Printed in Malaysia<br />
4-410-138-12(1)