Unified Access Point (AP) Administrator's Guide
Unified Access Point (AP) Administrator's Guide
Unified Access Point (AP) Administrator's Guide

Create successful ePaper yourself
Turn your PDF publications into a flip-book with our unique Google optimized e-Paper software.
<strong>Unified</strong> <strong>Access</strong> <strong>Point</strong><br />
(<strong>AP</strong>) Administrator’s<br />
<strong>Guide</strong><br />
Product Model : DWL-3500<strong>AP</strong><br />
DWL-8500<strong>AP</strong><br />
<strong>Unified</strong> Wired & Wireless <strong>Access</strong> System<br />
Release 2.1<br />
May 2008<br />
©Copyright 2008. All rights reserved.
D-Link <strong>Unified</strong> <strong>Access</strong> <strong>Point</strong> Administrator’s <strong>Guide</strong><br />
2 © 2001-2008 D-Link Corporation. All Rights Reserved.
Table of Contents<br />
Table of Contents<br />
List of Figures. . . . . . . . . . . . . . . . . . . . . . . . . . . . . . . . . . . . . . . . . . . 7<br />
List of Tables . . . . . . . . . . . . . . . . . . . . . . . . . . . . . . . . . . . . . . . . . . . 9<br />
About This Document . . . . . . . . . . . . . . . . . . . . . . . . . . . . . . . . . . . 11<br />
Document Organization . . . . . . . . . . . . . . . . . . . . . . . . . . . . . . . . . . . . . . . 11<br />
Audience . . . . . . . . . . . . . . . . . . . . . . . . . . . . . . . . . . . . . . . . . . . . . . . . . . . 11<br />
Document Conventions . . . . . . . . . . . . . . . . . . . . . . . . . . . . . . . . . . . . . . . . 11<br />
Online Help, Supported Browsers, and Limitations . . . . . . . . . . . . . . . . . . 12<br />
1 Overview of the D-Link <strong>Access</strong> <strong>Point</strong> . . . . . . . . . . . . . . . . . . . . 15<br />
Features and Benefits . . . . . . . . . . . . . . . . . . . . . . . . . . . . . . . . . . . . . . . . . 16<br />
IEEE Standards Support . . . . . . . . . . . . . . . . . . . . . . . . . . . . . . . . . . . . . . . . . 16<br />
Wireless Features . . . . . . . . . . . . . . . . . . . . . . . . . . . . . . . . . . . . . . . . . . . . . . 16<br />
Security Features. . . . . . . . . . . . . . . . . . . . . . . . . . . . . . . . . . . . . . . . . . . . . . . 17<br />
Networking . . . . . . . . . . . . . . . . . . . . . . . . . . . . . . . . . . . . . . . . . . . . . . . . . . . 17<br />
Maintainability . . . . . . . . . . . . . . . . . . . . . . . . . . . . . . . . . . . . . . . . . . . . . . . . 17<br />
<strong>Access</strong> <strong>Point</strong> Hardware . . . . . . . . . . . . . . . . . . . . . . . . . . . . . . . . . . . . . . . . . . 18<br />
2 Preparing to Install the <strong>Access</strong> <strong>Point</strong> . . . . . . . . . . . . . . . . . . . . 19<br />
Default Settings for the <strong>Unified</strong> <strong>Access</strong> <strong>Point</strong>s . . . . . . . . . . . . . . . . . . . . . . 19<br />
Administrator’s Computer Requirements . . . . . . . . . . . . . . . . . . . . . . . . . . 21<br />
Wireless Client Requirements . . . . . . . . . . . . . . . . . . . . . . . . . . . . . . . . . . . 22<br />
Dynamic and Static IP Addressing on the <strong>AP</strong>. . . . . . . . . . . . . . . . . . . . . . . 23<br />
Recovering an IP Address . . . . . . . . . . . . . . . . . . . . . . . . . . . . . . . . . . . . . . . . 23<br />
Discovering a Dynamically Assigned IP Address . . . . . . . . . . . . . . . . . . . . . . 23<br />
Using the Reset Button . . . . . . . . . . . . . . . . . . . . . . . . . . . . . . . . . . . . . . . . 23<br />
3 Installing the <strong>Access</strong> <strong>Point</strong> . . . . . . . . . . . . . . . . . . . . . . . . . . . . . 25<br />
Installing the <strong>Unified</strong> <strong>Access</strong> <strong>Point</strong>. . . . . . . . . . . . . . . . . . . . . . . . . . . . . . . 25<br />
Viewing Basic Settings. . . . . . . . . . . . . . . . . . . . . . . . . . . . . . . . . . . . . . . . . . . 29<br />
Using the CLI to View the IP Address. . . . . . . . . . . . . . . . . . . . . . . . . . . . . 30<br />
Configuring the Ethernet Interface . . . . . . . . . . . . . . . . . . . . . . . . . . . . . . 31<br />
Using the Web UI to configure Ethernet Settings . . . . . . . . . . . . . . . . . . . . . . 31<br />
Using the CLI to Configure Ethernet Settings. . . . . . . . . . . . . . . . . . . . . . . . . 33<br />
Configuring IEEE 802.1X Authentication . . . . . . . . . . . . . . . . . . . . . . . . . 34<br />
Using the Web UI to Configure 802.1X Authentication Information . . . . . . . 35<br />
Using the CLI to Configure 802.1X Authentication Information . . . . . . . . . . 36<br />
Verifying the Installation. . . . . . . . . . . . . . . . . . . . . . . . . . . . . . . . . . . . . . . 36<br />
4 Configuring <strong>Access</strong> <strong>Point</strong> Security . . . . . . . . . . . . . . . . . . . . . . 39<br />
Understanding Security on Wireless Networks . . . . . . . . . . . . . . . . . . . . . 39<br />
Choosing a Security Mode . . . . . . . . . . . . . . . . . . . . . . . . . . . . . . . . . . . . . . . 39<br />
Comparing Security Modes. . . . . . . . . . . . . . . . . . . . . . . . . . . . . . . . . . . . . . . 40<br />
Enabling Station Isolation. . . . . . . . . . . . . . . . . . . . . . . . . . . . . . . . . . . . . . . . 43<br />
3
D-Link <strong>Unified</strong> <strong>Access</strong> <strong>Point</strong> Administrator’s <strong>Guide</strong><br />
Configuring Virtual <strong>Access</strong> <strong>Point</strong> Security . . . . . . . . . . . . . . . . . . . . . . . . . 43<br />
None (Plain-text) . . . . . . . . . . . . . . . . . . . . . . . . . . . . . . . . . . . . . . . . . . . . . . . 45<br />
Static WEP . . . . . . . . . . . . . . . . . . . . . . . . . . . . . . . . . . . . . . . . . . . . . . . . . . . . 45<br />
IEEE 802.1X . . . . . . . . . . . . . . . . . . . . . . . . . . . . . . . . . . . . . . . . . . . . . . . . . . 49<br />
WPA Personal . . . . . . . . . . . . . . . . . . . . . . . . . . . . . . . . . . . . . . . . . . . . . . . . . 50<br />
WPA Enterprise . . . . . . . . . . . . . . . . . . . . . . . . . . . . . . . . . . . . . . . . . . . . . . . . 52<br />
Prohibiting the SSID Broadcast. . . . . . . . . . . . . . . . . . . . . . . . . . . . . . . . . . . . 53<br />
5 Managing the <strong>Access</strong> <strong>Point</strong> . . . . . . . . . . . . . . . . . . . . . . . . . . . . .55<br />
Setting the Wireless Interface . . . . . . . . . . . . . . . . . . . . . . . . . . . . . . . . . . . 55<br />
Using the 802.11h Wireless Mode . . . . . . . . . . . . . . . . . . . . . . . . . . . . . . . . . . 57<br />
Configuring Radio Settings . . . . . . . . . . . . . . . . . . . . . . . . . . . . . . . . . . . . 58<br />
Configuring Virtual <strong>Access</strong> <strong>Point</strong>s . . . . . . . . . . . . . . . . . . . . . . . . . . . . . . . 62<br />
Controlling <strong>Access</strong> by MAC Authentication . . . . . . . . . . . . . . . . . . . . . . . 66<br />
Configuring a MAC Filter List on the <strong>AP</strong> . . . . . . . . . . . . . . . . . . . . . . . . . . . . 66<br />
Configuring MAC Authentication on the RADIUS Server. . . . . . . . . . . . . . . . 67<br />
Configuring Load Balancing . . . . . . . . . . . . . . . . . . . . . . . . . . . . . . . . . . . 68<br />
6 Configuring <strong>Access</strong> <strong>Point</strong> Services . . . . . . . . . . . . . . . . . . . . . . .69<br />
Configuring Quality of Service (QoS) . . . . . . . . . . . . . . . . . . . . . . . . . . . . 69<br />
Understanding QoS . . . . . . . . . . . . . . . . . . . . . . . . . . . . . . . . . . . . . . . . . . . . . 69<br />
Configuring QoS Settings . . . . . . . . . . . . . . . . . . . . . . . . . . . . . . . . . . . . . . . . 75<br />
Enabling the Network Time Protocol Server . . . . . . . . . . . . . . . . . . . . . . . 79<br />
Enabling or Disabling a Network Time Protocol (NTP) Server . . . . . . . . . . . 80<br />
7 Maintaining the <strong>Access</strong> <strong>Point</strong> . . . . . . . . . . . . . . . . . . . . . . . . . . .81<br />
Managing the Configuration File . . . . . . . . . . . . . . . . . . . . . . . . . . . . . . . . 81<br />
Resetting the Factory Default Configuration . . . . . . . . . . . . . . . . . . . . . . . . . 82<br />
Saving the Current Configuration to a Backup File . . . . . . . . . . . . . . . . . . . . 83<br />
Restoring the Configuration from a Previously Saved File . . . . . . . . . . . . . . . 83<br />
Rebooting the <strong>Access</strong> <strong>Point</strong> . . . . . . . . . . . . . . . . . . . . . . . . . . . . . . . . . . . . . . . 85<br />
Upgrading the Firmware . . . . . . . . . . . . . . . . . . . . . . . . . . . . . . . . . . . . . . 85<br />
8 Configuring the <strong>Access</strong> <strong>Point</strong> for Managed Mode . . . . . . . . . .87<br />
Transitioning Between Modes. . . . . . . . . . . . . . . . . . . . . . . . . . . . . . . . . . . 87<br />
Configuring Managed <strong>Access</strong> <strong>Point</strong> Settings . . . . . . . . . . . . . . . . . . . . . . . 88<br />
Viewing Managed <strong>AP</strong> DHCP Information . . . . . . . . . . . . . . . . . . . . . . . . . 89<br />
9 Viewing <strong>Access</strong> <strong>Point</strong> Status . . . . . . . . . . . . . . . . . . . . . . . . . . . .91<br />
Viewing Interface Status . . . . . . . . . . . . . . . . . . . . . . . . . . . . . . . . . . . . . . . 91<br />
Ethernet (Wired) Settings. . . . . . . . . . . . . . . . . . . . . . . . . . . . . . . . . . . . . . . . . 92<br />
Wireless Settings . . . . . . . . . . . . . . . . . . . . . . . . . . . . . . . . . . . . . . . . . . . . . . . 92<br />
Viewing Events Logs . . . . . . . . . . . . . . . . . . . . . . . . . . . . . . . . . . . . . . . . . 92<br />
Configuring Persistent Logging Options. . . . . . . . . . . . . . . . . . . . . . . . . . . . . 93<br />
Configuring the Log Relay Host for Kernel Messages . . . . . . . . . . . . . . . . . . 94<br />
Enabling or Disabling the Log Relay Host on the Events Page . . . . . . . . . . . 95<br />
Viewing Transmit and Receive Statistics . . . . . . . . . . . . . . . . . . . . . . . . . . 95<br />
Viewing Client Association Information . . . . . . . . . . . . . . . . . . . . . . . . . . 97<br />
Link Integrity Monitoring . . . . . . . . . . . . . . . . . . . . . . . . . . . . . . . . . . . . . . . . 98<br />
4 © 2001-2008 D-Link Corporation. All Rights Reserved.
Table of Contents<br />
Viewing Neighboring <strong>Access</strong> <strong>Point</strong>s . . . . . . . . . . . . . . . . . . . . . . . . . . . . . 98<br />
A Wireless Client Settings and RADIUS Server Setup. . . . . . . 101<br />
<strong>Access</strong>ing Wireless Client Security Settings . . . . . . . . . . . . . . . . . . . . . . . 102<br />
Configuring a Client to <strong>Access</strong> an Unsecure Network . . . . . . . . . . . . . . . 104<br />
Configuring Static WEP Security on a Client. . . . . . . . . . . . . . . . . . . . . . 104<br />
Configuring WPA/WPA2 Personal on a Client . . . . . . . . . . . . . . . . . . . . . 106<br />
Using an External Authentication Server . . . . . . . . . . . . . . . . . . . . . . . . . 108<br />
Configuring IEEE 802.1X Security on a Client . . . . . . . . . . . . . . . . . . . . 108<br />
IEEE 802.1X Client Using E<strong>AP</strong>/TLS Certificate. . . . . . . . . . . . . . . . . . . . . . 108<br />
Configuring WPA/WPA2 Enterprise (RADIUS) . . . . . . . . . . . . . . . . . . . . 111<br />
WPA/WPA2 Enterprise (RADIUS) Client Using E<strong>AP</strong>/PE<strong>AP</strong> . . . . . . . . . . . . . 111<br />
WPA/WPA2 Enterprise (RADIUS) Client Using E<strong>AP</strong>-TLS Certificate . . . . . 113<br />
Configuring the RADIUS Server for Authentication . . . . . . . . . . . . . . . . 116<br />
Obtaining a TLS-E<strong>AP</strong> Certificate for a Client . . . . . . . . . . . . . . . . . . . . . 119<br />
Configuring the RADIUS Server for VLAN Tags . . . . . . . . . . . . . . . . . . . 122<br />
B CLI for <strong>AP</strong> Configuration . . . . . . . . . . . . . . . . . . . . . . . . . . . . 125<br />
How to <strong>Access</strong> the <strong>Access</strong> <strong>Point</strong> CLI . . . . . . . . . . . . . . . . . . . . . . . . . . . . 125<br />
Telnet Connection to the <strong>AP</strong> . . . . . . . . . . . . . . . . . . . . . . . . . . . . . . . . . . . . . 125<br />
SSH Connection to the <strong>AP</strong>. . . . . . . . . . . . . . . . . . . . . . . . . . . . . . . . . . . . . . . 126<br />
Commands and Syntax . . . . . . . . . . . . . . . . . . . . . . . . . . . . . . . . . . . . . . . 127<br />
Using the get Command . . . . . . . . . . . . . . . . . . . . . . . . . . . . . . . . . . . . . . . . 128<br />
Using the set Command. . . . . . . . . . . . . . . . . . . . . . . . . . . . . . . . . . . . . . . . . 128<br />
Using the add Command . . . . . . . . . . . . . . . . . . . . . . . . . . . . . . . . . . . . . . . . 129<br />
Using the remove Command . . . . . . . . . . . . . . . . . . . . . . . . . . . . . . . . . . . . . 129<br />
Additional CLI Commands . . . . . . . . . . . . . . . . . . . . . . . . . . . . . . . . . . . . . . 130<br />
Getting Help on Commands at the CLI . . . . . . . . . . . . . . . . . . . . . . . . . . 130<br />
Tab Completion . . . . . . . . . . . . . . . . . . . . . . . . . . . . . . . . . . . . . . . . . . . . . . . 130<br />
Keyboard Shortcuts . . . . . . . . . . . . . . . . . . . . . . . . . . . . . . . . . . . . . . . . . . . . 131<br />
Interface Naming Conventions . . . . . . . . . . . . . . . . . . . . . . . . . . . . . . . . . 132<br />
Saving Configuration Changes. . . . . . . . . . . . . . . . . . . . . . . . . . . . . . . . . 133<br />
<strong>Access</strong> <strong>Point</strong> CLI Commands . . . . . . . . . . . . . . . . . . . . . . . . . . . . . . . . . . 134<br />
Configuring Basic Settings . . . . . . . . . . . . . . . . . . . . . . . . . . . . . . . . . . . . . . 134<br />
Status . . . . . . . . . . . . . . . . . . . . . . . . . . . . . . . . . . . . . . . . . . . . . . . . . . . . . . . 135<br />
Ethernet Settings . . . . . . . . . . . . . . . . . . . . . . . . . . . . . . . . . . . . . . . . . . . . . . 136<br />
Wireless Interface . . . . . . . . . . . . . . . . . . . . . . . . . . . . . . . . . . . . . . . . . . . . . 137<br />
Radio Settings . . . . . . . . . . . . . . . . . . . . . . . . . . . . . . . . . . . . . . . . . . . . . . . . 138<br />
Virtual <strong>Access</strong> <strong>Point</strong>s. . . . . . . . . . . . . . . . . . . . . . . . . . . . . . . . . . . . . . . . . . . 139<br />
Managed <strong>Access</strong> <strong>Point</strong> . . . . . . . . . . . . . . . . . . . . . . . . . . . . . . . . . . . . . . . . . 146<br />
IEEE 802.1X Supplicant Authentication . . . . . . . . . . . . . . . . . . . . . . . . . . . . 147<br />
Quality of Service . . . . . . . . . . . . . . . . . . . . . . . . . . . . . . . . . . . . . . . . . . . . . 147<br />
Time . . . . . . . . . . . . . . . . . . . . . . . . . . . . . . . . . . . . . . . . . . . . . . . . . . . . . . . . 149<br />
System Management . . . . . . . . . . . . . . . . . . . . . . . . . . . . . . . . . . . . . . . . . . . 150<br />
CLI Classes and Properties Reference . . . . . . . . . . . . . . . . . . . . . . . . . . . 150<br />
Glossary . . . . . . . . . . . . . . . . . . . . . . . . . . . . . . . . . . . . . . . . . . . . . 153<br />
5
D-Link <strong>Unified</strong> <strong>Access</strong> <strong>Point</strong> Administrator’s <strong>Guide</strong><br />
6 © 2001-2008 D-Link Corporation. All Rights Reserved.
List of Figures<br />
List of Figures<br />
Figure 1. Administrator UI Online Help............................................................... 13<br />
Figure 2. LAN Connection for DHCP-Assigned IP ............................................. 26<br />
Figure 3. Ethernet Connection for Static IP Assignment...................................... 26<br />
Figure 4. Basic Settings ........................................................................................ 28<br />
Figure 5. LAN Interface Configuration ................................................................ 31<br />
Figure 6. IEEE 802.1X Authentication................................................................. 35<br />
Figure 7. Virtual <strong>Access</strong> <strong>Point</strong> Page. .................................................................... 44<br />
Figure 8. Static WEP Configuration ..................................................................... 45<br />
Figure 9. Static WEP Example ............................................................................. 48<br />
Figure 10. Providing a Wireless Client with a WEP Key..................................... 49<br />
Figure 11. IEEE 802.1X Configuration ................................................................ 50<br />
Figure 12. WPA Personal Configuration.............................................................. 51<br />
Figure 13. WPA Enterprise Configuration ........................................................... 52<br />
Figure 14. Wireless Interface Configuration ........................................................ 55<br />
Figure 15. Traffic Prioritization............................................................................ 74<br />
Figure 16. Configuration Management................................................................. 82<br />
Figure 17. Managed <strong>Access</strong> <strong>Point</strong> Settings .......................................................... 88<br />
Figure 18. Viewing and Configuring System Events ........................................... 92<br />
7
D-Link <strong>Unified</strong> <strong>Access</strong> <strong>Point</strong> Administrator’s <strong>Guide</strong><br />
8 © 2001-2008 D-Link Corporation. All Rights Reserved.
List of Tables<br />
List of Tables<br />
Table 1. Typographical Conventions . . . . . . . . . . . . . . . . . . . . . . . . . . . . . . . . . . 12<br />
Table 2. <strong>AP</strong> Default Settings . . . . . . . . . . . . . . . . . . . . . . . . . . . . . . . . . . . . . . . . 19<br />
Table 3. Requirements for the Administrator’s Computer . . . . . . . . . . . . . . . . . 21<br />
Table 4. Requirements for Wireless Clients . . . . . . . . . . . . . . . . . . . . . . . . . . . . 22<br />
Table 5. Reset Button . . . . . . . . . . . . . . . . . . . . . . . . . . . . . . . . . . . . . . . . . . . . . . 23<br />
Table 6. Basic Settings . . . . . . . . . . . . . . . . . . . . . . . . . . . . . . . . . . . . . . . . . . . . . 29<br />
Table 7. Ethernet Settings . . . . . . . . . . . . . . . . . . . . . . . . . . . . . . . . . . . . . . . . . . 31<br />
Table 8. CLI Commands for Ethernet Settings . . . . . . . . . . . . . . . . . . . . . . . . . . 33<br />
Table 9. IEEE 802.1X Supplicant Authentication . . . . . . . . . . . . . . . . . . . . . . . . 35<br />
Table 10. CLI Commands for the 802.1X Supplicant . . . . . . . . . . . . . . . . . . . . . 36<br />
Table 11. Static WEP . . . . . . . . . . . . . . . . . . . . . . . . . . . . . . . . . . . . . . . . . . . . . . 46<br />
Table 12. IEEE 802.1X . . . . . . . . . . . . . . . . . . . . . . . . . . . . . . . . . . . . . . . . . . . . 50<br />
Table 13. WPA Personal . . . . . . . . . . . . . . . . . . . . . . . . . . . . . . . . . . . . . . . . . . . 51<br />
Table 14. WPA Enterprise . . . . . . . . . . . . . . . . . . . . . . . . . . . . . . . . . . . . . . . . . . 52<br />
Table 15. Wireless Settings . . . . . . . . . . . . . . . . . . . . . . . . . . . . . . . . . . . . . . . . . 56<br />
Table 16. Radio Settings . . . . . . . . . . . . . . . . . . . . . . . . . . . . . . . . . . . . . . . . . . . 59<br />
Table 17. V<strong>AP</strong> Configuration . . . . . . . . . . . . . . . . . . . . . . . . . . . . . . . . . . . . . . . 63<br />
Table 18. MAC Authentication . . . . . . . . . . . . . . . . . . . . . . . . . . . . . . . . . . . . . . 67<br />
Table 19. RADIUS Server Attributes for MAC Authentication . . . . . . . . . . . . . 67<br />
Table 20. Load Balancing . . . . . . . . . . . . . . . . . . . . . . . . . . . . . . . . . . . . . . . . . . 68<br />
Table 21. VLAN Priority Tags . . . . . . . . . . . . . . . . . . . . . . . . . . . . . . . . . . . . . . 74<br />
Table 22. QoS Settings . . . . . . . . . . . . . . . . . . . . . . . . . . . . . . . . . . . . . . . . . . . . 76<br />
Table 23. SNTP Settings . . . . . . . . . . . . . . . . . . . . . . . . . . . . . . . . . . . . . . . . . . . 80<br />
Table 24. Managed <strong>Access</strong> <strong>Point</strong> . . . . . . . . . . . . . . . . . . . . . . . . . . . . . . . . . . . . . 88<br />
Table 25. Logging Options . . . . . . . . . . . . . . . . . . . . . . . . . . . . . . . . . . . . . . . . . 93<br />
Table 26. Log Relay Host . . . . . . . . . . . . . . . . . . . . . . . . . . . . . . . . . . . . . . . . . . 95<br />
Table 27. Transmit/Receive Statistics . . . . . . . . . . . . . . . . . . . . . . . . . . . . . . . . . 96<br />
Table 28. Associated Clients . . . . . . . . . . . . . . . . . . . . . . . . . . . . . . . . . . . . . . . . 97<br />
Table 29. Neighboring <strong>Access</strong> <strong>Point</strong>s . . . . . . . . . . . . . . . . . . . . . . . . . . . . . . . . . 99<br />
Table 30. Wireless Client with No Security . . . . . . . . . . . . . . . . . . . . . . . . . . . 104<br />
Table 31. Additional CLI Commands . . . . . . . . . . . . . . . . . . . . . . . . . . . . . . . . 130<br />
Table 32. Keyboard Shortcuts . . . . . . . . . . . . . . . . . . . . . . . . . . . . . . . . . . . . . . 131<br />
Table 33. Interface Naming Convention . . . . . . . . . . . . . . . . . . . . . . . . . . . . . . 132<br />
Table 34. Basic Setting Commands . . . . . . . . . . . . . . . . . . . . . . . . . . . . . . . . . . 134<br />
Table 35. Status Commands . . . . . . . . . . . . . . . . . . . . . . . . . . . . . . . . . . . . . . . 135<br />
Table 36. Ethernet Setting Commands . . . . . . . . . . . . . . . . . . . . . . . . . . . . . . . 136<br />
Table 37. Wireless Setting Commands . . . . . . . . . . . . . . . . . . . . . . . . . . . . . . . 137<br />
Table 38. Radio Setting Commands . . . . . . . . . . . . . . . . . . . . . . . . . . . . . . . . . 138<br />
Table 39. V<strong>AP</strong> Commands . . . . . . . . . . . . . . . . . . . . . . . . . . . . . . . . . . . . . . . . 139<br />
Table 40. Managed <strong>Access</strong> <strong>Point</strong> Commands . . . . . . . . . . . . . . . . . . . . . . . . . . 146<br />
Table 41. IEEE 802.1X Supplicant Commands . . . . . . . . . . . . . . . . . . . . . . . . 147<br />
Table 42. QoS Commands . . . . . . . . . . . . . . . . . . . . . . . . . . . . . . . . . . . . . . . . . 148<br />
Table 43. Valid Queue Name Values . . . . . . . . . . . . . . . . . . . . . . . . . . . . . . . . 149<br />
9
D-Link <strong>Unified</strong> <strong>Access</strong> <strong>Point</strong> Administrator’s <strong>Guide</strong><br />
Table 44. Time Related Commands . . . . . . . . . . . . . . . . . . . . . . . . . . . . . . . . . 149<br />
Table 45. System Management . . . . . . . . . . . . . . . . . . . . . . . . . . . . . . . . . . . . . 150<br />
Table 46. CLI Class Instances . . . . . . . . . . . . . . . . . . . . . . . . . . . . . . . . . . . . . . 150<br />
10 © 2001-2008 D-Link Corporation. All Rights Reserved.
About This Document<br />
About This Document<br />
This guide describes setup, configuration, administration and maintenance for the D-Link<br />
DWL-3500<strong>AP</strong> and DWL-8500<strong>AP</strong> access points on a wireless network.<br />
Document Organization<br />
The D-Link <strong>Access</strong> <strong>Point</strong> Administrator’s <strong>Guide</strong> contains the following information:<br />
Chapter 1, "Overview of the D-Link <strong>Access</strong> <strong>Point</strong>"<br />
Chapter 2, "Preparing to Install the <strong>Access</strong> <strong>Point</strong>"<br />
Chapter 3, "Installing the <strong>Access</strong> <strong>Point</strong>"<br />
Chapter 4, "Configuring <strong>Access</strong> <strong>Point</strong> Security"<br />
Chapter 5, "Managing the <strong>Access</strong> <strong>Point</strong>"<br />
Chapter 6, "Configuring <strong>Access</strong> <strong>Point</strong> Services"<br />
Chapter 7, "Maintaining the <strong>Access</strong> <strong>Point</strong>"<br />
Chapter 8, "Configuring the <strong>Access</strong> <strong>Point</strong> for Managed Mode"<br />
Chapter 9, "Viewing <strong>Access</strong> <strong>Point</strong> Status"<br />
Appendix A, "Wireless Client Settings and RADIUS Server Setup"<br />
Appendix B, "CLI for <strong>AP</strong> Configuration"<br />
Audience<br />
This guide is intended for the following audience:<br />
System administrators who are responsible for configuring and operating a network using<br />
D-Link <strong>Access</strong> <strong>Point</strong> software<br />
Level 1 and/or Level 2 Support providers<br />
To obtain the greatest benefit from this guide, you should also have basic knowledge of<br />
Ethernet and wireless networking concepts.<br />
Document Conventions<br />
This section describes the conventions this document uses.<br />
NOTE: A Note provides more information about a feature or technology and crossreferences<br />
to related topics.<br />
CAUTION: A Caution provides information about critical aspects of <strong>AP</strong><br />
configuration, combinations of settings, events, or procedures that can<br />
adversely affect network connectivity, security, and so on.<br />
Document Organization 11
D-Link <strong>Unified</strong> <strong>Access</strong> <strong>Point</strong> Administrator’s <strong>Guide</strong><br />
This guide uses the typographical conventions that Table 1 describes.<br />
Table 1. Typographical Conventions<br />
Symbol Example Description<br />
Bold Click Update to save your<br />
settings.<br />
Menu titles, page names, and button names<br />
Blue Text See “Document<br />
Conventions” on page 11.<br />
Hyperlinked text.<br />
courier font WLAN-<strong>AP</strong># Screen text, file names.<br />
courier bold show network Commands, user-typed command-line entries<br />
courier font<br />
italics<br />
Online Help, Supported Browsers, and Limitations<br />
Online help for the D-Link <strong>AP</strong> Administration Web pages provides information about all<br />
fields and features available from the user interface (UI). The information in the online help is<br />
a subset of the information available in the D-Link <strong>Access</strong> <strong>Point</strong> Administrator’s <strong>Guide</strong>.<br />
Online help information corresponds to each page on the D-Link <strong>Access</strong> <strong>Point</strong> Administration<br />
UI.<br />
For information about the settings on the current page, click the link on the right side of<br />
a page or the More... link at the bottom of the help panel on the UI.<br />
12 © 2001-2008 D-Link Corporation. All Rights Reserved.<br />
value Command parameter, which might be a<br />
variable or fixed value.<br />
Angle brackets Indicates a parameter is a variable. You must<br />
enter a value in place of the brackets and text<br />
inside them.<br />
[ ] Square brackets [value] Indicates an optional fixed parameter.<br />
[< >] Angle<br />
brackets within<br />
square brackets<br />
[] Indicates an optional variable.<br />
{} curly braces {choice1 | choice2} Indicates that you must select a parameter<br />
from the list of choices.<br />
| Vertical bars choice1 | choice2 Separates the mutually exclusive choices.<br />
[{}] Braces within<br />
square brackets<br />
[{choice1 | choice2}] Indicate a choice within an optional element.
About This Document<br />
Figure 1 shows an example of the online help available from the links on the user interface.<br />
Figure 1. Administrator UI Online Help<br />
Click to <strong>Access</strong> Help<br />
Table of Contents<br />
Online Help<br />
Navigation<br />
Online Help, Supported Browsers, and Limitations 13
D-Link <strong>Unified</strong> <strong>Access</strong> <strong>Point</strong> Administrator’s <strong>Guide</strong><br />
14 © 2001-2008 D-Link Corporation. All Rights Reserved.
Overview of the D-Link <strong>Access</strong> <strong>Point</strong><br />
1<br />
The D-Link DWL-3500<strong>AP</strong> and DWL-8500<strong>AP</strong> access points provide continuous, high-speed<br />
access between wireless devices and Ethernet devices. It is an advanced, standards-based<br />
solution for wireless networking in businesses of any size. The D-Link <strong>AP</strong> enables wireless<br />
local area network (WLAN) deployment while providing state-of-the-art wireless networking<br />
features.<br />
The D-Link <strong>AP</strong> can operate in two modes: Standalone Mode or Managed Mode. In Standalone<br />
Mode, the <strong>AP</strong> acts as an individual access point in the network, and you manage it by using the<br />
Administrator Web User Interface (UI) or the command-line interface (CLI). In Managed<br />
Mode, the <strong>Unified</strong> <strong>Access</strong> <strong>Point</strong> is part of the D-Link <strong>Unified</strong> Wired/Wireless <strong>Access</strong> System,<br />
and you manage it by using the D-Link <strong>Unified</strong> Switch. If an <strong>AP</strong> is in Managed Mode, the<br />
Administrator Web UI, Telnet, and SSH services are disabled.<br />
This document describes how to perform the setup, management, and maintenance of the<br />
DWL-3500<strong>AP</strong> and DWL-8500<strong>AP</strong> in Standalone Mode. For information about configuring the<br />
access points in Managed Mode by using the D-Link <strong>Unified</strong> Switch, see the D-Link <strong>Unified</strong><br />
Wired/Wireless <strong>Access</strong> System User Manual.<br />
The DWL-3500<strong>AP</strong> supports one radio, and the DWL-8500<strong>AP</strong> supports two radios. The<br />
DWL-3500<strong>AP</strong> radio and one of the DWL-8500<strong>AP</strong> radios operate in IEEE 802.11g mode. The<br />
second radio on the DWL-8500<strong>AP</strong> operates in IEEE 802.11a mode.<br />
Each access point supports up to eight virtual access points (V<strong>AP</strong>s) on each radio. The V<strong>AP</strong><br />
feature allows you to segment each physical access point into eight logical access points (per<br />
radio) that each support a unique SSID, VLAN ID, and security policy.<br />
15
D-Link <strong>Unified</strong> <strong>Access</strong> <strong>Point</strong> Administrator’s <strong>Guide</strong><br />
Features and Benefits<br />
This section lists the DWL-3500<strong>AP</strong> and DWL-8500<strong>AP</strong> features and benefits, which are in the<br />
following categories:<br />
IEEE Standards Support<br />
Wireless Features<br />
Security Features<br />
Networking<br />
Maintainability<br />
<strong>Access</strong> <strong>Point</strong> Hardware<br />
IEEE Standards Support<br />
The DWL-3500<strong>AP</strong> comes configured as a single-band access point with one radio and is<br />
capable of broadcasting in the following modes:<br />
IEEE 802.11b mode<br />
IEEE 802.11g mode<br />
Dynamic Turbo 2.4 GHz<br />
The DWL-8500<strong>AP</strong> comes configured as a dual-band access point with two radios and is<br />
capable of broadcasting in the following modes:<br />
IEEE 802.11b mode<br />
IEEE 802.11g mode<br />
IEEE 802.11a mode<br />
Dynamic Turbo 5 GHz<br />
Dynamic Turbo 2.4 GHz<br />
The DWL-3500<strong>AP</strong> and DWL-8500<strong>AP</strong> access points provide bandwidth of up to 54 Mbps for<br />
IEEE 802.11a or IEEE 802.11g, 108 Mbps for IEEE 802.11a Turbo, and 11 Mbps for IEEE<br />
802.11b.<br />
Wireless Features<br />
The following list describes some of the DWL-3500<strong>AP</strong> and DWL-8500<strong>AP</strong> wireless features:<br />
Auto channel selection at startup<br />
Transmit power adjustment<br />
Quality of Service (QoS) for enhanced throughput and better performance of timesensitive<br />
wireless traffic like Video, Audio, Voice over IP (VoIP) and streaming media<br />
Wi-Fi Multimedia (WMM) compliance for QoS<br />
Load Balancing<br />
Built-in support for multiple SSIDs (network names) and multiple BSSIDs (basic service<br />
set IDs) on the same access point<br />
Channel management for automatic coordination of radio channel assignments to reduce<br />
<strong>AP</strong>-to-<strong>AP</strong> interference on the network and maximize Wi-Fi bandwidth<br />
Neighboring access point detection (also known as “rogue” <strong>AP</strong> detection)<br />
Support for IEEE 802.11d Regulatory Domain selection (country codes for global operation)<br />
Support for IEEE 802.11h, incorporating TPC and DFS<br />
Support for Super AG technology, which can increase WLAN speed and throughput<br />
16 © 2001-2008 D-Link Corporation. All Rights Reserved.
SpectraLink Voice Priority (SVP)<br />
1 Overview of the D-Link <strong>Access</strong> <strong>Point</strong><br />
SpectraLink Voice Priority (SVP) is a QoS approach for Wi-Fi deployments. SVP is an<br />
open specification that is compliant with the IEEE 802.11b standard. SVP minimizes<br />
delay and prioritizes voice packets over data packets on the WLAN, which increases the<br />
probability of better network performance.<br />
Security Features<br />
The DWL-3500<strong>AP</strong> and DWL-8500<strong>AP</strong> access points provide several different security levels<br />
and options:<br />
Prevent SSID Broadcast<br />
Weak Initialization Vector (IV) avoidance<br />
Wireless Equivalent Privacy (WEP)<br />
Wi-Fi Protected <strong>Access</strong> (WPA/WPA2)<br />
WPA Personal<br />
WPA Enterprise<br />
IEEE 802.11i Architecture Support<br />
Advanced Encryption Standard (AES)<br />
MAC address filtering<br />
Secure Sockets Shell (SSH)<br />
Secure Sockets Layer (SSL)<br />
IEEE 802.1X Supplicant<br />
Networking<br />
The DWL-3500<strong>AP</strong> and DWL-8500<strong>AP</strong> access points have the following networking features:<br />
Dynamic Host Configuration Protocol (DHCP) support for dynamically obtaining<br />
network configuration information.<br />
Virtual Local Area Network (VLAN) support<br />
Eight virtual access points (V<strong>AP</strong>s) per radio<br />
Maintainability<br />
For each V<strong>AP</strong>, you can configure a unique SSID name, a default VLAN ID, a security<br />
mode, external RADIUS server information, and radio association. Additionally, you can<br />
configure dynamic VLANs on an external RADIUS server.<br />
HTTP, HTTPS, Telnet, and SSH<br />
Spanning Tree Protocol (STP)<br />
802.1p<br />
You can perform many maintenance and monitoring tasks from the DWL-3500<strong>AP</strong> and DWL-<br />
8500<strong>AP</strong> Administrator Web UI:<br />
Status, monitoring, and tracking views of the network including session monitoring, client<br />
associations, transmit/receive statistics, and event log<br />
Link integrity monitoring to continually verify connection to the client, regardless of<br />
network traffic activity levels<br />
Reset configuration option<br />
Features and Benefits 17
D-Link <strong>Unified</strong> <strong>Access</strong> <strong>Point</strong> Administrator’s <strong>Guide</strong><br />
Firmware upgrade by using HTTP or TFTP<br />
Backup and restore of access point configuration by using HTTP or TFTP<br />
<strong>Access</strong> <strong>Point</strong> Hardware<br />
The <strong>Unified</strong> <strong>Access</strong> <strong>Point</strong> software supports the following hardware features:<br />
Power port and power adapter<br />
Reset button<br />
For more information about the specifics of your <strong>Access</strong> <strong>Point</strong>, see the information provided<br />
by the manufacturer.<br />
18 © 2001-2008 D-Link Corporation. All Rights Reserved.
Preparing to Install the <strong>Access</strong> <strong>Point</strong><br />
2<br />
Before you power on a new D-Link <strong>Access</strong> <strong>Point</strong>, review the following sections to check<br />
required hardware and software components, client configurations, and compatibility issues.<br />
Make sure you have everything you need for a successful launch and test of your new or<br />
extended wireless network.<br />
This chapter contains the following sections:<br />
Default Settings for the <strong>Unified</strong> <strong>Access</strong> <strong>Point</strong>s<br />
Administrator’s Computer Requirements<br />
Wireless Client Requirements<br />
Dynamic and Static IP Addressing on the <strong>AP</strong><br />
Using the Reset Button<br />
Default Settings for the <strong>Unified</strong> <strong>Access</strong> <strong>Point</strong>s<br />
When you first power on a <strong>Unified</strong> <strong>Access</strong> <strong>Point</strong>, it has the default settings that Table 2 shows<br />
Table 2. <strong>AP</strong> Default Settings<br />
Feature<br />
System Information<br />
Default<br />
User Name admin<br />
Password<br />
Ethernet Interface Settings<br />
admin<br />
Connection Type DHCP<br />
DHCP Enabled<br />
IP Address 10.90.90.91 (if no DHCP server is available)<br />
Subnet Mask 255.0.0.0<br />
DNS Name None<br />
Management VLAN ID 1<br />
Untagged VLAN ID<br />
Radio Settings: DWL-8500<strong>AP</strong><br />
1<br />
Radio (1 and 2) On<br />
Default Settings for the <strong>Unified</strong> <strong>Access</strong> <strong>Point</strong>s 19
D-Link <strong>Unified</strong> <strong>Access</strong> <strong>Point</strong> Administrator’s <strong>Guide</strong><br />
Table 2. <strong>AP</strong> Default Settings<br />
Feature Default<br />
Radio 1 IEEE 802.11 Mode 802.11a<br />
Radio 2 IEEE 802.11 Mode 802.11g<br />
802.11b/g Channel Auto<br />
802.11a Channel<br />
Radio Settings: DWL-3500<strong>AP</strong><br />
Auto<br />
Radio On<br />
Radio IEEE 802.11 Mode 802.11g<br />
802.11b/g Channel Auto<br />
Radio Settings: DWL-3500 <strong>AP</strong> and DWL-8500<strong>AP</strong><br />
Beacon Interval 100<br />
DTIM Period 2<br />
Fragmentation Threshold 2346<br />
RTS Threshold 2347<br />
MAX Wireless Clients 256<br />
Transmit Power 100 percent<br />
Rate Sets<br />
IEEE 802.1a: 54, 48, 36, 24, 18, 12, 9, 6<br />
Supported (Mbps)<br />
IEEE 802.1g: 54, 48, 36, 24, 18, 12, 11, 9, 6, 5.5, 2, 1<br />
Turbo 5 GHz: 108, 96, 72, 48, 36, 24, 18, 12<br />
Rate Sets (Mbps)<br />
IEEE 802.1a: 24, 12, 6<br />
(Basic/Advertised)<br />
Virtual <strong>Access</strong> <strong>Point</strong> Settings<br />
IEEE 802.1g: 11, 5.5, 2, 1<br />
Turbo 5 GHz: 48, 24, 12<br />
Status V<strong>AP</strong>0 is enabled on both radios, all other V<strong>AP</strong>s disabled<br />
Network Name (SSID) “DLINK V<strong>AP</strong>” for V<strong>AP</strong>0<br />
SSID for all other V<strong>AP</strong>s is “Virtual <strong>Access</strong> <strong>Point</strong> x”<br />
where x is the V<strong>AP</strong> number.<br />
Broadcast SSID Allow<br />
Security Mode None (plain text)<br />
Authentication Type None<br />
RADIUS IP Address 10.90.90.1<br />
RADIUS Key secret<br />
RADIUS Accounting Disabled<br />
20 © 2001-2008 D-Link Corporation. All Rights Reserved.
Table 2. <strong>AP</strong> Default Settings<br />
Feature<br />
Other Default Settings<br />
Default<br />
MAC Authentication No stations in list<br />
Load Balancing Disabled<br />
Managed Mode Disabled<br />
HTTP <strong>Access</strong> Enabled; disabled in Managed Mode<br />
HTTPS <strong>Access</strong> Enabled; disabled in Managed Mode<br />
Telnet <strong>Access</strong> Enabled; disabled in Managed Mode<br />
SSH <strong>Access</strong> Enabled; disabled in Managed Mode<br />
802.1X Supplicant Disabled<br />
WMM Enabled<br />
Network Time Protocol (NTP) None<br />
2 Preparing to Install the <strong>Access</strong> <strong>Point</strong><br />
NOTE: The <strong>Unified</strong> <strong>Access</strong> <strong>Point</strong> is not designed to function as a Gateway to the<br />
Internet. To connect your Wireless LAN (WLAN) to other LANs or the<br />
Internet, you need a gateway device.<br />
Administrator’s Computer Requirements<br />
The following table describes the minimum requirements for the administrator’s computer for<br />
configuration and administration of the <strong>Unified</strong> <strong>Access</strong> <strong>Point</strong> through a Web-based user<br />
interface (UI).<br />
Table 3. Requirements for the Administrator’s Computer<br />
Required Software<br />
or Component<br />
Ethernet Connection to<br />
the <strong>Access</strong> <strong>Point</strong><br />
Wireless Connection to<br />
the Network<br />
Description<br />
The computer used to configure the first access point must be connected<br />
to the access point by an Ethernet cable.<br />
For more information on this step, see “Installing the <strong>Access</strong> <strong>Point</strong>” on<br />
page 25.<br />
After initial configuration and launch of the first access point on your new<br />
wireless network, you can make subsequent configuration changes<br />
through the Administration Web pages using a wireless connection to the<br />
internal network. For wireless connection to the access point, your<br />
administration device will need Wi-Fi capability similar to that of any<br />
wireless client:<br />
Portable or built-in Wi-Fi client adapter that supports one or more of<br />
the IEEE 802.11 modes in which you plan to run the access point.<br />
Wireless client software configured to associate with the <strong>Unified</strong><br />
<strong>Access</strong> <strong>Point</strong>.<br />
Administrator’s Computer Requirements 21
D-Link <strong>Unified</strong> <strong>Access</strong> <strong>Point</strong> Administrator’s <strong>Guide</strong><br />
Table 3. Requirements for the Administrator’s Computer<br />
Required Software<br />
or Component<br />
Web Browser and<br />
Operating System<br />
Wireless Client Requirements<br />
The DWL-3500<strong>AP</strong> and DWL-8500<strong>AP</strong> provide wireless access to any client with a properly<br />
configured Wi-Fi client adapter for the 802.11 mode in which the access point is running. The<br />
<strong>AP</strong> supports multiple client operating systems. Clients can be laptop or desktop computers,<br />
personal digital assistants (PDAs), or any other hand-held, portable or stationary device<br />
equipped with a Wi-Fi adapter and supporting drivers.<br />
In order to connect to the access point, wireless clients need the software and hardware<br />
described in Table 4.<br />
22 © 2001-2008 D-Link Corporation. All Rights Reserved.<br />
Configuration and administration of the <strong>Unified</strong> <strong>Access</strong> <strong>Point</strong> is provided<br />
through a Web-based user interface hosted on the access point. We<br />
recommend using Microsoft Internet Explorer version 6.0 or7.x (with upto-date<br />
patch level for either major version) on Microsoft Windows XP or<br />
Microsoft Windows 2000<br />
The administration Web browser must have JavaScript enabled to support<br />
the interactive features of the administration interface.<br />
Security Settings Ensure that security is disabled on the wireless client used to initially<br />
configure the access point.<br />
Table 4. Requirements for Wireless Clients<br />
Required<br />
Component<br />
Wi-Fi Client<br />
Adapter<br />
Wireless Client<br />
Software<br />
Client Security<br />
Settings<br />
Description<br />
Description<br />
Portable or built-in Wi-Fi client adapter that supports one or more of the IEEE<br />
802.11 modes in which you plan to run the access point. (IEEE 802.11a,<br />
802.11b, 802.11g, and Dynamic Turbo modes are supported.)<br />
Client software, such as Microsoft Windows Supplicant, configured to<br />
associate with the <strong>Unified</strong> <strong>Access</strong> <strong>Point</strong>.<br />
Security should be disabled on the client used to do initial configuration of the<br />
access point.<br />
If the Security mode on the access point is set to anything other than plain text,<br />
wireless clients will need to set a profile to the authentication mode used by the<br />
access point and provide a valid username and password, certificate, or similar<br />
user identity proof. Security modes are Static WEP, IEEE 802.1X, WPA with<br />
RADIUS server, and WPA-PSK.<br />
For information about configuring security on the access point, see<br />
“Configuring <strong>Access</strong> <strong>Point</strong> Security” on page 39.
2 Preparing to Install the <strong>Access</strong> <strong>Point</strong><br />
Dynamic and Static IP Addressing on the <strong>AP</strong><br />
When you power on the access point, the built-in DHCP client searches for a DHCP server on<br />
the network in order to obtain an IP Address and other network information. If the <strong>AP</strong> does not<br />
find a DHCP server on the network, the <strong>AP</strong> continues to use its default Static IP Address<br />
(10.90.90.91) until you re-assign it a new static IP address (and specify a static IP addressing<br />
policy) or until the <strong>AP</strong> successfully receives network information from a DHCP server.<br />
To change the connection type and assign a static IP address, see “Configuring the Ethernet<br />
Interface” on page 31.<br />
CAUTION: If you do not have a DHCP server on your internal network and do not<br />
plan to use one, the first thing you must do after powering on the access<br />
point is change the connection type from DHCP to static IP. You can<br />
either assign a new static IP address to the <strong>AP</strong> or continue using the<br />
default address. We recommend assigning a new static IP address so that<br />
if you bring up another <strong>Unified</strong> <strong>Access</strong> <strong>Point</strong> on the same network, the IP<br />
address for each <strong>AP</strong> will be unique.<br />
Recovering an IP Address<br />
If you experience trouble communicating with the access point, you can recover a static IP<br />
address by resetting the <strong>AP</strong> configuration to the factory defaults (see “Resetting the Factory<br />
Default Configuration” on page 82), or you can get a dynamically assigned address by<br />
connecting the <strong>AP</strong> to a network that has a DHCP server.<br />
Discovering a Dynamically Assigned IP Address<br />
If you have access to the DHCP server on your network and know the MAC address of your<br />
<strong>AP</strong>, you can view the new IP address associated with the MAC address of the <strong>AP</strong>.<br />
If you do not have access to the DHCP server that assigned the IP address to the <strong>AP</strong> or do not<br />
know the MAC address of the <strong>AP</strong>, you might need to use the CLI to find out what the new IP<br />
address is. For information about how to discover a dynamically assigned IP address, see<br />
“Using the CLI to View the IP Address” on page 30.<br />
Using the Reset Button<br />
The reset button is located on the rear panel of the access point and is labeled Reset. Use the<br />
reset button to manually reboot the <strong>AP</strong> or to reset the <strong>AP</strong> back to the factory default settings,<br />
as Table 5 describes.<br />
Table 5. Reset Button<br />
Function Action<br />
Reboot Press reset button for < 2 seconds<br />
Reset to factory defaults Press and hold reset button for > 5 seconds<br />
Dynamic and Static IP Addressing on the <strong>AP</strong> 23
D-Link <strong>Unified</strong> <strong>Access</strong> <strong>Point</strong> Administrator’s <strong>Guide</strong><br />
24 © 2001-2008 D-Link Corporation. All Rights Reserved.
Installing the <strong>Access</strong> <strong>Point</strong><br />
3<br />
This chapter describes the basic steps required to setup and deploy the D-Link <strong>Access</strong> <strong>Point</strong><br />
and contains the following sections:<br />
Installing the <strong>Unified</strong> <strong>Access</strong> <strong>Point</strong><br />
Using the CLI to View the IP Address<br />
Configuring the Ethernet Interface<br />
Configuring IEEE 802.1X Authentication<br />
Verifying the Installation<br />
To manage the DWL-3500<strong>AP</strong> and DWL-8500<strong>AP</strong> access points by using the Web interface or<br />
by using the CLI through Telnet or SSH, the <strong>AP</strong> needs an IP address. If you use VLANs or<br />
IEEE 802.1X Authentication (port security) on your network, you might need to configure<br />
additional settings on the <strong>AP</strong> before it can connect to the network.<br />
Installing the <strong>Unified</strong> <strong>Access</strong> <strong>Point</strong><br />
To access the Administration Web UI, you enter the IP address of the access point into a Web<br />
browser. You can use the default IP address of the <strong>AP</strong> (10.90.90.91) to log on to the <strong>AP</strong> and<br />
assign a static IP address, or you can use a DHCP server on you network to assign network<br />
information to the <strong>AP</strong>. The DHCP client on the <strong>AP</strong> is enabled by default.<br />
To install the <strong>Unified</strong> <strong>Access</strong> <strong>Point</strong>, use the following steps:<br />
1. Connect the access point to an administrative PC by using a LAN connection or a directcable<br />
connection.<br />
Installing the <strong>Unified</strong> <strong>Access</strong> <strong>Point</strong> 25
D-Link <strong>Unified</strong> <strong>Access</strong> <strong>Point</strong> Administrator’s <strong>Guide</strong><br />
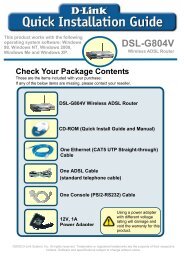
To use a LAN connection, connect one end of an Ethernet cable to the network port on the<br />
access point and the other end to the same hub where your PC is connected, as shown in<br />
Figure 2.<br />
Figure 2. LAN Connection for DHCP-Assigned IP<br />
LAN<br />
Hub to LAN<br />
The hub or switch you use must permit broadcast signals from the access point to reach all<br />
other devices on the network.<br />
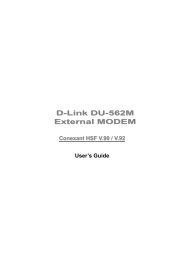
To use a direct-cable connection, connect one end of an Ethernet straight-through or<br />
crossover cable to the network port on the access point and the other end of the cable to the<br />
Ethernet port on the PC, as shown in Figure 3.<br />
Figure 3. Ethernet Connection for Static IP Assignment<br />
For initial configuration with a direct Ethernet connection and no DHCP server, be sure to<br />
set your PC to a static IP address in the same subnet as the default IP address on the access<br />
point. (The default IP address for the access point is 10.90.90.91.)<br />
If you use this method, you will need to reconfigure the cabling for subsequent startup and<br />
deployment of the access point so that the access point is no longer connected directly to<br />
the PC but instead is connected to the LAN (either by using a hub, as shown in Figure 2 or<br />
directly).<br />
NOTE: It is possible to detect access points on the network with a wireless<br />
connection. However, we strongly advise against using this method. In most<br />
environments, you may have no way of knowing whether you are actually<br />
connecting to the intended <strong>AP</strong>. Also, many of the initial configuration<br />
changes required will cause you to lose connectivity with the <strong>AP</strong> over a<br />
wireless connection.<br />
26 © 2001-2008 D-Link Corporation. All Rights Reserved.<br />
HUB<br />
<strong>AP</strong> to Hub<br />
<strong>Access</strong> <strong>Point</strong><br />
Crossover Cable (or straightthrough<br />
cable if your <strong>AP</strong><br />
supports auto MDI and MDI-X)<br />
Admin PC to Hub<br />
Administrator Computer<br />
(For Ethernet connections, This PC must have<br />
an IP address on the same subnet as <strong>Access</strong> <strong>Point</strong>.)
3 Installing the <strong>Access</strong> <strong>Point</strong><br />
2. Connect the power adapter to the power port on the back of the access point, and then plug<br />
the other end of the power cord into a power outlet.<br />
3. Use your Web browser to log on to the access point Administration Web pages.<br />
If the <strong>AP</strong> did not acquire an IP address from a DHCP server on your network, enter<br />
10.90.90.91 in the address field of your browser, which is the default IP address of the <strong>AP</strong>.<br />
If you used a DHCP server on your network to automatically configure network<br />
information for the <strong>AP</strong>, enter the new IP address of the <strong>AP</strong> into the Web browser.<br />
If you used a DHCP server and you do not know the new IP address of the <strong>AP</strong>, use the<br />
following procedures to obtain the information:<br />
A. Connect a serial cable from the administrative computer to the <strong>AP</strong> and use a terminal<br />
emulation program to access the command-line interface (CLI).<br />
B. At the login prompt, enter admin for the user name and admin for the password. At the<br />
command prompt, enter:<br />
get management<br />
The command output displays the IP address of the <strong>AP</strong>. Enter this address in the<br />
address field of your browser.<br />
4. When prompted, enter admin for the user name and admin for the password, then click<br />
OK.<br />
When you first log in, the Basic Settings page for the <strong>Unified</strong> <strong>Access</strong> <strong>Point</strong> administration<br />
is displayed.<br />
Installing the <strong>Unified</strong> <strong>Access</strong> <strong>Point</strong> 27
D-Link <strong>Unified</strong> <strong>Access</strong> <strong>Point</strong> Administrator’s <strong>Guide</strong><br />
5. Verify the settings on the Basic Settings page.<br />
Figure 4. Basic Settings<br />
A. Review access point description and provide a new administrator password for the<br />
access point if you do not want to use the default password, which is admin.<br />
B. Click the Update button to activate the wireless network with these new settings.<br />
NOTE: The changes you make are not saved or applied until you click Update.<br />
Changing some access point settings might cause the <strong>AP</strong> to stop and restart<br />
system processes. If this happens, wireless clients will temporarily lose<br />
connectivity. We recommend that you change access point settings when<br />
WLAN traffic is low.<br />
For more information about the fields and configuration options on the Basic Settings<br />
page, see “Viewing Basic Settings” on page 29.<br />
6. If you do not have a DHCP server on the management network and do not plan to use one,<br />
you must change the Connection Type from DHCP to Static IP.<br />
You can either assign a new Static IP address to the <strong>AP</strong> or continue using the default<br />
address. We recommend assigning a new Static IP address so that if you bring up another<br />
<strong>Unified</strong> <strong>Access</strong> <strong>Point</strong> on the same network, the IP address for each <strong>AP</strong> will be unique. To<br />
change the connection type and assign a static IP address, see “Configuring the Ethernet<br />
Interface” on page 31.<br />
28 © 2001-2008 D-Link Corporation. All Rights Reserved.
3 Installing the <strong>Access</strong> <strong>Point</strong><br />
7. If your network uses VLANs, you might need to configure the management VLAN ID or<br />
untagged VLAN ID on the D-Link <strong>Access</strong> <strong>Point</strong> in order for it to work with your network.<br />
For information about how to configure VLAN information, see “Configuring the<br />
Ethernet Interface” on page 31.<br />
8. If your network uses IEEE 802.1X port security for network access control, you must<br />
configure the 802.1X supplicant information on the <strong>AP</strong>.<br />
For information about how to configure the 802.1X user name and password, see<br />
“Configuring IEEE 802.1X Authentication” on page 34.<br />
Viewing Basic Settings<br />
From the Basic Settings page, you can view IP and MAC address information and configure<br />
the administrator password for the access point. Table 6 describes the fields and configuration<br />
options on the Basic Settings page.<br />
Table 6. Basic Settings<br />
Field Description<br />
IP Address Shows the IP address assigned to the <strong>AP</strong>. This field is not editable on this<br />
page because the IP address is already assigned (either by DHCP, or<br />
statically through the Ethernet Settings page as described in<br />
“Configuring the Ethernet Interface” on page 31).<br />
MAC Address Shows the MAC address of the access point.<br />
The address shown here is the MAC address associated with the<br />
management interface. This is the address by which the <strong>AP</strong> is known<br />
externally to other networks.<br />
Serial Number Shows the serial number of the <strong>AP</strong>.<br />
Firmware Version Shows version information about the firmware currently installed on the<br />
access point.<br />
As new versions of the <strong>Unified</strong> <strong>Access</strong> <strong>Point</strong> firmware become available,<br />
you can upgrade the firmware on your access points. For instructions<br />
about how to upgrade the firmware, see “Upgrading the Firmware” on<br />
page 85.<br />
Current Password Enter the current administrator password. You must correctly enter the<br />
current password before you are able to change it.<br />
New Password Enter a new administrator password. The characters you enter are<br />
displayed as “*” characters to prevent others from seeing your password<br />
as you type.<br />
The administrator password must be an alphanumeric string of up to 8<br />
characters. Do not use special characters or spaces.<br />
NOTE: As an immediate first step in securing your wireless network, we<br />
recommend that you change the administrator password from the default.<br />
Confirm New Re-enter the new administrator password to confirm that you typed it as<br />
Password<br />
intended.<br />
Installing the <strong>Unified</strong> <strong>Access</strong> <strong>Point</strong> 29
D-Link <strong>Unified</strong> <strong>Access</strong> <strong>Point</strong> Administrator’s <strong>Guide</strong><br />
Using the CLI to View the IP Address<br />
The DHCP client on the <strong>Unified</strong> <strong>Access</strong> <strong>Point</strong> is enabled by default. If you connect the access<br />
point to a network with a DHCP server, the <strong>AP</strong> automatically acquires an IP address. To<br />
manage the access point by using the Administrator UI, you must enter the IP address of the<br />
access point into a Web browser.<br />
If a DHCP server on your network assigns an IP address to the access point, and you do not<br />
know the IP address, use the following steps to view the IP address of the access point:<br />
1. Using a null-modem cable, connect a VT100/ANSI terminal or a workstation to the<br />
console (serial) port.<br />
If you attached a PC, Apple, or UNIX workstation, start a terminal-emulation program,<br />
such as HyperTerminal or TeraTerm.<br />
2. Configure the terminal-emulation program to use the following settings:<br />
- Baud rate: 115200 bps<br />
- Data bits: 8<br />
- Parity: none<br />
- Stop bit: 1<br />
- Flow control: none<br />
3. Press the return key, and a login prompt should appear.<br />
The login name is admin. The default password is admin.<br />
After a successful login, the screen shows the (<strong>Access</strong> <strong>Point</strong> Name)# prompt.<br />
4. At the login prompt, enter get management.<br />
Information similar to the following prints to the screen:.<br />
30 © 2001-2008 D-Link Corporation. All Rights Reserved.
Configuring the Ethernet Interface<br />
3 Installing the <strong>Access</strong> <strong>Point</strong><br />
The default Ethernet interface settings, which include DHCP and VLAN information, might<br />
not work for all networks. This section describes how to change the default settings.<br />
By default, the DHCP client on the D-Link <strong>Access</strong> <strong>Point</strong> automatically broadcasts requests for<br />
network information. If you want to use a static IP address, you must disable the DHCP client<br />
and manually configure the IP address and other network information.<br />
The management VLAN is VLAN 1 by default. This VLAN is also the default untagged<br />
VLAN. If you already have a management VLAN configured on your network with a different<br />
VLAN ID, you must change the VLAN ID of the management VLAN on the access point.<br />
Using the Web UI to configure Ethernet Settings<br />
The Ethernet interface is the interface that is connected to your LAN. To set network<br />
information for the access point by using the Web interface, click Ethernet Settings.<br />
Figure 5. LAN Interface Configuration<br />
Table 7 describes the fields and configuration options on the Ethernet Settings page.<br />
Table 7. Ethernet Settings<br />
Field Description<br />
DNS Name Enter the DNS name (host name) for the access point in the text box.<br />
The DNS name has the following requirements:<br />
Maximum of 20 characters<br />
Only letters, numbers and dashes<br />
Must start with a letter and end with either a letter or a number.<br />
Configuring the Ethernet Interface 31
D-Link <strong>Unified</strong> <strong>Access</strong> <strong>Point</strong> Administrator’s <strong>Guide</strong><br />
Table 7. Ethernet Settings<br />
Field Description<br />
MAC Address Shows the MAC address for the LAN interface for the Ethernet port on<br />
this access point. This is a read-only field that you cannot change.<br />
Management VLAN ID The management VLAN is the VLAN associated with the IP address<br />
you use to access the <strong>AP</strong>. The default management VLAN ID is 1.<br />
Provide a number between 1 and 4094 for the management VLAN ID.<br />
Untagged VLAN If you disable untagged VLANs, all traffic is tagged with a VLAN ID.<br />
By default all traffic on the <strong>Unified</strong> <strong>Access</strong> <strong>Point</strong> uses VLAN 1, which<br />
is the default untagged VLAN.<br />
This means that all traffic is untagged until you disable untagged<br />
VLANs, change the untagged traffic VLAN ID, or change the VLAN<br />
ID for a virtual access point (V<strong>AP</strong>) or a client using RADIUS.<br />
Untagged VLAN ID Provide a number between 1 and 4094 for the untagged VLAN ID.<br />
Traffic on the VLAN that you specify in this field will not be tagged<br />
with a VLAN ID.<br />
Connection Type If you select DHCP, the access point acquires its IP address, subnet<br />
mask, DNS, and gateway information from a DHCP server.<br />
If you select Static IP, you must enter information in the Static IP<br />
Address, Subnet Mask, and Default Gateway fields.<br />
Static IP Address Enter the static IP address in the text boxes. This field is disabled if you<br />
use DHCP as the connection type.<br />
Subnet Mask Enter the subnet mask in the text boxes.<br />
Default Gateway Enter the default gateway in the text boxes.<br />
DNS Nameservers Select the mode for the DNS.<br />
In Dynamic mode, the IP addresses for the DNS servers are<br />
assigned automatically via DHCP. (This option is only available if<br />
you specified DHCP for the Connection Type.)<br />
In Manual mode, you must assign static IP addresses to resolve<br />
domain names.<br />
NOTE: After you configure the Ethernet settings, you must click Update to apply the<br />
changes and to save the settings. Changing some access point settings might<br />
cause the <strong>AP</strong> to stop and restart system processes. If this happens, wireless<br />
clients will temporarily lose connectivity. We recommend that you change<br />
access point settings when WLAN traffic is low.<br />
32 © 2001-2008 D-Link Corporation. All Rights Reserved.
Using the CLI to Configure Ethernet Settings<br />
3 Installing the <strong>Access</strong> <strong>Point</strong><br />
Use the commands in Table 8 to view and set values for the Ethernet (wired) interface. For<br />
more information about each setting, see the description for the field in Table 7.<br />
Table 8. CLI Commands for Ethernet Settings<br />
Action Command<br />
Get the DNS Name get host id<br />
Set the DNS Name set host id <br />
Get Current Settings for the<br />
Ethernet (Wired) Internal Interface<br />
For example:<br />
set host id vicky-ap<br />
get management<br />
Set the management VLAN ID set management vlan-id <br />
View untagged VLAN information get untagged-vlan<br />
Enable the untagged VLAN set untagged-vlan status up<br />
Disable the untagged VLAN set untagged-vlan status down<br />
Set the untagged VLAN ID set untagged-vlan vlan-id <br />
View the connection type get management dhcp-status<br />
Use DHCP as the connection type set management dhcp-client status up<br />
Use a Static IP as the connection set management dhcp-client status down<br />
type<br />
Set the Static IP address set management static-ip <br />
Example:<br />
set management static-ip 10.10.12.221<br />
Set a Subnet Mask set management static-mask <br />
Example:<br />
Set the Default<br />
Gateway<br />
View the DNS Nameserver mode<br />
Dynamic= up<br />
Manual=down<br />
set management static-mask 255.0.0.0<br />
set static-ip-route gateway <br />
Example:<br />
set static-ip-route gateway 10.254.0.1<br />
Note that there is no need to set static-ip-route mask or staticip-route<br />
destination when setting the default gateway.<br />
In general, the static-ip-route mask should be set as the<br />
netmask for the destination net: “255.255.255.255” for a host<br />
or left as “0.0.0.0” for the default route.<br />
get host dns-via-dhcp<br />
Configuring the Ethernet Interface 33
D-Link <strong>Unified</strong> <strong>Access</strong> <strong>Point</strong> Administrator’s <strong>Guide</strong><br />
Table 8. CLI Commands for Ethernet Settings<br />
Action Command<br />
Set DNS Nameservers to Use<br />
Static IP Addresses (Dynamic to<br />
Manual Mode)<br />
Set DNS Nameservers to Use<br />
DHCP IP Addressing (Manual to<br />
Dynamic Mode)<br />
In the following example, the administrator uses the CLI to set the management VLAN ID to<br />
123 and to disable untagged VLANs so that all traffic is tagged with a VLAN ID.<br />
DLINK-WLAN-<strong>AP</strong># set management vlan-id 123<br />
DLINK-WLAN-<strong>AP</strong># set untagged-vlan status down<br />
DLINK-WLAN-<strong>AP</strong># get management<br />
Property Value<br />
-----------------------------vlan-id<br />
123<br />
interface brvlan123<br />
static-ip 10.90.90.91<br />
static-mask 255.0.0.0<br />
ip 10.254.24.43<br />
mask 255.0.248.0<br />
mac 00:02:BC:00:14:E8<br />
dhcp-status up<br />
DLINK-WLAN-<strong>AP</strong># get untagged-vlan<br />
Property Value<br />
--------------vlan-id<br />
1<br />
status down<br />
DLINK-WLAN-<strong>AP</strong>#<br />
Configuring IEEE 802.1X Authentication<br />
On networks that use IEEE 802.1X port-based network access control, a supplicant (client)<br />
cannot gain access to the network until the 802.1X authenticator grants access. If your network<br />
uses 802.1X, you must configure 802.1X authentication information that the <strong>AP</strong> can supply to<br />
the authenticator.<br />
34 © 2001-2008 D-Link Corporation. All Rights Reserved.<br />
set host dns-via-dhcp down<br />
set host static-dns-1 <br />
set host static-dns-2 <br />
Example:<br />
set host static-dns-1 192.168.23.45<br />
set host dns-via-dhcp up
3 Installing the <strong>Access</strong> <strong>Point</strong><br />
Using the Web UI to Configure 802.1X Authentication Information<br />
To configure the <strong>Unified</strong> <strong>Access</strong> <strong>Point</strong> 802.1X supplicant user name and password by using<br />
the Web interface, click the Authentication tab and configure the fields shown in Table 9.<br />
Figure 6. IEEE 802.1X Authentication<br />
Table 9. IEEE 802.1X Supplicant Authentication<br />
Field Description<br />
802.1X Supplicant Click Enabled to enable the Administrative status of the 802.1X<br />
Supplicant<br />
Click Disabled to disable the Administrative status of the 802.1X<br />
Supplicant.<br />
Username Enter the user name for the <strong>AP</strong> to use when responding to requests from<br />
an 802.1X authenticator.<br />
Password Enter the password for the <strong>AP</strong> to use when responding to requests from<br />
an 802.1X authenticator.<br />
NOTE: After you configure the settings on the Authentication page, you must click<br />
Update to apply the changes and to save the settings. Changing some access<br />
point settings might cause the <strong>AP</strong> to stop and restart system processes. If this<br />
happens, wireless clients will temporarily lose connectivity. We recommend<br />
that you change access point settings when WLAN traffic is low.<br />
Configuring IEEE 802.1X Authentication 35
D-Link <strong>Unified</strong> <strong>Access</strong> <strong>Point</strong> Administrator’s <strong>Guide</strong><br />
Using the CLI to Configure 802.1X Authentication Information<br />
Table 10 shows the commands you can use to configure 802.1X supplicant information by<br />
using the CLI.<br />
Table 10. CLI Commands for the 802.1X Supplicant<br />
Action Command<br />
View 802.1X supplicant settings get dot1x-supplicant<br />
Enable 802.1X supplicant set dot1x-supplicant status up<br />
Disable 802.1X supplicant set dot1x-supplicant status down<br />
Set the 802.1X user name set dot1x-supplicant user <br />
Set the 802.1X password set dot1x-supplicant password <br />
In the following example, the administrator enables the 802.1X supplicant and sets the user<br />
name to wlan<strong>AP</strong> and the password to test1234.<br />
DLINK-WLAN-<strong>AP</strong># set dot1x-supplicant status up<br />
DLINK-WLAN-<strong>AP</strong># set dot1x-supplicant user wlan<strong>AP</strong><br />
DLINK-WLAN-<strong>AP</strong># set dot1x-supplicant password test1234<br />
DLINK-WLAN-<strong>AP</strong># get dot1x-supplicant<br />
Property Value<br />
---------------status<br />
up<br />
user wlan<strong>AP</strong><br />
Verifying the Installation<br />
Make sure the access point is connected to the LAN and associate some wireless clients with<br />
the network. Once you have tested the basics of your wireless network, you can enable more<br />
security and fine-tune the <strong>AP</strong> by modifying advanced configuration features.<br />
1. Connect the access point to the LAN<br />
If you configured the access point and administrator PC by connecting both into a network<br />
hub, then your access point is already connected to the LAN. The next step is to test some<br />
wireless clients.<br />
If you configured the access point by using a direct cable connection from your computer<br />
to the access point, do the following procedures:<br />
A. Disconnect the cable from the computer and the access point.<br />
B. Connect an Ethernet cable from the access point to the LAN.<br />
C. Connect your computer to the LAN by using an Ethernet cable or a wireless card.<br />
2. Test LAN connectivity with wireless clients.<br />
Test the access point by trying to detect it and associate with it from some wireless client<br />
devices. For information about requirements for these clients, see “Wireless Client<br />
Requirements” on page 22 in the Preparing to Install the <strong>Access</strong> <strong>Point</strong> chapter.<br />
3. Secure and configure the access point by using advanced features.<br />
36 © 2001-2008 D-Link Corporation. All Rights Reserved.
3 Installing the <strong>Access</strong> <strong>Point</strong><br />
Once the wireless network is up and you can connect to the <strong>AP</strong> with some wireless clients,<br />
you can add in layers of security, create multiple virtual access points (V<strong>AP</strong>s), and<br />
configure performance settings.<br />
NOTE: The <strong>Unified</strong> <strong>Access</strong> <strong>Point</strong> is not designed for multiple, simultaneous<br />
configuration changes. If more than one administrator is logged on to the<br />
Administration Web pages and making changes to the configuration, there is<br />
no guarantee that all configuration changes specified by multiple users will<br />
be applied.<br />
By default, no security is in place on the access point, so any wireless client can associate with<br />
it and access your LAN. An important next step is to configure security, as described in<br />
“Configuring Virtual <strong>Access</strong> <strong>Point</strong> Security” on page 43.<br />
Verifying the Installation 37
D-Link <strong>Unified</strong> <strong>Access</strong> <strong>Point</strong> Administrator’s <strong>Guide</strong><br />
38 © 2001-2008 D-Link Corporation. All Rights Reserved.
Configuring <strong>Access</strong> <strong>Point</strong> Security<br />
This chapter describes DWL-3500<strong>AP</strong> and DWL-8500<strong>AP</strong> security options and how to<br />
configure security on the virtual access points (V<strong>AP</strong>s) to prevent unauthorized and<br />
unauthenticated clients from accessing the WLAN. This chapter contains the following<br />
sections:<br />
Understanding Security on Wireless Networks<br />
- Choosing a Security Mode<br />
- Comparing Security Modes<br />
- Enabling Station Isolation<br />
Configuring Virtual <strong>Access</strong> <strong>Point</strong> Security<br />
- Static WEP<br />
- IEEE 802.1X<br />
- WPA Personal<br />
- WPA Enterprise<br />
- Prohibiting the SSID Broadcast<br />
Understanding Security on Wireless Networks<br />
4<br />
The DWL-3500<strong>AP</strong> and DWL-8500<strong>AP</strong> access points provide several authentication and<br />
encryption schemes to ensure that your wireless infrastructure is accessed only by the intended<br />
users. The details of each security mode are described in the following sections.<br />
Some of the security modes use an external RADIUS server for client authentication. For<br />
information about configuring an external RADIUS server, see “Wireless Client Settings and<br />
RADIUS Server Setup” on page 101.<br />
Choosing a Security Mode<br />
In general, D-Link recommends that you use the most robust security mode that is feasible on<br />
your network. When configuring security on the access point, you first must choose the<br />
security mode, then in some modes you select an authentication algorithm and whether to<br />
allow clients not using the specified security mode to associate.<br />
Wi-Fi Protected <strong>Access</strong> (WPA) Enterprise with Remote Authentication Dial-In User Service<br />
(RADIUS) using the Advanced Encryption Standard (AES) encryption algorithm using<br />
Counter Mode with Cipher Block Chaining Message Authentication Code Protocol (CCMP)<br />
Understanding Security on Wireless Networks 39
D-Link <strong>Unified</strong> <strong>Access</strong> <strong>Point</strong> Administrator’s <strong>Guide</strong><br />
provides the best data protection available and is the best choice if all client stations are<br />
equipped with WPA supplicants. To use WPA Enterprise, you must have an external RADIUS<br />
server on your network. Additionally, backward compatibility or interoperability issues with<br />
clients or even with other access points may require that you configure WPA with RADIUS<br />
with a different encryption algorithm or choose one of the other security modes.<br />
For some networks, security might not be a priority. If you are simply providing Internet and<br />
printer access, as on a guest network, setting the security mode to “None (Plain-text)” might<br />
be the appropriate choice. To prevent clients from accidentally discovering and connecting to<br />
your network, you can disable the broadcast SSID so that your network name is not advertised.<br />
If the network is sufficiently isolated from access to sensitive information, this might offer<br />
enough protection in some situations. For more information, see “Prohibiting the SSID<br />
Broadcast” on page 53.<br />
Comparing Security Modes<br />
There are three major factors that determine the effectiveness of a security protocol:<br />
How the protocol manages keys<br />
What kind of encryption algorithm or formula the protocol uses to encode and decode the<br />
data<br />
Whether the protocol has integrated user authentication<br />
The following sections describe the security modes available on the DWL-3500<strong>AP</strong> and DWL-<br />
8500<strong>AP</strong> along with a description of the key management, authentication, and encryption<br />
algorithms used in each mode.<br />
When to Use Unencrypted (No Security)<br />
When to Use Static WEP<br />
When to Use IEEE 802.1X<br />
When to Use WPA Personal<br />
When to Use WPA Enterprise<br />
This guide also includes some suggestions as to when one mode might be more appropriate<br />
than another.<br />
When to Use Unencrypted (No Security)<br />
Setting the security mode to “None (Plain-text)” by definition provides no security. In this<br />
mode, the data is not encrypted but rather sent as “plain text” across the network. No key<br />
management, data encryption, or user authentication is used.<br />
Recommendations<br />
Unencrypted mode, i.e. None (Plain-text), is not recommended for networks with sensitive or<br />
private information because it is not secure. Therefore, only set the security mode to “None<br />
(Plain-text)” on the internal network for initial setup, testing, or problem solving.<br />
When to Use Static WEP<br />
Static Wired Equivalent Privacy (WEP) is a data encryption protocol for 802.11 wireless<br />
networks. All wireless stations and access points on the network are configured with a static<br />
40 © 2001-2008 D-Link Corporation. All Rights Reserved.
4 Configuring <strong>Access</strong> <strong>Point</strong> Security<br />
64-bit (40-bit secret key + 24-bit initialization vector (IV)), 128-bit (104-bit secret key + 24bit<br />
IV), or 152-bit (128-bit secret key + 24-bit IV) Shared Key for data encryption.<br />
Recommendations<br />
Static WEP was designed to provide the security equivalent of sending unencrypted data<br />
through an Ethernet connection; however, it has major flaws and does not provide the intended<br />
level of security.<br />
Therefore, Static WEP is not recommended as a secure mode. The only time to use Static<br />
WEP is when interoperability issues make it the only option available to you, and you are not<br />
concerned with the potential of exposing the data on your network.<br />
When to Use IEEE 802.1X<br />
IEEE 802.1X is the standard for passing the Extensible Authentication Protocol (E<strong>AP</strong>) over an<br />
802.11 wireless network using a protocol called E<strong>AP</strong> Encapsulation Over LANs (E<strong>AP</strong>OL).<br />
This is a newer, more secure standard than Static WEP.<br />
Recommendations<br />
Key Management Encryption Algorithm User Authentication<br />
Static WEP uses a fixed key<br />
that is provided by the<br />
administrator. WEP keys are<br />
indexed in different slots (up to<br />
four on the access point).<br />
The client stations must have<br />
the same key indexed in the<br />
same slot to access data on the<br />
access point.<br />
An RC4 stream cipher is used<br />
to encrypt the frame body and<br />
cyclic redundancy checking<br />
(CRC) of each 802.11 frame.<br />
This protocol provides a<br />
rudimentary form of user<br />
authentication when the client<br />
uses a shared key algorithm.<br />
Key Management Encryption Algorithm User Authentication<br />
IEEE 802.1X provides<br />
dynamically-generated keys<br />
that are periodically refreshed.<br />
There are different Unicast<br />
keys for each station.<br />
An RC4 stream cipher is used<br />
to encrypt the frame body and<br />
cyclic redundancy checking<br />
(CRC) of each 802.11 frame.<br />
IEEE 802.1X mode supports a<br />
variety of authentication<br />
methods, like certificates,<br />
Kerberos, and public key<br />
authentication with a RADIUS<br />
server.<br />
IEEE 802.1X mode is a better choice than Static WEP because keys are dynamically generated<br />
and changed periodically. However, the encryption algorithm used is the same as that of Static<br />
WEP and is therefore not as reliable as the more advanced encryption methods such as<br />
Temporal Key Integrity Protocol (TKIP) and AES-CCMP used in Wi-Fi Protected <strong>Access</strong><br />
(WPA) or WPA2.<br />
Additionally, compatibility issues may be cumbersome because of the variety of<br />
authentication methods supported and the lack of a standard implementation method.<br />
Therefore, IEEE 802.1X mode is not as secure a solution as WPA or WPA2. A better solution<br />
than using IEEE 802.1X mode is to use WPA Enterprise mode.<br />
Understanding Security on Wireless Networks 41
D-Link <strong>Unified</strong> <strong>Access</strong> <strong>Point</strong> Administrator’s <strong>Guide</strong><br />
When to Use WPA Personal<br />
Wi-Fi Protected <strong>Access</strong> Personal Pre-Shared Key (PSK) is an implementation of the Wi-Fi<br />
Alliance IEEE 802.11i standard, which includes AES-CCMP and TKIP mechanisms. This<br />
mode offers the same encryption algorithms as WPA 2 with RADIUS but without the ability to<br />
integrate a RADIUS server for user authentication.<br />
This security mode is backwards-compatible for wireless clients that support only the original<br />
WPA.<br />
Recommendations<br />
WPA Personal is not recommended for use with the <strong>Unified</strong> <strong>Access</strong> <strong>Point</strong> when WPA<br />
Enterprise is an option.<br />
We recommend that you use WPA Enterprise mode instead, unless you have interoperability<br />
issues that prevent you from using this mode. For example, some devices on your network<br />
might not support WPA or WPA2 with E<strong>AP</strong> talking to a RADIUS server. Embedded printer<br />
servers or other small client devices with very limited space for implementation might not<br />
support RADIUS. For such cases, we recommend that you use WPA Personal.<br />
When to Use WPA Enterprise<br />
Wi-Fi Protected <strong>Access</strong> Enterprise with RADIUS is an implementation of the Wi-Fi Alliance<br />
IEEE 802.11i standard, which includes AES-CCMP and TKIP mechanisms. This mode<br />
requires the use of a RADIUS server to authenticate users. On the <strong>Unified</strong> <strong>Access</strong> <strong>Point</strong>, WPA<br />
Enterprise provides the best security available for wireless networks.<br />
This security mode also provides backwards-compatibility for wireless clients that support<br />
only the original WPA.<br />
Recommendations<br />
Key Management Encryption Algorithms User Authentication<br />
WPA Personal provides<br />
dynamically-generated keys<br />
that are periodically refreshed.<br />
There are different Unicast<br />
keys for each station.<br />
TKIP<br />
AES-CCMP<br />
WPA Enterprise mode is the recommended mode. The AES-CCMP and TKIP encryption<br />
algorithms used with WPA modes are far superior to the RC4 algorithm used for Static WEP<br />
or IEEE 802.1X modes. Therefore, AES-CCMP or TKIP should be used whenever possible.<br />
All WPA modes allow you to use these encryption schemes, so WPA security modes are<br />
recommended above the other modes when using WPA is an option.<br />
42 © 2001-2008 D-Link Corporation. All Rights Reserved.<br />
The use of a PSK provides user<br />
authentication similar to that of<br />
shared keys in WEP.<br />
Key Management Encryption Algorithms User Authentication<br />
WPA Enterprise mode provides TKIP<br />
RADIUS<br />
dynamically-generated keys<br />
that are periodically refreshed.<br />
There are different Unicast<br />
keys for each station.<br />
AES-CCMP
4 Configuring <strong>Access</strong> <strong>Point</strong> Security<br />
Additionally, this mode incorporates a RADIUS server for user authentication which makes<br />
WPA Enterprise more secure than WPA Personal mode.<br />
Use the following guidelines for choosing options within the WPA Enterprise mode security<br />
mode:<br />
1. Currently, the best security you can have on a wireless network is WPA Enterprise mode<br />
using AES-CCMP encryption algorithm. AES is a symmetric 128-bit block data<br />
encryption technique that works on multiple layers of the network. It is the most effective<br />
encryption system currently available for wireless networks. If all clients or other <strong>AP</strong>s on<br />
the network are WPA/CCMP compatible, use this encryption algorithm. (If all clients are<br />
WPA2 compatible, choose to support only WPA2 clients.)<br />
2. The second best choice is WPA Enterprise with the encryption algorithm set to both TKIP<br />
and CCMP. This lets WPA client stations without CCMP associate, uses TKIP for<br />
encrypting Multicast and Broadcast frames, and allows clients to select whether to use<br />
CCMP or TKIP for Unicast (<strong>AP</strong>-to-single-station) frames. This WPA configuration allows<br />
more interoperability, at the expense of some security. Client stations that support CCMP<br />
can use it for their Unicast frames. If you encounter <strong>AP</strong>-to-station interoperability<br />
problems with the “Both” encryption algorithm setting, then you will need to select TKIP<br />
instead. (See next bullet.)<br />
3. The third best choice is WPA Enterprise with the encryption algorithm set to TKIP. Some<br />
clients have interoperability issues with CCMP and TKIP enabled at same time. If you<br />
encounter this problem, then choose TKIP as the encryption algorithm. This is the<br />
standard WPA mode and is usually interoperable with client Wireless software security<br />
features.<br />
Enabling Station Isolation<br />
When Station Isolation is enabled, the access point blocks communication between wireless<br />
clients associated with the same radio on the access point. The access point still allows data<br />
traffic between its wireless clients and wired devices on the network, but not among wireless<br />
clients. You enable station isolation on the Wireless settings page. For more information, see<br />
“Setting the Wireless Interface” on page 55.<br />
Configuring Virtual <strong>Access</strong> <strong>Point</strong> Security<br />
You configure secure wireless client access by configuring security for each virtual access<br />
point (V<strong>AP</strong>) that you enable. You can configure up to eight V<strong>AP</strong>s per radio that simulate<br />
multiple <strong>AP</strong>s in one physical access point. By default, only one V<strong>AP</strong> is enabled. For each V<strong>AP</strong>,<br />
you can configure a unique security mode to control wireless client access.<br />
V<strong>AP</strong>s segment the wireless LAN into multiple broadcast domains and are the wireless<br />
equivalent of Ethernet VLANs. You can configure each V<strong>AP</strong> with a unique SSIDs so that each<br />
V<strong>AP</strong> represents a different wireless network for clients to access. By configuring V<strong>AP</strong>s, you<br />
can maintain better control over broadcast and multicast traffic, which affects network<br />
performance.<br />
Configuring Virtual <strong>Access</strong> <strong>Point</strong> Security 43
D-Link <strong>Unified</strong> <strong>Access</strong> <strong>Point</strong> Administrator’s <strong>Guide</strong><br />
This section describes the security options available for V<strong>AP</strong>s and how to configure V<strong>AP</strong><br />
security. For more information about configuring V<strong>AP</strong>s, including VLAN configuration, see<br />
“Configuring Virtual <strong>Access</strong> <strong>Point</strong>s” on page 62.<br />
Each radio has eight V<strong>AP</strong>s, with V<strong>AP</strong> IDs from 0-7. By default, only V<strong>AP</strong> 0 on each radio is<br />
enabled. V<strong>AP</strong>0 has the following default settings:<br />
VLAN ID: 1<br />
Broadcast SSID: Enabled<br />
SSID: DLINK V<strong>AP</strong><br />
Security: None<br />
MAC Authentication Type: None<br />
All other V<strong>AP</strong>s are disabled by default. The default SSID for V<strong>AP</strong>s 1-7 is “Virtual <strong>Access</strong><br />
<strong>Point</strong> x” where x is the V<strong>AP</strong> ID.<br />
To prevent unauthorized access to the <strong>Unified</strong> <strong>Access</strong> <strong>Point</strong>, we recommend that you select<br />
and configure a security option other than None for the default V<strong>AP</strong> and for each V<strong>AP</strong> that you<br />
enable.<br />
To change V<strong>AP</strong> 0 or to enable and configure additional V<strong>AP</strong>s, select the V<strong>AP</strong> tab in the<br />
Manage section.<br />
Figure 7. Virtual <strong>Access</strong> <strong>Point</strong> Page.<br />
V<strong>AP</strong> 0 through V<strong>AP</strong> 7 are listed in rows, and the column headings contain the configuration<br />
options, which are described in “Configuring Virtual <strong>Access</strong> <strong>Point</strong>s” on page 62. The dropdown<br />
menu in the Security column contains the following security mode options:<br />
44 © 2001-2008 D-Link Corporation. All Rights Reserved.
None<br />
Static WEP<br />
IEEE 802.1X<br />
WPA Personal<br />
WPA Enterprise<br />
4 Configuring <strong>Access</strong> <strong>Point</strong> Security<br />
When you select a security mode other than None, additional fields appear. The following<br />
sections describe how to configure each security mode.<br />
None (Plain-text)<br />
If you select None as your security mode, no further options are configurable on the <strong>AP</strong>. This<br />
mode means that any data transferred to and from the access point is not encrypted. This<br />
security mode can be useful during initial network configuration or for problem solving, but it<br />
is not recommended for regular use on the internal network because it is not secure.<br />
Static WEP<br />
Static WEP is not the most secure mode available, but it offers more protection than setting the<br />
security mode to None because it prevents an outsider from easily sniffing out unencrypted<br />
wireless traffic. (For more secure modes, see the sections on “IEEE 802.1X” on page 49,<br />
“WPA Personal” on page 50, or “WPA Enterprise” on page 52.)<br />
WEP encrypts data moving across the wireless network based on a static key. (The encryption<br />
algorithm is a “stream” cipher called RC4.)<br />
If you select Static WEP as the Security Mode, additional fields display, as Figure 8 shows.<br />
Figure 8. Static WEP Configuration<br />
Configuring Virtual <strong>Access</strong> <strong>Point</strong> Security 45
D-Link <strong>Unified</strong> <strong>Access</strong> <strong>Point</strong> Administrator’s <strong>Guide</strong><br />
Table 11 describes the configuration options for static WEP.<br />
Table 11. Static WEP<br />
Field Description<br />
Transfer Key<br />
Index<br />
46 © 2001-2008 D-Link Corporation. All Rights Reserved.<br />
Select a key index from the drop-down menu. Key indexes 1 through 4 are<br />
available. The default is 1.<br />
The Transfer Key Index indicates which WEP key the access point will use<br />
to encrypt the data it transmits.<br />
Key Length Specify the length of the key by clicking one of the radio buttons:<br />
64 bits<br />
128 bits<br />
152 bits<br />
Key Type Select the key type by clicking one of the radio buttons:<br />
ASCII<br />
Hex
Table 11. Static WEP<br />
4 Configuring <strong>Access</strong> <strong>Point</strong> Security<br />
Field Description<br />
WEP Keys You can specify up to four WEP keys. In each text box, enter a string of<br />
characters for each key.<br />
If you selected “ASCII”, enter any combination ASCII characters. If you<br />
selected “HEX”, enter hexadecimal digits (any combination of 0-9 and a-f<br />
or A-F).<br />
Use the same number of characters for each key as specified in the<br />
“Characters Required” field. These are the RC4 WEP keys shared with the<br />
stations using the access point.<br />
Each client station must be configured to use one of these same WEP keys in<br />
the same slot as specified here on the <strong>AP</strong>. (See “Static WEP Rules” on<br />
page 48.)<br />
Characters Required: The number of characters you enter into the WEP<br />
Key fields is determined by the Key length and Key type you select. For<br />
example, if you use 128-bit ASCII keys, you must enter 26 characters in the<br />
WEP key. The number of characters required updates automatically based on<br />
how you set Key Length and Key Type.<br />
Authentication The authentication algorithm defines the method used to determine whether a<br />
client station is allowed to associate with an access point when static WEP is<br />
the security mode.<br />
Specify the authentication algorithm you want to use by choosing one of the<br />
following options:<br />
Open System<br />
Shared Key<br />
Note: You can also select both the Open System and Shared Key check<br />
boxes.<br />
Open System authentication allows any client station to associate with the<br />
access point whether that client station has the correct WEP key or not. This<br />
algorithm is also used in plain text, IEEE 802.1X, and WPA modes. When<br />
the authentication algorithm is set to “Open System,” any client can associate<br />
with the access point.<br />
Note that just because a client station is allowed to associate does not ensure<br />
it can exchange traffic with an access point. A station must have the correct<br />
WEP key to be able to successfully access and decrypt data from an access<br />
point, and to transmit readable data to the access point.<br />
Shared Key authentication requires the client station to have the correct<br />
WEP key in order to associate with the access point. When the authentication<br />
algorithm is set to “Shared Key,” a station with an incorrect WEP key will<br />
not be able to associate with the access point.<br />
Both Open System and Shared Key. When you select both authentication<br />
algorithms, client stations configured to use WEP in shared key mode must<br />
have a valid WEP key in order to associate with the access point. Also, client<br />
stations configured to use WEP as an open system (shared key mode not<br />
enabled) will be able to associate with the access point even if they do not<br />
have the correct WEP key.<br />
NOTE: After you configure the security settings, you must click Update to apply the<br />
changes and to save the settings. Changing some access point settings might<br />
Configuring Virtual <strong>Access</strong> <strong>Point</strong> Security 47
D-Link <strong>Unified</strong> <strong>Access</strong> <strong>Point</strong> Administrator’s <strong>Guide</strong><br />
Static WEP Rules<br />
cause the <strong>AP</strong> to stop and restart system processes. If this happens, wireless<br />
clients will temporarily lose connectivity. We recommend that you change<br />
access point settings when WLAN traffic is low.<br />
If you use Static WEP, the following rules apply:<br />
All client stations must have the Wireless LAN (WLAN) security set to WEP and all<br />
clients must have one of the WEP keys specified on the <strong>AP</strong> in order to de-code <strong>AP</strong>-tostation<br />
data transmissions.<br />
The <strong>AP</strong> must have all keys used by clients for station-to-<strong>AP</strong> transmit so that it can de-code<br />
the station transmissions.<br />
The same key must occupy the same slot on all nodes (<strong>AP</strong> and clients). For example if the<br />
<strong>AP</strong> defines abc123 key as WEP key 3, then the client stations must define that same string<br />
as WEP key 3.<br />
Client stations can use different keys to transmit data to the access point. (Or they can all<br />
use the same key, but this is less secure because it means one station can decrypt the data<br />
being sent by another.)<br />
On some wireless client software, you can configure multiple WEP keys and define a<br />
client station “transfer key index”, and then set the stations to encrypt the data they<br />
transmit using different keys. This ensures that neighboring <strong>AP</strong>s cannot decode each<br />
other’s transmissions.<br />
You cannot mix 64-bit, 128-bit, and 152-bit WEP keys between the access point and its<br />
client stations.<br />
Example of Using Static WEP<br />
In this example, the administrator configures three WEP keys on the access point and sets the<br />
Transfer Key Index to “3.” This means that the WEP key in slot “3” is the key the access point<br />
uses to encrypt the data it sends.<br />
Figure 9. Static WEP Example<br />
The administrator must then set all wireless client stations to use WEP and provide each client<br />
with one of the slot/key combinations defined on the <strong>AP</strong>.<br />
48 © 2001-2008 D-Link Corporation. All Rights Reserved.
4 Configuring <strong>Access</strong> <strong>Point</strong> Security<br />
For this example, the administrator sets WEP key 3 in the wireless network properties of a<br />
Windows client.<br />
Figure 10. Providing a Wireless Client with a WEP Key<br />
Additional wireless clients also need to have one of the WEP keys defined on the <strong>AP</strong>. The<br />
administrator can assign the same WEP key that the first client has, or the administrator can<br />
give the second station a different WEP key (key 2, for example) so that the two stations<br />
cannot decrypt each other’s transmissions.<br />
IEEE 802.1X<br />
IEEE 802.1X is the standard defining port-based authentication and infrastructure for doing<br />
key management. Extensible Authentication Protocol (E<strong>AP</strong>) messages are sent over an IEEE<br />
802.11 wireless network using a protocol called E<strong>AP</strong> Encapsulation Over LANs (E<strong>AP</strong>OL).<br />
IEEE 802.1X provides dynamically-generated keys that are periodically refreshed. An RC4<br />
stream cipher is used to encrypt the frame body and perform a cyclic redundancy check (CRC)<br />
on each 802.11 frame.<br />
This mode requires the use of an external RADIUS server to authenticate users. The access<br />
point requires a RADIUS server capable of E<strong>AP</strong>, such as the Microsoft Internet<br />
Authentication Server. To work with Windows clients, the authentication server must support<br />
Protected E<strong>AP</strong> (PE<strong>AP</strong>) and MSCH<strong>AP</strong> V2.<br />
You can use any of a variety of authentication methods that the IEEE 802.1X mode supports,<br />
including certificates, Kerberos, and public key authentication. You must configure the client<br />
stations to use the same authentication method the access point uses.<br />
Configuring Virtual <strong>Access</strong> <strong>Point</strong> Security 49
D-Link <strong>Unified</strong> <strong>Access</strong> <strong>Point</strong> Administrator’s <strong>Guide</strong><br />
If you select IEEE 802.1X as the Security Mode, additional fields display, as Figure 11 shows.<br />
Figure 11. IEEE 802.1X Configuration<br />
Table 12 describes the configuration options for the IEEE 802.1X security mode.<br />
Table 12. IEEE 802.1X<br />
Field Description<br />
Use Global<br />
RADIUS Server<br />
Settings<br />
NOTE: After you configure the security settings, you must click Update to apply the<br />
changes and to save the settings. Changing some access point settings might<br />
cause the <strong>AP</strong> to stop and restart system processes. If this happens, wireless<br />
clients will temporarily lose connectivity. We recommend that you change<br />
access point settings when WLAN traffic is low.<br />
WPA Personal<br />
WPA Personal is an implementation of the IEEE 802.11i standard, which includes AES-<br />
CCMP and TKIP mechanisms. The Personal version of WPA employs a pre-shared key (PSK)<br />
instead of using IEEE 802.1X and E<strong>AP</strong> as is used in the Enterprise WPA security mode). The<br />
50 © 2001-2008 D-Link Corporation. All Rights Reserved.<br />
By default each V<strong>AP</strong> uses the global RADIUS settings that you define for<br />
the <strong>AP</strong> at the top of the V<strong>AP</strong> page.<br />
To use the global RADIUS server settings, make sure the check box is<br />
selected.<br />
To use a separate RADIUS server for the V<strong>AP</strong>, clear the check box and<br />
enter the RADIUS server IP address and key in the following fields.<br />
RADIUS IP If the Use Global RADIUS Server Settings check box is cleared, enter the<br />
RADIUS IP in the text box.<br />
The RADIUS IP is the IP address of the RADIUS server.<br />
RADIUS Key If the Use Global RADIUS Server Settings check box is cleared, enter the<br />
RADIUS Key in the text box.<br />
The RADIUS Key is the shared secret key for the RADIUS server. The text<br />
you enter will be displayed as “*” characters to prevent others from seeing<br />
the RADIUS key as you type.<br />
You can use up to 63 standard alphanumeric and special characters. The key<br />
is case sensitive, and you must configure the same key on the <strong>AP</strong> and on<br />
your RADIUS server.<br />
Enable RADIUS<br />
accounting<br />
If the Use Global RADIUS Server Settings check box is cleared, click the<br />
Enable RADIUS accounting check box to track and measure the resources<br />
a particular user has consumed, such as system time, amount of data<br />
transmitted and received, and so on.
4 Configuring <strong>Access</strong> <strong>Point</strong> Security<br />
PSK is used for an initial check of credentials only. This security mode is backwardscompatible<br />
for wireless clients that support the original WPA.<br />
If you select WPA Personal as the Security Mode, additional fields display, as Figure 12<br />
shows.<br />
Figure 12. WPA Personal Configuration<br />
Table 13 describes the configuration options for the WPA Personal security mode.<br />
Table 13. WPA Personal<br />
Field Description<br />
WPA Versions Select the types of client stations you want to support:<br />
WPA. If all client stations on the network support the original WPA but<br />
none support the newer WPA2, then select WPA.<br />
WPA2. If all client stations on the network support WPA2, we suggest<br />
using WPA2 which provides the best security per the IEEE 802.11i<br />
standard.<br />
WPA and WPA2. If you have a mix of clients, some of which support<br />
WPA2 and others which support only the original WPA, select both of<br />
the check boxes. This lets both WPA and WPA2 client stations<br />
associate and authenticate, but uses the more robust WPA2 for clients<br />
who support it. This WPA configuration allows more interoperability,<br />
at the expense of some security.<br />
Cipher Suites Select the cipher suite you want to use:<br />
TKIP<br />
CCMP (AES)<br />
TKIP and CCMP (AES)<br />
Both TKIP and AES clients can associate with the access point. WPA<br />
clients must have one of the following to be able to associate with the <strong>AP</strong>:<br />
A valid TKIP key<br />
A valid AES-CCMP key<br />
Clients not configured to use WPA Personal will not be able to associate<br />
with the <strong>AP</strong>.<br />
Key The pre-shared key is the shared secret key for WPA Personal. Enter a string<br />
of at least 8 characters to a maximum of 63 characters.<br />
NOTE: After you configure the security settings, you must click Update to apply the<br />
changes and to save the settings. Changing some access point settings might<br />
cause the <strong>AP</strong> to stop and restart system processes. If this happens, wireless<br />
clients will temporarily lose connectivity. We recommend that you change<br />
access point settings when WLAN traffic is low.<br />
Configuring Virtual <strong>Access</strong> <strong>Point</strong> Security 51
D-Link <strong>Unified</strong> <strong>Access</strong> <strong>Point</strong> Administrator’s <strong>Guide</strong><br />
WPA Enterprise<br />
WPA Enterprise with RADIUS is an implementation of the IEEE 802.11i standard, which<br />
includes CCMP (AES) and TKIP mechanisms. The Enterprise mode requires the use of a<br />
RADIUS server to authenticate users.<br />
This security mode is backwards-compatible with wireless clients that support the original<br />
WPA.<br />
If you select WPA Enterprise as the Security Mode, additional fields display as Figure 13<br />
shows.<br />
Figure 13. WPA Enterprise Configuration<br />
Table 14 describes the configuration options for the WPA Enterprise security mode.<br />
Table 14. WPA Enterprise<br />
Field Description<br />
WPA Versions Select the types of client stations you want to support:<br />
Enable<br />
pre-authentication<br />
52 © 2001-2008 D-Link Corporation. All Rights Reserved.<br />
WPA. If all client stations on the network support the original WPA<br />
but none support the newer WPA2, then select WPA.<br />
WPA2. If all client stations on the network support WPA2, we suggest<br />
using WPA2 which provides the best security per the IEEE 802.11i<br />
standard.<br />
WPA and WPA2. If you have a mix of clients, some of which support<br />
WPA2 and others which support only the original WPA, select both<br />
WPA and WPA2. This lets both WPA and WPA2 client stations<br />
associate and authenticate but uses the more robust WPA2 for clients<br />
who support it. This WPA configuration allows more interoperability,<br />
at the expense of some security.<br />
If for WPA Versions you select only WPA2 or both WPA and WPA2, you<br />
can enable pre-authentication for WPA2 clients.<br />
Click Enable pre-authentication if you want WPA2 wireless clients to<br />
send pre-authentication packets. The pre-authentication information will be<br />
relayed from the access point the client is currently using to the target<br />
access point. Enabling this feature can help speed up authentication for<br />
roaming clients who connect to multiple access points.<br />
This option does not apply if you selected “WPA” for WPA Versions<br />
because the original WPA does not support this feature.
Table 14. WPA Enterprise<br />
4 Configuring <strong>Access</strong> <strong>Point</strong> Security<br />
Field Description<br />
Cipher Suites Select the cipher suite you want to use:<br />
TKIP<br />
CCMP (AES)<br />
TKIP and CCMP (AES)<br />
By default both TKIP and CCMP are selected. When both TKIP and<br />
CCMP are selected, client stations configured to use WPA with RADIUS<br />
must have one of the following:<br />
A valid TKIP RADIUS IP address and RADIUS Key<br />
A valid CCMP (AES) IP address and RADIUS Key<br />
Use Global RADIUS By default each V<strong>AP</strong> uses the global RADIUS settings that you define for<br />
Server Settings the <strong>AP</strong> at the top of the V<strong>AP</strong> page.<br />
To use the global RADIUS server settings, make sure the check box is<br />
selected.<br />
To use a separate RADIUS server for the V<strong>AP</strong>, clear the check box and<br />
enter the RADIUS server IP address and key in the following fields.<br />
RADIUS IP If the Use Global RADIUS Server Settings check box is cleared, enter the<br />
RADIUS IP in the text box.<br />
The RADIUS IP is the IP address of the RADIUS server.<br />
RADIUS Key If the Use Global RADIUS Server Settings check box is cleared, enter the<br />
RADIUS Key in the text box.<br />
The RADIUS Key is the shared secret key for the RADIUS server. The text<br />
you enter will be displayed as “*” characters to prevent others from seeing<br />
the RADIUS key as you type.<br />
You can use up to 63 standard alphanumeric and special characters. The<br />
key is case sensitive, and you must configure the same key on the <strong>AP</strong> and<br />
on your RADIUS server.<br />
Enable RADIUS If the Use Global RADIUS Server Settings check box is cleared, click the<br />
accounting<br />
Enable RADIUS accounting check box to track and measure the resources<br />
a particular user has consumed, such as system time, amount of data<br />
transmitted and received, and so on.<br />
NOTE: After you configure the security settings, you must click Update to apply the<br />
changes and to save the settings. Changing some access point settings might<br />
cause the <strong>AP</strong> to stop and restart system processes. If this happens, wireless<br />
clients will temporarily lose connectivity. We recommend that you change<br />
access point settings when WLAN traffic is low.<br />
Prohibiting the SSID Broadcast<br />
The column to the left of the Security modes allows you to enable or disable the SSID<br />
broadcast. You can suppress (prohibit) the SSID broadcast to discourage stations from<br />
automatically discovering your access point. When the broadcast SSID of the <strong>AP</strong> is<br />
suppressed, the network name is not displayed in the list of available networks on a client<br />
station. Instead, the client must have the exact network name configured in the supplicant<br />
before it is able to connect.<br />
Configuring Virtual <strong>Access</strong> <strong>Point</strong> Security 53
D-Link <strong>Unified</strong> <strong>Access</strong> <strong>Point</strong> Administrator’s <strong>Guide</strong><br />
Disabling the broadcast SSID is sufficient to prevent clients from accidentally connecting to<br />
your network, but it will not prevent even the simplest of attempts by a hacker to connect or<br />
monitor unencrypted traffic.<br />
Suppressing the SSID broadcast offers a very minimal level of protection on an otherwise<br />
exposed network (such as a guest network) where the priority is making it easy for clients to<br />
get a connection and where no sensitive information is available.<br />
54 © 2001-2008 D-Link Corporation. All Rights Reserved.
Managing the <strong>Access</strong> <strong>Point</strong><br />
5<br />
This chapter describes how to manage the <strong>Unified</strong> <strong>Access</strong> <strong>Point</strong> and contains the following<br />
sections:<br />
Setting the Wireless Interface<br />
Configuring Radio Settings<br />
Configuring Virtual <strong>Access</strong> <strong>Point</strong>s<br />
Controlling <strong>Access</strong> by MAC Authentication<br />
Configuring Load Balancing<br />
The configuration pages for the features in this chapter are located under the Manage heading<br />
on the Administration Web UI.<br />
Setting the Wireless Interface<br />
Wireless settings describe aspects of the LAN related specifically to the radio device in the<br />
access point (802.11 mode) and to the network interface to the access point (access point MAC<br />
address).<br />
To configure the wireless interface, click the Wireless Settings tab.<br />
NOTE: Figure 14 shows the Wireless Settings page for the DWL-8500<strong>AP</strong>.<br />
Figure 14. Wireless Interface Configuration<br />
Setting the Wireless Interface 55
D-Link <strong>Unified</strong> <strong>Access</strong> <strong>Point</strong> Administrator’s <strong>Guide</strong><br />
NOTE: For the DWL-8500<strong>AP</strong>, radio interface settings apply to both Radio Interface<br />
1 and Radio Interface 2.<br />
Table 15 describes the fields and configuration options available on the Wireless Settings<br />
page.<br />
Table 15. Wireless Settings<br />
Field Description<br />
802.11d Regulatory<br />
Domain Support<br />
IEEE 802.11h<br />
Support<br />
NOTE: After you configure the wireless settings, you must click Update to apply the<br />
changes and to save the settings. Changing some access point settings might<br />
cause the <strong>AP</strong> to stop and restart system processes. If this happens, wireless<br />
clients will temporarily lose connectivity. We recommend that you change<br />
access point settings when WLAN traffic is low.<br />
56 © 2001-2008 D-Link Corporation. All Rights Reserved.<br />
Enabling support for IEEE 802.11d (World Mode) on the access point<br />
causes the <strong>AP</strong> to broadcast its operational country code as a part of its<br />
beacons and probe responses. This allows client stations to operate in any<br />
country without reconfiguration.<br />
To enable 802.11d regulatory domain support, click Enabled.<br />
To disable 802.11d regulatory domain support, click Disabled.<br />
The Administration UI shows whether IEEE 802.11h regulatory domain<br />
control is in effect on the <strong>AP</strong>. IEEE 802.11h cannot be modified. For more<br />
information, see “Using the 802.11h Wireless Mode” on page 57.<br />
IEEE 802.11h is a standard that provides two services required to satisfy<br />
certain regulatory domains for the 5 GHz band. These two services are<br />
Transmit Power Control (TPC) and Dynamic Frequency Selection (DFS).<br />
Note: The 802.11h mode is automatically enabled if the <strong>AP</strong> is configured<br />
to work in any country that requires 802.11h as a minimum standard.<br />
Station Isolation To enable station isolation, select the option directly beside it.<br />
When Station Isolation is disabled, wireless clients can communicate<br />
with one another normally by sending traffic through the access point.<br />
When Station Isolation is enabled, the access point blocks<br />
communication between wireless clients. The access point still allows<br />
data traffic between its wireless clients and wired devices on the<br />
network, but not among wireless clients.<br />
Radio Interface The mode following the radio interface defines the IEEE wireless<br />
networking standard of the radio.<br />
MAC Address Indicates the Media <strong>Access</strong> Control (MAC) addresses for the interface.<br />
For the DWL-8500<strong>AP</strong>, this page shows the MAC addresses for Radio<br />
Interface One and Radio Interface Two.<br />
A MAC address is a permanent, unique hardware address for any device<br />
that represents an interface to the network. The MAC address is assigned<br />
by the manufacturer. You cannot change the MAC address. It is provided<br />
here for informational purposes as a unique identifier for an interface.
Using the 802.11h Wireless Mode<br />
There are a number of key points about the IEEE 802.11h standard:<br />
5 Managing the <strong>Access</strong> <strong>Point</strong><br />
802.11h only works for the 802.11a band. It is not required for 802.11b or 802.11g.<br />
If you are operating in an 802.11h enabled domain, the <strong>AP</strong> attempts to use the channel you<br />
assign. If the channel has been blocked by a previous radar detection, or if the <strong>AP</strong> detects<br />
a radar on the channel, then the <strong>AP</strong> automatically selects a different channel.<br />
When 802.11h is enabled, the initial bootup time increases by a minimum of sixty<br />
seconds. This is the minimum time required to scan the selected channel for radar<br />
interference.<br />
Setting the Wireless Interface 57
D-Link <strong>Unified</strong> <strong>Access</strong> <strong>Point</strong> Administrator’s <strong>Guide</strong><br />
Configuring Radio Settings<br />
Radio settings directly control the behavior of an IEEE 802.11-compliant radio device in the<br />
access point. Specifically, a user can control operational mode, power level, frequency, and<br />
other per-radio IEEE 802.11 configuration options.<br />
To specify radio settings, click the Radio tab.<br />
58 © 2001-2008 D-Link Corporation. All Rights Reserved.
5 Managing the <strong>Access</strong> <strong>Point</strong><br />
Table 16 describes the fields and configuration options for the Radio Settings page.<br />
Table 16. Radio Settings<br />
Field Description<br />
Radio<br />
(DWL-8500<strong>AP</strong> only)<br />
Select Radio 1 or Radio 2 to specify which radio to configure. The<br />
rest of the settings on this tab apply to the radio you select in this<br />
field. Be sure to configure settings for both radios.<br />
Note: this field is not available on the DWL-3500<strong>AP</strong> because it<br />
only has one radio.<br />
Status (On/Off) Specify whether you want the radio on or off by clicking On or<br />
Off.<br />
If you turn off a radio, the <strong>AP</strong> sends disassociation frames to all the<br />
wireless clients it is currently supporting so that the radio can be<br />
gracefully shutdown and the clients can start the association<br />
process with other available <strong>AP</strong>s.<br />
Mode<br />
(DWL-8500<strong>AP</strong> Radio 1 only)<br />
Mode<br />
(DWL-3500 and<br />
DWL-8500<strong>AP</strong> Radio 2)<br />
The Mode defines the wireless network standard the radio uses.<br />
IEEE 802.11a<br />
Dynamic Turbo 5 GHz<br />
The Mode defines the wireless network standard the radio uses.<br />
IEEE 802.11g<br />
Dynamic Turbo 2.4 GHz<br />
Super AG Super AG is a radio mode that attempts to increases performance<br />
through bursting and frame compression. Performance increases<br />
when the <strong>AP</strong> communicates with Super AG-enabled clients.<br />
However, with Super AG enabled, the access point transmissions<br />
consume more bandwidth.<br />
To enable Super AG, click Enabled.<br />
To disable Super AG, click Disabled.<br />
Channel Select the channel.<br />
The range of available channels is determined by the mode of the<br />
radio interface and the country code setting. If you select Auto for<br />
the channel setting, the access point scans available channels and<br />
selects a channel where no traffic is detected.<br />
The Channel defines the portion of the radio spectrum the radio<br />
uses for transmitting and receiving. Each mode offers a number of<br />
channels, depending on how the spectrum is licensed by national<br />
and transnational authorities such as the Federal Communications<br />
Commission (FCC) or the International Telecommunication Union<br />
(ITU-R).<br />
Antenna Select the antenna use to receive and transmit wireless traffic:<br />
Auto: This mode is not operational. Select the Primary or<br />
Secondary mode.<br />
Primary: Use the primary antenna to send and receive traffic.<br />
Secondary: Use the secondary antenna to send and receive<br />
traffic.<br />
Configuring Radio Settings 59
D-Link <strong>Unified</strong> <strong>Access</strong> <strong>Point</strong> Administrator’s <strong>Guide</strong><br />
Table 16. Radio Settings<br />
Field Description<br />
Beacon Interval Enter a value from 20 to 2000 milliseconds.<br />
Beacon frames are transmitted by an access point at regular<br />
intervals to announce the existence of the wireless network. The<br />
default behavior is to send a beacon frame once every 100<br />
milliseconds (or 10 per second).<br />
DTIM Period Specify a DTIM period from 1-255 beacons.<br />
The Delivery Traffic Information Map (DTIM) message is an<br />
element included in some Beacon frames. It indicates which client<br />
stations, currently sleeping in low-power mode, have data buffered<br />
on the access point awaiting pick-up.<br />
The DTIM period you specify indicates how often the clients<br />
served by this access point should check for buffered data still on<br />
the <strong>AP</strong> awaiting pickup.<br />
The measurement is in beacons. For example, if you set this field<br />
to 1, clients will check for buffered data on the <strong>AP</strong> at every beacon.<br />
If you set this field to 10, clients will check on every 10th beacon.<br />
Fragmentation<br />
Specify a number between 256 and 2,346 to set the frame size<br />
Threshold<br />
threshold in bytes.<br />
The fragmentation threshold is a way of limiting the size of frames<br />
transmitted over the network. If a packet exceeds the fragmentation<br />
threshold, the fragmentation function is activated and the packet is<br />
sent as multiple 802.11 frames.<br />
If the packet being transmitted is equal to or less than the threshold,<br />
fragmentation is not used.<br />
Setting the threshold to the largest value (2,346 bytes) effectively<br />
disables fragmentation.<br />
Fragmentation involves more overhead both because of the extra<br />
work of dividing up and reassembling of frames it requires, and<br />
because it increases message traffic on the network. However,<br />
fragmentation can help improve network performance and<br />
reliability if properly configured.<br />
Sending smaller frames (by using lower fragmentation threshold)<br />
might help with some interference problems; for example, it might<br />
help with microwave oven interference.<br />
By default, fragmentation is off. We recommend not using<br />
fragmentation unless you suspect radio interference. The additional<br />
headers applied to each fragment increase the overhead on the<br />
network and can greatly reduce throughput.<br />
60 © 2001-2008 D-Link Corporation. All Rights Reserved.
Table 16. Radio Settings<br />
5 Managing the <strong>Access</strong> <strong>Point</strong><br />
Field Description<br />
RTS Threshold Specify an RTS Threshold value between 0 and 2347.<br />
The RTS threshold specifies the packet size of the minimum packet<br />
for which a request to send (RTS) frame will be sent. This helps<br />
control traffic flow through the access point, especially one with a<br />
lot of clients.<br />
If you specify a low threshold value, RTS packets will be sent more<br />
frequently. This will consume more bandwidth and reduce the<br />
throughput of the packet.<br />
On the other hand, sending more RTS packets can help the network<br />
recover from interference or collisions which might occur on a<br />
busy network, or on a network experiencing electromagnetic<br />
interference.<br />
Maximum Stations Specify the maximum number of stations allowed to associate to<br />
this radio at any one time.<br />
You can enter a value between 0 and 256.<br />
Transmit Power Enter a percentage value for the transmit power level for this<br />
access point.<br />
The default value, which is 100%, can be more cost-efficient than a<br />
lower percentage since it gives the access point a maximum<br />
broadcast range and reduces the number of <strong>AP</strong>s needed.<br />
To increase capacity of the network, place <strong>AP</strong>s closer together and<br />
reduce the value of the transmit power. This helps reduce overlap<br />
and interference among <strong>AP</strong>s. A lower transmit power setting can<br />
also keep your network more secure because weaker wireless<br />
signals are less likely to propagate outside of the physical location<br />
of your network.<br />
Rate Sets Check the transmission rate sets you want the access point to<br />
support and the basic rate sets you want the access point to<br />
advertise:<br />
Rates are expressed in megabits per second.<br />
Supported Rate Sets indicate rates that the access point<br />
supports. You can check multiple rates (click an option to<br />
select or de-select a rate). The <strong>AP</strong> will automatically choose<br />
the most efficient rate based on factors like error rates and<br />
distance of client stations from the <strong>AP</strong>.<br />
Basic Rate Sets indicate rates that the access point will<br />
advertise to the network for the purposes of setting up<br />
communication with other <strong>AP</strong>s and client stations on the<br />
network. It is generally more efficient to have an <strong>AP</strong> broadcast<br />
a subset of its supported rate sets.<br />
For the DWL-8500<strong>AP</strong>, use the Radio Settings page to configure both Radio One and Radio<br />
Two. The settings on the page apply only to the radio that you select from the Radio list. After<br />
you configure settings for one of the radios, click Update and then select and configure the<br />
other radio. Be sure to click Update to apply the second set of configuration settings for the<br />
other radio.<br />
Configuring Radio Settings 61
D-Link <strong>Unified</strong> <strong>Access</strong> <strong>Point</strong> Administrator’s <strong>Guide</strong><br />
NOTE: After you configure the radio settings, you must click Update to apply the<br />
changes and to save the settings. Changing these access point settings might<br />
cause the <strong>AP</strong> to stop and restart system processes. Additionally, changing the<br />
Super AG setting will cause the <strong>AP</strong> to reset. If this happens, wireless clients<br />
will temporarily lose connectivity. We recommend that you change access<br />
point settings when WLAN traffic is low.<br />
Configuring Virtual <strong>Access</strong> <strong>Point</strong>s<br />
You can configure virtual access points (V<strong>AP</strong>s) to segment the wireless LAN into multiple<br />
broadcast domains that are the wireless equivalent of Ethernet VLANs. You can configure up<br />
to eight V<strong>AP</strong>s on a radio. The V<strong>AP</strong>s simulate multiple <strong>AP</strong>s in one physical access point.<br />
For each V<strong>AP</strong>, you can customize the security mode to control wireless client access. Each<br />
V<strong>AP</strong> can also have a unique SSID. Multiple SSIDs make a single access point look like two or<br />
more access points to other systems on the network. By configuring V<strong>AP</strong>s, you can maintain<br />
better control over broadcast and multicast traffic, which affects network performance.<br />
You can configure each V<strong>AP</strong> to use a different VLAN, or you can configure multiple V<strong>AP</strong>s to<br />
use the same VLAN. V<strong>AP</strong>0 is always enabled and is assigned to VLAN 1 by default.<br />
For the DWL-8500<strong>AP</strong>, V<strong>AP</strong>0 is always enabled on both radios, and V<strong>AP</strong>s can use a VLAN<br />
whether the VLAN is on the same radio or on a different radio.<br />
The access point adds VLAN ID tags to wireless client traffic based on the VLAN ID you<br />
configure on the V<strong>AP</strong> page or by using the RADIUS server assignment. If you use an external<br />
RADIUS server, you can configure multiple VLANs on each V<strong>AP</strong>. The external RADIUS<br />
server assigns wireless clients to the VLAN when the clients associate and authenticate. For<br />
more information about using a RADIUS server to manage VLANs, see “Configuring the<br />
RADIUS Server for VLAN Tags” on page 122.<br />
If wireless clients use a security mode that does not communicate with the RAIDUS server, or<br />
if the RADIUS server does not provide the VLAN information, you can assign a VLAN ID to<br />
each V<strong>AP</strong>. If the wireless client is not assigned a VLAN through any other method, the <strong>AP</strong><br />
assigns the VLAN ID specified in the V<strong>AP</strong> to all wireless clients that connect to the <strong>AP</strong><br />
through that V<strong>AP</strong>.<br />
NOTE: Before you configure VLANs on the <strong>AP</strong>, be sure to verify that the switch and<br />
DHCP server the <strong>Unified</strong> <strong>Access</strong> <strong>Point</strong> uses can support IEEE 802.1Q<br />
VLAN encapsulation.<br />
62 © 2001-2008 D-Link Corporation. All Rights Reserved.
To set up multiple virtual access points, Click the V<strong>AP</strong> tab.<br />
Table 17 describes the fields and configuration options on the V<strong>AP</strong> page.<br />
Table 17. V<strong>AP</strong> Configuration<br />
5 Managing the <strong>Access</strong> <strong>Point</strong><br />
Field Description<br />
RADIUS IP By default each V<strong>AP</strong> uses the global RADIUS settings that you define<br />
for the <strong>AP</strong> at the top of the V<strong>AP</strong> page.<br />
Enter the IP address of the RADIUS server on your network that all<br />
V<strong>AP</strong>s use by default.<br />
The RADIUS IP is the IP address of the global RADIUS server.<br />
RADIUS Key Enter the RADIUS Key in the text box.<br />
The RADIUS Key is the shared secret key for the global RADIUS server.<br />
The text you enter will be displayed as “*” characters to prevent others<br />
from seeing the RADIUS key as you type.<br />
Enable RADIUS Click this option if you want to log accounting information for clients<br />
Accounting<br />
with user names and passwords.<br />
Radio<br />
Select the radio to configure. V<strong>AP</strong>s are configured independently on<br />
(DWL-8500<strong>AP</strong> only) each radio.<br />
V<strong>AP</strong> You can configure up to 8 V<strong>AP</strong>s on a radio. V<strong>AP</strong>0 is the physical radio<br />
interface, so to disable V<strong>AP</strong>0, you must disable the radio.<br />
Configuring Virtual <strong>Access</strong> <strong>Point</strong>s 63
D-Link <strong>Unified</strong> <strong>Access</strong> <strong>Point</strong> Administrator’s <strong>Guide</strong><br />
Table 17. V<strong>AP</strong> Configuration<br />
Field Description<br />
Enabled You can enable or disable a configured network.<br />
To enable the specified network, click the Enabled option beside<br />
the appropriate V<strong>AP</strong>.<br />
To disable the specified network, clear the Enabled option beside<br />
the appropriate V<strong>AP</strong>.<br />
If you disable the specified network, you will lose the VLAN ID you<br />
entered.<br />
VLAN ID When a wireless client connects to the <strong>AP</strong> by using this V<strong>AP</strong>, the <strong>AP</strong> tags<br />
all traffic from the wireless client with the VLAN ID you enter in this<br />
field unless you enter the untagged VLAN ID or use a RADIUS server to<br />
assign a wireless client to a VLAN. The range for the VLAN ID is 1-<br />
4094.<br />
If you use RADIUS-based authentication for clients, you can optionally<br />
add the following attributes to configure a VLAN for the client:<br />
“Tunnel-Type”<br />
“Tunnel-Medium-Type”<br />
“Tunnel-Private-Group-ID”<br />
The RADIUS-assigned VLAN ID overrides the VLAN ID you configure<br />
on the V<strong>AP</strong> page.<br />
Note: Any RADIUS-assigned VLAN cannot be the same as the<br />
management VLAN.<br />
You configure the untagged and management VLAN IDs on the Ethernet<br />
Settings page. For more information, see ““Configuring the Ethernet<br />
Interface” on page 31.<br />
SSID Enter a name for the wireless network. The SSID is an alphanumeric<br />
string of up to 32 characters. You can use the same SSID for multiple<br />
V<strong>AP</strong>s, or you can choose a unique SSID for each V<strong>AP</strong>.<br />
Note: If you are connected as a wireless client to the same <strong>AP</strong> that you<br />
are administering, resetting the SSID will cause you to lose connectivity<br />
to the <strong>AP</strong>. You will need to reconnect to the new SSID after you save this<br />
new setting.<br />
Broadcast SSID To enable the SSID broadcast, click the Broadcast SSID option.<br />
By default, the access point broadcasts (allows) the Service Set Identifier<br />
(SSID) in its beacon frames.<br />
For information about turing off the SSID broadcast, see “Prohibiting the<br />
SSID Broadcast” on page 53.<br />
64 © 2001-2008 D-Link Corporation. All Rights Reserved.
Table 17. V<strong>AP</strong> Configuration<br />
5 Managing the <strong>Access</strong> <strong>Point</strong><br />
Field Description<br />
Security Select one of the following Security modes for this V<strong>AP</strong>:<br />
None<br />
Static WEP<br />
WPA Personal<br />
IEEE 802.1X<br />
WPA Enterprise<br />
If you select a security mode other than None, additional fields appear.<br />
Note: The Security mode you set here is specifically for this Virtual<br />
<strong>Access</strong> <strong>Point</strong>. For more information about the security options, see<br />
“Configuring Virtual <strong>Access</strong> <strong>Point</strong> Security” on page 43.<br />
MAC Authentication You can configure a global list of MAC addresses that are allowed or<br />
Type<br />
denied access to the network. The menu for this feature allows you to<br />
select the type of MAC Authentication to use:<br />
Disabled—Do not use MAC Authentication.<br />
Local—Use the MAC Authentication list that you configure on the<br />
MAC Authentication page.<br />
RADIUS—Use the MAC Authentication list on the external<br />
RADIUS server.<br />
For more information about MAC Authentication, see “Controlling<br />
<strong>Access</strong> by MAC Authentication” on page 66.<br />
NOTE: After you configure the V<strong>AP</strong> settings, you must click Update to apply the<br />
changes and to save the settings. Changing some access point settings might<br />
cause the <strong>AP</strong> to stop and restart system processes. If this happens, wireless<br />
clients will temporarily lose connectivity. We recommend that you change<br />
access point settings when WLAN traffic is low.<br />
Configuring Virtual <strong>Access</strong> <strong>Point</strong>s 65
D-Link <strong>Unified</strong> <strong>Access</strong> <strong>Point</strong> Administrator’s <strong>Guide</strong><br />
Controlling <strong>Access</strong> by MAC Authentication<br />
A Media <strong>Access</strong> Control (MAC) address is a hardware address that uniquely identifies each<br />
node of a network. All IEEE 802 network devices share a common 48-bit MAC address<br />
format, usually displayed as a string of 12 hexadecimal digits separated by colons, for example<br />
00:DC:BA:09:87:65. Each wireless network interface card (NIC) used by a wireless client has<br />
a unique MAC address.<br />
You can use the Administrator UI on the access point or use an external RADIUS server to<br />
control access based on the MAC address of the wireless client. This feature is called MAC<br />
Authentication or MAC Filtering. To control access locally, you configure a global list of<br />
MAC addresses that are allowed or denied access to the network. To use the RADIUS server,<br />
you configure authentication based on the MAC address of the client. When a wireless client<br />
attempts to associate with an <strong>AP</strong>, the <strong>AP</strong> looks up the client’s MAC address on the RADIUS<br />
server. If it is found, the global “allow” or “deny” setting is applied. If it is not found, the<br />
opposite is applied.<br />
You choose whether to use local or RADIUS-based MAC Authentication, local MAC<br />
Authentication, or no MAC Authentication on the V<strong>AP</strong> page. For more information, see<br />
“Configuring Virtual <strong>Access</strong> <strong>Point</strong>s” on page 62.<br />
Configuring a MAC Filter List on the <strong>AP</strong><br />
The MAC Authentication page allows you to control access to the access point based on<br />
MAC addresses. Based on how you set the filter, you can allow only client stations with a<br />
listed MAC address or deny access to the stations listed.<br />
When you enable MAC Authentication and specify a list of approved MAC addresses, only<br />
clients with a listed MAC address can access the network. If you specify MAC addresses to<br />
deny, all clients can access the network except for the clients on the deny list.<br />
To enable filtering by MAC address, click the MAC Authentication tab.<br />
NOTE: Global MAC Authentication settings apply to all V<strong>AP</strong>s. For the<br />
DWL-8500<strong>AP</strong>, the settings apply to all V<strong>AP</strong>s on both radios.<br />
66 © 2001-2008 D-Link Corporation. All Rights Reserved.
5 Managing the <strong>Access</strong> <strong>Point</strong><br />
Table 18 describes the fields and configuration options available on the MAC Authentication<br />
page.<br />
Table 18. MAC Authentication<br />
Field Description<br />
Filter To set the MAC Address Filter, click one of the following buttons:<br />
Allow only stations in the list<br />
Block all stations in list<br />
This setting applies to both RADIUS and local MAC authentication.<br />
Stations List To add a MAC Address to Stations List, enter its 48-bit MAC address<br />
into the lower text boxes, then click Add.<br />
The MAC Address is added to the Stations List.<br />
To remove a MAC Address from the Stations List, select its 48-bit MAC<br />
address, then click Remove.<br />
The stations in the list will either be allowed or denied <strong>AP</strong> access based<br />
on how you set the Filter.<br />
NOTE: After you configure the settings on the MAC Authentication page, you must<br />
click Update to apply the changes and to save the settings. Changing some<br />
access point settings might cause the <strong>AP</strong> to stop and restart system processes.<br />
If this happens, wireless clients will temporarily lose connectivity. We<br />
recommend that you change access point settings when WLAN traffic is low.<br />
Configuring MAC Authentication on the RADIUS Server<br />
If you use RADIUS MAC authentication for MAC-based access control, you must configure<br />
MAC entries in the RADIUS server, as described in Table 19.<br />
Table 19. RADIUS Server Attributes for MAC Authentication<br />
RADIUS Server<br />
Attribute<br />
Description Value<br />
User-Name (1) MAC address of the client station. Valid Ethernet MAC<br />
Address.<br />
User-Password (2) A fixed global password used to lookup a<br />
client MAC entry.<br />
NOPASSWORD<br />
Controlling <strong>Access</strong> by MAC Authentication 67
D-Link <strong>Unified</strong> <strong>Access</strong> <strong>Point</strong> Administrator’s <strong>Guide</strong><br />
Configuring Load Balancing<br />
You can set network utilization thresholds on the access point to maintain the speed and<br />
performance of the wireless network as clients associate and disassociate with the <strong>AP</strong>. For the<br />
DWL-8500<strong>AP</strong>, the load balancing settings apply to both radios.<br />
To configure load balancing and set limits and behavior to be triggered by a specified<br />
utilization rate of the access point, click the Load Balancing tab and update the fields shown<br />
in Table 20.<br />
Table 20. Load Balancing<br />
Field Description<br />
Load Balancing Enable or disable load balancing:<br />
To enable load balancing on this access point, click<br />
Enable.<br />
To disable load balancing on this access point, click<br />
Disable.<br />
Utilization for No New Associations Provide the percentage of network bandwidth utilization<br />
allowed on the radio before the <strong>AP</strong> stops accepting new<br />
client associations.<br />
The default is 0, which means that all new associations will<br />
be allowed regardless of the utilization rate.<br />
NOTE: After you configure the settings on the Load Balancing page, you must click<br />
Update to apply the changes and to save the settings. Changing some access<br />
point settings might cause the <strong>AP</strong> to stop and restart system processes. If this<br />
happens, wireless clients will temporarily lose connectivity. We recommend<br />
that you change access point settings when WLAN traffic is low.<br />
68 © 2001-2008 D-Link Corporation. All Rights Reserved.
Configuring <strong>Access</strong> <strong>Point</strong> Services<br />
6<br />
This chapter describes how to configure services on the DWL-3500<strong>AP</strong> and DWL-8500<strong>AP</strong> and<br />
contains the following sections:<br />
Configuring Quality of Service (QoS)<br />
Enabling the Network Time Protocol Server<br />
Configuring Quality of Service (QoS)<br />
Quality of Service (QoS) provides you with the ability to specify parameters on multiple<br />
queues for increased throughput and better performance of differentiated wireless traffic like<br />
Voice-over-IP (VoIP), other types of audio, video, and streaming media as well as traditional<br />
IP data over the <strong>Unified</strong> <strong>Access</strong> <strong>Point</strong>.<br />
Understanding QoS<br />
A primary factor that affects QoS is network congestion due to an increased number of clients<br />
attempting to access the air waves and higher traffic volume competing for bandwidth during a<br />
busy time of day. The most noticeable degradation in service on a busy, overloaded network<br />
will be evident in time-sensitive applications like Video, Voice-over-IP (VoIP), and streaming<br />
media.<br />
Unlike typical data files which are less affected by variability in QoS, Video, VoIP and<br />
streaming media must be sent in a specific order at a consistent rate and with minimum delay<br />
between packet transmission. If the quality of service is compromised, the audio or video will<br />
be distorted.<br />
QoS and Load Balancing<br />
By using a combination of load balancing (see “Configuring Load Balancing” on page 68) and<br />
QoS techniques, you can provide a high quality of service for time-sensitive applications even<br />
on a busy network. Load balancing sets thresholds for client associations and <strong>AP</strong> utilization.<br />
QoS is a means of allocating bandwidth and network access based on transmission priorities<br />
for different types of wireless traffic within a single access point.<br />
Configuring Quality of Service (QoS) 69
D-Link <strong>Unified</strong> <strong>Access</strong> <strong>Point</strong> Administrator’s <strong>Guide</strong><br />
802.11e and WMM Standards Support<br />
QoS describes a range of technologies for controlling data streams on shared network<br />
connections. The IEEE 802.11e task group is in the process of defining a QoS standard for<br />
transmission quality and availability of service on wireless networks. QoS is designed to<br />
provide better network service by minimizing network congestion; limiting Jitter, Latency,<br />
and Packet Loss; supporting dedicated bandwidth for time-sensitive or mission critical<br />
applications, and prioritizing wireless traffic for channel access.<br />
As with all IEEE 802.11 working group standards, the goal is to provide a standard way of<br />
implementing QoS features so that components from different companies are interoperable.<br />
The <strong>Unified</strong> <strong>Access</strong> <strong>Point</strong> provides QoS based on the Wireless Multimedia (WMM)<br />
specification, which implements a subset of 802.11e features.<br />
Both access points and wireless clients (laptops, consumer electronics products) can be<br />
WMM-enabled by the Wi-Fi Alliance.<br />
QoS Queues and Parameters to Coordinate Traffic Flow<br />
Configuring QoS options on the <strong>Unified</strong> <strong>Access</strong> <strong>Point</strong> consists of setting parameters on<br />
existing queues for different types of wireless traffic. You can configure different minimum<br />
and maximum wait times for the transmission of packets in each queue based on the<br />
requirements of the media being sent. Queues automatically provide minimum transmission<br />
delay for Voice, Video, multimedia, and mission critical applications, and rely on best-effort<br />
parameters for traditional IP data.<br />
For example, time-sensitive Voice, Video, and multimedia are given effectively higher priority<br />
for transmission (lower wait times for channel access), while other applications and traditional<br />
IP data which are less time-sensitive but often more data-intensive are expected to tolerate<br />
longer wait times.<br />
The <strong>Unified</strong> <strong>Access</strong> <strong>Point</strong> implements QoS based on the IEEE Wireless Multimedia (WMM)<br />
standard. A Linux-based queuing class is used to tag packets and establish multiple queues.<br />
The queues provided offer built-in prioritization and routing based on the type of data being<br />
transmitted.<br />
The Administration UI provides a way for you to configure parameters on the queues.<br />
QoS Queues and Diff-Serve Code <strong>Point</strong>s (DSCP) on Packets<br />
QoS on the <strong>Unified</strong> <strong>Access</strong> <strong>Point</strong> leverages WMM information in the IP packet header related<br />
to Diff-Serv Code <strong>Point</strong> (DSCP). Every IP packet sent over the network includes a DSCP field<br />
in the header that indicates how the data should be prioritized and transmitted over the<br />
network. The DSCP field consists of a 6 bit value defined by the local administration. For<br />
WMM, the Wi-Fi Alliance suggests a particular mapping for DSCP values<br />
The access point examines the DSCP field in the headers of all packets that pass through the<br />
<strong>AP</strong>. Based on the value in a packet’s DSCP field, the <strong>AP</strong> prioritizes the packet for transmission<br />
by assigning it to one of the queues. This process occurs automatically, regardless of whether<br />
you deliberately configure QoS or not.<br />
70 © 2001-2008 D-Link Corporation. All Rights Reserved.
6 Configuring <strong>Access</strong> <strong>Point</strong> Services<br />
A different type of data is associated with each queue. The queue and associated priorities and<br />
parameters for transmission are as follows:<br />
Data 0 (Voice). Highest priority queue, minimum delay. Time-sensitive data such as Voice<br />
over IP (VoIP) is automatically sent to this queue.<br />
Data 1 (Video). High priority queue, minimum delay. Time-sensitive data such as Video<br />
and other streaming media are automatically sent to this queue.<br />
Data 2 (Best Effort). Medium priority queue, medium throughput and delay. Most<br />
traditional IP data is sent to this queue.<br />
Data 3 (Background). Lowest priority queue, high throughput. Bulk data that requires<br />
maximum throughput and is not time-sensitive is sent to this queue (FTP data, for<br />
example).<br />
Using the QoS settings on the Administration UI, you can configure Enhanced Distributed<br />
Channel <strong>Access</strong> (EDCA) parameters that determine how each queue is treated when it is sent<br />
by the access point to the client or by the client to the access point.<br />
Wireless traffic travels:<br />
Downstream from the access point to the client station<br />
Upstream from client station to access point<br />
Upstream from access point to network<br />
Downstream from network to access point<br />
With WMM enabled, QoS settings on the <strong>Unified</strong> <strong>Access</strong> <strong>Point</strong> affect the first two of these;<br />
downstream traffic flowing from the access point to client station (<strong>AP</strong> EDCA parameters) and<br />
the upstream traffic flowing from the station to the access point (station EDCA parameters).<br />
With WMM disabled, you can still set some parameters on the downstream traffic flowing<br />
from the access point to the client station (<strong>AP</strong> EDCA parameters).<br />
The other phases of the traffic flow (to and from the network) are not under control of the QoS<br />
settings on the <strong>AP</strong>.<br />
EDCF Control of Data Frames and Arbitration Interframe Spaces<br />
Data is transmitted over 802.11 wireless networks in frames. A Frame consists of a discrete<br />
portion of data along with some descriptive meta-information packaged for transmission on a<br />
wireless network.<br />
Each frame includes a source and destination MAC address, a control field with protocol<br />
version, frame type, frame sequence number, frame body (with the actual information to be<br />
transmitted) and frame check sequence for error detection.<br />
The 802.11 standard defines various frame types for management and control of the wireless<br />
infrastructure, and for data transmission. 802.11 frame types are (1) management frames, (2)<br />
control frames, and (3) data frames. Management and control frames (which manage and<br />
control the availability of the wireless infrastructure) automatically have higher priority for<br />
transmission.<br />
802.11e uses interframe spaces to regulate which frames get access to available channels and<br />
to coordinate wait times for transmission of different types of data.<br />
Configuring Quality of Service (QoS) 71
D-Link <strong>Unified</strong> <strong>Access</strong> <strong>Point</strong> Administrator’s <strong>Guide</strong><br />
Backoff time<br />
in milliseconds<br />
Management and control frames wait a minimum amount of time for transmission; they wait a<br />
short interframe space (SIF). These wait times are built-in to 802.11 as infrastructure support<br />
and are not configurable.<br />
The <strong>Unified</strong> <strong>Access</strong> <strong>Point</strong> supports the Enhanced Distribution Coordination Function (EDCF)<br />
as defined by the 802.11e standard. EDCF, which is an enhancement to the DCF standard and<br />
is based on CSMA/CA protocol, defines the interframe space (IFS) between data frames. Data<br />
frames wait for an amount of time defined as the arbitration interframe space (AIFS) before<br />
transmitting.<br />
This parameter is configurable.<br />
Random Backoff and Minimum / Maximum Contention Windows<br />
If an access point detects that the medium is in use (busy), it uses the DCF random backoff<br />
timer to determine the amount of time to wait before attempting to access a given channel<br />
again. Each access point waits some random period of time between retries. The wait time<br />
(initially a random value within a range specified as the Minimum Contention Window)<br />
increases exponentially up to a specified limit (Maximum Contention Window). The random<br />
delay avoids most of the collisions that would occur if multiple <strong>AP</strong>s got access to the medium<br />
at the same time and tried to transmit data simultaneously. The more active users you have on<br />
a network, the more significant the performance gains of the backoff timer will be in reducing<br />
the number of collisions and retransmissions.<br />
Backoff 4 = re-doubled<br />
Backoff 2 = MinCW doubled<br />
Initial Backoff = random number in<br />
range of MinCW<br />
1 5 10 15 20<br />
The random backoff used by the access point is a configurable parameter. To describe the<br />
random delay, a “Minimum Contention Window” (MinCW) and a “Maximum Contention<br />
Window” (MaxCW) is defined.<br />
The value specified for the Minimum Contention Window is the upper limit of a range for<br />
the initial random backoff wait time. The number used in the random backoff is initially a<br />
random number between 0 and the number defined for the Minimum Contention Window.<br />
If the first random backoff time ends before successful transmission of the data frame, the<br />
access point increments a retry counter, and doubles the value of the random backoff<br />
window. The value specified in the Maximum Contention Window is the upper limit for<br />
this doubling of the random backoff. This doubling continues until either the data frame is<br />
sent or the Maximum Contention Window size is reached.<br />
72 © 2001-2008 D-Link Corporation. All Rights Reserved.<br />
Doubling continues on each try until MaxCW is reached<br />
at which point this wait time is used on retries<br />
until data is sent or until retries limit is reached<br />
25
Packet Bursting for Better Performance<br />
6 Configuring <strong>Access</strong> <strong>Point</strong> Services<br />
The <strong>Unified</strong> <strong>Access</strong> <strong>Point</strong> includes 802.11e based packet bursting technology that increases<br />
data throughput and speed of transmission over the wireless network. Packet bursting enables<br />
the transmission of multiple packets without the extra overhead of header information. The<br />
effect of this is to increase network speed and data throughput. The size of packet bursts<br />
allowed (maximum burst length) is a configurable parameter.<br />
Transmission Opportunity (TXOP) Interval for Client Stations<br />
The Transmission Opportunity (TXOP) is an interval of time when a Wi-Fi Multimedia<br />
(WMM) client station has the right to initiate transmissions onto the wireless medium (WM).<br />
802.1p and DSCP tags<br />
IEEE 802.1p is an extension of the IEEE 802 standard and is responsible for QoS provision.<br />
One purpose of 802.1p is to prioritize network traffic at the data link/ MAC layer.<br />
The 802.1q tag includes a three-bit field for prioritization, which allows packets to be grouped<br />
into various traffic classes. Eight priority levels are defined. The highest priority is seven,<br />
which might go to network critical traffic (voice). The lowest priority level is zero, this is used<br />
as a best-effort default, it is invoked automatically when no other value has been set.<br />
NOTE: IEEE 802.1p prioritization will not work unless QoS and WMM are enabled.<br />
WMM must be enabled on both the <strong>AP</strong> and on the client connecting to the<br />
<strong>AP</strong>.<br />
Configuring Quality of Service (QoS) 73
D-Link <strong>Unified</strong> <strong>Access</strong> <strong>Point</strong> Administrator’s <strong>Guide</strong><br />
Figure 15 outlines the way in which tags are retrieved and traffic prioritized on a network.<br />
Figure 15. Traffic Prioritization<br />
NO<br />
Take Priority from<br />
DSCP<br />
Take priority from tag<br />
Table 21 outlines the VLAN priority and DSCP values.<br />
Table 21. VLAN Priority Tags<br />
START<br />
Is VLAN tag?<br />
Is priority tag = 0<br />
NO<br />
VLAN Priority Priority DSCP Value<br />
0 Best Effort 0<br />
1 Background 16<br />
2 Background 8<br />
3 Best Effort 24<br />
4 Video 32<br />
5 Video 40<br />
6 Voice 48<br />
7 Voice 56<br />
74 © 2001-2008 D-Link Corporation. All Rights Reserved.<br />
NO<br />
YES<br />
YES<br />
Is VLAN priority tag<br />
(VLAN id = 0)<br />
Take Priority from<br />
DSCP<br />
YES<br />
Take priority from tag
Configuring QoS Settings<br />
6 Configuring <strong>Access</strong> <strong>Point</strong> Services<br />
Configuring Quality of Service (QoS) on the <strong>Unified</strong> <strong>Access</strong> <strong>Point</strong> consists of setting<br />
parameters on existing queues for different types of wireless traffic, and effectively specifying<br />
minimum and maximum wait times (through Contention Windows) for transmission. The<br />
settings described here apply to data transmission behavior on the access point only, not to that<br />
of the client stations.<br />
<strong>AP</strong> Enhanced Distributed Channel <strong>Access</strong> (EDCA) Parameters affect traffic flowing from the<br />
access point to the client station.<br />
Station Enhanced Distributed Channel <strong>Access</strong> (EDCA) Parameters affect traffic flowing from<br />
the client station to the access point.<br />
The default values for the <strong>AP</strong> and station EDCA parameters are those suggested by the Wi-Fi<br />
Alliance in the WMM specification. In normal use these values should not need to be changed.<br />
Changing these values will affect the QoS provided.<br />
NOTE: For the DWL-8500<strong>AP</strong>, the QoS settings apply to both radios but the traffic<br />
for each radio is queued independently.<br />
To set up queues for QoS, click the QoS tab under the Services heading and configure settings<br />
as described in Table 22.<br />
Configuring Quality of Service (QoS) 75
D-Link <strong>Unified</strong> <strong>Access</strong> <strong>Point</strong> Administrator’s <strong>Guide</strong><br />
Table 22. QoS Settings<br />
Field Description<br />
<strong>AP</strong> EDCA Parameters<br />
Queue Queues are defined for different types of data transmitted from <strong>AP</strong>-tostation:<br />
AIFS<br />
(Inter-Frame Space)<br />
cwMin<br />
(Minimum Contention<br />
Window)<br />
76 © 2001-2008 D-Link Corporation. All Rights Reserved.<br />
Data 0 (Voice)—High priority queue, minimum delay. Timesensitive<br />
data such as VoIP and streaming media are automatically<br />
sent to this queue.<br />
Data 1(Video)—High priority queue, minimum delay. Timesensitive<br />
video data is automatically sent to this queue.<br />
Data 2 (best effort)—Medium priority queue, medium throughput<br />
and delay. Most traditional IP data is sent to this queue.<br />
Data 3 (Background)—Lowest priority queue, high throughput.<br />
Bulk data that requires maximum throughput and is not timesensitive<br />
is sent to this queue (FTP data, for example).<br />
For more information, see “QoS Queues and Parameters to Coordinate<br />
Traffic Flow” on page 70.<br />
The Arbitration Inter-Frame Spacing (AIFS) specifies a wait time (in<br />
milliseconds) for data frames.<br />
Valid values for AIFS are 1 through 255.<br />
For more information, see “EDCF Control of Data Frames and<br />
Arbitration Interframe Spaces” on page 71.<br />
This parameter is input to the algorithm that determines the initial<br />
random backoff wait time (“window”) for retry of a transmission.<br />
The value specified for Minimum Contention Window is the upper limit<br />
(in milliseconds) of a range from which the initial random backoff wait<br />
time is determined.<br />
The first random number generated will be a number between 0 and the<br />
number specified here.<br />
If the first random backoff wait time expires before the data frame is<br />
sent, a retry counter is incremented and the random backoff value<br />
(window) is doubled. Doubling will continue until the size of the<br />
random backoff value reaches the number defined in the Maximum<br />
Contention Window.<br />
Valid values for cwMin are 1, 3, 7, 15, 31, 63, 127, 255, 511, or 1023.<br />
The value for cwMin can be equal to or lower than the value for cwMax.<br />
For more information, see “Random Backoff and Minimum / Maximum<br />
Contention Windows” on page 72.
Table 22. QoS Settings<br />
Field Description<br />
cwMax<br />
(Maximum Contention<br />
Window)<br />
6 Configuring <strong>Access</strong> <strong>Point</strong> Services<br />
The value specified for the Maximum Contention Window is the upper<br />
limit (in milliseconds) for the doubling of the random backoff value.<br />
This doubling continues until either the data frame is sent or the<br />
Maximum Contention Window size is reached.<br />
Once the Maximum Contention Window size is reached, retries will<br />
continue until a maximum number of retries allowed is reached.<br />
Valid values for cwMax are 1, 3, 7, 15, 31, 63, 127, 255, 511, or 1023.<br />
The value for cwMax can be equal to or higher than the value for<br />
cwMin.<br />
For more information, see “Random Backoff and Minimum / Maximum<br />
Contention Windows” on page 72.<br />
Max. Burst Length The Max. Burst Length is an <strong>AP</strong> EDCA parameter and only applies to<br />
traffic flowing from the access point to the client station.<br />
This value specifies (in milliseconds) the maximum burst length<br />
allowed for packet bursts on the wireless network. A packet burst is a<br />
collection of multiple frames transmitted without header information.<br />
The decreased overhead results in higher throughput and better<br />
performance.<br />
Valid values for maximum burst length are 0.0 through 999.<br />
For more information, see “Packet Bursting for Better Performance” on<br />
page 73.<br />
Wi-Fi MultiMedia Wi-Fi MultiMedia (WMM) is enabled by default. With WMM enabled,<br />
QoS prioritization and coordination of wireless medium access is on.<br />
With WMM enabled, QoS settings on the access point control<br />
downstream traffic flowing from the access point to client station (<strong>AP</strong><br />
EDCA parameters) and the upstream traffic flowing from the station to<br />
the access point (station EDCA parameters).<br />
Disabling WMM deactivates QoS control of station EDCA parameters<br />
on upstream traffic flowing from the station to the access point.<br />
With WMM disabled, you can still set some parameters on the<br />
downstream traffic flowing from the access point to the client station<br />
(<strong>AP</strong> EDCA parameters).<br />
To disable WMM extensions, click Disabled.<br />
To enable WMM extensions, click Enabled.<br />
Configuring Quality of Service (QoS) 77
D-Link <strong>Unified</strong> <strong>Access</strong> <strong>Point</strong> Administrator’s <strong>Guide</strong><br />
Table 22. QoS Settings<br />
Field Description<br />
Station EDCA Parameters<br />
Queue Queues are defined for different types of data transmitted from stationto-<strong>AP</strong>:<br />
AIFS<br />
(Inter-Frame Space)<br />
cwMin<br />
(Minimum Contention<br />
Window)<br />
78 © 2001-2008 D-Link Corporation. All Rights Reserved.<br />
Data 0 (Voice) - Highest priority queue, minimum delay. Timesensitive<br />
data such as VoIP and streaming media are automatically<br />
sent to this queue.<br />
Data 1(Video) - Highest priority queue, minimum delay. Timesensitive<br />
video data is automatically sent to this queue.<br />
Data 2 (best effort) - Medium priority queue, medium throughput<br />
and delay. Most traditional IP data is sent to this queue.<br />
Data 3 (Background) - Lowest priority queue, high throughput.<br />
Bulk data that requires maximum throughput and is not timesensitive<br />
is sent to this queue (FTP data, for example).<br />
For more information, see “QoS Queues and Parameters to Coordinate<br />
Traffic Flow” on page 70.<br />
The Arbitration Inter-Frame Spacing (AIFS) specifies a wait time (in<br />
milliseconds) for data frames.<br />
Valid values for AIFS are 1 through 255.<br />
For more information, see “EDCF Control of Data Frames and<br />
Arbitration Interframe Spaces” on page 71.<br />
This parameter is input to the algorithm that determines the initial<br />
random backoff wait time (“window”) for retry of a transmission.<br />
The value specified here in the Minimum Contention Window is the<br />
upper limit (in milliseconds) of a range from which the initial random<br />
backoff wait time is determined.<br />
The first random number generated will be a number between 0 and the<br />
number specified here.<br />
If the first random backoff wait time expires before the data frame is<br />
sent, a retry counter is incremented and the random backoff value<br />
(window) is doubled. Doubling will continue until the size of the<br />
random backoff value reaches the number defined in the Maximum<br />
Contention Window.<br />
Valid values for cwMin are 1, 3, 7, 15, 31, 63, 127, 255, 511, or 1023.<br />
The value for cwMin can be equal to or lower than the value for cwMax.<br />
For more information, see “Random Backoff and Minimum / Maximum<br />
Contention Windows” on page 72.
Table 22. QoS Settings<br />
Field Description<br />
cwMax<br />
(Maximum Contention<br />
Window)<br />
6 Configuring <strong>Access</strong> <strong>Point</strong> Services<br />
The value specified here in the Maximum Contention Window is the<br />
upper limit (in milliseconds) for the doubling of the random backoff<br />
value. This doubling continues until either the data frame is sent or the<br />
Maximum Contention Window size is reached.<br />
Once the Maximum Contention Window size is reached, retries will<br />
continue until a maximum number of retries allowed is reached.<br />
Valid values for cwMax are 1, 3, 7, 15, 31, 63, 127, 255, 511, or 1023.<br />
The value for cwMax can be equal to or higher than the value for<br />
cwMin.<br />
For more information, see “Random Backoff and Minimum / Maximum<br />
Contention Windows” on page 72.<br />
TXOP Limit The TXOP Limit is a station EDCA parameter and only applies to<br />
traffic flowing from the client station to the access point.<br />
The Transmission Opportunity (TXOP) is an interval of time when a<br />
WMM client station has the right to initiate transmissions onto the<br />
wireless medium.<br />
This value specifies the Transmission Opportunity (TXOP) for client<br />
stations; that is, the interval of time when a WMM client station has the<br />
right to initiate transmissions on the wireless network.<br />
The TXOP Limit range is 0 to 65535. The value is in units of 32microsecond<br />
periods.<br />
NOTE: After you configure the QoS settings, you must click Update to apply the<br />
changes and to save the settings. Changing some access point settings might<br />
cause the <strong>AP</strong> to stop and restart system processes. If this happens, wireless<br />
clients will temporarily lose connectivity. We recommend that you change<br />
access point settings when WLAN traffic is low.<br />
Enabling the Network Time Protocol Server<br />
The Network Time Protocol (NTP) is an Internet standard protocol that synchronizes<br />
computer clock times on your network. NTP servers transmit Coordinated Universal Time<br />
(UTC, also known as Greenwich Mean Time) to their client systems. NTP sends periodic time<br />
requests to servers, using the returned time stamp to adjust its clock. The timestamp is used to<br />
indicate the date and time of each event in log messages.<br />
See http://www.ntp.org for more information about NTP.<br />
Enabling the Network Time Protocol Server 79
D-Link <strong>Unified</strong> <strong>Access</strong> <strong>Point</strong> Administrator’s <strong>Guide</strong><br />
To configure the address of the NTP server that the <strong>AP</strong> uses, click the Time tab and update the<br />
fields as described in Table 23.<br />
Enabling or Disabling a Network Time Protocol (NTP) Server<br />
To configure your access point to use a network time protocol (NTP) server, first enable the<br />
use of NTP, and then identify the NTP server you want to use.<br />
Table 23. SNTP Settings<br />
Field Description<br />
Network Time Protocol<br />
(NTP)<br />
NOTE: After you configure the Time settings, you must click Update to apply the<br />
changes and to save the settings. Changing some access point settings might<br />
cause the <strong>AP</strong> to stop and restart system processes. If this happens, wireless<br />
clients will temporarily lose connectivity. We recommend that you change<br />
access point settings when WLAN traffic is low.<br />
80 © 2001-2008 D-Link Corporation. All Rights Reserved.<br />
NTP provides a way for the access point to obtain and maintain its time<br />
from a server on the network. Using an NTP server gives your <strong>AP</strong> the<br />
ability to provide the correct time of day in log messages and session<br />
information.<br />
Choose to either enable or disable use of a network time protocol<br />
(NTP) server:<br />
To permit the <strong>AP</strong> to poll an NTP server, click Enabled.<br />
To prevent the <strong>AP</strong> from polling an NTP server, click Disabled.<br />
NTP Server If NTP is enabled, select the NTP server you want to use.<br />
You can specify the NTP server by host name or IP address, although<br />
using the IP address is not recommended as these can change more<br />
readily.
Maintaining the <strong>Access</strong> <strong>Point</strong><br />
7<br />
This chapter describes how to maintain the <strong>Unified</strong> <strong>Access</strong> <strong>Point</strong> and contains the following<br />
sections:<br />
Managing the Configuration File<br />
Upgrading the Firmware<br />
From the access point Administrator UI, you can perform the following maintenance tasks:<br />
Restore the factory default configuration.<br />
Create a backup of the running configuration file on to a management station.<br />
Restore the <strong>AP</strong> configuration from a backup file.<br />
Upgrade the firmware.<br />
Reboot the <strong>AP</strong>.<br />
Managing the Configuration File<br />
The <strong>Unified</strong> <strong>Access</strong> <strong>Point</strong> configuration file is in XML format and contains all of the<br />
information about the <strong>AP</strong> settings. You can download the configuration file to a management<br />
station as a back-up copy or to manually edit the content. When you upload a configuration<br />
file to the <strong>AP</strong>, the configuration information in the XML file is applied to the <strong>AP</strong>.<br />
Managing the Configuration File 81
D-Link <strong>Unified</strong> <strong>Access</strong> <strong>Point</strong> Administrator’s <strong>Guide</strong><br />
Click the Configuration tab to access the configuration management page, which Figure 16<br />
shows.<br />
Figure 16. Configuration Management<br />
The following sections describe the fields and options on the Configuration page.<br />
Resetting the Factory Default Configuration<br />
If you are experiencing problems with the <strong>Unified</strong> <strong>Access</strong> <strong>Point</strong> and have tried all other<br />
troubleshooting measures, click Reset. This restores factory defaults and clears all settings,<br />
including settings such as a new password or wireless settings. You can also use the reset<br />
button on the back panel to reset the system to the default configuration. For information about<br />
the reset button, see “Using the Reset Button” on page 23.<br />
82 © 2001-2008 D-Link Corporation. All Rights Reserved.
Saving the Current Configuration to a Backup File<br />
7 Maintaining the <strong>Access</strong> <strong>Point</strong><br />
You can use HTTP or TFTP to transfer files to and from the <strong>Unified</strong> <strong>Access</strong> <strong>Point</strong>. After you<br />
download a configuration file to the management station, you can manually edit the file, which<br />
is in XML format. Then, you can upload the edited configuration file to apply those<br />
configuration settings to the <strong>AP</strong>.<br />
Use the following steps to save a copy of the current settings on an access point to a backup<br />
configuration file by using TFTP:<br />
1. If it is not already selected, click the option for using TFTP to download the file.<br />
2. Enter a name for the backup file in the Filename field, including the .xml file name<br />
extension.<br />
3. Enter the IP address of the TFTP server, including the path to the directory where you<br />
want to save the file.<br />
4. Click Download to save the file.<br />
Use the following steps to save a copy of the current settings on an access point to a backup<br />
configuration file by using HTTP:<br />
1. Uncheck the Use TFTP to download the configuration box.<br />
When you clear the option, the Filename and Server IP fields are disabled.<br />
2. Click the Download button.<br />
A File Download or Open dialog box displays.<br />
3. From the dialog box, choose the Save option.<br />
A file browser dialog box opens.<br />
4. Use the file browser to navigate to the directory where you want to save the file, and click<br />
OK to save the file.<br />
You can keep the default file name (config.xml) or rename the backup file, but be sure to<br />
save the file with an .xml extension.<br />
Restoring the Configuration from a Previously Saved File<br />
You can use HTTP or TFTP to transfer files to and from the <strong>Unified</strong> <strong>Access</strong> <strong>Point</strong>. After you<br />
download a configuration file to the management station, you can manually edit the file, which<br />
is in XML format. Then, you can upload the edited configuration file to apply those<br />
configuration settings to the <strong>AP</strong>.<br />
Managing the Configuration File 83
D-Link <strong>Unified</strong> <strong>Access</strong> <strong>Point</strong> Administrator’s <strong>Guide</strong><br />
Use the following procedures to restore the configuration on an access point to previously<br />
saved settings by using TFTP:<br />
1. If it is not already selected, click the option to use TFTP to upload the file.<br />
2. Enter a name for the backup file in the Filename field, including the .xml file name<br />
extension.<br />
3. Enter the IP address of the TFTP server, including the path to the directory, that contains<br />
the configuration file to upload.<br />
4. Click the Restore button.<br />
The <strong>AP</strong> reboots.<br />
A “reboot” confirmation dialog and follow-on “rebooting” status message displays. Please<br />
wait for the reboot process to complete, which might take several minutes.<br />
The Administration Web UI is not accessible until the <strong>AP</strong> has rebooted.<br />
Use the following steps to save a copy of the current settings on an access point to a backup<br />
configuration file by using HTTP:<br />
1. Uncheck the Use TFTP to upload the file box.<br />
2.<br />
When you clear the option, the Server IP field is disabled.<br />
Enter the name of the file to restore.<br />
3. Click the Restore button.<br />
A File Upload or Choose File dialog box displays.<br />
4. Navigate to the directory that contains the file, then select the file to upload and click<br />
Open.<br />
(Only those files created with the Backup function and saved as .xml backup configuration<br />
files are valid to use with Restore; for example, ap_config.xml.)<br />
5. Click the Restore button.<br />
The <strong>AP</strong> reboots.<br />
A “reboot” confirmation dialog and follow-on “rebooting” status message displays. Please<br />
wait for the reboot process to complete, which might take several minutes.<br />
The Administration Web UI is not accessible until the <strong>AP</strong> has rebooted.<br />
84 © 2001-2008 D-Link Corporation. All Rights Reserved.
Rebooting the <strong>Access</strong> <strong>Point</strong><br />
7 Maintaining the <strong>Access</strong> <strong>Point</strong><br />
For maintenance purposes or as a troubleshooting measure, you can reboot the <strong>Unified</strong> <strong>Access</strong><br />
<strong>Point</strong>. To reboot the access point, click the Reboot button on the Configuration page.<br />
Upgrading the Firmware<br />
As new versions of the DWL-3500<strong>AP</strong> and DWL-8500<strong>AP</strong> firmware become available, you can<br />
upgrade the firmware on your devices to take advantages of new features and enhancements.<br />
The <strong>AP</strong> uses a TFTP client for firmware upgrades. You can also use HTTP to perform<br />
firmware upgrades.<br />
NOTE: When you upgrade the firmware, the access point retains the existing<br />
configuration information.<br />
Use the following steps to upgrade the firmware on an access point by using TFTP:<br />
1. Click the Upgrade tab in the Maintenance section.<br />
Information about the current firmware version is displayed and an option to upgrade a<br />
new firmware image is provided.<br />
2. Make sure the Use TFTP to upload the file option is selected.<br />
3. Enter a name for the image file in the New Firmware Image field, including the .tar file<br />
name extension.<br />
The firmware upgrade file supplied must be in the format .upgrade.tar. Do<br />
not attempt to use .bin files or files of other formats for the upgrade; these<br />
types of files will not work.<br />
4. Enter the IP address of the TFTP server, including the path to the directory, that contains<br />
the image to upload.<br />
5. Click Upgrade.<br />
Upon clicking Upgrade for the firmware upgrade, a popup confirmation window is<br />
displayed that describes the upgrade process.<br />
6. Click OK to confirm the upgrade and start the process.<br />
Upgrading the Firmware 85
D-Link <strong>Unified</strong> <strong>Access</strong> <strong>Point</strong> Administrator’s <strong>Guide</strong><br />
NOTE: The firmware upgrade process begins once you click Upgrade and then OK<br />
in the popup confirmation window.<br />
The upgrade process may take several minutes during which time the access point will be<br />
unavailable. Do not power down the access point while the upgrade is in process. When<br />
the upgrade is complete, the access point restarts. The <strong>AP</strong> resumes normal operation with<br />
the same configuration settings it had before the upgrade.<br />
7. To verify that the firmware upgrade completed successfully, check the firmware version<br />
shown on the Upgrade tab (and also on the Basic Settings tab). If the upgrade was<br />
successful, the updated version name or number is indicated.<br />
Use the following steps to upgrade the firmware on an access point by using HTTP:<br />
1. Uncheck the Use TFTP to upload the file box.<br />
When you clear the option, the Server IP field is disabled.<br />
2. If you know the path to the New Firmware Image file, enter it in the New Firmware<br />
Image textbox. Otherwise, click the Browse button and locate the firmware image file.<br />
The firmware upgrade file supplied must be in the format .tar. Do not<br />
attempt to use .bin files or files of other formats for the upgrade; these will<br />
not work.<br />
3. Click Upgrade to apply the new firmware image.<br />
Upon clicking Upgrade for the firmware upgrade, a popup confirmation window is<br />
displayed that describes the upgrade process.<br />
4. Click OK to confirm the upgrade and start the process.<br />
NOTE: The firmware upgrade process begins once you click Upgrade and then OK<br />
in the popup confirmation window.<br />
The upgrade process may take several minutes during which time the access point will be<br />
unavailable. Do not power down the access point while the upgrade is in process. When<br />
the upgrade is complete, the access point restarts. The <strong>AP</strong> resumes normal operation with<br />
the same configuration settings it had before the upgrade.<br />
5. To verify that the firmware upgrade completed successfully, check the firmware version<br />
shown on the Upgrade tab (and also on the Basic Settings tab). If the upgrade was<br />
successful, the updated version name or number is indicated.<br />
86 © 2001-2008 D-Link Corporation. All Rights Reserved.
Configuring the <strong>Access</strong> <strong>Point</strong> for<br />
Managed Mode<br />
8<br />
The <strong>Unified</strong> <strong>Access</strong> <strong>Point</strong> can operate in two modes: Standalone Mode or Managed Mode. In<br />
Standalone Mode, the <strong>Unified</strong> <strong>Access</strong> <strong>Point</strong> acts as an individual access point in the network,<br />
and you manage it by using the Administrator Web User Interface (UI) or the CLI. In Managed<br />
Mode, the access point is part of the D-Link <strong>Unified</strong> Wired/Wireless <strong>Access</strong> System and you<br />
manage it by using the D-Link <strong>Unified</strong> Switch. If an <strong>AP</strong> is in Managed Mode, the<br />
Administrator Web UI, Telnet, and SSH services are disabled.<br />
This chapter contains the following sections:<br />
Transitioning Between Modes<br />
Configuring Managed <strong>Access</strong> <strong>Point</strong> Settings<br />
Viewing Managed <strong>AP</strong> DHCP Information<br />
Transitioning Between Modes<br />
Every 30 seconds, the D-Link <strong>Unified</strong> Switch sends a keepalive message to all of the access<br />
points it manages. Each <strong>AP</strong> checks for the keepalive messages on the SSL TCP connection. As<br />
long as the <strong>AP</strong> maintains communication with the switch through the keepalive messages, it<br />
remains in Managed Mode.<br />
If the <strong>AP</strong> does not receive a message within 45 seconds of the last keepalive message, the <strong>AP</strong><br />
assumes the switch has failed and terminates its TCP connection to the switch, and the <strong>AP</strong><br />
enters Standalone Mode.<br />
Once the <strong>AP</strong> transitions to Standalone Mode, it continues to forward traffic without any loss.<br />
The <strong>AP</strong> uses the configuration on the V<strong>AP</strong>s configured in VLAN Forwarding mode (the<br />
standard, non-tunneled mode).<br />
While the <strong>AP</strong> is in Standalone Mode, you can manage it by using the Web interface or the CLI<br />
(through Telnet).<br />
For any clients that are connected to the <strong>AP</strong> through tunneled V<strong>AP</strong>s, the <strong>AP</strong> sends disassociate<br />
messages and disables the tunneled V<strong>AP</strong>s.<br />
Transitioning Between Modes 87
D-Link <strong>Unified</strong> <strong>Access</strong> <strong>Point</strong> Administrator’s <strong>Guide</strong><br />
As long as the Managed <strong>AP</strong> Administrative Mode is set to Enabled, as Figure 17 shows, the<br />
<strong>AP</strong> starts discovery procedures. If the <strong>AP</strong> establishes a connection with a wireless switch,<br />
which may or may not be the same switch it was connected to before, the switch sends the <strong>AP</strong><br />
its configuration and the <strong>AP</strong> sends the wireless switch information about all currently<br />
associated clients.<br />
After the configuration from the switch is applied, the <strong>AP</strong> radios restart. Client traffic is briefly<br />
interrupted until the radios are up and the clients are re-associated.<br />
Configuring Managed <strong>Access</strong> <strong>Point</strong> Settings<br />
On the <strong>Unified</strong> <strong>Access</strong> <strong>Point</strong>, you can configure the IP addresses of up to four D-Link <strong>Unified</strong><br />
Switches that can manage it. In order to manage the <strong>AP</strong>, the <strong>Unified</strong> Switch and <strong>AP</strong> must<br />
discover each other. There are multiple ways for a <strong>Unified</strong> Switch to discover an <strong>AP</strong>. Adding<br />
the IP address of the <strong>Unified</strong> Switch to the <strong>AP</strong> while it is in Standalone Mode is one way to<br />
enable switch-to-<strong>AP</strong> discovery.<br />
To add the IP address of a D-Link <strong>Unified</strong> Switch to the <strong>AP</strong>, click the Managed <strong>Access</strong> <strong>Point</strong><br />
tab under the Manage heading and update the fields shown in Table 24.<br />
Figure 17. Managed <strong>Access</strong> <strong>Point</strong> Settings<br />
Table 24. Managed <strong>Access</strong> <strong>Point</strong><br />
Field Description<br />
Managed <strong>AP</strong><br />
Administrative Mode<br />
88 © 2001-2008 D-Link Corporation. All Rights Reserved.<br />
Click Enabled to allow the <strong>AP</strong> and <strong>Unified</strong> Switch to discover each<br />
other. If the <strong>AP</strong> successfully authenticates itself with a <strong>Unified</strong><br />
Switch, you will not be able to access the Administrator UI.<br />
Click Disabled to prevent the <strong>AP</strong> from contacting wireless switches.
Table 24. Managed <strong>Access</strong> <strong>Point</strong><br />
8 Configuring the <strong>Access</strong> <strong>Point</strong> for Managed Mode<br />
Field Description<br />
Switch IP address Enter the IP address of up to four wireless switches that can manage<br />
the <strong>AP</strong>. You can enter the IP address in dotted format or as an DNS<br />
name.<br />
You can view a list of wireless switches on your network that were<br />
configured by using a DHCP server. For more information, see<br />
“Configuring Managed <strong>Access</strong> <strong>Point</strong> Settings” on page 88.<br />
The <strong>AP</strong> attempts to contact Switch IP Address 1 first.<br />
Pass Phrase Enter a pass phrase to allow the <strong>Access</strong> <strong>Point</strong> to authenticate itself<br />
with the <strong>Unified</strong> Switch. The pass phrase can be up to 32<br />
alphanumeric characters.<br />
You must configure the same pass phrase on the <strong>Unified</strong> Switch.<br />
NOTE: After you configure the settings on the Managed <strong>Access</strong> <strong>Point</strong> page, you<br />
must click Update to apply the changes and to save the settings. Changing<br />
some access point settings might cause the <strong>AP</strong> to stop and restart system<br />
processes. If this happens, wireless clients will temporarily lose connectivity.<br />
We recommend that you change access point settings when WLAN traffic is<br />
low.<br />
If the <strong>Unified</strong> <strong>Access</strong> <strong>Point</strong> successfully authenticates with a D-Link <strong>Unified</strong> Switch, you will<br />
loose access to the <strong>AP</strong> through the Administrator UI.<br />
Viewing Managed <strong>AP</strong> DHCP Information<br />
The <strong>Unified</strong> <strong>Access</strong> <strong>Point</strong> can learn about D-Link <strong>Unified</strong> Switches on the network through<br />
DHCP responses to its initial DHCP request. The Managed <strong>AP</strong> DHCP page displays the DNS<br />
names or IP addresses of up to four D-Link <strong>Unified</strong> Switches that the <strong>AP</strong> learned about from a<br />
DHCP server on your network.<br />
For information about how to configure a DHCP server to respond to <strong>AP</strong> DHCP requests with<br />
the <strong>Unified</strong> Switch IP address information, see the D-Link <strong>Unified</strong> Wired/Wireless <strong>Access</strong><br />
System User Manual.<br />
Viewing Managed <strong>AP</strong> DHCP Information 89
D-Link <strong>Unified</strong> <strong>Access</strong> <strong>Point</strong> Administrator’s <strong>Guide</strong><br />
90 © 2001-2008 D-Link Corporation. All Rights Reserved.
Viewing <strong>Access</strong> <strong>Point</strong> Status<br />
9<br />
This chapter describes the information you can view from the tabs under the Status heading on<br />
the Administration Web UI. This chapter contains the following sections:<br />
Viewing Interface Status<br />
Viewing Events Logs<br />
Viewing Transmit and Receive Statistics<br />
Viewing Client Association Information<br />
Viewing Neighboring <strong>Access</strong> <strong>Point</strong>s<br />
Viewing Interface Status<br />
To monitor Ethernet LAN and wireless LAN (WLAN) settings, click the Interfaces tab.<br />
This page displays the current settings of the <strong>Unified</strong> <strong>Access</strong> <strong>Point</strong>. It displays the Wired<br />
Settings and the Wireless Settings.<br />
Viewing Interface Status 91
D-Link <strong>Unified</strong> <strong>Access</strong> <strong>Point</strong> Administrator’s <strong>Guide</strong><br />
Ethernet (Wired) Settings<br />
The Internal interface includes the Ethernet MAC Address, Management VLAN ID, IP<br />
Address, Subnet Mask, and DNS information. If you want to change any of these settings,<br />
click the Edit link.<br />
For information about configuring these settings, see “Configuring the Ethernet Interface” on<br />
page 31.<br />
Wireless Settings<br />
The Radio Interface includes the Radio Mode and Channel. The Wireless Settings section<br />
also shows the MAC address (read-only) associated with the radio interface.<br />
If you want to change the Radio Mode or Channel settings, click the Edit link. For information<br />
about configuring these settings, see “Setting the Wireless Interface” on page 55 and<br />
“Configuring Radio Settings” on page 58.<br />
Viewing Events Logs<br />
The Events Log shows real-time system events on the access point such as wireless clients<br />
associating with the <strong>AP</strong> and being authenticated.<br />
To view system events, click the Events tab.<br />
Figure 18. Viewing and Configuring System Events<br />
From the Events page, you can view the most recent events generated by this access point and<br />
configure logging settings. You can enable and configure persistent logging to write system<br />
event logs to non-volatile memory so that the events are not erased when the system reboots.<br />
This page also gives you the option of enabling a remote “log relay host” to capture all system<br />
events and errors in a Kernel Log.<br />
NOTE: The <strong>Unified</strong> <strong>Access</strong> <strong>Point</strong> acquires its date and time information using the<br />
network time protocol (NTP). This data is reported in UTC format (also<br />
known as Greenwich Mean Time). You need to convert the reported time to<br />
92 © 2001-2008 D-Link Corporation. All Rights Reserved.
9 Viewing <strong>Access</strong> <strong>Point</strong> Status<br />
your local time. For information on setting the network time protocol, see<br />
“Enabling the Network Time Protocol Server” on page 79.<br />
Configuring Persistent Logging Options<br />
If the system unexpectedly reboots, log messages can be useful to diagnose the cause.<br />
However, log messages are erased when the system reboots unless you enable persistent<br />
logging.<br />
CAUTION: Enabling persistent logging can wear out the non-volatile (flash) memory<br />
and degrade network performance. You should only enable persistent<br />
logging to debug a problem. Make sure you disable persistent logging<br />
after you finish debugging the problem.<br />
To configure persistent logging on the Events page, set the persistence, severity, and depth<br />
options as described in Table 26, and then click Update.<br />
Table 25. Logging Options<br />
Field Description<br />
Persistence Choose Enabled to save system logs to non-volatile memory so that the logs are<br />
not erased when the <strong>AP</strong> reboots. Choose Disabled to save system logs to volatile<br />
memory. Logs in volatile memory are deleted when the system reboots.<br />
Severity Specify the severity level of the log messages to write to non-volatile memory.<br />
For example, if you specify 2, critical, alert, and emergency logs are written to<br />
non-volatile memory. Error messages with a severity level of 3-7 are written to<br />
volatile memory.<br />
0—emergency<br />
1—alert<br />
2—critical<br />
3—error<br />
4—warning<br />
5—notice<br />
6—info<br />
7—debug<br />
Depth You can store up to 128 messages in non-volatile memory. Once the number you<br />
configure in this field is reached, the oldest log event is overwritten by the new<br />
log event.<br />
NOTE: To apply your changes, click Update. Changing some access point settings<br />
might cause the <strong>AP</strong> to stop and restart system processes. If this happens,<br />
wireless clients will temporarily lose connectivity. We recommend that you<br />
change access point settings when WLAN traffic is low.<br />
Viewing Events Logs 93
D-Link <strong>Unified</strong> <strong>Access</strong> <strong>Point</strong> Administrator’s <strong>Guide</strong><br />
Configuring the Log Relay Host for Kernel Messages<br />
The Kernel Log is a comprehensive list of system events (shown in the System Log) and<br />
kernel messages such as error conditions, like dropping frames.<br />
You cannot view kernel log messages directly from the Administration Web UI for an access<br />
point. You must first set up a remote server running a syslog process and acting as a syslog<br />
“log relay host” on your network. Then, you can configure the <strong>Unified</strong> <strong>Access</strong> <strong>Point</strong> to send<br />
syslog messages to the remote server.<br />
Remote log server collection for access point syslog messages provides the following features:<br />
Allows aggregation of syslog messages from multiple access points<br />
Stores a longer history of messages than kept on a single access point<br />
Triggers scripted management operations and alerts<br />
To use Kernel Log relaying, you must configure a remote server to receive the syslog<br />
messages. The procedure to configure a remote log host depends on the type of system you use<br />
as the remote host. The following example describes how to configure a remote Linux server<br />
using the syslog daemon.<br />
Example of Using Linux syslogd<br />
The following steps activate the syslog daemon on a Linux server. Make sure you have root<br />
user identity for these tasks.<br />
1. Log on as root to the machine you want to use as your syslog relay host.<br />
The following operations require root user permissions. If you are not already logged on<br />
as root, type su at the command line prompt to become root (“super user”).<br />
2. Edit /etc/init.d/sysklogd and add “-r” to the variable SYSLOGD near the top of the<br />
file. The line you edit will look like this:<br />
SYSLOGD=“-r”<br />
To view the Linux manual page to get more information about the SYSLOGD command<br />
options, enter man syslogd at the command prompt.<br />
3. To send all the messages to a file, edit /etc/syslog.conf.<br />
For example you can add the following line to send all messages to a log file called<br />
<strong>AP</strong>_syslog:<br />
*.* -/tmp/<strong>AP</strong>_syslog<br />
To view the Linux manual page to get more information about the syslog.conf command<br />
options, enter man syslogd at the command prompt.<br />
4. Restart the syslog server by typing the following at the command line prompt:<br />
/etc/init.d/sysklogd restart<br />
NOTE: The syslog process will default to use port 514. We recommend keeping this<br />
default port. However; If you choose to reconfigure the log port, make sure<br />
that the port number you assign to syslog is not being used by another<br />
process.<br />
94 © 2001-2008 D-Link Corporation. All Rights Reserved.
9 Viewing <strong>Access</strong> <strong>Point</strong> Status<br />
Enabling or Disabling the Log Relay Host on the Events Page<br />
To enable and configure Log Relaying on the Events page, set the Log Relay options as<br />
described in Table 26, and then click Update.<br />
Table 26. Log Relay Host<br />
Field Description<br />
Relay Log Choose to either enable or disable use of the Log Relay Host.<br />
If you select the Relay Log option, the Log Relay Host is enabled and the Relay<br />
Host and Relay Port fields are editable.<br />
Relay Host Specify the IP Address or DNS name of the remote log server.<br />
Relay Port Specify the Port number for the syslog process on the Relay Host.<br />
The default port is 514.<br />
NOTE: To apply your changes, click Update. Changing some access point settings<br />
might cause the <strong>AP</strong> to stop and restart system processes. If this happens,<br />
wireless clients will temporarily lose connectivity. We recommend that you<br />
change access point settings when WLAN traffic is low.<br />
If you enabled the Log Relay Host, clicking Update will activate remote logging. The access<br />
point will send its kernel messages real-time for display to the remote log server monitor, a<br />
specified kernel log file, or other storage, depending on how you configured the Log Relay<br />
Host.<br />
If you disabled the Log Relay Host, clicking Update will disable remote logging.<br />
Viewing Transmit and Receive Statistics<br />
The Transmit/Receive page provides some basic information about the current access point<br />
and a real-time display of the transmit and receive statistics for the Ethernet interface on the<br />
access point and for all V<strong>AP</strong>s on the radio interface (and for both radio interfaces on the DWL-<br />
8500<strong>AP</strong>). All transmit and receive statistics shown are totals since the access point was last<br />
started. If you reboot the <strong>AP</strong>, these figures indicate transmit and receive totals since the reboot.<br />
Viewing Transmit and Receive Statistics 95
D-Link <strong>Unified</strong> <strong>Access</strong> <strong>Point</strong> Administrator’s <strong>Guide</strong><br />
To view transmit and receive statistics for the access point, click the Transmit/Receive tab.<br />
Table 27. Transmit/Receive Statistics<br />
Field Description<br />
Interface The name of the Ethernet or V<strong>AP</strong> interface.<br />
Status Shows whether the interface is up or down.<br />
MAC Address MAC address for the specified interface.<br />
The access point has a unique MAC address for each<br />
interface. For the DWL-8500<strong>AP</strong>, each radio has a<br />
different MAC address for every interface on each of its<br />
two radios.<br />
VLAN ID Virtual LAN (VLAN) ID.<br />
You can use VLANs to establish multiple internal and<br />
guest networks on the same access point.<br />
The VLAN ID is set on the V<strong>AP</strong> tab. (See “Configuring<br />
Virtual <strong>Access</strong> <strong>Point</strong>s” on page 62.)<br />
96 © 2001-2008 D-Link Corporation. All Rights Reserved.
Table 27. Transmit/Receive Statistics<br />
Field Description<br />
Viewing Client Association Information<br />
To view the client stations associated with a particular access point, click the<br />
Client Associations tab.<br />
9 Viewing <strong>Access</strong> <strong>Point</strong> Status<br />
Name (SSID) Wireless network name. Also known as the SSID, this<br />
alphanumeric key uniquely identifies a wireless local<br />
area network.<br />
The SSID is set on the V<strong>AP</strong> tab. (See “Configuring<br />
Virtual <strong>Access</strong> <strong>Point</strong>s” on page 62.)<br />
Transmit and Receive Information<br />
Total Packets Indicates total packets sent (in Transmit table) or<br />
received (in Received table) by this access point.<br />
Total Bytes Indicates total bytes sent (in Transmit table) or received<br />
(in Received table) by this access point.<br />
Errors Indicates total errors related to sending and receiving<br />
data on this access point.<br />
The associated stations are displayed along with information about packet traffic transmitted<br />
and received for each station.<br />
Table 28 describes the fields on the Client Associations page.<br />
Table 28. Associated Clients<br />
Field Description<br />
Network Shows which virtual access point the client is associated with. For example,<br />
an entry of wlan0vap2 means the client is associated with Radio 1, V<strong>AP</strong> 2.<br />
An entry of wlan0 means the client is associated with V<strong>AP</strong> 0 on Radio 1. For<br />
the DWL-8500<strong>AP</strong>, an entry of wlan1 means the client is associated with V<strong>AP</strong><br />
0 on Radio 2.<br />
Station Shows the MAC address of the associated wireless client.<br />
Viewing Client Association Information 97
D-Link <strong>Unified</strong> <strong>Access</strong> <strong>Point</strong> Administrator’s <strong>Guide</strong><br />
Table 28. Associated Clients<br />
Field Description<br />
Status The “Authenticated” and “Associated” Status shows the underlying IEEE<br />
802.11 authentication and association status, which is present no matter<br />
which type of security the client uses to connect to the <strong>AP</strong>. This status does<br />
not show IEEE 802.1X authentication or association status.<br />
Some points to keep in mind with regard to this field are:<br />
If the <strong>AP</strong> security mode is None or Static WEP, the authentication and<br />
association status of clients showing on the Client Associations tab will<br />
be in line with what is expected; that is, if a client shows as authenticated<br />
to the <strong>AP</strong>, it will be able to transmit and receive data. (This is because<br />
Static WEP uses only IEEE 802.11 authentication.)<br />
If the <strong>AP</strong> uses IEEE 802.1X or WPA security, however, it is possible for<br />
a client association to show on this tab as authenticated (via the IEEE<br />
802.11 security) but actually not be authenticated to the <strong>AP</strong> via the<br />
second layer of security.<br />
From Station Shows the number of packets and bytes received from the wireless client.<br />
To Station Shows the number of packets and bytes transmitted from the <strong>AP</strong> to the wireless<br />
client.<br />
Link Integrity Monitoring<br />
The <strong>Unified</strong> <strong>Access</strong> <strong>Point</strong> provides link integrity monitoring to continually verify its<br />
connection to each associated client. To do this monitoring, the <strong>AP</strong> sends data packets to<br />
clients every few seconds when no other traffic is passing. This allows the access point to<br />
detect when a client goes out of range, even during periods when no normal traffic is<br />
exchanged. The client connection drops off the list within 300 seconds if these data packets are<br />
not acknowledged, even if no disassociation message is received.<br />
Viewing Neighboring <strong>Access</strong> <strong>Point</strong>s<br />
The status page for Neighboring <strong>Access</strong> <strong>Point</strong>s provides real-time statistics for all access<br />
points within range of the access point on which you are viewing the Administration Web<br />
pages.<br />
To view information about other access points on the wireless network, click the<br />
Neighboring <strong>Access</strong> <strong>Point</strong>s tab.<br />
You must enable the <strong>AP</strong> detection on the <strong>AP</strong> in order to collect information about other <strong>AP</strong>s<br />
within range.<br />
98 © 2001-2008 D-Link Corporation. All Rights Reserved.
Table 29 describes the information provided on neighboring access points.<br />
Table 29. Neighboring <strong>Access</strong> <strong>Point</strong>s<br />
9 Viewing <strong>Access</strong> <strong>Point</strong> Status<br />
Field Description<br />
<strong>AP</strong> Detection To enable neighbor access point detection and collect information about<br />
neighbor <strong>AP</strong>s, click Enabled.<br />
To disable neighbor <strong>AP</strong> detection, click Disabled.<br />
MAC Address Shows the MAC address of the neighboring access point.<br />
Radio The Radio field indicates which radio detected the neighboring <strong>AP</strong>:<br />
wlan0 (Radio 1 - DWL-8500<strong>AP</strong> only)<br />
wlan1 (Radio 2)<br />
Beacon Interval Shows the Beacon interval being used by this access point.<br />
Beacon frames are transmitted by an access point at regular intervals to<br />
announce the existence of the wireless network. The default behavior is to<br />
send a beacon frame once every 100 milliseconds (or 10 per second).<br />
The Beacon Interval is set on the Radio tab page. (See “Configuring Radio<br />
Settings” on page 58.)<br />
Type Indicates the type of device:<br />
<strong>AP</strong> indicates the neighboring device is an access point that supports the<br />
IEEE 802.11 Wireless Networking Framework in Infrastructure Mode.<br />
Ad hoc indicates a neighboring station running in Ad hoc Mode. Stations<br />
set to ad hoc mode communicate with each other directly, without the use<br />
of a traditional access point. Ad-hoc mode is an IEEE 802.11 Wireless<br />
Networking Framework also referred to as peer-to-peer mode or an<br />
Independent Basic Service Set (IBSS).<br />
SSID The Service Set Identifier (SSID) for the access point.<br />
The SSID is an alphanumeric string of up to 32 characters that uniquely<br />
identifies a wireless local area network. It is also referred to as the Network<br />
Name.<br />
The SSID is set on the V<strong>AP</strong> tab. (See “Configuring Virtual <strong>Access</strong> <strong>Point</strong>s” on<br />
page 62.)<br />
Privacy Indicates whether there is any security on the neighboring device.<br />
Off indicates that the Security mode on the neighboring device is set to<br />
“None” (no security).<br />
On indicates that the neighboring device has some security in place.<br />
Security is configured on the <strong>AP</strong> from the V<strong>AP</strong> page. For more information<br />
about security settings, see “Configuring <strong>Access</strong> <strong>Point</strong> Security” on page 39.<br />
WPA Indicates whether WPA security is “on” or “off” for this access point.<br />
Viewing Neighboring <strong>Access</strong> <strong>Point</strong>s 99
D-Link <strong>Unified</strong> <strong>Access</strong> <strong>Point</strong> Administrator’s <strong>Guide</strong><br />
Table 29. Neighboring <strong>Access</strong> <strong>Point</strong>s<br />
Field Description<br />
Band This indicates the IEEE 802.11 mode being used on the neighboring access<br />
point. (For example, IEEE 802.11a or IEEE 802.11g.).<br />
The number shown indicates the mode according to the following map:<br />
2.4 indicates IEEE 802.11b mode, IEEE 802.11g mode, or 2.4 GHz<br />
Dynamic Turbo<br />
5 indicates IEEE 802.11a mode or 5 GHz Dynamic Turbo<br />
5 Turbo indicates Turbo 5 GHz mode (this option displays only if your<br />
<strong>AP</strong> and the neighbor <strong>AP</strong> are both configured for “Turbo 5 GHz” and are<br />
operating in the same channel)<br />
Channel Shows the channel on which the access point is currently broadcasting.<br />
The Channel defines the portion of the radio spectrum that the radio uses for<br />
transmitting and receiving.<br />
The channel is set in Radio Settings. (See “Configuring Radio Settings” on<br />
page 58.)<br />
Rate Shows the rate (in megabits per second) at which this access point is currently<br />
transmitting.<br />
The current rate will always be one of the rates shown in Supported Rates.<br />
Signal Indicates the strength of the radio signal emitting from this access point as<br />
measured in decibels (dB).<br />
Beacons Shows the total number of beacons received from this access point since it<br />
was first discovered.<br />
Last Beacon Shows the date and time of the last beacon received from this access point.<br />
Rates Shows supported and basic (advertised) rate sets for the neighboring access<br />
point. Rates are shown in megabits per second (Mbps).<br />
All Supported Rates are listed, with Basic Rates shown in bold.<br />
Rate sets are configured on the Radio Settings page. (See “Configuring Radio<br />
Settings” on page 58.)<br />
100 © 2001-2008 D-Link Corporation. All Rights Reserved.
Wireless Client Settings and RADIUS<br />
Server Setup<br />
A<br />
Typically, users configure security on their wireless clients for access to many different<br />
networks (access points). The list of available wireless networks changes depending on the<br />
location of the client and which <strong>AP</strong>s are online and detectable in that location. 1 Once an <strong>AP</strong><br />
has been detected by the client and security is configured for it, it remains in the client’s list of<br />
networks but shows as either reachable or unreachable depending on the situation. For each<br />
network (<strong>AP</strong>) you want to connect to, configure security settings on the client to match the<br />
security mode being used by that network.<br />
The following sections describe how to set up each of the supported security modes on<br />
wireless clients of a network served by the <strong>Unified</strong> <strong>Access</strong> <strong>Point</strong>:<br />
<strong>Access</strong>ing Wireless Client Security Settings<br />
Configuring a Client to <strong>Access</strong> an Unsecure Network<br />
Configuring Static WEP Security on a Client<br />
Configuring WPA/WPA2 Personal on a Client<br />
Using an External Authentication Server<br />
Configuring IEEE 802.1X Security on a Client<br />
Configuring WPA/WPA2 Enterprise (RADIUS)<br />
Configuring the RADIUS Server for Authentication<br />
Obtaining a TLS-E<strong>AP</strong> Certificate for a Client<br />
Configuring the RADIUS Server for VLAN Tags<br />
NOTE: The recommended sequence for security configuration is (1) set up security<br />
on the access point, and (2) configure security on each of the wireless clients.<br />
A typical method to configure security is to connect to an access point that has no<br />
security set (None) from an unsecure wireless client. With this initial connection, you<br />
can access the Security page on the <strong>AP</strong> Administration Web UI and configure a<br />
security mode.<br />
When you re-configure the access point with a security setting and click Update, your<br />
1. The exception to this is if the access point is set to prohibit the broadcast of its network name. In this case the<br />
SSID will not show up in the list of Available Networks on the client. Instead, the client must have the exact network<br />
name configured in the network connection properties before it will be able to connect.<br />
101
D-Link <strong>Unified</strong> <strong>Access</strong> <strong>Point</strong> Administrator’s <strong>Guide</strong><br />
wireless client will be disassociated and you will lose connectivity to the <strong>AP</strong><br />
Administration Web pages. In some cases, you may need to make additional changes<br />
to the <strong>AP</strong> security settings before you configure the client. Therefore, you must have a<br />
backup Ethernet (wired) connection.<br />
This appendix describes security setup on a client that uses Microsoft Windows client software<br />
for wireless connectivity. The Windows client software is used as the example because of its<br />
widespread availability on Windows computers and laptops. These procedures will vary<br />
slightly if you use different software on the client, but the configuration information you need<br />
to provide is the same.<br />
Before you start to configure wireless clients, make sure that the software on the wireless<br />
clients is current. Software updates for wireless clients might include service packs, patches,<br />
and new releases of drivers and other supporting technologies. A common problem<br />
encountered in client security setup is not having the right driver or updates to it on the client.<br />
Even many client cards currently available do not ship from the factory with the latest drivers.<br />
<strong>Access</strong>ing Wireless Client Security Settings<br />
The procedures in this section describe how to access the wireless security settings on a<br />
Microsoft Windows XP system and might not apply to all wireless clients, even if they are<br />
running Microsoft Windows. You can use the following procedures to access the security<br />
settings dialogue:<br />
1. Open the Wireless Network Connection Properties.<br />
From the wireless connection icon on the Windows task bar:<br />
- Right-click on the Wireless connection icon in your Windows task bar and select View<br />
available wireless networks.<br />
- Select the SSID of the network to which you want to connect and click Advanced to<br />
open the Wireless Network Connection Properties dialog.<br />
Or<br />
From the Windows Start menu at the left end of the task bar:<br />
- From the Windows Start menu on the task bar, choose Start > My Network Places to<br />
bring up the Network Connections window.<br />
- From the Network Tasks menu on the left, click View Network Connections to bring<br />
up the Network Connections window.<br />
- Select the Wireless Network Connection you want to configure, right-mouse click and<br />
choose View available wireless networks.<br />
- Select the SSID of the network to which you want to connect and click Advanced to<br />
bring up the Wireless Network Connection Properties dialog.<br />
The Wireless Networks tab (which should be automatically displayed) lists Available<br />
networks and Preferred networks.<br />
102 © 2001-2008 D-Link Corporation. All Rights Reserved.
A Wireless Client Settings and RADIUS Server Setup<br />
List of available networks will change depending on<br />
client location. Each network (or access point) that<br />
that is detected by the client shows up in this list.<br />
(“Refresh” updates the list with current information.)<br />
For each network you want to connect to,<br />
configure security settings on the client<br />
to match the security mode being used by<br />
that network.<br />
Note: The exception to this is if the <strong>AP</strong> is<br />
configured to prohibit broadcast of its network name,<br />
the name will not show on this list. In that case<br />
you would need to type in the exact network name<br />
to be able to connect to it.<br />
2. From the list of available networks, select the SSID of the network to which you want to<br />
connect and click Configure.<br />
If you do not see the list of available networks or the network that you want to use is not<br />
listed, click Add to manually add and configure the network.<br />
The Wireless Network Connection Properties dialog with the Association and<br />
Authentication tabs for the selected network displays.<br />
<strong>Access</strong>ing Wireless Client Security Settings 103
D-Link <strong>Unified</strong> <strong>Access</strong> <strong>Point</strong> Administrator’s <strong>Guide</strong><br />
Use this dialog for configuring all the different types of client security described in the<br />
following sections. Make sure that the wireless network properties you configure are for<br />
the network name (SSID) for the network you want to reach on the wireless client.<br />
Configuring a Client to <strong>Access</strong> an Unsecure Network<br />
If the access point or wireless network to which you want to connect is configured as “None”,<br />
that is, no security, you need to configure the client accordingly. A client using no security to<br />
connect is configured with Network Authentication “Open” to that network and Data<br />
Encryption “Disabled” as described below.<br />
If you do have security configured on a client for properties of an unsecure network, the<br />
security settings can prevent successful access to the network because of the mismatch<br />
between client and access point security configurations.<br />
To configure the client to not use any security, bring up the client Network Properties dialog<br />
and configure the following settings.<br />
Table 30. Wireless Client with No Security<br />
Network Authentication Open<br />
Data Encryption Disabled<br />
Configuring Static WEP Security on a Client<br />
Static Wired Equivalent Privacy (WEP) encrypts data moving across a wireless network based<br />
on a static (non-changing) key. The encryption algorithm is a “stream” cipher called RC4. The<br />
access point uses a key to transmit data to the client stations. Each client must use that same<br />
104 © 2001-2008 D-Link Corporation. All Rights Reserved.<br />
Set Network Authentication to “Open”<br />
Set Data Encryption to “Disabled”
A Wireless Client Settings and RADIUS Server Setup<br />
key to decrypt data it receives from the access point. Different clients can use different keys to<br />
transmit data to the access point. (Or they can all use the same key, but this is less secure<br />
because it means one station can decrypt the data being sent by another.)<br />
If you configured the <strong>Unified</strong> <strong>Access</strong> <strong>Point</strong> to use Static WEP security mode, perform the<br />
following steps:<br />
1. Configure WEP security on each client.<br />
2. Configure the fields in the Associations Tab as described in the following table:<br />
Network<br />
Authentication<br />
Choose Open or Shared<br />
Choose WEP as the<br />
Data Encryption mode<br />
Enter a network key that matches<br />
the WEP key on the access point<br />
in the position set to the transfer<br />
key index (and re-type to confirm)<br />
Optionally set a different transfer<br />
key index to send data from client<br />
back to access point.<br />
Disable auto key option<br />
“Open” or “Shared”, depending on how you configured this option on the<br />
access point.<br />
Note: When the Authentication Algorithm on the access point is set to<br />
“Both”, clients set to either Shared or Open can associate with the <strong>AP</strong>. Clients<br />
configured to use WEP in Shared mode must have a valid WEP key in order to<br />
associate with the <strong>AP</strong>. Clients configured to use WEP as an Open system can<br />
associate with the <strong>AP</strong> even without a valid WEP key (but a valid key will be<br />
required to actually view and exchange data). For more information, see<br />
Administrators <strong>Guide</strong> and Online Help on the access point.<br />
Data Encryption WEP<br />
Network Key Provide the WEP key you entered on the access point Security settings in the<br />
Transfer Key Index position.<br />
For example, if the Transfer Key Index on the access point is set to “1”, then<br />
for the client Network Key specify the WEP Key you entered as WEP Key 1<br />
on the access point.<br />
Configuring Static WEP Security on a Client 105
D-Link <strong>Unified</strong> <strong>Access</strong> <strong>Point</strong> Administrator’s <strong>Guide</strong><br />
Key Index Set key index to indicate which of the WEP keys specified on the access point<br />
Security page will be used to transfer data from the client back to the access<br />
point.<br />
For example, you can set this to 1, 2, 3, or 4 if you have all four WEP keys<br />
configured on the access point.<br />
The key is Disable this option (click to uncheck the box).<br />
provided for me<br />
automatically<br />
3. Configure the fields in the Authentication Tab as described in the following table<br />
Enable IEEE<br />
802.1X<br />
authentication for<br />
this network<br />
4. Click OK on the Wireless Network Properties dialog to close it and save your changes.<br />
Static WEP clients should now be able to associate and authenticate with the access point. As<br />
a client, you will not be prompted for a WEP key. The WEP key configured on the client<br />
security settings is automatically used when you connect.<br />
Configuring WPA/WPA2 Personal on a Client<br />
WPA with Pre-Shared Key (PSK) is a Wi-Fi Alliance subset of IEEE 802.11i, which includes<br />
Temporal Key Integrity Protocol (TKIP), Advanced Encryption Algorithm (AES), and<br />
Counter mode/CBC-MAC Protocol (CCMP) mechanisms. PSK employs a pre-shared key for<br />
an initial check of client credentials.<br />
If you configured the <strong>Unified</strong> <strong>Access</strong> <strong>Point</strong> to use WPA/WPA2 Personal (PSK) security mode,<br />
perform the following steps:<br />
106 © 2001-2008 D-Link Corporation. All Rights Reserved.<br />
Make sure that IEEE 802.1X authentication is disabled (box should be<br />
unchecked).<br />
(Setting the encryption mode to WEP should automatically disable<br />
authentication.)
A Wireless Client Settings and RADIUS Server Setup<br />
1. Configure WPA/WPA2 Personal (PSK) security on each client as follows.<br />
2. Configure the following settings on the Association tab on the Network Properties dialog.<br />
Network Authentication WPA-PSK<br />
Data Encryption TKIP or AES depending on how this option is configured on the<br />
access point.<br />
Note: When the Cipher Suite on the access point is set to “Both”, then<br />
TKIP clients with a valid TKIP key and AES clients with a valid<br />
CCMP (AES) key can associate with the access point.<br />
Network Key Provide the key you entered on the access point Security settings for<br />
the cipher suite you are using.<br />
For example, if the key on the access point is set to use a TKIP key of<br />
“012345678”, then a TKIP client specify this same string as the<br />
network key.<br />
The key is provided for me This box should be disabled automatically based on other settings.<br />
automatically<br />
3. Configure the following settings on the Authentication tab on the Network Properties<br />
dialog.<br />
Enable IEEE 802.1X<br />
authentication for this<br />
network<br />
Choose WPA-PSK<br />
Choose either TKIP or AES for<br />
the Data Encryption mode<br />
Enter a network key that matches<br />
the one specified on the access<br />
point (and confirm by re-typing)<br />
Make sure that IEEE 802.1X authentication is disabled (unchecked).<br />
(Setting the encryption mode to WEP should automatically disable<br />
authentication.)<br />
4. Click OK on the Wireless Network Properties dialog to close it and save your changes.<br />
WPA-PSK clients should now be able to associate and authenticate with the access point. As a<br />
client, you will not be prompted for a key. The TKIP or AES key you configured on the client<br />
security settings is automatically used when you connect.<br />
Configuring WPA/WPA2 Personal on a Client 107
D-Link <strong>Unified</strong> <strong>Access</strong> <strong>Point</strong> Administrator’s <strong>Guide</strong><br />
Using an External Authentication Server<br />
The 802.1X and WPA Enterprise security modes require an external authentication server.<br />
Network security configurations including Public Key Infrastructures (PKI), Remote<br />
Authentication Dial-in User Server (RADIUS) servers, and Certificate Authority (CA) can<br />
vary a great deal from one organization to the next in terms of how they provide<br />
Authentication, Authorization, and Accounting (AAA). Ultimately, your network<br />
infrastructure determines how clients should configure security to access the wireless network.<br />
This appendix provides general guidelines about each type of client configuration supported<br />
by the <strong>Unified</strong> <strong>Access</strong> <strong>Point</strong> and does not attempt to describe every network configuration or<br />
scenario.<br />
This appendix assumes that you know how to configure client security options appropriate to<br />
your security infrastructure beyond the fundamental suggestions given here. Topics covered<br />
here that particularly relate to client security configuration in a RADIUS - PKI environment<br />
are:<br />
IEEE 802.1X Client Using E<strong>AP</strong>/TLS Certificate<br />
WPA/WPA2 Enterprise (RADIUS) Client Using E<strong>AP</strong>-TLS Certificate<br />
Configuring the RADIUS Server for Authentication<br />
Obtaining a TLS-E<strong>AP</strong> Certificate for a Client<br />
This appendix does not describe how to configure an E<strong>AP</strong>-PE<strong>AP</strong> client with a RADIUS<br />
server.<br />
Configuring IEEE 802.1X Security on a Client<br />
IEEE 802.1X is the standard defining port-based authentication and infrastructure for doing<br />
key management. Extensible Authentication Protocol (E<strong>AP</strong>) messages sent over an IEEE<br />
802.11 wireless network using a protocol called E<strong>AP</strong> Encapsulation Over LANs (E<strong>AP</strong>OL).<br />
IEEE 802.1X provides dynamically-generated keys that are periodically refreshed. An RC4<br />
stream cipher is used to encrypt the frame body and cyclic redundancy checking (CRC) of<br />
each 802.11 frame.<br />
IEEE 802.1X Client Using E<strong>AP</strong>/TLS Certificate<br />
Extensible Authentication Protocol (E<strong>AP</strong>) Transport Layer Security (TLS), or E<strong>AP</strong>-TLS, is an<br />
authentication protocol that supports the use of smart cards and certificates. You have the<br />
option of using E<strong>AP</strong>-TLS with both WPA/WPA2 Enterprise (RADIUS) and IEEE 802.1X<br />
modes if you have an external RADIUS server on the network to support it.<br />
To use IEEE 802.1X mode with E<strong>AP</strong>-TLS certificates for authentication and authorization of<br />
clients, you must have an external RADIUS server and a Public Key Authority Infrastructure<br />
(PKI), including a Certificate Authority (CA), server configured on your network. It is beyond<br />
the scope of this document to describe these configuration of the RADIUS server, PKI, and<br />
CA server. Consult the documentation for those products.<br />
For more information about Microsoft Windows PKI software, see the Microsoft Web site:<br />
http://support.microsoft.com.<br />
108 © 2001-2008 D-Link Corporation. All Rights Reserved.
Choose Open<br />
To use this type of security, you must perform the following steps:<br />
A Wireless Client Settings and RADIUS Server Setup<br />
1. Add the access point to the list of RADIUS server clients. (See “Configuring the RADIUS<br />
Server for Authentication” on page 116.)<br />
2. Configure the access point to use your RADIUS server (by providing the RADIUS server<br />
IP address as part of the “IEEE 802.1X” security mode settings).<br />
3. Configure wireless clients to use IEEE 802.1X security and “Smart Card or other<br />
Certificate” as described in this section.<br />
4. Obtain a certificate for this client as described in “Obtaining a TLS-E<strong>AP</strong> Certificate for a<br />
Client” on page 119.<br />
If you configured the access point to use IEEE 802.1X security mode with an external<br />
RADIUS server, perform the following steps:<br />
1. Configure IEEE 802.1X security with certificate authentication on each client as follows.<br />
Choose WEP<br />
Data Encryption mode<br />
1 2<br />
Enable (click to check) IEEE 8021x authentication<br />
Choose Smart Card/Certificate<br />
Enable auto<br />
key option<br />
...then, click “Properties”<br />
Configuring IEEE 802.1X Security on a Client 109
D-Link <strong>Unified</strong> <strong>Access</strong> <strong>Point</strong> Administrator’s <strong>Guide</strong><br />
3<br />
2. Configure the following settings on the Association tab on the Network Properties dialog.<br />
Network Authentication Open<br />
Data Encryption WEP<br />
Note: An RC4 stream cipher is used to encrypt the frame body and cyclic<br />
redundancy checking (CRC) of each IEEE 802.11 frame. This is the same<br />
encryption algorithm as is used for Static WEP; therefore, the data<br />
encryption method configured on the client for this mode is WEP.<br />
This key is provided for Enable (click to check) this option.<br />
me automatically<br />
3. Configure these settings on the Authentication tab.<br />
Enable IEEE 802.1X<br />
authentication for this network<br />
Enable (click to check) this option.<br />
E<strong>AP</strong> Type Choose Smart Card or other Certificate.<br />
4. Click Properties to bring up the Smart Card or other Certificate Properties dialog and<br />
enable the “Validate server certificate” option.<br />
Validate Server Certificate Enable this option (click to check the box).<br />
Certificates In the certificate list shown, select the certificate for this client.<br />
Click OK on all dialogs to close and save your changes.<br />
5. To complete the client configuration you must now obtain a certificate from the RADIUS<br />
server and install it on this client. For information on how to do this see “Obtaining a TLS-<br />
E<strong>AP</strong> Certificate for a Client” on page 119.<br />
110 © 2001-2008 D-Link Corporation. All Rights Reserved.<br />
Enable (click to check)<br />
“Validate server certificate”<br />
Select (check) the name of certificate<br />
on this client (downloaded from<br />
RADIUS server in a prerequisite procedure)
A Wireless Client Settings and RADIUS Server Setup<br />
IEEE 802.1X clients should now be able to connect to the access point using their TLS<br />
certificates. The certificate you installed is used when you connect, so you will not be<br />
prompted for login information. The certificate is automatically sent to the RADIUS server for<br />
authentication and authorization.<br />
Configuring WPA/WPA2 Enterprise (RADIUS)<br />
Wi-Fi Protected <strong>Access</strong> 2 (WPA2) with Remote Authentication Dial-In User Service<br />
(RADIUS) is an implementation of the Wi-Fi Alliance IEEE 802.11i standard, which includes<br />
Advanced Encryption Standard (AES), Counter mode/CBC-MAC Protocol (CCMP), and<br />
Temporal Key Integrity Protocol (TKIP) mechanisms. This mode requires the use of a<br />
RADIUS server to authenticate users.<br />
This security mode also provides backwards-compatibility for wireless clients that support<br />
only the original WPA.<br />
If you configure the access point to use this security mode with an external RADIUS server,<br />
you must configure the client stations to use WPA/WPA2 Enterprise (RADIUS) and<br />
whichever security protocol your RADIUS server is configured to use.<br />
WPA/WPA2 Enterprise (RADIUS) Client Using E<strong>AP</strong>/PE<strong>AP</strong><br />
If you have an external RADIUS server that uses E<strong>AP</strong>/PE<strong>AP</strong>, you will need to (1) add the<br />
access point to the list of RADIUS server clients, and (2) configure your “WPA/WPA2<br />
Enterprise (RADIUS)” wireless clients to use PE<strong>AP</strong>.<br />
If you configured the access point to use WPA/WPA2 Enterprise (RADIUS) security mode<br />
and an external RADIUS server that uses E<strong>AP</strong>/PE<strong>AP</strong>, perform the following steps.<br />
Configuring WPA/WPA2 Enterprise (RADIUS) 111
D-Link <strong>Unified</strong> <strong>Access</strong> <strong>Point</strong> Administrator’s <strong>Guide</strong><br />
Choose WPA<br />
1. Configure WPA security with PE<strong>AP</strong> authentication on each client as follows.<br />
Choose either TKIP or AES for the<br />
Data Encryption mode<br />
1 2<br />
Disable (click to uncheck) Choose “secured password (E<strong>AP</strong>-MSCH<strong>AP</strong> v2)”<br />
“Validate server certificate”<br />
112 © 2001-2008 D-Link Corporation. All Rights Reserved.<br />
Choose Protected E<strong>AP</strong> (PE<strong>AP</strong>)<br />
...then, click “Properties”<br />
...then click “Configure”<br />
3 4<br />
Disable (click to uncheck) this option
A Wireless Client Settings and RADIUS Server Setup<br />
2. Configure the following settings on the Association and Authentication tabs on the<br />
Network Properties dialog.<br />
Network Authentication WPA<br />
Data Encryption TKIP or AES depending on how this option is configured on the access<br />
point.<br />
Note: When the Cipher Suite on the access point is set to “Both”, then<br />
TKIP clients with a valid TKIP key and AES clients with a valid CCMP<br />
(AES) key can associate with the access point. For more information, see<br />
Administrators <strong>Guide</strong> and Online Help on the access point.<br />
3. Configure this setting on the Authentication tab.<br />
E<strong>AP</strong> Type Choose “Protected E<strong>AP</strong> (PE<strong>AP</strong>)”<br />
4. Click Properties to bring up the Protected E<strong>AP</strong> Properties dialog and configure the<br />
following settings.<br />
Validate Server<br />
Certificate<br />
Select Authentication<br />
Method<br />
Disable this option (click to uncheck the box).<br />
Note: This example assumes you are using the Built-in Authentication<br />
server on the <strong>AP</strong>. If you are setting up E<strong>AP</strong>/PE<strong>AP</strong> on a client of an <strong>AP</strong><br />
that is using an external RADIUS server, you might certificate validation<br />
and choose a certificate, depending on your infrastructure.<br />
Choose “Secured password (E<strong>AP</strong>-MSCH<strong>AP</strong> v2)”<br />
5. Click Configure to bring up the E<strong>AP</strong> MSCH<strong>AP</strong> v2 Properties dialog.<br />
On this dialog, disable (click to uncheck) the option to “Automatically use my Windows<br />
login name...” so that upon login you will be prompted for user name and password.<br />
6. Click OK on all dialogs (starting with the E<strong>AP</strong> MSCH<strong>AP</strong> v2 Properties dialog) to close<br />
and save your changes.<br />
“WPA/WPA2 Enterprise (RADIUS)” PE<strong>AP</strong> clients should now be able to associate with the<br />
access point. Client users will be prompted for a user name and password to authenticate with<br />
the network.<br />
WPA/WPA2 Enterprise (RADIUS) Client Using E<strong>AP</strong>-TLS Certificate<br />
Extensible Authentication Protocol (E<strong>AP</strong>) Transport Layer Security (TLS), or E<strong>AP</strong>-TLS, is an<br />
authentication protocol that supports the use of smart cards and certificates. You have the<br />
option of using E<strong>AP</strong>-TLS with both WPA/WPA2 Enterprise (RADIUS) and IEEE 802.1X<br />
modes if you have an external RADIUS server on the network to support it.<br />
If you want to use IEEE 802.1X mode with E<strong>AP</strong>-TLS certificates for authentication and<br />
authorization of clients, you must have an external RADIUS server and a Public Key Authority<br />
Infrastructure (PKI), including a Certificate Authority (CA), server configured on your<br />
network. It is beyond the scope of this document to describe these configuration of the<br />
RADIUS server, PKI, and CA server. Consult the documentation for those products.<br />
For more information about Microsoft Windows PKI software, see the Microsoft Web site:<br />
http://support.microsoft.com.<br />
Configuring WPA/WPA2 Enterprise (RADIUS) 113
D-Link <strong>Unified</strong> <strong>Access</strong> <strong>Point</strong> Administrator’s <strong>Guide</strong><br />
Choose WPA<br />
To use this type of security, you must perform the following steps:<br />
1. Add the access point to the list of RADIUS server clients. (See “Configuring the RADIUS<br />
Server for Authentication” on page 116.)<br />
2. Configure the access point to use your RADIUS server (by providing the RADIUS server<br />
IP address as part of the “WPA/WPA2 Enterprise [RADIUS]” security mode settings).<br />
3. Configure wireless clients to use WPA security and “Smart Card or other Certificate” as<br />
described in this section.<br />
4. Obtain a certificate for this client as described in “Obtaining a TLS-E<strong>AP</strong> Certificate for a<br />
Client” on page 119.<br />
If you configured the access point to use WPA/WPA2 Enterprise (RADIUS) security mode<br />
with an external RADIUS server, perform the following steps:<br />
1. Configure WPA security with certificate authentication on each client as follows.<br />
Choose either TKIP or AES for the<br />
Data Encryption mode<br />
1 2<br />
114 © 2001-2008 D-Link Corporation. All Rights Reserved.<br />
Choose Smart Card or other ...then, click<br />
certificate and enable “Authenticate<br />
as computer when info is available”<br />
“Properties”
3<br />
A Wireless Client Settings and RADIUS Server Setup<br />
2. Configure the following settings on the Association tab on the Network Properties dialog.<br />
Network Authentication WPA<br />
Data Encryption TKIP or AES depending on how this option is configured on the<br />
access point.<br />
Note: When the Cipher Suite on the access point is set to “Both”,<br />
then TKIP clients with a valid TKIP key and AES clients with a<br />
valid CCMP (AES) key can associate with the access point. For<br />
more information, see Administrators <strong>Guide</strong> and Online Help on<br />
the access point.<br />
3. Configure these settings on the Authentication tab.<br />
Enable (click to check)<br />
“Validate server certificate”<br />
Select (check) the name of certificate<br />
on this client (downloaded from<br />
RADIUS server in a prerequisite procedure)<br />
Enable IEEE 802.1X<br />
authentication for this network<br />
Enable (click to check) this option.<br />
E<strong>AP</strong> Type Choose Smart Card or other Certificate.<br />
4. Click Properties to bring up the Smart Card or other Certificate Properties dialog and<br />
enable the “Validate server certificate” option.<br />
Validate Server Certificate Enable this option (click to check the box).<br />
Certificates In the certificate list shown, select the certificate for this client.<br />
Click OK on all dialogs to close and save your changes.<br />
5. To complete the client configuration you must now obtain a certificate from the RADIUS<br />
server and install it on this client. For information on how to do this see “Obtaining a TLS-<br />
E<strong>AP</strong> Certificate for a Client” on page 119.<br />
WPA clients should now be able to connect to the access point using their TLS certificates.<br />
The certificate you installed is used when you connect, so you will not be prompted for login<br />
Configuring WPA/WPA2 Enterprise (RADIUS) 115
D-Link <strong>Unified</strong> <strong>Access</strong> <strong>Point</strong> Administrator’s <strong>Guide</strong><br />
information. The certificate is automatically sent to the RADIUS server for authentication and<br />
authorization.<br />
Configuring the RADIUS Server for Authentication<br />
An external RADIUS server running on the network can support of E<strong>AP</strong>-TLS smart card/<br />
certificate distribution to clients in a Public Key Infrastructure (PKI) as well as E<strong>AP</strong>-PE<strong>AP</strong><br />
user account setup and authentication.<br />
This section provides an example of configuring an external RADIUS server for the purposes<br />
of authenticating and authorizing TLS-E<strong>AP</strong> certificates from wireless clients of a particular<br />
<strong>Unified</strong> <strong>Access</strong> <strong>Point</strong> configured for either “WPA/WPA2 Enterprise (RADIUS)” or “IEEE<br />
802.1X” security modes. The intention of this section is to provide some idea of what this<br />
process will look like; procedures will vary depending on the RADIUS server you use and<br />
how you configure it. This example uses the Internet Authentication Service that comes with<br />
Microsoft Windows 2003 server.<br />
NOTE: This appendix does not describe how to set up Administrative users on the<br />
RADIUS server. This example assumes you have already configured<br />
RADIUS server user accounts. You need a RADIUS server user name and<br />
password for both this procedure and the following one that describes how to<br />
obtain and install a certificate on the wireless client. Please consult the<br />
documentation for your RADIUS server for information about setting up user<br />
accounts.<br />
The purpose of this procedure is to identify your <strong>Unified</strong> <strong>Access</strong> <strong>Point</strong> as a “client” to the<br />
RADIUS server. The RADIUS server can then handle authentication and authorization of<br />
wireless clients for the <strong>AP</strong>. This procedure is required per access point. If you have more than<br />
one access point with which you plan to use an external RADIUS server, you need to follow<br />
these steps for each of those <strong>AP</strong>s.<br />
The information you need to provide to the RADIUS server about the access point<br />
corresponds to settings on the access point (Security) and vice versa. You should have already<br />
provided the RADIUS server IP Address to the <strong>AP</strong>; in the steps that follow you will provide<br />
the access point IP address to the RADIUS server. The RADIUS Key provided on the <strong>AP</strong> is<br />
the “shared secret” you will provide to the RADIUS server.<br />
NOTE: The RADIUS server is identified by its IP address and UDP port numbers for<br />
the different services it provides. On the current release of the <strong>Unified</strong><br />
<strong>Access</strong> <strong>Point</strong> software, the RADIUS server User Datagram Protocol (UDP)<br />
ports used by the access point are not configurable. (The <strong>Unified</strong> <strong>Access</strong><br />
<strong>Point</strong> is hard-coded to use RADIUS server UDP port 1812 for authentication<br />
and port 1813 for accounting.)<br />
116 © 2001-2008 D-Link Corporation. All Rights Reserved.
A Wireless Client Settings and RADIUS Server Setup<br />
To configure the external RADIUS server, perform the following steps:<br />
1. Log on to the system hosting your RADIUS server and bring up the Internet<br />
Authentication Service.<br />
2. In the left panel, right click on “RADIUS Clients” node and choose New > RADIUS<br />
Client from the popup menu.<br />
3. On the first screen of the New RADIUS Client wizard provide information about the<br />
access point to which you want your clients to connect:<br />
- A logical (friendly) name for the access point. (You might want to use DNS name or<br />
location.)<br />
Configuring the RADIUS Server for Authentication 117
D-Link <strong>Unified</strong> <strong>Access</strong> <strong>Point</strong> Administrator’s <strong>Guide</strong><br />
- IP address for the access point.<br />
Click Next.<br />
4. For the “Shared secret” enter the RADIUS Key you provided to the access point (on the<br />
Security page). Re-type the key to confirm.<br />
118 © 2001-2008 D-Link Corporation. All Rights Reserved.
5. Click Finish.<br />
A Wireless Client Settings and RADIUS Server Setup<br />
The access point is now displayed as a client of the Authentication Server.<br />
Obtaining a TLS-E<strong>AP</strong> Certificate for a Client<br />
If you want to use IEEE 802.1X mode with E<strong>AP</strong>-TLS certificates for authentication and<br />
authorization of clients, you must have an external RADIUS server and a Public Key Authority<br />
Infrastructure (PKI), including a Certificate Authority (CA), server configured on your<br />
network. It is beyond the scope of this document to describe these configuration of the<br />
RADIUS server, PKI, and CA server. Consult the documentation for those products.<br />
For information about configuring Microsoft Windows PKI software or installing a CA, see<br />
the Microsoft Web site: http://support.microsoft.com/.<br />
Wireless clients configured to use either “WPA/WPA2 Enterprise (RADIUS)” or “IEEE<br />
802.1X” security modes with an external RADIUS server that supports TLS-E<strong>AP</strong> certificates<br />
must obtain a TLS certificate from the RADIUS server.<br />
This is an initial one-time step that must be completed on each client that uses either of these<br />
modes with certificates. This example uses the Microsoft Certificate Server.<br />
To obtain a certificate for a client, follow these steps.<br />
1. Enter the following URL in a Web browser:<br />
https:///certsrv/<br />
Obtaining a TLS-E<strong>AP</strong> Certificate for a Client 119
D-Link <strong>Unified</strong> <strong>Access</strong> <strong>Point</strong> Administrator’s <strong>Guide</strong><br />
Where is the IP address of your external RADIUS server, or of the<br />
Certificate Authority (CA), depending on the configuration of your infrastructure.<br />
2. Click “Yes” to proceed to the secure Web page for the server.<br />
The Welcome screen for the Certificate Server is displayed in the browser.<br />
3. Click “Request a certificate” to get the login prompt for the RADIUS server.<br />
4. Provide a valid user name and password to access the RADIUS server.<br />
120 © 2001-2008 D-Link Corporation. All Rights Reserved.
A Wireless Client Settings and RADIUS Server Setup<br />
NOTE: The user name and password you need to provide here is for access to the<br />
RADIUS server, for which you will already have user accounts configured at<br />
this point. This document does not describe how to set up Administrative<br />
user accounts on the RADIUS server. Please consult the documentation for<br />
your RADIUS server for these procedures.<br />
5. Click “User Certificate” on the next page displayed.<br />
6. Click “Yes” on the dialog displayed to install the certificate.<br />
7. Click “Submit” to complete and click “Yes” to confirm the submittal on the popup dialog.<br />
Obtaining a TLS-E<strong>AP</strong> Certificate for a Client 121
D-Link <strong>Unified</strong> <strong>Access</strong> <strong>Point</strong> Administrator’s <strong>Guide</strong><br />
8. Click “Install this certificate” to install the newly issued certificate on your client station.<br />
(Also, click “Yes” on the popup windows to confirm the install and to add the certificate to<br />
the Root Store.)<br />
A success message is displayed indicating the certificate is now installed on the client.<br />
Configuring the RADIUS Server for VLAN Tags<br />
A VLAN is a grouping of ports on a switch or a grouping of ports on different switches.<br />
Dynamic VLANs allow you to assign a user to a VLAN, and switches dynamically use this<br />
information to configure the port on the switch automatically. Selection of the VLAN is<br />
usually based on the identity of the user. The RADIUS server informs the network access<br />
server (NAS), which might be the access point, of the selected VLAN as part of the<br />
authentication. This setup enables users of Dynamic VLANs to move from one location to<br />
another without intervention and without having to make any changes to the switches.<br />
In the case of the <strong>Unified</strong> <strong>Access</strong> <strong>Point</strong>, if you configure an external RADIUS server on the<br />
V<strong>AP</strong> page, then an External RADIUS server will try to authenticate the user. A user’s<br />
authentication credentials are passed to a RADIUS server. If these credentials are found to be<br />
122 © 2001-2008 D-Link Corporation. All Rights Reserved.
A Wireless Client Settings and RADIUS Server Setup<br />
valid, the NAS configures the port to the VLAN indicated by the RADIUS authentication<br />
server.<br />
A RADIUS server needs to be configured to use Tunnel attributes in <strong>Access</strong>-Accept messages,<br />
in order to inform the access point about the selected VLAN. These attributes are defined in<br />
RFC 2868 and their use for dynamic VLAN is specified in RFC 3580.<br />
If you use an external RADIUS server to manage VLANs, the server must use the following<br />
VLAN attributes (as defined in RFC3580):<br />
Tunnel-Type=VLAN (13)<br />
Tunnel-Medium-Type=802<br />
Tunnel-Private-Group-ID=VLANID<br />
In the case of FreeRADIUS server, the following options may be set in the users file to add the<br />
necessary attributes.<br />
example-user Auth-Type :=E<strong>AP</strong>, User-Password =="nopassword"<br />
Tunnel-Type = 13,<br />
Tunnel-Medium-Type = 802,<br />
Tunnel-Private-Group-ID = 7<br />
Tunnel-Type and Tunnel-Medium-Type use the same values for all stations. Tunnel-Private-<br />
Group-ID is the selected VLAN ID and can be different for each user.<br />
NOTE: Do not use the management VLAN ID for the value of the Tunnel-Private-<br />
Group-ID. The dynamically-assigned RADIUS VLAN cannot be the same as<br />
the management VLAN. If the RADIUS server attempts to assign a dynamic<br />
VLAN that is also the management VLAN, the <strong>AP</strong> ignores the dynamic<br />
VLAN assignment, and a newly associated client is assigned to the default<br />
VLAN for that V<strong>AP</strong>. A re-authenticating client retains its previous VLAN ID.<br />
Configuring the RADIUS Server for VLAN Tags 123
D-Link <strong>Unified</strong> <strong>Access</strong> <strong>Point</strong> Administrator’s <strong>Guide</strong><br />
124 © 2001-2008 D-Link Corporation. All Rights Reserved.
CLI for <strong>AP</strong> Configuration<br />
B<br />
In addition to the Web based user interface, the <strong>Unified</strong> <strong>Access</strong> <strong>Point</strong> includes a command line<br />
interface (CLI) for administering the access point. The CLI lets you view and modify status<br />
and configuration information.<br />
The following topics provide an introduction to the class structure upon which the CLI is<br />
based, CLI commands, and examples of using the CLI to get or set configuration information<br />
on an access point:<br />
How to <strong>Access</strong> the <strong>Access</strong> <strong>Point</strong> CLI<br />
Commands and Syntax<br />
Getting Help on Commands at the CLI<br />
Interface Naming Conventions<br />
Saving Configuration Changes<br />
<strong>Access</strong> <strong>Point</strong> CLI Commands<br />
CLI Classes and Properties Reference<br />
How to <strong>Access</strong> the <strong>Access</strong> <strong>Point</strong> CLI<br />
You can use any of the following methods to access the command line interface (CLI) for the<br />
access point or wireless network:<br />
Telnet Connection to the <strong>AP</strong><br />
SSH Connection to the <strong>AP</strong><br />
Telnet Connection to the <strong>AP</strong><br />
If you already deployed the network and know the IP address of your access point, you can use<br />
a remote Telnet connection to the access point to view the system console over the network.<br />
Using a Telnet connection gives you remote access to the <strong>AP</strong> system console. The only<br />
disadvantage of using Telnet is that with Telnet you cannot access the system console until the<br />
<strong>AP</strong> is fully initialized. Therefore, you cannot view <strong>AP</strong> startup messages. However, once the<br />
<strong>AP</strong> is operational, you can use a Telnet connection to view the <strong>AP</strong> system console and enter<br />
CLI commands. To use Telnet, you need a Telnet client, such as PuTTY.<br />
To use the Microsoft Windows command window for Telnet access to the <strong>AP</strong>, use the<br />
following instructions:<br />
How to <strong>Access</strong> the <strong>Access</strong> <strong>Point</strong> CLI 125
D-Link <strong>Unified</strong> <strong>Access</strong> <strong>Point</strong> Administrator’s <strong>Guide</strong><br />
1. Open a command window on your PC.<br />
(For example, from the system tray on the desktop choose Start > Run to bring up the<br />
Run dialog, and type cmd in the Open property, then click OK.)<br />
2. At the command prompt, type the following:<br />
telnet <br />
where is the address of the access point you want to monitor.<br />
(If your Domain Name Server is configured to map domain names to IP addresses via<br />
DHCP, you can also telnet to the domain name of the <strong>AP</strong>.)<br />
3. When the login prompt appears, enter the username and password.<br />
The login name is admin, and the default password is admin.<br />
After a successful login, the screen shows the (<strong>Access</strong> <strong>Point</strong> Name)# prompt. You are now<br />
ready to enter CLI commands at the command line prompt.<br />
SSH Connection to the <strong>AP</strong><br />
If you already deployed your network and know the IP address of your access point, you can<br />
use a remote Secure Shell (SSH) connection to the access point to view the system console<br />
over the network.<br />
Using an SSH connection to the access point is similar to “Telnet” in that it gives you remote<br />
access to the system console and CLI. SSH has the added advantage of being a secure<br />
connection traffic encrypted.<br />
To use an SSH connection, you need to have SSH software installed on your PC. The<br />
examples in this guide use PuTTY, which is available as a free download from the Internet.<br />
126 © 2001-2008 D-Link Corporation. All Rights Reserved.
1. Start your SSH application. (We use PuTTY as an example.)<br />
2. Enter the IP address of access point and click Open.<br />
B CLI for <strong>AP</strong> Configuration<br />
(If your Domain Name Server is configured to map domain names to IP addresses via<br />
DHCP, you can enter the domain name of the <strong>AP</strong> instead of an IP address.)<br />
This brings up the SSH command window and establishes a connection to the access<br />
point. The login prompt is displayed.<br />
3. When the login prompt appears, enter the username and password.<br />
The login name is admin. If you did not change the default password, press ENTER when<br />
you are prompted for a password. The default password is blank.<br />
After a successful login, the screen shows the (<strong>Access</strong> <strong>Point</strong> Name)# prompt. You are now<br />
ready to enter CLI commands at the command line prompt.<br />
Commands and Syntax<br />
The CLI for the DWL-3500<strong>AP</strong> and DWL-8500<strong>AP</strong> provides the following commands for<br />
manipulating objects:<br />
get<br />
set<br />
add<br />
remove<br />
CAUTION: Settings updated from the CLI (with get, set, add, remove commands) will not<br />
be saved to the startup configuration unless you explicitly save them via the<br />
save-running command. For a description of configurations maintained on the<br />
Commands and Syntax 127
D-Link <strong>Unified</strong> <strong>Access</strong> <strong>Point</strong> Administrator’s <strong>Guide</strong><br />
Using the get Command<br />
128 © 2001-2008 D-Link Corporation. All Rights Reserved.<br />
<strong>AP</strong> and details on how to save your updates, see “Saving Configuration<br />
Changes” on page 133.<br />
The “get” command allows you to get the property values of existing instances of a class.<br />
Classes can be “named” or “unnamed.” The command syntax is:<br />
get unnamed-class [ property ... | detail ]<br />
get named-class [ instance | all [ property ... | name | detail ] ]<br />
The rest of the command line is optional. If provided, it is either a list of one or more<br />
properties, or the keyword detail.<br />
The following example uses the “get” command on an unnamed class with a single instance:<br />
get log<br />
There is only one log on the <strong>AP</strong>, so the command returns information on the log file.<br />
The following example uses the “get” command on an unnamed class with multiple instances:<br />
get log-entry<br />
There are multiple log entries but they are not named, so this command returns all log entries.<br />
The following example uses the “get” command on a named class with multiple instances:<br />
get bss wlan0bssvap0<br />
There are multiple BSSes and they are named, so this command returns information on the<br />
BSS named “wlan0bssvap0.”<br />
The following example uses the “get” command on a named class to get all instances:<br />
get mac-acl all mac<br />
get mac-acl all<br />
NOTE: wlan0bssvap0 is the name of the basic service set (BSS) on the wlan0<br />
interface. For information on interfaces, see “Interface Naming Convention”<br />
on page 132.<br />
Using the set Command<br />
The “set” command allows you to set the property values of existing instances of a class and<br />
has the following syntax<br />
set unnamed-class [ with qualifier-property qualifier-value ... to ] property<br />
value . . .<br />
The first argument is an unnamed class in the configuration.<br />
After this is an optional qualifier that restricts the set to only some instances. For singleton<br />
classes (with only one instance) no qualifier is needed. If there is a qualifier, it starts with the<br />
keyword with, then has a sequence of one or more qualifier-property qualifier-value pairs,<br />
and ends with the keyword to. If these are included, then only instances whose present value<br />
of qualifier-property is qualifier-value will be set. The qualifier-value arguments cannot<br />
contain spaces. Therefore, you cannot select instances whose desired qualifier-value has a<br />
space in it.
The rest of the command line contains property-value pairs.<br />
B CLI for <strong>AP</strong> Configuration<br />
set named-class instance | all [ with qualifier-property qualifier-value ...<br />
to ] property value...<br />
The first argument is either a named class in the configuration.<br />
The next argument is either the name of the instance to set, or the keyword all, which indicates<br />
that all instances should be set. Classes with multiple instances can be set consecutively in the<br />
same command line as shown in Example 4 below. The qualifier-value arguments cannot<br />
contain spaces.<br />
The following examples show set commands. Bold text indicates class names, property<br />
names or keywords; the text that is not bold shows the property values.<br />
1. set interface wlan0 ssid “Vicky's <strong>AP</strong>”<br />
2. set radio all beacon-interval 200<br />
3. set tx-queue wlan0 with queue data0 to aifs 3<br />
4. set tx-queue wlan0 with queue data0 to aifs 7 cwmin 15 cwmax 1024<br />
burst 0<br />
5. set vap vap2 with radio wlan0 to vlan-id 123<br />
NOTE: For information on interfaces used in this example (such as wlan0 or vap2)<br />
see “Interface Naming Convention” on page 132.<br />
Using the add Command<br />
The “add” command allows you to add a new instance or group of instances of a class and has<br />
the following syntax:<br />
add unique-named-class instance [ property value ... ]<br />
add group-named-class instance [ property value ... ]<br />
add anonymous-class [ property value ... ]<br />
For example:<br />
add mac-acl default mac 00:01:02:03:04:05<br />
NOTE: If you’re adding an instance to a unique-named class, you must assign the<br />
instance a name not already in use by any other instance of that class. If you<br />
add instances to group-named classes, you can form groups by creating<br />
instances and assigning them identical names. All instances of a groupnamed<br />
class that have the same name form a group of instances.<br />
Using the remove Command<br />
The “remove” command allows you to remove an existing instance of a class and has the<br />
following syntax:<br />
remove unnamed-class [ property value . . . ]<br />
remove named-class instance | all [ property value . . .]<br />
For example:<br />
remove mac-acl default mac 00:01:02:03:04:05<br />
Commands and Syntax 129
D-Link <strong>Unified</strong> <strong>Access</strong> <strong>Point</strong> Administrator’s <strong>Guide</strong><br />
Additional CLI Commands<br />
The CLI also includes the following commands for maintenance tasks:<br />
Table 31. Additional CLI Commands<br />
Command Description<br />
save-running The save-running command saves the running configuration as the<br />
startup configuration.<br />
For more information, see “Saving Configuration Changes” on<br />
page 133.<br />
reboot The reboot command restarts the access point (a “soft” reboot).<br />
factory-reset The factory-reset command resets the <strong>AP</strong> to factory defaults and<br />
reboots.<br />
firmware-upgrade Use the firmware-upgrade command to upload a new <strong>AP</strong> image.<br />
config Use the config command to upload or download the <strong>AP</strong><br />
configuration file.<br />
For information about classes, instances, and properties, see “CLI Classes and Properties<br />
Reference” on page 150<br />
Getting Help on Commands at the CLI<br />
The CLI provides keyboard shortcuts to help you navigate the command line and build valid<br />
commands, along with “tab completion” hints on available commands that match what you<br />
have typed so far. Using the CLI will be easier if you use the tab completion help and learn the<br />
keyboard shortcuts.<br />
Tab Completion<br />
Help on commands can be requested at the CLI by using the TAB key. This is a quick way to<br />
see all valid completions for a class. Entering TAB once will attempt to complete the current<br />
command.<br />
If multiple completions exist, a beep will sound and no results will be displayed. Enter TAB<br />
again to display all available completions.<br />
Example 1: At a blank command line, enter TAB twice to get a list of all commands.<br />
DLINK-WLAN-<strong>AP</strong>#<br />
add Add an instance to the running configuration<br />
config Upload/Download the running configuration<br />
factory-reset Reset the system to factory defaults<br />
firmware-upgrade Upgrade the firmware<br />
get Get property values of the running configuration<br />
reboot Reboot the system<br />
remove Remove instances in the running configuration<br />
save-running Save the running configuration<br />
set Set property values of the running configuration<br />
130 © 2001-2008 D-Link Corporation. All Rights Reserved.
B CLI for <strong>AP</strong> Configuration<br />
Example 2: Type remove TAB TAB (including a space after remove) to see a list of all<br />
property options for the remove command.<br />
DLINK-WLAN-<strong>AP</strong># remove<br />
basic-rate Basic rates of radios<br />
bridge-port Bridge ports of bridge interfaces<br />
bss Basic Service Set of radios<br />
interface Network interface<br />
mac-acl MAC address access list item<br />
snmp-group SNMP user groups<br />
snmp-target SNMPv3 targets to receive traps<br />
snmp-user SNMPv3 users<br />
snmp-view SNMP MIB views<br />
supported-rate Supported rates of radios<br />
traphost Destination host for SNMP traps<br />
Example 3: Type get system v TAB. This will result in completion with the only matching<br />
property, get system version. Press ENTER to display the output results of the command.<br />
Keyboard Shortcuts<br />
The CLI provides keyboard shortcuts to help you navigate the command line and build valid<br />
commands. Table 32 describes the keyboard shortcuts available from the CLI.<br />
Table 32. Keyboard Shortcuts<br />
Keyboard Shortcut Action on CLI<br />
Ctrl-a Move the cursor to the beginning of the current line<br />
Ctrl-e Move the cursor to the end of the current line<br />
Ctrl-b<br />
Move the cursor back on the current line, one character at a time<br />
Left Arrow key<br />
Ctrl-f<br />
Move the cursor forward on the current line, one character at a time<br />
Right Arrow Key<br />
Ctrl-c Start over at a blank command prompt (abandons the input on the current<br />
line)<br />
Ctrl-h<br />
Remove one character on the current line.<br />
Backspace<br />
Ctrl-w Remove the last word in the current command.<br />
(Clears one word at a time from the current command line, always<br />
starting with the last word on the line.)<br />
Ctrl-k Remove characters starting from cursor location to end of the current<br />
line.<br />
(Clears the current line from the cursor forward.)<br />
Ctrl-u Remove all characters before the cursor.<br />
(Clears the current line from the cursor back to the CLI prompt.)<br />
Ctrl-p<br />
Display previous command in history.<br />
Up Arrow key<br />
(Ctrl-p and Ctrl-n let you cycle through a history of all executed<br />
commands like Up and Down arrow keys typically do. Up/Down arrow<br />
keys also work for this.)<br />
Getting Help on Commands at the CLI 131
D-Link <strong>Unified</strong> <strong>Access</strong> <strong>Point</strong> Administrator’s <strong>Guide</strong><br />
Table 32. Keyboard Shortcuts<br />
Keyboard Shortcut Action on CLI<br />
Ctrl-n<br />
Display next command in history.<br />
Down Arrow key<br />
(Ctrl-p and Ctrl-n let you cycle through a history of all executed<br />
commands like Up and Down arrow keys typically do. Up/Down arrow<br />
keys also work for this.)<br />
Ctrl-d Exit the CLI. (At a blank command prompt, typing Ctrl-d closes the<br />
CLI.)<br />
(Typing Ctrl-d within command text also removes characters, one at a<br />
time, at cursor location like Ctrl-h.)<br />
Interface Naming Conventions<br />
The following summary of interface names is provided to help clarify the related CLI<br />
commands and output results. These names are not exposed on the Web UI, but are used<br />
throughout the CLI. You get and set many configuration values on the <strong>AP</strong> by referring to<br />
interfaces. In order to configure the <strong>AP</strong> through the CLI, you need to understand which<br />
interfaces are available on the <strong>AP</strong>, what role they play (corresponding setting on the Web UI),<br />
and how to refer to them. To view a list of the interface names and an associated description,<br />
use get interface all description.<br />
Table 33 describes the interface naming conventions for the DWL-3500<strong>AP</strong> and DWL-<br />
8500<strong>AP</strong>.<br />
NOTE: Use the get interface command to display common information on all<br />
interfaces, including IP addresses<br />
Table 33. Interface Naming Convention<br />
Interface Description<br />
brvlanx Bridge for VLAN x. These interfaces are used for the management interface and<br />
dynamic VLANs.<br />
By default, brvlan1 is the management VLAN interface.<br />
brtrunk Internal bridge trunk interface.<br />
lo Local loopback for data meant for the access point itself.<br />
eth0 The Ethernet interface connected to the Internal network.<br />
vlan1 The VLAN interface associated with the default virtual access point.<br />
wlan0 The default wireless interface on radio 1 - 802.11a radio. This is the interface for<br />
virtual access point (V<strong>AP</strong>) 0. The DWL-3500<strong>AP</strong> does not have this interface.<br />
wlan1 The default wireless interface on radio 2 - 802.11b/g radio . This is the interface for<br />
V<strong>AP</strong> 0.<br />
wlan0vapx The wireless interface for the x V<strong>AP</strong> on radio 1 - 802.11a radio. The value for x<br />
ranges from 1-7. The DWL-3500<strong>AP</strong> does not have this interface.<br />
wlan1vapx The wireless interface for the x V<strong>AP</strong> on radio 2 - 802.11b/g radio. The value for x<br />
ranges from 1-7.<br />
132 © 2001-2008 D-Link Corporation. All Rights Reserved.
Table 33. Interface Naming Convention<br />
B CLI for <strong>AP</strong> Configuration<br />
Interface Description<br />
wlan0bssvapx The basic service set interface for the x V<strong>AP</strong> on radio 1 - 802.11a radio. The value<br />
for x ranges from 0-7. The DWL-3500<strong>AP</strong> does not have this interface.<br />
wlan1bssvapx The basic service set interface for the x V<strong>AP</strong> on radio 2 - 802.11b/g radio. The<br />
value for x ranges from 0-7.<br />
NOTE: The commands and examples in this appendix use radio 1. To configure and<br />
view information about the second radio, replace the “wlan0” portion of the<br />
interface name with wlan1. Use the command get radio all to view<br />
information about the radios on the <strong>Unified</strong> <strong>Access</strong> <strong>Point</strong>.<br />
Saving Configuration Changes<br />
The <strong>Unified</strong> <strong>Access</strong> <strong>Point</strong> maintains three different configurations.<br />
Factory Default Configuration - This configuration consists of the default settings<br />
shipped with the access point (as specified in “Default Settings for the <strong>Unified</strong> <strong>Access</strong><br />
<strong>Point</strong>s” on page 19).<br />
You can always return the <strong>AP</strong> to the factory defaults by using the factory-reset command.<br />
Startup Configuration - The startup configuration contains the settings with which the<br />
<strong>AP</strong> will use the next time it starts up (for example, upon reboot).<br />
To save configuration updates made from the CLI to the startup configuration, you must<br />
execute the save-running or set config startup running command from the CLI<br />
after making changes.<br />
Running Configuration - The running configuration contains the settings with which the<br />
<strong>AP</strong> is currently running.<br />
When you view or update configuration settings through the command line interface (CLI)<br />
using get, set, add, and remove commands, you are viewing and changing values on the<br />
running configuration only. If you do not save the configuration (by executing the saverunning<br />
or “set config startup running” command at the CLI), you will lose any<br />
changes you submitted via the CLI upon reboot.<br />
The save-running command saves the running configuration as the startup configuration.<br />
(The save-running command is a shortcut command for set config startup running,<br />
which accomplishes the same thing)<br />
Settings updated from the CLI (with get, set, add, remove commands) will not be saved to<br />
the startup configuration unless you explicitly save them via the save-running command.<br />
This gives you the option of maintaining the startup configuration and trying out values on the<br />
running configuration that you can discard (by not saving).<br />
By contrast, configuration changes updated from the Web UI are automatically saved to both<br />
the running and startup configurations. If you make changes from the Web UI that you do not<br />
want to keep, your only option is to reset to factory defaults. The previous startup<br />
configuration will be lost.<br />
Saving Configuration Changes 133
D-Link <strong>Unified</strong> <strong>Access</strong> <strong>Point</strong> Administrator’s <strong>Guide</strong><br />
<strong>Access</strong> <strong>Point</strong> CLI Commands<br />
This section describes the commands you use to view and configure the <strong>Unified</strong> <strong>Access</strong> <strong>Point</strong>.<br />
The CLI commands correspond to tasks you can accomplish by using the Web-based user<br />
interface (UI). In some cases, the CLI get command provides additional details not available<br />
through the Web UI.<br />
NOTE: CLI commands for MAC Authentication and Load Balancing are not<br />
available. You must use the Web interface to view and configure these<br />
features on the access point.<br />
The CLI performs validation on individual property values in a set or add, but does not check<br />
to see if different property values are consistent with each other. For example, it would not<br />
provide any error if a radio's mode was set to “a” and its channel was set to “1”. (Even though<br />
“1” is not a valid channel in “a” mode, it is a valid channel in “g” mode.) In cases where the<br />
configuration is left in an inconsistent state, the services associated with the configuration may<br />
not be operational. Therefore, it is important to consult the class and property reference to<br />
understand the acceptable values for properties given the values of other properties. For more<br />
information, see “CLI Classes and Properties Reference” on page 150.<br />
Configuring Basic Settings<br />
The following CLI command examples correspond to tasks you can accomplish on the Basic<br />
Settings tab of the Web UI for access points.<br />
NOTE: Before you configure the basic settings, make sure you are familiar with the<br />
names of the interfaces as described in “Interface Naming Convention” on<br />
page 132. The interface name you reference in a command determines<br />
whether a setting applies to a wired or wireless interface, the Internal<br />
network, or to radio “one” or radio “two.”<br />
Table 34. Basic Setting Commands<br />
Action Command<br />
Get the following information To show all settings:<br />
about the management interface<br />
on the <strong>AP</strong>:<br />
get management<br />
VLAN ID<br />
Interface Name<br />
Static IP address (if DHCP is<br />
To show specific settings:<br />
get management vlan-id<br />
not used)<br />
get management interface<br />
Static Subnet Mask<br />
get management static-ip<br />
IP Address<br />
get management static-mask<br />
Subnet Mask<br />
MAC Address<br />
DHCP Status<br />
get management ip<br />
get management mask<br />
get management mac<br />
get management dhcp-status<br />
Get the Firmware Version get system version<br />
134 © 2001-2008 D-Link Corporation. All Rights Reserved.
Status<br />
Table 34. Basic Setting Commands<br />
Action Command<br />
Get the serial number get system serial-number<br />
Set the Password set system password <br />
Example:<br />
set system password test1234<br />
B CLI for <strong>AP</strong> Configuration<br />
The command tasks and examples in this section show status information on access points.<br />
These settings correspond to what is shown on the Status tabs in the Web UI.<br />
NOTE: Make sure you are familiar with the names of the interfaces as described in<br />
“Interface Naming Convention” on page 132. The interface name you<br />
reference in a get command determines whether the command output shows<br />
a wired or wireless interface, the Internal network, or to radio “one” or radio<br />
two.”<br />
Table 35. Status Commands<br />
Action Command<br />
Global command to get all detail on get bss all detail<br />
a Basic Service Set (BSS).<br />
This is a useful command to use to<br />
get a comprehensive picture of how<br />
the <strong>AP</strong> is currently configured.<br />
Get information about the wired and get interface<br />
WLAN interfaces<br />
Get the MAC Address for the Wired get interface wlan0 mac<br />
Internal Interface<br />
Get the VLAN ID for the wired get management vlan-id<br />
interface<br />
Get the Network Name (SSID) for get interface wlan0 ssid<br />
the default virtual access point.<br />
Get the Current IEEE 802.11 Radio get radio wlan0 mode<br />
Mode<br />
Get the Channel the <strong>AP</strong> is Currently get radio wlan0 channel<br />
Using<br />
Get Basic Radio Settings for the get radio wlan0<br />
Internal Interface<br />
get radio wlan0 detail<br />
Get Status on Events get log-entry detail<br />
<strong>Access</strong> <strong>Point</strong> CLI Commands 135
D-Link <strong>Unified</strong> <strong>Access</strong> <strong>Point</strong> Administrator’s <strong>Guide</strong><br />
Table 35. Status Commands<br />
Action Command<br />
Enable Remote Logging and Specify<br />
the Log Relay Host for the Kernel<br />
Log<br />
Get Transmit / Receive Statistics for<br />
all interfaces<br />
Note: You can also view all transmit<br />
and receive statistics individually.<br />
Ethernet Settings<br />
Use the commands in this section to view and set values for the Ethernet (wired) interface.<br />
NOTE: Before configuring this feature, make sure you are familiar with the names of<br />
the interfaces as described in “Interface Naming Conventions” on page 132.<br />
The interface name you reference in a command determines whether a setting<br />
applies to a wired or wireless interface, the Internal network, or to radio<br />
“one” or radio “two”.<br />
Table 36. Ethernet Setting Commands<br />
136 © 2001-2008 D-Link Corporation. All Rights Reserved.<br />
As a prerequisite to remote logging, the Log Relay Host<br />
must be configured first as described in “Viewing Events<br />
Logs” on page 92.<br />
Logging command examples:<br />
set log relay-enabled 1 enables remote logging<br />
set log relay-enabled 1 disables remote logging<br />
get log<br />
set log TAB TAB shows values you can set on the log<br />
get interface all ip mac ssid tx-packets txbytes<br />
tx-errors rx-packets rx-bytes rx-errors<br />
Get Client Associations get association detail<br />
Get neighboring access points get detected-ap detail<br />
Get information about switches that<br />
can discover and manage the <strong>AP</strong><br />
get managed-ap<br />
Action Command<br />
Get Summary View of Internal<br />
Interfaces<br />
get bss<br />
Get the DNS Name get host id<br />
Set the DNS Name set host id <br />
Get Current Settings for the<br />
Ethernet (Wired) Internal Interface<br />
For example:<br />
set host id vicky-ap<br />
get management<br />
Set the management VLAN ID set management vlan-id <br />
View untagged VLAN information get untagged-vlan<br />
Enable the untagged VLAN set untagged-vlan status up<br />
Disable the untagged VLAN set untagged-vlan status down<br />
Set the untagged VLAN ID set untagged-vlan vlan-id <br />
View the connection type get management dhcp-status
Table 36. Ethernet Setting Commands<br />
Wireless Interface<br />
B CLI for <strong>AP</strong> Configuration<br />
Action Command<br />
Use DHCP as the connection type set management dhcp-client status up<br />
Use a Static IP as the connection<br />
type<br />
set management dhcp-client status down<br />
Set the Static IP address set management static-ip <br />
Example:<br />
set management static-ip 10.10.12.221<br />
Set a Subnet Mask set management static-mask <br />
Example:<br />
Set the Default<br />
Gateway<br />
View the DNS Nameserver mode<br />
Dynamic= up<br />
Manual=down<br />
Set DNS Nameservers to Use<br />
Static IP Addresses (Dynamic to<br />
Manual Mode)<br />
Set DNS Nameservers to Use<br />
DHCP IP Addressing (Manual to<br />
Dynamic Mode)<br />
set management static-mask 255.0.0.0<br />
set static-ip-route gateway <br />
Example:<br />
set static-ip-route gateway 10.10.12.1<br />
get host dns-via-dhcp<br />
set host dns-via-dhcp down<br />
set host static-dns-1 <br />
set host static-dns-2 <br />
Example:<br />
set host static-dns-1 192.168.23.45<br />
set host dns-via-dhcp up<br />
To set up a wireless (radio) interface, configure the Radio Mode and Radio Channel on each<br />
interface. The commands in this table use radio 1 (wlan0). To change the wireless settings for<br />
radio 2, use wlan1.<br />
Table 37. Wireless Setting Commands<br />
Action Command<br />
Enable or Disable 802.11d regulatory set dot11 dot11d up<br />
domain support<br />
set dot11 dot11d down<br />
Enable or Disable Station Isolation set radio wlan0 station-isolation on<br />
set radio wlan0 station-isolation off<br />
View the current radio mode get radio wlan0 mode<br />
Set the radio mode to Dynamic Turbo 5 set radio wlan0 mode dynamic-turbo-a<br />
GHz<br />
(only applicable for radio interface<br />
wlan0)<br />
Set the radio mode to Dynamic Turbo 2.4 set radio wlan0 mode dynamic-turbo-g<br />
GHz<br />
(only applicable for radio interface<br />
wlan1)<br />
<strong>Access</strong> <strong>Point</strong> CLI Commands 137
D-Link <strong>Unified</strong> <strong>Access</strong> <strong>Point</strong> Administrator’s <strong>Guide</strong><br />
Table 37. Wireless Setting Commands<br />
Action Command<br />
View the radio channel. get radio wlan0 channel<br />
Set the radio channel to a static channel. set radio wlan0 channel-policy static<br />
set radio wlan0 static-channel <br />
Set the radio channel to “Auto” set radio wlan0 channel-policy best<br />
Radio Settings<br />
Table 38 shows the Radio Settings commands. The commands in this table use radio 1<br />
(wlan0). To change the wireless settings for radio 2, use wlan1.<br />
Table 38. Radio Setting Commands<br />
Action Command<br />
View a description of the<br />
radio interfaces<br />
get radio all description<br />
Turn the radio on set radio wlan0 status on<br />
Turn the radio off set radio wlan0 status off<br />
View the current radio mode get radio wlan0 mode<br />
Set the radio mode to IEEE set radio wlan1 mode b (only applicable for radio<br />
802.11b<br />
interface wlan1)<br />
Set the radio mode to IEEE set radio wlan1 mode g (only applicable for radio<br />
802.11g<br />
interface wlan1)<br />
Set the radio mode to IEEE set radio wlan0 mode a (only applicable for radio<br />
802.11a<br />
interface wlan0)<br />
Set the radio mode to set radio wlan0 mode dynamic-turbo-a (only<br />
Dynamic Turbo 5 GHz applicable for radio interface wlan0)<br />
Set the radio mode to set radio wlan0 mode dynamic-turbo-g (only<br />
Dynamic Turbo 2.4 GHz applicable for radio interface wlan1)<br />
Enable Super-AG Mode set radio wlan0 super-ag yes<br />
Disable Super-AG Mode set radio wlan0 super-ag no<br />
View the radio channel. get radio wlan0 channel<br />
Set the radio channel to a set radio wlan0 channel-policy static<br />
static channel.<br />
set radio wlan0 static-channel <br />
Set the radio channel to<br />
“Auto”<br />
set radio wlan0 channel-policy best<br />
Set the Beacon Interval set radio wlan0 beacon-interval <br />
Set the DTIM Interval set radio wlan0 dtim-period <br />
Set the Fragmentation<br />
Length Threshold<br />
set radio wlan0 fragmentation-threshold <br />
Set the RTS Threshold set radio wlan0 rts-threshold <br />
Set the maximum number of<br />
clients allowed to associate<br />
(V<strong>AP</strong> 0 radio 0)<br />
138 © 2001-2008 D-Link Corporation. All Rights Reserved.<br />
set bss wlan0bssvap0 max-stations
Table 38. Radio Setting Commands<br />
Action Command<br />
Set the power transmission<br />
level (percent)<br />
set radio wlan0 tx-power <br />
Select the antenna to use for<br />
sending and receiving traffic<br />
Virtual <strong>Access</strong> <strong>Point</strong>s<br />
B CLI for <strong>AP</strong> Configuration<br />
Use the commands in this section to view and configure security settings on the access point.<br />
These settings correspond to those available from the V<strong>AP</strong> tab on the Web UI. For a detailed<br />
discussion of security concepts and configuration options, see “Configuring <strong>Access</strong> <strong>Point</strong><br />
Security” on page 39.<br />
NOTE: Before configuring this feature, make sure you are familiar with the names of<br />
the interfaces as described in “Interface Naming Conventions” on page 132.<br />
The interface name you reference in a command determines whether a setting<br />
applies to a wired or wireless interface, the Internal network, or to radio<br />
“one” or radio “two”.<br />
This table shows the commands you use to configure V<strong>AP</strong>s.<br />
set radio wlan0 antenna-diversity {auto | primary |<br />
secondary}<br />
Add a basic rate set add basic-rate wlan0 rate integer<br />
Get current basic rates get basic-rate<br />
Add supported rate add supported-rate wlan0 rate integer<br />
Get current supported rates get supported-rate wlan0<br />
Table 39. V<strong>AP</strong> Commands<br />
Action Command<br />
Global RADIUS IP address set global-radius-server radius-ip <br />
Global RADIUS key set global-radius-server radius-key <br />
Enable or disable global RADIUS set global-radius-server radius-accounting on<br />
accounting<br />
set global-radius-server radius-accounting off<br />
View information about all V<strong>AP</strong>s get vap all detail<br />
Enable or disable a V<strong>AP</strong> on both set vap status up<br />
radios<br />
set vap status down<br />
Enable or disable a V<strong>AP</strong> on one<br />
radio<br />
Note: This example uses radio 1.<br />
For radio 2, use wlan1<br />
Set the VLAN ID for a V<strong>AP</strong> on<br />
both radios<br />
Example:<br />
set vap vap4 status up<br />
set vap with radio wlan0 to status up<br />
set vap with radio wlan0 to status down<br />
Example:<br />
set vap vap4 with radio wlan0 status up<br />
set vap vlan-id <br />
Example:<br />
set vap vap4 vlan-id 123<br />
<strong>Access</strong> <strong>Point</strong> CLI Commands 139
D-Link <strong>Unified</strong> <strong>Access</strong> <strong>Point</strong> Administrator’s <strong>Guide</strong><br />
Table 39. V<strong>AP</strong> Commands<br />
Action Command<br />
Set the VLAN ID for a V<strong>AP</strong> on<br />
one radio<br />
Note: This example uses radio 1.<br />
For radio 2, use wlan1<br />
Set Security to Static WEP<br />
To configure Static WEP as the security mode, you need to issue multiple commands. This<br />
section describes the commands and procedures to configure Static WEP.<br />
NOTE: This example shows how to configure static WEP on V<strong>AP</strong> 0 on radio 1<br />
(wlan0). For interface commands on V<strong>AP</strong>s 1-7, use wlanxvapy, where x is<br />
the radio, and y is the V<strong>AP</strong> ID. For example, to configure security on V<strong>AP</strong> 3<br />
on radio 2, use wlan1vap3 instead of wlan0 in all of the following<br />
commands.<br />
1. Set the security mode.<br />
DLINK-<strong>AP</strong># set interface wlan0 security static-wep<br />
2. Set the Transfer Key Index.<br />
The range for the transfer key index is 1-4. The following command sets the Transfer Key<br />
140 © 2001-2008 D-Link Corporation. All Rights Reserved.<br />
set vap with radio wlan0 to vlan-id<br />
<br />
Example:<br />
set vap vap4 with radio wlan0 to vlan-id 123<br />
View the wireless network name For V<strong>AP</strong> 0 on radio 1: get interface wlan0 ssid<br />
(SSID)<br />
For V<strong>AP</strong> 3 on radio 2: get interface wlan1vap3 ssid<br />
Set the SSID<br />
set interface wlan0 ssid <br />
Note: For V<strong>AP</strong> 0, use wlanx, For example:<br />
where x is the radio. For V<strong>AP</strong>s 1- set interface wlan0 ssid Engineering<br />
7, use wlanxvapy, where x is the set interface wlan0 ssid “Engineering’s <strong>AP</strong>”<br />
radio, and y is the V<strong>AP</strong> ID. For V<strong>AP</strong> 3 on radio 2:<br />
set interface wlan1vap3 ssid Engineering<br />
Get the current security mode For V<strong>AP</strong> 0 on radio 1: get interface wlan0 security<br />
For V<strong>AP</strong> 3 on radio 2: get interface wlan1vap3 security<br />
Get detailed description of current For V<strong>AP</strong> 0 on radio 1: get interface wlan0 detail<br />
security settings<br />
For V<strong>AP</strong> 3 on radio 2: get interface wlan1vap3 detail<br />
Set security to plain text set interface wlan0 security plain-text<br />
set interface wlan1vap3 security plain-text<br />
Set security to static WEP See the detailed example in “Set Security to Static WEP” on<br />
page 140.<br />
Set security to IEEE 802.1X See detailed example in See “Set Security to IEEE 802.1X” on<br />
page 142.<br />
Set security to WPA/WPA2 See detailed example in “Set Security to WPA/WPA2 Personal<br />
Personal (PSK)<br />
(PSK)” on page 143<br />
Set security to WPA/WPA2 See detailed example in “Set Security to WPA/WPA2<br />
Enterprise (RADIUS)<br />
Enterprise (RADIUS)” on page 144
Index to 4.<br />
DLINK-<strong>AP</strong># set interface wlan0 wep-default-key 4<br />
3. Set the Key Length<br />
B CLI for <strong>AP</strong> Configuration<br />
For the CLI, valid values for Key Length are 40 bits, 104 bits, or 128 bits.The Key Length<br />
values used by the CLI do not include the initialization vector in the length. On the Web<br />
UI, longer Key Length values may be shown which include the 24-bit initialization vector.<br />
To set the WEP Key Length to 64-bits, enter the following command:<br />
set interface wlan0 wep-key-length 40<br />
To set the WEP Key Length to 128-bits, enter the following command:<br />
set interface wlan0 wep-key-length 104<br />
To set the WEP Key Length to 156-bits, enter the following command:<br />
set interface wlan0 wep-key-length 128<br />
4. Set the Key Type<br />
Valid values for Key Type are ASCII or Hex. The following commands set the Key Type.<br />
To se the key type to ASCII, enter the following command:<br />
set interface wlan0 wep-key-ascii yes<br />
To se the key type to Hex, enter the following command:<br />
set interface wlan0 wep-key-ascii no<br />
5. Set the WEP keys.<br />
The number of characters required for each WEP key depends on how you set Key Length<br />
and Key Type:<br />
- If Key Length is 40 bits and the Key Type is “ASCII”, then each WEP key must be 5<br />
characters long.<br />
- If Key Length is 40 bits and Key Type is “Hex”, then each WEP key must be 10<br />
characters long.<br />
- If Key Length is 104 bits and Key Type is “ASCII”, then each WEP Key must be 13<br />
characters long.<br />
- If Key Length is 104 bits and Key Type is “Hex”, then each WEP Key must be 26<br />
characters long.<br />
- If Key Length is 128 bits and Key Type is “ASCII”, then each WEP Key must be 16<br />
characters long.<br />
- If Key Length is 128 bits and Key Type is “Hex”, then each WEP Key must be 32<br />
characters long.<br />
Although the CLI will allow you to enter WEP keys of any number of characters, you<br />
must use the correct number of characters for each key to ensure a valid security<br />
configuration.<br />
<strong>Access</strong> <strong>Point</strong> CLI Commands 141
D-Link <strong>Unified</strong> <strong>Access</strong> <strong>Point</strong> Administrator’s <strong>Guide</strong><br />
In the following example, the key length is 40-bits, and the key type is ASCII:<br />
DLINK-<strong>AP</strong># set interface wlan0 wep-key-1 abcde<br />
DLINK-<strong>AP</strong># set interface wlan0 wep-key-2 fghi<br />
DLINK-<strong>AP</strong># set interface wlan0 wep-key-3 klmno<br />
DLINK-<strong>AP</strong># set interface wlan0 wep-key-4 pqrst<br />
6. Select the type of authentication to use.<br />
For open system authentication:<br />
DLINK-<strong>AP</strong># set bss wlan0bssvap0 open-system-authentication on<br />
For shared key authentication:<br />
DLINK-<strong>AP</strong># set bss wlan0bssvap0 shared-key-authentication on<br />
To use both authentication types, use both of the preceding commands. To turn either of<br />
the authentication types off, replace the keyword on with off.<br />
7. View the security settings.<br />
Use the “get” command to view the updated security configuration and see the results of<br />
our new settings.<br />
DLINK-<strong>AP</strong># get interface wlan0 security<br />
The following command gets details about how the internal network is configured,<br />
including security details.<br />
DLINK-<strong>AP</strong># get bss wlan0bssvap0 detail<br />
The following command gets details about the interface and shows the WEP Key settings,<br />
specifically.<br />
DLINK-<strong>AP</strong># get interface wlan0 detail<br />
Set Security to IEEE 802.1X<br />
To configure IEEE 802.1X as the security mode, you need to issue multiple commands. This<br />
section describes the commands and procedures to configure IEEE 802.1X.<br />
NOTE: This example shows how to configure 802.1X on V<strong>AP</strong> 0 on radio 1 (wlan0).<br />
For V<strong>AP</strong>s 1-7 interface commands, use wlanxvapy, where x is the radio, and<br />
y is the V<strong>AP</strong> ID. For example, to configure security on V<strong>AP</strong> 3 on radio 2, use<br />
wlan1vap3 instead of wlan0 in all of the following commands.<br />
1. Set the security mode<br />
DLINK-<strong>AP</strong># set interface wlan0 security dot1x<br />
2. Set the Authentication Server.<br />
If you do not want to use the global RADIUS server for this V<strong>AP</strong>, you must disable the<br />
global RADIUS server and specify an IP address and RADIUS key for the V<strong>AP</strong>, as shown<br />
in the following commands:<br />
DLINK-<strong>AP</strong># set bss wlan0bssvap0 radius-ip 10.23.6.13<br />
DLINK-<strong>AP</strong># set bss wlan0bssvap0 radius-key thisISmyKey<br />
You can enable RADIUS Accounting if you want to track and measure the resources a<br />
particular user has consumed such system time, amount of data transmitted and received,<br />
142 © 2001-2008 D-Link Corporation. All Rights Reserved.
B CLI for <strong>AP</strong> Configuration<br />
and so on. To enable RADIUS accounting on the V<strong>AP</strong>, enter the following command:<br />
set bss wlan0bssvap0 radius-accounting on<br />
3. View the security settings.<br />
Use the “get” command to view the updated security configuration and see the results of<br />
the new settings.<br />
DLINK-<strong>AP</strong># get interface wlan0 security<br />
The following command gets details about how the internal network is configured,<br />
including security details.<br />
DLINK-<strong>AP</strong># get bss wlan0bssvap0 detail<br />
The following command gets details about the interface and shows the WEP Key settings,<br />
specifically.<br />
DLINK-<strong>AP</strong># get interface wlan0 detail<br />
Set Security to WPA/WPA2 Personal (PSK)<br />
To configure WPA/WPA2 Personal as the security mode, you need to issue multiple<br />
commands. This section describes the commands and procedures to configure WPA/WPA2<br />
Personal.<br />
NOTE: This example shows how to configure WPA/WPA2 Personal on V<strong>AP</strong> 0 on<br />
radio 1 (wlan0). For V<strong>AP</strong>s 1-7, use wlanxvapy, where x is the radio, and y is<br />
the V<strong>AP</strong> ID. For example, to configure security on V<strong>AP</strong> 3 on radio 2, use<br />
wlan1vap3 instead of wlan0 in all of the following commands.<br />
1. Set the Security Mode<br />
DLINK-<strong>AP</strong># set interface wlan0 security wpa-personal<br />
2. Set the WPA versions based on what types of client stations you want to support.<br />
- WPA—If all client stations on the network support the original WPA but none support<br />
the newer WPA2, then use WPA.<br />
set bss wlan0bssvap0 wpa-allowed on<br />
set bss wlan0bssvap0 wpa2-allowed off<br />
- WPA2—If all client stations on the network support WPA2, we suggest using WPA2<br />
which provides the best security per the IEEE 802.11i standard.<br />
set bss wlan0bssvap0 wpa-allowed off<br />
set bss wlan0bssvap0 wpa2-allowed on<br />
- WPA and WPA2—If you have a mix of clients, some of which support WPA2 and<br />
others which support only the original WPA, select both. This lets both WPA and<br />
WPA2 client stations associate and authenticate, but uses the more robust WPA2 for<br />
clients who support it. This WPA configuration allows more interoperability, at the<br />
expense of some security.<br />
set bss wlan0bssvap0 wpa-allowed on<br />
set bss wlan0bssvap0 wpa2-allowed on<br />
3. Set the Cipher Suite you want to use.<br />
- TKIP Only: Temporal Key Integrity Protocol (TKIP).<br />
<strong>Access</strong> <strong>Point</strong> CLI Commands 143
D-Link <strong>Unified</strong> <strong>Access</strong> <strong>Point</strong> Administrator’s <strong>Guide</strong><br />
set bss wlan0bssvap0 wpa-cipher-tkip on<br />
set bss wlan0bssvap0 wpa-cipher-ccmp off<br />
- CCMP (AES) Only—Counter mode/CBC-MAC Protocol (CCMP) is an encryption<br />
method for IEEE 802.11i that uses the Advanced Encryption Algorithm (AES).<br />
set bss wlan0bssvap0 wpa-cipher-tkip off<br />
set bss wlan0bssvap0 wpa-cipher-ccmp on<br />
- TKIP and CCMP (AES)—When you enable both authentication algorithms, both<br />
TKIP and AES clients can associate with the access point. WPA clients must have<br />
either a valid TKIP key or a valid CCMP (AES) key to be able to associate with the<br />
<strong>AP</strong>.<br />
set bss wlan0bssvap0 wpa-cipher-tkip on<br />
set bss wlan0bssvap0 wpa-cipher-ccmp on<br />
4. Set the Pre-shared key.<br />
The Pre-shared Key is the shared secret key for WPA-PSK. Enter a string of at least 8<br />
characters to a maximum of 63 characters. Following are two examples; the first sets the<br />
key to “SeCret !“, the second sets the key to “KeepSecret”.<br />
DLINK-<strong>AP</strong># set interface wlan0 wpa-personal-key "SeCret !"<br />
or<br />
DLINK-<strong>AP</strong># set interface wlan0 wpa-personal-key KeepSecret<br />
Shared secret keys can include spaces and special characters if the key is placed inside<br />
quotation marks as in the first example above. If the key is a string of characters with no<br />
spaces or special characters in it, the quotation marks are not necessary as in the second<br />
example above.<br />
5. View the security settings.<br />
Use the “get” command to view the updated security configuration and see the results of<br />
the new settings.<br />
DLINK-<strong>AP</strong># get interface wlan0 security<br />
The following command gets details about how the internal network is configured,<br />
including security details.<br />
DLINK-<strong>AP</strong># get bss wlan0bssvap0 detail<br />
The following command gets details about the interface and shows the WEP Key settings,<br />
specifically.<br />
DLINK-<strong>AP</strong># get interface wlan0 detail<br />
Set Security to WPA/WPA2 Enterprise (RADIUS)<br />
To configure WPA/WPA2 Enterprise as the security mode, you need to issue multiple<br />
commands. This section describes the commands and procedures to configure WPA/WPA2<br />
Enterprise.<br />
NOTE: This example shows how to configure WPA/WPA2 Personal on V<strong>AP</strong> 0 on<br />
radio 1 (wlan0). For V<strong>AP</strong>s 1-7, use wlanxvapy, where x is the radio, and y is<br />
the V<strong>AP</strong> ID. For example, to configure security on V<strong>AP</strong> 3 on radio 2, use<br />
wlan1vap3 instead of wlan0 in all of the following commands.<br />
144 © 2001-2008 D-Link Corporation. All Rights Reserved.
1. Set the Security Mode<br />
DLINK-<strong>AP</strong># set interface wlan0 security wpa-enterprise<br />
B CLI for <strong>AP</strong> Configuration<br />
2. Set the WPA versions based on what types of client stations you want to support.<br />
- WPA—If all client stations on the network support the original WPA but none support<br />
the newer WPA2, then use WPA.<br />
set bss wlan0bssvap0 wpa-allowed on<br />
set bss wlan0bssvap0 wpa2-allowed off<br />
- WPA2—If all client stations on the network support WPA2, we suggest using WPA2<br />
which provides the best security per the IEEE 802.11i standard.<br />
set bss wlan0bssvap0 wpa-allowed off<br />
set bss wlan0bssvap0 wpa2-allowed on<br />
- WPA and WPA2—If you have a mix of clients, some of which support WPA2 and<br />
others which support only the original WPA, select both. This lets both WPA and<br />
WPA2 client stations associate and authenticate, but uses the more robust WPA2 for<br />
clients who support it. This WPA configuration allows more interoperability, at the<br />
expense of some security.<br />
set bss wlan0bssvap0 wpa-allowed on<br />
set bss wlan0bssvap0 wpa2-allowed on<br />
3. Enable Pre-Authentication<br />
If you set WPA versions to “WPA2” or “Both”, you can enable pre-authentication for<br />
WPA2 clients.<br />
Enable pre-authentication if you want WPA2 wireless clients to send pre-authentication<br />
packet. The pre-authentication information will be relayed from the access point the client<br />
is currently using to the target access point. Enabling this feature can help speed up<br />
authentication for roaming clients who connect to multiple access points.<br />
To enable pre-authentication for WPA2 clients, enter the following command:<br />
set bss wlan0bssvap0 rsn-preauthentication on<br />
To disable pre-authentication for WPA2 clients, enter the following command:<br />
set bss wlan0bssvap0 rsn-preauthentication on<br />
The pre-authentication option does not apply if you set the WPA Version to support “WPA”<br />
clients because the original WPA does not support this pre-authentication<br />
4. Set the Cipher Suite you want to use.<br />
- TKIP Only: Temporal Key Integrity Protocol (TKIP).<br />
set bss wlan0bssvap0 wpa-cipher-tkip on<br />
set bss wlan0bssvap0 wpa-cipher-ccmp off<br />
- CCMP (AES) Only—Counter mode/CBC-MAC Protocol (CCMP) is an encryption<br />
method for IEEE 802.11i that uses the Advanced Encryption Algorithm (AES).<br />
set bss wlan0bssvap0 wpa-cipher-tkip off<br />
set bss wlan0bssvap0 wpa-cipher-ccmp on<br />
- TKIP and CCMP (AES)—When you enable both authentication algorithms, both<br />
TKIP and AES clients can associate with the access point. WPA clients must have<br />
<strong>Access</strong> <strong>Point</strong> CLI Commands 145
D-Link <strong>Unified</strong> <strong>Access</strong> <strong>Point</strong> Administrator’s <strong>Guide</strong><br />
either a valid TKIP key or a valid CCMP (AES) key to be able to associate with the<br />
<strong>AP</strong>.<br />
set bss wlan0bssvap0 wpa-cipher-tkip on<br />
set bss wlan0bssvap0 wpa-cipher-ccmp on<br />
5. Set the Authentication Server.<br />
If you do not want to use the global RADIUS server for this V<strong>AP</strong>, you must disable the<br />
global RADIUS server and specify an IP address and RADIUS key for the V<strong>AP</strong>, as shown<br />
in the following commands:<br />
DLINK-<strong>AP</strong># set bss wlan0bssvap0 radius-ip 10.23.6.13<br />
DLINK-<strong>AP</strong># set bss wlan0bssvap0 radius-key thisISmyKey<br />
You can enable RADIUS Accounting if you want to track and measure the resources a<br />
particular user has consumed such system time, amount of data transmitted and received,<br />
and so on. To enable RADIUS accounting on the V<strong>AP</strong>, enter the following command:<br />
set bss wlan0bssvap0 radius-accounting on<br />
6. View the security settings.<br />
Use the “get” command to view the updated security configuration and see the results of<br />
the new settings.<br />
DLINK-<strong>AP</strong># get interface wlan0 security<br />
The following command gets details about how the internal network is configured,<br />
including security details.<br />
DLINK-<strong>AP</strong># get bss wlan0bssvap0 detail<br />
The following command gets details about the interface and shows the WEP Key settings,<br />
specifically.<br />
DLINK-<strong>AP</strong># get interface wlan0 detail<br />
Managed <strong>Access</strong> <strong>Point</strong><br />
You can use a D-Link <strong>Unified</strong> Switch to manage one or more access points on your network.<br />
To allow a <strong>Unified</strong> Switch to manage the <strong>AP</strong> the switch and <strong>AP</strong> must discover each other. The<br />
commands in Table 40 show how to change the <strong>AP</strong> mode from Standalone to Managed and<br />
how to configure the IP address of a D-Link <strong>Unified</strong> Switch so that the <strong>AP</strong> can discover it. You<br />
can configure a pass phrase on the <strong>AP</strong> and on the switch so that only authenticated <strong>AP</strong>s can<br />
associate with the switch.<br />
Table 40. Managed <strong>Access</strong> <strong>Point</strong> Commands<br />
Action Command<br />
View Managed <strong>AP</strong> settings get managed-ap<br />
Set the <strong>AP</strong> to<br />
Managed mode<br />
set managed-ap mode up<br />
Set the <strong>AP</strong> to<br />
Standalone mode<br />
set managed-ap mode down<br />
146 © 2001-2008 D-Link Corporation. All Rights Reserved.
Table 40. Managed <strong>Access</strong> <strong>Point</strong> Commands<br />
Action Command<br />
set managed-ap pass-phrase <br />
Set the pass phrase for <strong>AP</strong>to-switch<br />
authentication<br />
Configure the IP address of<br />
up to four D-Link <strong>Unified</strong><br />
Switches on your network.<br />
IEEE 802.1X Supplicant Authentication<br />
B CLI for <strong>AP</strong> Configuration<br />
Use the 802.1X Supplicant Authentication settings to configure the access point to<br />
authenticate to a secured wired network.<br />
Quality of Service<br />
Note: The phrase you enter must match the local authentication<br />
password you configure for Valid <strong>AP</strong>s on the D-Link <strong>Unified</strong> Switch<br />
set managed-ap switch-address-1 <br />
set managed-ap switch-address-2 <br />
set managed-ap switch-address-3 <br />
set managed-ap switch-address-4 <br />
Example:<br />
Table 41. IEEE 802.1X Supplicant Commands<br />
set managed-ap switch-address-1 192.168.2.123<br />
Action Command<br />
Enable 802.1X supplicant set dot1x-supplicant status up<br />
Disable 802.1X supplicant set dot1x-supplicant status down<br />
Set the 802.1X user name set dot1x-supplicant user <br />
Set the 802.1X password set dot1x-supplicant password <br />
Quality of Service (QoS) provides you with the ability to specify parameters on multiple<br />
queues for increased throughput and better performance of differentiated wireless traffic like<br />
Voice-over-IP (VoIP), other types of audio, video, and streaming media as well as traditional<br />
IP data over the access point.<br />
<strong>AP</strong> Enhanced Distributed Channel <strong>Access</strong> (EDCA) Parameters affect traffic flowing from the<br />
access point to the client station (<strong>AP</strong>-to-station). To get and set QoS settings on the access<br />
point (<strong>AP</strong>), use “tx-queue” class name in the command.<br />
Station Enhanced Distributed Channel <strong>Access</strong> (EDCA) Parameters affect traffic flowing from<br />
the client station to the access point (station-to-<strong>AP</strong>). Keep in mind that station-to-<strong>AP</strong><br />
parameters apply only when WMM is enabled. To get and set QoS settings on the client<br />
station, use the “wme-queue” class name in the command.<br />
<strong>Access</strong> <strong>Point</strong> CLI Commands 147
D-Link <strong>Unified</strong> <strong>Access</strong> <strong>Point</strong> Administrator’s <strong>Guide</strong><br />
Table 42 shows QOS commands. For valid values, see Table 43. For other<br />
variable values, see<br />
Table 42. QoS Commands<br />
Action Command<br />
Enable/Disable Wi-Fi<br />
Multimedia<br />
Get QoS Settings on the<br />
<strong>AP</strong> (<strong>AP</strong> EDCA<br />
parameters)<br />
Get QoS Settings on the<br />
Client Station (Station<br />
EDCA parameters)<br />
Set Arbitration Interframe<br />
Spaces (AIFS) on the <strong>AP</strong><br />
Set Arbitration Interframe<br />
Spaces (AIFS) on a client<br />
station<br />
Setting Minimum and<br />
Maximum Contention<br />
Windows (cwmin,<br />
cwmax) on the <strong>AP</strong><br />
Setting Minimum and<br />
Maximum Contention<br />
Windows (cwmin,<br />
cwmax) on a client station<br />
148 © 2001-2008 D-Link Corporation. All Rights Reserved.<br />
set radio wlan0 wme off<br />
set radio wlan0 wme on<br />
get tx-queue<br />
get wme-queue<br />
set tx-queue wlan0 with queue to aifs<br />
<br />
Example:<br />
set tx-queue wlan0 with queue data0 to aifs 13<br />
set wme-queue wlan0 with queue to aifs<br />
<br />
Example:<br />
set wme-queue wlan0 with queue vo to aifs 14<br />
On the <strong>AP</strong>:<br />
set tx-queue wlan0 with queue to cwmin<br />
cwmax <br />
Example:<br />
set tx-queue wlan0 with queue data1 cwmin 15 cwmax 31<br />
set wme-queue wlan0 with queue to cwmin<br />
cwmax <br />
Example:<br />
set wme-queue wlan0 with queue vi cwmin 7 cwmax 15<br />
Valid values for the “cwmin” are 1, 3, 7, 15, 31, 63, 127, 255, 511, or 1024. The value for “cwmin”<br />
must be lower than the value for “cwmax”.<br />
Valid values for the “cwmax” are 1, 3, 7, 15, 31, 63, 127, 255, 511, or 1024. The value for “cwmax”<br />
must be higher than the value for “cwmin”.<br />
Set the Maximum Burst<br />
Length (burst) on the <strong>AP</strong><br />
Set Transmission<br />
Opportunity Limit (txoplimit)<br />
for WMM client<br />
stations<br />
set tx-queue wlan0 with queue to burst<br />
<br />
Example:<br />
set tx-queue wlan0 with queue data2 to burst 0.5<br />
set wme-queue wlan0 with queue to txoplimit<br />
<br />
Example:<br />
set wme-queue wlan0 with queue vo to txop-limit 49
Time<br />
B CLI for <strong>AP</strong> Configuration<br />
The same types of queues are defined for different kinds of data transmitted from <strong>AP</strong>-tostation<br />
and station-to-<strong>AP</strong> but they are referenced by differently depending on whether you are<br />
configuring <strong>AP</strong> or station parameters.<br />
Table 43. Valid Queue Name Values<br />
Data <strong>AP</strong> Station<br />
Voice - High priority queue, minimum delay. Timesensitive<br />
data such as VoIP and streaming media are<br />
automatically sent to this queue.<br />
data0 vo<br />
Video - High priority queue, minimum delay. Timesensitive<br />
video data is automatically sent to this queue.<br />
data1 vi<br />
Best Effort - Medium priority queue, medium<br />
throughput and delay. Most traditional IP data is sent to<br />
this queue.<br />
data2 be<br />
Background - Lowest priority queue, high throughput.<br />
Bulk data that requires maximum throughput and is not<br />
time-sensitive is sent to this queue (FTP data, for<br />
example).<br />
data3 bk<br />
Table 44 shows the commands you use to view the system uptime and to enable and manage<br />
the Network Time Protocol (NTP) server on the access point.<br />
Table 44. Time Related Commands<br />
Action Command<br />
View the system<br />
uptime<br />
uptime<br />
View NTP server<br />
settings<br />
get ntp detail<br />
Enable the NTP<br />
Server<br />
set ntp status up<br />
Disable the NTP<br />
server<br />
set ntp status down<br />
Set the NTP server set ntp-server server [ | ]<br />
hostname or IP Example:<br />
address<br />
set ntp-server server time.foo.com<br />
or<br />
set ntp-server server 192.168.34.201<br />
<strong>Access</strong> <strong>Point</strong> CLI Commands 149
D-Link <strong>Unified</strong> <strong>Access</strong> <strong>Point</strong> Administrator’s <strong>Guide</strong><br />
System Management<br />
Table 45 shows the commands you use to manage the configuration file and firmware on the<br />
<strong>AP</strong>.<br />
Table 45. System Management<br />
Action Command<br />
Restore the factory default<br />
settings<br />
factory-reset<br />
Save the configuration to a config download <br />
backup file<br />
Example:<br />
config download tftp://1.2.3.4/defaultcfg.xml<br />
Restore the configuration config upload <br />
from a previously saved file Example:<br />
config upload tftp://1.2.3.4/defaultcfg.xml<br />
Reboot the system reboot<br />
Upgrade the firmware firmware-upgrade <br />
(requires a reboot)<br />
Example:<br />
CLI Classes and Properties Reference<br />
Configuration information for the <strong>Unified</strong> <strong>Access</strong> <strong>Point</strong> is represented as a set of classes and<br />
objects. The following is a general introduction to the CLI classes and properties.<br />
Different kinds of information uses different classes. For example, information about a<br />
network interface is represented by the “interface” class, while information about an NTP<br />
client is represented by the “ntp” class.<br />
Depending on the type of class, there can be multiple instances of a class. For example, there is<br />
one instance of the “interface” class for each network interface the <strong>AP</strong> has (Ethernet, radio,<br />
and so on), while there is just a singleton instance of the “ntp” class, since an <strong>AP</strong> needs only a<br />
single NTP client. Some classes require their instances to have names to differentiate between<br />
them; these are called named classes. For example, one interface might have a name of eth0 to<br />
indicate that it is an Ethernet interface, while another interface could have a name of wlan0 to<br />
indicate it is a wireless LAN (WLAN) interface. Instances of singleton classes do not have<br />
names, since they only have a single instance. Classes that can have multiple instances but do<br />
not have a name are called anonymous classes. Together, singleton and anonymous classes are<br />
called unnamed classes. Some classes require their instances to have names, but the multiple<br />
instances can have the same name to indicate that they are part of the same group. These are<br />
called group classes.<br />
Table 46. CLI Class Instances<br />
150 © 2001-2008 D-Link Corporation. All Rights Reserved.<br />
firmware-upgrade tftp://1.2.3.4/upgrade.tar<br />
firmware-upgrade file://1.2.3.4/tmp/upgrade.tar<br />
has name? \ # of instances? one multiple<br />
no singleton anonymous
Table 46. CLI Class Instances<br />
has name? \ # of instances? one multiple<br />
yes - unique n/a unique named<br />
yes - non-unique n/a group named<br />
B CLI for <strong>AP</strong> Configuration<br />
Each class defines a set of properties that describe the actual information associated with a<br />
class. Each instance of a class has a value for each property that contains the information. For<br />
example, the interface class has properties such as “ip” and “mask.” For one instance, the ip<br />
property might have a value of 10.90.90.91 while the mask property has a value of 255.0.0.0;<br />
another instance might have an ip property with a value of 10.0.0.1 and mask property with a<br />
value of 255.0.0.0. To view the IP address and mask for a specific interface, you must identify<br />
the instance in the command.<br />
The following table is a comprehensive list of all classes and their properties. Some of the<br />
commands allow you to view or configure settings that are not available from the Web<br />
interface. Use get or set to build commands based on the class and property. If the class is a<br />
named class, you must include the name. For example, interface is a named class.<br />
CLI Classes and Properties Reference 151
D-Link <strong>Unified</strong> <strong>Access</strong> <strong>Point</strong> Administrator’s <strong>Guide</strong><br />
152 © 2001-2008 D-Link Corporation. All Rights Reserved.
Glossary<br />
0-9 A B C D E F G H I J K L M N O<br />
P Q R S T U V W X Y Z<br />
0-9<br />
802<br />
IEEE 802 (IEEE Std. 802-2001) is a family of<br />
standards for peer-to-peer communication over a<br />
LAN. These technologies use a shared-medium, with<br />
information broadcast for all stations to receive. The<br />
basic communications capabilities provided are<br />
packet-based. The basic unit of transmission is a<br />
sequence of data octets (8-bits), which can be of any<br />
length within a range that is dependent on the type of<br />
LAN.<br />
Included in the 802 family of IEEE standards are<br />
definitions of bridging, management, and security<br />
protocols.<br />
802.1X<br />
IEEE 802.1X (IEEE Std. 802.1X-2001) is a standard<br />
for passing E<strong>AP</strong> packets over an 802.11 wireless<br />
network using a protocol called E<strong>AP</strong> Encapsulation<br />
Over LANs (E<strong>AP</strong>OL). It establishes a framework that<br />
supports multiple authentication methods.<br />
IEEE 802.1X authenticates users not machines.<br />
802.2<br />
IEEE 802.2 (IEEE Std. 802.2.1998) defines the LLC<br />
layer for the 802 family of standards.<br />
802.3<br />
IEEE 802.3 (IEEE Std. 802.3-2002) defines the<br />
MAC layer for networks that use CSMA/CA.<br />
Ethernet is an example of such a network.<br />
802.11<br />
IEEE 802.11 (IEEE Std. 802.11-1999) is a medium<br />
access control (MAC) and physical layer (PHY)<br />
specification for wireless connectivity for fixed,<br />
Glossary<br />
portable, and moving stations within a local area. It<br />
uses direct sequence spread spectrum (DSSS) in the<br />
2.4 GHz ISM band and supports raw data rates of 1<br />
and 2 Mbps. It was formally adopted in 1997 but has<br />
been mostly superseded by 802.11b.<br />
IEEE 802.11 is also used generically to refer to the<br />
family of IEEE standards for wireless local area<br />
networks.<br />
802.11a<br />
IEEE 802.11a (IEEE Std. 802.11a-1999) is a PHY<br />
standard that specifies operating in the 5 GHz U-NII<br />
band using orthogonal frequency division<br />
multiplexing (OFDM). It supports data rates ranging<br />
from 6 to 54 Mbps.<br />
802.11a Turbo<br />
IEEE 802.11a Turbo is a proprietary variant of the<br />
802.11a standard from Atheros Communications. It<br />
supports accelerated data rates ranging from 6 to<br />
108Mbps. Atheros Turbo 5 GHz is IEEE 802.11a<br />
Turbo mode. Atheros Turbo 2.4 GHz is IEEE<br />
802.11g Turbo mode.<br />
802.11b<br />
IEEE 802.11b (IEEE Std. 802.11b-1999) is an<br />
enhancement of the initial 802.11 PHY to include 5.5<br />
Mbps and 11 Mbps data rates. It uses direct sequence<br />
spread spectrum (DSSS) or frequency hopping<br />
spread spectrum (FHSS) in the 2.4 GHz ISM band as<br />
well as complementary code keying (CCK) to<br />
provide the higher data rates. It supports data rates<br />
ranging from 1 to 11 Mbps.<br />
802.11d<br />
IEEE 802.11d defines standard rules for the<br />
operation of IEEE 802.11 wireless LANs in any<br />
country without reconfiguration. PHY requirements<br />
such as provides frequency hopping tables,<br />
acceptable channels, and power levels for each<br />
country are provided. Enabling support for IEEE<br />
802.11d on the access point causes the <strong>AP</strong> to<br />
broadcast which country it is operating in as a part of<br />
its beacons. Client stations then use this information.<br />
This is particularly important for <strong>AP</strong> operation in the<br />
5GHz IEEE 802.11a bands because use of these<br />
153
D-Link <strong>Unified</strong> <strong>Access</strong> <strong>Point</strong> Administrator’s <strong>Guide</strong><br />
frequencies varies a great deal from one country to<br />
another.<br />
802.11e<br />
IEEE 802.11e is a developing IEEE standard for<br />
MAC enhancements to support QoS. It provides a<br />
mechanism to prioritize traffic within 802.11. It<br />
defines allowed changes in the Arbitration Interframe<br />
Space, a minimum and maximum Contention<br />
Window size, and the maximum length (in kµsec) of<br />
a burst of data.<br />
IEEE 802.11e is still a draft IEEE standard (most<br />
recent version is D5.0, July 2003). A currently<br />
available subset of 802.11e is the Wireless<br />
Multimedia Enhancements (WMM) standard.<br />
802.11f<br />
IEEE 802.11f (IEEE Std. 802.11f-2003) is a standard<br />
that defines the inter access point protocol (I<strong>AP</strong>P) for<br />
access points (wireless hubs) in an extended service<br />
set (ESS). The standard defines how access points<br />
communicate the associations and re-associations of<br />
their mobile stations.<br />
802.11g<br />
IEEE 802.11g (IEEE Std. 802.11g-2003) is a higher<br />
speed extension (up to 54 Mbps) to the 802.11b<br />
PHY, while operating in the 2.4 GHz band. It uses<br />
orthogonal frequency division multiplexing<br />
(OFDM). It supports data rates ranging from 1 to 54<br />
Mbps.<br />
802.11h<br />
IEEE 802.11h is a standard used is to resolve the<br />
issue of interference which was prevalent in 802.11a.<br />
The two schemes used to minimize interference in<br />
802.11h are Transmit Power Control (TPC) and<br />
Dynamic Frequency Selection (DFS). DFS detects<br />
other <strong>AP</strong>s on the same frequency and redirects these<br />
to another channel. TPC reduces the network<br />
frequency output power of the <strong>AP</strong>, thus reducing the<br />
chance of any interference. This is a required<br />
standard in Europe, Japan, and the U.S.<br />
802.11i<br />
IEEE 802.11i is a comprehensive IEEE standard for<br />
154 © 2001-2008 D-Link Corporation. All Rights Reserved.<br />
security in a wireless local area network (WLAN)<br />
that describes Wi-Fi Protected <strong>Access</strong> 2 (WPA2). It<br />
defines enhancements to the MAC Layer to counter<br />
the some of the weaknesses of WEP. It incorporates<br />
stronger encryption techniques than the original Wi-<br />
Fi Protected <strong>Access</strong> (WPA), such as Advanced<br />
Encryption Standard (AES).<br />
The original WPA, which can be considered a subset<br />
of 802.11i, uses Temporal Key Integrity Protocol<br />
(TKIP) for encryption. WPA2 is backwardscompatible<br />
with products that support the original<br />
WPA<br />
IEEE 802.11i / WPA2 was finalized and ratified in<br />
June of 2004.<br />
802.11j<br />
IEEE 802.11j standardizes chipsets that can use both<br />
the 4.9 and 5 GHz radio bands according to rules<br />
specified by the Japanese government to open both<br />
bands to indoor, outdoor and mobile wireless LAN<br />
applications. The regulations require companies to<br />
adjust the width of those channels. IEEE 802.11j<br />
allows wireless devices to reach some previously<br />
unavailable channels by taking advantage of new<br />
frequencies and operating modes. This is an attempt<br />
to mitigate the crowding on the airwaves, and has<br />
tangential relationships to IEEE 802.11h.<br />
802.11k<br />
IEEE 802.11k is a developing IEEE standard for<br />
wireless networks (WLANs) that helps auto-manage<br />
network Channel selection, client Roaming, and<br />
<strong>Access</strong> <strong>Point</strong> (<strong>AP</strong>) utilization. 802.11k capable<br />
networks will automatically load balance network<br />
traffic across <strong>AP</strong>s to improve network performance<br />
and prevent under or over-utilization of any one <strong>AP</strong>.<br />
802.11k will eventually complement the 802.11e<br />
quality of service (QoS) standard by ensuring QoS<br />
for multimedia over a wireless link.<br />
802.1p<br />
802.1p is an extension of the IEEE 802 standard and<br />
is responsible for QoS provision. The primary<br />
purpose of 802.1p is to prioritize network traffic at<br />
the data link/ MAC layer. 802.1p offers the ability to<br />
filter multicast traffic to ensure it doesn’t increase
over layer 2 switched networks. It uses tag frames for<br />
the prioritization scheme.<br />
To be compliant with this standard, layer 2 switches<br />
must be capable of grouping incoming LAN packets<br />
into separate traffic classes.<br />
802.1Q<br />
IEEE 802.1Q is the IEEE standard for Virtual Local<br />
Area Networks (VLANs) specific to wireless<br />
technologies. (See http://www.ieee802.org/1/pages/<br />
802.1Q.html.)<br />
The standard addresses the problem of how to break<br />
large networks into smaller parts to prevent broadcast<br />
and multicast data traffic from consuming more<br />
bandwidth than is necessary. 802.11Q also provides<br />
for better security between segments of internal<br />
networks. The 802.1Q specification provides a<br />
standard method for inserting VLAN membership<br />
information into Ethernet frames.<br />
A<br />
<strong>Access</strong> <strong>Point</strong><br />
An access point is the communication hub for the<br />
devices on a WLAN, providing a connection or<br />
bridge between wireless and wired network devices.<br />
It supports a Wireless Networking Framework called<br />
Infrastructure Mode.<br />
When one access point is connected to a wired<br />
network and supports a set of wireless stations, it is<br />
referred to as a basic service set (BSS). An extended<br />
service set (ESS) is created by combining two or<br />
more BSSs.<br />
Ad hoc Mode<br />
Ad hoc mode is a Wireless Networking Framework in<br />
which stations communicate directly with each other.<br />
It is useful for quickly establishing a network in<br />
situations where formal infrastructure is not required.<br />
Ad hoc mode is also referred to as peer-to-peer mode<br />
or an independent basic service set (IBSS).<br />
AES<br />
Glossary<br />
The Advanced Encryption Standard (AES) is a<br />
symmetric 128-bit block data encryption technique<br />
developed to replace DES encryption. AES works at<br />
multiple network layers simultaneously.<br />
Further information is available on the NIST Web<br />
site.<br />
B<br />
Basic Rate Set<br />
The basic rate set defines the transmission rates that<br />
are mandatory for any station wanting to join this<br />
wireless network. All stations must be able to receive<br />
data at the rates listed in this set.<br />
Beacon<br />
Beacon frames provide the “heartbeat” of a WLAN,<br />
announcing the existence of the network, and<br />
enabling stations to establish and maintain<br />
communications in an orderly fashion. It carries the<br />
following information (some of which is optional):<br />
The Timestamp is used by stations to update their<br />
local clock, enabling synchronization among all<br />
associated stations.<br />
The Beacon interval defines the amount of time<br />
between transmitting beacon frames. Before<br />
entering power save mode, a station needs the<br />
beacon interval to know when to wake up to<br />
receive the beacon.<br />
The Capability Information lists requirements of<br />
stations that want to join the WLAN. For<br />
example, it indicates that all stations must use<br />
WEP.<br />
The Service Set Identifier (SSID).<br />
The Basic Rate Set is a bitmap that lists the rates<br />
that the WLAN supports.<br />
The optional Parameter Sets indicates features of<br />
the specific signaling methods in use (such as<br />
frequency hopping spread spectrum, direct<br />
155
D-Link <strong>Unified</strong> <strong>Access</strong> <strong>Point</strong> Administrator’s <strong>Guide</strong><br />
sequence spread spectrum, etc.).<br />
The optional Traffic Indication Map (TIM)<br />
identifies stations, using power saving mode, that<br />
have data frames queued for them.<br />
Bridge<br />
A connection between two local area networks<br />
(LANs) using the same protocol, such as Ethernet or<br />
IEEE 802.1X.<br />
Broadcast<br />
A Broadcast sends the same message at the same<br />
time to everyone. In wireless networks, broadcast<br />
usually refers to an interaction in which the access<br />
point sends data traffic in the form of IEEE 802.1X<br />
Frames to all client stations on the network.<br />
Some wireless security modes distinguish between<br />
how unicast, multicast, and broadcast frames are<br />
encrypted or whether they are encrypted.<br />
See also Unicast and Multicast.<br />
Broadcast Address<br />
See IP Address.<br />
BSS<br />
A basic service set (BSS) is an Infrastructure Mode<br />
Wireless Networking Framework with a single<br />
access point. Also see extended service set (ESS) and<br />
independent basic service set (IBSS).<br />
BSSID<br />
In Infrastructure Mode, the Basic Service Set<br />
Identifier (BSSID) is the 48-bit MAC address of the<br />
wireless interface of the <strong>Access</strong> <strong>Point</strong>.<br />
C<br />
CCMP<br />
Counter mode/CBC-MAC Protocol (CCMP) is an<br />
encryption method for 802.11i that uses AES. It<br />
employs a CCM mode of operation, combining the<br />
Cipher Block Chaining Counter mode (CBC-CTR)<br />
and the Cipher Block Chaining Message<br />
156 © 2001-2008 D-Link Corporation. All Rights Reserved.<br />
Authentication Code (CBC-MAC) for encryption<br />
and message integrity.<br />
AES-CCMP requires a hardware coprocessor to<br />
operate.<br />
CGI<br />
The Common Gateway Interface (CGI) is a standard<br />
for running external programs from an HTTP server.<br />
It specifies how to pass arguments to the executing<br />
program as part of the HTTP request. It may also<br />
define a set of environment variables.<br />
A CGI program is a common way for an HTTP<br />
server to interact dynamically with users. For<br />
example, an HTML page containing a form can use a<br />
CGI program to process the form data after it is<br />
submitted.<br />
Channel<br />
The Channel defines the portion of the radio<br />
spectrum the radio uses for transmitting and<br />
receiving. Each 802.11 standard offers a number of<br />
channels, dependent on how the spectrum is licensed<br />
by national and transnational authorities such as the<br />
Federal Communications Commission (FCC), the<br />
European Telecommunications Standards Institute<br />
(ETSI), the Korean Communications Commission, or<br />
the Telecom Engineering Center (TELEC).<br />
CSMA/CA<br />
Carrier Sense Multiple <strong>Access</strong> with Collision<br />
Avoidance (CSMA/CA) is a low-level network<br />
arbitration/contention protocol. A station listens to<br />
the media and attempts to transmit a packet when the<br />
channel is quiet. When it detects that the channel is<br />
idle, the station transmits the packet. If it detects that<br />
the channel is busy, the station waits a random<br />
amount of time and then attempts to access the media<br />
again.<br />
CSMA/CA is the basis of the IEEE 802.11e<br />
Distributed Control Function (DCF). See also RTS<br />
and CTS.<br />
The CSMA/CA protocol used by 802.11 networks is<br />
a variation on CSMA/CD (used by Ethernet<br />
networks). In CSMA/CD the emphasis is on collision
detection whereas with CSMA/CA the emphasis is<br />
on collision avoidance.<br />
CTS<br />
A clear to send (CTS) message is a signal sent by an<br />
IEEE 802.11 client station in response to an request<br />
to send (RTS) message. The CTS message indicates<br />
that the channel is clear for the sender of the RTS<br />
message to begin data transfer. The other stations<br />
will wait to keep the air waves clear. This message is<br />
a part of the IEEE 802.11 CSMA/CA protocol. (See<br />
also RTS.)<br />
D<br />
DCF<br />
The Distribution Control Function is a component of<br />
the IEEE 802.11e Quality of Service (QoS)<br />
technology standard. The DCF coordinates channel<br />
access among multiple stations on a wireless network<br />
by controlling wait times for channel access. Wait<br />
times are determined by a random backoff timer<br />
which is configurable by defining minimum and<br />
maximum contention windows. See also EDCF.<br />
DHCP<br />
The Dynamic Host Configuration Protocol (DHCP)<br />
is a protocol specifying how a central server can<br />
dynamically provide network configuration<br />
information to clients. A DHCP server “offers” a<br />
“lease” (for a pre-configured period of time—see<br />
Lease Time) to the client system. The information<br />
supplied includes the client's IP addresses and<br />
netmask plus the address of its DNS servers and<br />
Gateway.<br />
DNS<br />
The Domain Name Service (DNS) is a generalpurpose<br />
query service used for translating fullyqualified<br />
names into Internet addresses. A fullyqualified<br />
name consists of the hostname of a system<br />
plus its domain name. For example, www is the host<br />
name of a Web server and www.dlink.com is the<br />
fully-qualified name of that server. DNS translates<br />
the domain name www.dlink.com to some IP<br />
address, for example 66.93.138.219.<br />
Glossary<br />
A domain name identifies one or more IP addresses.<br />
Conversely, an IP address may map to more than one<br />
domain name.<br />
A domain name has a suffix that indicates which top<br />
level domain (TLD) it belongs to. Every country has<br />
its own top-level domain, for example .de for<br />
Germany, .fr for France, .jp for Japan, .tw for<br />
Taiwan, .uk for the United Kingdom, .us for the<br />
U.S.A., and so on. There are also .com for<br />
commercial bodies, .edu for educational institutions,<br />
.net for network operators, and .org for other<br />
organizations as well as .gov for the U. S.<br />
government and .mil for its armed services.<br />
DOM<br />
The Document Object Model (DOM) is an interface<br />
that allows programs and scripts to dynamically<br />
access and update the content, structure, and style of<br />
documents. The DOM allows you to model the<br />
objects in an HTML or XML document (text, links,<br />
images, tables), defining the attributes of each object<br />
and how they can be manipulated.<br />
Further details about the DOM can be found at the<br />
W3C.<br />
DTIM<br />
The Delivery Traffic Information Map (DTIM)<br />
message is an element included in some Beacon<br />
frames. It indicates which stations, currently sleeping<br />
in low-power mode, have data buffered on the<br />
<strong>Access</strong> <strong>Point</strong> awaiting pick-up. Part of the DTIM<br />
message indicates how frequently stations must<br />
check for buffered data.<br />
Dynamic IP Address<br />
See IP Address.<br />
E<br />
E<strong>AP</strong><br />
The Extensible Authentication Protocol (E<strong>AP</strong>) is an<br />
authentication protocol that supports multiple<br />
methods, such as token cards, Kerberos, one-time<br />
passwords, certificates, public key authentication,<br />
and smart cards.<br />
157
D-Link <strong>Unified</strong> <strong>Access</strong> <strong>Point</strong> Administrator’s <strong>Guide</strong><br />
Variations on E<strong>AP</strong> include E<strong>AP</strong> Cisco Wireless<br />
(LE<strong>AP</strong>), Protected E<strong>AP</strong> (PE<strong>AP</strong>), E<strong>AP</strong>-TLS, and<br />
E<strong>AP</strong> Tunnelled TLS (E<strong>AP</strong>-TTLS).<br />
EDCF<br />
Enhanced Distribution Control Function is an<br />
extension of DCF. EDCF, a component of the IEEE<br />
Wireless Multimedia (WMM) standard, provides<br />
prioritized access to the wireless medium.<br />
ESS<br />
An extended service set (ESS) is an Infrastructure<br />
Mode Wireless Networking Framework with<br />
multiple access points, forming a single subnetwork<br />
that can support more clients than a basic service set<br />
(BSS). Each access point supports a number of<br />
wireless stations, providing broader wireless<br />
coverage for a large space, for example, an office.<br />
Ethernet<br />
Ethernet is a local-area network (LAN) architecture<br />
supporting data transfer rates of 10 Mbps to 1 Gbps.<br />
The Ethernet specification is the basis for the IEEE<br />
802.3 standard, which specifies the physical and<br />
lower software layers. It uses the CSMA/CA access<br />
method to handle simultaneous demands.<br />
Ethernet supports data rates of 10 Mbps, Fast<br />
Ethernet supports 100 Mbps, and Gigabit Ethernet<br />
supports 1 Gbps. Its cables are classified as<br />
“XbaseY”, where X is the data rate in Mbps and Y is<br />
the category of cabling. The original cable was<br />
10base5 (Thicknet or “Yellow Cable”). Some others<br />
are 10base2 (Cheapernet), 10baseT (Twisted Pair),<br />
and 100baseT (Fast Ethernet). The latter two are<br />
commonly supplied using CAT5 cabling with RJ-45<br />
connectors. There is also 1000baseT (Gigabit<br />
Ethernet).<br />
ERP<br />
The Extended Rate Protocol refers to the protocol<br />
used by IEEE 802.11g stations (over 20 Mbps<br />
transmission rates at 2.4GHz) when paired with<br />
Orthogonal Frequency Division Multiplexing<br />
(OFDM). Built into ERP and the IEEE 802.11g<br />
standard is a scheme for effective interoperability of<br />
IEEE 802.11g stations with IEEE 802.11b nodes on<br />
158 © 2001-2008 D-Link Corporation. All Rights Reserved.<br />
the same channel.<br />
Legacy IEEE 802.11b devices cannot detect the<br />
ERP-OFDM signals used by IEEE 802.11g stations,<br />
and this can result in collisions between data frames<br />
from IEEE 802.11b and IEEE 802.11g stations.<br />
If there is a mix of 802.11b and 802.11g nodes on the<br />
same channel, the IEEE 802.11g stations detect this<br />
via an ERP flag on the access point and enable<br />
request to send (RTS) and clear to send (CTS)<br />
protection before sending data.<br />
See also CSMA/CA protocol.<br />
F<br />
Frame<br />
A Frame consists of a discrete portion of data along<br />
with some descriptive meta-information packaged<br />
for transmission on a wireless network. Each frame<br />
includes a source and destination MAC address, a<br />
control field with protocol version, frame type, frame<br />
sequence number, frame body (with the actual<br />
information to be transmitted) and frame check<br />
sequence for error detection. A Frame is similar in<br />
concept to a Packet, the difference being that a<br />
packet operates on the Network layer (layer 3 in the<br />
OSI model) whereas a frame operates on the Data-<br />
Link layer (layer 2 in the OSI model).<br />
G<br />
Gateway<br />
A gateway is a network node that serves as an<br />
entrance to another network. A gateway also often<br />
provides a proxy server and a firewall. It is<br />
associated with both a router, which use headers and<br />
forwarding tables to determine where packets are<br />
sent, and a switch or bridge, which provides the<br />
actual path for the packet in and out of the gateway.<br />
Before a host on a LAN can access the Internet, it<br />
needs to know the address of its default gateway.
H<br />
HTTP<br />
The Hypertext Transfer Protocol (HTTP) defines<br />
how messages are formatted and transmitted on the<br />
World Wide Web. An HTTP message consists of a<br />
URL and a command (GET, HEAD, POST, etc.), a<br />
request followed by a response.<br />
HTTPS<br />
The Secure Hypertext Transfer Protocol (HTTPS) is<br />
the secure version of HTTP, the communication<br />
protocol of the World Wide Web. HTTPS is built into<br />
the browser. If you are using HTTPS you will notice<br />
a closed lock icon at the bottom corner of your<br />
browser page.<br />
All data sent via HTTPS is encrypted, thus ensuring<br />
secure transactions take place.<br />
I<br />
I<strong>AP</strong>P<br />
The Inter <strong>Access</strong> <strong>Point</strong> Protocol (I<strong>AP</strong>P) is an IEEE<br />
standard (802.11f) that defines communication<br />
between the access points in a “distribution system”.<br />
This includes the exchange of information about<br />
mobile stations and the maintenance of bridge<br />
forwarding tables, plus securing the communications<br />
between access points.<br />
IBSS<br />
An independent basic service set (IBSS) is an Ad hoc<br />
Mode Wireless Networking Framework in which<br />
stations communicate directly with each other.<br />
IEEE<br />
The Institute of Electrical and Electronic Engineers<br />
(IEEE) is an international standards body that<br />
develops and establishes industry standards for a<br />
broad range of technologies, including the 802<br />
family of networking and wireless standards. (See<br />
802, 802.1X, 802.11, 802.11a, 802.11b, 802.11e,<br />
802.11f, 802.11g, and 802.11i.)<br />
For more information about IEEE task groups and<br />
standards, see http://standards.ieee.org/.<br />
Infrastructure Mode<br />
Glossary<br />
Infrastructure Mode is a Wireless Networking<br />
Framework in which wireless stations communicate<br />
with each other by first going through an <strong>Access</strong><br />
<strong>Point</strong>. In this mode, the wireless stations can<br />
communicate with each other or can communicate<br />
with hosts on a wired network. The access point is<br />
connected to a wired network and supports a set of<br />
wireless stations.<br />
An infrastructure mode framework can be provided<br />
by a single access point (BSS) or a number of access<br />
points (ESS).<br />
Intrusion Detection<br />
The Intrusion Detection System (IDS) inspects all<br />
inbound network activity and reports suspicious<br />
patterns that may indicate a network or system attack<br />
from someone attempting to break into the system. It<br />
reports access attempts using unsupported or known<br />
insecure protocols.<br />
IP<br />
The Internet Protocol (IP) specifies the format of<br />
packets, also called datagrams, and the addressing<br />
scheme. IP is a connectionless, best-effort packet<br />
switching protocol. It provides packet routing,<br />
fragmentation and re-assembly. It is combined with<br />
higher-level protocols, such as TCP or UDP, to<br />
establish the virtual connection between destination<br />
and source.<br />
The current version of IP is IPv4. A new version,<br />
called IPv6 or IPng, is under development. IPv6 is an<br />
attempt to solve the shortage of IP addresses.<br />
IP Address<br />
Systems are defined by their IP address, a four-byte<br />
(octet) number uniquely defining each host on the<br />
Internet. It is usually shown in form 10.90.90.91.<br />
This is called dotted-decimal notation.<br />
An IP address is partitioned into two portions: the<br />
network prefix and a host number on that network. A<br />
Subnet Mask is used to define the portions. There are<br />
159
D-Link <strong>Unified</strong> <strong>Access</strong> <strong>Point</strong> Administrator’s <strong>Guide</strong><br />
two special host numbers:<br />
The Network Address consists of a host number<br />
that is all zeroes (for example, 10.90.2.0).<br />
The Broadcast Address consists of a host number<br />
that is all ones (for example, 10.90.2.255).<br />
There are a finite number of IP addresses that can<br />
exist. Therefore, a local area network typically uses<br />
one of the IANA-designated address ranges for use in<br />
private networks. These address ranges are:<br />
10.0.0.0 to 10.255.255.255<br />
172.16.0.0 to 172.31.255.255<br />
192.168.0.0 to 192.168.255.255<br />
A Dynamic IP Address is an IP address that is<br />
automatically assigned to a host by a DHCP server or<br />
similar mechanism. It is called dynamic because you<br />
may be assigned a different IP address each time you<br />
establish a connection.<br />
A Static IP Address is an IP address that is hardwired<br />
for a specific host. A static address is usually<br />
required for any host that is running a server, for<br />
example, a Web server.<br />
IPSec<br />
IP Security (IPSec) is a set of protocols to support the<br />
secure exchange of packets at the IP layer. It uses<br />
shared public keys. There are two encryption modes:<br />
Transport and Tunnel.<br />
Transport mode encrypts only the data portion<br />
(payload) of each packet, but leaves the headers<br />
untouched.<br />
The more secure Tunnel mode encrypts both the<br />
header and the payload.<br />
ISP<br />
An Internet Service Provider (ISP) is a company that<br />
provides access to the Internet to individuals and<br />
companies. It may provide related services such as<br />
virtual hosting, network consulting, Web design, etc.<br />
160 © 2001-2008 D-Link Corporation. All Rights Reserved.<br />
J<br />
Jitter<br />
Jitter is the difference between the latency (or delay)<br />
in packet transmission from one node to another<br />
across a network. If packets are not transmitted at a<br />
consistent rate (including Latency), QoS for some<br />
types of data can be affected. For example,<br />
inconsistent transmission rates can cause distortion in<br />
VoIP and streaming media. QoS is designed to<br />
reduce jitter along with other factors that can impact<br />
network performance.<br />
L<br />
Latency<br />
Latency, also known as delay, is the amount of time it<br />
takes to transmit a Packet from sender to receiver.<br />
Latency can occur when data is transmitted from the<br />
access point to a client and vice versa. It can also<br />
occur when data is transmitted from access point to<br />
the Internet and vice versa. Latency is caused by<br />
fixed network factors such as the time it takes to<br />
encode and decode a packet, and also by variable<br />
network factors such as a busy or overloaded<br />
network. QoS features are designed to minimize<br />
latency for high priority network traffic.<br />
LAN<br />
A Local Area Network (LAN) is a communications<br />
network covering a limited area, for example, the<br />
computers in your home that you want to network<br />
together or a couple of floors in a building. A LAN<br />
connects multiple computers and other network<br />
devices such as storage and printers. Ethernet is the<br />
most common technology implementing a LAN.<br />
Wireless Ethernet (802.11) is another very popular<br />
LAN technology (also see WLAN).<br />
LD<strong>AP</strong><br />
The Lightweight Directory <strong>Access</strong> Protocol (LD<strong>AP</strong>)<br />
is a protocol for accessing on-line directory services.<br />
It is used to provide an authentication mechanism. It<br />
is based on the X.500 standard, but less complex.
Lease Time<br />
The Lease Time specifies the period of time the<br />
DHCP Server gives its clients an IP Address and<br />
other required information. When the lease expires,<br />
the client must request a new lease. If the lease is set<br />
to a short span, you can update your network<br />
information and propagate the information provided<br />
to the clients in a timely manner.<br />
LLC<br />
The Logical Link Control (LLC) layer controls frame<br />
synchronization, flow control, and error checking. It<br />
is a higher level protocol over the PHY layer,<br />
working in conjunction with the MAC layer.<br />
M<br />
MAC<br />
The Media <strong>Access</strong> Control (MAC) layer handles<br />
moving data packets between NICs across a shared<br />
channel. It is a higher level protocol over the PHY<br />
layer. It provides an arbitration mechanism in an<br />
attempt to prevent signals from colliding.<br />
It uses a hardware address, known as the MAC<br />
address, that uniquely identifies each node of a<br />
network. IEEE 802 network devices share a common<br />
48-bit MAC address format, displayed as a string of<br />
twelve (12) hexadecimal digits separated by colons,<br />
for example FE:DC:BA:09:87:65.<br />
Managed Mode<br />
In Managed Mode, the D-Link <strong>Access</strong> <strong>Point</strong> is part<br />
of the D-Link <strong>Unified</strong> Wired/Wireless <strong>Access</strong><br />
System, and you manage it by using the D-Link<br />
<strong>Unified</strong> Switch. If an <strong>AP</strong> is in Managed Mode, the<br />
Administrator Web UI is disabled.<br />
MDI and MDI-X<br />
Medium Dependent Interface (MDI) and MDI<br />
crossover (MDIX) are twisted pair cabling<br />
technologies for Ethernet ports in hardware devices.<br />
Built-in twisted pair cabling and auto-sensing enable<br />
connection between like devices with the use of a<br />
standard Ethernet cable. (For example, if a wireless<br />
access point supports MDI/MDIX, one can<br />
Glossary<br />
successfully connect a PC and that access point with<br />
an Ethernet cable rather than having to use a<br />
crossover cable).<br />
MIB<br />
Management Information Base (MIB) is a virtual<br />
database of objects used for network management.<br />
SSID agents along with other SNMP tools can be<br />
used to monitor any network device defined in the<br />
MIB.<br />
MSCH<strong>AP</strong> V2<br />
Microsoft Challenge Handshake Authentication<br />
Protocol Version 2 (MSCH<strong>AP</strong> V2) provides<br />
authentication for PPP connections between a<br />
Windows-based computer and an <strong>Access</strong> <strong>Point</strong> or<br />
other network access device.<br />
MTU<br />
The Maximum Transmission Unit is the largest<br />
physical packet size, measured in bytes, that a<br />
network can transmit. Any messages larger than the<br />
MTU are fragmented into smaller packets before<br />
being sent.<br />
Multicast<br />
A Multicast sends the same message to a select group<br />
of recipients. Sending an e-mail message to a mailing<br />
list is an example of multicasting. In wireless<br />
networks, multicast usually refers to an interaction in<br />
which the access point sends data traffic in the form<br />
of IEEE 802.1X Frames to a specified set of client<br />
stations (MAC addresses) on the network.<br />
Some wireless security modes distinguish between<br />
how unicast, multicast, and broadcast frames are<br />
encrypted or whether they are encrypted.<br />
See also Unicast and Broadcast.<br />
N<br />
NAT<br />
Network Address Translation is an Internet standard<br />
that masks the internal IP addresses being used in a<br />
LAN. A NAT server running on a gateway maintains<br />
161
D-Link <strong>Unified</strong> <strong>Access</strong> <strong>Point</strong> Administrator’s <strong>Guide</strong><br />
a translation table that maps all internal IP addresses<br />
in outbound requests to its own address and converts<br />
all inbound requests to the correct internal host.<br />
NAT serves three main purposes: it provides security<br />
by obscurity by hiding internal IP addresses, enables<br />
the use of a wide range of internal IP addresses<br />
without fear of conflict with the addresses used by<br />
other organizations, and it allows the use of a single<br />
Internet connection.<br />
Network Address<br />
See IP Address.<br />
NIC<br />
A Network Interface Card is an adapter or expansion<br />
board inserted into a computer to provide a physical<br />
connection to a network. Most NICs are designed for<br />
a particular type of network, protocol, and media, for<br />
example, Ethernet or wireless.<br />
NTP<br />
The Network Time Protocol assures accurate<br />
synchronization of the system clocks in a network of<br />
computers. NTP servers transmit Coordinated<br />
Universal Time (UTC, also known as Greenwich<br />
Mean Time) to their client systems. An NTP client<br />
sends periodic time requests to servers, using the<br />
returned time stamp to adjust its clock.<br />
O<br />
OSI<br />
The Open Systems Interconnection (OSI) reference<br />
model is a framework for network design. The OSI<br />
model consists of seven layers:<br />
Layer 1, the Physical layer, identifies the<br />
physical medium used for communication<br />
between nodes. In the case of wireless networks,<br />
the physical medium is air, and radio frequency<br />
(RF) waves are a components of the physical<br />
layer.<br />
Layer 2, the Data-Link layer, defines how data<br />
for transmission will be structured and formatted,<br />
along with low-level protocols for<br />
162 © 2001-2008 D-Link Corporation. All Rights Reserved.<br />
P<br />
communication and addressing. For example,<br />
protocols such as<br />
CSMA/CA and components like MAC<br />
addresses, and Frames are all defined and dealt<br />
with as a part of the Data-Link layer.<br />
Layer 3, the Network layer, defines the how to<br />
determine the best path for information<br />
traversing the network. Packets and logical IP<br />
Addresses operate on the network layer.<br />
Layer 4, the Transport layer, defines connection<br />
oriented protocols such as TCP and UDP.<br />
Layer 5, the Session layer, defines protocols for<br />
initiating, maintaining, and ending<br />
communication and transactions across the<br />
network. Some common examples of protocols<br />
that operate on this layer are network file system<br />
(NFS) and structured query language (SQL).<br />
Also part of this layer are communication flows<br />
like single mode (device sends information<br />
bulk), half-duplex mode (devices take turns<br />
transmitting information in bulk), and fullduplex<br />
mode (interactive, where devices transmit<br />
and receive simultaneously).<br />
Layer 6, the Presentation layer, defines how<br />
information is presented to the application. It<br />
includes meta-information about how to encrypt/<br />
decrypt and compress/decompress the data.<br />
JPEG and TIFF file formats are examples of<br />
protocols at this layer.<br />
Layer 7, the Application layer, includes protocols<br />
like hypertext transfer protocol (HTTP), simple<br />
mail transfer protocol (SMTP), and file transfer<br />
protocol (FTP).<br />
Packet<br />
Data and media are transmitted among nodes on a<br />
network in the form of packets. Data and multimedia<br />
content is divided up and packaged into packets. A<br />
packet includes a small chunk of the content to be<br />
sent along with its destination address and sender<br />
address. Packets are pushed out onto the network and
inspected by each node. The node to which it is<br />
addressed is the ultimate recipient.<br />
Packet Loss<br />
Packet Loss describes the percentage of packets<br />
transmitted over the network that did not reach their<br />
intended destination. A 0 percent package loss<br />
indicates no packets were lost in transmission. QoS<br />
features are designed to minimize packet loss.<br />
PHY<br />
The Physical Layer (PHY) is the lowest layer in the<br />
network layer model (see OSI). The Physical Layer<br />
conveys the bit stream - electrical impulse, light or<br />
radio signal -- through the network at the electrical<br />
and mechanical level. It provides the hardware<br />
means of sending and receiving data on a medium,<br />
including defining cables, NICs, and physical<br />
aspects.<br />
Ethernet and the 802.11 family are protocols with<br />
physical layer components.<br />
PID<br />
The Process Identifier (PID) is an integer used by<br />
Linux to uniquely identify a process. A PID is<br />
returned by the fork() system call. It can be used by<br />
wait() or kill() to perform actions on the given<br />
process.<br />
Port Forwarding<br />
Port Forwarding creates a ‘tunnel’ through a<br />
firewall, allowing users on the Internet access to a<br />
service running on one of the computers on your<br />
LAN, for example, a Web server, an FTP or SSH<br />
server, or other services. From the outside user’s<br />
point of view, it looks like the service is running on<br />
the firewall.<br />
PPP<br />
The <strong>Point</strong>-to-<strong>Point</strong> Protocol is a standard for<br />
transmitting network layer datagrams (IP packets)<br />
over serial point-to-point links. PPP is designed to<br />
operate both over asynchronous connections and bitoriented<br />
synchronous systems.<br />
Glossary<br />
PPPoE<br />
<strong>Point</strong>-to-<strong>Point</strong> Protocol over Ethernet (PPPoE) is a<br />
specification for connecting the users on a LAN to<br />
the Internet through a common broadband medium,<br />
such as a single DSL or cable modem line.<br />
PPtP<br />
<strong>Point</strong>-to-<strong>Point</strong> Tunneling Protocol (PPtP) is a<br />
technology for creating a Virtual Private Network<br />
(VPN) within the <strong>Point</strong>-to-<strong>Point</strong> Protocol (PPP). It is<br />
used to ensure that data transmitted from one VPN<br />
node to another are secure.<br />
Proxy<br />
A proxy is server located between a client application<br />
and a real server. It intercepts requests, attempting to<br />
fulfill them itself. If it cannot, it forwards them to the<br />
real server. Proxy servers have two main purposes:<br />
improve performance by spreading requests over<br />
several machines and filter requests to prevent access<br />
to specific servers or services.<br />
PSK<br />
Pre-Shared Key (PSK), see Shared Key.<br />
Public Key<br />
A public key is used in public key cryptography to<br />
encrypt a message which can only be decrypted with<br />
the recipient's private or secret key. Public key<br />
encryption is also called asymmetric encryption,<br />
because it uses two keys, or Diffie-Hellman<br />
encryption. Also see Shared Key.<br />
Q<br />
QoS<br />
Quality of Service (QoS) defines the performance<br />
properties of a network service, including guaranteed<br />
throughput, transit delay, and priority queues. QoS is<br />
designed to minimize Latency, Jitter, Packet Loss,<br />
and network congestion, and provide a way of<br />
allocating dedicated bandwidth for high priority<br />
network traffic.<br />
The IEEE standard for implementing QoS on<br />
wireless networks is currently in-work by the<br />
163
D-Link <strong>Unified</strong> <strong>Access</strong> <strong>Point</strong> Administrator’s <strong>Guide</strong><br />
802.11e task group. A subset of 802.11e features is<br />
described in the WMM specification.<br />
R<br />
RADIUS<br />
The Remote Authentication Dial-In User Service<br />
(RADIUS) provides an authentication and<br />
accounting system. It is a popular authentication<br />
mechanism for many ISPs.<br />
RC4<br />
A symmetric stream cipher provided by RSA<br />
Security. It is a variable key-size stream cipher with<br />
byte-oriented operations. It allows keys up to 2048<br />
bits in length.<br />
Roaming<br />
In IEEE 802.11 parlance, roaming clients are mobile<br />
client stations or devices on a wireless network<br />
(WLAN) that require use of more than one <strong>Access</strong><br />
<strong>Point</strong> (<strong>AP</strong>) as they move out of and into range of<br />
different base station service areas. IEEE 802.11f<br />
defines a standard by which <strong>AP</strong>s can communicate<br />
information about client associations and<br />
disassociations in support of roaming clients.<br />
Router<br />
A router is a network device which forwards packets<br />
between networks. It is connected to at least two<br />
networks, commonly between two local area<br />
networks (LANs) or between a LAN and a wide-area<br />
network (WAN), for example, the Internet. Routers<br />
are located at gateways—places where two or more<br />
networks connect.<br />
A router uses the content of headers and its tables to<br />
determine the best path for forwarding a packet. It<br />
uses protocols such as the Internet Control Message<br />
Protocol (ICMP), Routing Information Protocol<br />
(RIP), and Internet Router Discovery Protocol<br />
(IRDP) to communicate with other routers to<br />
configure the best route between any two hosts. The<br />
router performs little filtering of data it passes.<br />
164 © 2001-2008 D-Link Corporation. All Rights Reserved.<br />
RSSI<br />
The Received Signal Strength Indication (RSSI) an<br />
802.1X value that calculates voltage relative to the<br />
received signal strength. RSSI is one of several ways<br />
of measuring and indicating radio frequency (RF)<br />
signal strength. Signal strength can also be measured<br />
in mW (milliwatts), dBms (decibel milliwatts), and a<br />
percentage value.<br />
RTP<br />
Real-Time Transport Protocol (RTP) is an Internet<br />
protocol for transmitting real-time data like audio<br />
and video. It does not guarantee delivery but<br />
provides support mechanisms for the sending and<br />
receiving applications to enable streaming data. RTP<br />
typically runs on top of the UDP protocol, but can<br />
support other transport protocols as well.<br />
RTS<br />
A request to send (RTS) message is a signal sent by a<br />
client station to the access point, asking permission<br />
to send a data packet and to prevent other wireless<br />
client stations from grabbing the radio waves. This<br />
message is a part of the IEEE 802.11 CSMA/CA<br />
protocol. (See also RTS Threshold and CTS.)<br />
RTS Threshold<br />
The RTS threshold specifies the packet size of a<br />
request to send (RTS) transmission. This helps<br />
control traffic flow through the access point, and is<br />
especially useful for performance tuning on an access<br />
point with a many clients.<br />
S<br />
Shared Key<br />
A shared key is used in conventional encryption<br />
where one key is used both for encryption and<br />
decryption. It is also called secret-key or symmetrickey<br />
encryption.<br />
Also see Public Key.<br />
SSID<br />
The Service Set Identifier (SSID) is a thirty-two<br />
character alphanumeric key that uniquely identifies a
wireless local area network. It is also referred to as<br />
the Network Name. There are no restrictions on the<br />
characters that may be used in an SSID.<br />
Standalone Mode<br />
In Standalone Mode, the D-Link <strong>AP</strong> acts as an<br />
individual access point in the network, and you<br />
manage it by using the Administrator Web User<br />
Interface (UI) or the CLI.<br />
Static IP Address<br />
See IP Address.<br />
STP<br />
The Spanning Tree Protocol (STP) is an IEEE 802.1<br />
standard protocol (related to network management)<br />
for MAC bridges that manages path redundancy and<br />
prevents undesirable loops in the network created by<br />
multiple active paths between client stations. Loops<br />
occur when there are multiple routes between access<br />
points. STP creates a tree that spans all of the<br />
switches in an extended network, forcing redundant<br />
paths into a standby or blocked state. STP allows<br />
only one active path at a time between any two<br />
network devices (this prevents the loops), but<br />
establishes the redundant links as a backup if the<br />
initial link should fail. If STP costs change, or if one<br />
network segment in the STP becomes unreachable,<br />
the spanning tree algorithm reconfigures the<br />
spanning tree topology and reestablishes the link by<br />
activating the standby path. Without STP in place, it<br />
is possible that both connections may be<br />
simultaneously live, which could result in an endless<br />
loop of traffic on the LAN.<br />
Subnet Mask<br />
A Subnet Mask is a number that defines which part of<br />
an IP address is the network address and which part<br />
is a host address on the network. It is shown in<br />
dotted-decimal notation (for example, a 24-bit mask<br />
is shown as 255.0.0.0) or as a number appended to<br />
the IP address (for example, 10.90.90.91/24).<br />
The subnet mask allows a router to quickly determine<br />
if an IP address is local or needs to be forwarded by<br />
performing a bitwise AND operation on the mask<br />
and the IP address. For example, if an IP address is<br />
Glossary<br />
192.168.2.128 and the netmask is 255.255.255.0,<br />
the resulting Network address is 192.168.2.0.<br />
The bitwise AND operator compares two bits and<br />
assigns 1 to the result only if both bits are 1.<br />
Supported Rate Set<br />
The supported rate set defines the transmission rates<br />
that are available on this wireless network. A station<br />
may be able to receive data at any of the rates listed<br />
in this set. All stations must be able to receive data at<br />
the rates listed in the Basic Rate Set.<br />
SVP<br />
SpectraLink Voice Priority (SVP) is a QoS approach<br />
to Wi-Fi deployments. SVP is an open specification<br />
that is compliant with the IEEE 802.11b standard.<br />
SVP minimizes delay and prioritizes voice packets<br />
over data packets on the Wireless LAN, thus<br />
increasing the probability of better network<br />
performance.<br />
T<br />
TCP<br />
The Transmission Control Protocol (TCP) is built on<br />
top of Internet Protocol (IP). It adds reliable<br />
communication (guarantees delivery of data), flowcontrol,<br />
multiplexing (more than one simultaneous<br />
connection), and connection-oriented transmission<br />
(requires the receiver of a packet to acknowledge<br />
receipt to the sender). It also guarantees that packets<br />
will be delivered in the same order in which they<br />
were sent.<br />
TCP/IP<br />
The Internet and most local area networks are<br />
defined by a group of protocols. The most important<br />
of these is the Transmission Control Protocol over<br />
Internet Protocol (TCP/IP), the de facto standard<br />
protocols. TCP/IP was originally developed by<br />
Defense Advanced Research Projects Agency<br />
(DARPA, also known as ARPA, an agency of the US<br />
Department of Defense).<br />
Although TCP and IP are two specific protocols,<br />
TCP/IP is often used to refer to the entire protocol<br />
165
D-Link <strong>Unified</strong> <strong>Access</strong> <strong>Point</strong> Administrator’s <strong>Guide</strong><br />
suite based upon these, including ICMP, ARP, UDP,<br />
and others, as well as applications that run upon these<br />
protocols, such as telnet, FTP, etc.<br />
TKIP<br />
The Temporal Key Integrity Protocol (TKIP)<br />
provides an extended 48-bit initialization vector, perpacket<br />
key construction and distribution, a Message<br />
Integrity Code (MIC, sometimes called “Michael”),<br />
and a re-keying mechanism. It uses a RC4 stream<br />
cipher to encrypt the frame body and CRC of each<br />
802.11 frame before transmission. It is an important<br />
component of the WPA and 802.11i security<br />
mechanisms.<br />
ToS<br />
TCP/IP packet headers include a 3-to-5 bit Type of<br />
Service (ToS) field set by the application developer<br />
that indicates the appropriate type of service for the<br />
data in the packet. The way the bits are set<br />
determines whether the packet is queued for sending<br />
with minimum delay, maximum throughput, low<br />
cost, or mid-way “best-effort” settings depending<br />
upon the requirements of the data. The ToS field is<br />
used by the D-Link <strong>AP</strong> to provide configuration<br />
control over Quality of Service (QoS) queues for data<br />
transmitted from the <strong>AP</strong> to client stations.<br />
U<br />
UDP<br />
The User Datagram Protocol (UDP) is a transport<br />
layer protocol providing simple but unreliable<br />
datagram services. It adds port address information<br />
and a checksum to an IP packet.<br />
UDP neither guarantees delivery nor does it require a<br />
connection. It is lightweight and efficient. All error<br />
processing and retransmission must be performed by<br />
the application program.<br />
Unicast<br />
A Unicast sends a message to a single, specified<br />
receiver. In wireless networks, unicast usually refers<br />
to an interaction in which the access point sends data<br />
traffic in the form of IEEE 802.1X Frames directly to<br />
a single client station MAC address on the network.<br />
166 © 2001-2008 D-Link Corporation. All Rights Reserved.<br />
Some wireless security modes distinguish between<br />
how unicast, multicast, and broadcast frames are<br />
encrypted or whether they are encrypted.<br />
See also Multicast and Broadcast.<br />
URL<br />
A Uniform Resource Locator (URL) is a standard for<br />
specifying the location of objects on the Internet,<br />
such as a file or a newsgroup. URLs are used<br />
extensively in HTML documents to specify the target<br />
of a hyperlink which is often another HTML<br />
document (possibly stored on another computer).<br />
The first part of the URL indicates what protocol to<br />
use and the second part specifies the IP address or the<br />
domain name where that resource is located.<br />
For example, ftp://ftp.dlink.com/downloads/<br />
myfile.tar.gz specifies a file that should be fetched<br />
using the FTP protocol; http://www.dlink.com/<br />
index.html specifies a Web page that should be<br />
fetched using the HTTP protocol.<br />
V<br />
VLAN<br />
A virtual LAN (VLAN) is a software-based, logical<br />
grouping of devices on a network that allow them to<br />
act as if they are connected to a single physical<br />
network, even though they may not be. The nodes in<br />
a VLAN share resources and bandwidth, and are<br />
isolated on that network. The <strong>Unified</strong> <strong>Access</strong> <strong>Point</strong><br />
supports the configuration of a wireless VLAN. This<br />
technology is leveraged on the access point for the<br />
“virtual” guest network feature.<br />
VPN<br />
A Virtual Private Network (VPN) is a network that<br />
uses the Internet to connect its nodes. It uses<br />
encryption and other mechanisms to ensure that only<br />
authorized users can access its nodes and that data<br />
cannot be intercepted.
W<br />
WAN<br />
A Wide Area Network (WAN) is a communications<br />
network that spans a relatively large geographical<br />
area, extending over distances greater than one<br />
kilometer. A WAN is often connected through public<br />
networks, such as the telephone system. It can also be<br />
connected through leased lines or satellites.<br />
The Internet is essentially a very large WAN.<br />
WEP<br />
Wired Equivalent Privacy (WEP) is a data encryption<br />
protocol for 802.11 wireless networks. All wireless<br />
stations and access points on the network are<br />
configured with a static 64-bit (40-bit secret key +<br />
24-bit initialization vector (IV)) or 128-bit (104-bit<br />
secret key + 24-bit IV) Shared Key for data<br />
encryption. It uses a RC4 stream cipher to encrypt<br />
the frame body and CRC of each 802.11 frame before<br />
transmission.<br />
Wi-Fi<br />
A test and certification of interoperability for WLAN<br />
products based on the IEEE 802.11 standard<br />
promoted by the Wi-Fi Alliance, a non-profit trade<br />
organization.<br />
WINS<br />
The Windows Internet Naming Service (WINS) is a<br />
server process for resolving Windows-based<br />
computer names to IP addresses. It provides<br />
information that allows these systems to browse<br />
remote networks using the Network Neighborhood.<br />
Wireless Networking Framework<br />
There are two ways of organizing a wireless network:<br />
Stations communicate directly with one another<br />
in an Ad hoc Mode network, also known as an<br />
independent basic service set (IBSS).<br />
Stations communicate through an <strong>Access</strong> <strong>Point</strong><br />
in an Infrastructure Mode network. A single<br />
access point creates an infrastructure basic<br />
service set (BSS) whereas multiple access points<br />
WLAN<br />
Glossary<br />
are organized in an extended service set (ESS).<br />
Wireless Local Area Network (WLAN) is a LAN that<br />
uses high-frequency radio waves rather than wires to<br />
communicate between its nodes.<br />
WMM<br />
Wireless Multimedia (WMM) is a IEEE technology<br />
standard designed to improve the quality of audio,<br />
video and multimedia applications on a wireless<br />
network. Both access points and wireless clients<br />
(laptops, consumer electronics products) can be<br />
WMM-enabled. WMM features are based on is a<br />
subset of the WLAN IEEE 802.11e draft<br />
specification. Wireless products that are built to the<br />
standard and pass a set of quality tests can carry the<br />
“Wi-Fi certified for WMM” label to ensure<br />
interoperability with other such products. For more<br />
information, see the WMM page on the Wi-Fi<br />
Alliance Web site: http://www.wi-fi.org/<br />
OpenSection/wmm.asp.<br />
WPA<br />
Wi-Fi Protected <strong>Access</strong> (WPA) is a Wi-Fi Alliance<br />
version of the draft IEEE 802.11i standard. It<br />
provides more sophisticated data encryption than<br />
WEP and also provides user authentication. WPA<br />
includes TKIP and 802.1X mechanisms.<br />
WPA2<br />
WiFi Protected <strong>Access</strong> (WPA2) is an enhanced<br />
security standard, described in IEEE 802.11i, that<br />
uses Advanced Encryption Standard (AES) for data<br />
encryption.<br />
The original WPA uses Temporal Key Integrity<br />
Protocol (TKIP) for data encryption. WPA2 is<br />
backwards-compatible with products that support the<br />
original WPA.<br />
WPA2, like the original WPA, supports an Enterprise<br />
and Personal version. The Enterprise version<br />
requires use of IEEE 802.1X security features and<br />
Extensible Authentication Protocol (E<strong>AP</strong>)<br />
authentication with a RADIUS server.<br />
167
D-Link <strong>Unified</strong> <strong>Access</strong> <strong>Point</strong> Administrator’s <strong>Guide</strong><br />
The Personal version does not require IEEE 802.1X<br />
or E<strong>AP</strong>. It uses a Pre-Shared Key (PSK) password to<br />
generate the keys needed for authentication.<br />
WR<strong>AP</strong><br />
Wireless Robust Authentication Protocol (WR<strong>AP</strong>) is<br />
an encryption method for 802.11i that uses AES but<br />
another encryption mode (OCB) for encryption and<br />
integrity.<br />
X<br />
XML<br />
The Extensible Markup Language (XML) is a<br />
specification developed by the W3C. XML is a<br />
simple, flexible text format derived from Standard<br />
Generalized Markup Language (SGML), which is<br />
defined in ISO 8879:1986, designed especially for<br />
electronic publishing.<br />
168 © 2001-2008 D-Link Corporation. All Rights Reserved.