ShoreTel Voice Mail Quick Reference
ShoreTel Voice Mail Quick Reference
ShoreTel Voice Mail Quick Reference

You also want an ePaper? Increase the reach of your titles
YUMPU automatically turns print PDFs into web optimized ePapers that Google loves.
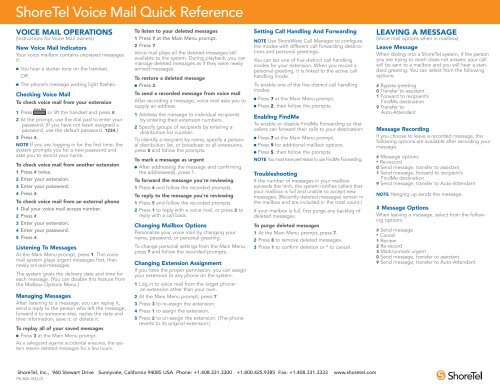
<strong>ShoreTel</strong> <strong>Voice</strong> <strong>Mail</strong> <strong>Quick</strong> <strong>Reference</strong><br />
VOICE MAIL OPERATIONS<br />
(Instructions for <strong>Voice</strong> <strong>Mail</strong> owners)<br />
New <strong>Voice</strong> <strong>Mail</strong> Indicators<br />
Your voice mailbox contains unplayed messages<br />
if:<br />
You hear a stutter tone on the handset.<br />
OR<br />
The phone’s message waiting light flashes.<br />
Checking <strong>Voice</strong> <strong>Mail</strong><br />
To check voice mail from your extension<br />
<strong>Voice</strong> <strong>Mail</strong><br />
1 Press or lift the handset and press #.<br />
2 At the prompt, use the dial pad to enter your<br />
password. (If you have not been assigned a<br />
password, use the default password, 1234.)<br />
3 Press #.<br />
NOTE If you are logging in for the first time, the<br />
system prompts you for a new password and<br />
asks you to record your name.<br />
To check voice mail from another extension<br />
1 Press # twice.<br />
2 Enter your extension.<br />
3 Enter your password.<br />
4 Press #.<br />
To check voice mail from an external phone<br />
1 Dial your voice mail access number.<br />
2 Press #.<br />
3 Enter your extension.<br />
4 Enter your password.<br />
5 Press #.<br />
Listening To Messages<br />
At the Main Menu prompt, press 1. The voice<br />
mail system plays urgent messages first, then<br />
newly arrived messages.<br />
The system gives the delivery date and time for<br />
each message. (You can disable this feature from<br />
the <strong>Mail</strong>box Options Menu.)<br />
Managing Messages<br />
After listening to a message, you can replay it,<br />
send a reply to the person who left the message,<br />
forward it to someone else, replay the date and<br />
time information, save it, or delete it.<br />
To replay all of your saved messages<br />
Press 3 at the Main Menu prompt.<br />
As a safeguard against accidental erasures, the system<br />
retains deleted messages for a few hours.<br />
To listen to your deleted messages<br />
1 Press 7 at the Main Menu prompt.<br />
2 Press 7.<br />
<strong>Voice</strong> mail plays all the deleted messages still<br />
available to the system. During playback, you can<br />
manage deleted messages as if they were newly<br />
arrived messages.<br />
To restore a deleted message<br />
Press 2.<br />
To send a recorded message from voice mail<br />
After recording a message, voice mail asks you to<br />
supply an address.<br />
1 Address the message to individual recipients<br />
by entering their extension numbers.<br />
2 Specify groups of recipients by entering a<br />
distribution list number.<br />
To identify a recipient by name, specify a personal<br />
distribution list, or broadcast to all extensions,<br />
press 0 and follow the prompts.<br />
To mark a message as urgent<br />
After addressing the message and confirming<br />
the addressee(s), press 1.<br />
To forward the message you're reviewing<br />
1 Press 4 and follow the recorded prompts.<br />
To reply to the message you're reviewing<br />
1 Press 5 and follow the recorded prompts.<br />
2 Press 1 to reply with a voice mail, or press 2 to<br />
reply with a call back.<br />
Changing <strong>Mail</strong>box Options<br />
Personalize your voice mail by changing your<br />
name, password, or personal greeting.<br />
To change personal settings from the Main Menu,<br />
press 7 and follow the recorded prompts.<br />
Changing Extension Assignment<br />
If you have the proper permission, you can assign<br />
your extension to any phone on the system.<br />
1 Log in to voice mail from the target phone–<br />
an extension other than your own.<br />
2 At the Main Menu prompt, press 7.<br />
3 Press 3 to re-assign the extension.<br />
4 Press 1 to assign the extension.<br />
5 Press 2 to un-assign the extension. (The phone<br />
reverts to its original extension.)<br />
Setting Call Handling And Forwarding<br />
NOTE Use ShoreWare Call Manager to configure<br />
the modes with different call forwarding destinations<br />
and personal greetings.<br />
You can set one of five distinct call handling<br />
modes for your extension. When you record a<br />
personal greeting, it is linked to the active call<br />
handling mode.<br />
To enable one of the five distinct call handling<br />
modes:<br />
Press 7 at the Main Menu prompt.<br />
Press 2, then follow the prompts.<br />
Enabling FindMe<br />
To enable or disable FindMe Forwarding so that<br />
callers can forward their calls to your destination:<br />
Press 7 at the Main Menu prompt.<br />
Press 9 for additional mailbox options.<br />
Press 5, then follow the prompts.<br />
NOTE You must have permission to use FindMe Forwarding.<br />
Troubleshooting<br />
If the number of messages in your mailbox<br />
exceeds the limit, the system notifies callers that<br />
your mailbox is full and unable to accept new<br />
messages. (Recently deleted messages remain in<br />
the mailbox and are included in the total count.)<br />
If your mailbox is full, first purge any backlog of<br />
deleted messages.<br />
To purge deleted messages<br />
1 At the Main Menu prompt, press 7.<br />
2 Press 8 to remove deleted messages.<br />
3 Press 1 to confirm deletion or * to cancel.<br />
<strong>ShoreTel</strong>, Inc., 960 Stewart Drive Sunnyvale, California 94085 USA Phone: +1.408.331.3300 +1.800.425.9385 Fax: +1.408.331.3333 www.shoretel.com<br />
PN 800-1032-01<br />
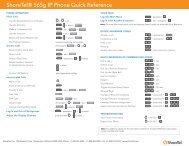
LEAVING A MESSAGE<br />
(<strong>Voice</strong> mail options when in mailbox)<br />
Leave Message<br />
When dialing into a <strong>ShoreTel</strong> system, if the person<br />
you are trying to reach does not answer, your call<br />
will be sent to a mailbox and you will hear a standard<br />
greeting. You can select from the following<br />
options:<br />
# Bypass greeting<br />
0 Transfer to assistant<br />
1 Forward to recipient’s<br />
FindMe destination<br />
9 Transfer to<br />
Auto-Attendant<br />
Message Recording<br />
If you choose to leave a recorded message, the<br />
following options are available after recording your<br />
message:<br />
# Message options<br />
* Re-record<br />
0 Send message, transfer to assistant<br />
1 Send message, forward to recipient’s<br />
FindMe destination<br />
9 Send message, transfer to Auto-Attendant<br />
NOTE Hanging up sends the message.<br />
# Message Options<br />
When leaving a message, select from the following<br />
options:<br />
# Send message<br />
* Cancel<br />
1 Review<br />
2 Re-record<br />
3 Mark/unmark urgent<br />
0 Send message, transfer to assistant<br />
9 Send message, transfer to Auto-Attendant
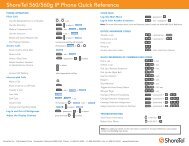
<strong>ShoreTel</strong> <strong>Voice</strong> <strong>Mail</strong> <strong>Quick</strong> <strong>Reference</strong><br />
PRESS<br />
1<br />
2<br />
3<br />
7<br />
8<br />
9<br />
#<br />
<strong>ShoreTel</strong>, Inc., 960 Stewart Drive Sunnyvale, California 94085 USA Phone: +1.408.331.3300 +1.800.425.9385 Fax: +1.408.331.3333 www.shoretel.com<br />
PN 800-1032-01<br />
Main Menu for <strong>Voice</strong> <strong>Mail</strong> Operations<br />
Listen to Messages<br />
Select one of the following options during or at the end of a message:<br />
1 Replay<br />
2 Save<br />
3 Delete<br />
4 Forward<br />
5 Reply<br />
6 Play envelope<br />
7 Move backward<br />
8 Pause<br />
9 Move forward<br />
# Skip<br />
* Cancel<br />
Send a Message # Accept<br />
Record your message at the tone.<br />
When finished, press # and select<br />
from the following options:<br />
# Accept<br />
1 Review<br />
2 Re-record<br />
* Cancel<br />
Listen to Saved Messages<br />
Refer to “Listen to Messages” for<br />
message options while listening to<br />
saved messages.<br />
Change <strong>Mail</strong>box Options<br />
1 Record greeting<br />
2 Set call handling mode<br />
3 Re-assign extension<br />
4 Set password<br />
5 Enable/disable envelope information<br />
6 Record name<br />
7 Listen to deleted messages<br />
8 Remove deleted messages<br />
9 Additional options<br />
* Cancel<br />
Log Off<br />
Return to<br />
Auto-Attendant<br />
Hear <strong>Mail</strong>box<br />
Status<br />
Enter the extension or the system<br />
distribution list to receive the message:<br />
# Conclude addressing<br />
0 Additional addressing options<br />
* Cancel last address<br />
** Cancel<br />
1 Record Greeting<br />
Record your greeting for the currently<br />
active mode at the tone. When finished,<br />
press # and select from the following<br />
options:<br />
# Accept 3 Delete<br />
1 Review * Cancel<br />
2 Re-record<br />
2 Set Call Handling Mode<br />
1 Standard 5 Custom<br />
2 In a meeting 6 No change<br />
3 Out of office * Cancel<br />
4 Extended absence<br />
5 Reply<br />
Select one of the following :<br />
1 Reply with a voice mail<br />
2 Reply with a call back<br />
# Conclude Addressing<br />
# Send<br />
1 Mark/unmark urgent<br />
2 Mark/unmark for return receipt<br />
* Cancel<br />
0 Addressing Options<br />
1 Address by name<br />
2 Address by personal distribution list<br />
3 Broadcast<br />
3 Re-assign Extension<br />
Press either 1 to Assign,<br />
or 2 to Un-assign.<br />
4 Set Password<br />
Enter password twice in<br />
response to the prompts.<br />
* Cancel<br />
5 Enable Envelope Info<br />
Press either 1 to enable,<br />
or 2 to disable<br />
Log In: Internal Log In: External<br />
a) From your own extension, lift the headset,<br />
press #, enter password, and press #<br />
b) From another extension, press # twice,<br />
enter extension, enter password, and press #<br />
6 Record Name<br />
Record your name at the<br />
tone. When finished, press<br />
# and select from the following<br />
options:<br />
# Accept 3 Delete<br />
1 Review * Cancel<br />
2 Re-record<br />
8 Remove Deleted<br />
Messages<br />
1 Confirm * Cancel<br />
1 Address by Name<br />
Call your voice mail access<br />
number, enter extension,<br />
enter password, and press #<br />
Spell the name of the person, last name first.<br />
Press 7 for Q and 9 for Z. * Cancel<br />
Note: System returns to Addressing after name is entered.<br />
2 Address by Personal Distribution List<br />
Enter the two-digit personal distribution list number.<br />
* Cancel<br />
9 Additional Options<br />
1 Enable or disable Outlook<br />
automated call handling<br />
2 Change email delivery options<br />
3 Change Agent state<br />
5 Change Find Me Forwarding state<br />
* Cancel<br />
2 Email Delivery Options<br />
1 Disable email delivery<br />
2 Enable email delivery<br />
3 Enable email delivery with voice<br />
mail attached<br />
4 Mark voice mail heard after<br />
email delivery<br />
3 Agent State<br />
1 Log in and assign extension<br />
2 Log out<br />
3 Log in without assigning extension