

Aprilia Scarabeo 4T servicemanual - Scootergrisen
Aprilia Scarabeo 4T servicemanual - Scootergrisen
Aprilia Scarabeo 4T servicemanual - Scootergrisen

You also want an ePaper? Increase the reach of your titles
YUMPU automatically turns print PDFs into web optimized ePapers that Google loves.
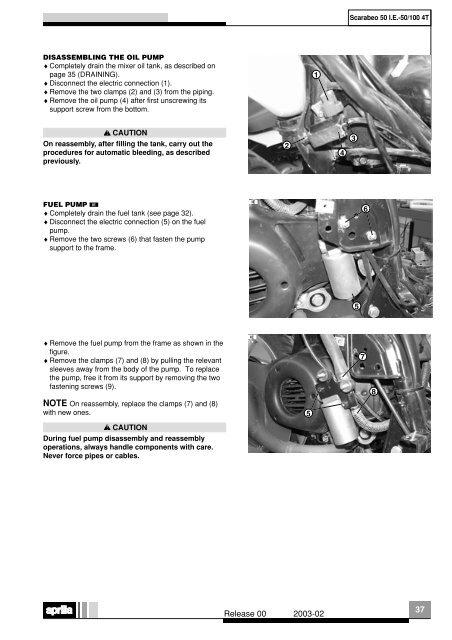
DISASSEMBLING THE OIL PUMP<br />
♦ Completely drain the mixer oil tank, as described on<br />
page 35 (DRAINING).<br />
♦ Disconnect the electric connection (1).<br />
♦ Remove the two clamps (2) and (3) from the piping.<br />
♦ Remove the oil pump (4) after first unscrewing its<br />
support screw from the bottom.<br />
CAUTION<br />
On reassembly, after filling the tank, carry out the<br />
procedures for automatic bleeding, as described<br />
previously.<br />
FUEL PUMP<br />
♦ Completely drain the fuel tank (see page 32).<br />
♦ Disconnect the electric connection (5) on the fuel<br />
pump.<br />
♦ Remove the two screws (6) that fasten the pump<br />
support to the frame.<br />
♦ Remove the fuel pump from the frame as shown in the<br />
figure.<br />
♦ Remove the clamps (7) and (8) by pulling the relevant<br />
sleeves away from the body of the pump. To replace<br />
the pump, free it from its support by removing the two<br />
fastening screws (9).<br />
NOTE On reassembly, replace the clamps (7) and (8)<br />
with new ones.<br />
CAUTION<br />
During fuel pump disassembly and reassembly<br />
operations, always handle components with care.<br />
Never force pipes or cables.<br />
Release 00 2003-02<br />
2<br />
5<br />
1<br />
4<br />
<strong>Scarabeo</strong> 50 I.E.-50/100 <strong>4T</strong><br />
3<br />
5<br />
7<br />
6<br />
8<br />
37


