Exclusive U.S. Distributor - Apollo Design Technology
Exclusive U.S. Distributor - Apollo Design Technology
Exclusive U.S. Distributor - Apollo Design Technology

Create successful ePaper yourself
Turn your PDF publications into a flip-book with our unique Google optimized e-Paper software.
<strong>Exclusive</strong> U.S. <strong>Distributor</strong>
Table Of Contents<br />
Introduction ...................................................................................................... 2<br />
Product Description ........................................................................................ 2<br />
Safety Information and Symbols .................................................................... 2<br />
Security Advice ............................................................................................ 3<br />
Protection from Eye Injury ............................................................................ 3<br />
Protection from Electric Shock ..................................................................... 3<br />
Protection from Fire ...................................................................................... 4<br />
Protection from Injury and Damage .............................................................. 4<br />
Health Advice ................................................................................................... 5<br />
Functional Advice ............................................................................................ 5<br />
Environmental Advice .................................................................................... 5<br />
LED Lifetime Advice ........................................................................................ 5<br />
Unpacking ........................................................................................................ 5<br />
Getting started (IP65 Version only) ................................................................ 6<br />
Making Internal Connections ....................................................................... 6<br />
Indoor/Outdoor Conversion (Diagram) ......................................................... 8<br />
Internal Connections (Diagram) ................................................................... 9<br />
Getting started changing the lens panel (only if required) .........................10<br />
Lens panel change (Diagram) .....................................................................11<br />
Getting started (IP20 & IP65 Version) ............................................................12<br />
Choosing a Location ...................................................................................12<br />
Secure Mounting .........................................................................................12<br />
Making AC Power Connections ...................................................................13<br />
Making DMX Control Connections (Diagram) .............................................14<br />
Operation/User Interface (Diagram) ..............................................................14<br />
Operation Modes ............................................................................................15<br />
“ST” Static Color Mode ..............................................................................15<br />
“C” Color Mode ..........................................................................................15<br />
“SP” Switch / Strobe Mode.........................................................................16<br />
“FP” Fade Patterns Mode ...........................................................................17<br />
“SLA” DMX Slave Mode .............................................................................17<br />
“GDMX” General DMX Mode .....................................................................18<br />
“CBAL” Color Balance Mode .....................................................................19<br />
“EDIT” Edit Settings Mode ................................................................... 20-21<br />
Maintenance ................................................................................................... 21<br />
Technical Data ............................................................................................... 21<br />
Standards ....................................................................................................... 22<br />
Warranty ......................................................................................................... 22<br />
1
<strong>Exclusive</strong> U.S. <strong>Distributor</strong><br />
Introduction<br />
Dear customer,<br />
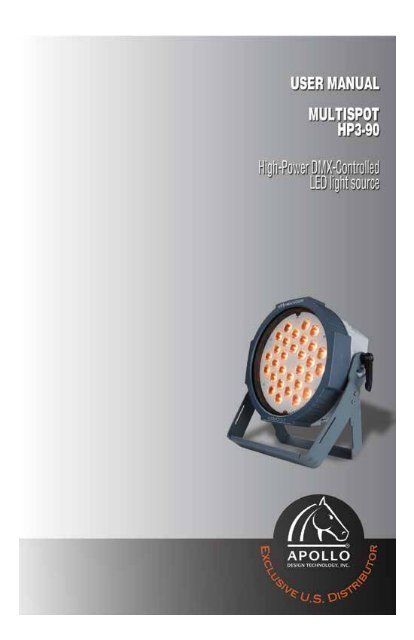
Congratulations on the purchase of the Multispot HP3-90 from <strong>Apollo</strong>. <strong>Apollo</strong> is the US<br />
exclusive distributor for Multiform, a leading global manufacturer of professional lighting<br />
equipment with decades of experience in design, production, and quality assurance.<br />
To meet your requirements, this unit has been designed and built to the highest standards<br />
to assure you have made a sound investment. To take full advantage of all possibilities<br />
and for your own safety and the safety of your environment, please read these operating<br />
instructions carefully before you start using the unit.<br />
Product Description<br />
The Multispot HP3-90 is a high-power DMX-controlled LED light source for both indoor<br />
and outdoor applications, ranging from architectural illumination to stage lighting. This<br />
fixture has been designed for flexibility and reliability, including various connection options<br />
and an advanced cooling system that allow for longer LED lifetime.<br />
Safety Informaton<br />
Read the safety precautions in this chapter before installing,<br />
powering up, operating or servicing this device. Failure to do<br />
so may void the product warranty, and releases the manufacturer<br />
and distributor from all product liability.<br />
Symbols used in this manual<br />
The following symbols are used to identify important safety information on the product<br />
and in this manual:<br />
WARNING! Read manual before installation, operation or servicing.<br />
WARNING! Safety hazard. Risk of injury or death.<br />
WARNING! Hazardous voltage. Risk of severe or fatal electric shock.<br />
WARNING! Shock hazard. Equipment must be properly grounded.<br />
WARNING! Hot surface. Risk of skin burn or skin irritation.<br />
2
WARNING! Fire hazard.<br />
WARNING! LED light emission. Risk of eye injury.<br />
Security Advice Before Use<br />
General advice:<br />
1. Read this manual completely before using the product.<br />
2. Keep this manual in your records for future reference.<br />
3. Follow all instructions printed in this manual, otherwise<br />
warranty may become void.<br />
4. Follow all printed safety advice on the device.<br />
5. Carry this product with care. Dropping or heavy vibration may<br />
damage this product mechanically and/or electrically.<br />
6. The manufacturer and distributor take no responsibility for injury<br />
or damage caused by not following the safety precautions and<br />
instructions printed within this manual and on the device.<br />
Protection From Eye Injury<br />
1. Warning: Depending on the configuration of the device, this device<br />
reaches the limits of IEC/EN62471 Group 2 and may extend into<br />
Group 3.<br />
2. To avoid eye injury, do not look into the beam from a distance<br />
of less than 28’ (8.5m) from the front surface of the fixture without<br />
protective eyewear such as shade-5 welding goggles. At greater<br />
distances, light output is harmless to the naked eye provided that<br />
the eye’s natural aversion response is normal.<br />
3. Do not view the beam directly with optical instruments such as<br />
magnifiers, telescopes, binoculars or similar optical instruments<br />
that may concentrate the light output.<br />
4. Ensure that during setup and DMX programming, no persons are<br />
within 28’ (8.5m) of the device’s front surface to avoid accidental<br />
exposure to the light beam.<br />
Protection From Electric Shock:<br />
1. Only connect this unit to a mains socket outlet with protective earth<br />
connection, ground-fault (earth-fault) and overload protection.<br />
2. When removing the AC power cord from an AC power outlet, grip<br />
the plug. Never pull on the cable only. To disconnect the unit from<br />
AC power, remove the AC power cord from the AC power outlet.<br />
Do not disconnect the unit from AC power using the locking power<br />
connector. The locking power connector does not have a breaking<br />
capacity, i.e. the locking power connector should not be connected<br />
or disconnected under load or when live.<br />
3
<strong>Exclusive</strong> U.S. <strong>Distributor</strong><br />
3. Disconnect the unit from AC power before cleaning.<br />
Use a smooth and dry cloth only for cleaning.<br />
4. Do not submerge unit in liquid.<br />
5. If unit is not converted to comply with IP65 rating, do not expose<br />
this unit to any dripping or splashing liquids, and do not place<br />
objects filled with liquids, such as vases, on the unit. Do not operate<br />
this unit near open water or in high humidity.<br />
6. Choose the position of the AC cord according to the lowest risk of<br />
damage by foot traffic or rolling equipment.<br />
7. Do not open the unit for service. There are no user-serviceable<br />
parts inside. Warranty will be void in any case of unauthorized<br />
service by the user or other unauthorized persons.<br />
Protection From Fire:<br />
1. Take care to not place the unit near sources of heat (e.g. powerful<br />
amplifiers, fog machines).<br />
2. Allow at least 6” (15cm) between this unit and other devices or walls<br />
to allow for proper cooling.<br />
3. Take care to allow sufficient air convection in the unit’s environment<br />
to avoid overheating. Make sure air convection slots are not<br />
blocked. Do not operate this unit in environmental temperatures<br />
exceeding 105°F (40°C).<br />
4. Be sure unit is kept at least 30” (76cm) away from any flammable<br />
materials.<br />
5. Do not attach gel or diffusion directly to the LEDs or the front of<br />
the unit.<br />
6. To avoid overloading power, check the total maximum power of your<br />
AC wall outlet if you are using powerCON jumpers to daisy chain<br />
units together.<br />
7. When using powerCON jumpers to daisy chain units using the<br />
locking power outlet, do not connect more than 12 units together.<br />
Protection From Injury and Damage:<br />
1. Never use any accessories or modifications not authorized by the<br />
manufacturer of this unit.<br />
2. Choose a location for operation where the unit is protected from<br />
vibration and where a fixed mounting position is provided. In case of<br />
overhead-mounting, follow applicable rigging rules and regulations<br />
for rigging safety, including the use of an approved safety cable.<br />
3. The surface of the device may get hot during operation. Do not<br />
touch heat sink areas of the device during operation. Allow 30<br />
minutes of cool-down time after powering off before touching.<br />
4. If fluids have spilled into the unit when configured to IP20,<br />
immediately disconnect power to the unit and return the unit to<br />
<strong>Apollo</strong> for service.<br />
5. This unit has no user serviceable parts. If service is needed, return<br />
unit to <strong>Apollo</strong> for service.<br />
4
Health advice<br />
This unit produces and absorbs electromagnetic radiation. The strength of radiation<br />
and the sensitivity for disturbing interference conforms to CE and FCC requirements.<br />
A corresponding sign is printed on the backside of the unit. Any change or modification<br />
may affect the behavior of the unit concerning electromagnetic radiation, and may cause<br />
non-conformity to CE requirements. The manufacturer takes no responsibility in this case.<br />
Functional advice<br />
This unit is immune to the presence of electromagnetic disturbances – both conducted<br />
and radiated - up to a certain level. Under peak conditions, the unit is classified to show<br />
a “class C” performance criteria and may encounter temporary degradation or loss of<br />
function. In such a case, disconnect the unit AC power from the unit and reconnect it<br />
again to recover.<br />
Environmental advice<br />
This unit is built to conform to the ROHS standards and the WEEE<br />
directive 2002/96/EC of the European Parliament and of the Council<br />
of the European Union. Under these regulations, the product shall<br />
not be discarded into regular garbage at the end of its life, but shall be returned<br />
to authorized recycling stations. It is highly recommended that North American users<br />
follow environmentally safe disposal/recycling practices.<br />
LED Lifetime advice<br />
LED lifetime is determined by the gradually declining brightness of an LED over time<br />
where, the point of 50% brightness reduction marks the defined end of its lifetime. The<br />
driving factor of this effect is the heat that the chip inside the LED is exposed to. While an<br />
LED may reach 100,000 hours under ideal circumstances,<br />
the real-world lifetime may only be 30,000 to 50,000 hours. This may be less if the LED is<br />
exposed to excessive heat, which can be caused by continuously running all LEDs inside<br />
this device at full power and/or operating the unit in high environmental temperatures. If<br />
improving the lifetime of the LED is a concern, keeping the operating temperature lower<br />
is advised. This may include forced air external cooling and/or the reduction of overall<br />
intensity.<br />
Unpacking<br />
Please check that the box contains the following items:<br />
Main parts: 1 Multispot HP3-90 LED main unit<br />
1 operation manual<br />
Accessory parts: 2 M6 security lugs<br />
1 power cable (IP20 unit only)<br />
If any part is missing, please contact your dealer immediately for replacement.<br />
5
<strong>Exclusive</strong> U.S. <strong>Distributor</strong><br />
Getting started: IP65 version only<br />
Making Internal Connections<br />
Your Multiform HP fixture is available in several IP-65 versions. Please take note of the<br />
following precautions and instructions to ensure that it is done properly to avoid personal<br />
injury and/or damage to the unit.<br />
Reliability risk: Disassembling and reassembling the unit in an<br />
inappropriate manner may defeat the IP65 rating and may void the<br />
warranty if water intrudes into the unit. It is essential to follow the<br />
instructions to maintain the IP65 rating of the fixture and its product<br />
warranty.<br />
Safety risk: Be sure that the unit is disconnected from AC power<br />
before proceeding. This procedure requires opening the unit and<br />
exposure to AC electrical parts. If the internal wiring is improperly done<br />
or not completed, the safety of the whole installation where this unit is<br />
used may be endangered and a risk of fire is possible. Therefore, this<br />
procedure should only be carried out by qualified technicians with<br />
relevant experience in safe work methods for electrical equipment<br />
service and maintenance. DO NOT attempt if you do not have the<br />
applicable experience. <strong>Apollo</strong> does not assume any liability for life and<br />
assets if such unqualified attempt is made.<br />
Before opening the unit, please make sure that:<br />
• This procedure is only being carried out by a qualified technician with relevant<br />
experience in safe work methods for electrical equipment service and maintenance.<br />
• The unit is disconnected from any AC source.<br />
• The unit is completely dry, and has cooled down for at least 30 minutes after last<br />
operation. The unit should be at room temperature.<br />
• The location chosen to perform the work does not have more than 40% relative<br />
humidity and the temperature during the work does not exceed 105°F (40°C).<br />
This is important to avoid condensation inside of the unit if operated at lower<br />
temperatures.<br />
• The proper tools are used to disassemble and reassemble the unit to avoid any<br />
damage to the screws. A 4mm hex driver, a #2 Phillips screwdriver, and a 3/32” flat<br />
head screwdriver are required.<br />
• Tools with built-in torque measurement or other torque measurement devices are<br />
recommended to ensure that screws are fastened with the right amount of torque<br />
during reassembly.<br />
Permanent installations:<br />
For permanent installations, fixtures are shipped with IP-65 cable plates with water<br />
resistant cable glands. Cables are not included. Please take note of the following.<br />
6
To ensure the IP65 rating of the fixture is maintained, the proper<br />
size cable must be used.<br />
• Rubber AC cable of at least 3x16AWG, with outer diameter of not less than .236”<br />
(6mm), and not more than .354” (9mm).<br />
• DMX signal cable, 2x22AWG twisted pair with shield, with outer diameter of not<br />
less than .236” (6mm), and not more than .354” (9mm).<br />
Reliability risk: Using cable material of unsuitable outer diameter or<br />
with insufficient flexibility of its outer jacket may defeat the IP65 rating<br />
of the fixture and may void any warranty.<br />
NOTE: If opting to not install cable in all 4 PG9 glands, it is necessary to install the<br />
rubber plugs in place of cable to maintain the IP65 rating. 3 pieces are provided for<br />
this purpose.<br />
Please follow the below step-by-step instructions to properly install the necessary<br />
cables.<br />
1. Place the unit on its front. Remove the 6 socket head caps screws<br />
that hold the rear cover of the power supply compartment. Set the<br />
screws aside, do not lose them.<br />
2. The PSU PCB and MCU PCB are attached to the rear cover. Carefully<br />
lift the cover straight up from the main unit.<br />
3. Gently turn the cover around. You will see two sets of wires in a white<br />
sleeve coming through a hole in the main body. Carefully unplug just<br />
these wires from the PSU PCB and MCU PCB. The cover and<br />
attached electronics should now be loose.<br />
4. Insert your cables through the PG9 glands mounted to the cover.<br />
Do not tighten the gland cover nuts yet so the cable can still<br />
slide through the glands. Pull enough cable through to allow<br />
preparation of the cable ends.<br />
5. AC cable preparation and installation:<br />
a. Remove 1 1/2” (38mm) of the outer jacket.<br />
b. Strip each wire 3/8” (9.5mm).<br />
c. Insert the AC leads into the screw terminal block on the PSU<br />
PCB. If connecting an output cable, insert both wires of each<br />
cable into the terminal block.<br />
d. Carefully tighten screws taking care to not over tighten as this<br />
could cause damage to the terminal block and PSU PCB.<br />
6. DMX cable preparation and installation:<br />
a. Remove 1 1/2” (38mm) of the outer jacket<br />
b. Strip each wire 3/16” (4.75mm)<br />
c. Insert the wires into the screw terminal blocks on the MCU<br />
PCB. It is recommended to cover the shield wire with a piece<br />
of 1 1/4” (6.35mm) long 1/8” (3.2mm) heat shrink to protect<br />
from creating shorts on the MCU PCB.<br />
d. Carefully tighten screws taking care to not over tighten as this<br />
could cause damage to the terminal block and MCU PCB.<br />
7
<strong>Exclusive</strong> U.S. <strong>Distributor</strong><br />
7. Pull the cables from the outside of the rear cover until the remaining<br />
internal length is minimized without putting strain on the cables or their<br />
connections to the terminal blocks.<br />
8. Tighten the cover nuts of the PG9 glands. Be sure the rubber gland<br />
seal adapts properly and tightly to the cable’s outer perimeter to<br />
maintain the IP65 rating.<br />
9. At this point, carefully inspect the rubber seal on the main unit to<br />
ensure that it is properly seated in the grove of the outer edge of<br />
the rear compartment.<br />
10. Carefully reconnect the wires unplugged in step 3 to the proper locations<br />
on the PSU PCB and MCU PCB. Take care to properly line up the<br />
connectors before attempting to plug them in to avoid damage to<br />
the connectors.<br />
11. Gently turn the cover so the electronics are facing down. Carefully<br />
lower the cover straight down into the main unit. Check to ensure that<br />
the rubber seal is still properly seated, and then carefully place the<br />
cover down on the main unit. NOTE: It is extremely important the<br />
rubber seal is properly seated in the groove of the outer edge of the<br />
rear compartment to maintain the IP65 rating.<br />
12. Carefully replace the 6 socket head cap screws into the proper holes<br />
on the main unit. Tighten them to 5.3 in-lbs (0.6 N-m) ~ 6.2 in-lbs<br />
(0.7 N-m) torque.<br />
Indoor/Outdoor Conversion<br />
A. Detach Rear Cover<br />
B. Connect Cable Wires C. Re-attach Rear Cover<br />
8
Internal Connections (View from PCB Side)<br />
1<br />
2<br />
3<br />
5<br />
4<br />
[AC-In/Out] L (Red Lead)<br />
[AC-In/Out] N (Black Lead)<br />
[AC-In/Out] GND (YG Lead)<br />
[DMX-Out] GND (Black Lead)<br />
[DMX-Out] - DATA (Green Lead)<br />
[DMX-Out] + DATA (Red Lead)<br />
DANGER! Safety hazard. Risk of<br />
severe injury or death.<br />
WARNING! Hazardous voltage.<br />
Risk of lethal or severe electric shock.<br />
9<br />
[MCU-PCB Supply] + DC (Red Lead)<br />
[MCU-PCB Supply] - DC (Black Lead)<br />
[LED-PCB Supply] + DC (Red Lead)<br />
[LED-PCB Supply] GND (Black Lead)<br />
[DMX-In] + DATA (Red Lead)<br />
[DMX-In] - DATA (Green Lead)<br />
[DMX-In] GND (Black Lead)<br />
[Supply] + DC (Red Lead)<br />
[Supply] - DC (Black Lead)<br />
NOTE: Any internal work on this unit<br />
shall only be carried out by qualified<br />
technicians who are familiar with safe<br />
repair techniques. Disconnect AC<br />
before opening the unit.<br />
Semi-Permanent and Temporary Installations<br />
For semi-permanent and temporary installations, fixtures will be shipped with 3’ long<br />
power in/out and 3’ long DMX in/out cables. Power cable connectors are not includes.<br />
DMX connectors are included and will be either IP-20 or IP-65 compatible depending<br />
on which cable package is ordered.<br />
Note on Internal Condensation<br />
Under some extreme conditions of heating and cooling condensation can form on<br />
the inside of front lens and menu display. This is normal. Condensation will evaporate<br />
when the fixture is powered on and heats up. The internal components of the HP<br />
fixture are coated to protect against moisture.<br />
5<br />
4<br />
3<br />
1<br />
2
<strong>Exclusive</strong> U.S. <strong>Distributor</strong><br />
Getting started: changing the lens panel (only if required)<br />
Your Multiform HP3-90 has been factory-fitted with a 25° lens panel. A 60° lens panel is<br />
available as an option. If you wish to exchange the lens panel to achieve a 60° dispersion<br />
angle, please contact your dealer to order the 60° lens panel. Please take note of the<br />
following precautions and instructions below to ensure the lens panel exchange is done<br />
properly to avoid damage to the unit.<br />
Reliability risk: Disassembling and reassembling the unit in an inappropriate<br />
manner may defeat the IP65 rating and may void the warranty if water intrudes<br />
into the unit. It is essential to follow the instructions to maintain the IP65 rating of<br />
the fixture and its product warranty.<br />
Before you start to exchange the lens panel, please make sure that:<br />
• All cables are disconnected from unit.<br />
• The unit is completely dry, and has cooled down for at least 30 minutes after last<br />
operation. The unit should be at room temperature.<br />
• The location chosen to exchange the lens panel does not have more than 40% relative<br />
humidity and the temperature during the exchange does not exceed 105°F (40°C). This<br />
is important to avoid condensation inside of the unit if operated at lower temperatures.<br />
• The proper tools are used to exchange the lens panel to avoid any damage to the unit<br />
and screws. A 4mm hex driver and a #2 Phillips screwdriver are required.<br />
• Tools with built-in torque measurement or other torque measurement devices are<br />
recommended to ensure that screws are fastened with the right amount of torque<br />
during reassembly.<br />
Please follow the below step-by-step instructions to properly exchange<br />
the lens panel.<br />
1) Place the unit on its facedown on its front frame. Remove the 8 socket head cap<br />
screws that hold the front frame to the main fixture body (Illustration step A). Set<br />
the screws aside, do not lose them.<br />
2) Carefully take hold of the main fixture body and front frame and turn the unit over<br />
onto its back. It is possible that the glass seal around the front glass could stick<br />
to the front frame and unexpectedly break loose, potentially damaging the glass.<br />
Carefully lift off the front frame while holding down the front glass to be sure the<br />
glass seal does not stick to the front frame.<br />
3) Carefully lift off the front glass including the glass seal (Illustration step B). Do not<br />
remove the glass seal from around the glass.<br />
4) Remove the 5 lens panel screws holding the lens panel in place. Set the screws<br />
aside, do not lose them.<br />
5) It is possible to damage the LEDs if the lens panel is not removed properly.<br />
Carefully remove the lens panel by gripping it by the two finger grip points and<br />
lifting it straight up off of the unit.<br />
10
6) Once again, it is possible to damage the LEDs if the lens panel is not placed<br />
properly. The LEDs can be easily damaged by coming into contact with the<br />
lenses. Carefully place the lens panel by gripping it by the two finger grip<br />
points and gently lower it straight down onto the unit. Do not apply pressure<br />
to the lens panel. If the lens is not properly aligned, carefully lift it back up and<br />
check alignment before carefully lowering it back down.<br />
7) Carefully replace the 5 lens panel screws. Tighten them to 4.4 in-lbs<br />
(0.50 N-m) ~ 4.8 in-lbs (0.55 N-m) torque.<br />
8) Be sure that the glass seal is installed properly around the front glass and<br />
carefully place the front glass into position on the unit.<br />
9) Check to be sure that the glass seal is properly seated down and inside of<br />
the 8 tabs around the edge of the unit. If this is not done properly, the unit<br />
may not meet IP65 rating.<br />
10) Carefully lower the front frame down onto the main unit with the screw holes<br />
aligned. Avoid any position change of the front glass with seal and the<br />
main seal.<br />
11) Carefully take hold of the main fixture body and the front frame and turn<br />
the unit over onto the front frame.<br />
12) Carefully replace the 8 socket head cap screws which secure the front frame<br />
to the main fixture body. Tighten them to 26.5 in-lbs (3.0 N-m) ~ 29.2 in-lbs<br />
(3.3 N-m) torque.<br />
11
<strong>Exclusive</strong> U.S. <strong>Distributor</strong><br />
Getting Started: IP20 and IP65 Versions<br />
Choosing A Location<br />
Risk of fire: The Multispot HP3-90 has been designed to operate at<br />
environmental temperatures up to 105°F (40°C). For proper<br />
operation, the unit must be operated with unobstructed air convection<br />
to its outside metal case.<br />
Do not:<br />
• Operate the Multispot HP3-90 in environments with more than 105°F (40°C)<br />
environmental temperature.<br />
• Operate the Multispot HP3-90 in any closed space, unless forced air convection<br />
is provided.<br />
• Operate less than 30” (76cm) away from any flammable materials.<br />
Secure Mounting<br />
The Multispot HP3-90 can be mounted in various ways:<br />
Floor standing operation<br />
• Turn the bracket to the lower side of the unit and fold out the second bracket.<br />
• Place the unit in a secure position.<br />
• Make sure to comply with the cooling requirements of the unit.<br />
Hanging/Rigging, ceiling-mounted Operation<br />
Risk of injury: Overhead mounting requires extensive experience,<br />
including, among others, calculating working load limits, good<br />
knowledge of the installation material being used, and periodic<br />
safety inspection of all installation material and the unit.<br />
If you lack such qualifications, do not attempt the installation<br />
yourself. Improper installation can result in injury. Be sure to<br />
complete all rigging and installation procedures before applying<br />
power to the unit.<br />
• Leave the inner and outer bracket folded.<br />
• The unit should be installed out of reach of people and outside areas where<br />
persons may walk by or be seated.<br />
• Make sure the installation area can hold a minimum point load of 10<br />
times the unit’s weight.<br />
• In fixed installations, attach the unit with self-locking screws/nuts to the<br />
mounting point.<br />
• When mounting the unit to truss, be sure to secure an appropriately rated<br />
clamp to the hanging yoke through the center hole of the hanging yoke.<br />
• Attach the supplied M6 safety lugs to the rear side threaded insert points.<br />
Secure the installation with an appropriate safety cable fixed to an individual<br />
separate mounting point. Be sure to only use the designated rigging point for<br />
the safety cable.<br />
12
• Always use a certified safety cable that can hold 12 times the weight of<br />
the unit when installing the unit. This secondary safety attachment should<br />
be installed in a way that no part of the unit can drop more than 8” (20cm)<br />
if the main attachment fails.<br />
• Never stand directly below the device when mounting, removing, or servicing<br />
the fixture.<br />
• The installation should be inspected every year by a skilled person to ensure safety.<br />
• Be sure to comply with the cooling requirements of the unit.<br />
Making AC Power Connections<br />
Risk of fire / Safety risk<br />
• The Multispot HP3-90 requires an AC power source with sufficient<br />
power and correct grounding to ensure safe operation. The AC power<br />
source must be equipped with a circuit breaker. Make sure to only use<br />
compliant AC supply lines.<br />
• The Multispot HP3-90 has an AC outlet that is designed to carry<br />
loads of no more than 10A. Make sure that all connected units in a<br />
chain fed by the first unit do not exceed a maximum of 10A current<br />
consumption.<br />
• When using powerCON jumpers to daisy chain units using the locking<br />
power outlet, do not connect more than 12 units together.<br />
• Do not disconnect the unit from AC power using the locking power<br />
connector. The locking power connector does not have a breaking<br />
capacity, i.e. the locking power connector should not be connected<br />
or disconnected under load or when live.<br />
To connect the unit to AC power, first plug the cable into the unit. Align the tabs on the<br />
locking power input connector (blue) with the slots in the locking power inlet (blue) and<br />
insert connector until it stops, then rotate the connector clockwise until the silver tab<br />
clicks into place and locks the connector in. If using powerCON jumpers to daisy chain<br />
power across multiple units using the locking power outlet, connect all units, up to 12,<br />
together before connecting the first unit to AC power. Align the tabs on the locking power<br />
output connector (grey) with the slots in the locking power outlet (grey) and insert connector<br />
until it stops, then rotate the connector counterclockwise until the silver tab clicks<br />
into place and locks the connector in. Once all units are connected together, the first unit<br />
may be connected to AC power.<br />
To remove the power cables from the units, first disconnect the first unit from AC power.<br />
Grasp the locking power input connector (blue), slide the silver tab back, and rotate the<br />
connector counterclockwise until it stops, then pull the connector straight out of the<br />
locking power inlet. Grasp the locking power output connector (grey), slide the silver tab<br />
back, and rotate the connector clockwise until it stops, then pull the connector straight<br />
out of the locking power outlet.<br />
13
<strong>Exclusive</strong> U.S. <strong>Distributor</strong><br />
NOTE: The locking power connector does not have a breaking capacity, i.e. the locking<br />
power connector should not be connected or disconnected under load or when live.<br />
Making DMX Control Connections<br />
Connect the Multispot HP3-90 to a suitable DMX controller where needed, and<br />
interconnect several units by means of their DMX In/Outputs as required. The last unit<br />
shall be fitted with a proper 120 Ohm termination resistor-equipped DMX-plug as shown<br />
in below drawing. Please make sure that all used DMX cables comply with below<br />
standard:<br />
Operation<br />
User interface<br />
User Interface Overview:<br />
1 MODE selection Button<br />
2 LEFT ARROW Button<br />
3 RIGHT ARROW Button<br />
4 – Button<br />
5 + Button<br />
6 DISPLAY: Sound-to-Light Indicator<br />
7 DISPLAY: 4-Digit Message Display Area<br />
8 DISPLAY: + Indicator<br />
9 DISPLAY: - Indicator<br />
14<br />
Termination<br />
10 DISPLAY: ARROW Indicators<br />
11 DISPLAY: DMX Signal<br />
Presence Indicator<br />
12 Microphone cover membrane<br />
13 DMX Input<br />
14 DMX Output<br />
15 AC Power Input<br />
16 AC Power Output<br />
17 M6 safety lug mounting thread<br />
18 M10 nut insert point
Operation Modes<br />
The Multispot HP3-90 has several operating modes to allow for local preset<br />
control and remote operation.<br />
“ST” Static Color Mode<br />
Press the MODE button (1) until the first two digits on the display shows “ST”. Choose<br />
a color, “ST 0” – “ST25”, by pressing the left/right buttons (2 or 3), see table below. The<br />
+/- buttons (4 or 5) change the dimming level, “L 0” – “L100”. Pressing the +/- buttons (4<br />
or 5) once shows the current dimming level. The dimming level can then be changed by<br />
using the +/- buttons (4 or 5). Holding the +/- buttons (4 or 5) for longer than 1 second<br />
accelerates the change rate of the displayed value to 3 times normal speed. The display<br />
will automatically return to show “ST##” after 5 seconds, and the dimming level will<br />
remain as set.<br />
# Color # Color<br />
ST 0 All Off ST13 Flesh<br />
ST 1 Red ST14 Light Blue Green<br />
ST 2 Green ST15 Light Green<br />
ST 3 Blue ST16 Light Purple<br />
ST 4 Yellow ST17 Light Lavender<br />
ST 5 Pink ST18 Light Blue<br />
ST 6 Turquoise ST19 White 1 (cool)<br />
ST 7 Lime ST20 White 2<br />
ST 8 Orange ST21 White 3<br />
ST 9 Marine ST22 White 4<br />
ST10 Blue Green ST23 White 5 (warm)<br />
ST11 Lavender ST24 Light Orange<br />
ST12 Hot Pink ST25 Dark Orange<br />
NOTE: This mode is automatically disabled when an external DMX signal is present.<br />
“C” Color Picker Mode<br />
Press the MODE button (1) until the first digit on the display shows “C”. There are 226<br />
color steps. Choose a color, “C 0” – “C225”, by pressing the left/right buttons (2 or 3).<br />
The +/- buttons (4 or 5) change the dimming level, “L 0” – “L100”. Pressing the +/- buttons<br />
(4 or 5) once shows the current dimming level. The dimming level can then be<br />
changed by using the +/- buttons (4 or 5). Holding the +/- buttons (4 or 5) for longer than<br />
1 second accelerates the change rate of the displayed value to 3 times normal speed.<br />
The display will automatically return to show “C###” after 5 seconds, and the dimming<br />
level will remain as set.<br />
NOTE: This mode is automatically disabled when an external DMX signal is present.<br />
15
<strong>Exclusive</strong> U.S. <strong>Distributor</strong><br />
“SP” Switch / Strobe Patterns Mode<br />
In this mode you will only find hard switching and strobe patterns. Press the MODE<br />
button (1) until the first two digits on the display shows “SP”. Choose a pattern, “SP 0” –<br />
“SP12”, by pressing the left/right buttons (2 or 3), see table below.<br />
# Pattern # Pattern<br />
SP 0 Red - Green SP 7 Red - Green - Blue<br />
SP 1 Green - Blue SP 8 Red - Yellow - Green - Turquoise - Blue - Hot Pink<br />
SP 2 Red - Blue SP 9 Strobe Red<br />
SP 3 Red - Yellow SP10 Strobe Green<br />
SP 4 Hot Pink - Lime SP11 Strobe Blue<br />
SP 5 Pink - Blue SP12 Strobe White<br />
SP 6 Turquoise - Pink<br />
The +/- buttons (4 or 5) change the color speed or activate the Sound-to-Light function,<br />
“SL 0” – “SL25”, “S2L” . Pressing the +/- buttons (4 or 5) once shows the current setting.<br />
The setting can then be changed by using the +/- buttons (4 or 5), see table below. The<br />
display will automatically return to show “SP##” after 5 seconds, and the speed setting<br />
will remain as set.<br />
Setting Speed Setting Speed<br />
S2L Sound-to-Light SL13 1 step per second<br />
SL 1 1 step per 240 seconds SL14 1.5 steps per second<br />
SL 2 1 step per 120 seconds SL15 2 steps per second<br />
SL 3 1 step per 90 seconds SL16 2.5 steps per second<br />
SL 4 1 step per 60 seconds SL17 3 steps per second<br />
SL 5 1 step per 30 seconds SL18 4 steps per second<br />
SL 6 1 step per 20 seconds SL19 5 steps per second<br />
SL 7 1 step per 10 seconds SL20 6 steps per second<br />
SL 8 1 step per 5 seconds SL21 7 steps per second<br />
SL 9 1 step per 3 seconds SL22 8 steps per second<br />
SL10 1 step per 2 seconds SL23 9 steps per second<br />
SL11 1 step per 1.6 seconds SL24 10 steps per second<br />
SL12 1 step per 1.2 seconds SL25 11 steps per second<br />
Please note that above speed levels are only applicable to patterns “SP 0” – “SP 8”.<br />
When using patterns “SP 9” – “SP12”, “S2L “ indicates Sound-to-Strobe and “SL 1” –<br />
“SL25” are strobe speed ranging from 1Hz to 18Hz.<br />
When Sound-to-Light or Sound-to-Strobe, “S2L “, is selected, the “S” indicator (6) will be<br />
illuminated. The built-in microphone will be active.<br />
NOTE: This mode is automatically disabled when an external DMX signal is<br />
present.<br />
16
“FP” Fade Patterns Mode<br />
In this mode you will only find soft fade patterns. Press the MODE button (1) until the<br />
first two digits on the display shows “FP”. Choose a pattern, “FP 0” – “FP 7”, by pressing<br />
the left/right buttons (2 or 3), see table below.<br />
# Pattern # Pattern<br />
FP 0 Red - Green FP 4 Hot Pink - Lime<br />
FP 1 Green - Blue FP 5 Pink - Blue<br />
FP 2 Blue - Red FP 6 Turquoise - Pink<br />
FP 3 Red - Yellow FP 7 Red - Green - Blue (All Colors)<br />
The +/- buttons (4 or 5) change the color fade speed, “SL 0” – “SL25”. Pressing the<br />
+/- buttons (4 or 5) once shows the current setting. The setting can then be changed<br />
by using the +/- buttons (4 or 5), see table below. The display will automatically return<br />
to show “FP##” after 5 seconds, and the speed setting will remain as set.<br />
Setting Speed Setting Speed<br />
SL 0 1 loop per 960 seconds SL13 1 loop per 3 seconds<br />
SL 1 1 loop per 480 seconds SL14 1 loop per 2 seconds<br />
SL 2 1 loop per 360 seconds SL15 1 loop per 1.5 seconds<br />
SL 3 1 loop per 240 seconds SL16 1 loop per 1.25 seconds<br />
SL 4 1 loop per 120 seconds SL17 1 loop per 1 second<br />
SL 5 1 loop per 80 seconds SL18 1.2 loops per second<br />
SL 6 1 loop per 40 seconds SL19 1.4 loops per second<br />
SL 7 1 loop per 20 seconds SL20 1.6 loops per second<br />
SL 8 1 loop per 12 seconds SL21 1.9 loops per second<br />
SL 9 1 loop per 10 seconds SL22 2.2 loops per second<br />
SL10 1 loop per 8 seconds SL23 2.5 loops per second<br />
SL11 1 loop per 6 seconds SL24 2.8 loops per second<br />
SL12 1 loop per 4 seconds SL25 3.2 loops per second<br />
NOTE: This mode is automatically disabled when an external DMX signal is present.<br />
“SLA” DMX Slave Mode<br />
The Slave mode offers 4 independent groups of slaves. Press the MODE button (1) until<br />
the first three digits on the display shows “SLA”. The +/- buttons (4 or 5) change the slave<br />
group, “SLA1” – “SLA4”. The first unit will then control any connected units. Each slave<br />
group will be in the same preset and speed as the master, but the timing of the preset<br />
will be offset from the previous slave group. To have all units operating together, set all<br />
units to slave group 1.<br />
17
DMX<br />
channel<br />
1<br />
<strong>Exclusive</strong> U.S. <strong>Distributor</strong><br />
“GDMX” General DMX Mode<br />
Press the MODE button (1) until the display shows “GDMX”. When the unit is receiving a<br />
DMX signal, the DMX indicator (11) will be illuminated.<br />
Setting the DMX Address<br />
The +/- buttons (4 or 5) change the DMX address, “ 1” – “ 512”. Pressing the +/- buttons<br />
(4 or 5) once shows the current DMX address. The DMX address can then be changed<br />
by using the +/- buttons (4 or 5). Holding the +/- buttons (4 or 5) for longer than 1 second<br />
accelerates the change rate of the displayed value to 3 times normal speed. The<br />
display will automatically return to show “GDMX” after 5 seconds, and the DMX address<br />
will remain as set. The DMX address remains the same regardless of the selected DMX<br />
control mode. However, the number of channels used may change depending on the<br />
selected DMX control mode.<br />
Selecting a DMX Control Mode<br />
Pressing the left/right buttons (2 or 3) once shows the current DMX control mode. The left/<br />
right buttons (2 or 3) can then be used to cycle through the following DMX control modes.<br />
- “3RAW” 3 Channels – 1=Red, 2=Green, 3=Blue<br />
- “3CCC” 4 Channels – 1=Red, 2=Green, 3=Blue, 4=Intensity/Strobe<br />
- – CH 4 values – 000-127=Intensity, 128-239=Strobe, 240-255=Full Intensity<br />
- “3CMS” 5 Channels – 1=Red, 2=Green, 3=Blue, 4=Intensity, 5=Strobe<br />
- “HSLS” 4 Channels – 1=Hue, 2=Saturation, 3=Lightness, 4=Strobe<br />
- “PRES” 4 Channels – Presets, see section below.<br />
When the DMX control mode is set to Presets, the DMX value of channel 3 determines<br />
which presets channel 1 controls. If the DMX value of channel 3 is 000-049, channel<br />
1 selects static colors, see table below. Channel 4 strobe speed is 015=slow (1Hz) to<br />
255=fast (18Hz).<br />
Value<br />
Range<br />
Function<br />
18<br />
DMX<br />
channel<br />
Value<br />
Range<br />
Function<br />
000-010 Red<br />
154-163 Light Purple<br />
011-020 Green 164-174 Light Lavender<br />
021-030 Blue 175-184 Light Blue<br />
031-040 Yellow 185-194 White 1 (cool)<br />
041-051<br />
052-061<br />
Pink<br />
Turquoise<br />
1<br />
195-204<br />
205-215<br />
White 2<br />
White 3<br />
062-071 Lime 216-225 White 4<br />
072-081 Orange 226-235 White 5 (warm)<br />
082-092 Marine 236-245 Light Orange<br />
093-102 Blue Green 246-255 Dark Orange<br />
103-112 Lavender 2 000-255 Intensity<br />
113-122 Hot Pink 3 000-049 Static Colors<br />
123-133<br />
134-143<br />
Flesh<br />
Light Blue Green<br />
4<br />
000-014<br />
015-255<br />
Strobe off<br />
Strobe on<br />
144-153 Light Green
If the DMX value of channel 3 is 050-255, channel 1 selects fade/switch colors, see<br />
table below. Channel 3 controls the fade/switch speed (050=slow/255=fast). Channel 4<br />
strobe speed is 015=slow (1Hz) to 255=fast (18Hz).<br />
DMX channel Value Range Function<br />
000-015 Fade Red - Green<br />
016-031 Fade Blue - Green<br />
032-047 Fade Blue - Red<br />
048-063 Fade Red - Lime<br />
064-079 Fade Hot Pink - Lime<br />
080-095 Fade Pink - Blue<br />
096-111 Fade Turquoise - Pink<br />
1<br />
112-127<br />
128-143<br />
Fade Red - Green - Blue (All Colors)<br />
Switch Red - Green<br />
144-159 Switch Green - Blue<br />
160-175 Switch Red - Blue<br />
176-191 Switch Red - Yellow<br />
192-207 Switch Hot Pink - Lime<br />
208-223 Switch Pink - Blue<br />
224-239 Switch Turquoise - Pink<br />
240-255 Switch Red - Green - Blue<br />
2 000-255 Intensity<br />
3 050-255 Fade/Switch Speed<br />
4<br />
000-014<br />
015-255<br />
Strobe off<br />
Strobe on<br />
“CBAL” Color Balance Mode<br />
In this mode you can define the unit’s color balance by setting a maximum brightness for<br />
each LED color, giving you the individual color balance you desire. Any changes made<br />
to the color balance will affect the unit in all modes. Press the MODE button (1) until the<br />
display shows “CBAL”. Once color balance mode is entered all the LEDs will turn on at<br />
their set value. Use the left/right buttons (2 or 3) to enter color balance mode and cycle<br />
though “R###”, “G###”, and “B###”. ### indicates values from 200 through 255. (Values<br />
below 200 are disabled to avoid overall output reduction of the fixture.) Pressing the +/buttons<br />
(4 or 5) will change the values. All changes are effective immediately.<br />
NOTE: To make sure that several fixtures used together do not exhibit different color<br />
behavior, all fixtures must be calibrated to the same color balance.<br />
19
<strong>Exclusive</strong> U.S. <strong>Distributor</strong><br />
“EDIT” Edit Settings Mode<br />
Press the MODE button (1) until the display shows “EDIT”. Pressing the left/right buttons<br />
(2 or 3) will cycle through the following options.<br />
“ADMX” Automatic DMX Addressing – Automatic DMX Addressing is used<br />
to quickly setup multiple Multiform HP3-90 units that are daisy chained with DMX<br />
cable. Two modes, Slave and DMX, are available. When in DMX mode, the first unit<br />
will determine the DMX mode and addresses of the units. The desired DMX mode and<br />
starting address needs to be set on the first unit prior to using this feature.<br />
Press the left/right buttons (2 or 3) until the display shows “ADMX”. Pressing the<br />
+/- buttons (4 or 5) once shows “ OFF”. Pressing the + button (4) will set the units to<br />
“GDMX” (General DMX mode) and start the auto addressing process. This process<br />
assumes that it is executed from the first device in a chain. It will set all the following<br />
devices’ settings to the same DMX mode as the first unit and assign DMX channels<br />
consecutively according to the chosen DMX mode. Pressing the - button (5) will set the<br />
units to DMX Slave Mode. The master unit will be assigned to slave group 1, and the<br />
following units will be assigned to consecutive groups up to “SLA4” then starting over at<br />
“SLA1”, i.e. Unit 2 = “SLA2”, unit 3 = “SLA3”, unit 4 = “SLA4”, unit 5 = “SLA1”, and so on.<br />
NOTE: For this to execute properly, the first unit must not be connected to DMX and all<br />
units need to be in one of the following operating modes when the process is initiated –<br />
DMX Slave Mode, General DMX Mode, Color Balance Mode, or Edit Settings Mode.<br />
“ALOK” Auto Lock – Press the left/right buttons (2 or 3) until the display shows<br />
“ALOK”. Press the +/- buttons (4 or 5) to alternate between “ ON” or “ OFF”. When turned<br />
on, the unit will lock itself after 1 minute with no button presses. To unlock a locked unit,<br />
press the left (2) and right (3) buttons simultaneously.<br />
“ADIS” Auto Display Off – Press the left/right buttons (2 or 3) until the display<br />
shows “ADIS”. Press the +/- buttons (4 or 5) to alternate between “ ON” or “ OFF”. When<br />
turned on, the display backlight will turn off after 1 minute with no button presses.<br />
Pressing any button will turn the display backlight on again. The display elements<br />
themselves remain active at all times. When turned off, the display backlight stays lit.<br />
“TEMP” Temperature Display – Press the left/right buttons (2 or 3) until the display<br />
shows “TEMP”. Press the +/- buttons (4 or 5) to alternate between “ ON” or “ OFF”.<br />
When turned on, the display will show the current operating temperature in °C after 1<br />
minute with no button presses. Pressing any button will return the display to normal<br />
operation.<br />
20
“RSET” Reset – Press the left/right buttons (2 or 3) until the display shows “RSET”.<br />
Press the +/- buttons (4 or 5) to change the display to “YES+”. Pressing the + button (4)<br />
will perform a factory reset. This returns all the settings and calibration to the defaults.<br />
This does not include the operation hours.<br />
“HOUR” Operation Hours – Press the left/right buttons (2 or 3) until the display<br />
shows “HOUR”. Press the +/- buttons (4 or 5) to show the number of hours of operation.<br />
The unit can only display the hours up to 9999.<br />
“VERS” Software Version – Press the left/right buttons (2 or 3) until the display<br />
shows “VERS”. Press the +/- buttons (4 or 5) to show the software version.<br />
Maintenance<br />
This device does not need regular maintenance. It the unit fails to operate, return the<br />
unit to <strong>Apollo</strong> for service. There are no user serviceable parts inside. The glass front<br />
may be cleaned using a glass cleaner.<br />
Technical Data Multispot HP3-90<br />
Output 3550 lm<br />
LEDs, Total 30 RGB<br />
LEDs, Red 30<br />
LEDs, Green 30<br />
LEDs, Blue 30<br />
Optics Secondary, 25 degrees<br />
DMX Channels 3-5<br />
IP Rating 20 (as-is)/65 (with conversion kit)<br />
Mains Input AC90-250V~ 50/60Hz<br />
Power supply type Auto-switching<br />
Power consumption 95W<br />
Fuse internal (see service manual)<br />
DMX connections 5 pin XLR (Male / Female)<br />
Modulation Type Pulse Density Modulation (PDM)<br />
Control protocol DMX 512 (1990)<br />
Dimensions (with straight bracket)<br />
HxWxD<br />
21<br />
13” (33cm) x 12.8” (32.5cm) x 6.2”<br />
(15.75cm)<br />
Weight 14.8 lbs (6.7kg)
<strong>Exclusive</strong> U.S. <strong>Distributor</strong><br />
Standards<br />
This product complies with the following standards:<br />
EU electrical safety . . . . . . . . . . . . . . EN60598-1:2008, EN60598-2-1:1989<br />
EU general safety . . . . . . . . . . . . . . . . . . . . . . . . . . . . EN60598-2-17<br />
EU photobiological safety . .. . .. . .. . .. . .. . .. . .. . EN 62471:2008<br />
EU EMC. . . . . . . . . . . EN55015: 2006 + A1:2007, EN61547:1995 + A1:2000<br />
EU Harmonics . . . . . . . . . . . . . . . . . . . . . . . . . . . . EN61000-3-2:2006<br />
EU Flicker . .. . .. . .. . .. . .. . .. . .. . .. . .. . ..EN61000-3-3:2008<br />
US safety . . . . . . . . . . . . . . . . . . . . . . . . . . . . . . . . . . . . .UL60065<br />
US EMC. . . . . . . . . . . . . . . . . . . . . . . . . . . . . . . . . . . .FCC Part 15<br />
This product meets both the EMC Directive 2004/108/EC and the Low Voltage<br />
Directive 2006/95/EC.<br />
Warranty<br />
Items are covered for defects in materials and workmanship for one year, including repair<br />
parts and repair labor on defective item, from date of <strong>Apollo</strong> invoice. The warranty covers<br />
freight for 30 days after initial purchase. <strong>Apollo</strong> does not cover any other loss resulting<br />
from product failure.<br />
Products being returned for warranty repair must display the original serial number sticker.<br />
Removal of the serial number sticker voids the product’s limited warranty.<br />
• Despite the care taken for the compilation of this book, <strong>Apollo</strong> <strong>Design</strong> <strong>Technology</strong>, Inc.,<br />
cannot be held responsible for any damages resulting from errors that may appear in<br />
this book. All efforts have been made to provide the most accurate, up-to-date<br />
instructions and illustrations possible.<br />
• Need assistance? Call <strong>Apollo</strong> at 800-288-4626 for details.<br />
Keep this information handy if requiring technical assistance.<br />
Serial Number<br />
Date Purchased<br />
Purchased From<br />
22
6-03-2012<br />
Other Quality Products<br />
From <strong>Apollo</strong><br />
• Stainless Steel Gobos<br />
• Glass Gobos<br />
• PrintScenic Plastic and Glass<br />
Gobos<br />
• Gel<br />
• Right Arm®<br />
• Smart Color® PRO Scrollers<br />
• Smart Move® Rotators<br />
• Smart Move® Vertical<br />
• Smart Power Power Supplies<br />
• EZ Iris DMX<br />
• Tape<br />
• Dichroics<br />
• Pattern Holders<br />
• Cable<br />
• Tuff-Stuff C-Clamps<br />
4130 Fourier Dr., Fort Wayne, IN 46818 USA<br />
Voice: +1.260.497.9191<br />
Fax: +1.260.497.9192<br />
International: (00)+1.260.497.9191<br />
www.apollodesign.net