DM-4800 OWNER'S MANUAL - zZounds.com - Tascam
DM-4800 OWNER'S MANUAL - zZounds.com - Tascam
DM-4800 OWNER'S MANUAL - zZounds.com - Tascam

You also want an ePaper? Increase the reach of your titles
YUMPU automatically turns print PDFs into web optimized ePapers that Google loves.
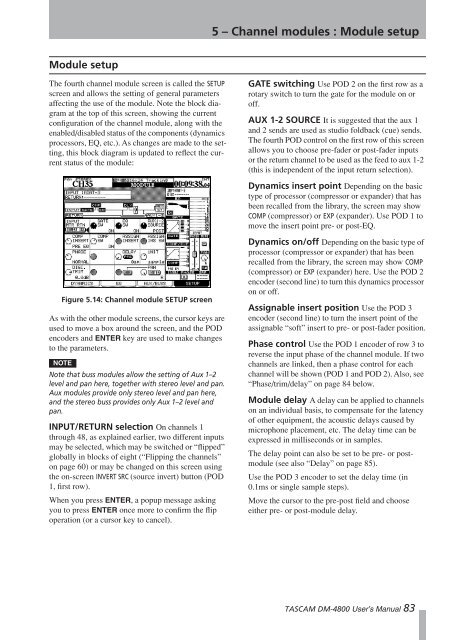
Module setup<br />
The fourth channel module screen is called the SETUP<br />
screen and allows the setting of general parameters<br />
affecting the use of the module. Note the block diagram<br />
at the top of this screen, showing the current<br />
configuration of the channel module, along with the<br />
enabled/disabled status of the <strong>com</strong>ponents (dynamics<br />
processors, EQ, etc.). As changes are made to the setting,<br />
this block diagram is updated to reflect the current<br />
status of the module:<br />
Figure 5.14: Channel module SETUP screen<br />
As with the other module screens, the cursor keys are<br />
used to move a box around the screen, and the POD<br />
encoders and ENTER key are used to make changes<br />
to the parameters.<br />
NOTE<br />
Note that buss modules allow the setting of Aux 1–2<br />
level and pan here, together with stereo level and pan.<br />
Aux modules provide only stereo level and pan here,<br />
and the stereo buss provides only Aux 1–2 level and<br />
pan.<br />
INPUT/RETURN selection On channels 1<br />
through 48, as explained earlier, two different inputs<br />
may be selected, which may be switched or “flipped”<br />
globally in blocks of eight (“Flipping the channels”<br />
on page 60) or may be changed on this screen using<br />
the on-screen INVERT SRC (source invert) button (POD<br />
1, first row).<br />
When you press ENTER, a popup message asking<br />
you to press ENTER once more to confirm the flip<br />
operation (or a cursor key to cancel).<br />
5 – Channel modules : Module setup<br />
GATE switching Use POD 2 on the first row as a<br />
rotary switch to turn the gate for the module on or<br />
off.<br />
AUX 1-2 SOURCE It is suggested that the aux 1<br />
and 2 sends are used as studio foldback (cue) sends.<br />
The fourth POD control on the first row of this screen<br />
allows you to choose pre-fader or post-fader inputs<br />
or the return channel to be used as the feed to aux 1-2<br />
(this is independent of the input return selection).<br />
Dynamics insert point Depending on the basic<br />
type of processor (<strong>com</strong>pressor or expander) that has<br />
been recalled from the library, the screen may show<br />
COMP (<strong>com</strong>pressor) or EXP (expander). Use POD 1 to<br />
move the insert point pre- or post-EQ.<br />
Dynamics on/off Depending on the basic type of<br />
processor (<strong>com</strong>pressor or expander) that has been<br />
recalled from the library, the screen may show COMP<br />
(<strong>com</strong>pressor) or EXP (expander) here. Use the POD 2<br />
encoder (second line) to turn this dynamics processor<br />
on or off.<br />
Assignable insert position Use the POD 3<br />
encoder (second line) to turn the insert point of the<br />
assignable “soft” insert to pre- or post-fader position.<br />
Phase control Use the POD 1 encoder of row 3 to<br />
reverse the input phase of the channel module. If two<br />
channels are linked, then a phase control for each<br />
channel will be shown (POD 1 and POD 2). Also, see<br />
“Phase/trim/delay” on page 84 below.<br />
Module delay A delay can be applied to channels<br />
on an individual basis, to <strong>com</strong>pensate for the latency<br />
of other equipment, the acoustic delays caused by<br />
microphone placement, etc. The delay time can be<br />
expressed in milliseconds or in samples.<br />
The delay point can also be set to be pre- or postmodule<br />
(see also “Delay” on page 85).<br />
Use the POD 3 encoder to set the delay time (in<br />
0.1ms or single sample steps).<br />
Move the cursor to the pre-post field and choose<br />
either pre- or post-module delay.<br />
TASCAM <strong>DM</strong>-<strong>4800</strong> User’s Manual 83